cooling MERCEDES-BENZ GLS 2019 User Guide
[x] Cancel search | Manufacturer: MERCEDES-BENZ, Model Year: 2019, Model line: GLS, Model: MERCEDES-BENZ GLS 2019Pages: 398, PDF Size: 7.3 MB
Page 134 of 398

Problems with the "Cooling with air dehumidification" function
Problem
Possible causes/consequences and
0050
0050Solutions The indicator lamp in the
005A or0056 button
flashes three times or
remains off. The "Cool-
ing with air dehumidifi-
cation" function cannot
be switched on. Cooling with air dehumidification has been deactivated due to a mal-
function.
X Visit a qualified specialist workshop. Setting climate control to automatic
General notes In automatic mode, the set temperature is main-
tained automatically at a constant level. The
system automatically regulates the temperature of the dispensed air, the airflow and the air dis- tribution.
The "Cooling with air dehumidification" function
is activated automatically in automatic mode.
In the rear compartment, you can also switch
climate control for the rear seats to automatic
mode using the 0058button.
Automatic control X
Turn the SmartKey to position 0048in the igni-
tion lock (Y page 140).
X Set the desired temperature.
X To activate: press the0058button.
The indicator lamp in the 0058button lights
up. Automatic air distribution and airflow are
activated.
X To switch to manual mode: press the008F
button.
3-zone automatic climate control: when auto-
matic mode is activated, you can select a cli-
mate mode (Y page 132). Adjusting the climate mode settings
You can select the following climate mode set-
tings in automatic mode:
FOCUS high airflow, slightly cooler setting
MEDIUM medium airflow, standard setting
DIFFUSE low airflow, slightly warmer and draft- free setting X
Turn the SmartKey to position 0048in the igni-
tion lock (Y page 140).
X Press the 0058button.
X Press the 00F0button repeatedly until the
desired climate mode appears in the display. Setting the temperature
Dual-zone automatic climate control Different temperatures can be set for the driv-
er's and front-passenger sides.
X Turn the SmartKey to position 0048in the igni-
tion lock (Y page 140).
X To increase or decrease: turn control0043or
0084 counter-clockwise or clockwise
(Y page 125).
Only change the temperature setting in small
increments. Start at 72 ‡ (22 †).
3-zone automatic climate control You can select different temperature settings
for the driver's and front-passenger sides as well
as for the rear compartment.
X Turn the SmartKey to position 0048in the igni-
tion lock (Y page 140).
X To increase or decrease temperature in
the front compartment:
turn control0043or
0084 counter-clockwise or clockwise
(Y page 127).
Only change the temperature setting in small
increments. Start at 72 ‡ (22 †).
X To increase or reduce the temperature in
the rear compartment using the front con-
trol panel: press the00D6button.
The indicator lamp in the 00D6button goes
out. 132
Operating the climate control systemsClimate control
Page 136 of 398
.
X To activate: press the0064button.
The indicator lamp in the 0064button lights
up.
The climate control")
Activating/deactivating
X
Turn the SmartKey to position 0048in the igni-
tion lock (Y page 140).
X To activate: press the0064button.
The indicator lamp in the 0064button lights
up.
The climate control system switches to the
following settings:
R high airflow
R high temperature
R air distribution to the windshield and front
side windows
R air-recirculation mode off
X To deactivate: press the0064button.
The indicator lamp in the 0064button goes
out. The previously selected settings are
restored. Air-recirculation mode remains
deactivated. MAX COOL maximum cooling
The MAX COOL function is only available in vehi-
cles for the USA.
MAX COOL is only operational when the engine is running.
X To activate: press the00C9button.
The indicator lamp in the 00C9button lights
up.
X To deactivate: press the00C9button.
The indicator lamp in the 00C9button goes
out. The previously selected settings are
restored.
When you activate MAX COOL, climate control
switches to the following functions: R maximum cooling
R maximum airflow
R air-recirculation mode on Removing condensation from the win-
dows
Windows fogged up on the inside X
Activate the 005Aor0056 cooling with air
dehumidification function.
X Activate automatic mode 0058.
X If the windows continue to fog up, activate the
"windshield defrosting" function
(Y page 133).
i You should only select this setting until the
windshield is clear again.
Windows fogged up on the outside X
Activate the windshield wipers.
X Press the 008Fbutton repeatedly until the
009C or009B symbol appears in the display.
i You should only select this setting until the
windshield is clear again.
i If you clean the windows regularly, they do
not fog up so quickly. Rear window defroster
General notes The rear window defroster has a high current
draw. You should therefore switch it off as soon
as the rear window is clear. Otherwise, the rear
window defroster switches off automatically
after several minutes.
If the battery voltage is too low, the rear window defroster may switch off.
Activating/deactivating X
Turn the SmartKey to position 0048in the igni-
tion lock (Y page 140).
X Press the 006Cbutton.
The indicator lamp in the 006Cbutton lights
up or goes out. 134
Operating the climate control systemsClimate cont
rol
Page 137 of 398

Problems with the rear window defroster
Problem
Possible causes/consequences and
0050
0050Solutions The rear window
defroster has deactiva-
ted prematurely or can-
not be activated. The battery has not been sufficiently charged.
X Switch off any consumers that are not required, e.g. reading lamps,
interior lighting or the seat heating.
When the battery is sufficiently charged, the rear window defroster can be activated again. Switching air-recirculation mode
on/off
General notes You can deactivate the flow of fresh air if
unpleasant odors are entering the vehicle from
outside. The air already inside the vehicle will
then be recirculated.
If you switch on air-recirculation mode, the win-
dows can fog up more quickly, in particular at
low temperatures. Only use air-recirculation
mode briefly to prevent the windows from fog-
ging up.
Activating/deactivating X
Turn the SmartKey to position 0048in the igni-
tion lock (Y page 140).
X To activate: press the0089button.
The indicator lamp in the 0089button lights
up.
i In the event of high pollution levels (3-zone
automatic climate control only) or at high out-
side temperatures, air-recirculation mode is
automatically activated. When air-recircula-
tion mode is activated automatically, the indi-
cator lamp in the 0089button is not lit.
Outside air is added after about 30 minutes.
X To deactivate: press the0089button.
The indicator lamp in the 0089button goes
out.
i Air-recirculation mode deactivates auto-
matically:
R after approximately five minutes at outside
temperatures below approximately 41 ‡
(5 †)
R after approximately five minutes if cooling
with air dehumidification is deactivated
R after approximately 30 minutes at outside
temperatures above approximately 41 ‡ (5 †) if the "Cooling with air dehumidifi-
cation" function is activated Switching the residual heat on or off
General notes The residual heat function is only available on
vehicles for Canada.
It is possible to make use of the residual heat of
the engine to continue heating the stationary
vehicle for up to 30 minutes after the engine has been switched off. The heating time depends on
the set interior temperature.
Activating/deactivating X
To activate: press the004Bor0056 button.
The indicator lamp in the 004Bor0056 button
lights up.
i The blower will run at a low speed regardless
of the airflow setting.
i If you activate the residual heat function at
high temperatures, only the ventilation will be
activated. The blower runs at medium speed.
X To deactivate: press the004Bor0056 but-
ton.
The indicator lamp in the 004Bor0056 button
goes out.
Residual heat is deactivated automatically:
R after approximately 30 minutes
R when the ignition is switched on
R if the battery voltage drops Ionization
Ionization is used to purify the air in the vehicle interior and attain an improved interior climate. Operating the climate control systems
135Climate control
Page 138 of 398
The ionization of the interior air is odorless and
cannot be perceived directly in the vehicle inte- rior.
You can switch ionization on and off via the mul-
timedia system (see the Digital Operator's Man-
ual).
Ionization can only be operated when the auto-
matic climate control is switched on. The side air vent on the driver's side must be open. Setting the air vents
Important safety notes
G
WARNING
Very hot or very cold air can flow from the air vents. This could result in burns or frostbite in the immediate vicinity of the air vents. There
is a risk of injury.
Make sure that all vehicle occupants always
maintain a sufficient distance to the air out-
lets. If necessary, redirect the airflow to
another area of the vehicle interior.
In order to ensure the direct flow of fresh air
through the air vents into the vehicle interior,
please observe the following notes:
R keep the air inlet grille on the hood and in the
engine compartment on the front-passenger
side free of blockages, such as ice, snow or
leaves.
R never cover the air vents or air intake grilles in
the vehicle interior.
i For virtually draft-free ventilation, adjust the
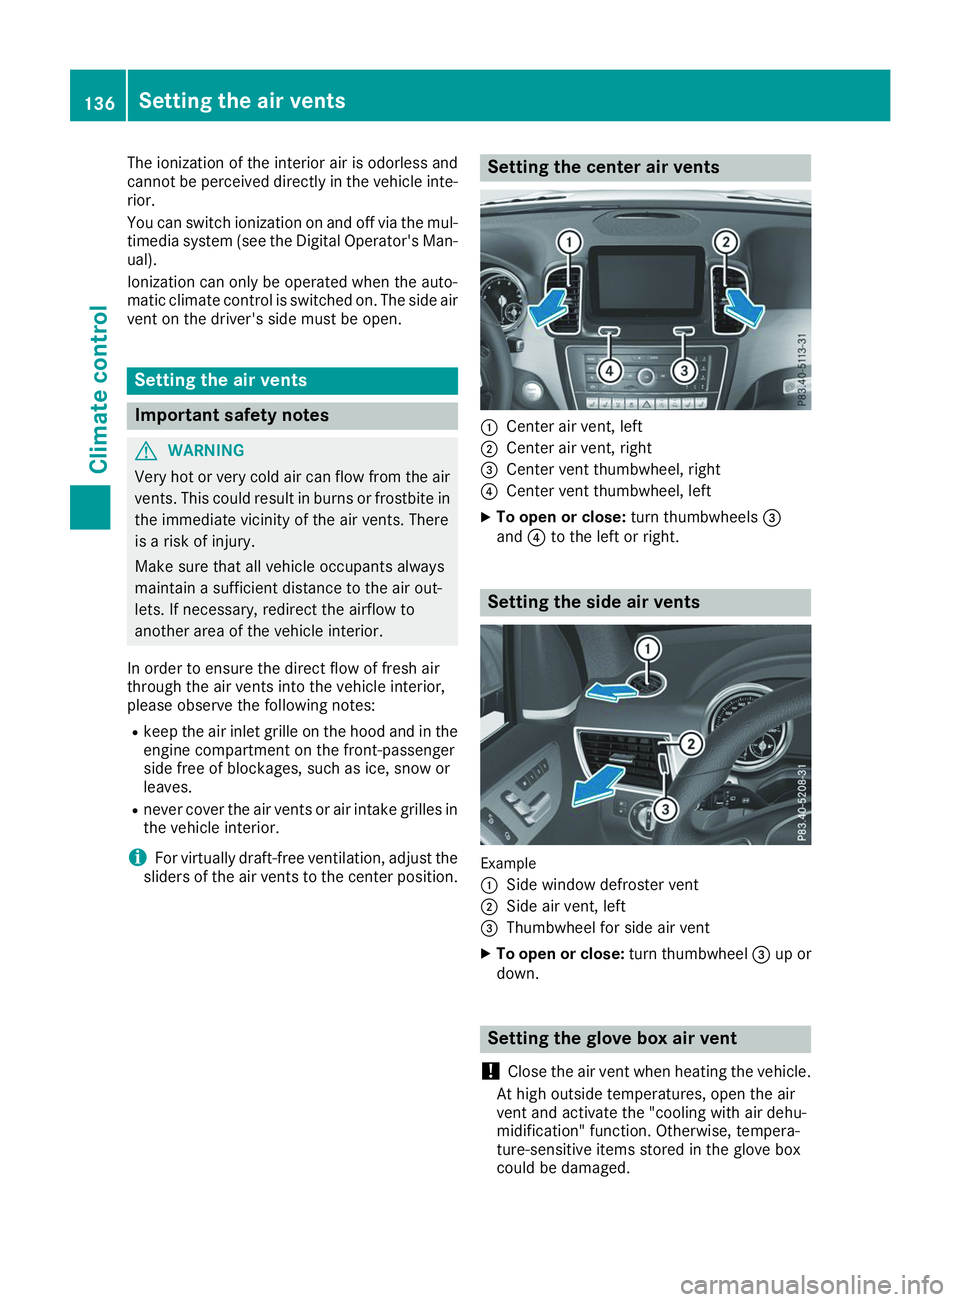
sliders of the air vents to the center position. Setting the center air vents
0043
Center air vent, left
0044 Center air vent, right
0087 Center vent thumbwheel, right
0085 Center vent thumbwheel, left
X To open or close: turn thumbwheels0087
and 0085to the left or right. Setting the side air vents
Example
0043
Side window defroster vent
0044 Side air vent, left
0087 Thumbwheel for side air vent
X To open or close: turn thumbwheel0087up or
down. Setting the glove box air vent
! Close the air vent when heating the vehicle.
At high outside temperatures, open the air
vent and activate the "cooling with air dehu-
midification" function. Otherwise, tempera-
ture-sensitive items stored in the glove box
could be damaged. 136
Setting the air ventsClimate control
Page 224 of 398

R
is affected more by strong crosswinds
R demands more sensitive steering
R has a larger turning circle
This could impair the handling characteristics.
When towing a trailer, always adjust your speed to the current road and weather conditions. Do
not exceed the maximum permissible speed for
your vehicle/trailer combination. Notes on towing a trailer
General notes !
If you have a trailer tow hitch retrofitted,
changes to the cooling system and drive train may be necessary, depending on the vehicle
type.
If you have a trailer tow hitch retrofitted,
observe the anchorage points on the chassis
frame.
R Do not exceed the legally prescribed maxi-
mum speed for vehicle/trailer combinations
in the relevant country.
This lowers the risk of an accident.
R Only install an approved trailer coupling on
your vehicle.
More information on availability and installa-
tion can be obtained at any qualified special-
ist workshop.
R The bumpers of your vehicle are not suitable
for installing detachable trailer couplings.
R Do not install hired trailer couplings or other
detachable trailer couplings on the bumpers
of your vehicle.
R If you no longer need the ball coupling,
remove it from the ball coupling recess. This
will reduce the risk of damage to the ball cou-
pling.
When towing a trailer, set the tire pressure on
the rear axle of the towing vehicle for the max-
imum load. You will find the values in the tire
pressure table in the fuel filler flap of the vehicle (Y page 371).
Please note that when towing a trailer, the fol-
lowing driving systems have limited availability
or are not available at all:
R Parking Assist PARKTRONIC (Y page 189)
R Blind Spot Assist (Y page 207)
R Active Lane Keeping Assist (Y page 212)On vehicles without level control, the height of
the ball coupling will alter according to the load
placed on the vehicle. If necessary, use a trailer
with a height-adjustable drawbar.
You will find installing dimensions and loads
under "Technical data" (Y page 392).
Driving tips Also observe the notes on pulling away with a
trailer (Y
page 143).
The maximum permissible speed for vehicle/
trailer combinations depends on the type of
trailer. Before beginning the journey, check the
trailer's documents to see what the maximum
permissible speed is for your trailer. Observe the
legally permissible maximum speed in the rele-
vant country.
For certain Mercedes-Benz vehicles, the maxi-
mum permissible rear axle load is increased
when towing a trailer. See "Technical data" to
find out whether this applies to your vehicle
(Y page 392). If you utilize any of the added
maximum rear axle load when towing a trailer,
the vehicle/trailer combination may not exceed
a maximum speed of 60 mph (100 km/h) for
reasons concerning the operating permit. This
also applies in countries in which the maximum
permissible speed for car/trailer combinations
is greater than 60 mph (100 km/h).
When towing a trailer, your vehicle's handling
characteristics will be different in comparison
with when driving without a trailer.
Use the left-hand steering wheel paddle shifter
to shift into a lower gear in good time on long
and steep downhill gradients.
This also applies if you have activated cruise
control or Active Distance Assist DISTRONIC.
This will use the braking effect of the engine, so that less braking will be required to maintain the
speed. This relieves the load on the brake sys-
tem and prevents the brakes from overheating
and wearing too quickly. If you need additional
braking, depress the brake pedal repeatedly
rather than continuously.
Driving tips If the trailer swings from side to side:
X Do not accelerate.
X Do not counter-steer.
X Brake if necessary. 222
Towing a trailerDriving and parking
Page 260 of 398

Display messages
Possible causes/consequences and
0050
0050Solutions 0049
Switch Off Lights Switch Off Lights You leave the vehicle and the lights are switched on. A warning tone
also sounds.
X Turn the light switch to the 0058position. 0049
Switch On Headlamps Switch On Headlamps You are driving with low-beam headlamps switched off.
X Turn the light switch to the 0058or0058 position. Adaptive Highbeam
Adaptive Highbeam
Assist Currently Assist Currently
Unavailable See Unavailable See
Operator's Manual Operator's Manual Adaptive Highbeam Assist is deactivated and temporarily inoperative.
Possible causes are:
R the windshield in the camera's field of vision is dirty
R visibility is impaired due to heavy rain, snow or fog
X Clean the windshield.
If the system detects that the camera is fully operational, the Adap‐
Adap‐
tive Highbeam Assist Now Available
tive Highbeam Assist Now Available message is displayed.
Adaptive Highbeam Assist is operational again. Adaptive Highbeam
Adaptive Highbeam
Assist Inoperative
Assist Inoperative Adaptive Highbeam Assist is faulty.
X
Visit a qualified specialist workshop. Engine
Display messages
Possible causes/consequences and
0050 0050Solutions 00BD
Check Check
Coolant
Coolant Level Level
See Operator's Man‐
See Operator's Man‐
ual ual The coolant level is too low.
! Avoid longer journeys when there is insufficient coolant in the
engine cooling system. You could otherwise damage the engine.
X Add coolant, observing the warning notes before doing so
(Y page 324).
If you have to add coolant frequently:
X Contact a qualified specialist workshop and have the engine cooling
system checked. 00AC The fan motor is defective.
X At coolant temperatures below 248 ‡(120 †), drive to the nearest
qualified specialist workshop.
X Avoid heavy loads on the engine as you do so, e.g. driving in moun-
tainous terrain and stop-and-go traffic. 258
Display messagesOn-board computer and displays
Page 265 of 398

Display messages
Possible causes/consequences and
0050
0050Solutions ACTIVE
ACTIVE
CURVE
CURVESYSTEM
SYSTEM
Malfunction See
Malfunction See
Operator's Manual Operator's Manual The ACTIVE CURVE SYSTEM is faulty. The vehicle's handling charac-
teristics are severely impaired. A warning tone also sounds.
G WARNING
There is a risk of an accident.
X Drive on carefully.
X Adjust your driving style to the altered handling characteristics.
X Avoid sudden acceleration around tight corners and fast steering
movements.
X Do not drive at speeds above 50 mph (80 km/h).
X Visit a qualified specialist workshop immediately. 003B
Different. Lock Different. Lock
Sys. Malfunction Sys. Malfunction The differential lock is faulty.
X Do not drive at speeds above 50 mph (80 km/h).
X Visit a qualified specialist workshop. 003B
Different. Locking Different. Locking
Sys. Cooling Down Sys. Cooling Down
Please Wait Please Wait The differential lock is too hot and has been disengaged.
X Drive on carefully.
X Allow the differential lock to cool down.
The differential lock re-engages as soon as it has cooled down. LOW RANGE Stop LOW RANGE Stop
Apply Parking Brake Apply Parking Brake A gearshift process has been canceled. LOW RANGE is in the neutral
position. There is no connection between the engine and the drive
wheels.
X Pull over and stop the vehicle safely as soon as possible, paying
attention to road and traffic conditions.
X Apply the electric parking brake. Do not continue driving under any
circumstances.
X Repeat the gearshift process. LOW RANGE Malfunc‐
LOW RANGE Malfunc‐
tion tion
To
ToPark,
Park, Apply
Apply
Brake
Brake LOW RANGE is malfunctioning.
X Do not drive at speeds above 31 mph (50 km/h).
X When parking, secure the vehicle against rolling away (Y page 158).
X Visit a qualified specialist workshop. LOW RANGE Max.
LOW RANGE Max.
Speed 25 mph Speed 25 mph You have exceeded the maximum speed for the gearshift process.
X Drive more slowly.
The gear change is made. LOW RANGE Max. LOW RANGE Max.
Speed 31 mph Speed 31 mph You have exceeded the maximum speed for the gearshift process.
X Drive more slowly.
The gear change is made. LOW RANGE Shift to LOW RANGE Shift to
Position N Briefly Position N Briefly You have reduced the vehicle speed, but the automatic transmission
is not in position 005C.
X Briefly shift the automatic transmission to 005C. Display
messages
263On-board computer and displays Z
Page 286 of 398

Warning/
indicator
lamp
0051
0051 Signal type
Possible causes/consequences and 0050 0050Solutions 00AC
0051
The red coolant warning lamp comes on while the engine is running.
The coolant level is too low.
If the coolant level is correct, the airflow to the engine radiator may be blocked or the electric engine radiator fan may be defective.
The coolant is too hot and the engine is no longer being cooled sufficiently.
X Observe the additional display messages in the multifunction display.
X Pull over and stop the vehicle safely and switch off the engine, paying attention
to road and traffic conditions.
X Secure the vehicle against rolling away (Y page 158).
X Leave the vehicle and keep a safe distance from the vehicle until the engine has
cooled down.
X Check the coolant level and add coolant, observing the warning notes
(Y page 324).
X If you have to add coolant frequently, have the engine cooling system checked.
X Make sure that the air supply to the engine radiator is not blocked, e.g. by snow,
slush or ice.
X Do not start the engine again until the coolant temperature is below 248 ‡
(120 †). Otherwise, the engine could be damaged.
X Drive to the nearest qualified specialist workshop.
X Avoid heavy loads on the engine as you do so, e.g. driving in mountainous terrain
and stop-and-go traffic. 00AC
0051
The red coolant warning lamp comes on while the engine is running.
The coolant temperature has exceeded 248 ‡ (120 †). The airflow to the engine radiator may be blocked or the coolant level may be too low.
G WARNING
The engine is not being cooled sufficiently and may be damaged.
Do not drive when your engine is overheated. This can cause some fluids which
may have leaked into the engine compartment to catch fire.
Steam from the overheated engine can also cause serious burns which can occur just by opening the hood.
There is a risk of injury.
X Observe the additional display messages in the multifunction display.
X Pull over and stop the vehicle safely and switch off the engine, paying attention
to road and traffic conditions.
X Secure the vehicle against rolling away (Y page 158).
X Leave the vehicle and keep a safe distance from the vehicle until the engine has
cooled down.
X Check the coolant level and add coolant, observing the warning notes
(Y page 324).
X If you have to add coolant frequently, have the engine cooling system checked.
X Make sure that the air supply to the engine radiator is not blocked, e.g. by snow,
slush or ice. 284
Warning and indicator lamps in the instrument clusterOn-board computer and displays
Page 306 of 398

!
Only use the cup holders for containers of
the right size and which have lids. The drinks
could otherwise spill.
! Do not expose drinks bottles in the cup
holder in the center console to continuous,
strong and direct sunlight. The passenger
compartment in the area of the center con-
sole can otherwise be damaged by the con-
centrated and reflected sunlight.
Do not keep the KEYLESS-GO key in the tem-
perature-controlled cup holder (Y page 304).
Otherwise, the KEYLESS-GO key will not be rec-
ognized.
The stowage compartments in the doors provide
space for bottles with a capacity of up to
34 fl. oz. (1.0 l).
The bottles are not secured or prevented from
tipping over. Therefore, do not place any open
drink containers in the stowage compartments.
Cup holder in the front center console 0043
Cup holder
0044 Cover
X To open: slide cover 0044to its foremost posi-
tion.
X To close: pull cover 0044back as far as it will go.
You can remove the cup holder's rubber mat for
cleaning. Clean with clear, lukewarm water only. Temperature-controlled cup holder in
the front-compartment center console 0043
Cup holder
0044 Residual heat indicator lamp
0087 Switch
The temperature-controlled cup holder can be
used to keep cold drinks cool and warm drinks
warm.
X Turn the SmartKey to position 0048in the igni-
tion lock.
X To switch on the cooling function: press
and hold button 0087until the blue indicator
lamp on the button lights up.
X To switch on the heating function: press
and hold button 0087until the red indicator
lamp on the button lights up.
X To switch off the function: press and hold
button 0087until the indicator lamp on the but-
ton goes out.
When the heating function is used, the metal
insert of the cup holder is heated. Once a certain
temperature is reached, residual heat indicator
lamp 0044lights up. This means that the metal
insert of the cup holder is hot. For this reason,
you must not reach into the cup holder metal
insert.
Do not use hard or sharp objects to clean the
cup holder. Use only a soft cloth to clean it.
Cup holder in the rear seat armrest !
Do not sit on or support your body weight on
the rear seat armrest when it is folded down,
as you could otherwise damage it. 304
FeaturesStowage and features
Page 311 of 398

Problems with the 115 V power socket
Problem
Possible causes/consequences and
0050
0050Solutions The warning lamp on the
115 V power socket is
not lit. The on-board voltage is too low because the battery is too weak.
X Start the engine.
or X Charge the battery (Y page 342).
If the indicator lamp still does not light up: X Visit a qualified specialist workshop. The temperature of the DC/AC converter is temporarily too high.
X Remove the electronic device connector from the 115 V socket.
X Let the DC/AC converter cool down.
If the indicator lamp still does not light up after cooling down the
converter:
X Visit a qualified specialist workshop. You have connected an electronic device that has a constant nominal
power of less than 150 watts, but has a very high switch-on current.
This device will not work. If you connect such a device, the 115 V
power socket will not supply it with power.
X Connect a suitable electronic device. mbrace
General notes The mbrace system is only available in the USA.
A license agreement must be in place in order to
activate the mbrace service. Make sure that
your system is activated and operational. To
register, press the 00D9Info call button. If any of
the steps mentioned are not carried out, the
system may not be activated.
If you have questions about the activation, con- tact one of the following telephone hotlines:
Mercedes-Benz Customer Assistance Center at
1-800 FOR-MERCEDES (1-800-367-6372) or
1-866-990-9007
Shortly after successfully registering with the
mbrace service, a user ID and password will be
sent to you by mail. You can use this password
to log onto the mbrace area under "Owners
Online" at http://www.mbusa.com. The system is available if:
R it has been activated and is operational
R the corresponding mobile phone network is
available for transmitting data to the Cus-
tomer Center
R a service subscription is available
Determining the location of the vehicle on a map
is only possible if:
R GPS reception is available
R the vehicle position can be forwarded to the
Customer Assistance Center
The mbrace system To adjust the volume during a call, proceed as
follows:
X Press the 0081or0082 button on the multi-
function steering wheel.
or X Use the multimedia system volume control. Features
309Stowage and features Z