towing MERCEDES-BENZ GLS SUV 2016 Owner's Guide
[x] Cancel search | Manufacturer: MERCEDES-BENZ, Model Year: 2016, Model line: GLS SUV, Model: MERCEDES-BENZ GLS SUV 2016Pages: 397, PDF Size: 14.21 MB
Page 242 of 397
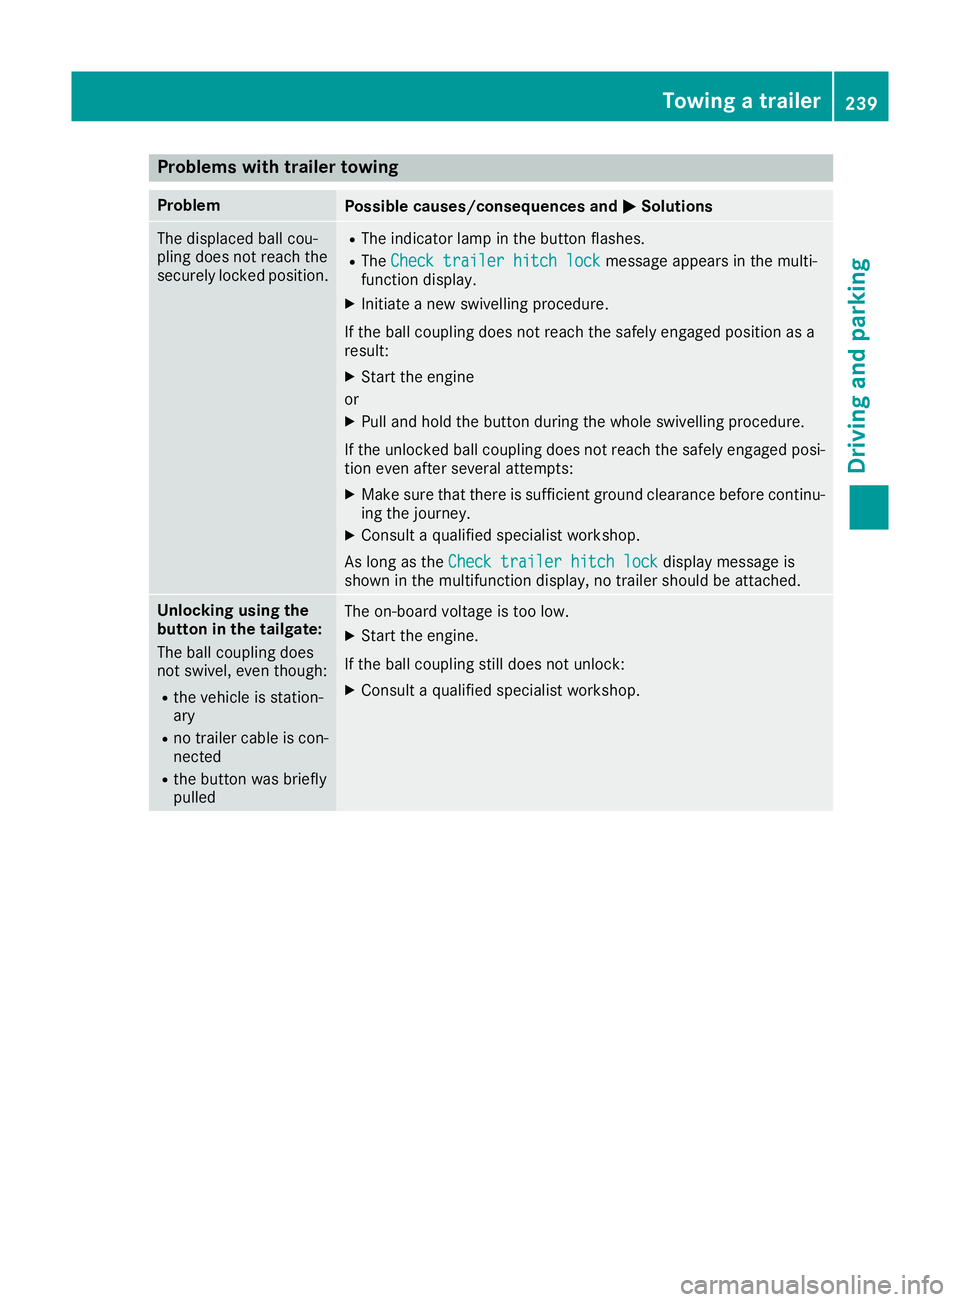
Problems with trailer towing
Problem
Possible causes/consequences and
M
MSolutions The displaced ball cou-
pling does not reach the
securely locked position. R
The indicator lamp in the button flashes.
R The Check trailer hitch lock Check trailer hitch lock message appears in the multi-
function display.
X Initiate a new swivelling procedure.
If the ball coupling does not reach the safely engaged position as a
result:
X Start the engine
or
X Pull and hold the button during the whole swivelling procedure.
If the unlocked ball coupling does not reach the safely engaged posi- tion even after several attempts:
X Make sure that there is sufficient ground clearance before continu-
ing the journey.
X Consult a qualified specialist workshop.
As long as the Check trailer hitch lock
Check trailer hitch lock display message is
shown in the multifunction display, no trailer should be attached. Unlocking using the
button in the tailgate:
The ball coupling does
not swivel, even though:
R
the vehicle is station-
ary
R no trailer cable is con-
nected
R the button was briefly
pulled The on-board voltage is too low.
X Start the engine.
If the ball coupling still does not unlock:
X Consult a qualified specialist workshop. Towing a trailer
239Driving and parking Z
Page 243 of 397
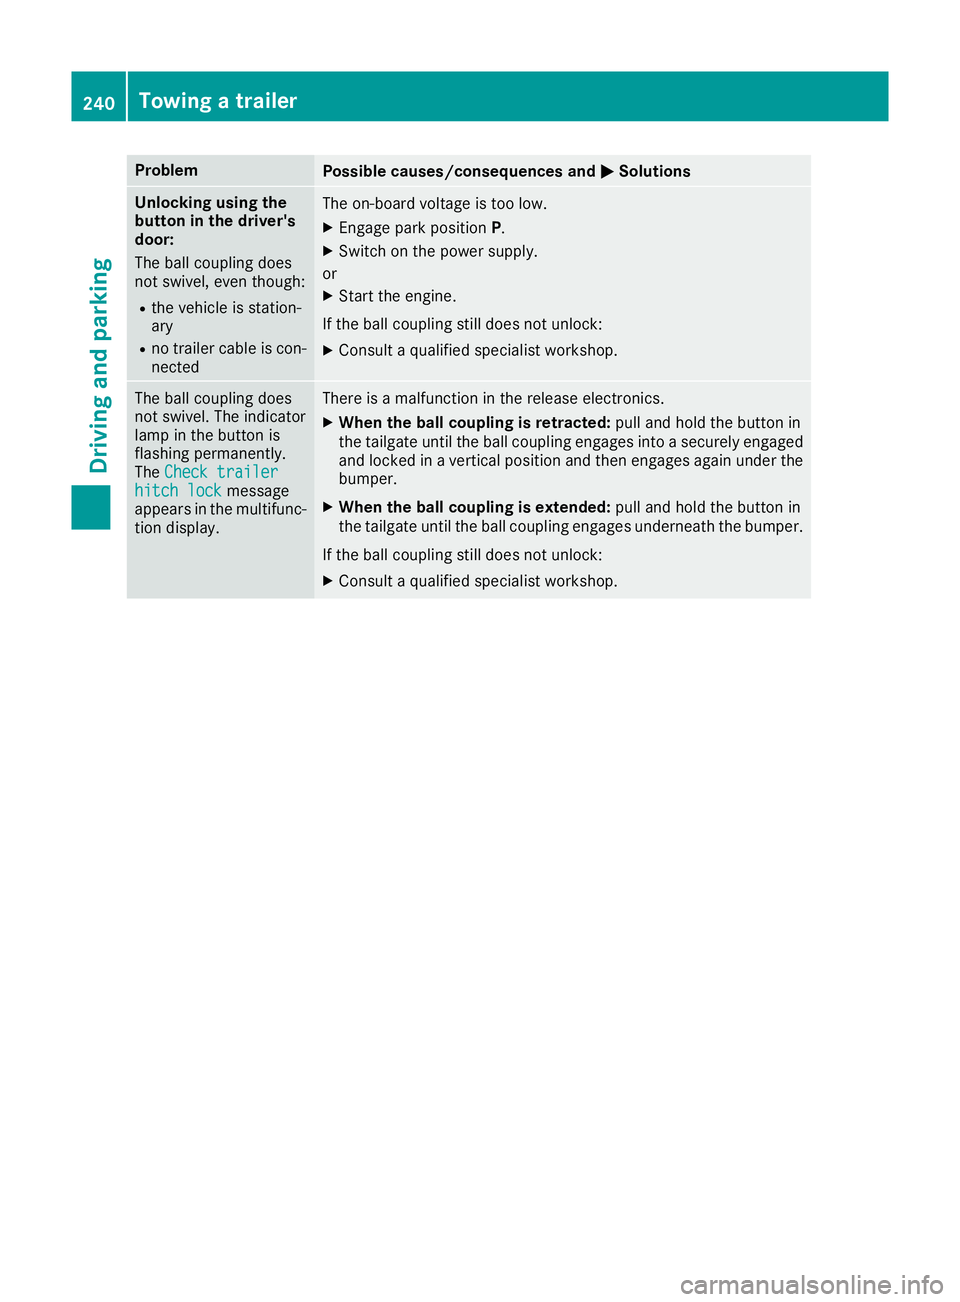
Problem
Possible causes/consequences and
M
MSolutions Unlocking using the
button in the driver's
door:
The ball coupling does
not swivel, even though:
R the vehicle is station-
ary
R no trailer cable is con-
nected The on-board voltage is too low.
X Engage park position P.
X Switch on the power supply.
or X Start the engine.
If the ball coupling still does not unlock: X Consult a qualified specialist workshop. The ball coupling does
not swivel. The indicator
lamp in the button is
flashing permanently.
The
Check trailer Check trailer
hitch lock
hitch lock message
appears in the multifunc- tion display. There is a malfunction in the release electronics.
X When the ball coupling is retracted: pull and hold the button in
the tailgate until the ball coupling engages into a securely engaged
and locked in a vertical position and then engages again under the
bumper.
X When the ball coupling is extended: pull and hold the button in
the tailgate until the ball coupling engages underneath the bumper.
If the ball coupling still does not unlock:
X Consult a qualified specialist workshop. 240
Towing a trailerDriving and parking
Page 278 of 397
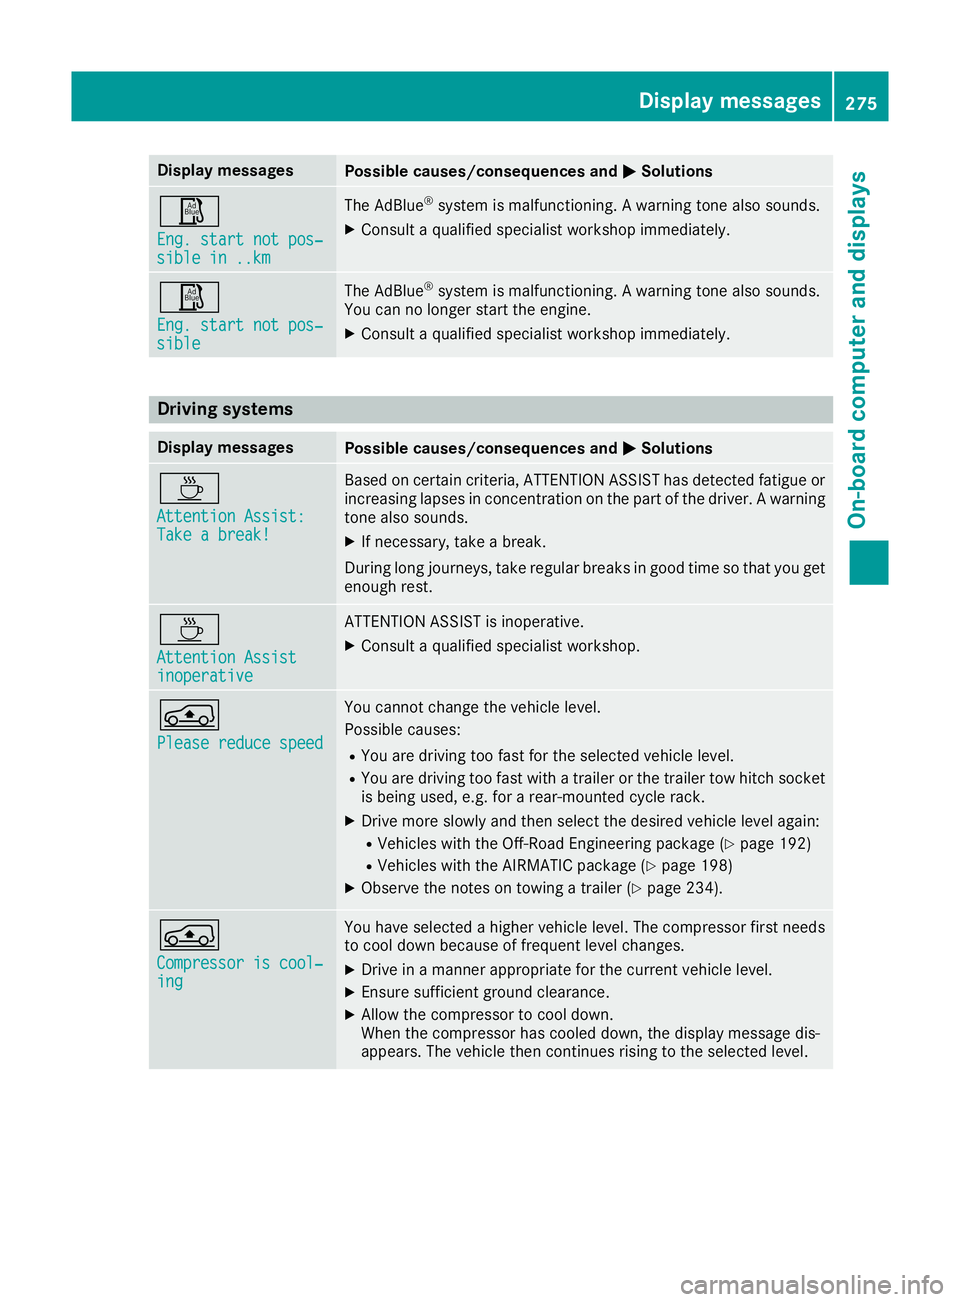
Display messages
Possible causes/consequences and
M
MSolutions Ø
Eng. start not pos‐ Eng. start not pos‐
sible in ..km sible in ..km The AdBlue
®
system is malfunctioning. A warning tone also sounds.
X Consult a qualified specialist workshop immediately. Ø
Eng. start not pos‐ Eng. start not pos‐
sible sible The AdBlue
®
system is malfunctioning. A warning tone also sounds.
You can no longer start the engine.
X Consult a qualified specialist workshop immediately. Driving systems
Display messages
Possible causes/consequences and
M
MSolutions À
Attention Assist: Attention Assist:
Take a break! Take a break! Based on certain criteria, ATTENTION ASSIST has detected fatigue or
increasing lapses in concentration on the part of the driver. A warning tone also sounds.
X If necessary, take a break.
During long journeys, take regular breaks in good time so that you get enough rest. À
Attention Assist Attention Assist
inoperative inoperative ATTENTION ASSIST is inoperative.
X Consult a qualified specialist workshop. Á
Please reduce speed Please reduce speed You cannot change the vehicle level.
Possible causes:
R You are driving too fast for the selected vehicle level.
R You are driving too fast with a trailer or the trailer tow hitch socket
is being used, e.g. for a rear-mounted cycle rack.
X Drive more slowly and then select the desired vehicle level again:
R Vehicles with the Off-Road Engineering package (Y page 192)
R Vehicles with the AIRMATIC package (Y page 198)
X Observe the notes on towing a trailer (Y page 234).Á
Compressor is cool‐ Compressor is cool‐
ing ing You have selected a higher vehicle level. The compressor first needs
to cool down because of frequent level changes.
X Drive in a manner appropriate for the current vehicle level.
X Ensure sufficient ground clearance.
X Allow the compressor to cool down.
When the compressor has cooled down, the display message dis-
appears. The vehicle then continues rising to the selected level. Display
messages
275On-board computer and displays Z
Page 282 of 397
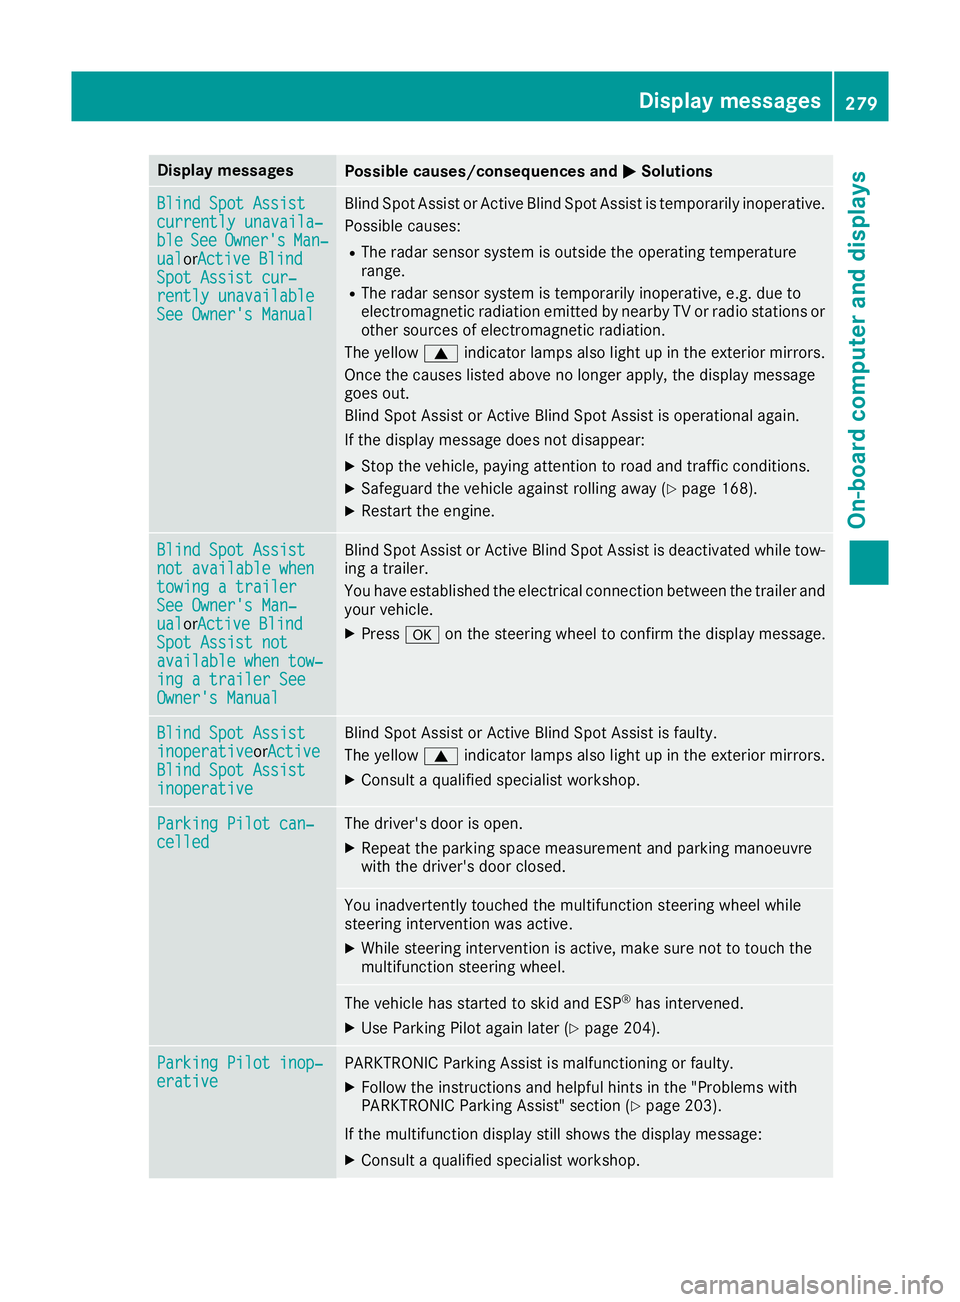
Display messages
Possible causes/consequences and
M
MSolutions Blind Spot Assist
Blind Spot Assist
currently unavaila‐ currently unavaila‐
ble ble
See
SeeOwner's
Owner's Man‐
Man‐
ual
ual orActive BlindActive Blind
Spot Assist cur‐
Spot Assist cur‐
rently unavailable rently unavailable
See Owner's Manual See Owner's Manual Blind Spot Assist or Active Blind Spot Assist is temporarily inoperative.
Possible causes:
R The radar sensor system is outside the operating temperature
range.
R The radar sensor system is temporarily inoperative, e.g. due to
electromagnetic radiation emitted by nearby TV or radio stations or
other sources of electromagnetic radiation.
The yellow 9indicator lamps also light up in the exterior mirrors.
Once the causes listed above no longer apply, the display message
goes out.
Blind Spot Assist or Active Blind Spot Assist is operational again.
If the display message does not disappear:
X Stop the vehicle, paying attention to road and traffic conditions.
X Safeguard the vehicle against rolling away (Y page 168).
X Restart the engine. Blind Spot Assist Blind Spot Assist
not available when not available when
towing a trailer towing a trailer
See Owner's Man‐ See Owner's Man‐
ual ual
orActive BlindActive Blind
Spot Assist not
Spot Assist not
available when tow‐ available when tow‐
ing a trailer See ing a trailer See
Owner's Manual Owner's Manual Blind Spot Assist or Active Blind Spot Assist is deactivated while tow-
ing a trailer.
You have established the electrical connection between the trailer and
your vehicle.
X Press aon the steering wheel to confirm the display message. Blind Spot Assist Blind Spot Assist
inoperative inoperativeorActive
Active
Blind Spot Assist
Blind Spot Assist
inoperative inoperative Blind Spot Assist or Active Blind Spot Assist is faulty.
The yellow 9indicator lamps also light up in the exterior mirrors.
X Consult a qualified specialist workshop. Parking Pilot can‐
Parking Pilot can‐
celled celled The driver's door is open.
X Repeat the parking space measurement and parking manoeuvre
with the driver's door closed. You inadvertently touched the multifunction steering wheel while
steering intervention was active.
X While steering intervention is active, make sure not to touch the
multifunction steering wheel. The vehicle has started to skid and ESP
®
has intervened.
X Use Parking Pilot again later (Y page 204).Parking Pilot inop‐ Parking Pilot inop‐
erative erative PARKTRONIC Parking Assist is malfunctioning or faulty.
X Follow the instructions and helpful hints in the "Problems with
PARKTRONIC Parking Assist" section (Y page 203).
If the multifunction display still shows the display message:
X Consult a qualified specialist workshop. Display
messages
279On-board computer and displays Z
Page 315 of 397
Stowage areas
Loading guidelines
G
WARNING
If objects, luggage or loads are not secured or not secured sufficiently, they could slip, tip
over or be flung around and thereby hit vehicle
occupants. There is a risk of injury, especially when braking or abruptly changing directions.
Always store objects so that they cannot be
flung around. Secure objects, luggage or
loads against slipping or tipping before the
journey. G
WARNING
Combustion engines emit poisonous exhaust
gases such as carbon monoxide. If the tailgate is open when the engine is running, particu-
larly if the vehicle is moving, exhaust fumes
could enter the passenger compartment.
There is a risk of poisoning.
Turn off the engine before opening the tail-
gate. Never drive with the tailgate open. G
WARNING
The exhaust tail pipe and tail pipe trim can
become very hot. If you come into contact
with these parts of the vehicle, you could burn
yourself. There is a risk of injury.
Always be particularly careful around the
exhaust tail pipe and the tail pipe trim. Allow
these components to cool down before touch-
ing them.
The handling characteristics of a laden vehicle
are dependent on the distribution of the load
within the vehicle. For this reason, you should
observe the following notes when transporting a
load:
R never exceed the maximum permissible gross
vehicle weight or the permissible axle loads
for the vehicle (including occupants).
R the luggage compartment is the preferred
place to store objects.
R position heavy loads as far forwards as pos-
sible and as low down in the load compart-
ment as possible. R
the load must not protrude above the upper
edge of the seat backrests.
R always place the load against the rear or front
seat backrests. Make sure that the seat
backrests are securely locked into place.
R always place the load behind unoccupied
seats if possible.
R use the lashing eyelets and the luggage nets
to transport loads and luggage.
R only use lashing eyelets and fastening com-
ponents that are suitable for the weight and
size of the load.
R secure the load with sufficiently strong and
wear-resistant lashing material. pad sharp
edges for protection.
i Load restraints are available at any qualified
specialist workshop, e.g. a Mercedes-Benz
Service Centre. Stowage compartments
Important safety notes G
WARNING
If you transport objects in the vehicle interior and these are not adequately secured, they
could slip or be flung around and thereby
strike vehicle occupants. In addition, cup
holders, open stowage spaces and mobile
phone brackets may not always be able to
hold the objects placed in them in the event of an accident. There is a risk of injury, particu-
larly in the event of sharp braking or sudden
changes of direction.
R Always stow objects in such a way that they
cannot be tossed about in these or similar
situations.
R Always make sure that objects do not proj-
ect from stowage spaces, luggage nets or
stowage nets.
R Ensure that closable stowage spaces are
shut before beginning your journey.
R Always stow and secure heavy, hard, poin-
ted, sharp-edged, fragile or outsize objects
in the load compartment.
Observe the loading guidelines (Y page 312).312
Stowage areasStowing and features
Page 316 of 397
Glove compartment
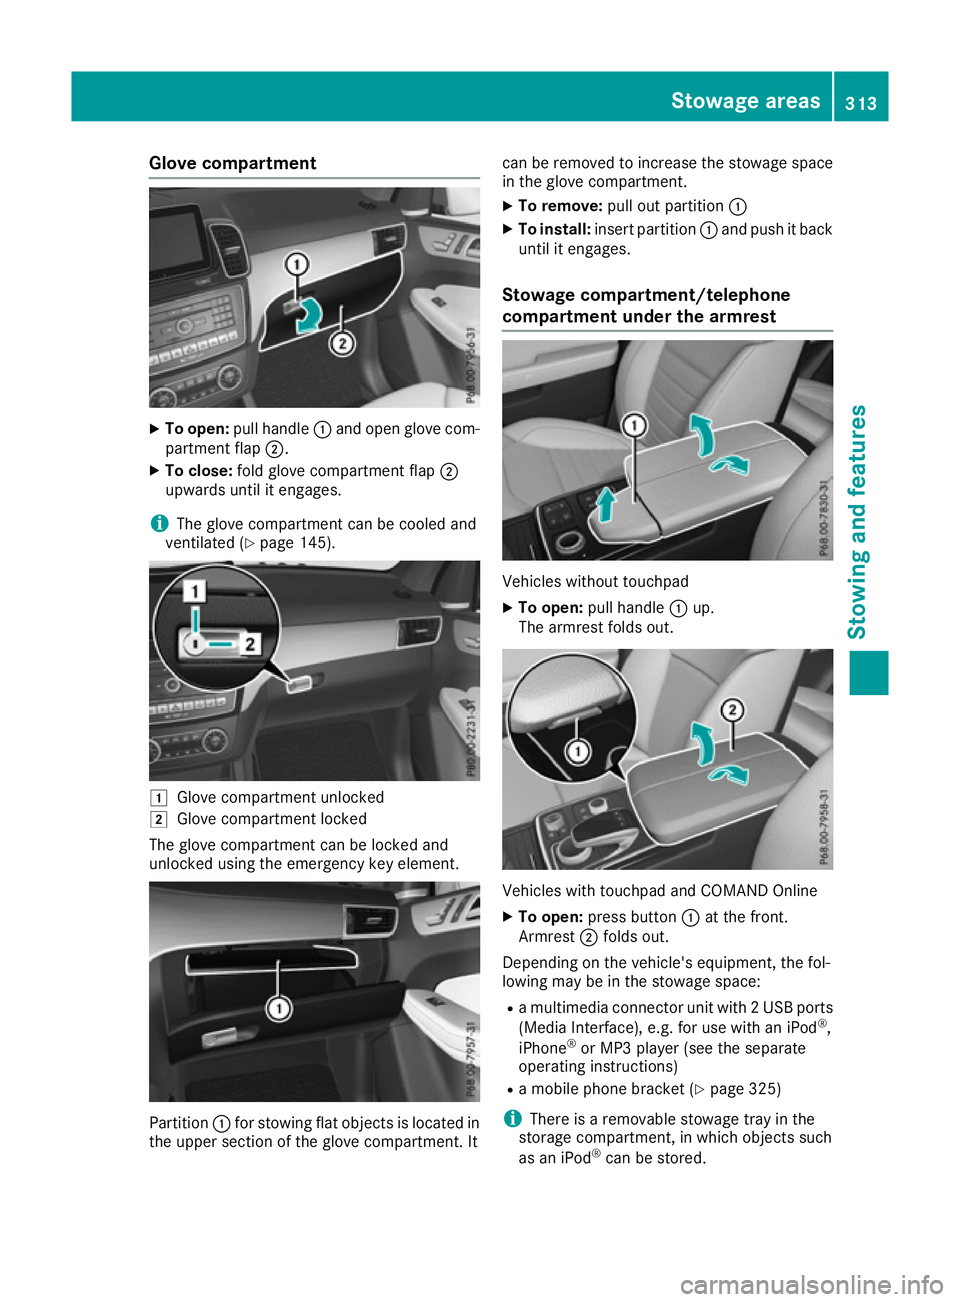
X
To open: pull handle :and open glove com-
partment flap ;.
X To close: fold glove compartment flap ;
upwards until it engages.
i The glove compartment can be cooled and
ventilated (Y page 145). 1
Glove compartment unlocked
2 Glove compartment locked
The glove compartment can be locked and
unlocked using the emergency key element. Partition
:for stowing flat objects is located in
the upper section of the glove compartment. It can be removed to increase the stowage space
in the glove compartment.
X To remove: pull out partition :
X To install: insert partition :and push it back
until it engages.
Stowage compartment/telephone
compartment under the armrest Vehicles without touchpad
X To open: pull handle :up.
The armrest folds out. Vehicles with touchpad and COMAND Online
X To open: press button :at the front.
Armrest ;folds out.
Depending on the vehicle's equipment, the fol-
lowing may be in the stowage space:
R a multimedia connector unit with 2 USB ports
(Media Interface), e.g. for use with an iPod ®
,
iPhone ®
or MP3 player (see the separate
operating instructions)
R a mobile phone bracket (Y page 325)
i There is a removable stowage tray in the
storage compartment, in which objects such
as an iPod ®
can be stored. Stowage areas
313Stowing and features Z
Page 317 of 397

Spectacles compartment
X
To open: press marking :.
The spectacles compartment opens down-
wards.
X To close: press marking :again and the
spectacles compartment returns upwards
and engages.
Make sure that the spectacles compartment is
always closed while the vehicle is in motion.
Stowage compartment in the front
centre console X
To open: slide cover :forwards.
Stowage compartment ;appears.
X To close: pull cover :back as far as it will go. Stowage compartment in the rear
centre console X
To open: briefly press the stowage compart-
ment marking.
The stowage compartment opens.
i Depending on the vehicle's equipment,
there may be open stowage spaces above and
below the stowage compartment. Stowage net
:
Stowage net in the front-passenger footwell :
Stowage net on the back of the front seats 314
Stowage areasStowing and features
Page 318 of 397
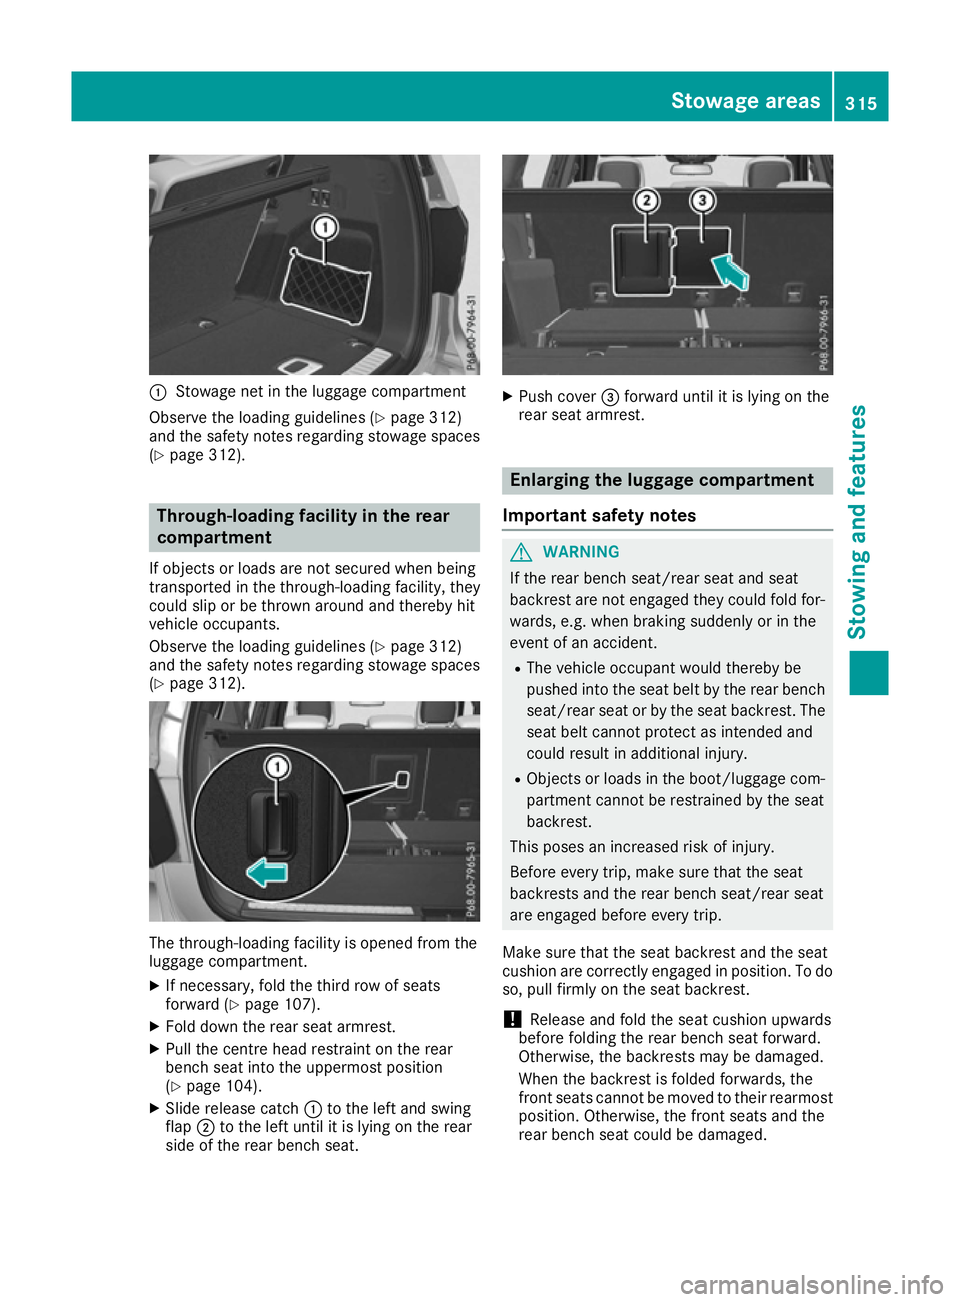
:
Stowage net in the luggage compartment
Observe the loading guidelines (Y page 312)
and the safety notes regarding stowage spaces
(Y page 312). Through-loading facility in the rear
compartment
If objects or loads are not secured when being
transported in the through-loading facility, they
could slip or be thrown around and thereby hit
vehicle occupants.
Observe the loading guidelines (Y page 312)
and the safety notes regarding stowage spaces
(Y page 312). The through-loading facility is opened from the
luggage compartment.
X If necessary, fold the third row of seats
forward (Y page 107).
X Fold down the rear seat armrest.
X Pull the centre head restraint on the rear
bench seat into the uppermost position
(Y page 104).
X Slide release catch :to the left and swing
flap ;to the left until it is lying on the rear
side of the rear bench seat. X
Push cover =forward until it is lying on the
rear seat armrest. Enlarging the luggage compartment
Important safety notes G
WARNING
If the rear bench seat/rear seat and seat
backrest are not engaged they could fold for- wards, e.g. when braking suddenly or in the
event of an accident.
R The vehicle occupant would thereby be
pushed into the seat belt by the rear bench
seat/rear seat or by the seat backrest. The
seat belt cannot protect as intended and
could result in additional injury.
R Objects or loads in the boot/luggage com-
partment cannot be restrained by the seat
backrest.
This poses an increased risk of injury.
Before every trip, make sure that the seat
backrests and the rear bench seat/rear seat
are engaged before every trip.
Make sure that the seat backrest and the seat
cushion are correctly engaged in position. To do
so, pull firmly on the seat backrest.
! Release and fold the seat cushion upwards
before folding the rear bench seat forward.
Otherwise, the backrests may be damaged.
When the backrest is folded forwards, the
front seats cannot be moved to their rearmost
position. Otherwise, the front seats and the
rear bench seat could be damaged. Stowage areas
315Stowing and features Z
Page 319 of 397
!
The backrest is heavy. Therefore, exercise
care when folding it down. Make sure that the
head restraints are pushed all the way in so
that the backrests and seat cushions are not
damaged.
Observe the loading guidelines (Y page 312).
The left-hand and right-hand backrests in the
2nd row of seats can be folded forwards sepa-
rately to increase the luggage compartment
capacity.
On vehicles with a third row of seats, you must
fold down the 3rd row of seats beforehand
(Y page 107) to obtain maximum luggage com-
partment enlargement.
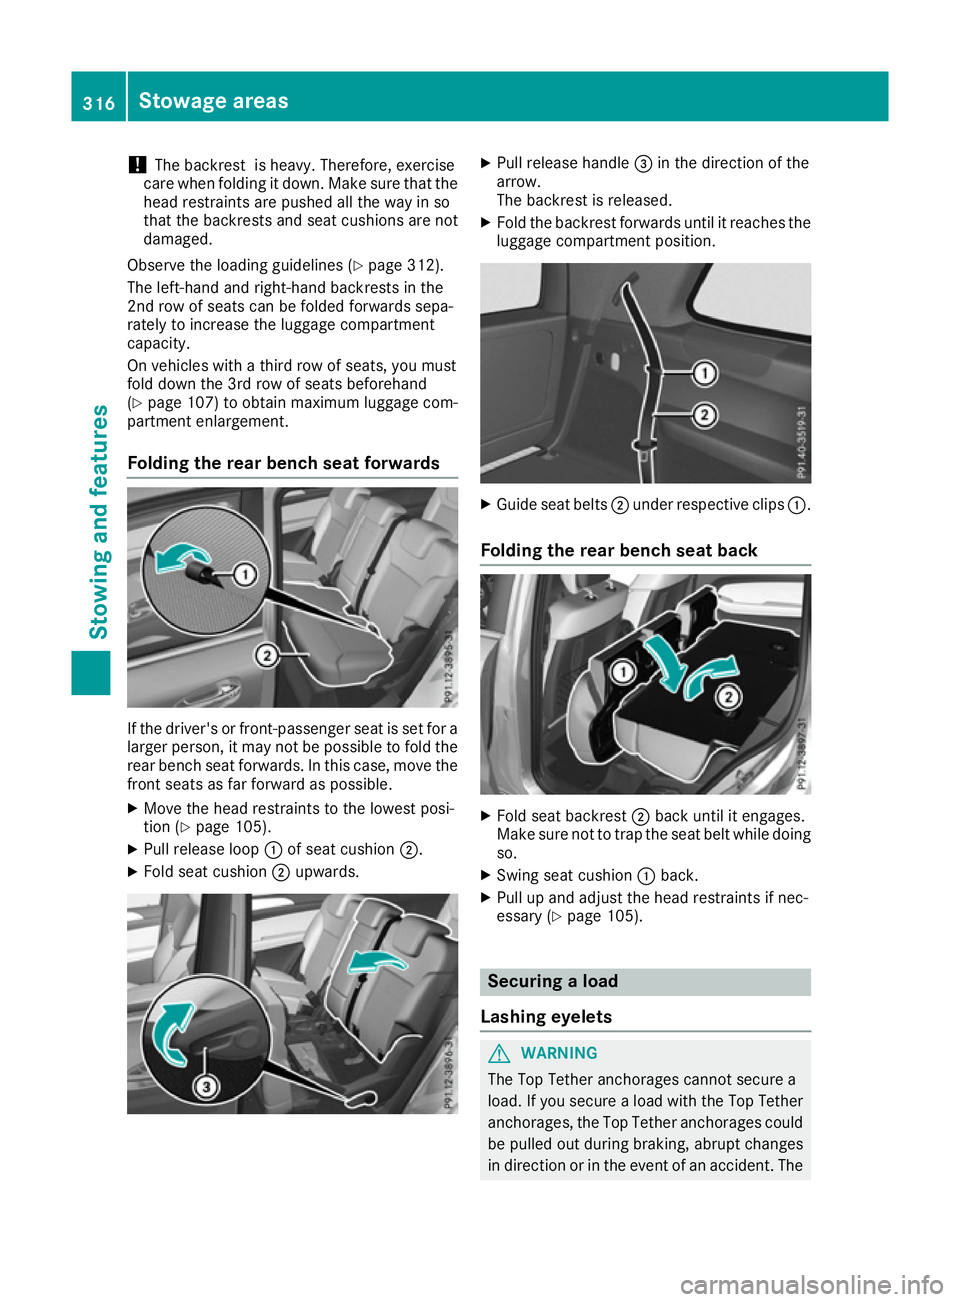
Folding the rear bench seat forwards If the driver's or front-passenger seat is set for a
larger person, it may not be possible to fold the
rear bench seat forwards. In this case, move the front seats as far forward as possible.
X Move the head restraints to the lowest posi-
tion (Y page 105).
X Pull release loop :of seat cushion ;.
X Fold seat cushion ;upwards. X
Pull release handle =in the direction of the
arrow.
The backrest is released.
X Fold the backrest forwards until it reaches the
luggage compartment position. X
Guide seat belts ;under respective clips :.
Folding the rear bench seat back X
Fold seat backrest ;back until it engages.
Make sure not to trap the seat belt while doing so.
X Swing seat cushion :back.
X Pull up and adjust the head restraints if nec-
essary (Y page 105). Securing a load
Lashing eyelets G
WARNING
The Top Tether anchorages cannot secure a
load. If you secure a load with the Top Tether
anchorages, the Top Tether anchorages could be pulled out during braking, abrupt changes
in direction or in the event of an accident. The 316
Stowage areasStowing and features
Page 320 of 397
load could slip, tip over or be flung around and
thereby collide with vehicle occupants. There
is a risk of injury.
Only use the lashing eyelets when securing a
load.
Observe the following notes on securing loads: R Secure the load using the lashing eyelets.
R Distribute the load on the lashing eyelets
evenly.
R Do not use elastic straps or nets to secure a
load. These are only intended as an anti-slip
protection for light loads.
R Do not route lashing materials across sharp
edges or corners.
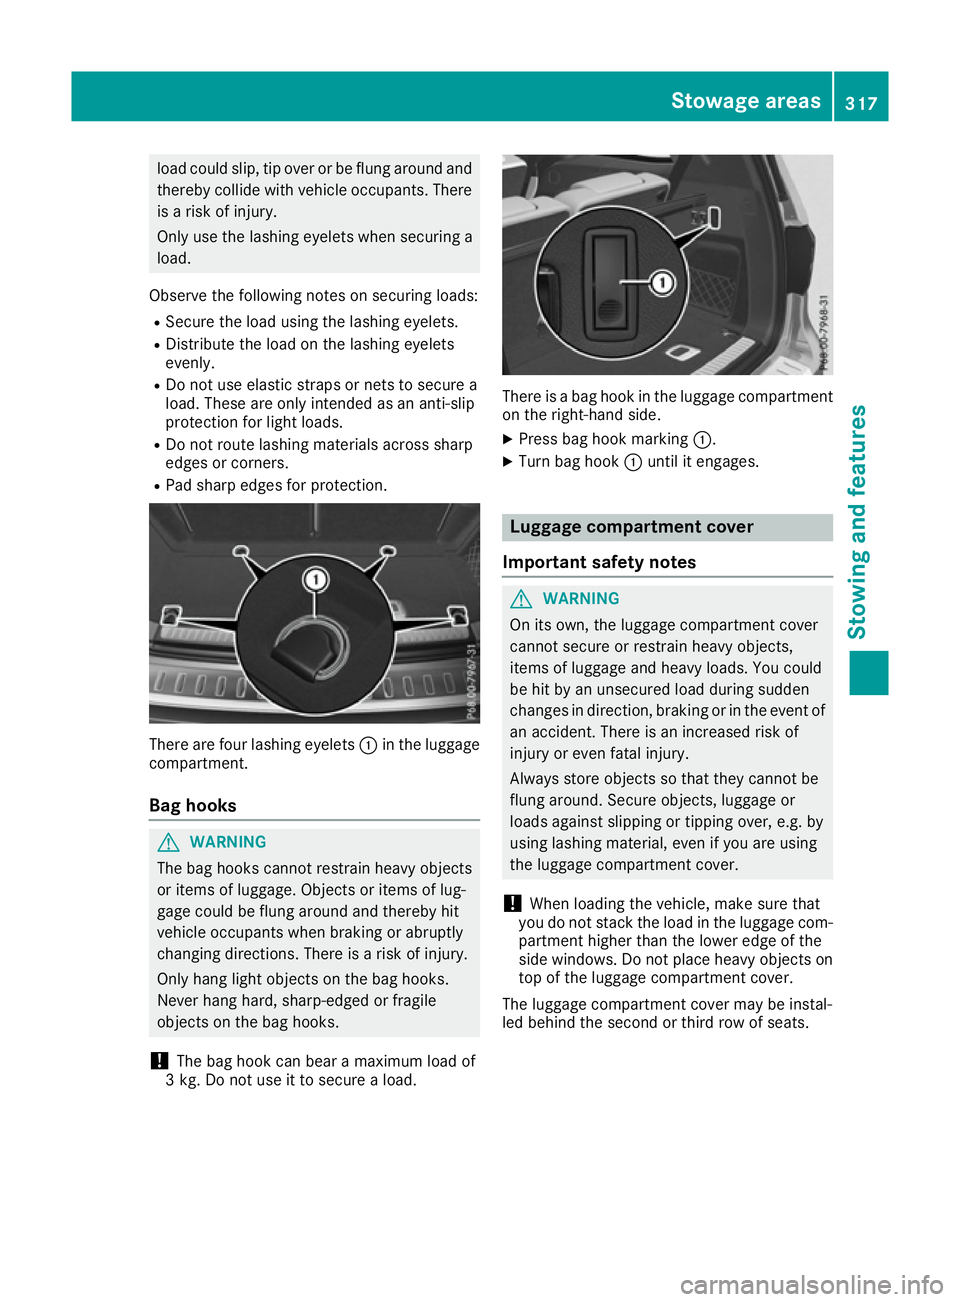
R Pad sharp edges for protection. There are four lashing eyelets
:in the luggage
compartment.
Bag hooks G
WARNING
The bag hooks cannot restrain heavy objects
or items of luggage. Objects or items of lug-
gage could be flung around and thereby hit
vehicle occupants when braking or abruptly
changing directions. There is a risk of injury.
Only hang light objects on the bag hooks.
Never hang hard, sharp-edged or fragile
objects on the bag hooks.
! The bag hook can bear a maximum load of
3 kg. Do not use it to secure a load. There is a bag hook in the luggage compartment
on the right-hand side.
X Press bag hook marking :.
X Turn bag hook :until it engages. Luggage compartment cover
Important safety notes G
WARNING
On its own, the luggage compartment cover
cannot secure or restrain heavy objects,
items of luggage and heavy loads. You could
be hit by an unsecured load during sudden
changes in direction, braking or in the event of an accident. There is an increased risk of
injury or even fatal injury.
Always store objects so that they cannot be
flung around. Secure objects, luggage or
loads against slipping or tipping over, e.g. by
using lashing material, even if you are using
the luggage compartment cover.
! When loading the vehicle, make sure that
you do not stack the load in the luggage com- partment higher than the lower edge of the
side windows. Do not place heavy objects ontop of the luggage compartment cover.
The luggage compartment cover may be instal-
led behind the second or third row of seats. Stowage areas
317Stowing and features Z