towing MERCEDES-BENZ GLS SUV 2016 Repair Manual
[x] Cancel search | Manufacturer: MERCEDES-BENZ, Model Year: 2016, Model line: GLS SUV, Model: MERCEDES-BENZ GLS SUV 2016Pages: 397, PDF Size: 14.21 MB
Page 378 of 397

Emergency spare wheel
Important safety notes
G
WARNING
The wheel/tyre dimensions and the tyre type of the spare wheel/emergency spare wheel
and the wheel to be replaced may differ. Fit-
ting a spare wheel/emergency spare wheel
may severely impair the driving characteris-
tics. There is a risk of accident.
To prevent hazardous situations:
R Adapt your driving style accordingly and
drive carefully.
R Never fit more than one spare wheel/emer-
gency spare wheel if the dimensions are
different to those of the wheel being
replaced.
R Only use a spare wheel/emergency spare
wheel briefly if the dimensions are different
to those of the wheel being replaced.
R Do not switch off ESP ®
.
R Have the spare wheel/emergency spare
wheel in question replaced at the nearest
qualified specialist workshop. Make sure
that the wheel/tyre dimensions and tyre
type are correct.
! Mercedes-AMG vehicles with
"Minispare" emergency spare wheel: only
use the "Minispare" emergency spare wheel
on the rear axle. If you fit the "Minispare"
emergency spare wheel to the front axle, the braking system could be damaged.
If a tyre on the front axle is damaged, an
undamaged wheel on the rear axle must be
replaced first with the "Minispare" emergency
spare wheel. The damaged wheel on the front
axle can then be replaced by the undamaged wheel from the rear axle.
You must observe the instruction label on the"Minispare" emergency spare wheel.
When using an emergency spare wheel or spare wheel of a different size, you must not exceed
the maximum speed of 80 km/h.
Snow chains must not be fitted to emergency
spare wheels. General notes
You can ask for information regarding permitted emergency spare wheels at a Mercedes-Benz
Service Centre.
Fitting the emergency spare wheel is described under "Fitting a wheel" (Y page 370).
You should check the pressure of all your tyres, including the emergency spare wheel, regularly
as well as prior to long trips, and correct the
pressure as necessary (Y page 364). The value
on the wheel is valid.
An emergency spare wheel may also be fitted
against the direction of rotation. Observe the
time restriction on use as well as the speed lim- itation specified on the emergency spare wheel.
Replace the tyres after six years at the latest,
regardless of wear. This also applies to the
emergency spare wheel.
If you are driving with the emergency spare
wheel fitted, the tyre pressure loss warning sys- tem or the tyre pressure monitor cannot func-
tion reliably. Restart the tyre pressure loss warn-
ing system or tyre pressure monitor only once
the defective wheel has been replaced with a
new wheel.
Vehicles with tyre pressure monitor: after an
emergency spare wheel has been fitted, the sys- tem may still display the tyre pressure of the
removed wheel for a few minutes. The value dis-
played for the position where the emergency
spare wheel is fitted is not the same as the cur- rent tyre pressure of the emergency spare
wheel. Removing/stowing the emergency
spare wheel
Vehicles with a "Minispare" emergency
spare wheel under the luggage com-
partment floor Observe the instructions and safety notes in the
"Fitting a wheel" section (Y page 370).
Example image: vehicle without lockable lug-
gage compartment floor. Emergency spare wheel
375Wheels and tyres Z
Page 379 of 397
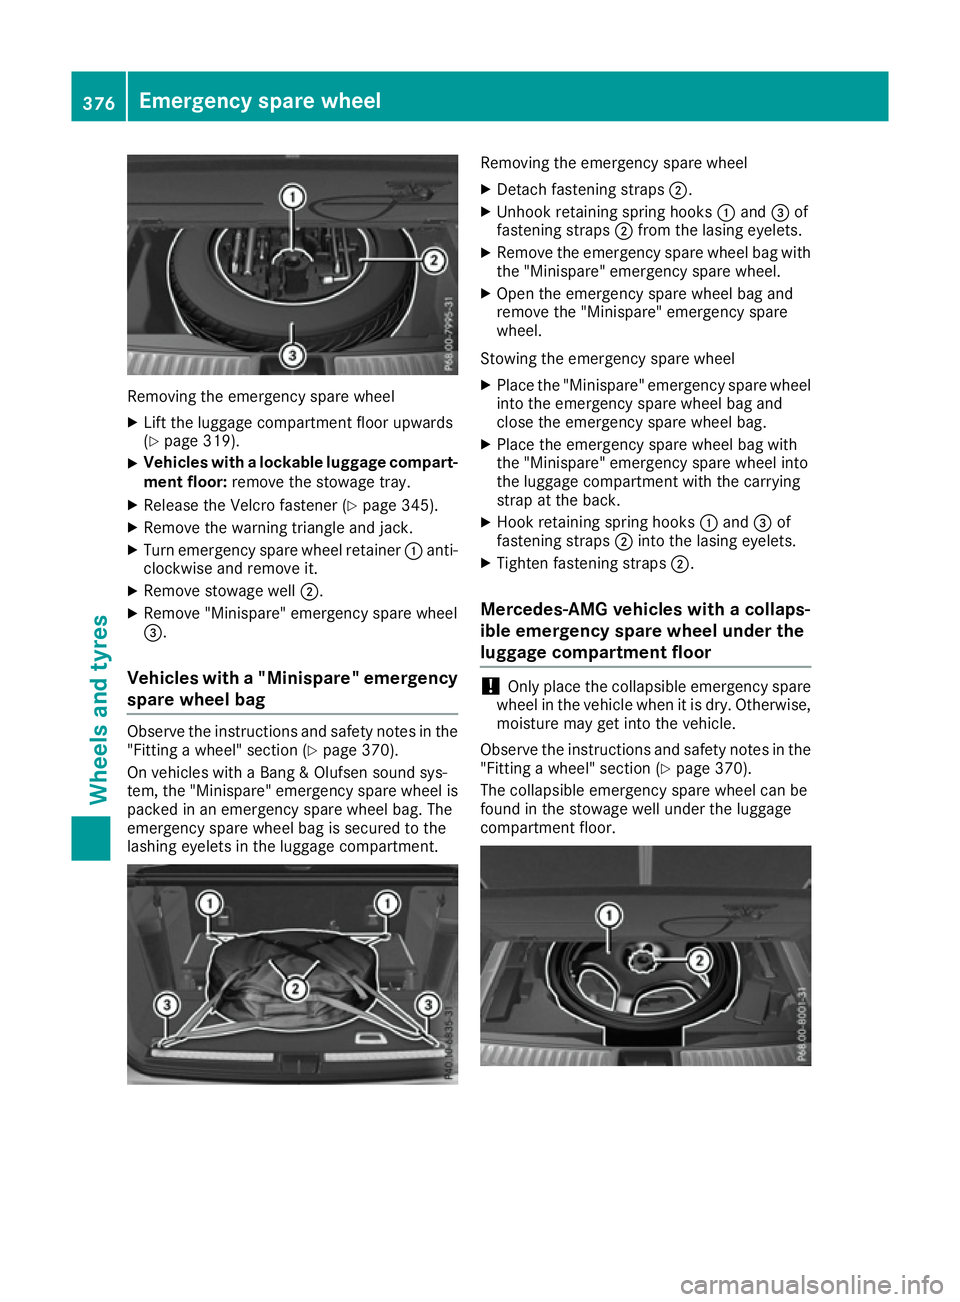
Removing the emergency spare wheel
X Lift the luggage compartment floor upwards
(Y page 319).
X Vehicles with a lockable luggage compart-
ment floor: remove the stowage tray.
X Release the Velcro fastener (Y page 345).
X Remove the warning triangle and jack.
X Turn emergency spare wheel retainer :anti-
clockwise and remove it.
X Remove stowage well ;.
X Remove "Minispare" emergency spare wheel
=.
Vehicles with a "Minispare" emergency spare wheel bag Observe the instructions and safety notes in the
"Fitting a wheel" section (Y page 370).
On vehicles with a Bang & Olufsen sound sys-
tem, the "Minispare" emergency spare wheel is
packed in an emergency spare wheel bag. The
emergency spare wheel bag is secured to the
lashing eyelets in the luggage compartment. Removing the emergency spare wheel
X Detach fastening straps ;.
X Unhook retaining spring hooks :and =of
fastening straps ;from the lasing eyelets.
X Remove the emergency spare wheel bag with
the "Minispare" emergency spare wheel.
X Open the emergency spare wheel bag and
remove the "Minispare" emergency spare
wheel.
Stowing the emergency spare wheel
X Place the "Minispare" emergency spare wheel
into the emergency spare wheel bag and
close the emergency spare wheel bag.
X Place the emergency spare wheel bag with
the "Minispare" emergency spare wheel into
the luggage compartment with the carrying
strap at the back.
X Hook retaining spring hooks :and =of
fastening straps ;into the lasing eyelets.
X Tighten fastening straps ;.
Mercedes-AMG vehicles with a collaps-
ible emergency spare wheel under the
luggage compartment floor !
Only place the collapsible emergency spare
wheel in the vehicle when it is dry. Otherwise,
moisture may get into the vehicle.
Observe the instructions and safety notes in the
"Fitting a wheel" section (Y page 370).
The collapsible emergency spare wheel can be
found in the stowage well under the luggage
compartment floor. 376
Emergency spare wheelWheels and ty
res
Page 380 of 397

Removing the emergency spare wheel
X Lift the luggage compartment floor upwards
(Y page 319).
X Unscrew retaining screw ;anti-clockwise.
X Remove collapsible emergency spare
wheel :from the spare wheel well.
Inflating the collapsible emergency spare wheel (Y page 377).
Take the following steps to stow a used collaps-
ible emergency spare wheel. Otherwise, it will
not fit in the spare wheel well. Mercedes-Benz
recommends that you have this work performed
at a qualified specialist workshop, e.g. at a
Mercedes-Benz Service Centre.
Stowing the emergency spare wheel
X Unscrew the valve cap from the valve.
X If possible, unscrew the valve insert from the
valve and release the air.
i Fully deflating the tyre may take a few
minutes.
X Screw the valve insert back into the valve.
X Screw the valve cap back on.
X Lay collapsible emergency spare wheel :in
the emergency spare wheel well.
X Screw in retaining screw ;clockwise in the
collapsible emergency wheel to the stop.
X Swing the luggage compartment floor down
(Y page 319).
Mercedes-AMG vehicles with a collaps-
ible emergency spare wheel in the
emergency spare wheel bag Observe the instructions and safety notes in the
"Fitting a wheel" section (Y page 370).
On Mercedes-AMG vehicles with a Bang & Oluf-
sen sound system, the collapsible emergency
spare wheel is packed in an emergency spare
wheel bag. The emergency spare wheel bag is
secured to the lashing eyelets in the luggage
compartment. Removing the emergency spare wheel
X Unhook retaining spring hooks :of fasten-
ing strap ;from the lashing eyelets.
X Remove the emergency spare wheel bag with
the collapsible emergency spare wheel.
X Open the emergency spare wheel bag and
remove the collapsible emergency spare
wheel.
Inflating the collapsible emergency spare wheel (Y page 377).
Stowing the emergency spare wheel
X Place the collapsible emergency spare wheel
into the emergency spare wheel bag and
close the emergency spare wheel bag.
X Place the emergency spare wheel bag with
the collapsible emergency spare wheel into
the luggage compartment with the carrying
strap at the back.
X Hook retaining spring hooks :of fastening
strap ;into the lashing eyelets.
X Tighten fastening strap ;. Inflating the collapsible emergency
spare wheel (Mercedes-AMG GLS 63)
! Inflate the collapsible emergency spare
wheel using the tyre inflation compressor
before lowering the vehicle. The wheel rim
could otherwise be damaged.
! Do not operate the tyre inflation compres-
sor for longer than eight minutes at a time
without a break. It may otherwise overheat.
The tyre inflation compressor can be oper-
ated again once it has cooled down.
Comply with the manufacturer's safety instruc-
tions on the tyre inflation compressor label and
on the tyre sealant bottle. Emergency spare wheel
377Wheels and tyres Z
Page 393 of 397

i
If the load on the front axle is reduced when
pulling away on a steep uphill slope, the front
wheels have a tendency to spin. 4ETS recog-
nises this and brakes the wheels accordingly. The rear wheel torque is increased and it is
easier to pull away.
For further information about maximum gradi-
ent-climbing capability, see (Y page 180).Trailer tow hitch
Trailer loads
Trailer loads, noseweights and axle
loads !
Use a drawbar noseweight as close as pos-
sible to the maximum permissible nose-
weight. Do not use a noseweight of less than
50kg, otherwise the trailer may come loose.
Note that the payload and the rear axle load
are reduced by the actual payload.
Missing values were not available at the time of going to print. GLS 400 4M
ATIC Permissible trailer load,
unbraked
750 kg
Permissible trailer load,
braked (at a minimum gra-
dient-climbing capability
of12%from a standstill)
3500 kg
Maximum drawbar nose-
weight (the drawbar nose-
weight is not included in
the trailer load)
140 kg
Permissible rear axle load
during trailer towing
1925 kg
GLS 500 4M
ATIC Permissible trailer load,
unbraked
750 kg
Permissible trailer load,
braked (at a minimum gra-
dient-climbing capability
of12%from a standstill)
3500 kg GLS 500 4M
ATIC Maximum drawbar nose-
weight (the drawbar nose-
weight is not included in
the trailer load)
140 kg
Permissible rear axle load
during trailer towing
1900 kg
Mercedes‑A
MG GLS 63 4 MATIC Permissible trailer load,
unbraked
Permissible trailer load,
braked (at a minimum gra-
dient-climbing capability
of12%from a standstill)
Maximum drawbar nose-
weight (the drawbar nose-
weight is not included in
the trailer load)
Permissible rear axle load
during trailer towing
GLS 350 d 4
MATIC
(166.824) Permissible trailer load,
unbraked
750 kg
Permissible trailer load,
braked (at a minimum gra-
dient-climbing capability
of12%from a standstill)
3500 kg
Maximum drawbar nose-
weight (the drawbar nose-
weight is not included in
the trailer load)
140 kg
Permissible rear axle load
during trailer towing
1955 kg390
Trailer tow hitchTechnical data
Page 394 of 397

GLS 350 d 4
MATIC
(166.823) Permissible trailer load,
unbraked
Permissible trailer load,
braked (at a minimum gra-
dient-climbing capability
of12%from a standstill)
Maximum drawbar nose-
weight (the drawbar nose-
weight is not included in
the trailer load)
Permissible rear axle load
during trailer towing
The actual drawbar load may not be higher than
the specified value. The value can be found on
the trailer tow hitch or trailer identification
plates. The lowest weight applies.
You can attach carrier systems, e.g. bicycle
racks or load-bearing implements, to the ball
coupling. The maximum payload of 75 kg applies
when using carrier systems on the ball coupling. Trailer tow hitch
391Technical data Z