tire pressure MERCEDES-BENZ GLS SUV 2016 Owners Manual
[x] Cancel search | Manufacturer: MERCEDES-BENZ, Model Year: 2016, Model line: GLS SUV, Model: MERCEDES-BENZ GLS SUV 2016Pages: 397, PDF Size: 14.21 MB
Page 25 of 397
Telephone compartment ................3
13
Telephone module with Bluetooth ®
(SAP profile) Activating and connecting the
module .......................................... .308
Charging a mobile phone .............. .310
Connecting the mobile phone ....... .309
Connecting the module via a USB
cable .............................................. 308
Data modem mode ........................ 309
Installing the module ..................... 308
Introduction ................................... 307
Saving/deleting the PIN for the
SIM card ........................................ 310
Settings ......................................... 310
SIM card mode .............................. 309
Text messages ............................... 310
Transferring the phone book .......... 310
Temperature
Coolant (display in the instrument
cluster) .......................................... 242
Coolant (on-board computer,
Mercedes-AMG vehicles) .............. .255
Engine oil (on-board computer,
Mercedes-AMG vehicles) .............. .255
Outside temperature ..................... .241
Setting (climate control) ................ 136
Transmission oil (on-board com-
puter, Mercedes-AMG vehicles) ..... 255
TEMPOMAT
Function/notes ............................ .180
Text messages
Telephone module with Blue-
tooth ®
(SAP profile) ....................... 310
Through-loading ................................ 315
Time
see Separate Owner's manual
Timing (RACETIMER) ......................... 256
TIREFIT Kit
Declaration of conformity ................ 29
Important safety notes .................. 348
Storage location ............................ 346
Tyre pressure not reached ............. 350
Tyre pressure reached ................... 350
Using ............................................. 349
Tool
see Vehicle tool kit Top Tether
............................................ 60
Total distance recorder .................... 244
Tow-away protection
Activating ......................................... 79
Deactivating ..................................... 79
Function .......................................... .79
Tow-starting
Emergency engine starting ............ 359
Important safety notes .................. 356
Towing
Important safety notes .................. 356
Notes for 4MATIC vehicles ............ 358
Transporting the vehicle ................ 358
Towing a trailer
Active Blind Spot Assist ................. 224
Active Lane Keeping Assist ............ 227
Axle load, permissibl e.................... 390
ESP ®
(Electronic Stability Pro-
gram) ............................................... 74
Failure check for LEDs ................... 238
Parking Assist PARKTRONIC .......... 201
Pulling away with a traile r.............. 151
Swinging out the ball coupling ....... 235
Swinging the ball coupling in ......... 235
Trailer tow hitch display message .. 288
Towing away
Fitting the towing ey e.................... 357
Removing the towing eye ............... 357
With both axles on the ground ....... 358
Towing eye ......................................... 345
Traffic Sign Assist
Activating/deactivating the warn-ing function .................................... 250
Display message ............................ 278
Function/note s............................. 217
Important safety notes .................. 218
Instrument cluster display ............. 218
Trailer coupling
see Towing a trailer
Trailer towing
7-pin connecto r............................. 238
Blind Spot Assist ............................ 220
Cleaning the trailer tow hitch ......... 342
Coupling up a traile r...................... 236
Decoupling a trailer ....................... 237
Driving tips .................................... 234
Important safety notes .................. 233 22
Index
Page 26 of 397
Lights display messag
e.................. 270
Power supply ................................. 238
Problem (fault) ............................... 239
Trailer load s................................... 390
Transmission
see Automatic transmission
Transmission position display ......... 158
Transporting the vehicle .................. 358
Travelling uphill
Brow of hill ..................................... 180
Driving downhill ............................. 180
Maximum gradient-climbing capa-
bility ............................................... 180
Trim pieces (cleaning instruc-
tions) .................................................. 343
Trip computer (on-board com-
puter) .................................................. 244
Trip meter
Calling up ....................................... 244
Resetting (on-board computer) ...... 245
Turn signals
Replacing bulbs (front) ................... 128
Switching on/of f........................... 122
TV
Operating (on-board computer) ..... 248
see Separate operating instructions
Two-way radio
Frequencies ................................... 379
Installation ..................................... 379
Transmission output (maximum) .... 379
Type identification plate
see Vehicle identification plate
Tyre inflation compressor
see TIREFIT kit
Tyre pressure
Calling up (on-board computer) ..... 367
Display message ............................ 283
Not reached (TIREFIT) .................... 350
Reached (TIREFIT) .......................... 350
Recommended ............................... 364
Tyre pressure loss warning
General notes ................................ 366
Important safety notes .................. 366
Restarting ...................................... 366
Tyre pressure monitor
Checking the tyre pressure elec-
tronically ........................................ 367
Function/note s............................. 367 General notes ................................ 367
Important safety notes .................. 367
Radio type approval for the tyre
pressure monitor ........................... 369
Restarting ...................................... 368
Warning lamp ................................. 302
Warning message .......................... 368
Tyres
Changing a whee l.......................... 369
Checking ........................................ 361
Direction of rotation ...................... 370
Display message ............................ 283
Important safety notes .................. 361
Information on driving .................... 361
M+S tyres ...................................... 363
MOExtended tyre s......................... 363
Replacing ....................................... 369
Service life ..................................... 362
Snow chains .................................. 364
Storing ........................................... 370
Summer tyres in winter ................. 363
Tyre size (data ).............................. 374
Tyre tread ...................................... 362
Wheel and tyre combinations ........ 374
see Flat tyre U
Unlocking Emergency unlocking ....................... 89
From inside the vehicle (central
unlocking button) ............................. 88
Upshift indicator (on-board com-
puter, Mercedes-AMG vehicles) ....... 255
USB devices
Connecting to the Media Inter-
face ............................................... 311 V
Vanity mirror (in sun visor) .............. 322
Vehicle
Correct use ...................................... 31
Data acquisition ............................... 31
Display message ............................ 285
Electronics ..................................... 379
Equipment ....................................... 27
Implied warranty .............................. 31
Individual settings .......................... 251 Index
23
Page 176 of 397
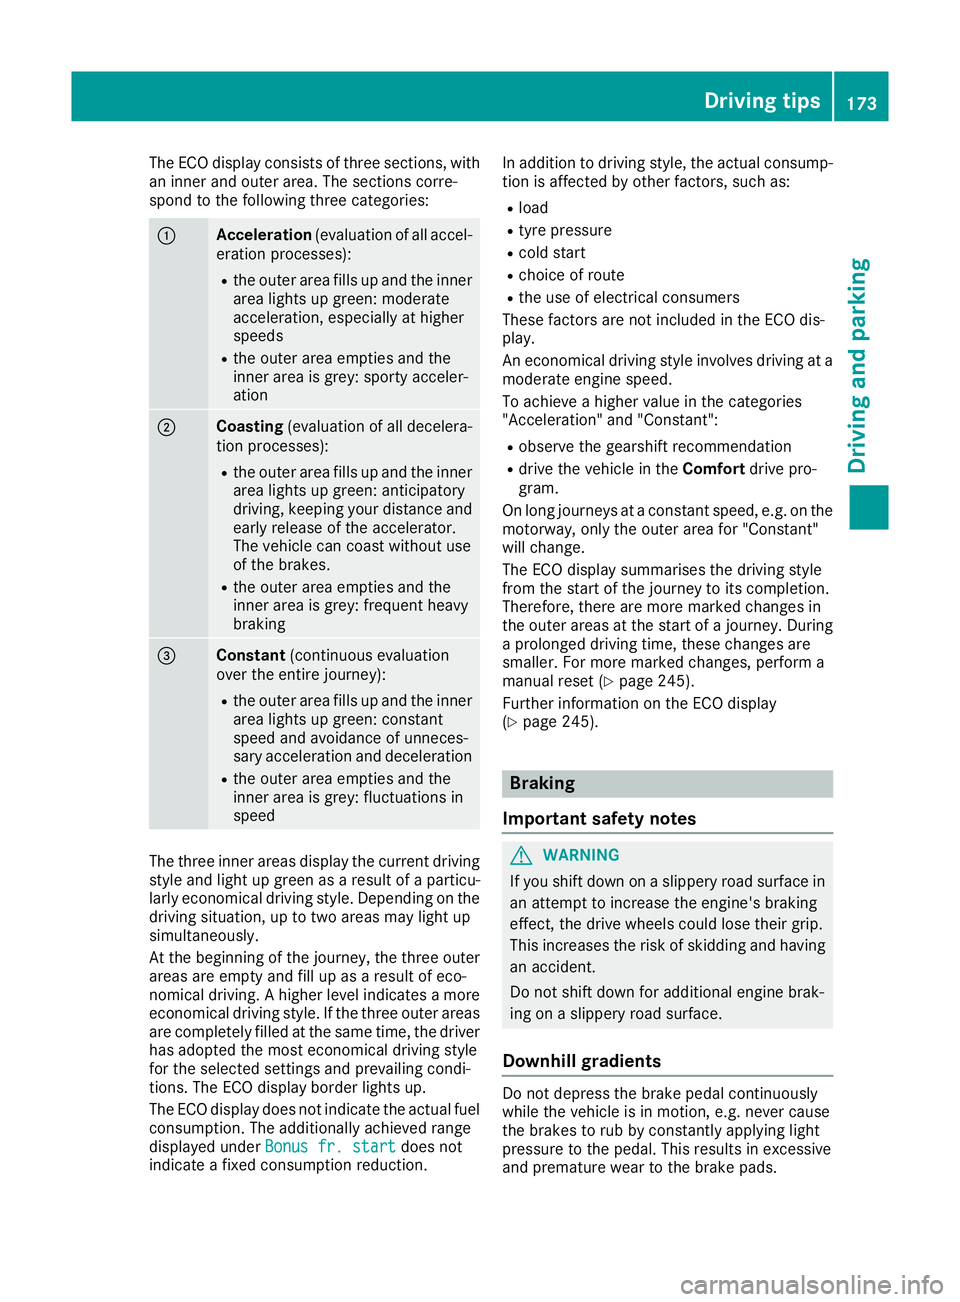
The ECO display consists of three sections, with
an inner and outer area. The sections corre-
spond to the following three categories: :
Acceleration
(evaluation of all accel-
eration processes):
R the outer area fills up and the inner
area lights up green: moderate
acceleration, especially at higher
speeds
R the outer area empties and the
inner area is grey: sporty acceler-
ation ;
Coasting
(evaluation of all decelera-
tion processes):
R the outer area fills up and the inner
area lights up green: anticipatory
driving, keeping your distance and
early release of the accelerator.
The vehicle can coast without use
of the brakes.
R the outer area empties and the
inner area is grey: frequent heavy
braking =
Constant
(continuous evaluation
over the entire journey):
R the outer area fills up and the inner
area lights up green: constant
speed and avoidance of unneces-
sary acceleration and deceleration
R the outer area empties and the
inner area is grey: fluctuations in
speed The three inner areas display the current driving
style and light up green as a result of a particu-
larly economical driving style. Depending on the driving situation, up to two areas may light up
simultaneously.
At the beginning of the journey, the three outer
areas are empty and fill up as a result of eco-
nomical driving. A higher level indicates a more
economical driving style. If the three outer areas
are completely filled at the same time, the driver
has adopted the most economical driving style
for the selected settings and prevailing condi-
tions. The ECO display border lights up.
The ECO display does not indicate the actual fuel consumption. The additionally achieved range
displayed under Bonus fr. start
Bonus fr. start does not
indicate a fixed consumption reduction. In addition to driving style, the actual consump-
tion is affected by other factors, such as:
R load
R tyre pressure
R cold start
R choice of route
R the use of electrical consumers
These factors are not included in the ECO dis-
play.
An economical driving style involves driving at a moderate engine speed.
To achieve a higher value in the categories
"Acceleration" and "Constant":
R observe the gearshift recommendation
R drive the vehicle in the Comfortdrive pro-
gram.
On long journeys at a constant speed, e.g. on the
motorway, only the outer area for "Constant"
will change.
The ECO display summarises the driving style
from the start of the journey to its completion.
Therefore, there are more marked changes in
the outer areas at the start of a journey. During a prolonged driving time, these changes are
smaller. For more marked changes, perform a
manual reset (Y page 245).
Further information on the ECO display
(Y page 245). Braking
Important safety notes G
WARNING
If you shift down on a slippery road surface in an attempt to increase the engine's braking
effect, the drive wheels could lose their grip.
This increases the risk of skidding and having
an accident.
Do not shift down for additional engine brak-
ing on a slippery road surface.
Downhill gradients Do not depress the brake pedal continuously
while the vehicle is in motion, e.g. never cause
the brakes to rub by constantly applying light
pressure to the pedal. This results in excessive
and premature wear to the brake pads. Driving tips
173Driving and parking Z
Page 181 of 397

R
Do not stray from marked routes or paths.
R Observe the notes on off-road fording
(Y page 175).
i Information about retrofitting special all-ter-
rain tyres is available from any qualified spe-
cialist workshop.
i Do not use the HOLD function when driving
off-road, on steep uphill or downhill gradients or on slippery or loose surfaces. The HOLD
function cannot hold the vehicle on such sur- faces.
Checklist before off-road driving X
Engine oil level: check the engine oil and top
it up if necessary.
When driving on steep gradients, the oil level must be sufficiently high to ensure a correct
oil supply in the vehicle.
X AdBlue ®
tank (BlueTEC vehicles): check the
level and top up if necessary (Y page 166).
X Tyre-change tool kit: check that the jack is
working and make sure that the wheel
wrench, a robust tow cable and a folding
spade are in the vehicle.
X Wheels and tyres: check the tyre tread
depth and tyre pressure.
X Check for damage and remove any foreign
objects, e.g. small stones, from the wheels/
tyres.
X Replace any missing valve caps.
X Replace dented or damaged wheels.
X Wheels: dented or bent wheels can lead to a
loss of tyre pressure and damage to the tyre
bead. Before driving off-road, check the
wheels and replace them if necessary.
Checklist after off-road driving !
If you detect damage to the vehicle after
driving off-road, have the vehicle checked
immediately at a qualified specialist work-
shop.
Driving over rough terrain places greater
demands on your vehicle than driving on normal
roads. After driving off-road, check the vehicle.
This allows you to detect damage promptly and reduce the risk of an accident to yourself and
other road users.
X If the Off-road orOff-road Plus drive pro-
gram is selected: select the Individual,Sport,
Comfort orSlippery drive program
(Y page 155).
X Deactivate the LOW RANGE offroad gear
(Y page 230).
X Deactivate DSR (Y page 227).
X Lower the vehicle level again to a level suita-
ble to the road conditions, e.g. to the normal
level.
X Clean the headlamps and rear lights and
check for damage.
X Clean the front and rear licence plates.
X Clean the wheels and tyres with a water jet
and remove any foreign objects.
X Clean the wheels, wheel arches and the vehi-
cle underside with a water jet; check for any
foreign objects and damage.
X Check whether twigs or other parts of plants
have become trapped. These increase the risk
of fire and can damage fuel pipes, brake
hoses or the rubber bellows of the axle joints
and propeller shafts.
X After the trip, examine without fail the entire
undercarriage, wheels, tyres, brakes, body-
work structure, steering, chassis and exhaust
system for damage.
X After driving for extended periods across
sand, mud, gravel, water or in similarly dirty
conditions, have the brake discs, wheels,
brake pads/linings and axle joints checked
and cleaned.
X If you detect strong vibrations after driving
off-road, check for foreign objects in the
wheels and drive train and remove them if
necessary. Foreign objects can disturb the
balance and cause vibrations.
Driving on sand Observe the following rules when driving on
sand:
R Select the Offroaddrive program (vehicles
without Off-Road Engineering package)
(Y page 228).
R Select the Offroaddrive program (vehicles
with Off-Road Engineering package)
(Y page 229).
R Select a higher vehicle level.
R Avoid high engine speeds.
R Use the left-hand steering wheel gearshift
paddle to shift to a lower gear appropriate to
the terrain. 178
Driving
tipsDriving an d parking
Page 351 of 397
may be used as a temporary measure. Make
sure that you use the proper size and type
(summer or winter tyres).
i Vehicles with MOExtended tyres are not
equipped with a TIREFIT kit at the factory. It is therefore recommended that you additionally
equip your vehicle with a TIREFIT kit if you fit
tyres that do not feature run-flat characteris-
tics, e.g. winter tyres. A TIREFIT kit can be
obtained from a qualified specialist work-
shop.
Important safety notes G
WARNING
When driving in emergency mode, the driving characteristics deteriorate, e.g. when corner-
ing, accelerating quickly and when braking.
There is a risk of accident.
Do not exceed the stated maximum speed.
Avoid abrupt steering and driving manoeu-
vres, and driving over obstacles (kerbs, pot-
holes, off-road). This applies in particular to a laden vehicle.
Stop driving in emergency mode if:
R you hear banging noises.
R the vehicle starts to shake.
R you see smoke and smell rubber.
R ESP ®
is intervening constantly.
R there are tears in the sidewalls of the tyre.
After driving in emergency mode, have the
wheel rims checked at a qualified specialist
workshop with regard to their further use. The
faulty tyre must be replaced. TIREFIT kit
Important safety notes TIREFIT is a tyre sealant.
You can use TIREFIT to seal punctures of up to
4 mm, particularly those in the tyre tread. You
can use TIREFIT at outside temperatures down
to
Ò20 †. G
WARNING
In the following situations, the tyre sealant is
unable to provide sufficient breakdown assis- tance, as it is unable to seal the tyre properly:
R there are cuts or punctures in the tyre
larger than those mentioned above.
R the wheel rim is damaged.
R you have driven at very low tyre pressures
or on a flat tyre.
There is a risk of an accident.
Do not drive any further. Contact a qualified
specialist workshop. G
WARNING
The tyre sealant is harmful and causes irrita-
tion. It must not come into contact with your
skin, eyes or clothing or be swallowed. Do not inhale TIREFIT fumes. Keep tyre sealant away
from children. There is a risk of injury.
If you come into contact with the tyre sealant,
observe the following:
R Rinse off the tyre sealant from your skin
immediately with water.
R If the tyre sealant comes into contact with
your eyes, immediately rinse them thor-
oughly with clean water.
R If tyre sealant is swallowed, immediately
rinse your mouth out thoroughly and drink
plenty of water. Do not induce vomiting,
and seek medical attention immediately.
R Immediately change out of clothing which
has come into contact with tyre sealant.
R If an allergic reaction occurs, seek medical
attention immediately.
! Do not operate the tyre inflation compres-
sor for longer than eight minutes at a time
without a break. It may otherwise overheat.
The tyre inflation compressor can be oper-
ated again once it has cooled down.
Comply with the manufacturer's safety instruc-
tions on the sticker on the tyre inflation com-
pressor. 348
Flat tyreBreakdown assistance
Page 352 of 397
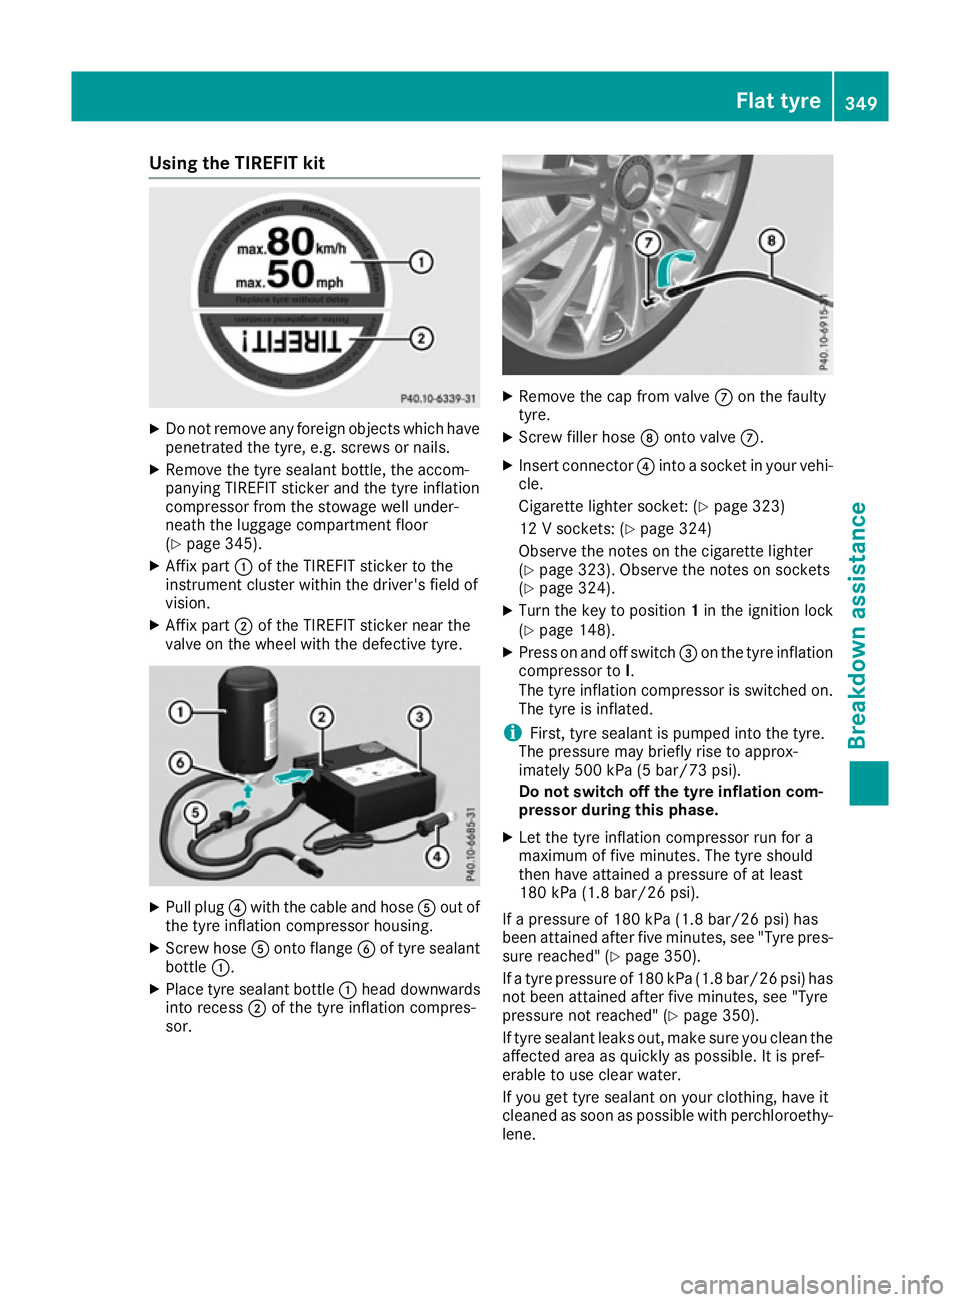
Using the TIREFIT kit
X
Do not remove any foreign objects which have
penetrated the tyre, e.g. screws or nails.
X Remove the tyre sealant bottle, the accom-
panying TIREFIT sticker and the tyre inflation
compressor from the stowage well under-
neath the luggage compartment floor
(Y page 345).
X Affix part :of the TIREFIT sticker to the
instrument cluster within the driver's field of
vision.
X Affix part ;of the TIREFIT sticker near the
valve on the wheel with the defective tyre. X
Pull plug ?with the cable and hose Aout of
the tyre inflation compressor housing.
X Screw hose Aonto flange Bof tyre sealant
bottle :.
X Place tyre sealant bottle :head downwards
into recess ;of the tyre inflation compres-
sor. X
Remove the cap from valve Con the faulty
tyre.
X Screw filler hose Donto valve C.
X Insert connector ?into a socket in your vehi-
cle.
Cigarette lighter socket: (Y page 323)
12 V sockets: (Y page 324)
Observe the notes on the cigarette lighter
(Y page 323). Observe the notes on sockets
(Y page 324).
X Turn the key to position 1in the ignition lock
(Y page 148).
X Press on and off switch =on the tyre inflation
compressor to I.
The tyre inflation compressor is switched on.
The tyre is inflated.
i First, tyre sealant is pumped into the tyre.
The pressure may briefly rise to approx-
imately 500 kPa (5 bar/73 psi).
Do not switch off the tyre inflation com-
pressor during this phase.
X Let the tyre inflation compressor run for a
maximum of five minutes. The tyre should
then have attained a pressure of at least
180 kPa (1.8 bar/26 psi).
If a pressure of 180 kPa (1.8 bar/26 psi) has
been attained after five minutes, see "Tyre pres-
sure reached" (Y page 350).
If a tyre pressure of 180 kPa (1.8 bar/26 psi) has not been attained after five minutes, see "Tyre
pressure not reached" (Y page 350).
If tyre sealant leaks out, make sure you clean the
affected area as quickly as possible. It is pref-
erable to use clear water.
If you get tyre sealant on your clothing, have it
cleaned as soon as possible with perchloroethy- lene. Flat tyre
349Breakdown assistance Z
Page 353 of 397
Tyre pressure not reached
If a pressure of 180 kPa (1.8 bar/26 psi) has not
been attained after five minutes:
X Switch off the tyre inflation compressor.
X Unscrew the filler hose from the valve of the
faulty tyre.
Please note that tyre sealant may leak out
when unscrewing the filler hose.
X Very slowly drive forwards or reverse approx-
imately 10 m.
X Pump up the tyre again.
After a maximum of five minutes the tyre
pressure must be at least 180 kPa (1.8 bar/
26 psi). G
WARNING
If the required tyre pressure is not reached
after the specified time, the tyre is too badly
damaged. The tyre sealant cannot repair the
tyre in this instance. Damaged tyres and a tyre pressure that is too low can significantly
impair the vehicle's braking and driving char-
acteristics. There is a risk of accident.
Do not continue driving. Contact a qualified
specialist workshop.
Tyre pressure reached G
WARNING
A tyre temporarily sealed with tyre sealant
impairs the driving characteristics and is not
suitable for higher speeds. There is a risk of
accident.
You should therefore adapt your driving style
accordingly and drive carefully. Do not exceed the specified maximum speed with a tyre that
has been repaired using tyre sealant.
The maximum permissible speed for a tyre
sealed with tyre sealant is 80 km/h. The upper
part of the TIREFIT sticker must be affixed to the
instrument cluster where it will be easily seen by
the driver.
! After use, excess tyre sealant may run out of
the filler hose. This could cause stains.
Therefore, place the filler hose in the plastic
bag which contained the TIREFIT kit. H
Environmental note
Have the used tyre sealant bottle disposed of professionally, e.g. at a qualified specialist
workshop.
If a tyre pressure of 180 kPa (1.8 bar/26 psi) has been attained after five minutes:
X Switch off the tyre inflation compressor.
X Unscrew the filler hose from the valve of the
faulty tyre.
X Stow the tyre sealant bottle, the tyre inflation
compressor and the warning triangle.
X Pull away immediately.
X Stop after driving for approximately ten
minutes and check the tyre pressure with the
tyre inflation compressor.
The tyre pressure must now be at least
130 kPa (1.3 bar/19 psi). G
WARNING
If the required tyre pressure is not reached
after driving for a short period, the tyre is too badly damaged. The tyre sealant cannot
repair the tyre in this instance. Damaged tyres and a tyre pressure that is too low can signif-
icantly impair the vehicle's braking and driv-
ing characteristics. There is a risk of accident.
Do not continue driving. Contact a qualified
specialist workshop.
i In your vehicle, you will find a sticker with
the Mercedes-Benz Service24h telephone
number, e.g. on the B-pillar on the driver's
side.
X Correct the tyre pressure if it is still at least
130 kPa (1.3 ba r/19 psi). See the tyre pres-
sure table on the fuel filler flap for values.
X To increase the tyre pressure: switch on
the tyre inflation compressor. 350
Flat tyreBreakdown assistance
Page 365 of 397
Check the tyres regularly for signs of damage
and replace any damaged tyres immediately.
Check wheels and tyres for damage at least
once a month. Check wheels and tyres after
driving off-road or on rough roads. Damaged
wheels can cause a loss of tyre pressure. Pay
particular attention to damage such as:
R cuts in the tyres
R punctures
R tears in the tyres
R bulges on the tyres
R deformation or severe corrosion on wheels
Regularly check the tyre tread depth and the
condition of the tread across the whole width of
the tyre (Y page 362). If necessary, turn the
front wheels to full lock in order to inspect the
inner side of the tyre surface.
All wheels must have a valve cap to protect the valve against dirt and moisture. Do not fit any-
thing onto the valve other than the standard
valve cap or other valve caps approved for your
vehicle by Mercedes-Benz. Do not fit any other
valve caps or systems, e.g. tyre pressure moni-
toring systems.
Regularly check the pressure of all the tyres,
particularly prior to long trips. Adjust the tyre
pressure as necessary (Y page 364).
Observe the notes on the emergency spare
wheel (Y page 375).
The service life of tyres depends on various fac- tors, including the following:
R driving style
R tyre pressure
R mileage Notes on the tyre tread
G
WARNING
Insufficient tyre tread will reduce tyre trac-
tion. The tyre is no longer able to dissipate
water. This means that on wet road surfaces, the risk of aquaplaning increases, in particularwhere speed is not adapted to suit the driving
conditions. There is a risk of accident.
If the tyre pressure is too high or too low, tyres may exhibit different levels of wear at differ-
ent locations on the tyre tread. Thus, you should regularly check the tread depth and
the condition of the tread across the entire
width of all tyres.
Minimum tyre tread depth for:
R summer tyres: 3 mm
R M+S tyres: 4 mm
For safety reasons, replace the tyres before
the legally prescribed limit for the minimum
tyre tread depth is reached. Selecting, fitting and replacing tyres
G
WARNING
Exceeding the stated tyre load-bearing capa-
city and the approved maximum speed could
lead to tyre damage or the tyre bursting. There is a risk of accident.
Therefore, only use tyre types and sizes
approved for your vehicle model. Observe the
tyre load rating and speed rating required for your vehicle.
Pay special attention to country-specific
requirements for tyre approval. These require-
ments can stipulate a specific tyre type for your
vehicle. Furthermore, the use of certain tyre
types in certain regions and areas of operation
can be highly beneficial. You can find further
information regarding tyres at specialist tyre
retailers, at qualified specialist workshops or at
any Mercedes-Benz Service Centre.
R Only fit tyres and wheels of the same type and
make.
Exception: it is permissible to fit a different
type or make in the event of a flat tyre.
Observe here the "MOExtended tyres (tyres
with run-flat characteristics)" section
(Y page 347).
R Only fit tyres of the correct size onto the
wheels.
R Run in new tyres at moderate speeds for the
first 100 km. They only reach their full per-
formance after this distance.
R Do not drive with tyres which have too little
tread depth. This otherwise significantly 362
OperationWheels and tyres
Page 366 of 397
reduces the traction on wet roads (aquaplan-
ing).
R Replace the tyres after six years at the latest,
regardless of wear.
Observe the notes on the emergency spare
wheel (Y page 375). MOExtended tyres (tyres with run-flat
characteristics)
With MOExtended tyres (tyres with run-flat char-
acteristics), you can continue to drive your vehi- cle even if there is a total loss of pressure in one
or more tyres.
MOExtended tyres may only be used in conjunc- tion with an activated tyre pressure loss warning system or with an activated tyre pressure mon-
itor and on wheels specifically tested by
Mercedes-Benz.
Notes on driving with MOExtended tyres with a
flat tyre (Y page 347).
Vehicles with MOExtended tyres are not equip-
ped with a TIREFIT kit at the factory. It is there-
fore recommended that you additionally equip
your vehicle with a TIREFIT kit if you fit tyres that do not feature run-flat characteristics, e.g. win-
ter tyres. A TIREFIT kit can be obtained from a
qualified specialist workshop. Winter operation
General notes
Have your vehicle winterproofed at a qualified
specialist workshop at the onset of winter.
Observe the notes in the "Changing a wheel"
section (Y page 369). Driving with summer tyres
At temperatures below +7 †, summer tyres lose
elasticity and therefore traction and braking
power. Change the tyres on your vehicle to
M+S tyres. Using summer tyres at very cold
temperatures could cause tears to form,
thereby damaging the tyres permanently.
Mercedes-Benz cannot accept responsibility for
this type of damage. G
WARNING
Damaged tyres can cause tyre inflation pres-
sure loss. As a result, you could lose control of your vehicle. There is a risk of accident.
Check the tyres regularly for signs of damageand replace any damaged tyres immediately. M+S tyres
G
WARNING
M+S tyres with a tyre tread depth of less than 4 mm are not suitable for use in winter as they
do not provide sufficient traction. There is a
risk of accident.
M+S tyres with a tread depth of less than
4 mm must be replaced.
At temperatures below +7 †, use winter tyres or all-season tyres. Both types of tyre are identified
by the M+S marking.
Only winter tyres bearing the isnowflake
symbol in addition to the M+S marking provide
the best possible grip in wintry road conditions. Only these tyres will allow driving safety sys-
tems such as ABS and ESP ®
to function opti-
mally in winter. These tyres have been devel-
oped specifically for driving in snow.
Use M+S tyres of the same make and tread on all
wheels to maintain safe handling characteris-
tics.
Always observe the maximum permissible
speed specified for the M+S tyres you have fit-
ted.
If you fit M+S tyres that have a lower maximum
permissible speed than that of the maximum
design speed of the vehicle, affix a correspond- ing warning label in the driver's field of vision.
This can be obtained at a qualified specialist
workshop.
Under these circumstances, you should also
restrict the maximum design speed of the vehi- cle using the permanent limiter so that it does
not exceed the maximum permissible speed for
the M+S tyres (Y page 184). Winter operation
363Wheels and tyres Z
Page 377 of 397
X
Tighten the wheel bolts evenly in a crosswise
pattern in the sequence indicated (: toA).
The tightening torque must be 150 Nm.
X Turn the jack back to its initial position.
X Stow the jack and the rest of the tyre chang-
ing tools in the stowage well under the boot
floor.
X Check the air pressure of the newly fitted
wheel and adjust accordingly.
Observe the recommended tyre pressure
(Y page 364).
If you are driving with the emergency spare
wheel fitted, the tyre pressure loss warning sys-
tem or the tyre pressure monitor cannot func-
tion reliably. Only restart the tyre pressure loss
warning system or tyre pressure monitor when
the defective wheel has been replaced with a
new wheel.
Vehicles with a tyre pressure monitor: all fit-
ted wheels must be equipped with functioning
sensors. Wheel and tyre combinations
You can ask for information regarding permitted wheel/tyre combinations at a Mercedes-Benz
Service Centre.
! For safety reasons, Mercedes-Benz recom-
mends that you only use tyres and wheels
which have been approved by Mercedes-Benz specifically for your vehicle.
These are specially adapted to the control
systems, such as ABS or ESP ®
and are
marked as follows:
R MO = Mercedes-Benz Original
R MOE = Mercedes-Benz Original Extended
(tyres featuring run-flat characteristics)
R MO1 = Mercedes-Benz Original (only cer-
tain AMG tyres)
Mercedes-Benz Original Extended tyres may
only be used on wheels that have been spe-
cifically approved by Mercedes-Benz.
Only use tyres, wheels or accessories tested
and approved by Mercedes-Benz. Certain
characteristics, e.g. handling, vehicle noise
emissions or fuel consumption, may other-
wise be adversely affected. In addition, when
driving with a load, tyre dimension variations
could cause the tyres to come into contact
with the bodywork and axle components. This could result in damage to the tyres or the
vehicle.
Mercedes-Benz accepts no liability for dam-
age resulting from the use of tyres, wheels or
accessories other than those tested and
approved.
Further information about wheels, tyres and
approved combinations can be obtained from any qualified specialist workshop.
! Retreaded tyres are neither tested nor rec-
ommended by Mercedes-Benz, since previ-
ous damage cannot always be detected on
retreaded tyres. As a result, Mercedes-Benz
cannot guarantee vehicle safety if retreaded
tyres are fitted. Do not fit used tyres if you
have no information about their previous
usage.
! Large wheels: the lower the section width
for a certain wheel size, the lower the ride
comfort is on poor road surfaces. Roll comfort and suspension comfort are reduced and therisk of damage to the wheels and tyres as a
result of driving over obstacles increases.
The recommended tyre pressures for various
operating conditions can be found in the tyre
pressure table inside the fuel filler flap. Further
information on tyre pressure (Y page 364).
Check tyre pressures regularly and only when
the tyres are cold.
Notes on the vehicle equipment – always fit the
vehicle:
R with tyres of the same size across an axle
(left/right)
R with the same type of tyres at a given time
(summer tyres, winter tyres, MOExtended
tyres)
Vehicles with MOExtended tyres are not equip-
ped with a TIREFIT kit at the factory. It is there-
fore recommended that you additionally equip
your vehicle with a TIREFIT kit if you fit tyres that do not feature run-flat characteristics, e.g. win-
ter tyres. A TIREFIT kit can be obtained from a
qualified specialist workshop. 374
Wheel and tyre combinationsWheels and tyres