transmission MERCEDES-BENZ GLS SUV 2018 Owner's Guide
[x] Cancel search | Manufacturer: MERCEDES-BENZ, Model Year: 2018, Model line: GLS SUV, Model: MERCEDES-BENZ GLS SUV 2018Pages: 398, PDF Size: 6.75 MB
Page 164 of 398
Switching off the engine
GWARNING
The automatic transmission switches to neu-
tral position Nwhen you switch off the engine.
The vehicle may roll away. There is a risk of an
accident.
After switching off the engine, always switch
to parking position P. Prevent the parked vehi-
cle from rolling away by applying the parking
brake.
XApply the electric parking brake.
XShift the transmission to position j.
XWith the SmartKey:turn the SmartKey to
position uin the ignition lock and remove it.
The immobilizer is activated.
XWith KEYLESS-GO:
Press the Start/Stop button (
Ypage 140)
The engine stops and all the indicator lamps in
the instrument cluster go out.
If you switch the engine off with the transmis-
sion in position korh, the automatic trans-
mission shifts to iautomatically.
If you then open the driver's or front-passenger
door, the automatic transmission shifts to j
automatically.
If you want the automatic transmission to
remain in neutral i, e.g. when having the vehi-
cle cleaned in an automatic, tow-through car
wash:
XVehicles with a SmartKey: switch on the
ignition.
XVehicles with KEYLESS-GO: remove the
Start/Stop button from the ignition lock.
XInsert the SmartKey into the ignition lock.
XSwitch on the ignition.
XAll vehicles: depress the brake pedal and
keep it depressed.
XEngage neutral i.
XRelease the brake pedal.
XRelease the electric parking brake.
XSwitch off the ignition and leave the SmartKey
in the ignition lock.
iThe engine can be switched off in an emer-
gency while the vehicle is in motion by press-
ing and holding the Start/Stop button for
three seconds.
Electric parking brake
General notes
GWARNING
If you leave children unsupervised in the vehi-
cle, they could set it in motion by, for example:
Rrelease the parking brake.
Rshift the automatic transmission out of the
parking position P.
Rstart the engine.
In addition, they may operate vehicle equip-
ment and become trapped. There is a risk of
an accident and injury.
When leaving the vehicle, always take the
SmartKey with you and lock the vehicle. Never
leave children unsupervised in the vehicle.
The function of the electric parking brake is
dependent on the on-board voltage. If the on-
board voltage is low or there is a malfunction in
the system, it may not be possible to apply the
released parking brake.
XIf this is the case, only park the vehicle on
level ground and secure it to prevent it rolling
away.
XShift the automatic transmission to position
j.
It may not be possible to release an applied
parking brake if the on-board voltage is low or
there is a malfunction in the system. Contact a
qualified specialist workshop.
iThe electric parking brake performs a func-
tion test at regular intervals while the engine
is switched off. The sounds that can be heard
while this is occurring are normal.
162Parking
Driving and parking
Page 165 of 398
Applyingorreleasing manually
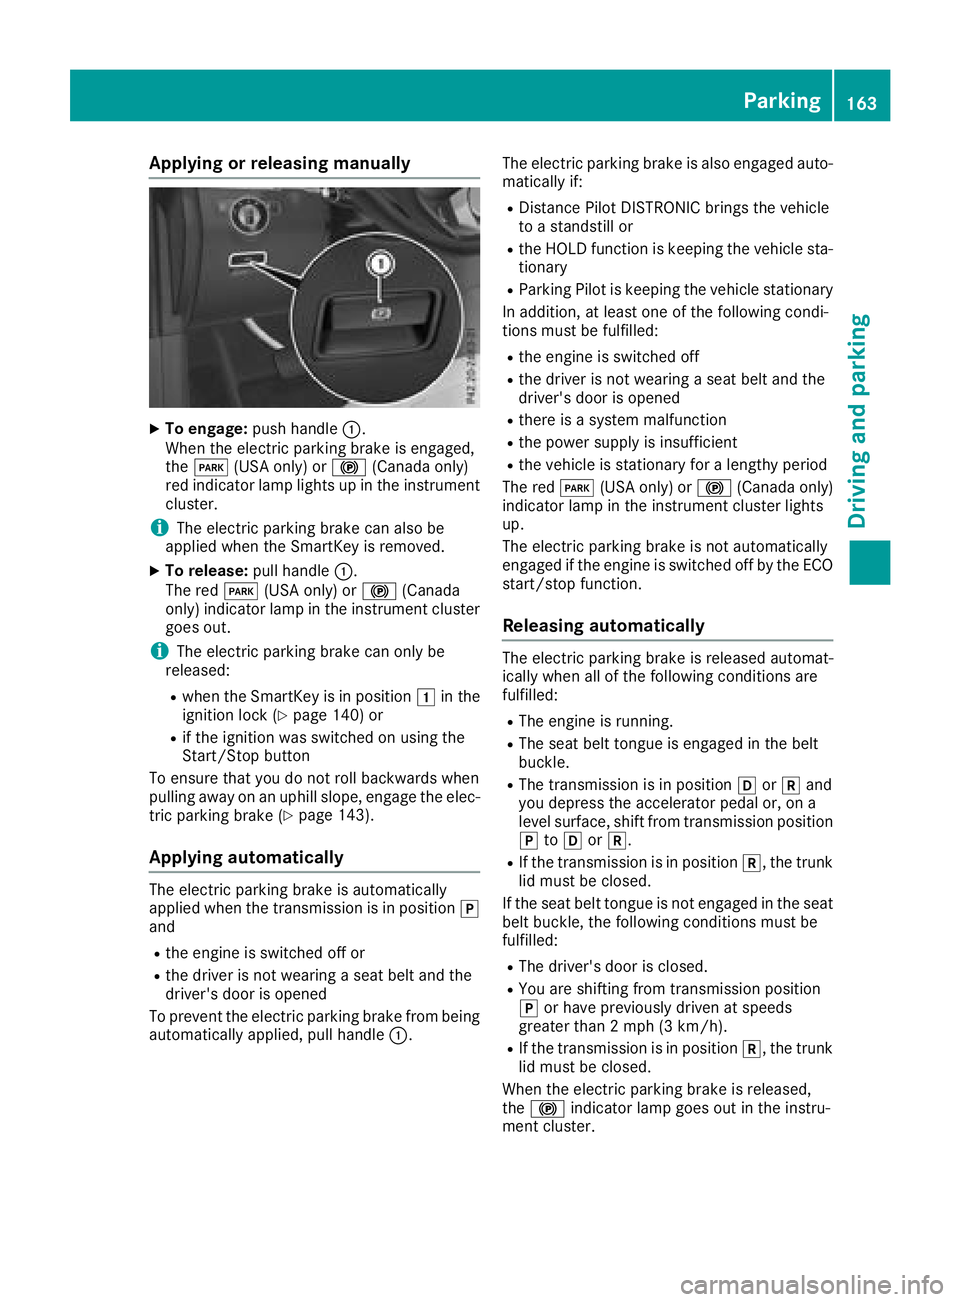
XTo engage: push handle :.
When th eelectric parking brak eis engaged,
th eF (USAonly) or !(Canada only)
red indicator lamp lights up in th einstrumen t
cluster.
iThe electric parking brak ecan also be
applie dwhen th eSmartKey is removed.
XTo release: pull handle:.
The red F(USAonly) or !(Canada
only) indicator lamp in th einstrumen tcluste r
goe sout .
iThe electric parking brak ecan only be
released:
Rwhen th eSmartKey is in position 1in th e
ignition loc k (Ypage 140) or
Rif theignition was switched on usin gth e
Start/Sto pbutto n
To ensur ethat you do no trol lbackwards when
pullin gaway on an uphil lslope, engage th eelec -
tric parking brak e (
Ypage 143).
Applying automatically
The electric parking brak eis automatically
applie dwhen th etransmission is in position j
and
Rth eengin eis switched off or
Rth edriver is no twearing aseat belt and th e
driver's door is opened
To preven tth eelectric parking brak efrom bein g
automatically applied, pull handle :.The electric parking brak
eis also engage dauto -
matically if:
RDistanc ePilo tDISTRONI Cbring sth evehicl e
to astandstill or
Rth eHOLD function is keepin gth evehicl esta-
tionary
RParking Pilo tis keepin gth evehicl estationary
In addition ,at least on eof th efollowin gcondi-
tion smus tbe fulfilled :
Rtheengin eis switched off
Rth edriver is no twearing aseat belt and th e
driver's door is opened
Rthere is asystem malfunction
Rth epowe rsupply is insufficien t
Rthevehicl eis stationary for alengthy period
The red F(USAonly) or !(Canada only)
indicator lamp in th einstrumen tcluste rlights
up.
The electric parking brak eis no tautomatically
engage dif th eengin eis switched off by th eECO
start/sto pfunction .
Releasing automatically
The electric parking brak eis release dautomat -
ically when all of th efollowin gcondition sare
fulfilled :
RThe engin eis running.
RThe seat belt tongue is engage din th ebelt
buckle.
RThe transmission is in position hork and
you depress th eaccelerato rpedal or, on a
level surface, shif tfrom transmission position
j toh ork.
RIf th etransmission is in position k,thetrunk
lid mus tbe closed.
If th eseat belt tongue is no tengage din th eseat
belt buckle, th efollowin gcondition smus tbe
fulfilled :
RThe driver's door is closed.
RYou are shifting from transmission position
jor hav epreviously driven at speeds
greate rthan 2mph (3 km/h).
RIf th etransmission is in position k,thetrunk
lid mus tbe closed.
When th eelectric parking brak eis released,
th e! indicator lamp goes out in th einstru-
men tcluster.
Parking163
Driving and parking
Z
Page 170 of 398
parking brake is being tested on a brake dyna-
mometer (maximum 10 seconds).
Braking triggered automatically by ESP
®may
seriously damage the brake system.
All checks and maintenance work on the brake
system must be carried out at a qualified spe-
cialist workshop.
Have brake pads installed and brake fluid
replaced at a qualified specialist workshop.
If the brake system has only been subject to
moderate loads, you should test the functional-
ity of your brakes at regular intervals. To do so,
depress the brake pedal firmly when driving at a high speed. This improves the grip of the brake
pads.
You can find a description of Brake Assist (BAS)
on (
Ypage 67) or of BAS PLUS on (Ypage 72).
Mercedes-Benz recommends that you only have
brake pads/linings installed on your vehicle
which have been approved for Mercedes-Benz
vehicles or which correspond to an equivalent
quality standard. Brake pads/linings which have
not been approved for Mercedes-Benz vehicles
or which are not of an equivalent quality could
affect your vehicle's operating safety.
Mercedes-Benz recommends that you only use
brake fluid that has been specially approved for
your vehicle by Mercedes-Benz, or which corre-
sponds to an equivalent quality standard. Brake
fluid which has not been approved for
Mercedes-Benz vehicles or which is not of an
equivalent quality could affect your vehicle's
operating safety.
High-performance brake system
(Mercedes-AMG vehicles)
The high-performance brake system is designed
for heavy loads. This may lead to noise when
braking. This will depend on:
RSpeed
RBraking force
REnvironmental conditions, such as tempera-
ture and humidity
The wear of individual components of the brake
system, such as the brake pads/linings or brake
discs, depends on the individual driving style
and operating conditions.
For this reason, it is impossible to state a mile-
age that will be valid under all circumstances. An
aggressive driving style will lead to high wear. You can obtain further information about this
from your authorized Mercedes-Benz Center.
New and replaced brake pads and discs only
reach their optimum braking effect after several
hundred kilometers of driving. Compensate for
this by applying greater force to the brake pedal.
Keep this in mind, and adapt your driving and
braking accordingly during this break-in period.
Excessive heavy braking results in correspond-
ingly high brake wear. Observe the #brake
wear warning lamp in the instrument cluster and
note any brake status messages in the multi-
function display. Especially for high perform-
ance driving, it is important to maintain and have
the brake system checked regularly.
Driving on wet roads
Hydroplaning
If water has accumulated to a certain depth on
the road surface, there is a danger of hydro-
planing occurring, even if:
Ryou drive at low speeds.
Rthe tires have adequate tread depth.
For this reason, in the event of heavy rain or in
conditions in which hydroplaning may occur,
you must drive in the following manner:
Rlower your speed.
Ravoid ruts.
Ravoid sudden steering movements.
Rbrake carefully.
Driving on flooded roads
!Do not drive through flooded areas. Check
the depth of any water before driving through it. Drive slowly through standing water. Oth-
erwise, water may enter the vehicle interior or
the engine compartment. This can damage
the electronic components in the engine or
the automatic transmission. Water can also
be drawn in by the engine's air suction nozzles
and this can cause engine damage.
iVehicles with the AIRMATIC package:
select the raised vehicle level before driving
through a body of water.
168Driving tips
Driving and parking
Page 171 of 398
Off-road fording
!Under no circumstances should you accel-
erate before entering the water. The bow
wave could cause water to enter and damage
the engine and other assemblies.
!Do not open any of the vehicle's doors while
fording. Otherwise, water could get into the
vehicle interior and damage the vehicle's
electronics and interior equipment.
REstablish how deep the water is and the char-
acteristics of the body of water before ford-
ing.
RSelect the highest possible vehicle level.
RShift to a lower gear using the left-hand steer-
ing wheel paddle shifter.
RAvoid high engine speeds.
REnter and exit the water at a flat place and at
a steady walking pace.
RDrive slowly and at an even speed through the
water.
REnsure that a bow wave does not form as you
drive.
RDo not stop and do not switch off the engine.
Water offers a high degree of resistance, and
the ground is slippery and in some cases
unstable. Therefore, it is difficult and danger-
ous to pull away in the water.
RClean any mud from the tire tread after ford-
ing.
RApply the brakes to dry them after fording.
Always observe the fording depth values
(
Ypage 393).
Winter driving
GWARNING
If you shift down on a slippery road surface in an attempt to increase the engine's braking
effect, the drive wheels could lose their grip.
There is an increased danger of skidding and
accidents.
Do not shift down for additional engine brak-
ing on a slippery road surface.
GDANGER
If the exhaust pipe is blocked or adequate
ventilation is not possible, poisonous gases
such as carbon monoxide (CO) may enter the vehicle. This is the case, e.g. if the vehicle
becomes trapped in snow. There is a risk of
fatal injury.
If you leave the engine or the auxiliary heating
running, make sure the exhaust pipe and area
around the vehicle are clear of snow. To
ensure an adequate supply of fresh air, open a
window on the side of the vehicle that is not
facing into the wind.
!When scraping ice off the rear window, take
care not to damage the rear-window seal or
trim.
Have your vehicle winter-proofed at a qualified
specialist workshop at the onset of winter.
Drive particularly carefully on slippery road sur-
faces. Avoid sudden acceleration, steering and
braking maneuvers. Do not use cruise control or
Distance Pilot DISTRONIC.
If the vehicle threatens to skid or cannot be
stopped when moving at low speed:
XShift the transmission to position i.
XTry to bring the vehicle under control using
corrective steering.
When driving in snow with or without snow
chains, select driving program Slippery
(
Ypage 147).
iVehicles with a diesel engine: do not
cover the radiator, e.g. with a protective
cover. The measuring function of the on-
board diagnosis system may otherwise pro-
vide inaccurate values. Some of these values
are required by law and must therefore always be accurate.
The outside temperature indicator is not
designed to serve as an ice-warning device and
is therefore unsuitable for that purpose.
Changes in the outside temperature are dis-
played after a short delay.
Indicated temperatures just above the freezing
point do not guarantee that the road surface is
free of ice. The road may still be icy, especially in
wooded areas or on bridges. You should pay
special attention to road conditions when tem-
peratures are around the freezing point.
For more information on driving with snow
chains, see (
Ypage 356).
Driving tips169
Driving and parking
Z
Page 172 of 398
For more information on driving with summer
tires, see (Ypage 356).
Observe the notes in the "Changing a wheel"
section (
Ypage 374).
Off-road driving
Important safety notes
GWARNING
If you drive on a steep incline at an angle or
turn when driving on an incline, the vehicle
could slip sideways, tip and rollover. There is a risk of an accident.
Always drive on a steep incline in the line of
fall (straight up or down) and do not turn the
vehicle.
GWARNING
Flammable material such as leaves, grass or
twigs may ignite if they come into contact with
hot parts of the exhaust system. There is a risk of fire.
When driving off road or on unpaved roads,
check the vehicle's underside regularly. In
particular, remove parts of plants or other
flammable materials which have become
trapped. In the case of damage, contact a
qualified specialist workshop.
GWARNING
If the vehicle level is high, the vehicle center of gravity is raised. This could cause the vehicle
to tip over more easily on uphill or downhill
gradients. There is a risk of an accident.
Select the lowest possible vehicle level.
!There is a risk of damage to the vehicle if:
Rthe vehicle becomes stuck, e.g. on a high
curb or an unpaved road
Ryou drive too fast over an obstacle, e.g. a
curb, a speed bump or a pothole in the road
Ra heavy object strikes the underbody or
parts of the chassis
In situations like this, the body, the under-
body, chassis parts, wheels or tires could be
damaged without the damage being visible. Components damaged in this way can unex-
pectedly fail or, in the case of an accident, no
longer withstand the loads they are designed
to.
If the underbody paneling is damaged, com-
bustible materials such as leaves, grass or
twigs can gather between the underbody and
the underbody paneling. If these materials
come in contact with hot parts of the exhaust
system, they can catch fire.
In such situations, have the vehicle checked
and repaired immediately at a qualified spe-
cialist workshop. If on continuing your jour-
ney you notice that driving safety is impaired,
pull over and stop the vehicle immediately,
paying attention to road and traffic condi-
tions. In such cases, consult a qualified spe-
cialist wor kshop.
W
hen driving off-road, substances such as sand,
mud and water or water mixed with oil may get
into the brakes. This could result in a reduced
braking effect or in total brake failure and also in
increased wear and tear. The braking charac-
teristics change depending on the material
entering the brakes. Clean the brakes after driv-
ing off-road. If you detect a reduced braking
effect or grinding noises, have the brake system checked in a qualified specialist workshop as
soon as possible. Adapt your driving style to the
different braking characteristics.
Driving off-road increases the likelihood of dam-
age to the vehicle, which, in turn, can lead to
failure of the mechanical assembly or systems.
Adapt your driving style to suit the terrain con-
ditions. Drive carefully. Have damage to the
vehicle rectified immediately at a qualified spe-
cialist workshop.
Do not switch to transmission position Nwhen
driving off-road. If you try to brake the vehicle
using the service brake, you could lose control
of the vehicle. If the gradient is too steep for your
vehicle, drive back down in reverse gear.
General notes
HEnvironmental note
Protection of the environment is of primary
importance. Treat nature with respect.
Observe all prohibiting signs.
Read this section carefully before driving your
vehicle off-road. Practice by driving over more
gentle off-road terrain first.
170Driving tips
Driving and parking
Page 173 of 398
Familiarize yourself with the characteristics of
your vehicle and the gear shift operation before
driving through difficult terrain.
The following driving systems are specially
adapted to off-road driving:
RtheOff-road drive program (vehicles without
Off-Road Engineering package)
(
Ypage 219)
ROff-road andOff-road Plus drive programs
(vehicles with Off-Road Engineering package)
(
Ypage 220)
RLOW RANGE off-road gear (vehicles with the
Off-Road Engineering package)
(
Ypage 221)
RDifferential lock (vehicles with the Off-Road
Engineering package) (Ypage 221)
ROff-road ABS (Ypage 67)
ROff-road 4ETS (Ypage 70)
ROff-road ESP®(Ypage 71)
RAIRMATIC package (vehicle level)
(Ypage 188)
RDSR (Downhill Speed Regulation)
(Ypage 218)
Observe the following notes:
RStop the vehicle before starting to drive along
an off-road route. If necessary, select the off- road program (
Ypage 220) or shift to the
LOW RANGE off-road gear (Ypage 221).
RSelect a vehicle level that is suitable for the
terrain. To avoid damaging the vehicle, make
sure there is always sufficient ground clear-
ance.
RCheck that items of cargo and loads are
stowed safely and are well secured
(
Ypage 305).
RAlways keep the engine running and in gear
when driving on a downhill gradient. Activate
DSR (
Ypage 218).
RAlways keep the engine running and in gear
when driving down an incline.
RAdapt your speed to the terrain. The rougher,
steeper or more ruts on the terrain, the slower
your speed should be.
RDo not jump with the vehicle as this will inter- rupt the vehicle's propulsion.
RDrive with extreme care on unfamiliar off-road
routes where visibility is poor. For safety rea-
sons, get out of the vehicle first and survey
the off-road route.
RLook out for obstacles, such as rocks, holes,
tree stumps and furrows.
RTake care when turning on an uphill or down-hill slope or when driving across a slope. The
vehicle could otherwise tip over.
RAlways keep the doors, the tailgate, the side
windows and the sliding sunroof closed whilethe vehicle is in motion.
RDo not shift the automatic transmission to
position i.
RObserve the notes on off-road fording
(Ypage 169).
iInformation about retrofitting special all-ter-
rain tires is available from any qualified spe-
cialist workshop.
iDo not use the HOLD function when driving
off-road, on steep uphill or downhill gradients
or on slippery or loose surfaces. The HOLD
function cannot hold the vehicle on such sur-
faces.
Checklist before driving off-road
!If the engine oil warning lamp lights up while
the vehicle is in motion, stop the vehicle in a
safe place as soon as possible. Check the
engine oil level. The engine oil warning lamp
warning must not be ignored. Continuing the
journey while the symbol is displayed could
lead to engine damage.
XEngine oil level: check the engine oil level
and add oil if necessary.
When driving on steep gradients, the engine
oil level must be sufficiently high to ensure a
correct oil supply in the vehicle.
XDEF tank (BlueTEC vehicles): check the
level and add if necessary (Ypage 158).
XTire-changing tool kit: check that the jack is
working and make sure you have the lug
wrench, a robust tow cable and a folding
spade in the vehicle.
XWheels and tires: check the tread depth and
pressure of the tires.
XCheck for damage and remove any foreign
objects, e.g. small stones, from the wheels/
tires.
XReplace any missing valve caps.
XReplace dented or damaged wheels.
XRims: dented or bent rims can result in a loss
of tire pressure and damage the tire bead.
Driving tips171
Driving and parking
Z
Page 177 of 398
Cruise control lever
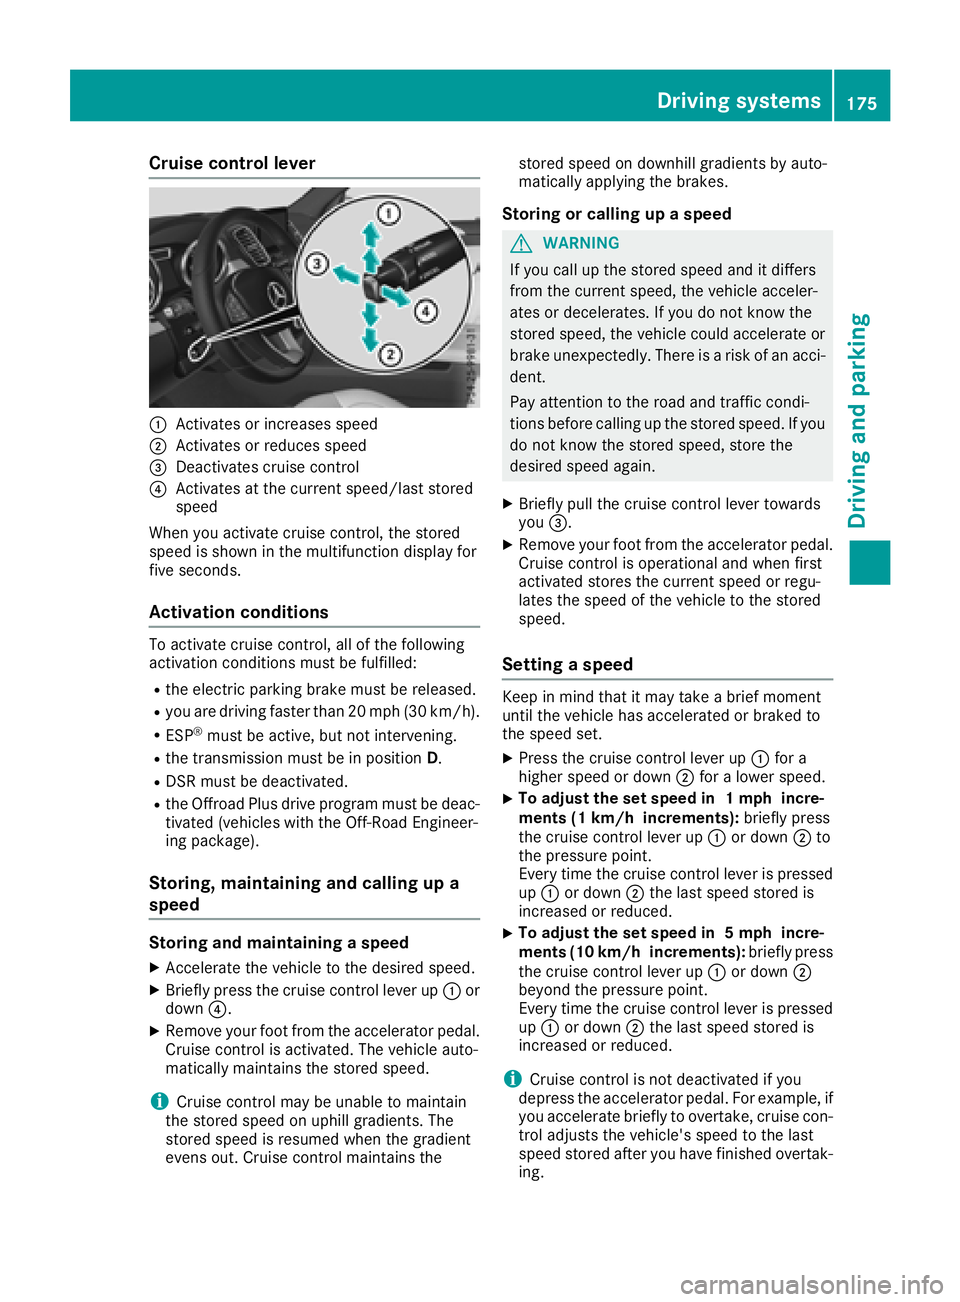
:Activates or increases speed
;Activates or reduces speed
=Deactivates cruise control
?Activates at the current speed/last stored
speed
When you activate cruise control, the stored
speed is shown in the multifunction display for
five seconds.
Activation conditions
To activate cruise control, all of the following
activation conditions must be fulfilled:
Rthe electric parking brake must be released.
Ryou are driving faster than 20 mph (30 km/h).
RESP®must be active, but not intervening.
Rthe transmission must be in position D.
RDSR must be deactivated.
Rthe Offroad Plus drive program must be deac-
tivated (vehicles with the Off-Road Engineer-
ing package).
Storing, maintaining and calling up a
speed
Storing and maintaining a speed
XAccelerate the vehicle to the desired speed.
XBriefly press the cruise control lever up :or
down ?.
XRemove your foot from the accelerator pedal.
Cruise control is activated. The vehicle auto-
matically maintains the stored speed.
iCruise control may be unable to maintain
the stored speed on uphill gradients. The
stored speed is resumed when the gradient
evens out. Cruise control maintains the stored speed on downhill gradients by auto-
matically applying the brakes.
Storing or calling up a speed
GWARNING
If you call up the stored speed and it differs
from the current speed, the vehicle acceler-
ates or decelerates. If you do not know the
stored speed, the vehicle could accelerate or brake unexpectedly. There is a risk of an acci-
dent.
Pay attention to the road and traffic condi-
tions before calling up the stored speed. If you
do not know the stored speed, store the
desired speed again.
XBriefly pull the cruise control lever towards
you =.
XRemove your foot from the accelerator pedal.
Cruise control is operational and when first
activated stores the current speed or regu-
lates the speed of the vehicle to the stored
speed.
Setting a speed
Keep in mind that it may take a brief moment
until the vehicle has accelerated or braked to
the speed set.
XPress the cruise control lever up :for a
higher speed or down ;for a lower speed.
XTo adjust the set speed in 1 mph incre-
ments (1 km/h increments): briefly press
the cruise control lever up :or down ;to
the pressure point.
Every time the cruise control lever is pressed
up : or down ;the last speed stored is
increased or reduced.
XTo adjust the set speed in 5 mph incre-
ments (10 km/h increments): briefly press
the cruise control lever up :or down ;
beyond the pressure point.
Every time the cruise control lever is pressed
up : or down ;the last speed stored is
increased or reduced.
iCruise control is not deactivated if you
depress the accelerator pedal. For example, if
you accelerate briefly to overtake, cruise con-
trol adjusts the vehicle's speed to the last
speed stored after you have finished overtak-
ing.
Driving system s175
Driving an d parking
Z
Page 178 of 398
Deactivating cruisecontro l
There are severa lways to deactivat ecruise con-
trol:
XBriefly press th ecruise contro llever for-
ward s:.
or
XBrake.
Cruise contro lis automatically deactivated if:
Ryou engage th eelectric parking brake
Ryou are drivin gat les sthan 20 mph (30 km/h)
RESP®intervenes or you deactivate ESP®
Ryou activate DSR
Ryou activate the Offroad Plus program (vehi-
cles with the Off-Road Engineering package)
Ryou shift the transmission to position Nwhile
driving
If cruise control is deactivated, you will hear a
warning tone. You will see the Cruise Con‐
trol Offmessage in the multifunction display
for approximately five seconds.
iWhen you switch off the engine, the last
speed stored is cleared.
Distance Pilot DISTRONIC
General notes
Distance Pilot DISTRONIC regulates the speed
and automatically helps you maintain the dis-
tance to the vehicle detected in front. Vehicles
are detected with the aid of the radar sensor
system. Distance Pilot DISTRONIC brakes auto-
matically so that the set speed is not exceeded.
You must select a lower gear in good time on
long and steep downhill gradients, especially if
the vehicle is laden or towing a trailer. By doing so, you will make use of the braking effect of the
engine. This relieves the load on the brake sys-
tem and prevents the brakes from overheating
and wearing too quickly.
If Distance Pilot DISTRONIC detects that there is a risk of a collision, you will be warned visually
and acoustically. Without your intervention, Dis-
tance Pilot DISTRONIC cannot prevent a colli-
sion. An intermittent warning tone will then
sound and the distance warning lamp will light
up in the instrument cluster. Brake immediately
in order to increase the distance to the vehicle in front or take evasive action provided it is safe to
do so.
For Distance Pilot DISTRONIC to assist you
when driving, the radar sensor system must be
operational.
Distance Pilot DISTRONIC
ope
rates in the range
between 0 mph (0 km/h) and 120 mph
(200 km/h).
Do not use Distance Pilot DISTRONIC while driv-
ing on roads with steep gradients.
Since Distance Pilot DISTRONIC transmits radar
waves, it can resemble the radar detectors of
the responsible authorities. You can refer to the
relevant chapter in the Operator's Manual if
questions are asked about this.
iUSA only:
This device has been approved by the FCC as
a "Vehicular Radar System". The radar sensor
is intended for use in an automotive radar
system only. Removing, tampering with, or
altering the device will void any warranties,
and is not permitted by the FCC. Do not tam-
per with, alter, or use in any non-approved
way.
Any unauthorized modification to this device
could void the user’s authority to operate the
equipment.
iCanada only: This device complies with
RSS-210 of Industry Canada. Operation is
subject to the following two conditions:
1. This device may not cause harmful inter-
ference, and
2. This device must accept any interference
received, including interference that may
cause undesired operation of the device.
Do not tamper with, alter or use in any non-
appro ved w
ay.
Any unauthorized modification to this device
could void the user's authority to operate the
equipment.
Important safety notes
GWARNING
Distance Pilot DISTRONIC does not react to:
Rpeople or animals
Rstationary objects on the road, e.g. stopped
or parked vehicles
Roncoming vehicles and crossing traffic
176Driving system s
Driving an d parking
Page 180 of 398
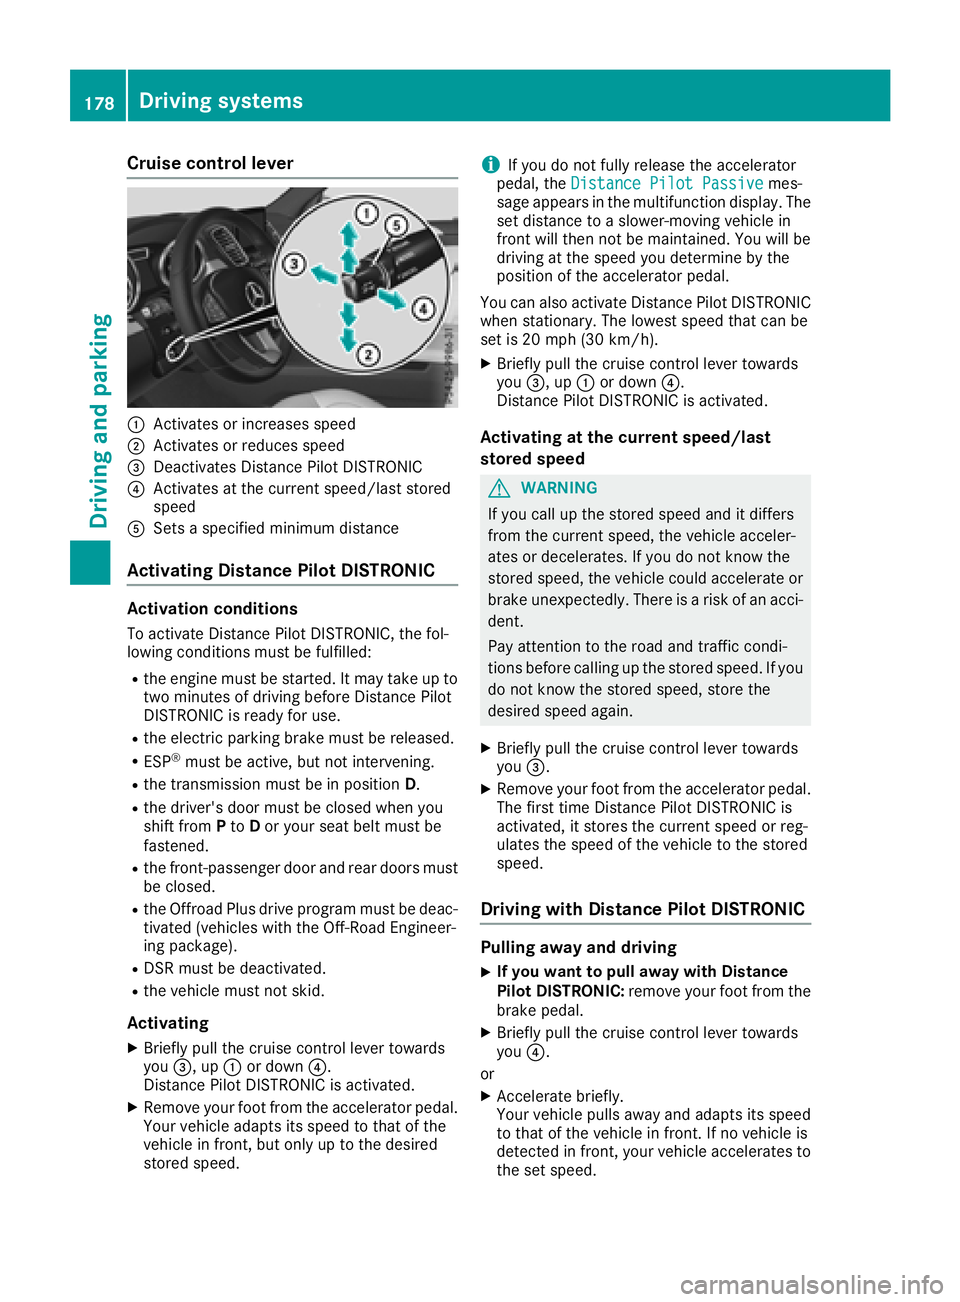
Cruise control lever
:Activates or increases speed
;Activates or reduces speed
=Deactivates Distance Pilot DISTRONIC
?Activates at the current speed/last stored
speed
ASets a specified minimum distance
Activating Distance Pilot DISTRONIC
Activation conditions
To activate Distance Pilot DISTRONIC, the fol-
lowing conditions must be fulfilled:
Rthe engine must be started. It may take up totwo minutes of driving before Distance Pilot
DISTRONIC is ready for use.
Rthe electric parking brake must be released.
RESP®must be active, but not intervening.
Rthe transmission must be in position D.
Rthe driver's door must be closed when you
shift fromPto Dor your seat belt must be
fastened.
Rthe front-passenger door and rear doors must
be closed.
Rthe Offroad Plus drive program must be deac-
tivated (vehicles with the Off-Road Engineer-
ing package).
RDSR must be deactivated.
Rthe vehicle must not skid.
Activating
XBriefly pull the cruise control lever towards
you =, up :or down ?.
Distance Pilot DISTRONIC is activated.
XRemove your foot from the accelerator pedal.
Your vehicle adapts its speed to that of the
vehicle in front, but only up to the desired
stored speed.
iIf you do not fully release the accelerator
pedal, the Distance Pilot Passivemes-
sage appears in the multifunction display. The
set distance to a slower-moving vehicle in
front will then not be maintained. You will be
driving at the speed you determine by the
position of the accelerator pedal.
You can also activate Distance Pilot DISTRONIC
when stationary. The lowest speed that can be
set is 20 mph (30 km/h).
XBriefly pull the cruise control lever towards
you =, up :or down ?.
Distance Pilot DISTRONIC is activated.
Activating at the current speed/last
stored speed
GWARNING
If you call up the stored speed and it differs
from the current speed, the vehicle acceler-
ates or decelerates. If you do not know the
stored speed, the vehicle could accelerate or brake unexpectedly. There is a risk of an acci-
dent.
Pay attention to the road and traffic condi-
tions before calling up the stored speed. If you
do not know the stored speed, store the
desired speed again.
XBriefly pull the cruise control lever towards
you =.
XRemove your foot from the accelerator pedal.
The first time Distance Pilot DISTRONIC is
activated, it stores the current speed or reg-
ulates the speed of the vehicle to the stored
speed.
Driving with Distance Pilot DISTRONIC
Pulling away and driving
XIf you want to pull away with Distance
Pilot DISTRONIC: remove your foot from the
brake pedal.
XBriefly pull the cruise control lever towards
you ?.
or
XAccelerate briefly.
Your vehicle pulls away and adapts its speed
to that of the vehicle in front. If no vehicle is
detected in front, your vehicle accelerates to the set speed.
178Driving systems
Driving and parking
Page 181 of 398
The vehicle can also pull away when it is facing
an unidentified obstacle or is driving on a differ-
ent line from another vehicle. The vehicle then
brakes automatically.
If there is no vehicle in front, Distance Pilot
DISTRONIC operates in the same way as cruise
control.
If Distance Pilot DISTRONIC detects a slower-
moving vehicle in front, it brakes your vehicle. In
this way, the distance you have selected is main-
tained.
If Distance Pilot DISTRONIC detects a faster-
moving vehicle in front, it increases the driving
speed. However, the vehicle is only accelerated up to the speed you have stored.
Selecting the drive program
Distance Pilot DISTRONIC supports a sporty
driving style if you have selected the Sportor
Sport Plus drive program (
Ypage 151). Accel-
eration behind the vehicle in front or to the set
speed is then noticeably more dynamic. If you
have selected the Comfortdrive program, the
vehicle accelerates more gently. This setting is
recommended in stop-and-start traffic.
Changing lanes
If you change to the overtaking lane, Distance
Pilot DISTRONIC supports you if:
Ryou are driving faster than 45 mph (70 km/h)
Ryou switch on th eappropriat etur nsignal
RDistanc ePilo tDISTRONI Cdoes no tcurrentl y
detec t adanger of collision
If these condition sare fulfilled ,your vehicl eis
accelerated. Acceleration will be interrupted if
changin glanes takes to olon gor if th edistanc e
between your vehicl eand th evehicl ein fron t
become sto osmall.
iWhe nyou chang elanes, Distanc ePilo t
DISTRONI Cmonitors th eright lan e(in left-
side traffic) or th elef tlan e(in right-side traf-
fic).
Stopping
GWARNIN G
If you leav eth evehicl ewhen it is only bein g
braked by Distanc ePilo tDISTRONIC, it could
rol laway if:
Rthere is amalfunction in th esystem or in
th evoltag esupply.
RDistanc ePilo tDISTRONI Cis switched off
usin gth ecruise control lever, e.g. by avehi-
cle occupant or from outside th evehicl e
Rtheelectrica lsystem in th eengin ecom-
partment, th ebattery or th efuses are tam -
pered with.
Rth ebattery is disconnected
Rth evehicl eis accelerated, e.g. by avehicl e
occupant .
There is aris kof an accident.
Befor eleavin gth evehicle, always deactivat e
Distanc ePilo tDISTRONI Cand secure th e
vehicl eagainst rollin gaway.
If Distanc ePilo tDISTRONI Cdetects that th e
vehicl ein fron tis stopping ,it brakes your vehicl e
to astop.
Once your vehicl eis stationary, it remain ssta-
tionary and you do no tneed to depress th e
brake.
Afte r atime, th eelectric parkin gbrak esecures
th evehicl eand relieves th eservic ebrake.
Dependin gon th especified minimum distance,
your vehicl ewill come to astandstill at asuffi-
cient distanc ebehind th evehicl ein front. The
specified minimum distanc eis set usin
gth e
contro
l on th ecruise control lever.
The transmission is shifted automatically to
position Pif, wit hDistanc ePilo tDISTRONI C
activated and th evehicl estationary:
Rth edriver's doo ris open and th edriver's seat
belt is unfastened.
Rth eengin eis switched off ,unless it is auto-
matically switched off by th eECO start/sto p
function .
The electric parkin gbrak esecures th evehicl e
automatically if, wit hDistanc ePilo tDISTRONI C
activated and th evehicl estationary:
Rasystem malfunction occurs.
Rth epowe rsupply is no tsufficient.
Driving systems179
Driving and parking
Z