transmission MERCEDES-BENZ GLS SUV 2018 Workshop Manual
[x] Cancel search | Manufacturer: MERCEDES-BENZ, Model Year: 2018, Model line: GLS SUV, Model: MERCEDES-BENZ GLS SUV 2018Pages: 398, PDF Size: 6.75 MB
Page 205 of 398
iFor technical reasons, the ball coupling of
the trailer tow hitch in the multimedia system
display is either only partially visible or not at
all.
XSelect symbol ?using the controller.
The "Coupling up a trailer" function is selec-
ted. The distance specifications now only
apply to objects that are at the same level as
the ball coupling.
XBack up carefully, making sure that trailer
drawbar locating aid ;points approximately
in the direction of trailer drawbar =.
XBack up carefully until trailer drawbar =rea-
ches the red guide line.
The distance between the trailer drawbar and the red guide line is now approximately
0.30 m.
XCoupl eup the trailer (Ypage 225).
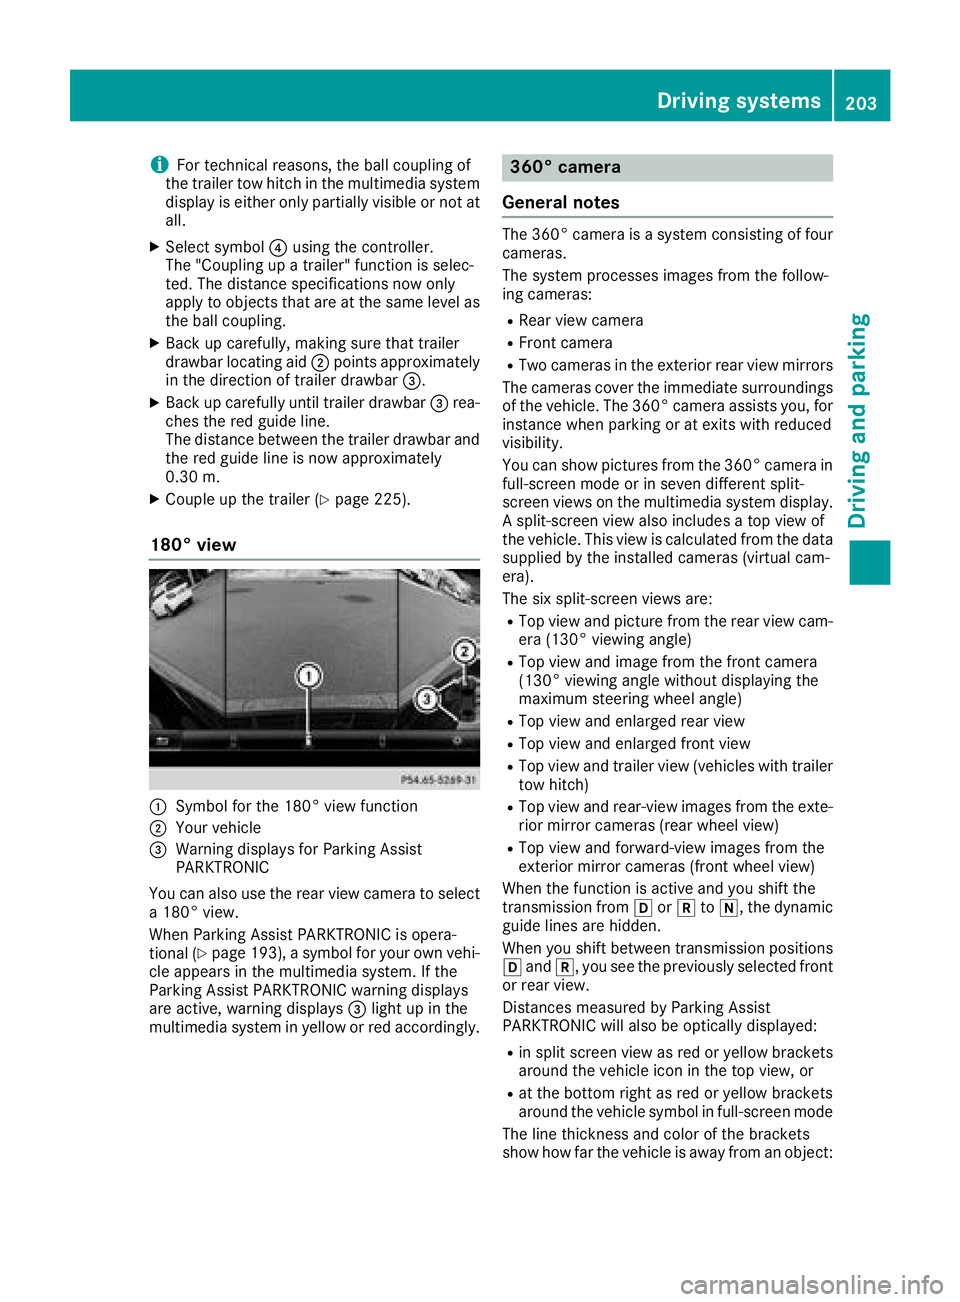
180° view
:Symbol for the 180° view function
;Your vehicle
=Warning displays for Parking Assist
PARKTRONIC
You can also use the rear view camera to select
a 180° view.
When Parking Assist PARKTRONIC is opera-
tional (
Ypage 193), a symbol for your own vehi-
cle appears in the multimedia system. If the
Parking Assist PARKTRONIC warning displays
are active, warning displays =light up in the
multimedia system in yellow or red accordingly.
360° camera
General notes
The 360° camera is a system consisting of four
cameras.
The system processes images from the follow-
ing cameras:
RRear view camera
RFront camera
RTwo cameras in the exterior rear view mirrors
The cameras cover the immediate surroundings
of the vehicle. The 360° camera assists you, for
instance when parking or at exits with reduced
visibility.
You can show pictures from the 360° camera in
full-screen mode or in seven different split-
screen views on the multimedia system display.
A split-screen view also includes a top view of
the vehicle. This view is calculated from the data
supplied by the installed cameras (virtual cam-
era).
The six split-screen views are:
RTop view and picture from the rear view cam-
era (130° viewing angle)
RTop view and image from the front camera
(130° viewing angle without displaying the
maximum steering wheel angle)
RTop view and enlarged rear view
RTop view and enlarged front view
RTop view and trailer view (vehicles with trailer
tow hitch)
RTop view and rear-view images from the exte-
rior mirror cameras (rear wheel view)
RTop view and forward-view images from the
exterior mirror cameras (front wheel view)
When the function is active and you shift the
transmission from hork toi, the dynamic
guide lines are hidden.
When you shift between transmission positions
h and k, you see the previously selected front
or rear view.
Distances measured by Parking Assist
PARKTRONIC will also be optically displayed:
Rin split screen view as red or yellow brackets
around the vehicle icon in the top view, or
Rat the bottom right as red or yellow brackets
around the vehicle symbol in full-screen mode
The line thickness and color of the brackets
show how far the vehicle is away from an object:
Driving system s203
Driving an d parking
Z
Page 206 of 398
Ryellowbrackets wit hthin lines: Parking Assis t
PARKTRONI Cis active
Ryello wbrackets wit hnormal lines: an objec tis
presen tin close range of th evehicl e
Rred line: an objec tis presen tin th eimmediat e
close range of th evehicl e
iThe camera in th erear area is protected
from raindrops and dust by mean sof aflap .
Whe nth ecamera is activated, this flap opens.
The flap closes again in th efollowin gsitua-
tions:
Ryou hav efinished th emaneuverin gprocess
Ryou switch th eengin eoff
Ryou open th ecargo compartmen t
Observ eth enote son cleaning (
Ypage 334).
Fo rtechnical reasons, th eflap may remain
open briefl yafter th ecamera has been deac -
tivated.
Impor tant safety notes
The 360°camera is only an aid and may sho w a
distorted vie wof obstacles, sho wthem incor-
rectl yor no tat all. The 360°camera is no t a
substitut efor attentive driving.
You are always responsibl efor saf emaneuver-
in g and parking. Mak esur ethat there are no
persons, animals or objects in th emaneuverin g
area while maneuverin gand parkin gin parkin g
spaces.
You are always responsibl efor safet yand mus t
continue to pay attention to your immediat e
surroundings when parkin gand maneuvering.
This applies to th earea sbehind ,in fron tof and
beside th evehicle. You could otherwise endan -
ger yourself and others.
The 360° camera will no tfunction or will func-
tion in alimite dmanne rin th efollowin gsitua-
tions:
Rth edoors are open
Rth eexterio rmirror sare folded in
Rth etailgat eis open
Rin heav yrain ,snow or fog
Rat night or in ver ydark places
Rth ecameras are exposed to ver ybright ligh t
Rthearea is lit by fluorescent bulbs or LE D
lighting (the display may flicker)
Rthere is asudden chang ein temperature,
suc has when drivin ginto aheated garage in
winte r
Rthecamera lenses are dirty or covered
Rth evehicl ecomponent sin whic hth ecameras
are inst alled are damaged In this event ,hav e
th ecamera position and setting checke dat a
qualified specialist workshop
Do no tuse th e360° camera under suc hcir -
cumstances. You can otherwise injur eother sor
caus edamage to objects or th evehicle.
Guide lines are always shown at roa dlevel. In
trailer mode, th eguide lines are shown at th e
level of th etrailer coupling.
The field of vision and other function sof th e
camera system may be restricted due to addi-
tional accessories on th erear of th evehicl e(e.g.
license plat eholder, bicycle rack) .
On vehicles wit hheight-adjustable chassis,
dependin gon technical conditions, leavin gth e
standard height can result in :
Rinaccuracies in theguide lines
Rinaccuracies in th edisplay of generated
images (top view)
Activati onconditions
The 360° camera imag ecan be displayed in th e
followin gsituations:
Ryour vehicl eis equipped wit h a360° camera
RtheSmartKey is in ke yposition 2in th eigni-
tion loc k
Rthemultimedia system is switched on
Switching onthe 360° camera
XPress th eØ buttonin th ecenter console
for longer than tw oseconds.
Dependin gon whether transmission position
h ork is selected, th efollowin gappears :
Raspli tscree nwit hto pvie wand th eimag e
from th efron tcamera or
Ra spli tscree nwit hto pvie wand th eimag e
from th erear vie wcamera
or
XPress th eØ buttonin th ecenter console.
The vehicl emen uis displayed.
XSelec t360 °Cameraand press 7to confirm .
Dependin gon whether transmission position
h ork is selected, th efollowin gappears :
Raspli tscree nwit hto pvie wand th eimag e
from th efron tcamera or
Ra spli tscree nwit hto pvie wand th eimag e
from th erear vie wcamera
204Driving systems
Driving and parking
Page 209 of 398
iYou can also select the camera setting in the
exterior mirrors for the rear-facing view.
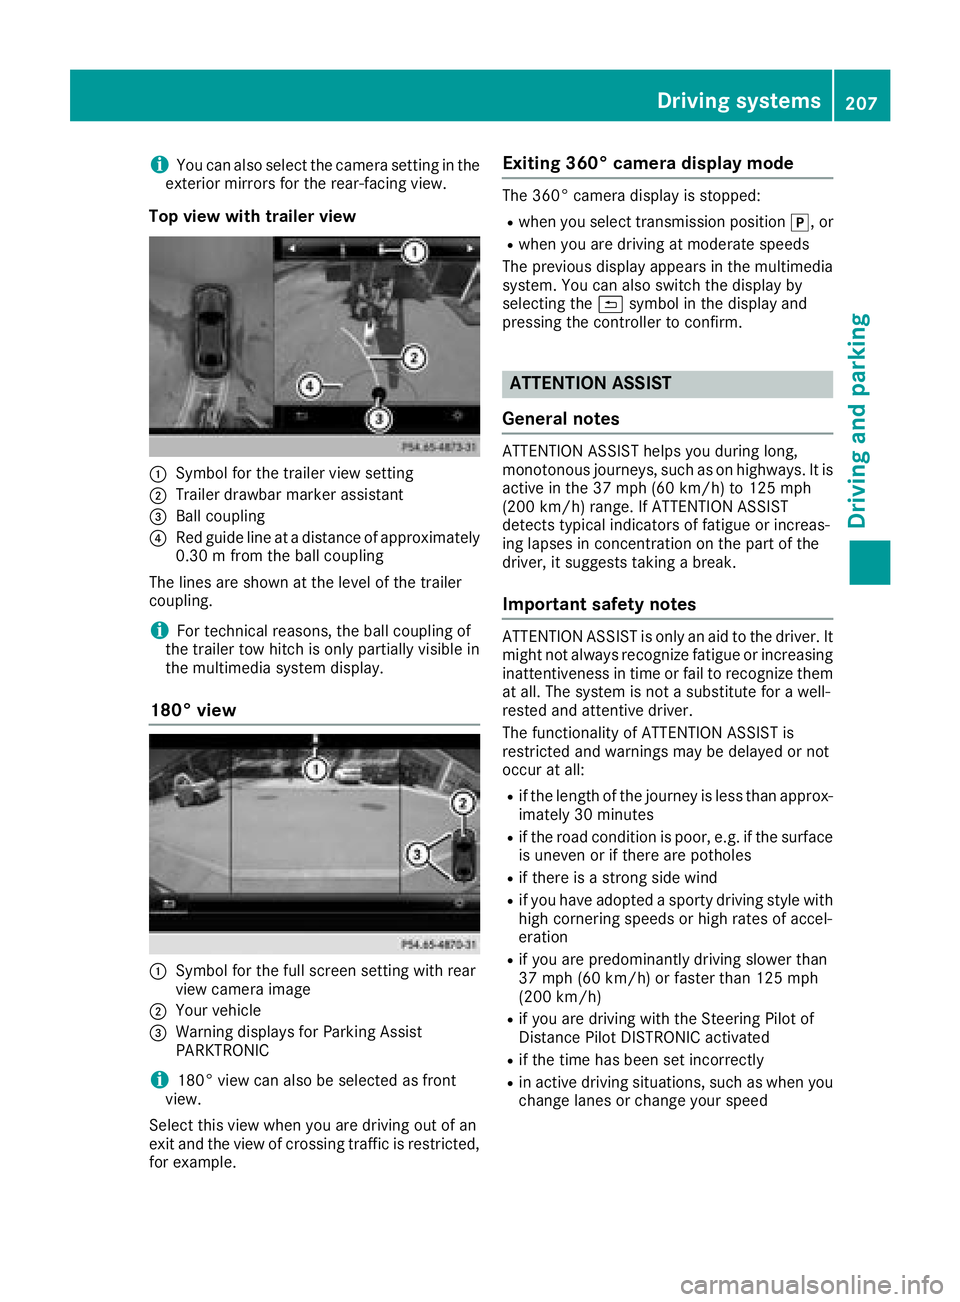
Top view with trailer view
:Symbol for the trailer view setting
;Trailer drawbar marker assistant
=Ball coupling
?Red guide line at a distance of approximately
0.30 m from the ball coupling
The lines are shown at the level of the trailer
coupling.
iFor technical reasons, the ball coupling of
the trailer tow hitch is only partially visible in
the multimedia system display.
180° view
:Symbol for the full screen setting with rear
view camera image
;Your vehicle
=Warning displays for Parking Assist
PARKTRONIC
i180° view can also be selected as front
view.
Select this view when you are driving out of an
exit and the view of crossing traffic is restricted,
for example.
Exiting 360° camera display mode
The 360° camera display is stopped:
Rwhen you select transmission position j, or
Rwhen you are driving at moderate speeds
The previous display appears in the multimedia
system. You can also switch the display by
selecting the &symbol in the display and
pressing the controller to confirm.
ATTENTION ASSIST
General notes
ATTENTION ASSIST helps you during long,
monotonous journeys, such as on highways. It is
active in the 37 mph (60 km/h) to 125 mph
(200 km/h) range. If ATTENTION ASSIST
detects typical indicators of fatigue or increas-
ing lapses in concentration on the part of the
driver, it suggests taking a break.
Important safety notes
ATTENTION ASSIST is only an aid to the driver. It
might not always recognize fatigue or increasing inattentiveness in time or fail to recognize them
at all. The system is not a substitute for a well-
rested and attentive driver.
The functionality of ATTENTION ASSIST is
restricted and warnings may be delayed or not
occur at all:
Rif the length of the journey is less than approx-
imately 30 minutes
Rif the road condition is poor, e.g. if the surface
is uneven or if there are potholes
Rif there is a strong side wind
Rif you have adopted a sporty driving style with
high cornering speeds or high rates of accel-
eration
Rif you are predominantly driving slower than
37 mph (60 km/h) or faster than 125 mph
(200 km/h)
Rif you are driving with the Steering Pilot of
Distance Pilot DISTRONIC activated
Rif the time has been set incorrectly
Rin active driving situations, such as when you
change lanes or change your speed
Driving systems207
Driving and parking
Z
Page 219 of 398
ing over a solid lane marking. There is a risk of
an accident.
An inappropriate brake application may be
interrupted at any time if you steer slightly in
the opposite direction. Always make sure that
there is sufficient distance on the side for
other traffic or obstacles.
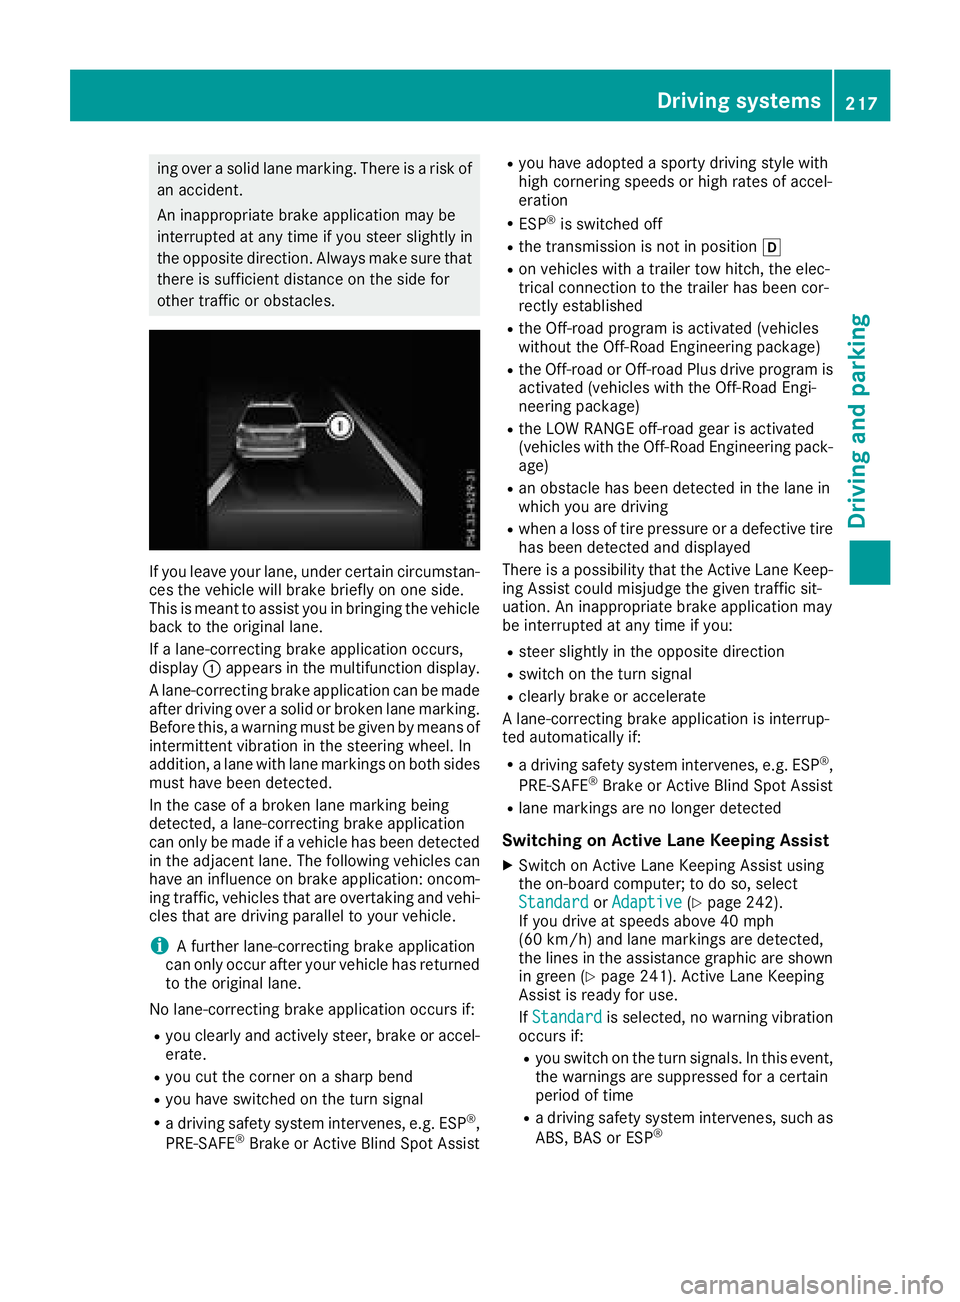
If you leave your lane, under certain circumstan-
ces the vehicle will brake briefly on one side.
This is meant to assist you in bringing the vehicle
back to the original lane.
If a lane-correcting brake application occurs,
display:appears in the multifunction display.
A lane-correcting brake application can be made
after driving over a solid or broken lane marking.
Before this, a warning must be given by means of
intermittent vibration in the steering wheel. In
addition, a lane with lane markings on both sides must have been detected.
In the case of a broken lane marking being
detected, a lane-correcting brake application
can only be made if a vehicle has been detected
in the adjacent lane. The following vehicles can
have an influence on brake application: oncom-
ing traffic, vehicles that are overtaking and vehi-
cles that are driving parallel to your vehicle.
iA further lane-correcting brake application
can only occur after your vehicle has returned
to the original lane.
No lane-correcting brake application occurs if:
Ryou clearly and actively steer, brake or accel-
erate.
Ryou cut the corner on a sharp bend
Ryou have switched on the turn signal
Ra driving safety system intervenes, e.g. ESP®,
PRE-SAFE®Brake or Active Blind Spot Assist
Ryou have adopted a sporty driving style with
high cornering speeds or high rates of accel-
eration
RESP®is switched off
Rthe transmission is not in position h
Ron vehicles with a trailer tow hitch, the elec-
trical connection to the trailer has been cor-
rectly est
ablished
Rthe Off-road program is activated (vehicles
without the Off-Road Engineering package)
Rthe Off-road or Off-road Plus drive program is
activated (vehicles with the Off-Road Engi-
neering package)
Rthe LOW RANGE off-road gear is activated
(vehicles with the Off-Road Engineering pack-
age)
Ran obstacle has been detected in the lane in
which you are driving
Rwhen a loss of tire pressure or a defective tire
has been detected and displayed
There is a possibility that the Active Lane Keep- ing Assist could misjudge the given traffic sit-
uation. An inappropriate brake application may
be interrupted at any time if you:
Rsteer slightly in the opposite direction
Rswitch on the turn signal
Rclearly brake or accelerate
A lane-correcting brake application is interrup-
ted automatically if:
Ra driving safety system intervenes, e.g. ESP®,
PRE-SAFE®Brake or Active Blind Spot Assist
Rlane markings are no longer detected
Switching on Active Lane Keeping Assist
XSwitch on Active Lane Keeping Assist using
the on-board computer; to do so, select
Standard
or Adaptive(Ypage 242).
If you drive at speeds above 40 mph
(60 km/h) and lane markings are detected,
the lines in the assistance graphic are shown
in green (
Ypage 241). Active Lane Keeping
Assist is ready for use.
If Standard
is selected, no warning vibration
occurs if:
Ryou switch on the turn signals. In this event,
the warnings are suppressed for a certain
period of time
Ra driving safety system intervenes, such as
ABS, BAS or ESP®
Driving systems217
Driving and parking
Z
Page 220 of 398
WhenAdaptiveis selected, no warning vibra-
tion occurs if:
Ryou switch on the turn signals. In this event,
the warnings are suppressed for a certain
period of time
Ra driving safety system intervenes, e.g.
ABS, BAS or ESP®
Ryou accelerate hard, e.g. kickdown
Ryou brake hard
Ryou steer actively, e.g. swerve to avoid an
obstacle or change lanes quickly
Ryou cut the corner on a sharp bend
Towing a trailer
When you attach a trailer, make sure you have
correctly established the electrical connection.
This can be accomplished by checking the trailer
lighting. Lane-correcting brake application does
not take place when towing a trailer. Active Lane
Keeping Assist is not activated and the lines in
the assistance graphic are gray.
Off-road driving systems
4MATIC (permanent four-wheel drive)
4MATIC ensures that all four wheels are perma-
nently driven. Together with ESP®and 4ETS, it
improves the traction of your vehicle whenever
a drive wheel spins due to insufficient grip.
If you fail to adapt your driving style, 4MATIC can
neither reduce the risk of accident nor override the laws of physics. 4MATIC cannot take
account of road, weather and traffic conditions.
4MATIC is only an aid. You are responsible for
the distance to the vehicle in front, for vehicle
speed, for braking in good time and for staying in
your lane.
!Never tow the vehicle with one axle raised.
This may damage the transfer case. Damage
of this sort is not covered by the Mercedes-
Benz Limited Warranty. All wheels must
remain either on the ground or be fully raised.
Observe the instructions for towing the vehi-
cle with all wheels in full contact with the
ground.
!A function or performance test should only
be carried out on a two-axle dynamometer.
Before you operate the vehicle on such a
dynamometer, please consult a qualified workshop. You could otherwise damage the
drive train or the brake system.
iIn wintry driving conditions, the maximum
effect of 4MATIC can only be achieved if you
use winter tires (M+S tires), with snow chains
if necessary.
Further information about "Driving off-road"
(
Ypage 170).
DSR (Downhill Speed Regulation)
General notes
DSR is an aid to assist you when driving down-
hill. It keeps the speed of travel at the speed
selected on the on-board computer. The steeper
the downhill gradient, the greater the DSR brak-
ing effect on the vehicle. When driving on flat
stretches of road or on an uphill gradient, the
DSR braking effect is minimal or nonexistent.
DSR controls the vehicle’s speed when it is acti- vated and the transmission is in position D,Ror
N . You can drive at a higher or a lower speed
than that set on the on-board computer at any
time by accelerating or braking.
Important safety notes
GWARNING
If the speed driven and the set speed deviate and you activate DSR on a slippery road sur-
face, the wheels may lose traction. There is an
increased danger of skidding and accidents.
Before switching DSR on, please take into
consideration the road surface and the differ- ence between driving speed and the set
speed.
If you fail to adapt your driving style, DSR can
neither reduce the risk of accident nor override the laws of physics. DSR cannot take account of
road, weather and traffic conditions. DSR is only
an aid. You are responsible for the distance to
the vehicle in front, for vehicle speed, for brak-
ing in good time and for staying in your lane.
You are always responsible for keeping control
of the vehicle and for assessing whether the
downhill gradient can be managed. DSR may not always be able to keep to the set speed, depend-
ing on road surface and tire conditions. Select a
set speed suitable for the prevailing conditions
and when necessary, apply the brakes manually.
218Driving systems
Driving and parking
Page 223 of 398
multifunction display. The last active drive pro-
gram is selected again.
Selecting the Offroad program
XTo select a drive program: turn DYNAMIC
SELECT controller:until indicator lamp ;
lights up.
The Drive program "Offroad" Max.
speed 60 mphmessage appears in the mul-
tifunction display.
The vehicle is raised by +1.2 in (30 mm).
The vehicle changes from the Offroaddrive pro-
gram to the Comfortdrive program if you drive
faster than 70 mph (112 km/h).
The Drive more slowly
message appears in
the multifunction display.
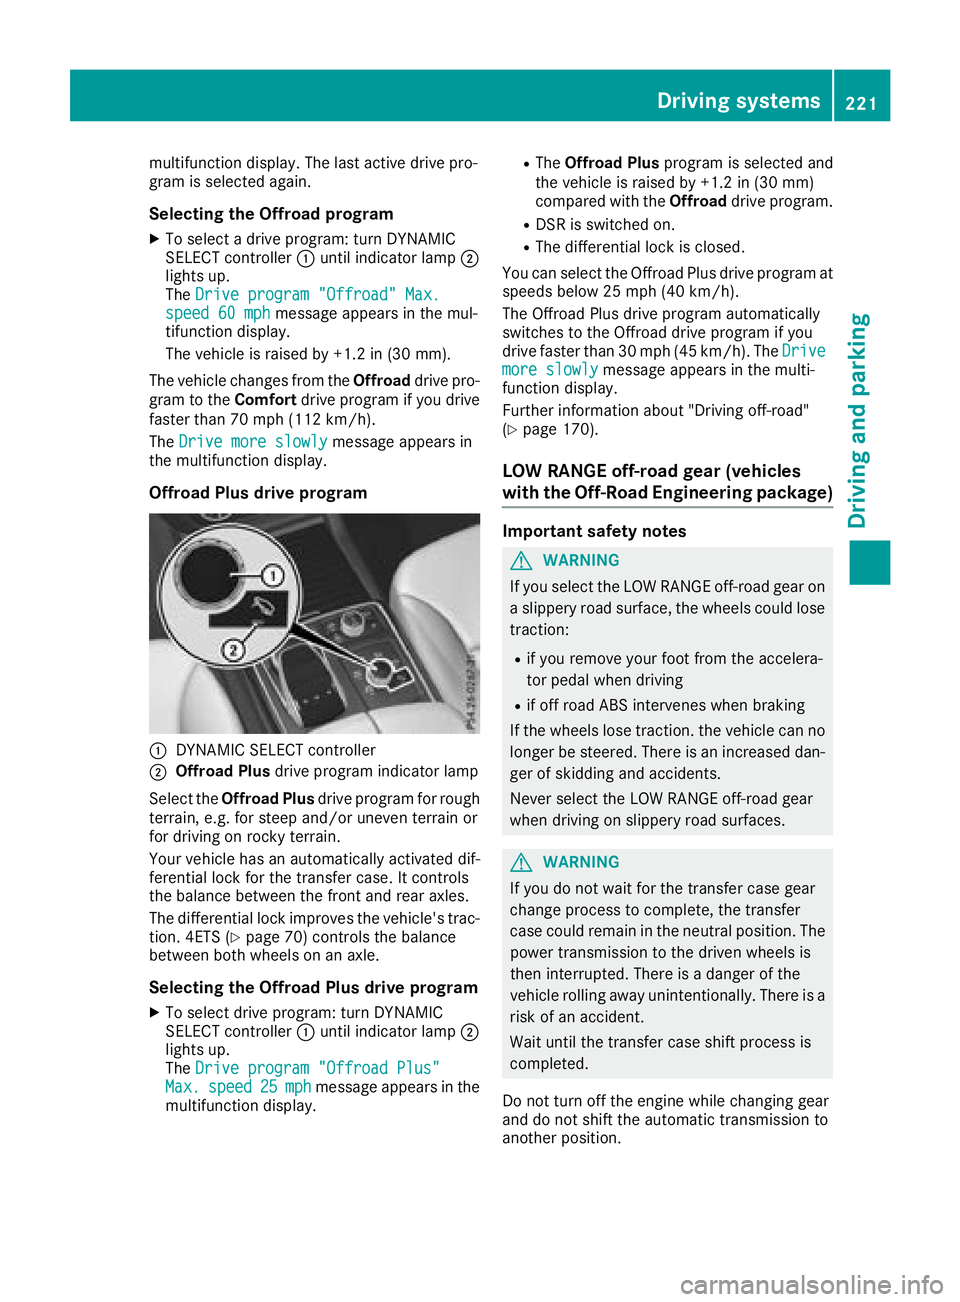
Offroad Plus drive program
:DYNAMIC SELECT controller
;Offroad Plus drive program indicator lamp
Select the Offroad Plus drive program for rough
terrain, e.g. for steep and/or uneven terrain or
for driving on rocky terrain.
Your vehicle has an automatically activated dif-
ferential lock for the transfer case. It controls
the balance between the front and rear axles.
The differential lock improves the vehicle's trac-
tion. 4ETS (
Ypage 70) controls the balance
between both wheels on an axle.
Selecting the Offroad Plus drive program
XTo select drive program: turn DYNAMIC
SELECT controller :until indicator lamp ;
lights up.
The Drive program "Offroad Plus"
Max.speed25mphmessage appears in the
multifunction display.
RThe Offroad Plus program is selected and
the vehicle is raised by +1.2 in (30 mm)
compared with the Offroaddrive program.
RDSR is switched on.
RThe differential lock is closed.
You can select the Offroad Plus drive program at
speeds below 25 mph (40 km/h).
The Offroad Plus drive program automatically
switches to the Offroad drive program if you
drive faster than 30 mph (45 km/h). The Drive
more slowlymessage appears in the multi-
function display.
Further information about "Driving off-road"
(
Ypage 170).
LOW RANGE off-road gear (vehicles
with the Off-Road Engineering package)
Important safety notes
GWARNING
If you select the LOW RANGE off-road gear on
a slippery road surface, the wheels could lose traction:
Rif you remove your foot from the accelera-
tor pedal when driving
Rif off road ABS intervenes when braking
If the wheels lose traction. the vehicle can no
longer be steered. There is an increased dan-
ger of skidding and accidents.
Never select the LOW RANGE off-road gear
when driving on slippery road surfaces.
GWARNING
If you do not wait for the transfer case gear
change process to complete, the transfer
case could remain in the neutral position. The power transmission to the driven wheels is
then interrupted. There is a danger of the
vehicle rolling away unintentionally. There is a
risk of an accident.
Wait until the transfer case shift process is
completed.
Do not turn off the engine while changing gear
and do not shift the automatic transmission to
another position.
Driving systems221
Driving and parking
Z
Page 224 of 398
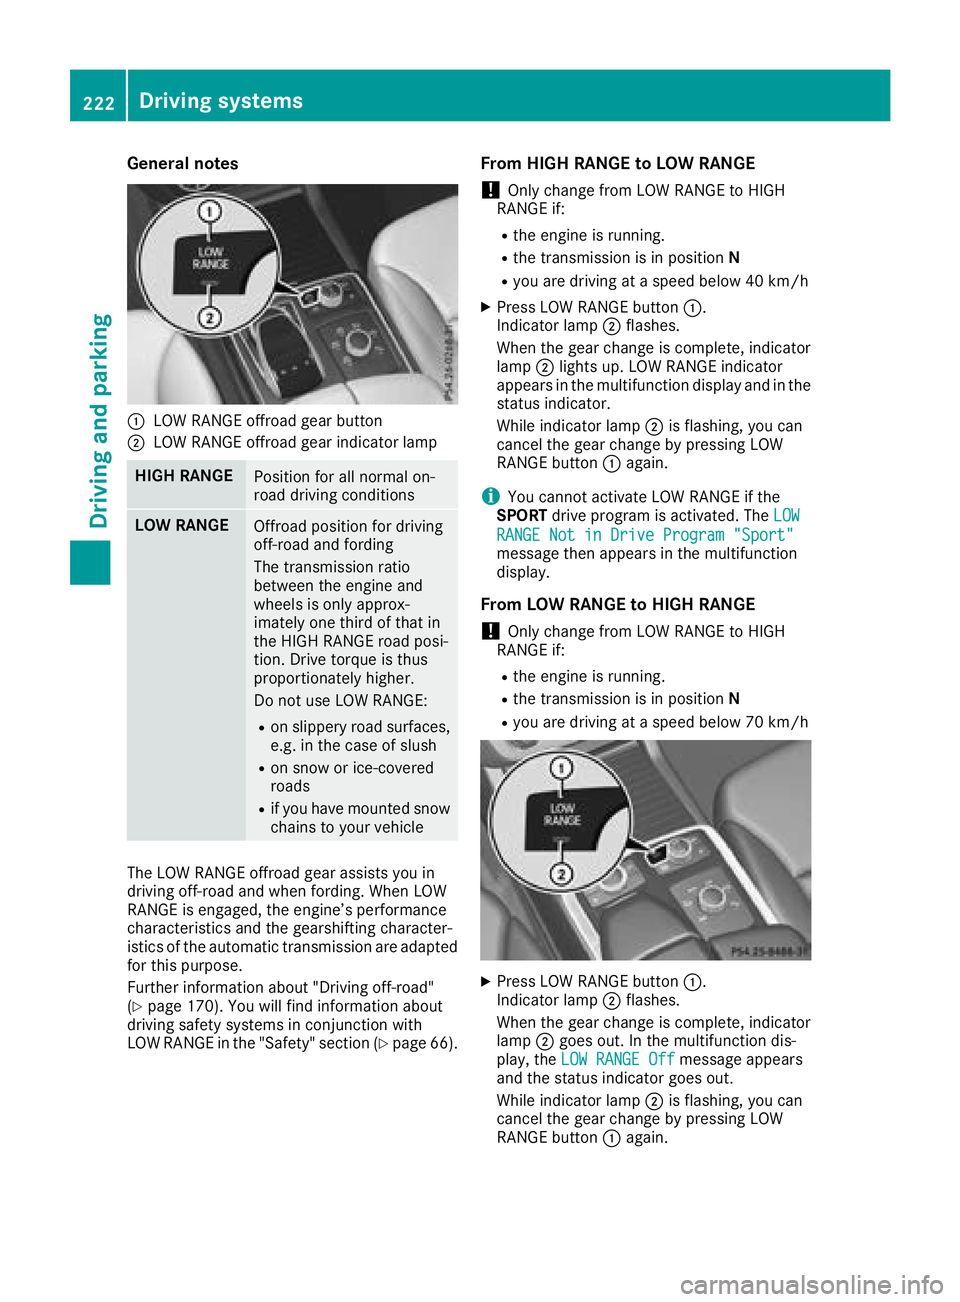
General notes
:LOW RANGE offroad gear button
;LOW RANGE offroad gear indicator lamp
HIGH RANGEPosition for all normal on-
road driving conditions
LOW RANGEOffroad position for driving
off-road and fording
The transmission ratio
between the engine and
wheels is only approx-
imately one third of that in
the HIGH RANGE road posi-
tion. Drive torque is thus
proportionately higher.
Do not use LOW RANGE:
Ron slippery road surfaces,
e.g. in the case of slush
Ron snow or ice-covered
roads
Rif you have mounted snow
chains to your vehicle
The LOW RANGE offroad gear assists you in
driving off-road and when fording. When LOW
RANGE is engaged, the engine’s performance
characteristics and the gearshifting character-
istics of the automatic transmission are adapted
for this purpose.
Further information about "Driving off-road"
(
Ypage 170). You will find information about
driving safety systems in conjunction with
LOW RANGE in the "Safety" section (
Ypage 66).
From HIGH RANGE to LOW RANGE
!Only change from LOW RANGE to HIGH
RANGE if:
Rthe engine is running.
Rthe transmission is in position N
Ryou are driving at a speed below 40 km/h
XPress LOW RANGE button:.
Indicator lamp ;flashes.
When the gear change is complete, indicator
lamp ;lights up. LOW RANGE indicator
appears in the multifunction display and in the
status indicator.
While indicator lamp ;is flashing, you can
cancel the gear change by pressing LOW
RANGE button :again.
iYou cannot activate LOW RANGE if the
SPORT drive program is activated. The LOW
RANGE Not in Drive Program "Sport"message then appears in the multifunction
display.
From LOW RANGE to HIGH RANGE
!Only change from LOW RANGE to HIGH
RANGE if:
Rthe engine is running.
Rthe transmission is in position N
Ryou are driving at a speed below 70 km/h
XPress LOW RANGE button:.
Indicator lamp ;flashes.
When the gear change is complete, indicator
lamp ;goes out. In the multifunction dis-
play, the LOW RANGE Off
message appears
and the status indicator goes out.
While indicator lamp ;is flashing, you can
cancel the gear change by pressing LOW
RANGE button :again.
222Driving systems
Driving and parking
Page 225 of 398
Messages in the multifunction display
If a gear change process has not been successful, the following messages may be displayed in the
multifunction display:
Display messagesPossible causes/consequences andMSolutions
LOW RANGE Max.Speed 24 mphYou have been driving faster than 24 mph (40 km/h). Additionally, the
indicator lamp on the button in the center console is flashing.
XSlow down to change gear.
LOW RANGE Shift toPosition N BrieflyThe transmission is in positionDand you are driving at below
40 km/h.
XShift the transmission to Nto complete the gear change process.
LOW RANGE ShiftingCanceled PleaseReactivate
The gear change process was not carried out.
XEnsure that all gear change conditions are fulfilled and carry out the
gear change process again.
LOW RANGE StopApply Parking BrakeA warning tone also sounds. The gear change process has not been
completed. LOW RANGE is in the neutral position. There is no con-
nection between the engine and the drive wheels.
!Do not drive any further. You could otherwise damage the vehi-
cle's drive train.
XStop the vehicle. Take into account the road and traffic conditions
when doing this.
XDepress the electric parking brake (Ypage 162).
XCarry out the gear change process again.
If the gear change process has been carried out, the LOW RANGE
Stop Apply Parking Brakemessage disappears.
Driving dynamics display in the
COMAND display (vehicles with the Off-
Road Engineering package)
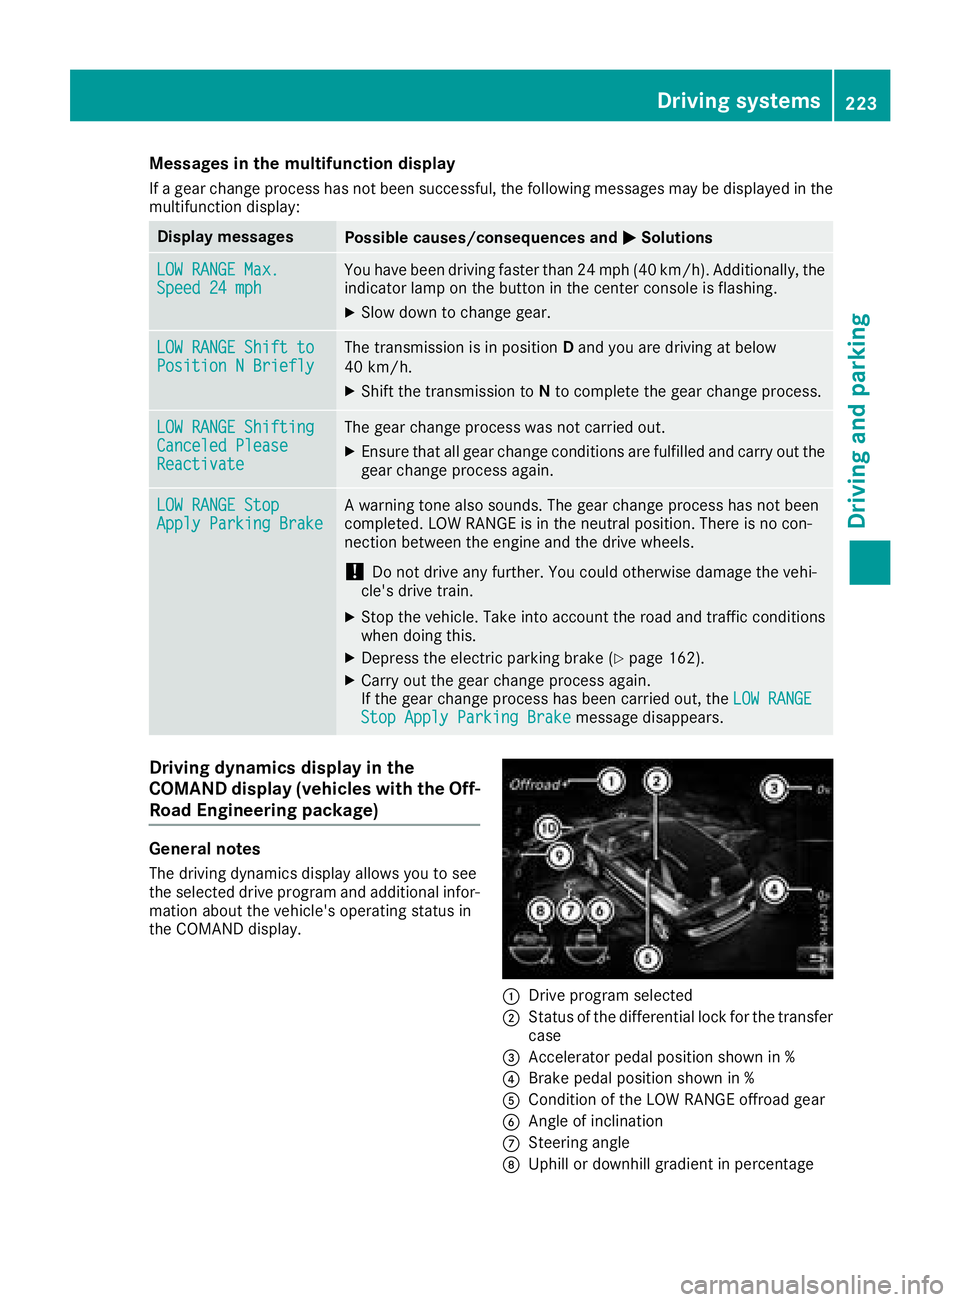
General notes
The driving dynamics display allows you to see
the selected drive program and additional infor-
mation about the vehicle's operating status in
the COMAND display.
:Drive program selected
;Status of the differential lock for the transfer
case
=Accelerator pedal position shown in %
?Brake pedal position shown in %
ACondition of the LOW RANGE offroad gear
BAngle of inclination
CSteering angle
DUphill or downhill gradient in percentage
Driving systems223
Driving and parking
Z
Page 229 of 398
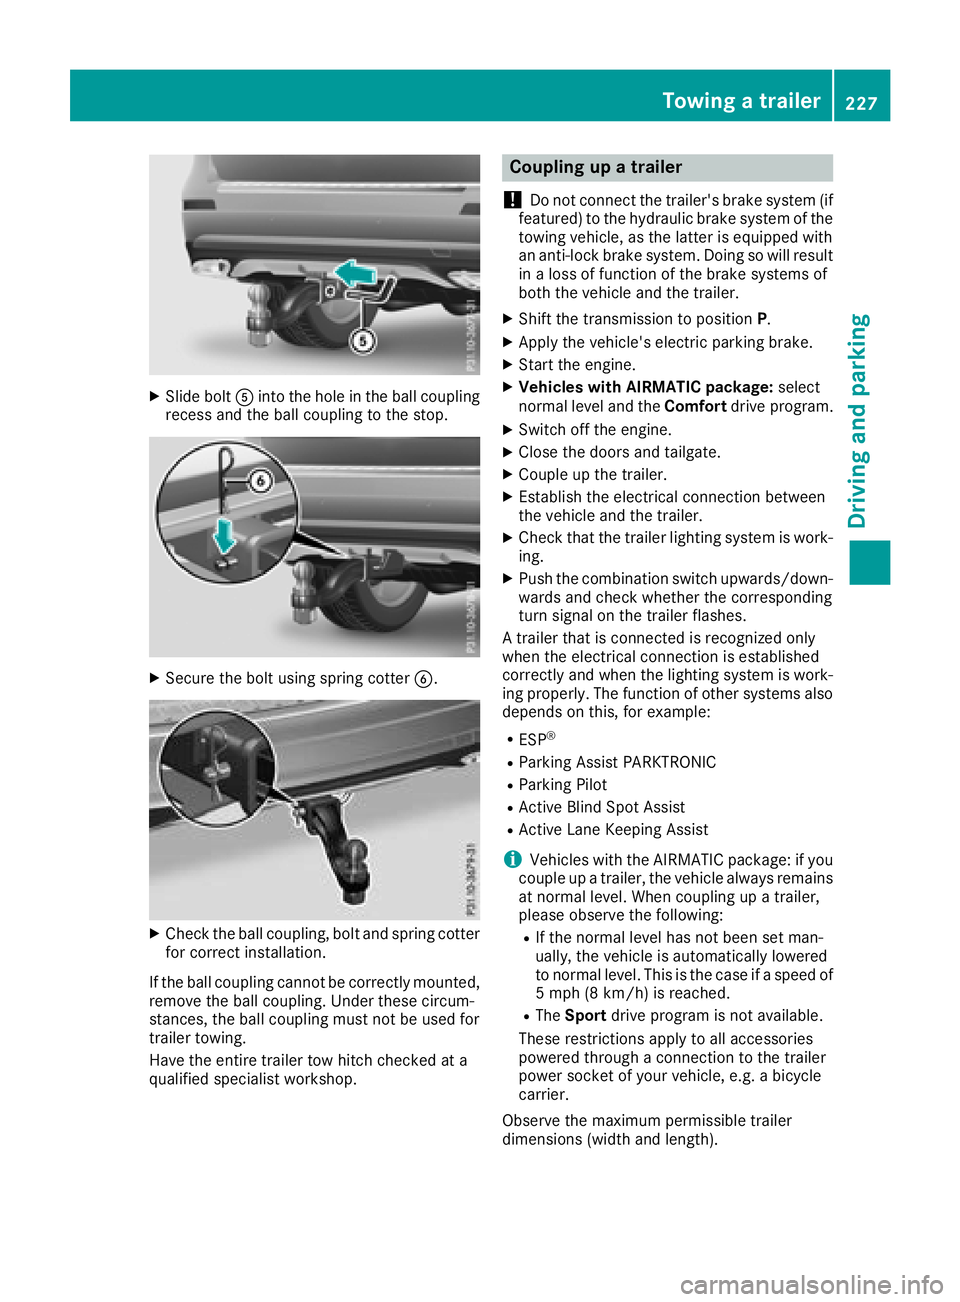
XSlide boltAinto the hole in the ball coupling
recess and the ball coupling to the stop.
XSecure the bolt using spring cotter B.
XCheck the ball coupling, bolt and spring cotter
for correct installation.
If the ball coupling cannot be correctly mounted,
remove the ball coupling. Under these circum-
stances, the ball coupling must not be used for
trailer towing.
Have the entire trailer tow hitch checked at a
qualified specialist workshop.
Coupling up a trailer
!
Do not connect the trailer's brake system (if
featured) to the hydraulic brake system of the
towing vehicle, as the latter is equipped with
an anti-lock brake system. Doing so will result
in a loss of function of the brake systems of
both the vehicle and the trailer.
XShift the transmission to position P.
XApply the vehicle's electric parking brake.
XStart the engine.
XVehicles with AIRMATIC package: select
normal level and the Comfortdrive program.
XSwitch off the engine.
XClose the doors and tailgate.
XCouple up the trailer.
XEstablish the electrical connection between
the vehicle and the trailer.
XCheck that the trailer lighting system is work-
ing.
XPush the combination switch upwards/down-
wards and check whether the corresponding
turn signal on the trailer flashes.
A trailer that is connected is recognized only
when the electrical connection is established
correctly and when the lighting system is work-
ing properly. The function of other systems also
depends on this, for example:
RESP®
RParking Assist PARKTRONIC
RParking Pilot
RActive Blind Spot Assist
RActive Lane Keeping Assist
iVehicles with the AIRMATIC package: if you
couple up a trailer, the vehicle always remains
at normal level. When coupling up a trailer,
please observe the foll
owing:
RIf the normal level has not been set man-
ually, the vehicle is automatically lowered
to normal level. This is the case if a speed of
5 mph (8 km/h) is reached.
RThe
Sport drive program is not available.
These restrictions apply to all accessories
powered through a connection to the trailer
power socket of your vehicle, e.g. a bicycle
carrier.
Observe the maximum permissible trailer
dimensions (width and length).
Towing a trailer227
Driving and parking
Z
Page 230 of 398
Most U.S. states and all Canadian provinces
require by law:
RSafety chains between the towing vehicle and
the trailer. The chains should be cross-wound
under the trailer drawbar. They must be fas-
tened to the vehicle's trailer coupling, not to
the bumper or the axle.
Leave enough play in the chains to make tight
cornering possible.
RA separate brake system for certain types of
trailer.
RSafety switch for braked trailers. Check the
specific legal requirements applicable to your
state.
If the trailer becomes detached from the tow-
ing vehicle, the safety feature triggers the
trailer brakes.
Towing a trailer
There are numerous legal requirements con-
cerning the towing of a trailer, e.g. speed restric-
tions. Make sure that your car/trailer combina-tion complies with the local regulations:
Rin your place of residence
Rin the location to which you are driving
The police and local authorities can provide reli-
able information.
Observe the following when towing a trailer:
RTo gain driving experience and to become
accustomed to the new handling characteris-
tics, you should practice the following in a
traffic-free location:
-cornering
-stopping
-backing up
RBefore driving, check:
-trailer tow hitch
-safety switch for braked trailers
-safety chains
-electrical connections
-lights
-wheels
RAdjust the exterior mirrors to provide an
unobstructed view of the rear section of the
trailer.
RIf the trailer has electronically controlled
brakes, pull away carefully. Brake manually using the brake controller and check whether
the brakes function correctly.
RSecure any objects on the trailer to prevent
the cargo from slipping when the vehicle is in
motion.
RWhen you couple up a trailer, check at regular
intervals that the load is firmly secured. If the
trailer is equipped with trailer lights and
brakes, check the trailer to ensure that these
are working.
RBear in mind that the handling will be less
stable when towing a trailer than when driving
without one. Avoid sudden steering move-
ments.
RThe vehicle/trailer combination is heavier,
accelerates more slowly, has a decreased
gradient climbing capability and a longer
braking distance.
It is more susceptible to side winds and
requires more careful steering.
RIf possible, do not brake suddenly, but instead
depress the brake pedal moderately at first so
that the trailer can activate its brakes. Then
increase the pressure on the brake pedal.
RIf the automatic transmission repeatedly
shifts between gears on uphill or downhill gra-
dients, shift to a lower gear using the left-hand
steering wheel paddle shifter.
A lower gear and lower speed reduce the risk
of engine failure.
RWhen driving downhill, shift to a lower gear to
utilize the engine's braking effect.
Avoid continuous brake application as this
may overheat the vehicle brakes and, if instal-
led, the trailer brakes.
RIf the coolant temperature increases dramat-
ically while the air-condit ioning system is
switched on, switch off the air-conditioning
system.
Coolant heat can also be dissipated by open-
ing the windows and switching the ventilation blower and the interior temperature to the
highest level.
RWhen overtaking, pay particular attention to
the extended length of your vehicle/trailer
combination.
Due to the length of the vehicle/trailer com-
bination, you require additional road space in
relation to the vehicle you are overtaking
before you can change back to the original
lane.
228Towing a trailer
Driving and parking