fuel cap MERCEDES-BENZ GLS SUV 2018 Owner's Manual
[x] Cancel search | Manufacturer: MERCEDES-BENZ, Model Year: 2018, Model line: GLS SUV, Model: MERCEDES-BENZ GLS SUV 2018Pages: 398, PDF Size: 6.75 MB
Page 13 of 398
Display message ............................ 261
ECO start/stop function ................ 144
Engine number ............................... 386
Irregular running ............................ 146
Jump-starting ................................. 346
Starting (important safety notes) ... 141
Starting problems .......................... 146
Starting the engine with the
SmartKey ....................................... 142
Starting via smartphone ................ 142
Starting with KEYLESS-GO ............. 142
Switching off .................................. 162
Tow-starting (vehicle) ..................... 352
Engine electronics
Problem (malfunction) ................... 146
Engine jump starting
see Jump starting (engine)
Engine oil
Adding ........................................... 327
Additives ........................................ 390
Checking the oil level ..................... 326
Checking the oil level using the
dipstick .......................................... 327
Display message ............................ 263
Filling capacity ............................... 390
Notes about oil grades ................... 389
Notes on oil level/consumption .... 326
Temperature (on-board computer,
Mercedes-AMG vehicles) ............... 245
Engine switch-off
see ECO start/stop function
Entering an address
see also Digital Operator's Man-
ual .................................................. 292
ESP
®(Electronic Stability Pro-
gram)
AMG menu (on-board computer) ... 246
Characteristics ................................. 70
Deactivating/activating ................... 71
Display message ............................ 249
Function/notes ................................ 69
General notes .................................. 69
Important safety information ........... 70
Warning lamp ................................. 284
ETS/4ETS (Electronic Traction Sys-
tem) ...................................................... 70
Exhaust check ................................... 165 Exhaust pipe (cleaning instruc-
tions)
.................................................. 334
Exterior lighting
see Lights
Exterior mirrors
Adjusting ....................................... 110
Dipping (automatic) ....................... 112
Folding in whe
n locking (on-board
computer) ...................................... 245
Folding in/out (automatically) ....... 111
Folding in/out (electrically) ........... 111
Out of position (troubleshooting) ... 112
Setting ........................................... 111
Storing settings (memory func-
tion) ............................................... 113
Storing the parking position .......... 112
Eyeglasses compartment ................. 302
F
Favorites
Overview ........................................ 294
Filler cap
see Refueling
Flat tire
MOExtended tires .......................... 340
Preparing the vehicle ..................... 339
TIREFIT kit ...................................... 341
see Emergency spare wheel
Floormats ........................................... 324
Fog lamps (extended range) ............. 118
Folding the rear bench seat for-
wards/back ....................................... 303
Fording
Off-road ......................................... 169
On flooded roads ........................... 168
Frequencies
Mobile phone ................................. 384
Two-way radio ................................ 384
Fuel
Additives ........................................ 388
Consumption statistics .................. 236
Displaying the current consump-
tion ................................................ 237
Displaying the range ...................... 237
Driving tips .................................... 164
Fuel gauge ....................................... 37
Grade (gasoline) ............................ 387
Index11
Page 14 of 398
Important safety notes .................. 387
Low outside temperatures .............388
Problem (malfunction) ................... 158
Quality (diesel) ............................... 388
Refueling ........................................ 155
Tank content/reserve fuel ............. 387
Fuel filler flap
Opening ......................................... 157
Fuel filter (display message) ............ 264
Fuel level
Calling up the range (on-board
computer) ...................................... 237
Fuel tank
Capacity ........................................ 387
Problem (malfunction) ................... 158
Fuses
Allocation chart ............................. 352
Before changing ............................. 352
Dashboard fuse box ....................... 352
Fuse box in the engine compart-
ment .............................................. 353
Fuse box under rear bench seat .... 353
Important safety notes .................. 352
G
Garage door openerClearing the memory ..................... 324
General notes ................................ 321
Important safety notes .................. 321
Opening/closing the garage doo r..3 23
Problems when programming ........3 23
Programming (button in the rear-
view mirror) ................................... 322
Synchronizing the rolling code ....... 322
Gear indicator (on-board com-
puter, Mercedes-AMG vehicles) ....... 245
Genuine parts ...................................... 27
Glove box ...........................................3 01
Google™ Local Search
see also Digital Operator's Man-
ual ..................................................2 92
GTW (Gross Trailer Weight) (defini-
tion) .................................................... 373
H
Handbrake
see Parking brake
Hazard warning lamps ......................117
Head restraints
Adjusting ......................................... 99
Adjusting (electrically) ................... 100
Adjusting (manually) ........................ 99
Adjusting (rear) .............................. 100
Installing/removing (rear) .............. 100
Luxury ............................................ 100
Headlamps
Fogging up ..................................... 119
see Automatic headlamp mode
Heating
see Climate control
High beam flasher .............................1 16
High-beam headlamps
Adaptive Highbeam Assist ............. 118
Display message ............................ 260
Replacing bulbs .............................1 21
Switching on/off ........................... 116
Highway mode ................................... 118
Hill start assist .................................. 143
HOLD function
Deactivating ................................... 187
Display message ............................ 268
Function/notes .............................1 87
Home address
see also Digital Operator's Man-
ual ..................................................2 92
Hood
Closing ...........................................3 26
Display message ............................ 277
Important safety notes .................. 325
Opening ......................................... 325
Horn ...................................................... 36
Hydroplaning ..................................... 168
I
Ignition lock
see Key positions
Immobilizer .......................................... 75
Indicator lamps
see Warning and indicator lamps
12Index
Page 23 of 398
SUV(Sport Utility Vehicle) ....................... 30
Switching air-recirculation mode
on/off .................................................1 35
Switching on media mode
Via the device list .......................... 298
T
Tachometer ........................................ 233
Tailgate
Display message ............................ 276
Emergency unlocking ....................... 88
Important safety notes .................... 84
Limiting the opening angle ............... 88
Opening dimensions ...................... 392
Opening/closing (automatically
from inside) ...................................... 87
Opening/closing (automatically
from outside) ................................... 86
Opening/closing (from outside) ....... 85
Power closing .................................. 84
Tank
see Fuel tank
Tank content
Fuel gauge ....................................... 37
Technical data
Capacities ...................................... 386
Information .................................... 384
Tires/wheels ................................. 379
Trailer loads ................................... 395
Vehicle data ................................... 392
Telephone
Accepting a call (multifunction
steering wheel) .............................. 240
Authorizing a mobile phone (con-
necting) ......................................... 296
Authorizing a mobile phone via the
device manager (connecting) ......... 297
Connecting a mobile phone
(device manager) ........................... 297
Connecting a mobile phone (gen-
eral information) ............................ 296
Display message ............................ 277
Menu (on-board computer) ............ 240
Number from the phone book ........ 240
Redialing ........................................ 240
Rejecting/ending a call ................. 240 see also Digital Operator's Man-
ual .................................................. 292
Temperature
Coolant (display in the instrument
cluster) .......................................... 234
Coolant (on-board computer,
Mercedes-AMG vehicles) ............... 245
Engine oil (on-board computer,
Mercedes-AMG vehicles) ............... 245
Outside temperature ...................... 233
Setting (climate control) ................ 132
Transmission oil (on-board com-
puter, Mercedes-AMG vehicles) ..... 245
Through-loading feature ................... 303
Timing (RACETIMER) ......................... 246
Tire pre
ssure
Calling up (on-board computer) ..... 361
Checking manually ........................ 360
Display message ............................ 273
Maximum ....................................... 360
Not reached (TIREFIT) .................... 342
Notes ............................................. 359
Reached (TIREFIT) .......................... 343
Recommended ............................... 357
Tire pressure loss warning system
General notes ................................ 360
Important safety notes .................. 361
Restarting ...................................... 361
Tire pressure monitor
Checking the tire pressure elec-
tronically ........................................ 363
Function/notes ............................. 361
General notes ................................ 361
Important safety notes .................. 362
Radio type approval for the tire
pressure monitor ........................... 364
Restarting ...................................... 364
Warning lamp ................................. 291
Warning message .......................... 363
Tire pressure table ............................ 358
TIREFIT kit
Important safety notes .................. 341
Storage location ............................ 339
Tire pressure not reached .............. 342
Tire pressure reached .................... 343
Using ............................................. 341
Tires
Aspect ratio (definition) ................. 373
Index21
Page 158 of 398
GWARNING
Fuel is poisonous and hazardous to health.
There is a risk of injury.
You must make sure that fuel does not come into contact with your skin, eyes or clothing
and that it is not swallowed. Do not inhale fuel
vapors. Keep fuel away from children.
If you or others come into contact with fuel,
observe the following:
RWash away fuel from skin immediately
using soap and water.
RIf fuel comes into contact with your eyes,
immediately rinse them thoroughly with
clean water. Seek medical assistance with-
out delay.
RIf fuel is swallowed, seek medical assis-
tance without delay. Do not induce vomit-
ing.
RImmediately change out of clothing which
has come into contact with fuel.
GWARNING
Electrostatic buildup can create sparks and
ignite fuel vapors. There is a risk of fire and
explosion.
Always touch the vehicle body before opening
the fuel filler flap or touching the fuel pump
nozzle. Any existing electrostatic buildup is
thereby discharged.
GWARNING
Vehicles with a diesel engine:
If you mix diesel fuel with gasoline, the flash
point is lower than that of pure diesel fuel.
When the engine is running, exhaust system
components could overheat without being
noticed. There is a risk of fire.
Never refuel with gasoline. Never mix gasoline with diesel fuel.
!Do not use gasoline to refuel vehicles with a
diesel engine. Do not switch on the ignition if
you accidentally refuel with the wrong fuel.
Otherwise, the fuel will enter the fuel system. Even small amounts of the wrong fuel could
result in damage to the fuel system and the engine. The repair costs are high. Notify a
qualified specialist workshop and have the
fuel tank and fuel lines drained completely.
!Do not use diesel to refuel vehicles with a
gasoline engine. Do not switch on the ignition
if you accidentally refuel with the wrong fuel.
Otherwise, the fuel will enter the fuel system. Even small amounts of the wrong fuel could
result in damage to the fuel system and the
engine. Notify a qualified specialist workshop
and have the fuel tank and fuel lines drained
completely.
!Overfilling the fuel tank could damage the
fuel system.
!Take care not to spill any fuel on painted
surfaces. You could otherwise damage the
paintwork.
!Use a filter when adding fuel from a fuel can.
The fuel lines and/or the fuel injection system
could otherwise be blocked by particles from
the fuel can.
Do not get into the vehicle again during the refu-
eling process. Otherwise, electrostatic charge
could build up again.
If you overfill the fuel tank, fuel could spray out
when the fuel pump nozzle is removed.
For further information on fuel and fuel quality
(
Ypage 387).
Refueling
General information
Pay attention to the important safety notes
(Ypage 155).
The fuel filler flap is unlocked or locked auto-
matically when you unlock or lock the vehicle
with the SmartKey or using KEYLESS-GO.
The position of the fuel filler cap is displayed
8 in the instrument cluster. The arrow next
to the filling pump indicates the side of the vehi-
cle.
156Refueling
Driving and parking
Page 159 of 398
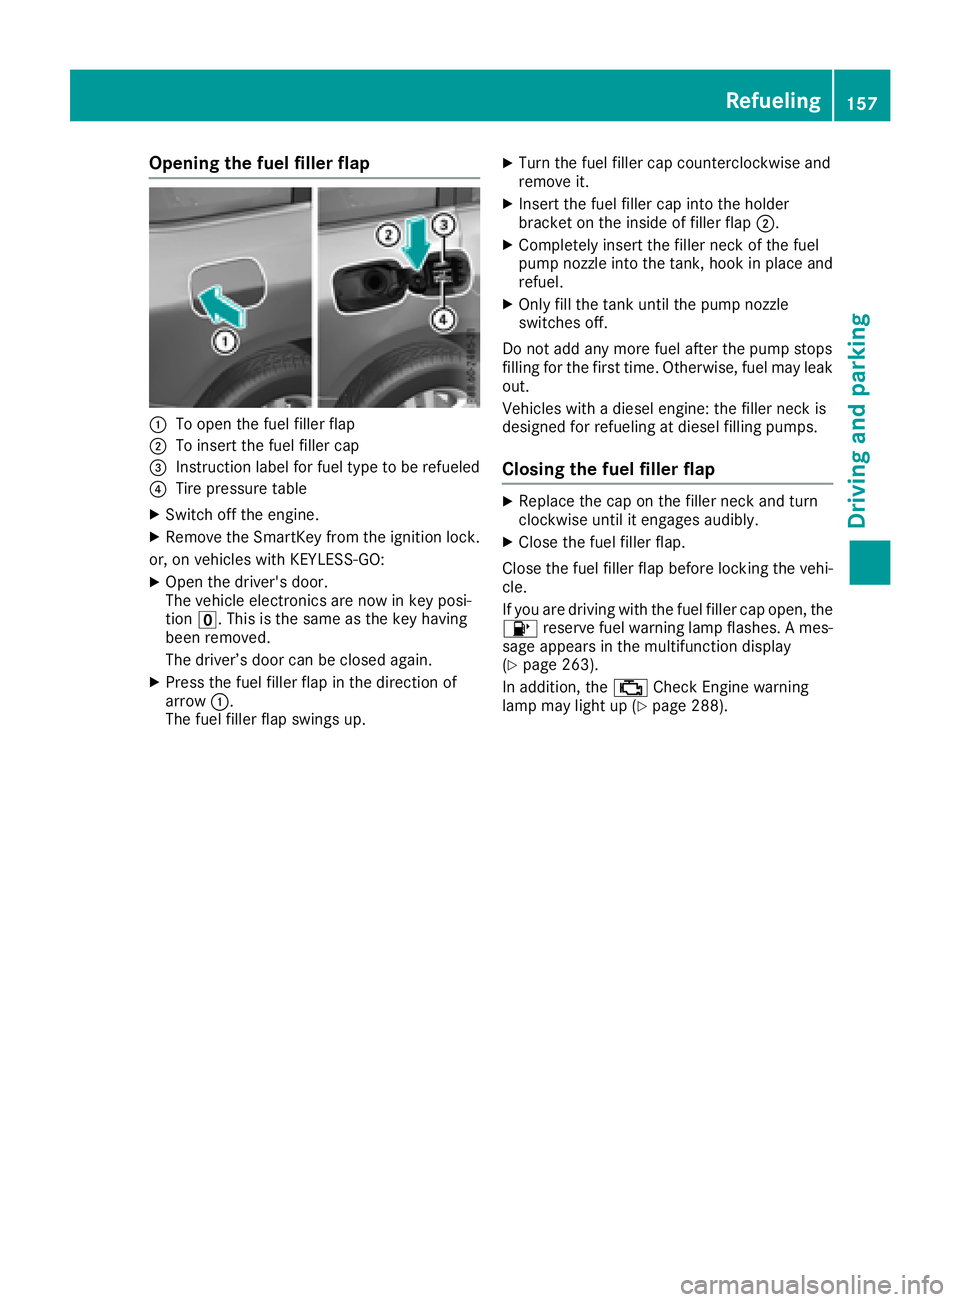
Opening the fuel filler flap
:To open the fuel filler flap
;To insert the fuel filler cap
=Instruction label for fuel type to be refueled
?Tire pressure table
XSwitch off the engine.
XRemove the SmartKey from the ignition lock.
or, on vehicles with KEYLESS ‑GO:
XOpen the driver's door.
The vehicle electronics are now in key posi-
tion u. This is the same as the key having
been removed.
The driver’s door can be closed again.
XPress the fuel filler flap in the direction of
arrow :.
The fuel filler flap swings up.
XTurn the fuel filler cap counterclockwise and
remove it.
XInsert the fuel filler cap into the holder
bracket on the inside of filler flap ;.
XCompletely insert the filler neck of the fuel
pump nozzle into the tank, hook in place and
refuel.
XOnly fill the tank until the pump nozzle
switches off.
Do not add any more fuel after the pump stops
filling for the first time. Otherwise, fuel may leak
out.
Vehicles with a diesel engine: the filler neck is
designed for refueling at diesel filling pumps.
Closing the fuel filler flap
XReplace the cap on the filler neck and turn
clockwise until it engages audibly.
XClose the fuel filler flap.
Close the fuel filler flap before locking the vehi-
cle.
If you are driving with the fuel filler cap open, the
8 reserve fuel warning lamp flashes. A mes-
sage appears in the multifunction display
(
Ypage 263).
In addition, the ;Check Engine warning
lamp may light up (
Ypage 288).
Refueling157
Driving and parking
Z
Page 162 of 398
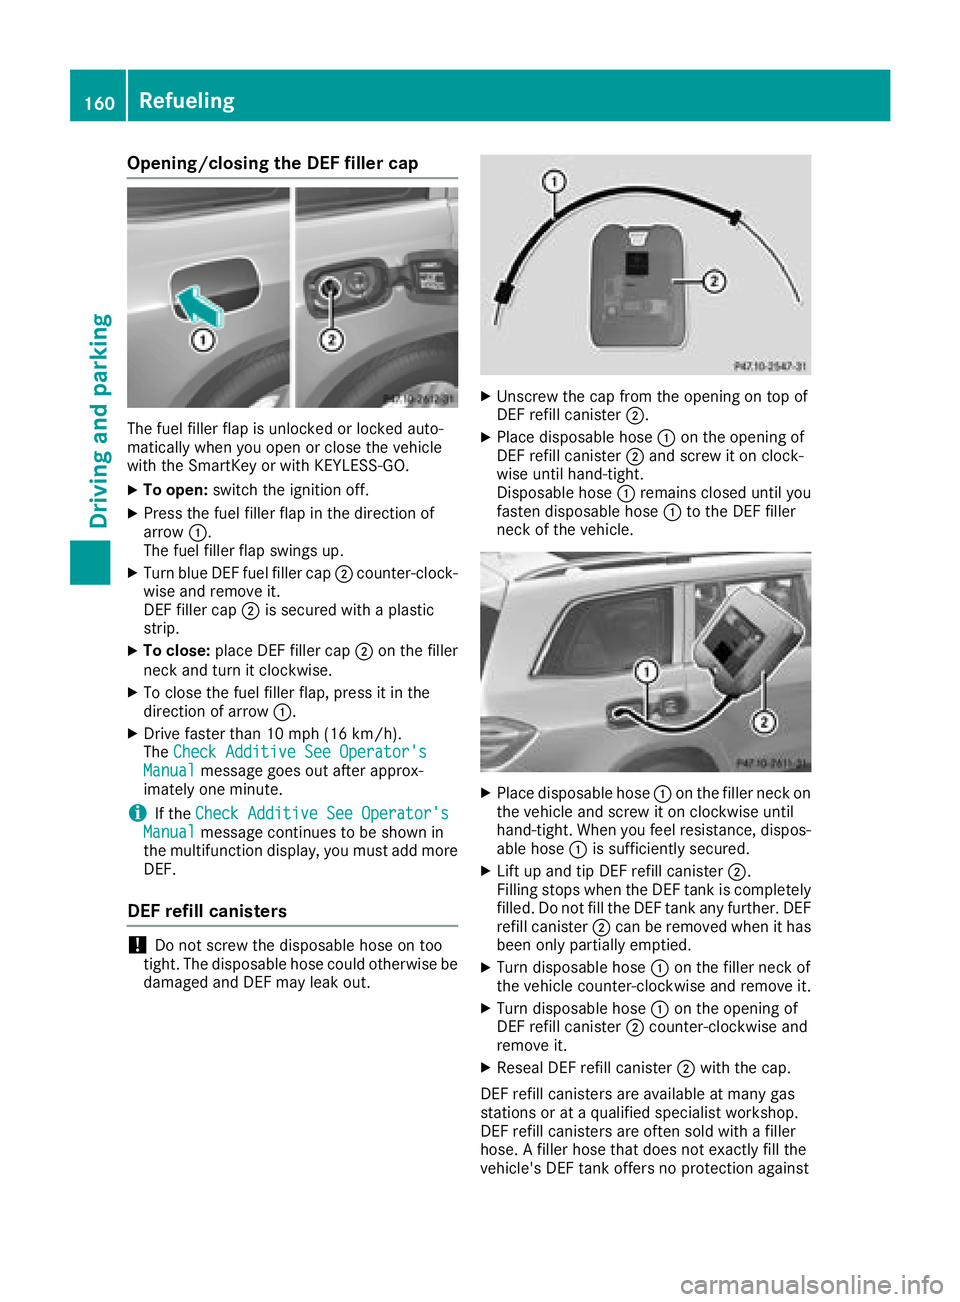
Opening/closing the DEF filler cap
The fuel filler flap is unlocked or locked auto-
matically when you open or close the vehicle
with the SmartKey or with KEYLESS-GO.
XTo open:switch the ignition off.
XPress the fuel filler flap in the direction of
arrow:.
The fuel filler flap swings up.
XTurn blue DEF fuel filler cap ;counter-clock-
wise and remove it.
DEF filler cap ;is secured with a plastic
strip.
XTo close: place DEF filler cap ;on the filler
neck and turn it clockwise.
XTo close the fuel filler flap, press it in the
direction of arrow :.
XDrive faster than 10 mph (16 km/h).
TheCheck Additive See Operator's
Manualmessage goes out after approx-
imately one minute.
iIf the Check Additive See Operator'sManualmessage continues to be shown in
the multifunction display, you must add more
DEF.
DEF refill canisters
!Do not screw the disposable hose on too
tight. The disposable hose could otherwise be damaged and DEF may leak out.
XUnscrew the cap from the opening on top of
DEF refill canister ;.
XPlace disposable hose :on the opening of
DEF refill canister ;and screw it on clock-
wise until hand-tight.
Disposable hose :remains closed until you
fasten disposable hose :to the DEF filler
neck of the vehicle.
XPlace disposable hose :on the filler neck on
the vehicle and screw it on clockwise until
hand-tight. When you feel resistance, dispos-
able hose :is sufficiently secured.
XLift up and tip DEF refill canister ;.
Filling stops when the DEF tank is completely
filled. Do not fill the DEF tank any further. DEF
refill canister ;can be removed when it has
been only partially emptied.
XTurn disposable hose :on the filler neck of
the vehicle counter-clockwise and remove it.
XTurn disposable hose :on the opening of
DEF refill canister ;counter-clockwise and
remove it.
XReseal DEF refill canister ;with the cap.
DEF refill canisters are available at many gas
stations or at a qualified specialist workshop.
DEF refill canisters are often sold with a filler
hose. A filler hose that does not exactly fill the
vehicle's DEF tank offers no protection against
160Refueling
Driving and parking
Page 266 of 398
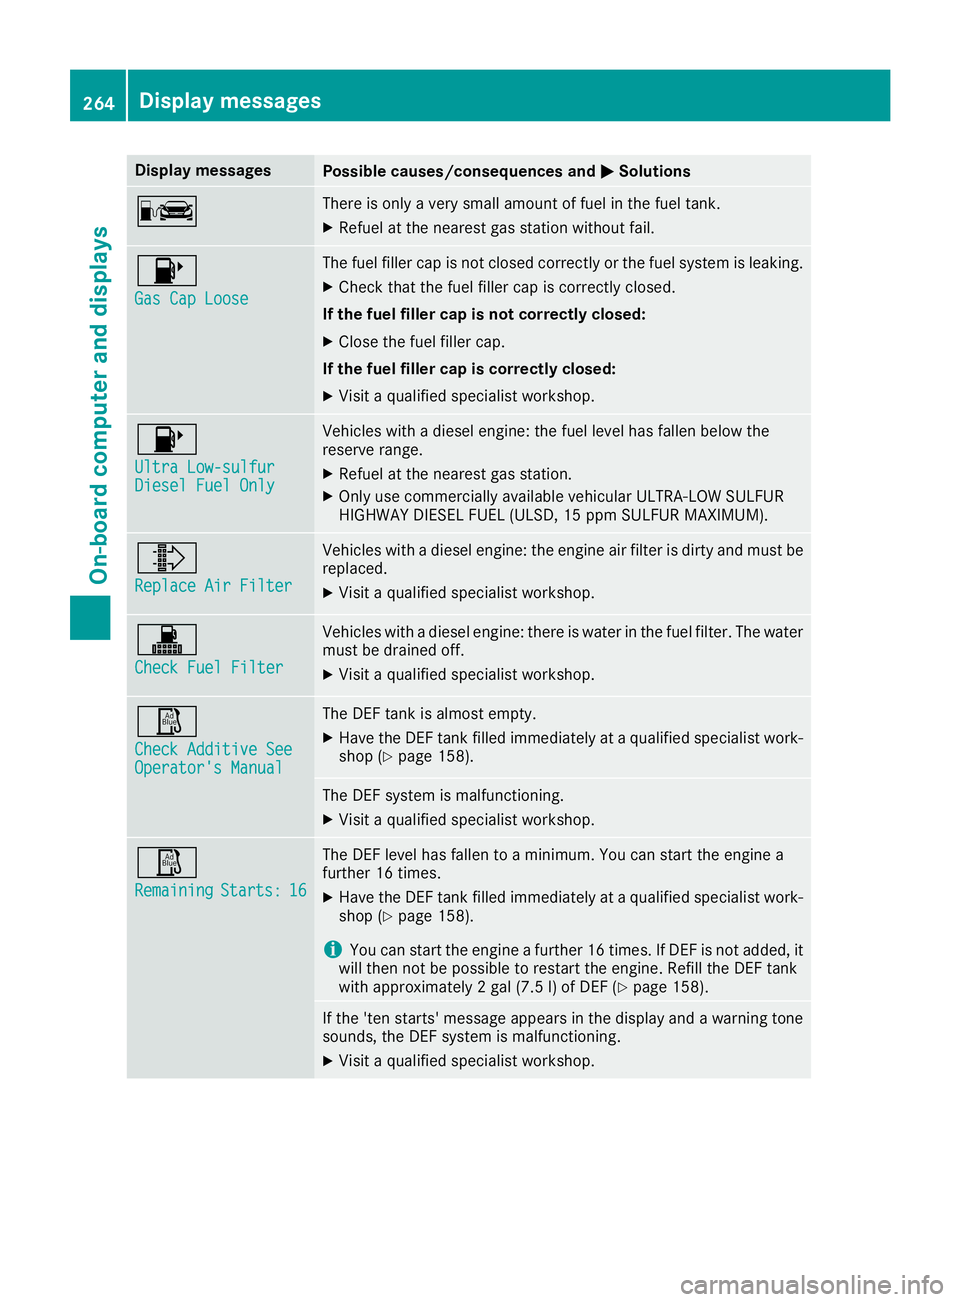
Display messagesPossible causes/consequences andMSolutions
CThere is onlyaver ysmall amount of fuel in th efuel tank.
XRefue lat th eneares tgas station without fail .
8
Gas Cap Loose
The fuel filler cap is notclosed correctl yor th efuel system is leaking .
XCheckthat th efuel filler cap is correctl yclosed .
If th efuel filler cap is not correctl yclosed :
XCloseth efuel filler cap .
If th efuel filler cap is correctl yclosed :
XVisitaqualified specialist workshop .
8
Ultra Low-sulfurDiesel FuelOnl y
Vehicles wit h adiesel engine: th efuel level has fallen belo wthe
reserv erange.
XRefue lat th eneares tgas station .
XOnly use commercially available vehicular ULTRA-LOW SULFUR
HIGHWAY DIESEL FUEL (ULSD ,15 ppm SULFUR MAXIMUM) .
¸
ReplaceAir Filter
Vehicles wit h adiesel engine: th eengin eair filter is dirty and mus tbe
replaced.
XVisit aqualified specialist workshop .
!
Check FuelFilter
Vehicles wit h adiesel engine: there is water in th efuel filter. The water
mus tbe draine doff .
XVisit aqualified specialist workshop .
Ø
Check Additive SeeOperator'sManual
The DE Ftan kis almost empty.
XHav eth eDE Ftan kfilled immediately at aqualified specialist work-
sho p (Ypage 158).
The DE Fsystem is malfunctioning .
XVisitaqualified specialist workshop .
Ø
RemainingStarts:16
The DEFlevel has fallen to aminimum .You can start th eengin e a
further 16 times .
XHaveth eDE Ftan kfilled immediately at aqualified specialist work-
sho p (Ypage 158).
iYou can start th eengin e afurther 16 times .If DE Fis no tadded ,it
will then no tbe possibl eto restar tth eengine. Refill th eDE Ftan k
wit happroximately 2gal (7. 5l) of DE F (
Ypage 158).
If the'ten starts' message appear sin th edisplay and awarning tone
sounds, th eDE Fsystem is malfunctioning .
XVisitaqualified specialist workshop .
264Display messages
On-board computer and displays
Page 290 of 398
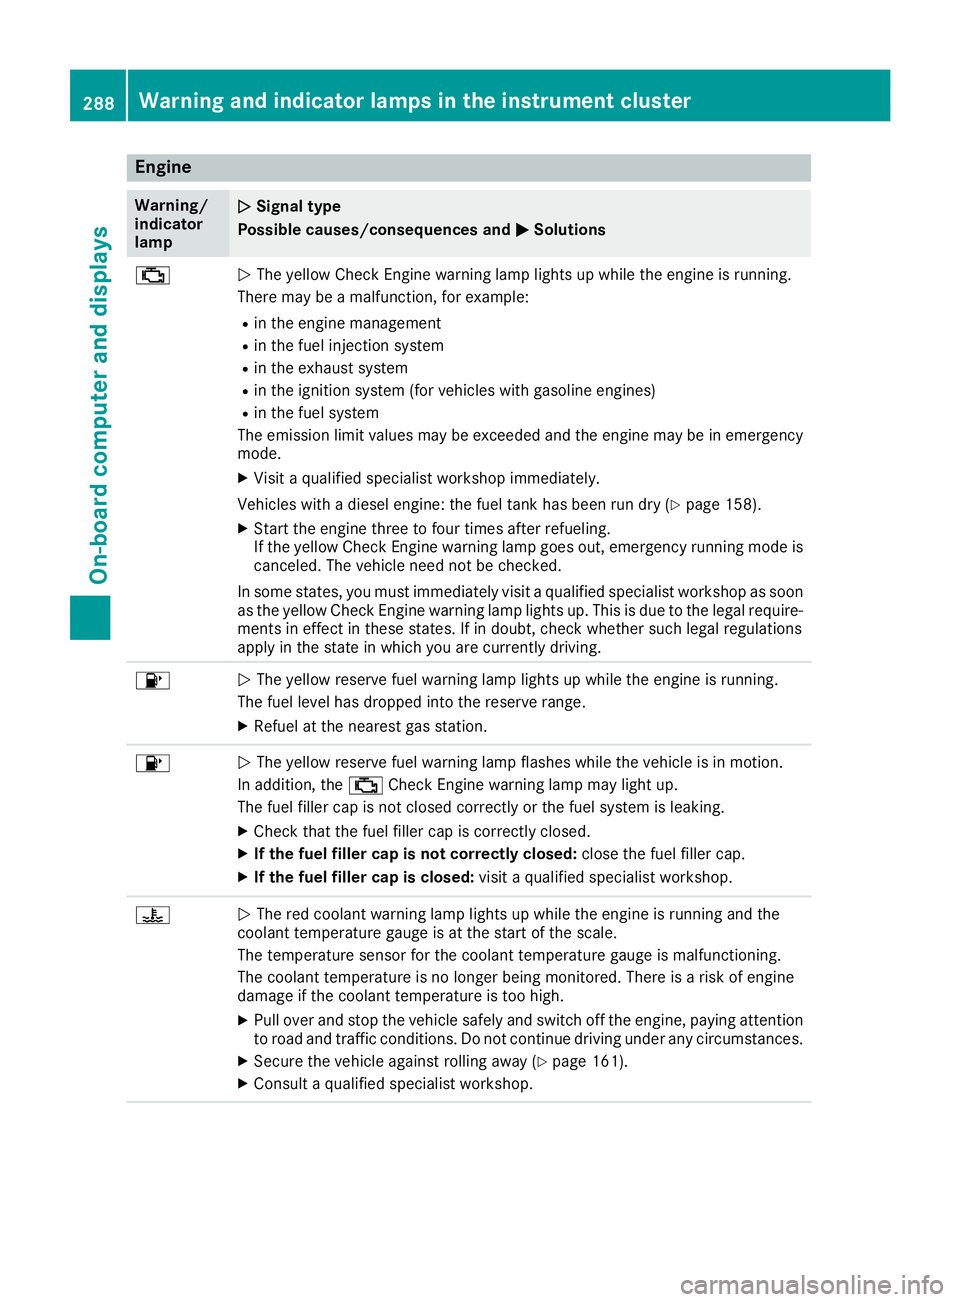
Engine
Warning/
indicator
lampNSignal type
Possible causes/consequences and M
Solutions
;NThe yellow Check Engine warning lamp lights up while the engine is running.
There may be a malfunction, for example:
Rin the engine management
Rin the fuel injection system
Rin the exhaust system
Rin the ignition system (for vehicles with gasoline engines)
Rin the fuel system
The emission limit values may be exceeded and the engine may be in emergency
mode.
XVisit a qualified specialist workshop immediately.
Vehicles with a diesel engine: the fuel tank has been run dry (
Ypage 158).
XStart the engine three to four times after refueling.
If the yellow Check Engine warning lamp goes out, emergency running mode is
canceled. The vehicle need not be checked.
In some states, you must immediately visit a qualified specialist workshop as soon
as the yellow Check Engine warning lamp lights up. This is due to the legal require-
ments in effect in these states. If in doubt, check whether such legal regulations
apply in the state in which you are currently driving.
8N The yellow reserve fuel warning lamp lights up while the engine is running.
The fuel level has dropped into the reserve range.
XRefuel at the nearest gas station.
8N The yellow reserve fuel warning lamp flashes while the vehicle is in motion.
In addition, the ;Check Engine warning lamp may light up.
The fuel filler cap is not closed correctly or the fuel system is leaking.
XCheck that the fuel filler cap is correctly closed.
XIf the fuel filler cap is not correctly closed: close the fuel filler cap.
XIf the fuel filler cap is closed:visit a qualified specialist workshop.
?NThe red coolant warning lamp lights up while the engine is running and the
coolant temperature gauge is at the start of the scale.
The temperature sensor for the coolant temperature gauge is malfunctioning.
The coolant temperature is no longer being monitored. There is a risk of engine
damage if the coolant temperature is too high.
XPull over and stop the vehicle safely and switch off the engine, paying attention
to road and traffic conditions. Do not continue driving under any circumstances.
XSecure the vehicle against rolling away (Ypage 161).
XConsult a qualified specialist workshop.
288Warning and indicator lamps in the instrument cluster
On-board computer and displays
Page 345 of 398
Do not continue driving. Contact a qualified
specialist workshop.
Tire pressure reached
GWARNING
A tire temporarily sealed with tire sealant
impairs the driving characteristics and is not
suitable for higher speeds. There is a risk of
accident.
You should therefore adapt your driving style
accordingly and drive carefully. Do not exceed the specified maximum speed with a tire that
has been repaired using tire sealant.
The maximum permissible speed for a tire
sealed with tire sealant is 50 mph (80 km/h).
The upper part of the TIREFIT sticker must be
affixed to the instrument cluster in the driver's
field of vision.
!Residue from the tire sealant may come out
of the filler hose after use. This could cause
stains.
Therefore, place the filler hose in the plastic
bag which contained the TIREFIT kit.
HEnvironmental note
Have the used tire sealant bottle disposed of
professionally, e.g. at a qualified specialist
workshop.
If a tire pressure of 180 kPa (1.8 bar/26 psi) has
been attained after five minutes:
XSwitch off the tire inflation compressor.
XUnscrew the filler hose from the valve of the
faulty tire.
XStow the tire sealant bottle and the tire infla-
tion compressor.
XPull away immediately.
XStop after driving for approximately ten
minutes and check the tire pressure with the
tire inflation compressor.
The tire pressure must now be at least
130 kPa (1.3 bar/19 psi).
GWARNING
If the required tire pressure is not reached
after driving for a short period, the tire is too
badly damaged. The tire sealant cannot repair
the tire in this instance. Damaged tires and a
tire pressure that is too low can significantly
impair the vehicle's braking and driving char-
acteristics. There is a risk of accident.
Do not continue driving. Contact a qualified
specialist workshop.
iIn cases such as the one mentioned above,
contact an authorized Mercedes-Benz Cen-
ter. Or call 1-800 FOR-MERCEDES (in the
USA) or 1-800-387-0100 (in Canada).
XCorrect the tire pressure if it is still at least
130 kPa (1.3 ba r/19 psi). See the Tire and
Loading Information placard on the driver's
side B-pillar or the tire pressure table in the
fuel filler flap for values.
XTo increase the tire pressure: switch on the
tire inflation compressor.
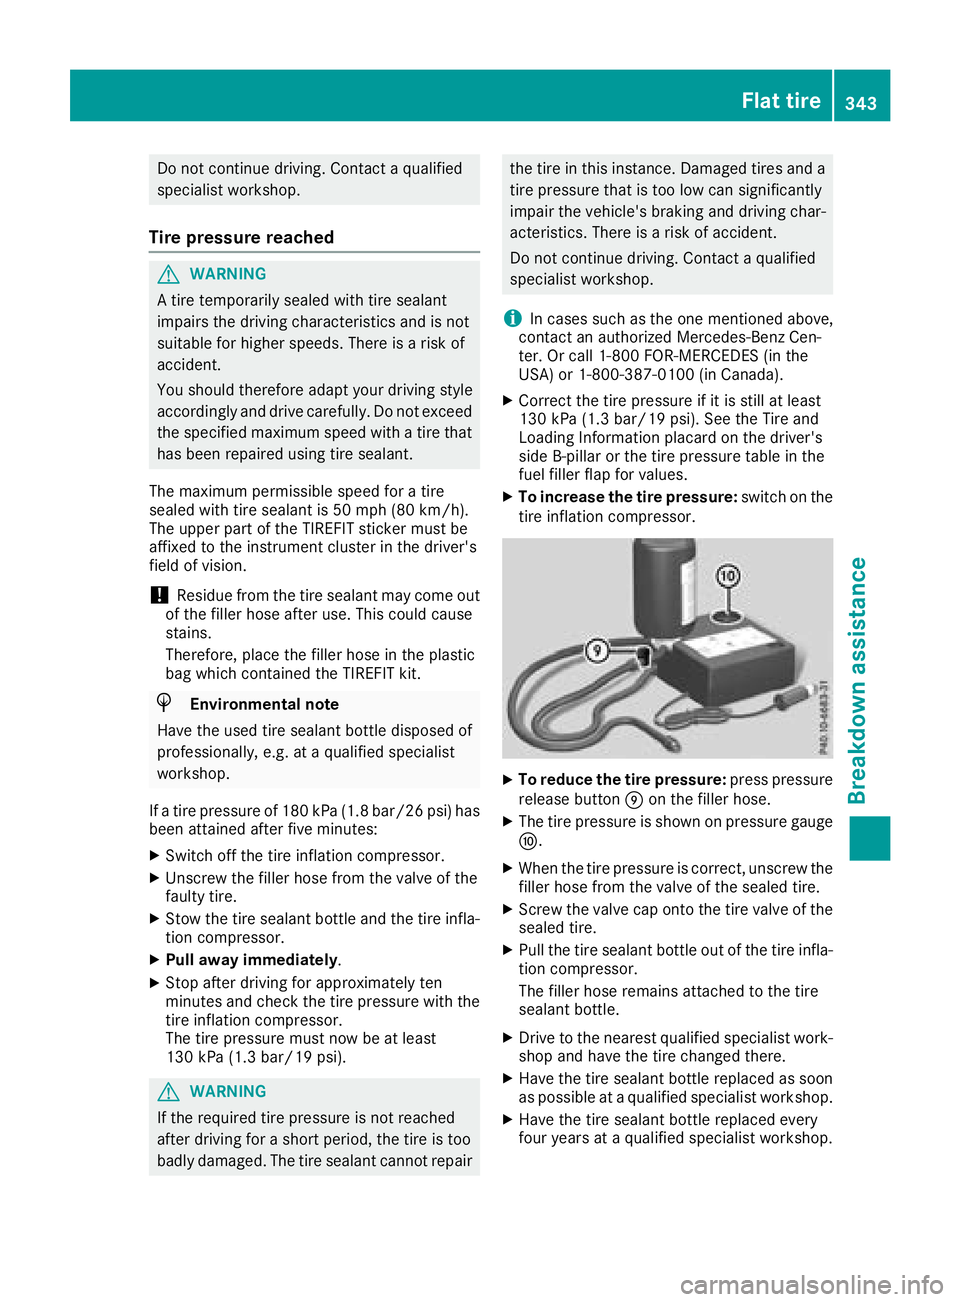
XTo reduce the tire pressure: press pressure
release button Eon the filler hose.
XThe tire pressure is shown on pressure gauge
F.
XWhen the tire pressure is correct, unscrew the
filler hose from the valve of the sealed tire.
XScrew the valve cap onto the tire valve of the
sealed tire.
XPull the tire sealant bottle out of the tire infla-
tion compressor.
The filler hose remains attached to the tire
sealant bottle.
XDrive to the nearest qualified specialist work-
shop and have the tire changed there.
XHave the tire sealant bottle replaced as soon
as possible at a qualified specialist workshop.
XHave the tire sealant bottle replaced every
four years at a qualified specialist workshop.
Flat tire343
Breakdown assistance
Z
Page 349 of 398
Particularly avoid fire, open flames, creating sparks and smoking. Ensure there is sufficient ven-
tilation while charging and jump-starting. Do not lean over a battery.
GWARNING
During the charging process, a battery produces hydrogen gas. If a short circuit occurs or sparks
are created, the hydrogen gas can ignite. There is a risk of an explosion.
RMake sure that the positive terminal of a connected battery does not come into contact with
vehicle parts.
RNever place metal objects or tools on a battery.
RIt is important that you observe the described order of the battery terminals when connecting
and disconnecting a battery.
RWhen jump-starting, make sure that the battery poles with identical polarity are connected.
RIt is particularly important to observe the described order when connecting and disconnecting
the jumper cables.
RNever connect or disconnect the battery terminals while the engine is running.
GWARNING
A discharged battery can freeze at temperatures below freezing point. When jump-starting the
vehicle or charging the battery, gases can escape from the battery. There is a risk of an explosion. Allow the frozen battery to thaw out before charging it or jump-starting.
!Vehicles with a gasoline engine: avoid repeated and lengthy starting attempts. Otherwise, the
catalytic converter could be damaged by non-combusted fuel.
If the indicator/warning lamps do not light up at low temperatures, it is very likely that the dis-
charged battery has frozen. In this case you may neither jump-start the vehicle nor charge the
battery. The service life of a thawed-out battery may be shorter. The starting characteristics can be
impaired, particularly at low temperatures. Have the thawed-out battery checked at a qualified
specialist workshop.
Do not start the vehicle using a rapid charging device. If your vehicle's battery is discharged, the
engine can be jump-started from another vehicle or from a donor battery using jumper cables.
Observe the following points:
RThe battery is not accessible in all vehicles. If the other vehicle's battery is not accessible, jump-
start the vehicle using a donor battery or a jump-starting device.
RVehicles with a gasoline engine: only jump-start the vehicle when the engine and exhaust
system are cold.
RDo not start the engine if the battery is frozen. Let the battery thaw first.
ROnly jump-start from batteries with a 12 V voltage rating.
ROnly use jumper cables which have a sufficient cross-section and insulated terminal clamps.
RIf the battery is fully discharged, leave the battery that is being used to jump-start connected for
a few minutes before attempting to start. This charges the battery slightly.
RMake sure that the two vehicles do not touch.
Jump-starting347
Breakdown assistance
Z