Tow ball MERCEDES-BENZ M-Class 2011 W164 Owner's Manual
[x] Cancel search | Manufacturer: MERCEDES-BENZ, Model Year: 2011, Model line: M-Class, Model: MERCEDES-BENZ M-Class 2011 W164Pages: 372, PDF Size: 16.23 MB
Page 188 of 372

yellow segments showing operational
readiness = light up.
The selected transmission position
determines which warning display is active
when the engine is running.Transmission
positionWarning displayDFront area activatedR or NRear and front areas
activatedPNo areas activated
One or more segments light up as the vehicle
approaches an obstacle, depending on the
vehicle's distance from the obstacle.
From the:
R sixth segment onwards, you will hear an
intermittent warning tone for
approximately two seconds.
R seventh segment onwards, you will hear a
warning tone for approximately two
seconds. This indicates that you have now
reached the minimum distance.
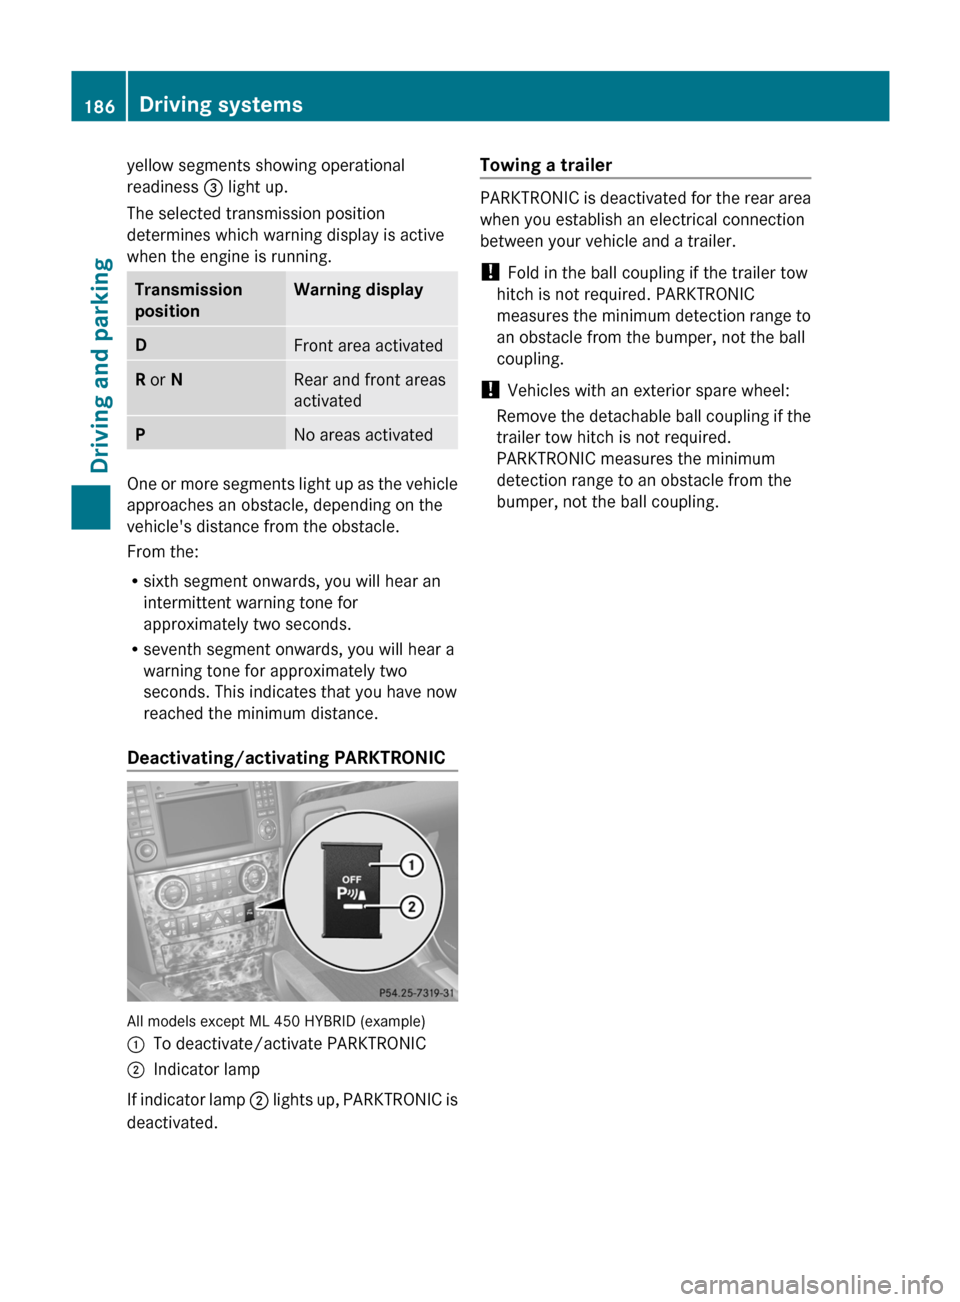
Deactivating/activating PARKTRONIC
All models except ML 450 HYBRID (example)
:To deactivate/activate PARKTRONIC;Indicator lamp
If indicator lamp ; lights up, PARKTRONIC is
deactivated.
Towing a trailer
PARKTRONIC is deactivated for the rear area
when you establish an electrical connection
between your vehicle and a trailer.
! Fold in the ball coupling if the trailer tow
hitch is not required. PARKTRONIC
measures the minimum detection range to
an obstacle from the bumper, not the ball
coupling.
! Vehicles with an exterior spare wheel:
Remove the detachable ball coupling if the
trailer tow hitch is not required.
PARKTRONIC measures the minimum
detection range to an obstacle from the
bumper, not the ball coupling.
186Driving systemsDriving and parking
BA 164.1 USA, CA Edition B 2011; 1; 2, en-USd2mskotVersion: 3.0.3.52010-04-21T17:25:06+02:00 - Seite 186
Page 190 of 372

GWarning!
The rear view camera is only an aid and may
display obstacles
R from a distorted perspective
R inaccurately
R may not display obstacles at all
The rear view camera does not relieve you of
the responsibility to be cautious. Take care
and pay careful attention. The rear view
camera may not show objects which are
R very close to the rear bumper
R under the rear bumper
R above the tailgate handle
You are responsible for safety at all times and
must continue to pay attention to the
immediate surroundings when parking and
maneuvering. This includes the area behind,
in front of, and beside the vehicle. Otherwise
you could endanger yourself and/or others.
GWarning!
The rear view camera either will not function
or will not function to its full capability if
R the tailgate is open
R it is raining very hard, snowing or foggy
R it is night or you are parking/maneuvering
your vehicle in an area where it is very dark
R the camera is exposed to a very bright white
light
R the immediate surroundings are
illuminated with fluorescent light (the
display may flicker)
R there is a sudden change in temperature,
e.g. if you drive into a heated garage from
the cold (lens condensation)
R the camera lens is dirty or covered
R the rear of your vehicle is damaged
In this case, have the position and setting
of the camera checked by a qualified
specialist workshop. Mercedes-Benz
recommends that you contact a Mercedes-
Benz Center for this purpose.
Do not use the rear view camera in these
situations. Otherwise you could injure
yourself or others and/or damage property
including your vehicle while parking/
maneuvering.
Activating the rear view cameraXMake sure that the key is in position 2 in
the ignition lock.XMake sure that the "rear view camera"
function is selected in COMAND APS; see
the separate operating instructions for
COMAND APS.XEngage reverse gear.
The area behind the vehicle is shown in the
COMAND APS display with guide lines.
Guide lines in the COMAND APS display
GWarning!
Use of rear view camera can be dangerous if
you are color-blind or have impaired color
vision.
Only use rear view camera if you can see and
distinguish all colored guidelines shown by
rear view camera on the COMAND system
display.
GWarning
Please note that objects that do not touch the
ground may appear to be further away than
they actually are, for example:
R the bumper of a vehicle parked behind you
R the trailer drawbar
R the ball coupling of a trailer tow hitch
R the rear end of a truck
R a slanted post
In such cases, you should not use the guide
lines to judge the distance. You may misjudge
the distance, which increases the risk of
impacting the objects.
Even if the object you approach is directly on
the ground, do not approach the object any
closer than the red guide line.
188Driving systemsDriving and parking
BA 164.1 USA, CA Edition B 2011; 1; 2, en-USd2mskotVersion: 3.0.3.52010-04-21T17:25:06+02:00 - Seite 188
Page 200 of 372

Message in the multifunction display
Diff. Lock System Overheated -
Wait briefly.
The differential lock system has overheated
and briefly disengaged.XContinue driving.
The differential locks cool off and are soon
available once again.
Towing a trailer
Notes on towing a trailer
Important safety instructions
GWarning!
Failure to use proper equipment and driving
technique can result in a loss of vehicle
control when towing a trailer.
Improper towing or failure to follow the
instructions in this manual can result in
vehicle damage and/or serious personal
injury. Follow the guidelines below carefully
to assure safe trailer operation.
Contact an authorized Mercedes-Benz Center
should you require an explanation of
information contained in this manual.
General information
R Only install an approved trailer coupling on
your vehicle.
Further information on availability and on
installation is available from any authorized
Mercedes-Benz Center.
R The bumpers of your vehicle are not
suitable for installing detachable trailer
couplings.
R Do not install hired trailer couplings or
other detachable trailer couplings on the
bumpers of your vehicle.
R To reduce the risk of damage to the ball
coupling, remove it from the ball coupling
recess when not in use.
Coupling up a trailerGWarning!
Vehicles with air suspension program: While
you are coupling or decoupling a trailer, make
sure nobody locks or unlocks the vehicle and/
or opens or closes doors or the tailgate.
The vehicle’s level could change and you
could endanger yourself and/or others as a
result.
Make sure that you do not operate the ADS
switch or the vehicle level control system
when coupling/decoupling the trailer.
Observe the maximum permissible trailer
dimensions (width and length).
Most federal states and all Canadian
provinces require by law:
R safety chains between the towing vehicle
and the trailer. The chains should be cross-
wound under the trailer drawbar. They must
be fastened to the vehicle's trailer
coupling, not to the bumper or the axle.
Allow for enough play in the chains to
facilitate turning tight corners.
R a separate brake system for certain types
of trailer.
R a safety switch for braked trailers. Check
the specific legal requirements applicable
to your federal state.
If the trailer detaches from the towing
vehicle, the safety switch applies the
trailer's brakes.
! Do not connect the trailer's brake system
(if featured) to the hydraulic brake system
of the towing vehicle, as the latter is
equipped with an anti-lock brake system.
Doing so will result in a loss of function of
the brake systems of both the vehicle and
the trailer.
i The vehicle's wiring harness features a
line to the brake indicator lamp.
198Towing a trailerDriving and parking
BA 164.1 USA, CA Edition B 2011; 1; 2, en-USd2mskotVersion: 3.0.3.52010-04-21T17:25:06+02:00 - Seite 198
Page 203 of 372

Loading a trailer
RWhen loading a trailer, please note that
neither the permissible gross trailer weight
nor the permissible Gross Vehicle Weight
Rating (GVWR) may be exceeded. The
permissible Gross Vehicle Weight Rating
(GVWR) is specified on the type plate
located on the B-pillar on the driver's side
of your vehicle.
You can find the maximum permissible
values on the type plates of your vehicle
and the trailer. Always observe the lowest
respective value when determining the
maximum weight with which you can load
the vehicle and the trailer.
R The drawbar noseweight acting on the ball
coupling has to be added to the rear axle
weight in order to prevent the permissible
Gross Axle Weight Rating (GAWR) from
being exceeded. The permissible Gross
Vehicle Weight Rating (GVWR) is specified
on the type plate located on the B-pillar on
the driver's side of your vehicle.
i Mercedes-Benz recommends loading the
trailer so that the drawbar noseweight
remains between 8% and 15% of the
permissible gross trailer weight.
i The weight of additional accessories,
passengers, and cargo reduces the
permissible trailer load and drawbar
noseweight for your vehicle.
Checking the vehicle and trailer weight
R To check that the weights of the towing
vehicle and the trailer comply with the
maximum permissible values, have the
vehicle/trailer combination (including the
driver, passengers, and cargo with a fully
laden trailer) weighed on a calibrated
weighbridge.
R Check the permissible axle weight of the
front and rear axle, the Gross Trailer Weight
(GTW), and the drawbar noseweight.
Check the permissible axle weight of the
front and rear axle, the Gross Trailer Weight
(GTW), and the drawbar noseweight.
Trailer power supply
The trailer power socket of your vehicle is
designed for connecting the 7-pin connector
supplied as part of the Mercedes-Benz-
approved trailer coupling.
i Depending on your trailer, you may need
an adapter to connect your trailer to the
vehicle.
Further information is available from any
authorized Mercedes-Benz Center.
Towing a trailer201Driving and parkingBA 164.1 USA, CA Edition B 2011; 1; 2, en-USd2mskotVersion: 3.0.3.52010-04-21T17:25:06+02:00 - Seite 201Z
Page 349 of 372

TWR (permissible trailer drawbar
noseweight)
The TWR is the maximum permissible weight
that the ball coupling of the trailer tow hitch
can support.
Wear indicator
Narrow bars (tread wear bars) that are
distributed over the tire tread. If the tire tread
is level with the bars, the wear limit of 1
/ 16 in
(1.6 mm) has been reached.
Distribution of the vehicle occupants
Distribution of vehicle occupants over
designated seat positions in a vehicle.
Maximum permissible payload
weight
Nominal load and luggage load plus
68 kilograms (150 lb) multiplied by the
number of seats in the vehicle.
Wheel/tire combinations
Points to remember
GWarning
Observe the "Important safety information"
( Y page 324).
! For safety reasons, Mercedes-Benz
recommends that you only use tires,
wheels and accessories which have been
approved by Mercedes-Benz specifically
for your vehicle. These tires have been
specially adapted for use with the control
systems, such as ABS or ESP ®
, and are
marked as follows:
R MO = Mercedes-Benz Original
R MOE = Mercedes-Benz Original Extended
(tires with run-flat characteristics)
R MO1 = Mercedes-Benz Original (AMG)
Only use Mercedes-Benz Original Extended
tires on wheels that have been specifically
approved by Mercedes-Benz.
If you use other tires, wheels and
accessories, Mercedes-Benz cannot
accept any responsibility for damage that
may result from this. Further information
about tires, wheels and approved
combinations can be obtained from any
authorized Mercedes-Benz Center.
! If you mount tires other than those tested
and recommended by Mercedes-Benz,
characteristics such as handling, noise
levels and fuel consumption, etc. may be
adversely affected. In addition, when
driving with a load, tire dimensional
variations could cause the tires to come
into contact with the bodywork and axle
components. This could result in damage
to the tires or the vehicle.
i Further information about tires and
wheels can be obtained from any
authorized Mercedes-Benz Center.
i The Tire and Load Information placard
with the recommended tire pressures is
attached to the B-pillar on the driver's side.
Further information about driving at high
speeds or driving with vehicle loads that are
lighter than the maximum vehicle load can
be found in the tire pressure table on the
inside of the fuel filler flap. Check tire
pressures regularly, and only when the tires
are cold. Comply with the maintenance
recommendations of the tire manufacturer
in the vehicle document wallet.
Further information on the recommended tire
inflation pressure and on tire pressures for
specific driving conditions, see (Y page 326).
i Notes on the vehicle equipment:
R always mount tires of the same size on a
given axle (left/right).
R always mount the same type of tires on
your vehicle at a given time (summer
tires, winter tires, MOExtended tires).Wheel/tire combinations347Tires and wheelsBA 164.1 USA, CA Edition B 2011; 1; 2, en-USd2mskotVersion: 3.0.3.52010-04-21T17:25:06+02:00 - Seite 347Z