oil pressure MERCEDES-BENZ M-Class 2011 W164 Owner's Manual
[x] Cancel search | Manufacturer: MERCEDES-BENZ, Model Year: 2011, Model line: M-Class, Model: MERCEDES-BENZ M-Class 2011 W164Pages: 372, PDF Size: 16.23 MB
Page 18 of 372
Telescopic rod (EASY-PACK load-
securing kit) ....................................... 264
Temperature Coolant (on-board computer) ......... 208
Displaying the outside
temperature ................................... 208
Engine oil (on-board computer) ...... 209
Outside temperature ...................... 204
Setting ........................................... 131
Theft deterrent locking system
Immobilizer ...................................... 69
Tilt/sliding sunroof
Opening/closing .............................. 89
Resetting ......................................... 89
Time (on-board computer) ................ 215
Timer (on-board computer) .............. 209
TIREFIT kit .......................................... 301
Tire pressure Calling up (on-board computer) .....331
Checking manually ........................329
Display message ............................ 241
Maximum ....................................... 334
Notes ............................................. 327
Not reached (TIREFIT) ....................303
Pressure loss warning ....................329
Reached (TIREFIT) ..........................304
Recommended ............................... 326
Tire pressure monitor
Warning lamp ................................. 253
Tire pressure monitoring system
Function/notes ............................. 331
Restarting ...................................... 333
Tires
Aspect ratio (definition) .................346
Average weight of the vehicle
occupants (definition) ....................344
Bar (definition) ............................... 344
Characteristics .............................. 344
Checking ........................................ 325
Cleaning ......................................... 326
Definition of terms .........................344
Direction of rotation ......................338
Distribution of the vehicle
occupants (definition) ....................347
DOT, Tire Identification Number
(TIN) ............................................... 343
DOT (Department of
Transportation) (definition) ............344Flat tire .......................................... 300
GAWR (Gross Axle Weight Rating)
(definition) ..................................... 345
GTW (Gross Trailer Weight)
(definition) ..................................... 345
Guidelines to be observed .............325
GVW (Gross Vehicle Weight)
(definition) ..................................... 345
GVWR (Gross Vehicle Weight
Rating) (definition) .........................345
Increased vehicle weight due to
optional equipment (definition) ......345
Kilopascal (kPa) (definition) ...........345
Labeling (overview) ........................340
Load bearing index (definition) ......346
Load index ..................................... 343
Load index (definition) ...................345
Maximum loaded vehicle weight
(definition) ..................................... 345
Maximum load on a tire
(definition) ..................................... 346
Maximum permissible tire
pressure (definition) ....................... 346
Maximum tire load .........................338
Maximum tire loading (definition) ..346
Optional equipment weight
(definition) ..................................... 346
PSI (pounds per square inch)
(definition) ..................................... 346
Replacing ....................................... 340
Service life ..................................... 325
Sidewall (definition) .......................346
Speed index (definition) .................345
Storing ........................................... 326
Structure and characteristics
(definition) ..................................... 344
Temperature .................................. 339
TIN (Tire Identification Number)
(definition) ..................................... 346
Tire bead (definition) ......................346
Tire pressure (definition) ................346
Tire pressures (recommended) ......344
Tire quality classes ........................338
Tire size (data) ............................... 347
Tire size designation, load-bearing
capacity, speed index ....................341
Tire tread ....................................... 325
Tire tread (definition) .....................34616IndexBA 164.1 USA, CA Edition B 2011; 1; 2, en-USd2mskotVersion: 3.0.3.52010-04-21T17:25:06+02:00 - Seite 16
Page 155 of 372
Diesel fuel with improved cold flow properties
is available during the winter months. Further
information on fuel properties can be
obtained from oil companies, e.g. at filling
stations.
Refueling
Fuel filler flap
The fuel filler flap is unlocked or locked
automatically when you open or close the
vehicle with the SmartKey or using KEYLESS-
GO.
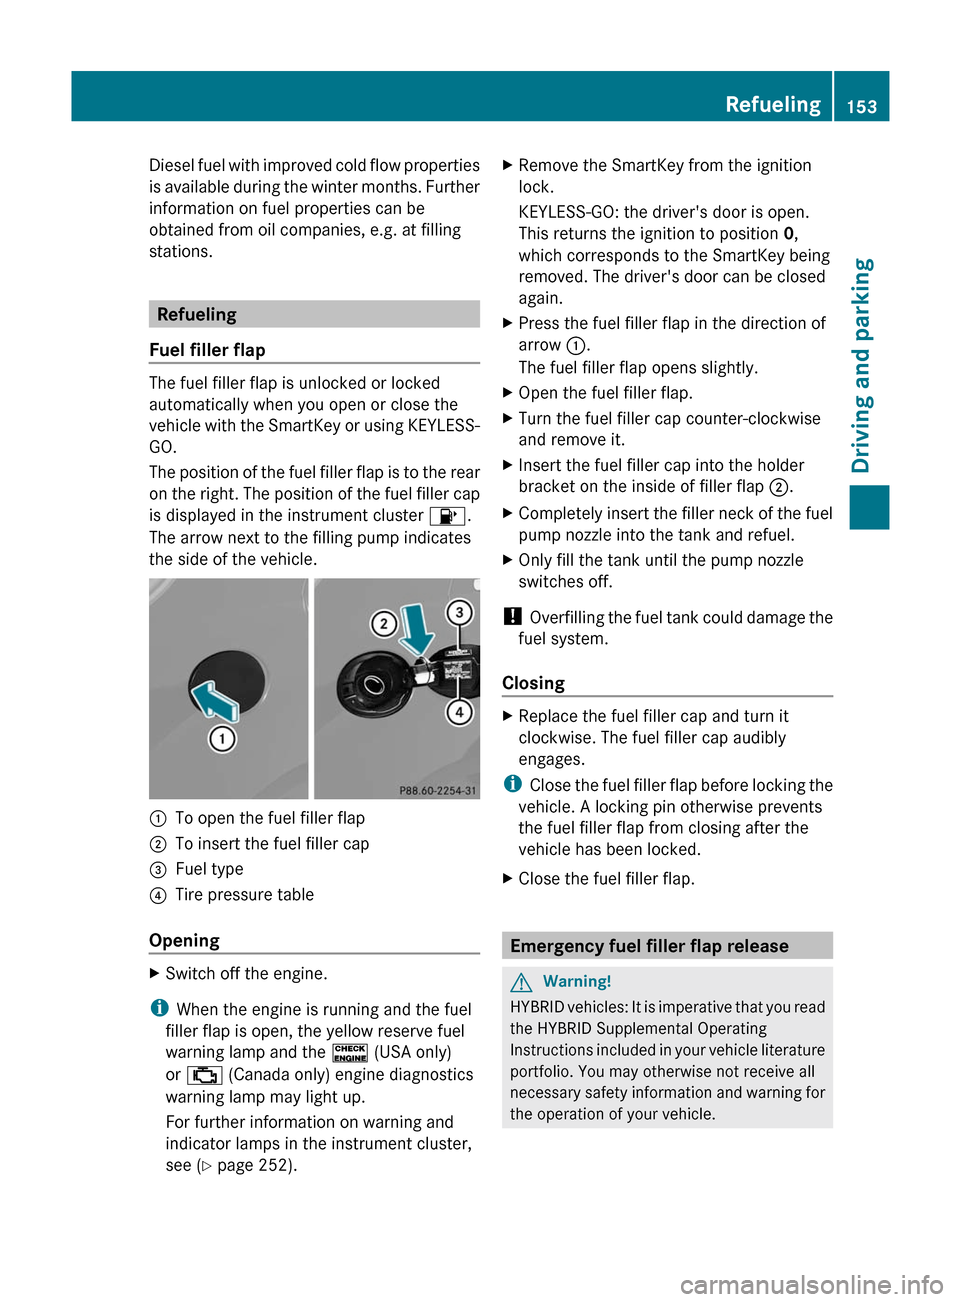
The position of the fuel filler flap is to the rear
on the right. The position of the fuel filler cap
is displayed in the instrument cluster 8.
The arrow next to the filling pump indicates
the side of the vehicle.
:To open the fuel filler flap;To insert the fuel filler cap=Fuel type?Tire pressure table
Opening
XSwitch off the engine.
i When the engine is running and the fuel
filler flap is open, the yellow reserve fuel
warning lamp and the ! (USA only)
or ; (Canada only) engine diagnostics
warning lamp may light up.
For further information on warning and
indicator lamps in the instrument cluster,
see ( Y page 252).
XRemove the SmartKey from the ignition
lock.
KEYLESS-GO: the driver's door is open.
This returns the ignition to position 0,
which corresponds to the SmartKey being
removed. The driver's door can be closed
again.XPress the fuel filler flap in the direction of
arrow :.
The fuel filler flap opens slightly.XOpen the fuel filler flap.XTurn the fuel filler cap counter-clockwise
and remove it.XInsert the fuel filler cap into the holder
bracket on the inside of filler flap ;.XCompletely insert the filler neck of the fuel
pump nozzle into the tank and refuel.XOnly fill the tank until the pump nozzle
switches off.
! Overfilling the fuel tank could damage the
fuel system.
Closing
XReplace the fuel filler cap and turn it
clockwise. The fuel filler cap audibly
engages.
i Close the fuel filler flap before locking the
vehicle. A locking pin otherwise prevents
the fuel filler flap from closing after the
vehicle has been locked.
XClose the fuel filler flap.
Emergency fuel filler flap release
GWarning!
HYBRID vehicles: It is imperative that you read
the HYBRID Supplemental Operating
Instructions included in your vehicle literature
portfolio. You may otherwise not receive all
necessary safety information and warning for
the operation of your vehicle.
Refueling153Driving and parkingBA 164.1 USA, CA Edition B 2011; 1; 2, en-USd2mskotVersion: 3.0.3.52010-04-21T17:25:06+02:00 - Seite 153Z
Page 169 of 372
GWarning!
Vehicles with air suspension program: Please
be aware that by raising the vehicle level, the
center of gravity also rises. Therefore, always
ensure that the vehicle level is as low as
possible. With higher ride height the ESP ®
may activate earlier in certain situations.
GWarning!
Do not reduce the tire inflation pressure
before driving through sand. However, if you
do so, remember to correct the tire inflation
pressure before continuing your trip. Driving
with reduced tire inflation pressure increases
the risk of losing control of the vehicle and
rolling over.
General information
Read this section before driving your vehicle
off-road. Practice by traveling over more
gentle off-road terrain first.
Familiarize yourself with the characteristics
of your vehicle and the gear change process
before driving through difficult terrain.
The following driving systems are specially
adapted to off-road driving:
R off-road drive program ( Y page 193)
R off-road ABS ( Y page 66)
R off-road 4ETS ( Y page 67)
R off-road ESP ®
(Y page 68)
R hill start assist
R AIRMATIC package ( Y page 183)
R DSR (Downhill Speed Regulation)
( Y page 192)
Observe the following notes:
R stop your vehicle and, if necessary, select
the off-road drive program ( Y page 193)
before driving off-road.
R vehicles with the AIRMATIC package:
select a vehicle level that is suitable for the
terrain. Make sure there is always sufficient
ground clearance to prevent damage to the
vehicle.
R make sure that items of luggage and cargo
are stowed safely and are well secured
( Y page 260).
R always keep the engine running and in gear
when driving on a downhill gradient.
Activate DSR ( Y page 192).
R always keep the doors, tailgate, windows
and the tilt/sliding sunroof closed while the
vehicle is in motion.
R adapt the speed to suit the terrain
conditions. The more uneven, worn or
steeper the terrain is, the slower you should
drive.
R drive slowly and at an even speed through
the water. Ensure that a bow wave does not
form as you drive.
R drive with extreme care on unfamiliar off-
road routes where visibility is poor. For
safety reasons, get out of the vehicle first
and survey the off-road route.
R look out for obstacles, such as rocks, holes,
tree stumps and furrows.
R check the depth of water before fording
rivers and streams.
R do not stop in water and do not switch the
engine off.
R drive quickly on sand to overcome the
rolling resistance. Otherwise, the vehicle
could dig itself into the sand.
R do not jump with the vehicle. This
interrupts the vehicle's traction.
R always keep the engine running and in gear
when driving on slopes.
R do not shift the automatic transmission to
transmission position N.
Check list before driving off-roadXEngine oil level: check the engine oil and
top it up if necessary.
The oil supply can only be guaranteed on
steep slopes if the engine oil level is
sufficient.
! If the engine oil warning lamp lights up
while the vehicle is in motion, stop the
Driving tips167Driving and parkingBA 164.1 USA, CA Edition B 2011; 1; 2, en-USd2mskotVersion: 3.0.3.52010-04-21T17:25:06+02:00 - Seite 167Z
Page 170 of 372
vehicle in a safe place as soon as possible.
Check the engine oil level. The engine oil
warning lamp warning must not be ignored.
Continuing the journey while the symbol is
displayed could lead to engine damage.XWheel-changing tool kit: check that the
jack is working and make sure you have the
wheelbrace, a robust tow cable and a
folding spade in the vehicle.XWheels and tires: check the tire tread
depth and tire pressure. A table with the
recommended tire pressures can be found
on the B-pillar on the driver's side of your
vehicle.XCheck for damage and remove any foreign
objects, e.g. small stones, from the
wheels/tires.XReplace any missing valve caps.XReplace dented or damaged wheels.XWheels: dented or deformed wheels could
result in a loss of tire pressure and damage
the tire bead. Therefore, check the wheels
before driving off-road and replace them if
necessary.
Check list after driving off-road
GWarning
If you feel a sudden significant vibration or
ride disturbance, or you suspect that possible
damage to your vehicle has occurred, you
should turn on the hazard warning flashers,
carefully slow down, and drive with caution to
an area which is a safe distance from the road.
Inspect the tires and the vehicle underbody
for possible damage. If the vehicle appears
unsafe, have the vehicle towed to the nearest
authorized Mercedes-Benz Center or tire
dealer for repairs.
Driving over rough terrain places greater
demands on your vehicle than driving on
normal roads. After driving off-road, check
the vehicle. This allows you to detect damage
promptly and reduce the risk of an accident
to yourself and other road users.
XDeactivate the off-road drive program
( Y page 193).XDeactivate DSR ( Y page 192).XVehicles with the AIRMATIC package: lower
the vehicle to a level that suits the road
conditions, e.g. highway/high-speed level.XClean the headlamps and rear lights and
check for damage.XClean the front and rear license plates.XClean the wheels/tires, wheel arch and the
underbody with a water jet. Check for
damage and remove any foreign objects.XAfter the trip, examine without fail the
entire undercarriage, wheels, tires, brakes,
bodywork structure, steering, chassis and
exhaust system for damage.XCheck whether twigs or other parts of
plants have become trapped. These
increase the risk of fire and can damage
fuel pipes, brake hoses or the rubber
bellows of the axle joints and propeller
shafts.XAfter driving for extended periods across
sand, mud, gravel, water or in similarly dirty
conditions, have the brake discs, wheels,
brake pads/linings and axle joints checked
and cleaned.XIf you detect strong vibrations after off-road
travel, check for foreign objects in the
wheels and drive train and remove them if
necessary. Foreign objects can disturb the
balance and cause vibrations.XTest the brakes.
Driving on sand
GWarning!
Do not reduce the tire inflation pressure
before driving through sand. However, if you
do so, remember to correct the tire inflation
pressure before continuing your trip. Driving
with reduced tire inflation pressure increases
the risk of losing control of the vehicle and
rolling over.
168Driving tipsDriving and parking
BA 164.1 USA, CA Edition B 2011; 1; 2, en-USd2mskotVersion: 3.0.3.52010-04-21T17:25:06+02:00 - Seite 168
Page 287 of 372
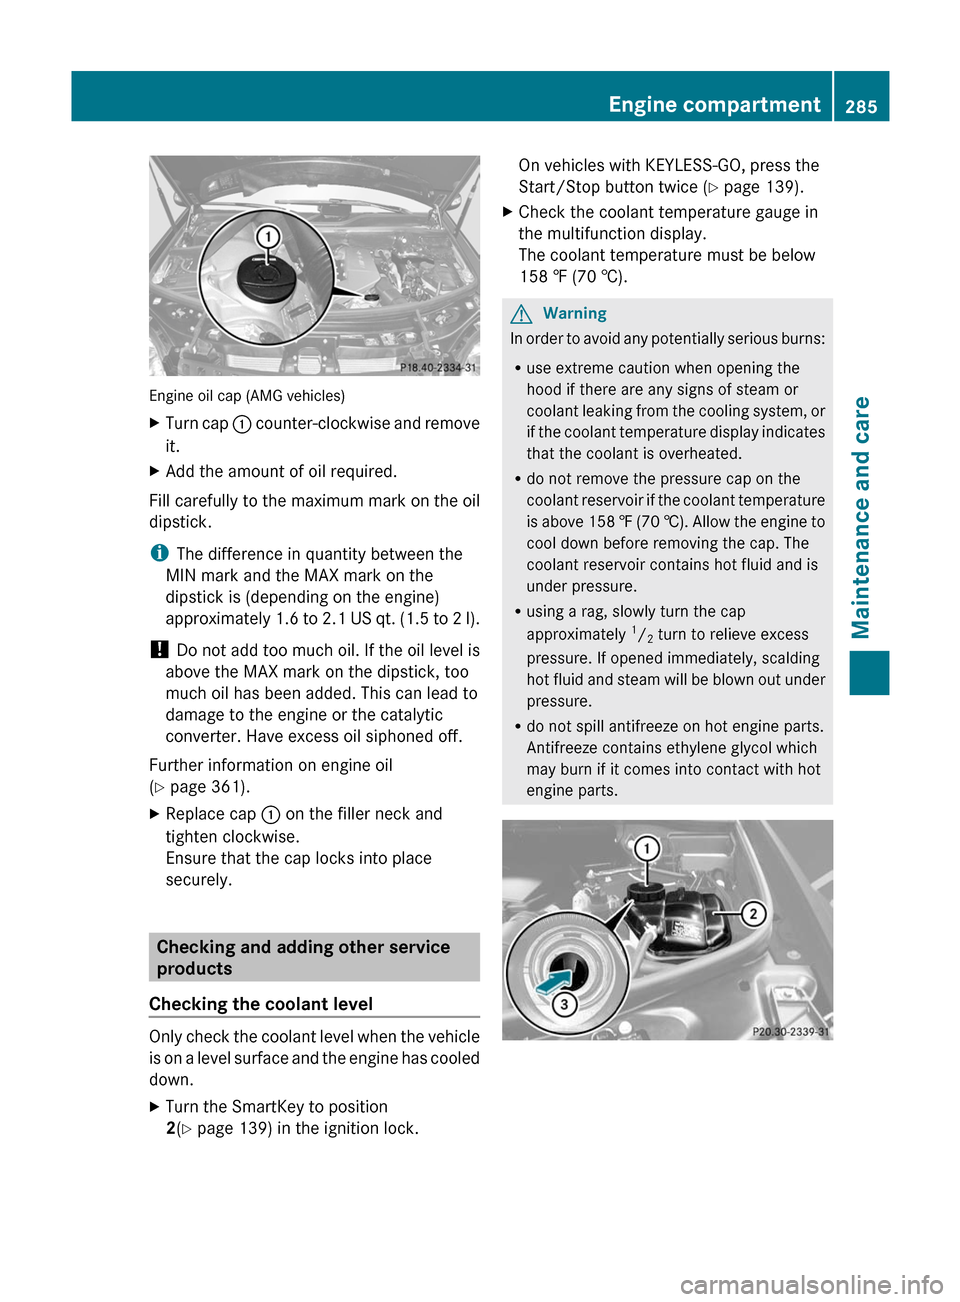
Engine oil cap (AMG vehicles)
XTurn cap : counter-clockwise and remove
it.XAdd the amount of oil required.
Fill carefully to the maximum mark on the oil
dipstick.
i The difference in quantity between the
MIN mark and the MAX mark on the
dipstick is (depending on the engine)
approximately 1.6 to 2.1 US qt. (1.5 to 2 l).
! Do not add too much oil. If the oil level is
above the MAX mark on the dipstick, too
much oil has been added. This can lead to
damage to the engine or the catalytic
converter. Have excess oil siphoned off.
Further information on engine oil
( Y page 361).
XReplace cap : on the filler neck and
tighten clockwise.
Ensure that the cap locks into place
securely.
Checking and adding other service
products
Checking the coolant level
Only check the coolant level when the vehicle
is on a level surface and the engine has cooled
down.
XTurn the SmartKey to position
2 (Y page 139) in the ignition lock.On vehicles with KEYLESS-GO, press the
Start/Stop button twice ( Y page 139).XCheck the coolant temperature gauge in
the multifunction display.
The coolant temperature must be below
158 ‡ (70 †).GWarning
In order to avoid any potentially serious burns:
R use extreme caution when opening the
hood if there are any signs of steam or
coolant leaking from the cooling system, or
if the coolant temperature display indicates
that the coolant is overheated.
R do not remove the pressure cap on the
coolant reservoir if the coolant temperature
is above 158 ‡ (70 †). Allow the engine to
cool down before removing the cap. The
coolant reservoir contains hot fluid and is
under pressure.
R using a rag, slowly turn the cap
approximately 1
/ 2 turn to relieve excess
pressure. If opened immediately, scalding
hot fluid and steam will be blown out under
pressure.
R do not spill antifreeze on hot engine parts.
Antifreeze contains ethylene glycol which
may burn if it comes into contact with hot
engine parts.
Engine compartment285Maintenance and careBA 164.1 USA, CA Edition B 2011; 1; 2, en-USd2mskotVersion: 3.0.3.52010-04-21T17:25:06+02:00 - Seite 285Z
Page 294 of 372

Interior care
Cleaning the displayXBefore cleaning the display, make sure that
it is switched off and has cooled down.XClean the display surface using a
commercially-available microfiber cloth
and TFT/LCD display cleaner.XDry the display surface using a dry
microfiber cloth.
! For cleaning, do not use any of the
following:
R alcohol-based thinner or gasoline
R abrasive cleaning agents
R commercially-available household
cleaning agents
These may damage the display surface. Do
not put pressure on the display surface
when cleaning. This could lead to
irreparable damage to the display.
Cleaning the plastic trim
GWarning!
When cleaning the steering wheel boss and
dashboard, do not use cockpit sprays or
cleaning agents containing solvents. Cleaning
agents containing solvents cause the surface
to become porous, and as a result, plastic
parts may break away and be thrown around
the interior when an air bag is deployed, which
may result in severe injuries.
! Do not affix the following to plastic
surfaces:
R stickers
R films
R scented oil bottles or similar items
You can otherwise damage the plastic.
! Do not allow cosmetics, insect repellent
or sunscreen to come into contact with the
plastic trim. This maintains the high-quality
look of the surfaces.
XWipe the plastic trim with a damp, lint-free
cloth, e.g. a microfiber cloth.XHeavy soiling: use car care and cleaning
products recommended and approved by
Mercedes-Benz.
The surface may change color temporarily.
Wait until the surface is dry again.
Cleaning the steering wheel and gear or
selector lever
XWash thoroughly with a damp cloth or use
a leather care agent that has been
recommended and approved by Mercedes-
Benz.
Cleaning real wood and trim strips
XWipe the wooden trim and trim strips with
a damp, lint-free cloth, e.g. a microfiber
cloth.XHeavy soiling: use car care and cleaning
products recommended and approved by
Mercedes-Benz.
! Do not use solvent-based cleaning agents
such as tar remover, wheel cleaners,
polishes or waxes. There is otherwise a risk
of damaging the surface.
! Do not use chrome polish for trim strips.
The trim strips have a chrome look but are
mostly made of anodized aluminum and
can lose their shine if chrome polish is
used. Use a damp, lint-free cloth instead
when cleaning the trim strips.
Chrome polish can be used to remove very
heavy soiling from trim strips which you are
sure are made of chrome. If you are unsure
as to whether a trim strip is chrome-plated
or not, consult an authorized Mercedes-
Benz Center.
Cleaning the seat covers
! Do not use microfiber cloths to clean
genuine leather, artificial leather or
Alcantara ®
covers. If used often, these can
damage the cover.
292CareMaintenance and care
BA 164.1 USA, CA Edition B 2011; 1; 2, en-USd2mskotVersion: 3.0.3.52010-04-21T17:25:06+02:00 - Seite 292
Page 328 of 372

Depending upon the weather and/or road
surface (conditions), the tire traction varies
widely.
Do not use tires until they are excessively
worn as the tire traction on wet road surfaces
decreases significantly when the tread depth
is less than 1
/ 8 in (3 mm).
Tread wear indicators (TWI) are required by
law. Six indicators are positioned over the tire
tread. They are visible as soon as a tread
depth of approximately 1
/ 16 in (1.6 mm) is
reached. If this is the case, the tire is so worn
that it must be replaced.
The recommended tread depth for summer
tires is at least 1
/ 8 in (3 mm). The
recommended tread depth for winter tires is
at least 1
/ 6 in (4 mm).
Bar marking
: for tread wear is integrated
into the tire tread.
Storing tires
Store tires that are not being used in a cool,
dry and preferably dark place. Protect the
tires from contact with oil, grease and fuel.
Cleaning tires
! Do not use a high pressure jet with
circular jet nozzles (concentrated-power
jets) to clean the tires. The high pressure
of the water jet could damage the tires.
Always replace damaged tires.
Tire pressures
Tire pressure information
GWarning
Follow recommended tire inflation pressures.
Do not underinflate tires. Underinflated tires
wear excessively and/or unevenly, adversely
affect handling and fuel economy, and are
more likely to fail from being overheated.
Do not overinflate tires. Overinflated tires can
adversely affect handling and ride comfort,
wear unevenly, increase stopping distance,
and result in sudden deflation (blowout)
because they are more likely to become
punctured or damaged by road debris,
potholes etc.
Do not overload the tires by exceeding the
specified load limit as indicated on the Tire
and Loading Information placard on the
driver's door B-pillar. Overloading the tires
can overheat them, possibly causing a
blowout. Overloading the tires can also result
in handling or steering problems, or brake
failure.
You will find a table of recommended tire
pressures on the Tire and Loading
Information placard on the B-pillar on the
driver's side ( Y page 334). You will find a
table of tire pressures for various operating
conditions on the inside of your vehicle's fuel
filler flap.
To test tire pressure, use a suitable pressure
gauge. The outer appearance of a tire does
not permit any reliable conclusion about the
tire pressure. On vehicles installed with the
electronic tire pressure monitor, the tire
pressure can be checked in the on-board
computer.
GWarning!
Should the tire pressure drop repeatedly:
326Tire pressuresTires and wheels
BA 164.1 USA, CA Edition B 2011; 1; 2, en-USd2mskotVersion: 3.0.3.52010-04-21T17:25:06+02:00 - Seite 326
Page 347 of 372
Increased vehicle weight due to
optional equipment
The combined weight of all standard and
optional equipment available for the vehicle,
regardless of whether it is actually installed
on the vehicle or not.
Wheel rim
The part of the wheel on which the tire is
mounted.
GAWR (Gross Axle Weight Rating)
The GAWR is the maximum gross axle weight
rating. The actual load on an axle must never
exceed the gross axle weight rating. The
gross axle weight rating can be found on the
vehicle identification plate on the B-pillar on
the driver's side.
Speed index
The speed index is part of the tire
identification. Specifies the speed range for
which the tire is approved.
GTW (Gross Trailer Weight)
The GTW is the weight of a trailer including
the weight of the load, luggage, accessories
etc. on the trailer.
GVW (Gross Vehicle Weight)
The gross vehicle weight includes the weight
of the vehicle including fuel, tools, the spare
wheel, accessories installed, occupants,
luggage and the drawbar noseweight if
applicable. The gross vehicle weight must not
exceed the gross vehicle weight rating GVWR
as specified on the vehicle identification plate
on the B-pillar on the driver's side.
GVWR (Gross Vehicle Weight Rating)
The GVWR is the maximum permissible gross
weight of a fully loaded vehicle (the weight of
the vehicle including all accessories,
occupants, fuel, luggage and the drawbar
noseweight if applicable). The gross vehicle
weight rating is specified on the vehicle
identification plate on the B-pillar on the
driver's side.
Maximum weight of the laden vehicle
The maximum weight is the sum of the
unladen weight of the vehicle, the weight of
the accessories, the maximum load and the
weight of the optional equipment installed at
the factory.
Kilopascal (kPa)
Metric unit for tire pressure. 6.9 kPa is the
equivalent of 1 psi. Another unit for tire
pressure is bar. 100 kilopascal (kPa) is the
equivalent of 1 bar.
Load index
In addition to the load bearing index, the load
index may also be imprinted on the sidewall
of the tire. This specifies the load bearing
capacity more precisely.
Unladen weight
The weight of a vehicle with standard
equipment including the maximum capacity
of fuel, oil and coolant. It also includes the air-
conditioning system and optional equipment
if these are installed on the vehicle, but does
not include passengers or luggage.
Definitions for tires and loading345Tires and wheelsBA 164.1 USA, CA Edition B 2011; 1; 2, en-USd2mskotVersion: 3.0.3.52010-04-21T17:25:06+02:00 - Seite 345Z
Page 361 of 372
Octane Number (MON): (RON + MON) / 2,
also known as knock resistance.
Reformulated Gasoline (RFG) and/or
unleaded gasoline with additives can be used
if the concentration of the additives in the fuel
does not exceed 10%, e.g.:
R Ethanol
R TAME
R ETBE
R IPA
R TBA
For MTBE, the concentration should not
exceed 15%.
The concentration of methanol in gasoline
including other additives must not exceed 3%.
Using mixtures of methanol and ethanol is not
permitted. Gasohol, a mixture of 10% ethanol
and 90% unleaded petrol can be used.
All of these mix fuels must fulfill the fuel
requirements, e.g.:
R knock resistance
R boiling point
R vapor pressure
Diesel engines – important safety
information
! Only use commercially available ULTRA-
LOW SULFUR DIESEL FUEL (ULSD, 15 ppm
MAXIMUM SULFUR) that meets the
ASTM D975 standard. Failure to use
ULTRA-LOW SULFUR DIESEL FUEL (ULSD)
can severely damage the vehicle's exhaust
gas aftertreatment system.
! Do not fill the tank with gasoline. Do not
blend diesel fuel with gasoline or kerosene.
Otherwise, the fuel system and the engine
will be damaged. Damage resulting from
the use of gasoline or kerosene is not
covered by the Mercedes-Benz Limited
Warranty.
To prevent malfunctions, diesel fuel with
improved flow characteristics is available in
the winter months. Check with your fuel
retailer.Information on the fuel grade can usually be
found on the gas pump. If the information
cannot be found on the gas pump, ask service
station personnel. For further information,
contact an authorized Mercedes-Benz Center
or visit http://www.mbusa.com (USA
only).
Diesel engines – Fuels containing bio-
diesel (FAME [fatty acid methyl ester])
Mercedes-Benz USA approves the use of B5
(ULSD with a maximum of up to five percent
by volume biodiesel) for all diesel engines
with common rail direct injection (CDI) and
BlueTEC.
Pure biodiesel and diesel fuels that contain a
higher percentage of biodiesel, e.g. B20, may
cause damage to the fuel system/engine and
are, therefore, not approved.
For further information, please ask the
service station personnel. The label on the
gas pump must indicate clearly that the B5
biodiesel blend meets the ULSD standard. If
the label is not clear, do not refuel the vehicle.
The Mercedes-Benz Limited Warranty does
not cover damages caused by the use of fuels
not meeting Mercedes-Benz approved fuel
standards.
Additives in gasoline
One of the major problems in engine design
is the creation of carbon deposits during the
process of burning fuel. Mercedes-Benz
recommends that you use fuel brands that
have the additives which prevent the build up
of carbon deposits.
If you use fuels without these additives for a
longer period of time, there may be a build up
of carbon deposits, especially on the inlet
valves and in the combustion chamber.
This could lead to engine running problems,
e.g.:
R warm-up hesitation
R unstable idle
R knocking/pinging
Service products and capacities359Technical dataBA 164.1 USA, CA Edition B 2011; 1; 2, en-USd2mskotVersion: 3.0.3.52010-04-21T17:25:06+02:00 - Seite 359Z