run flat MERCEDES-BENZ M-Class 2011 W164 Owner's Manual
[x] Cancel search | Manufacturer: MERCEDES-BENZ, Model Year: 2011, Model line: M-Class, Model: MERCEDES-BENZ M-Class 2011 W164Pages: 372, PDF Size: 16.23 MB
Page 11 of 372
Exhaust tail pipe (cleaning
instructions) ...................................... 291
Exterior lighting see Lights
Exterior mirrors
Adjusting ....................................... 101
Dipping (automatic) .......................102
Folding in/out (automatically) .......102
Folding in/out (electrically) ...........102
Folding in when locking (on-board
computer) ...................................... 218
Out of position ............................... 102
Setting ........................................... 102
Storing settings (memory
function) ........................................ 103
Storing the parking position ..........103
Exterior view ........................................ 26
F
Filling capacity see Technical data
First-aid kit ......................................... 297
Flat tire Changing a wheel/mounting the
spare wheel ................................... 305
MOExtended run-flat system .........311
Preparing the vehicle .....................300
Raising the vehicle .........................306
TIREFIT kit ...................................... 301
Floormat ............................................. 279
Front fog lamp (display
message) ............................................ 232
Fuel Additives ........................................ 359
Notes ............................................. 358
Premium-grade unleaded gasoline . 358
Refueling ........................................ 151
Specifications ................................ 358
Troubleshooting ............................. 155
Fuel consumption
Current (on-board computer) .........220
Notes ............................................. 160
Fuel filler cap (display message) ..... 236
Fuel filler flap Emergency release ........................153
Opening/closing ............................ 153
Fuel filter (display message) ............ 236
Fuel level
Calling up the range (on-board
computer) ...................................... 220
Fuses
Dashboard fuse box .......................321
Engine emergency stop .................322
Fuse allocation chart .....................321
Fuse box in the cargo
compartment ................................. 321
Fuse box in the engine
compartment ................................. 321
Notes ............................................. 320
G
Garage door opener Clearing the memory .....................279
Notes ............................................. 276
Opening/closing the garage door ..278
Programming the remote control ...276
Gear indicator (on-board
computer) .......................................... 209
Gear or selector lever (cleaning
guidelines) ......................................... 292
Genuine Mercedes-Benz parts ......... 354
Genuine wood trim and trim strips
(cleaning instructions) ...................... 292
Glove box ........................................... 257
GTW (Gross Trailer Weight)
(definition) ......................................... 345
H
Headlamp cleaning system .............. 109
Adding washer fluid .......................286
Notes ............................................. 363
Headlamp delayed switch-off
see Delayed switch-off, exterior lighting
Headlamp mode (daytime driving)
see Daytime running lamps
Headlamps
Cleaning ......................................... 291
Misting up ...................................... 110
Setting ........................................... 116
Head restraint
Adjusting (electrically) .....................95
Head restraints
Adjusting (manually) ........................95
Index9BA 164.1 USA, CA Edition B 2011; 1; 2, en-USd2mskotVersion: 3.0.3.52010-04-21T17:25:06+02:00 - Seite 9
Page 13 of 372
High-beam headlamps ...................109
Light switch ................................... 106
Low-beam headlamps ....................107
Rear fog lamp ................................ 108
Switching the daytime driving
lights on/off (on-board computer) . 215
Switching the exterior lighting
delayed switch-off on/off (on-
board computer) ............................ 216
Switching the surround lighting
on/off (on-board computer) ..........215
Light sensor (display message) ....... 233
Loading guidelines ............................ 256
Locking Automatic ........................................ 79
Emergency locking ........................... 80
From inside the vehicle (central
locking button) ................................. 79
Low-beam headlamp (display
message) ............................................ 230
LOW RANGE Display message ............................ 238
Off-road gear ................................. 194
LOW RANGE off-road gear ................ 194
Luggage net ....................................... 258
Lumbar support 4-way lumbar support ......................97
Luxury head restraints ....................... 95
M
Main-beam headlamps (display
message) ............................................ 231
Malfunction message see Display messages
Malfunctions relevant to safety
Reporting ......................................... 23
Manual drive program ...................... 149
mbrace Call priority .................................... 274
Display message ............................ 224
Downloading destinations
(COMAND) ..................................... 274
Emergency call .............................. 271
Important safety notes ..................270
Locating a stolen vehicle ...............275
MB info call button ........................273
Roadside Assistance button ..........272
Self-test ......................................... 271
System .......................................... 271
Vehicle remote unlocking ..............275
Mechanical key
Function/notes ................................ 75
Memory card (on-board computer) . 212
Memory function ............................... 103
Menu (on-board computer) Additional functions .......................219
AMG ............................................... 209
Audio ............................................. 211
DISTRONIC .................................... 179
DVD ............................................... 212
Message memory .......................... 222
Navigation ..................................... 212
Off-road ......................................... 213
Off-road mode ............................... 211
Overview of menus ........................207
Resetting to factory settings ..........213
Settings ......................................... 213
Standard display ............................ 208
Telephone ...................................... 220
Trip computer ................................ 219
Messages
see Display messages
Mirrors
Sun visor ........................................ 266
see Exterior mirrors or Rear-view mirror
MOExtended run-flat system ........... 311
MP3 Operating (on-board computer) .....212
see separate operating instructions
Multicontour seat ................................ 97
Multifunction display ........................ 206
Multifunction steering wheel Operating the on-board computer . 205
Overview .......................................... 30
N
Navigation On-board computer .......................212
see separate operating instructions
NECK-PRO head restraints
Operation ......................................... 52
Resetting triggered ..........................53
Notes on breaking-in a new
vehicle ................................................ 138
Index11BA 164.1 USA, CA Edition B 2011; 1; 2, en-USd2mskotVersion: 3.0.3.52010-04-21T17:25:06+02:00 - Seite 11
Page 162 of 372
Driving tips
General driving tips
Important safety instructions
GWarning!
Please do not forget that your primary
responsibility is to drive the vehicle. A driver’s
attention to the road must always be his/her
primary focus when driving. For your safety
and the safety of others, we recommend that
you pull over to a safe location and stop
before placing or taking a telephone call.
If you choose to use the telephone 26
while
driving, please use the hands-free device and
only use the telephone when road, weather
and traffic conditions permit. Some
jurisdictions prohibit the driver from using a
mobile telephone while driving a vehicle.
Only operate the COMAND 26
(Cockpit
Management and Data System) if road,
weather and traffic conditions permit.
Otherwise, you may not be able to observe
traffic conditions and could endanger yourself
and others.
Bear in mind that at a speed of just 30 mph
(approximately 50 km/h), your vehicle is
covering a distance of 44 feet (approximately
14 m) every second.
Drive sensibly – save fuel
To save fuel, observe the following notes:
XKeep tires at the recommended inflation
pressures.XRemove unnecessary cargo.XRemove the roof carrier when not in use.XMaintain a low engine speed until the
engine is warm.XAvoid frequent acceleration and
deceleration.XHave all maintenance work performed at
the service intervals specified in theService Booklet or indicated by the service
interval indicator.
Fuel consumption is also increased by driving
in cold weather, in stop-and-go traffic, on
short trips and in mountainous areas.
Drinking and driving
GWarning
Drinking and driving and/or taking drugs and
driving are very dangerous combinations.
Even a small amount of alcohol or drugs can
affect your reflexes, perceptions and
judgment.
The possibility of a serious or even fatal
accident are greatly increased when you drink
or take drugs and drive.
Do not drink or take drugs and drive or allow
anyone to drive who has been drinking or
taking drugs.
Pedals
GWarning
Make sure absolutely no objects are
obstructing the pedals' range of movement.
Keep the driver's footwell clear of all
obstacles. If there are any floormats or
carpets in the footwell, make sure that the
pedals still have sufficient clearance.
During sudden driving or braking maneuvers,
the objects could get caught between the
pedals. You could then no longer brake or
accelerate. This could lead to accidents and
injury.
Coasting with the engine switched off
GWarning!
There is no power assistance for the steering
and the brake when the engine is not running.
Steering and braking requires significantly
more effort and you could lose control of the
vehicle and cause an accident as a result.
26 Observe all legal requirements.160Driving tipsDriving and parking
BA 164.1 USA, CA Edition B 2011; 1; 2, en-USd2mskotVersion: 3.0.3.52010-04-21T17:25:06+02:00 - Seite 160
Page 169 of 372
GWarning!
Vehicles with air suspension program: Please
be aware that by raising the vehicle level, the
center of gravity also rises. Therefore, always
ensure that the vehicle level is as low as
possible. With higher ride height the ESP ®
may activate earlier in certain situations.
GWarning!
Do not reduce the tire inflation pressure
before driving through sand. However, if you
do so, remember to correct the tire inflation
pressure before continuing your trip. Driving
with reduced tire inflation pressure increases
the risk of losing control of the vehicle and
rolling over.
General information
Read this section before driving your vehicle
off-road. Practice by traveling over more
gentle off-road terrain first.
Familiarize yourself with the characteristics
of your vehicle and the gear change process
before driving through difficult terrain.
The following driving systems are specially
adapted to off-road driving:
R off-road drive program ( Y page 193)
R off-road ABS ( Y page 66)
R off-road 4ETS ( Y page 67)
R off-road ESP ®
(Y page 68)
R hill start assist
R AIRMATIC package ( Y page 183)
R DSR (Downhill Speed Regulation)
( Y page 192)
Observe the following notes:
R stop your vehicle and, if necessary, select
the off-road drive program ( Y page 193)
before driving off-road.
R vehicles with the AIRMATIC package:
select a vehicle level that is suitable for the
terrain. Make sure there is always sufficient
ground clearance to prevent damage to the
vehicle.
R make sure that items of luggage and cargo
are stowed safely and are well secured
( Y page 260).
R always keep the engine running and in gear
when driving on a downhill gradient.
Activate DSR ( Y page 192).
R always keep the doors, tailgate, windows
and the tilt/sliding sunroof closed while the
vehicle is in motion.
R adapt the speed to suit the terrain
conditions. The more uneven, worn or
steeper the terrain is, the slower you should
drive.
R drive slowly and at an even speed through
the water. Ensure that a bow wave does not
form as you drive.
R drive with extreme care on unfamiliar off-
road routes where visibility is poor. For
safety reasons, get out of the vehicle first
and survey the off-road route.
R look out for obstacles, such as rocks, holes,
tree stumps and furrows.
R check the depth of water before fording
rivers and streams.
R do not stop in water and do not switch the
engine off.
R drive quickly on sand to overcome the
rolling resistance. Otherwise, the vehicle
could dig itself into the sand.
R do not jump with the vehicle. This
interrupts the vehicle's traction.
R always keep the engine running and in gear
when driving on slopes.
R do not shift the automatic transmission to
transmission position N.
Check list before driving off-roadXEngine oil level: check the engine oil and
top it up if necessary.
The oil supply can only be guaranteed on
steep slopes if the engine oil level is
sufficient.
! If the engine oil warning lamp lights up
while the vehicle is in motion, stop the
Driving tips167Driving and parkingBA 164.1 USA, CA Edition B 2011; 1; 2, en-USd2mskotVersion: 3.0.3.52010-04-21T17:25:06+02:00 - Seite 167Z
Page 243 of 372
Currently Unavailable See Operator’s Manual message will be displayed in the
multifunction display and DISTRONIC will be turned off.
Tires
GWarning
Do not drive with a flat tire. A flat tire affects the ability to steer or brake the vehicle. You may
lose control of the vehicle. Continued driving with a flat tire will cause excessive heat build-up
and possibly a fire.
GWarning
Follow recommended tire inflation pressures.
Do not underinflate tires. Underinflated tires wear excessively and/or unevenly, adversely affect
handling and fuel economy, and are more likely to fail from being overheated.
Do not overinflate tires. Overinflated tires can adversely affect handling and ride comfort, wear
unevenly, increase stopping distance, and result in sudden deflation (blowout) because they are
more likely to become punctured or damaged by road debris, potholes etc.
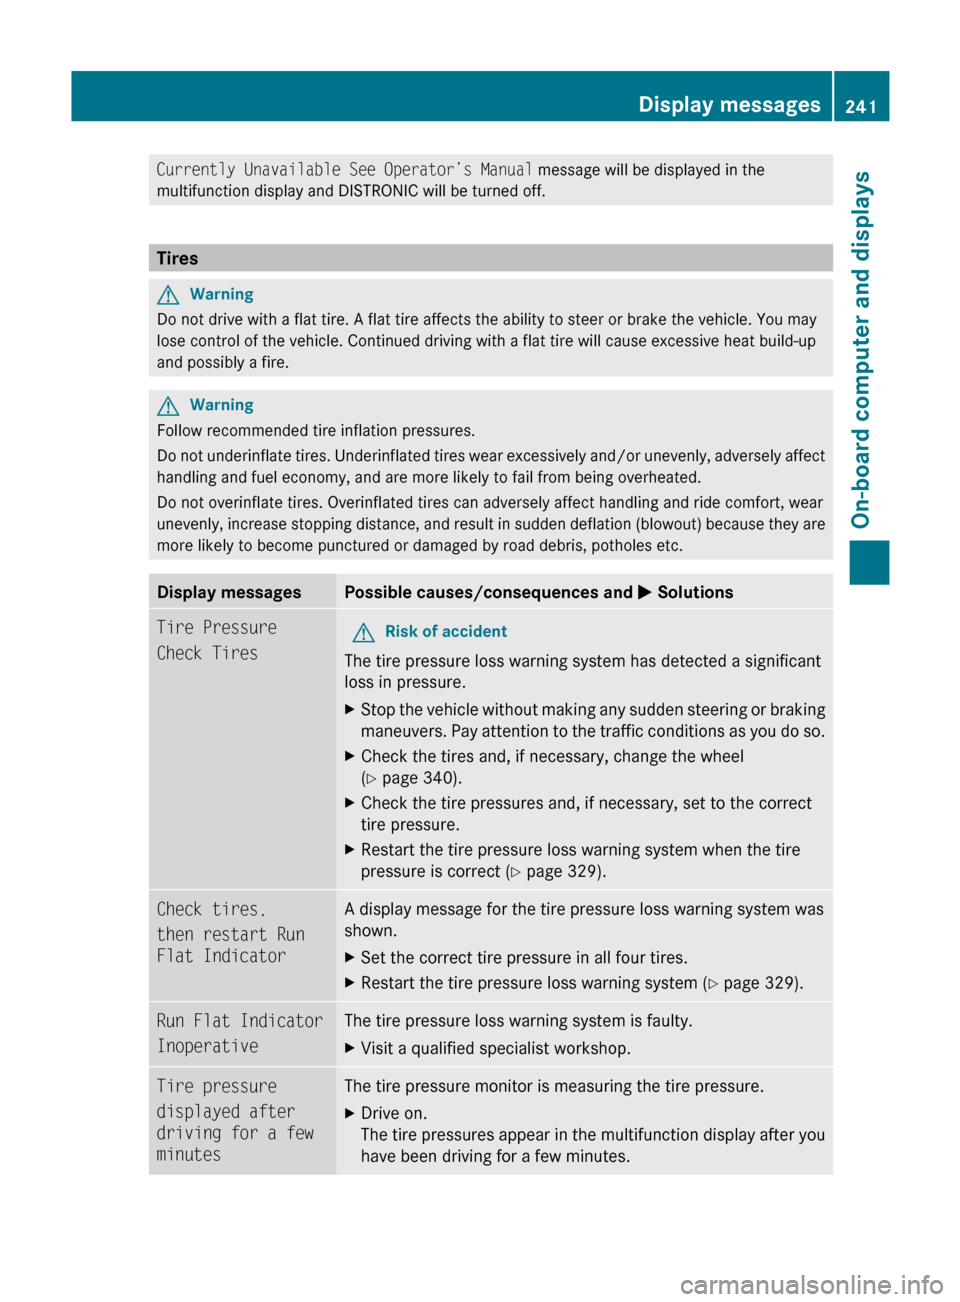
Display messagesPossible causes/consequences and M SolutionsTire Pressure
Check TiresGRisk of accident
The tire pressure loss warning system has detected a significant
loss in pressure.
XStop the vehicle without making any sudden steering or braking
maneuvers. Pay attention to the traffic conditions as you do so.XCheck the tires and, if necessary, change the wheel
( Y page 340).XCheck the tire pressures and, if necessary, set to the correct
tire pressure.XRestart the tire pressure loss warning system when the tire
pressure is correct ( Y page 329).Check tires,
then restart Run
Flat IndicatorA display message for the tire pressure loss warning system was
shown.XSet the correct tire pressure in all four tires.XRestart the tire pressure loss warning system ( Y page 329).Run Flat Indicator
InoperativeThe tire pressure loss warning system is faulty.XVisit a qualified specialist workshop.Tire pressure
displayed after
driving for a few
minutesThe tire pressure monitor is measuring the tire pressure.XDrive on.
The tire pressures appear in the multifunction display after you
have been driving for a few minutes.Display messages241On-board computer and displaysBA 164.1 USA, CA Edition B 2011; 1; 2, en-USd2mskotVersion: 3.0.3.52010-04-21T17:25:06+02:00 - Seite 241Z
Page 275 of 372
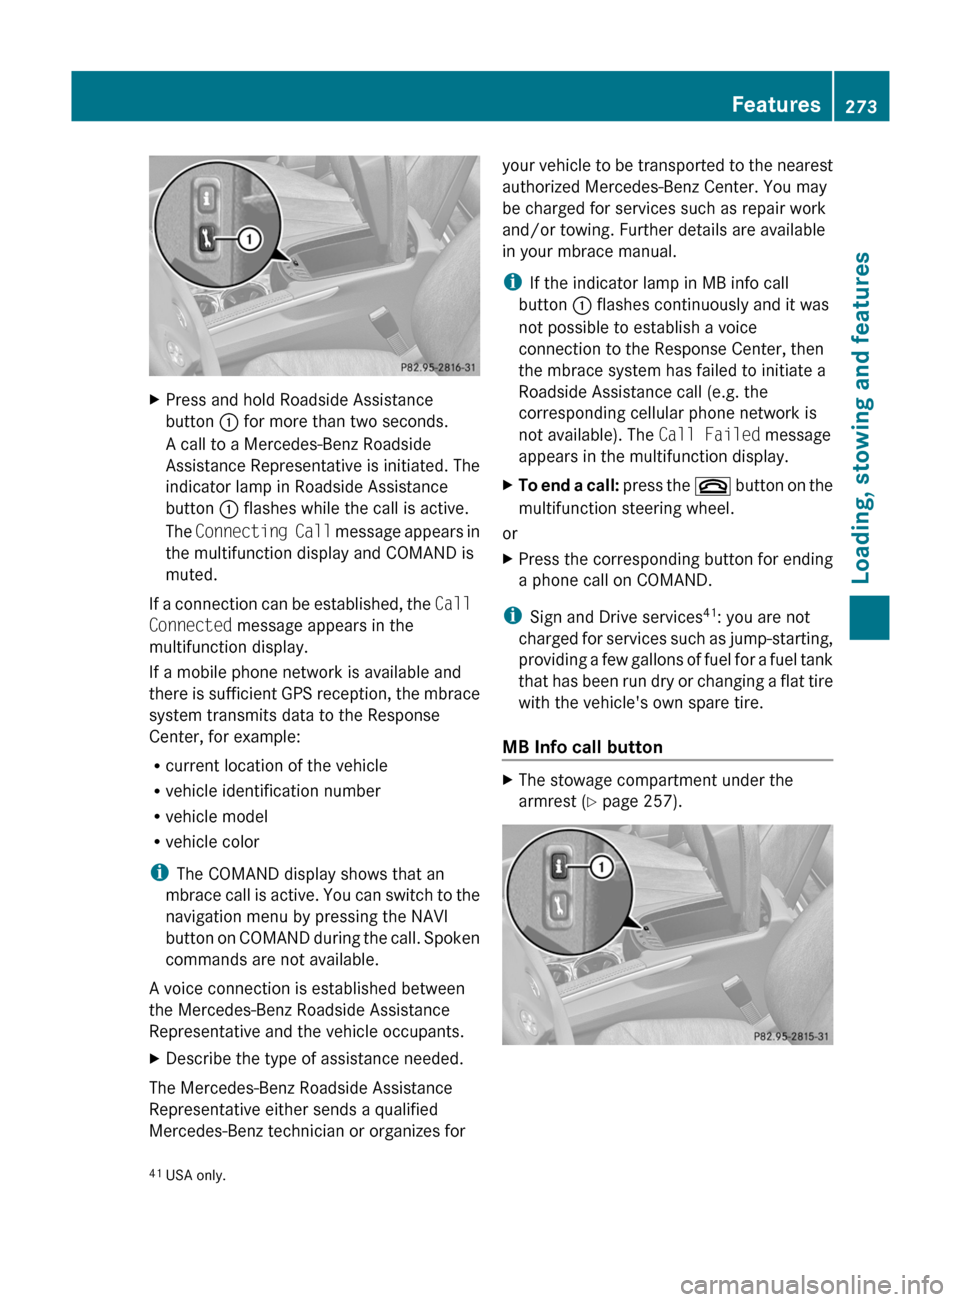
XPress and hold Roadside Assistance
button : for more than two seconds.
A call to a Mercedes-Benz Roadside
Assistance Representative is initiated. The
indicator lamp in Roadside Assistance
button : flashes while the call is active.
The Connecting Call message appears in
the multifunction display and COMAND is
muted.
If a connection can be established, the Call
Connected message appears in the
multifunction display.
If a mobile phone network is available and
there is sufficient GPS reception, the mbrace
system transmits data to the Response
Center, for example:
R current location of the vehicle
R vehicle identification number
R vehicle model
R vehicle color
i The COMAND display shows that an
mbrace call is active. You can switch to the
navigation menu by pressing the NAVI
button on COMAND during the call. Spoken
commands are not available.
A voice connection is established between
the Mercedes-Benz Roadside Assistance
Representative and the vehicle occupants.
XDescribe the type of assistance needed.
The Mercedes-Benz Roadside Assistance
Representative either sends a qualified
Mercedes-Benz technician or organizes for
your vehicle to be transported to the nearest
authorized Mercedes-Benz Center. You may
be charged for services such as repair work
and/or towing. Further details are available
in your mbrace manual.
i If the indicator lamp in MB info call
button : flashes continuously and it was
not possible to establish a voice
connection to the Response Center, then
the mbrace system has failed to initiate a
Roadside Assistance call (e.g. the
corresponding cellular phone network is
not available). The Call Failed message
appears in the multifunction display.XTo end a call: press the ~ button on the
multifunction steering wheel.
or
XPress the corresponding button for ending
a phone call on COMAND.
i Sign and Drive services 41
: you are not
charged for services such as jump-starting,
providing a few gallons of fuel for a fuel tank
that has been run dry or changing a flat tire
with the vehicle's own spare tire.
MB Info call button
XThe stowage compartment under the
armrest ( Y page 257).41
USA only.Features273Loading, stowing and featuresBA 164.1 USA, CA Edition B 2011; 1; 2, en-USd2mskotVersion: 3.0.3.52010-04-21T17:25:06+02:00 - Seite 273Z
Page 302 of 372
XRemove the valve extractor from the
vehicle tool kit.XUnscrew the valve cap from the valve.XUnscrew the valve insert from the valve and
release the air.
i Fully deflating the tire can take a few
minutes.
XScrew the valve insert back into the valve.XScrew the valve cap back on.XPlace the valve extractor back into the
vehicle tool kit.XStow the collapsible spare wheel in the
emergency spare wheel well under the
cargo compartment and fasten in place.
Flat tire
Preparing the vehicle
Your vehicle may be equipped with:
R a TIREFIT kit 47
R a "Minispare" emergency spare wheel
R a collapsible spare wheel
R the MOExtended run-flat
system( Y page 311)
i Vehicle preparation is not necessary on
vehicles with the MOExtended run-flat
system.
i Vehicles featuring the MOExtended run-
flat system are not equipped with the
TIREFIT kit at the factory. It is therefore
recommended that you additionally equip
your vehicle with the TIREFIT kit if you
mount tires that do not feature run-flat
properties, e.g. winter tires. You can obtain
a TIREFIT kit from an authorized Mercedes-
Benz Center, for example.
XMake sure that highway level is
selected 48
(Y page 181).XStop the vehicle as far away as possible
from traffic on solid, non-slippery and level
ground.XSwitch on the hazard warning lamps.XFirmly depress the parking brake.XBring the front wheels into the straight-
ahead position.XMove the DIRECT SELECT lever to P.XSwitch off the engine.XVehicles without KEYLESS-GO: remove
the key from the ignition lock.XVehicles with KEYLESS-GO: open the
driver's door.
The on-board electronics have status 0,
which is the same as the key having been
removed.XVehicles with KEYLESS-GO: remove the
Start/Stop button from the ignition lock
( Y page 139).XAll occupants must get out of the vehicle.
Make sure that they are not endangered as
they get out of the vehicle.XMake sure that no one is near the danger
area whilst a wheel is being changed.
Anyone who is not directly assisting in the
wheel change should, for example, stand
behind the barrier.XGet out of the vehicle. Pay attention to
traffic conditions when doing so.XClose the driver's door.
i Only operate the electric air pump using
the socket in the footwell of the 2nd row of
seats ( Y page 269), even if the ignition is
turned off.
An emergency cut-off ensures that the on-
board voltage does not drop too low. If the
on-board voltage is too low, power to the
sockets is automatically cut-off. This
47 Canada only.
48 Vehicles with air suspension.300Flat tireRoadside assistance
BA 164.1 USA, CA Edition B 2011; 1; 2, en-USd2mskotVersion: 3.0.3.52010-04-21T17:25:06+02:00 - Seite 300
Page 303 of 372
ensures that there is sufficient power to
start the engine.
TIREFIT kit
Using the TIREFIT kit
You can use the TIREFIT kit to seal small
punctures, particularly those in the tire tread.
You can use TIREFIT at outside temperatures
down to -4 ‡ (-20 †).
GWarning
TIREFIT is a limited repair device. TIREFIT
cannot be used for cuts or punctures larger
than approximately 0.16 in (4 mm) and tire
damage caused by driving with extremely low
tire inflation pressure, or on a flat tire, or a
damaged wheel.
Do not drive the vehicle under such
circumstances.
Contact the nearest authorized Mercedes-
Benz Center for assistance or call roadside
assistance.
XDo not remove any foreign objects which
have penetrated the tire, e.g. screws or
nails.
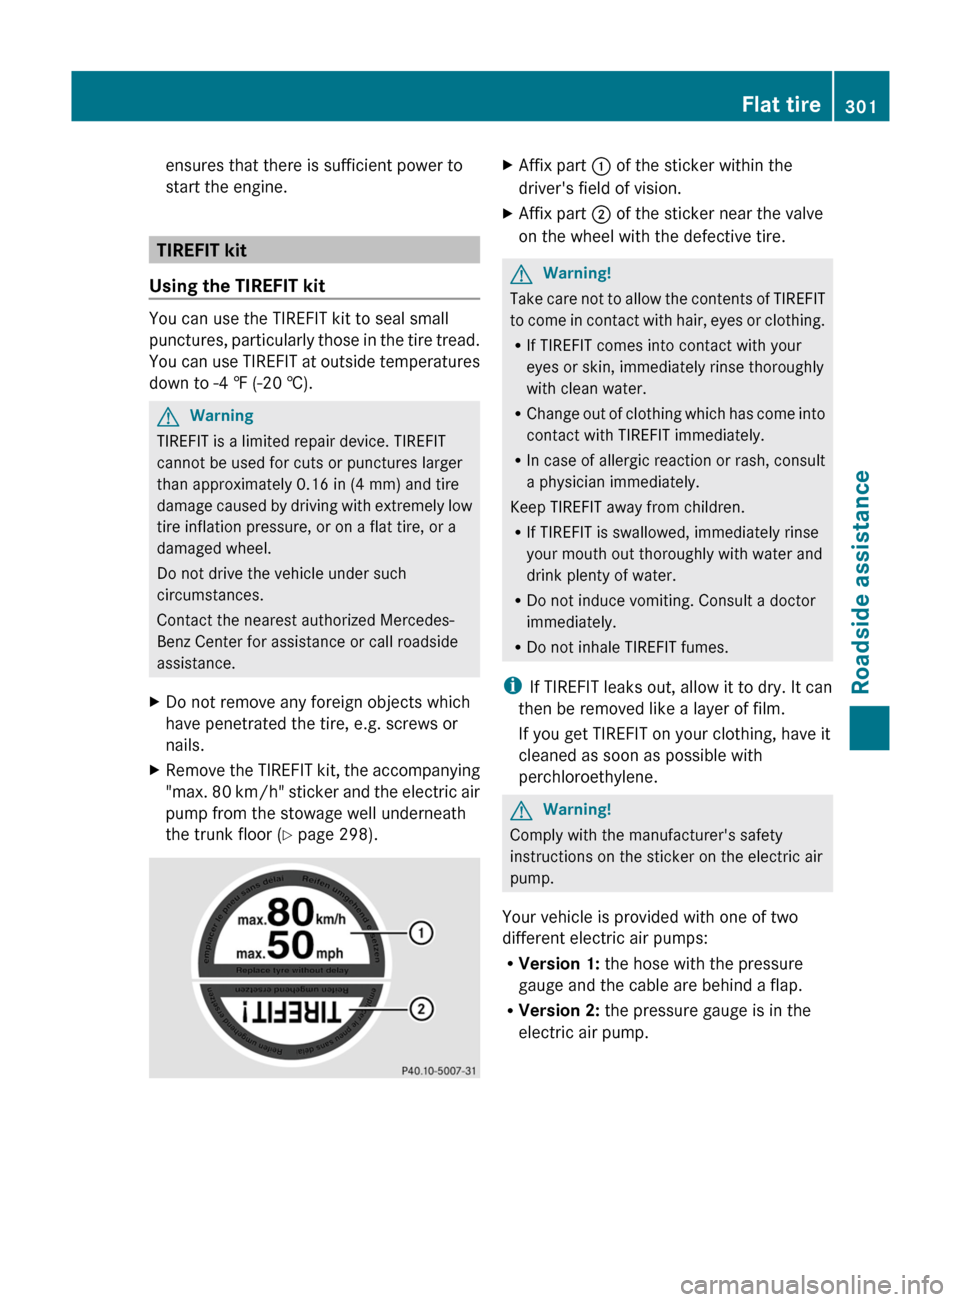
XRemove the TIREFIT kit, the accompanying
"max. 80 km/h" sticker and the electric air
pump from the stowage well underneath
the trunk floor (Y page 298).
XAffix part : of the sticker within the
driver's field of vision.
XAffix part ; of the sticker near the valve
on the wheel with the defective tire.
GWarning!
Take care not to allow the contents of TIREFIT
to come in contact with hair, eyes or clothing.
RIf TIREFIT comes into contact with your
eyes or skin, immediately rinse thoroughly
with clean water.
RChange out of clothing which has come into
contact with TIREFIT immediately.
RIn case of allergic reaction or rash, consult
a physician immediately.
Keep TIREFIT away from children.
RIf TIREFIT is swallowed, immediately rinse
your mouth out thoroughly with water and
drink plenty of water.
RDo not induce vomiting. Consult a doctor
immediately.
RDo not inhale TIREFIT fumes.
iIf TIREFIT leaks out, allow it to dry. It can
then be removed like a layer of film.
If you get TIREFIT on your clothing, have it
cleaned as soon as possible with
perchloroethylene.
GWarning!
Comply with the manufacturer's safety
instructions on the sticker on the electric air
pump.
Your vehicle is provided with one of two
different electric air pumps:
RVersion 1: the hose with the pressure
gauge and the cable are behind a flap.
RVersion 2: the pressure gauge is in the
electric air pump.
Flat tire301Roadside assistanceBA 164.1 USA, CA Edition B 2011; 1; 2, en-USd2mskotVersion: 3.0.3.52010-04-21T17:25:06+02:00 - Seite 301Z
Page 304 of 372
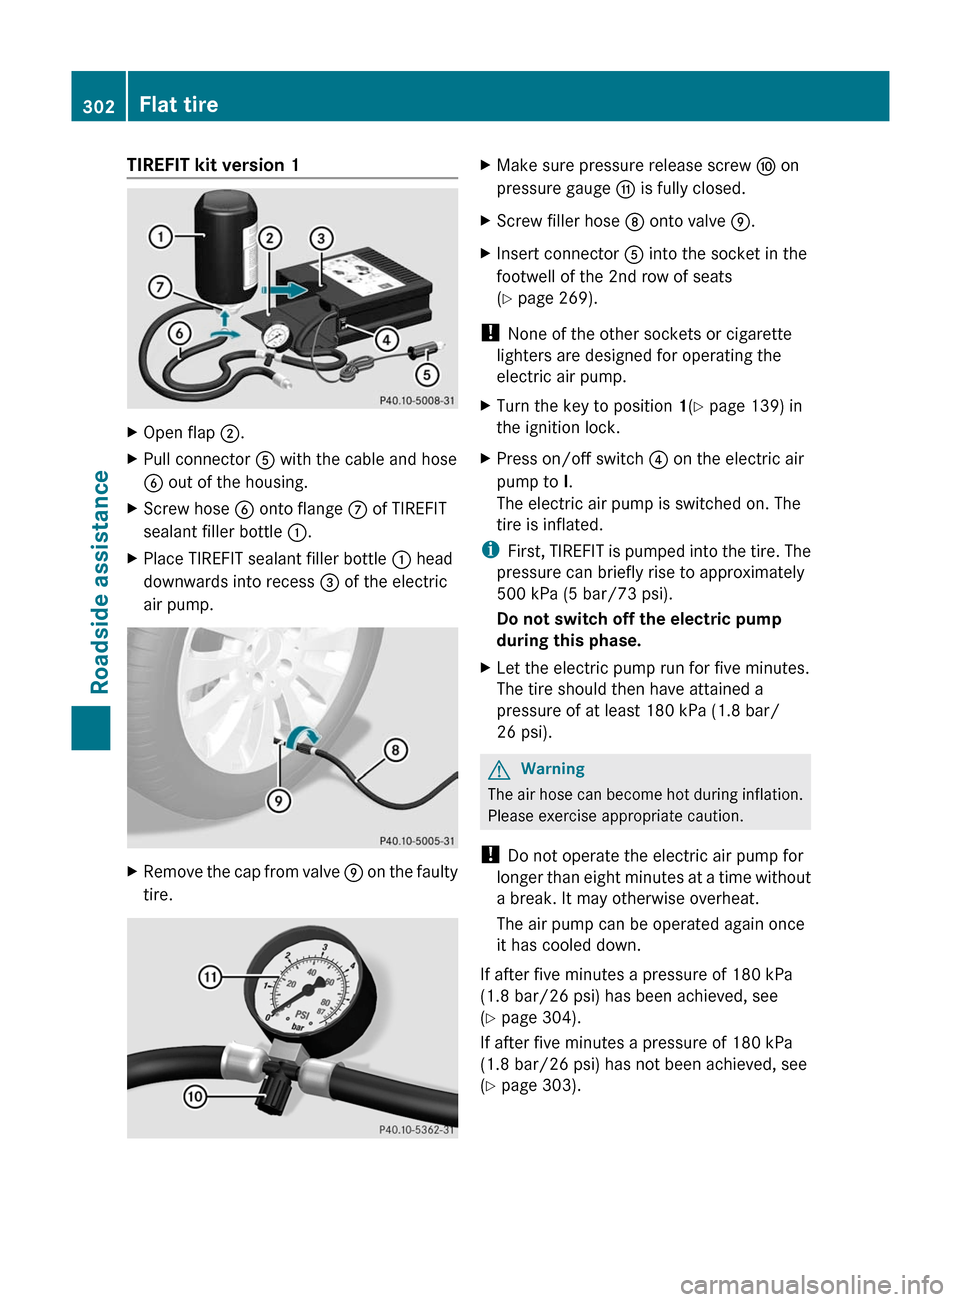
TIREFIT kit version 1XOpen flap ;.XPull connector A with the cable and hose
B out of the housing.
XScrew hose B onto flange C of TIREFIT
sealant filler bottle :.
XPlace TIREFIT sealant filler bottle : head
downwards into recess = of the electric
air pump.
XRemove the cap from valve E on the faulty
tire.
XMake sure pressure release screw F on
pressure gauge G is fully closed.
XScrew filler hose D onto valve E.XInsert connector A into the socket in the
footwell of the 2nd row of seats
(Y page 269).
! None of the other sockets or cigarette
lighters are designed for operating the
electric air pump.
XTurn the key to position 1(Y page 139) in
the ignition lock.
XPress on/off switch ? on the electric air
pump to I.
The electric air pump is switched on. The
tire is inflated.
iFirst, TIREFIT is pumped into the tire. The
pressure can briefly rise to approximately
500 kPa (5 bar/73 psi).
Do not switch off the electric pump
during this phase.
XLet the electric pump run for five minutes.
The tire should then have attained a
pressure of at least 180 kPa (1.8 bar/
26 psi).
GWarning
The air hose can become hot during inflation.
Please exercise appropriate caution.
! Do not operate the electric air pump for
longer than eight minutes at a time without
a break. It may otherwise overheat.
The air pump can be operated again once
it has cooled down.
If after five minutes a pressure of 180 kPa
(1.8 bar/26 psi) has been achieved, see
(Y page 304).
If after five minutes a pressure of 180 kPa
(1.8 bar/26 psi) has not been achieved, see
(Y page 303).
302Flat tireRoadside assistance
BA 164.1 USA, CA Edition B 2011; 1; 2, en-USd2mskotVersion: 3.0.3.52010-04-21T17:25:06+02:00 - Seite 302
Page 306 of 372
In this case TIREFIT cannot seal the tire
properly.
Do not drive any further.
Contact the nearest authorized Mercedes-
Benz Center for assistance or call roadside
assistance.
Tire pressure of 180 kPa (1.8 bar/
26 psi) is achieved
XPress the on/off switch on the electric air
pump to 0.
The electric air pump is switched off.
XRemove the TIREFIT kit from the wheel.GWarning
The air hose may still be hot. Exercise proper
caution to avoid burning yourself when
detaching the electric air pump.
! After use, excess TIREFIT may run out of
the filler hose. This could cause stains.
Therefore, place the filler hose in the plastic
bag which contained the TIREFIT kit.
XStow the TIREFIT kit and the electric air
pump.
XPull away immediately.GWarning
Do not exceed a vehicle speed of 50 mph
(80 km/h). A TIREFIT repair is not designed to
operate at higher speeds.
The sticker must be attached on the
instrument cluster where it will be easily seen
by the driver.
Vehicle handling characteristics of a TIREFIT
repaired tire may change. Adapt your driving
accordingly.
XStop after driving for approximately ten
minutes and check the tire pressure with
the electric air pump.
GWarning
If tire inflation pressure has fallen below
130 kPa (1.3 bar/26 psi) do not continue to
drive the vehicle.
Park your vehicle safely away from the
roadway and contact the nearest authorized
Mercedes-Benz Center or roadside
assistance.
Have the damaged tire replaced.
XCorrect the tire inflation pressure if it is at
least 130 kPa (1.3 bar/26 psi) (for values
see Tire and Load Information placard on
the driver's side B-pillar or tire inflation
pressure table inside the fuel filler flap).
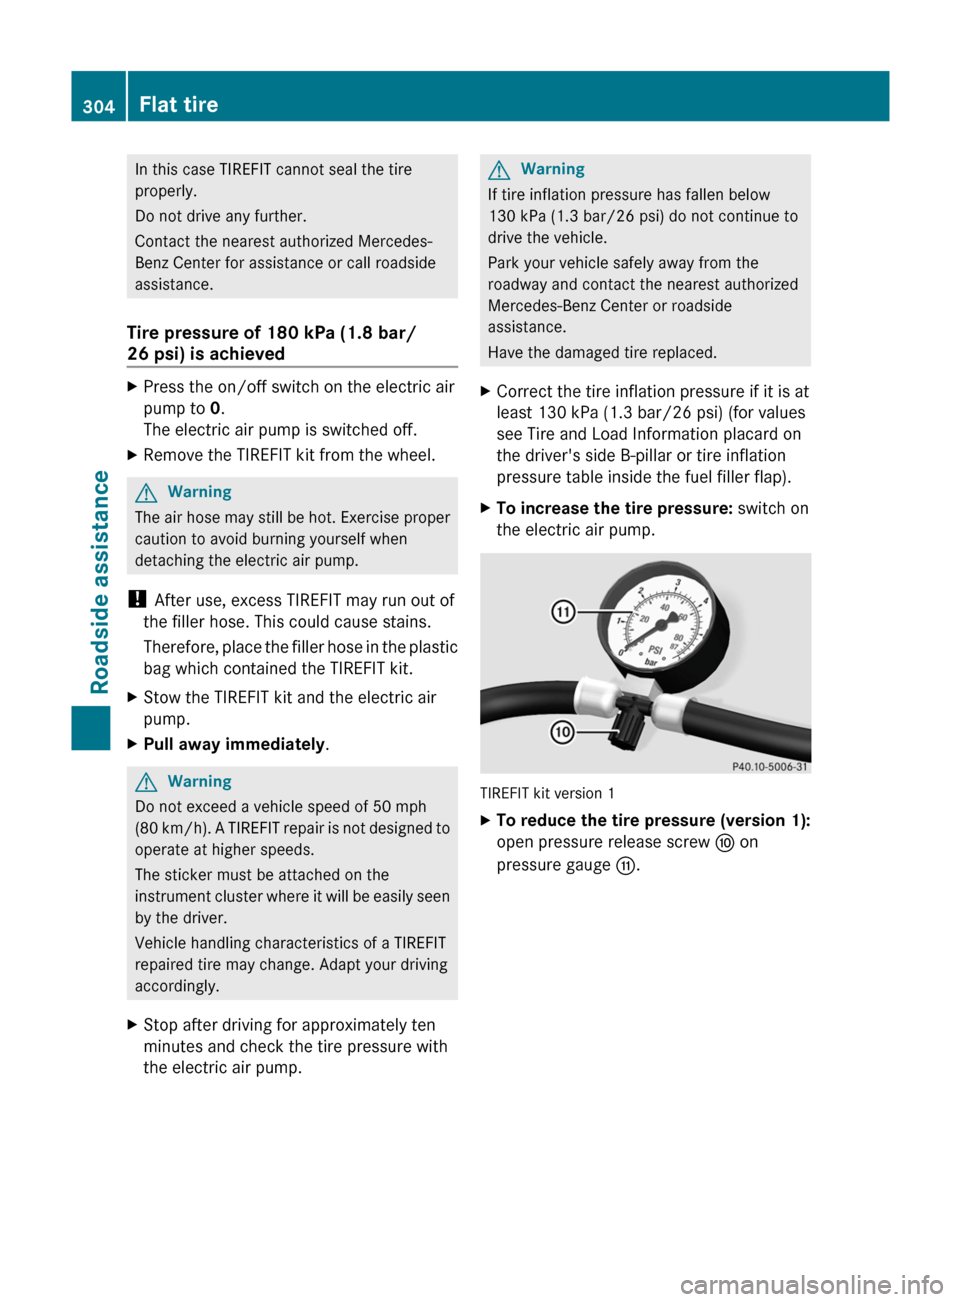
XTo increase the tire pressure: switch on
the electric air pump.
TIREFIT kit version 1
XTo reduce the tire pressure (version 1):
open pressure release screw F on
pressure gauge G.
304Flat tireRoadside assistance
BA 164.1 USA, CA Edition B 2011; 1; 2, en-USd2mskotVersion: 3.0.3.52010-04-21T17:25:06+02:00 - Seite 304