wiper fluid MERCEDES-BENZ M-Class 2011 W164 Owner's Manual
[x] Cancel search | Manufacturer: MERCEDES-BENZ, Model Year: 2011, Model line: M-Class, Model: MERCEDES-BENZ M-Class 2011 W164Pages: 372, PDF Size: 16.23 MB
Page 7 of 372
B
BAS (Brake Assist System) ................. 66
Battery Charging ........................................ 314
Checking (SmartKey) .......................76
Display message ............................ 235
Important safety guidelines
(SmartKey) ....................................... 75
Jump-starting ................................. 315
Replacing (SmartKey) ......................76
Safety notes .................................. 312
Voltage (on-board computer) .........209
Belt
see Seat belts
Blind Spot Assist
Activating/deactivating (on-
board computer) ............................ 219
Display message ............................ 239
Function/notes ............................. 189
Trailer towing ................................. 191
BlueTEC
AdBlue ®
......................................... 360
Adding AdBlue ®
............................. 156
Brake fluid
Notes ............................................. 362
Brake fluid level ................................ 286
Brake lamp (display message) ......... 231
Brakes ABS .................................................. 65
BAS .................................................. 66
Brake fluid (notes) .........................362
Display message ............................ 229
High-performance brake system ....163
Maintenance .................................. 162
Parking brake ........................ 159, 163
Warning lamp ................................. 247
Braking
Important safety instructions ......... 161
Breakdown
see Accident (notes)
see Flat tire
Bulbs
Backup lamp .................................. 115
Brake lamp .................................... 115
High-beam headlamps ...................113
License plate lamp .........................116
Low-beam headlamps ....................113Overview ........................................ 112
Parking lamps ................................ 114
Rear fog lamp ................................ 115
Replacing ....................................... 114
Standing lamps (front) ...................114
Standing lamps (rear) ....................115
Tail lamps ...................................... 115
Turn signal lamp ............................ 115
Turn signals (front) ......................... 114
C
CAC (Customer Assistance Center) .........22
California
Important notice for retail
customers and lessees ....................20
Calling up a malfunction
see Display messages
Care
Carpets .......................................... 293
Car wash ........................................ 288
Display ........................................... 292
Gear or selector lever ....................292
Headlamps ..................................... 291
Notes ............................................. 288
Paint .............................................. 290
Plastic trim .................................... 292
Power washer ................................ 289
Rear view camera .......................... 291
Roof lining ...................................... 293
Seat belt ........................................ 293
Seat covers .................................... 292
Sensors ......................................... 291
Steering wheel ............................... 292
Tail pipes ....................................... 291
Trim strips ..................................... 292
Washing by hand ........................... 289
Wheels ........................................... 289
Windows ........................................ 290
Wiper blades .................................. 290
Wooden trim .................................. 292
Cargo compartment cover ............... 261
Cargo compartment enlargement ... 258
Cargo compartment floor ................. 298
Cargo net Attaching ....................................... 262
Important safety information .........261
Index5BA 164.1 USA, CA Edition B 2011; 1; 2, en-USd2mskotVersion: 3.0.3.52010-04-21T17:25:06+02:00 - Seite 5
Page 20 of 372
W
Warning and indicator lamps Overview .......................................... 29
PASSENGER AIRBAG OFF
indicator lamp (only Canada) ...........48
PASSENGER AIRBAG OFF
indicator lamp (only USA) ................42
Warranty ............................................ 354
Wheel bolt tightening torque ........... 310
Wheel chock ...................................... 306
Wheels Changing/replacing .......................340
Changing a wheel .......................... 305
Checking ........................................ 325
Cleaning ......................................... 289
Guidelines to be observed .............325
Mounting a wheel .......................... 308
Removing a wheel ..........................308
Tightening torque ........................... 310
Wheel size/tire size .......................347
Window curtain air bag ....................... 41
Windows see Side windows
Windows (cleaning instructions) ..... 290
Windshield Defrosting ...................................... 132
Infrared reflective .......................... 279
Windshield washer fluid (display
message) ............................................ 245
Windshield washer system Adding washer fluid .......................286
Notes ............................................. 363
Windshield wipers
Important safety notes ..................117
Replacing the wiper blades ....118, 119
Switching on/off ........................... 117
Troubleshooting ............................. 120
Winter operation ............................... 166
Radiator cover ............................... 283
Winter tires ........................................ 165
Wiper blades Cleaning ......................................... 29018IndexBA 164.1 USA, CA Edition B 2011; 1; 2, en-USd2mskotVersion: 3.0.3.52010-04-21T17:25:06+02:00 - Seite 18
Page 111 of 372
Combination switch
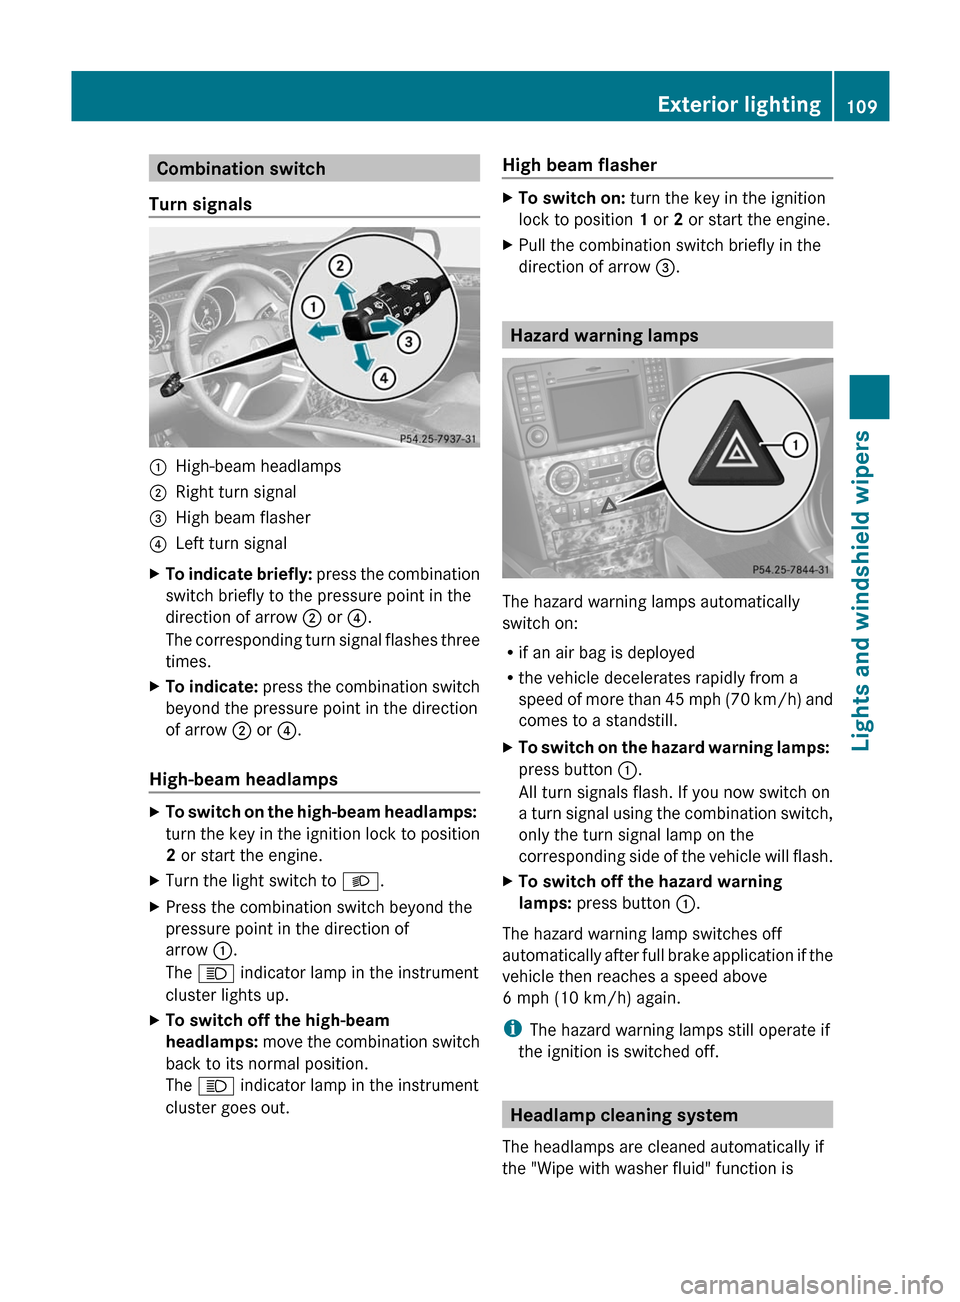
Turn signals:High-beam headlamps;Right turn signal=High beam flasher?Left turn signalXTo indicate briefly: press the combination
switch briefly to the pressure point in the
direction of arrow ; or ?.
The corresponding turn signal flashes three
times.XTo indicate: press the combination switch
beyond the pressure point in the direction
of arrow ; or ?.
High-beam headlamps
XTo switch on the high-beam headlamps:
turn the key in the ignition lock to position
2 or start the engine.XTurn the light switch to L.XPress the combination switch beyond the
pressure point in the direction of
arrow :.
The K indicator lamp in the instrument
cluster lights up.XTo switch off the high-beam
headlamps: move the combination switch
back to its normal position.
The K indicator lamp in the instrument
cluster goes out.High beam flasherXTo switch on: turn the key in the ignition
lock to position 1 or 2 or start the engine.XPull the combination switch briefly in the
direction of arrow =.
Hazard warning lamps
The hazard warning lamps automatically
switch on:
R if an air bag is deployed
R the vehicle decelerates rapidly from a
speed of more than 45 mph (70 km/h) and
comes to a standstill.
XTo switch on the hazard warning lamps:
press button :.
All turn signals flash. If you now switch on
a turn signal using the combination switch,
only the turn signal lamp on the
corresponding side of the vehicle will flash.XTo switch off the hazard warning
lamps: press button :.
The hazard warning lamp switches off
automatically after full brake application if the
vehicle then reaches a speed above
6 mph (10 km/h) again.
i The hazard warning lamps still operate if
the ignition is switched off.
Headlamp cleaning system
The headlamps are cleaned automatically if
the "Wipe with washer fluid" function is
Exterior lighting109Lights and windshield wipersBA 164.1 USA, CA Edition B 2011; 1; 2, en-USd2mskotVersion: 3.0.3.52010-04-21T17:25:06+02:00 - Seite 109Z
Page 119 of 372

XInsert a suitable tool into the openings in
the cover. The directions of arrow =
and ? indicate the angle at which the tool
needs to be inserted in order to reach the
adjustment screws.XTurn both screws uniformly until the
vertical setting corresponds to :. Turn the
screws clockwise to adjust the headlamp
upwards and counterclockwise to adjust it
downwards.
Gradation:
R Screw at arrow =: 0.67˚ angle of
inclination
R Screw at arrow ?: 0.50˚ angle of
inclination
The left and right headlamp need to be
adjusted individually.
i If it is not possible to adjust the
headlamps accurately, have the
adjustment performed at an authorized
Mercedes-Benz Center.
Windshield wipers
Important safety guidelines
GWarning!
Wiper blades are components that are subject
to wear and tear. Replace the wiper blades
twice a year, preferably in the spring and fall.
Otherwise the windows will not be wiped
properly. As a result, you may not be able to
observe surrounding traffic conditions and
could cause an accident.
! Do not operate the windshield wipers
when the windshield is dry, as this could
damage the wiper blades. Moreover, dust
that has collected on the windshield/rear
window can scratch the glass if wiping
takes place when the windshield/rear
window is dry.
If it is necessary to switch on the windshield
wipers in dry weather conditions, always
use washer fluid when operating the
windshield wipers.
Switching the windshield wipers on/
off
Combination switch
1$ Windshield wipers off2Ä Intermittent wipe, low 133Å
Intermittent wipe, high 144°
Continuous wipe, slow5¯ Continuous wipe, fastBí Single wipe/ î To wipe the
windshield using washer fluidXSwitch on the ignition.XTurn the combination switch to the
corresponding position.
! Intermittent wiping with rain sensor: due
to optical influences and the windshield
becoming dirty in dry weather conditions,
the windshield wipers may be activated
inadvertently. This could then damage the
windshield wiper blades or scratch the
windshield.
For this reason, you should always switch
off the windshield wipers in dry weather.
In the Ä or Å position, the appropriate
wiping frequency is set automatically
according to the intensity of the rain. In
13 Rain sensor set to low sensitivity.
14 Rain sensor set to high sensitivity.Windshield wipers117Lights and windshield wipersBA 164.1 USA, CA Edition B 2011; 1; 2, en-USd2mskotVersion: 3.0.3.52010-04-21T17:25:06+02:00 - Seite 117Z
Page 120 of 372
the Å position, the rain sensor is more
sensitive than in the Ä position, causing
the windshield wiper to wipe more frequently.
Intermittent wiping is interrupted when you
stop the vehicle and open a front door. This
prevents a person from being splashed
inadvertently when getting into or out of the
vehicle.
Intermittent wiping continues when all doors
are closed and
R you shift the automatic transmission to
drive position D or reverse gear R
or
R you change the wipe setting on the
combination switch.
i To prevent smearing on the windshield or
noise when wiping, wipe the windshield
occasionally with washer fluid.
Switching the rear window wiper on/
off
Combination switch
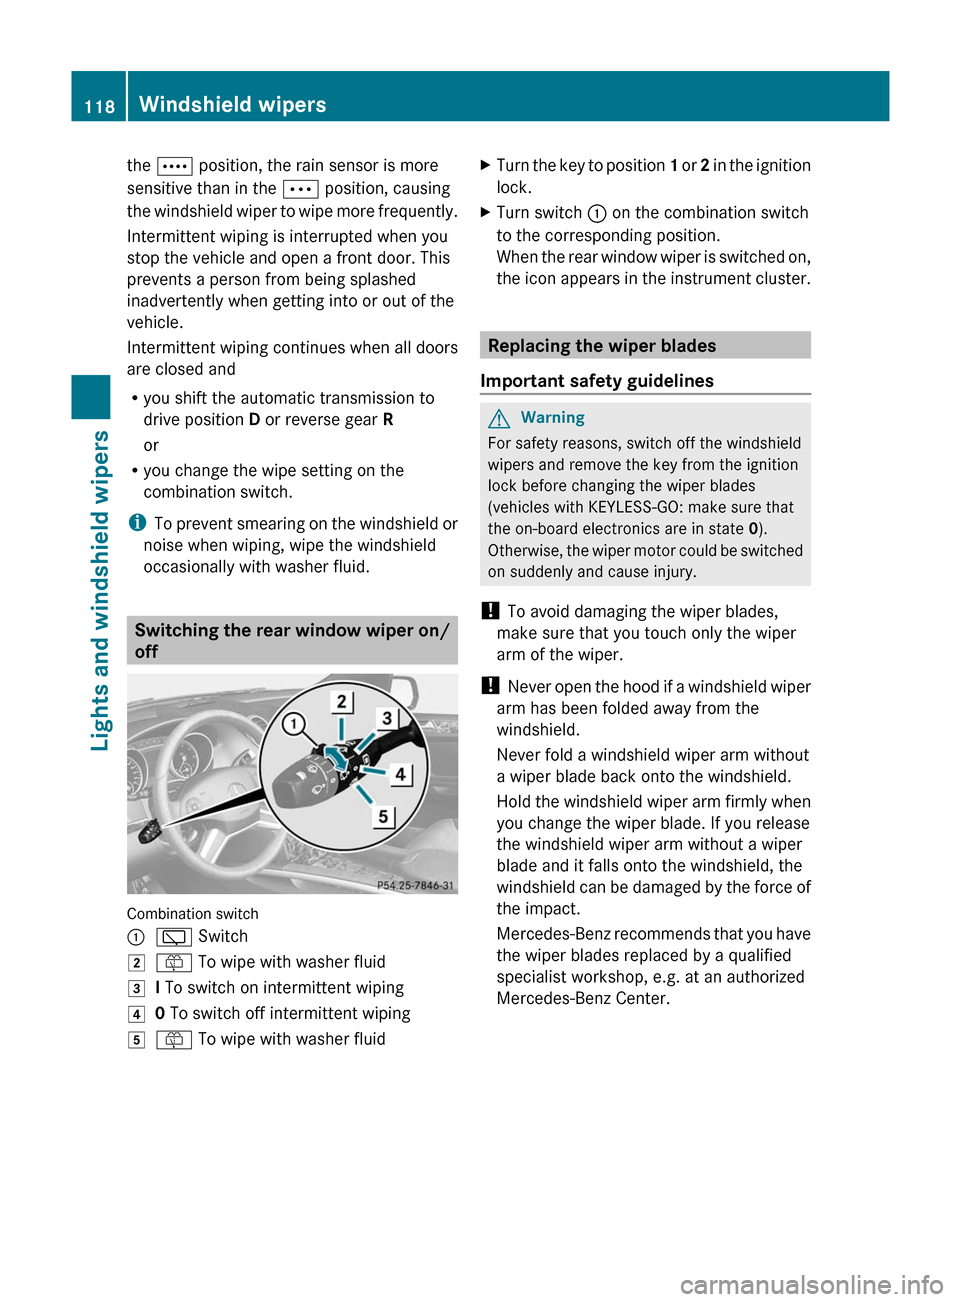
:è Switch2ô To wipe with washer fluid3I To switch on intermittent wiping40 To switch off intermittent wiping5ô To wipe with washer fluidXTurn the key to position 1 or 2 in the ignition
lock.XTurn switch : on the combination switch
to the corresponding position.
When the rear window wiper is switched on,
the icon appears in the instrument cluster.
Replacing the wiper blades
Important safety guidelines
GWarning
For safety reasons, switch off the windshield
wipers and remove the key from the ignition
lock before changing the wiper blades
(vehicles with KEYLESS-GO: make sure that
the on-board electronics are in state 0).
Otherwise, the wiper motor could be switched
on suddenly and cause injury.
! To avoid damaging the wiper blades,
make sure that you touch only the wiper
arm of the wiper.
! Never open the hood if a windshield wiper
arm has been folded away from the
windshield.
Never fold a windshield wiper arm without
a wiper blade back onto the windshield.
Hold the windshield wiper arm firmly when
you change the wiper blade. If you release
the windshield wiper arm without a wiper
blade and it falls onto the windshield, the
windshield can be damaged by the force of
the impact.
Mercedes-Benz recommends that you have
the wiper blades replaced by a qualified
specialist workshop, e.g. at an authorized
Mercedes-Benz Center.
118Windshield wipersLights and windshield wipers
BA 164.1 USA, CA Edition B 2011; 1; 2, en-USd2mskotVersion: 3.0.3.52010-04-21T17:25:06+02:00 - Seite 118
Page 292 of 372
cleaning. Braking heats the brake discs and
brake pads, thus drying them. The vehicle
can then be parked up.
Cleaning the paintwork
Scratches, corrosive deposits, areas affected
by corrosion and damage caused by
inadequate care cannot always be completely
repaired. In such cases, visit a qualified
specialist workshop immediately, e.g. an
authorized Mercedes-Benz Center.
XRemove impurities immediately, where
possible, whilst avoiding rubbing too hard.XSoak insect remains with insect remover
and rinse off the treated areas afterwards.XSoak bird droppings with water and rinse
off the treated areas afterwards.XRemove coolant, brake fluid, tree resin,
oils, fuels and greases by rubbing gently
with a cloth soaked in petroleum ether or
lighter fluid.XUse tar remover to remove tar stains.XUse silicone remover to remove wax.
! Do not affix:
R stickers
R films
R magnetic plates or similar items
to painted surfaces. You could otherwise
damage the paintwork.
If water no longer forms "beads" on the
painted surface, paint care products should
be used that have been approved and
recommended by Mercedes-Benz. This is the
case approximately every three to five
months, depending on climatic conditions
and the care product used.
If dirt has entered the paint surface or the
paintwork has become dull, a paint cleaner
should be used that has been approved and
recommended by Mercedes-Benz.
Never use such care products in direct
sunlight or on a hot hood.
XUse a suitable touch-up stick, e.g. MB
Touch Up stick, for quick, temporary repair
of damaged paintwork.
Cleaning the windows
GWarning!
Switch off the windshield wipers and remove
the SmartKey from the ignition lock before
cleaning the windshield or the wiper blades.
On vehicles with KEYLESS-GO, press the
Start/Stop button repeatedly until all
indicator lamps in the instrument cluster have
gone out. The windshield wipers could
otherwise move and injure you.
XClean the inside and outside of the
windows with a damp cloth and a cleaning
agent that is recommended and approved
by Mercedes-Benz.
! Do not use dry cloths, abrasive products,
solvents or cleaning agents containing
solvents to clean the inside of the windows.
Do not use hard objects to clean the insides
of the windows, e.g. an ice scraper or ring.
There is otherwise a risk of damaging the
windows.
! Clean the water drainage channels of the
windshield and the rear window at regular
intervals. Under certain circumstances,
deposits such as leaves, petals and pollen
may prevent water from draining away,
leading to corrosion damage.
Cleaning the wiper blades
GWarning!
Switch off the windshield wipers and remove
the SmartKey from the ignition lock before
cleaning the windshield or the wiper blades.
On vehicles with KEYLESS-GO, press the
Start/Stop button repeatedly until all
indicator lamps in the instrument cluster have
gone out. The windshield wipers could
otherwise move and injure you.
290CareMaintenance and care
BA 164.1 USA, CA Edition B 2011; 1; 2, en-USd2mskotVersion: 3.0.3.52010-04-21T17:25:06+02:00 - Seite 290