MERCEDES-BENZ M-Class 2012 W166 Owner's Manual
Manufacturer: MERCEDES-BENZ, Model Year: 2012, Model line: M-Class, Model: MERCEDES-BENZ M-Class 2012 W166Pages: 396, PDF Size: 14.48 MB
Page 291 of 396
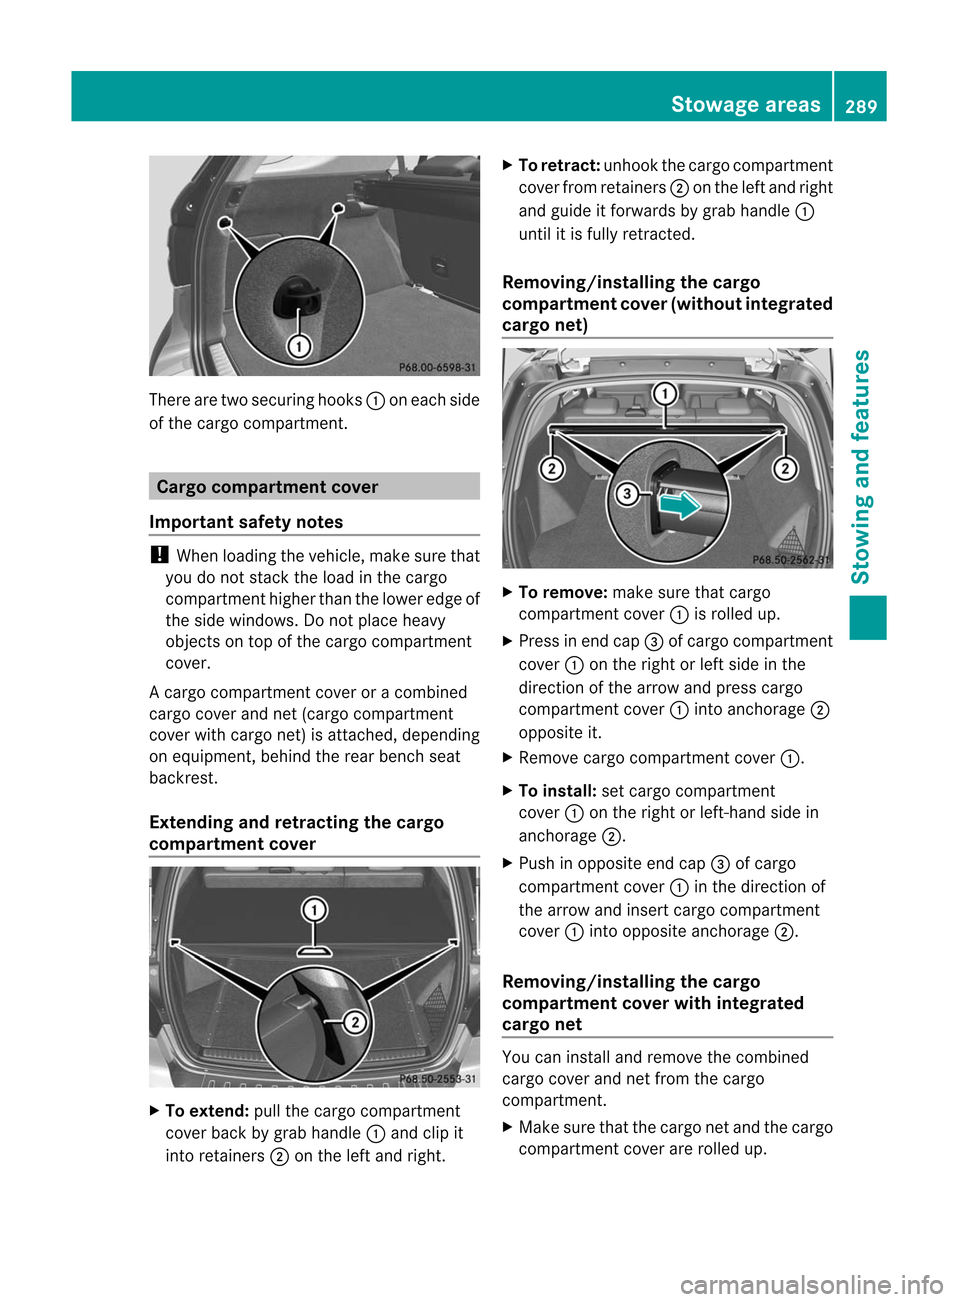
There
aretwo securing hooks:oneach side
of the cargo compart ment. Cargo
compar tment cover
Impor tantsafety notes !
When loading thevehicle, makesurethat
you donot stack theload inthe cargo
compart menthigher thanthelower edgeof
the side windows. Donot place heavy
object son top ofthe cargo compart ment
cover.
A cargo compart mentcover oracombined
cargo coverandnet(cargo compart ment
cover withcargo net)is attach ed,depending
on equipment, behindtherear bench seat
backrest .
Extending andretracting thecargo
compar tment cover X
To extend: pullthecargo compart ment
cover backbygrab handle :and clipit
into retainers ;onthe left and right. X
To retr act: unhook thecargo compart ment
cover fromretainers ;onthe left and right
and guide itforwards bygrab handle :
until itis fully retrac ted.
Removing/installing thecargo
compar tment cover (without integrated
cargo net) X
To remove: makesurethatcargo
compart mentcover :isrolled up.
X Press inend cap=ofcargo compart ment
cover :onthe right orleft side inthe
direction ofthe arrow andpress cargo
compart mentcover :into anchorage ;
opposite it.
X Remove cargocompart mentcover :.
X To install: setcargo compart ment
cover :onthe right orleft- hand sidein
anchorage ;.
X Push inopposite endcap=ofcargo
compart mentcover :inthe direction of
the arrow andinsert cargocompart ment
cover :into opposite anchorage ;.
Removing/installing thecargo
compar tment cover withintegrat ed
cargo net You
caninstall andremove thecombined
cargo coverandnetfrom thecargo
compart ment.
X Make surethatthecargo netand thecargo
compart mentcover arerolled up. Stowage
areas
289Stowing and features Z
Page 292 of 396
X
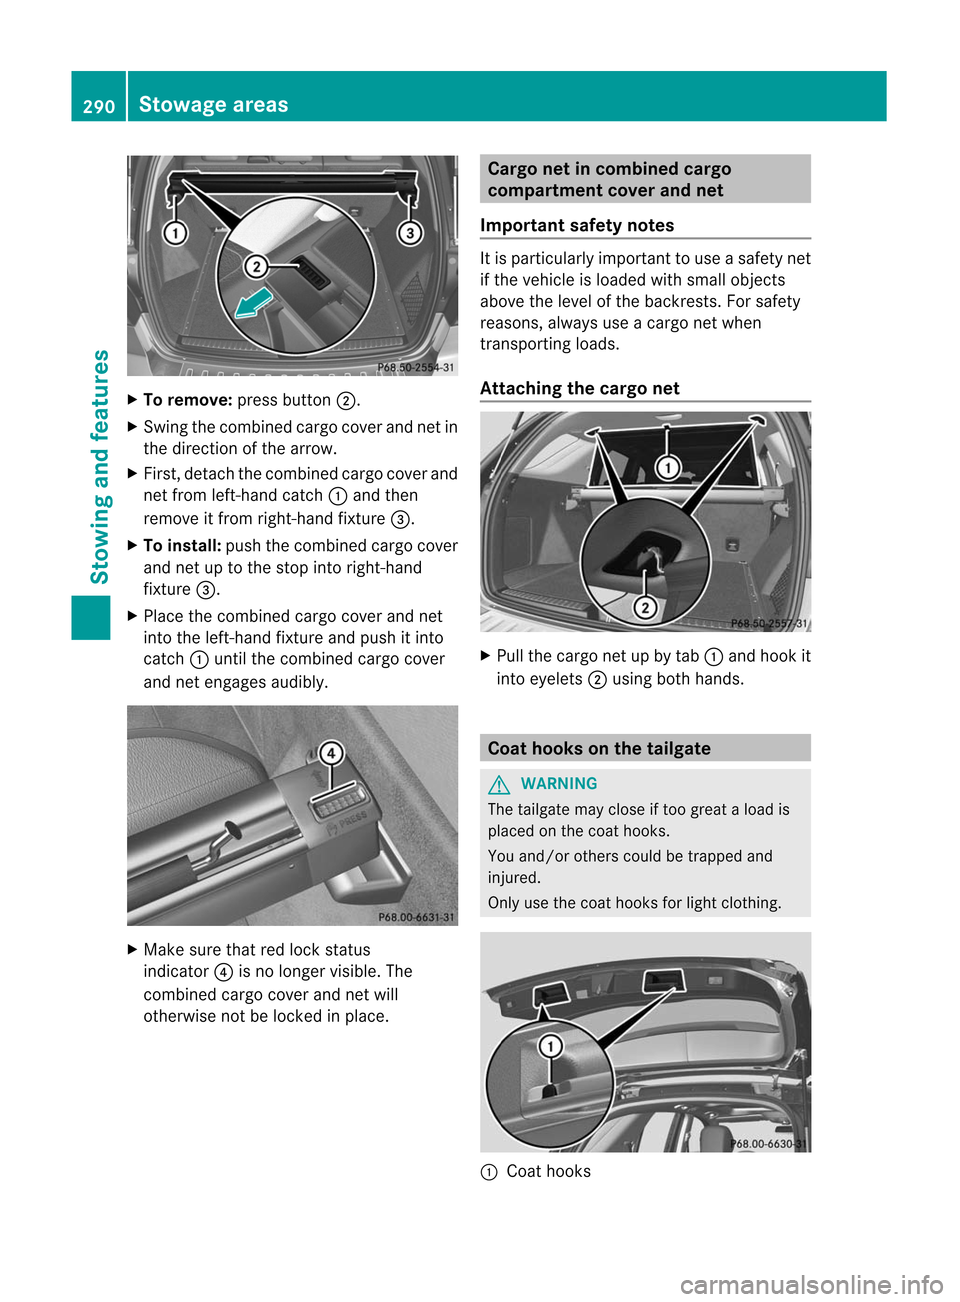
To remo ve:pre ssbutton ;.
X Swi ngthe comb inedcar gocove rand net in
the directi onofthe arrow .
X Fir st, detach thecomb inedcar gocove rand
net from left-ha ndcatch :and then
rem ove itfrom right-ha ndfixtu re=.
X To instal l:pu sh the comb inedcar gocove r
and netuptothe stop intoright-ha nd
fixtu re=.
X Place thecomb inedcar gocove rand net
into theleft-ha ndfixtu reand push itinto
catch :unti lthe comb inedcar gocove r
and netengages audibl y. X
Ma kesure tha tred lock status
indicat or? isno longer visible. The
combin edcargo coverandnetwill
other wisenotbelocked inplace. Cargo
netincombined cargo
compa rtment cover andnet
Impor tantsafet ynotes It
is particularly importanttouse asafety net
if the vehicle isloaded withsmall objects
above thelevel ofthe backr ests.Forsafety
reasons, alwaysuse acargo netwhen
tran sport ingloads.
Atta ching thecargo net X
Pull thecargo netupbytab :and hook it
int oeyelets ;using bothhands. Coat
hooks onthe tailga te G
WARN
ING The
tailgate mayclose iftoo great aload is
placed onthe coat hooks.
You and/or otherscould betrapped and
injur ed.
Only usethecoat hooks forlight cloth ing. :
Coat hooks 290
Stowage
areasStowing and features
Page 293 of 396
EASY-P
ACKload-secu ringkit
Comp onentsand stora ge The
EASY- PACK load- securin gkit allows you
to use your cargocom partmen tfor avar iety
of purpo ses.Theaccesso rypart sare locate d
unde rth etrunk floor.
X Open thetrunk floor(Y page 292). EA
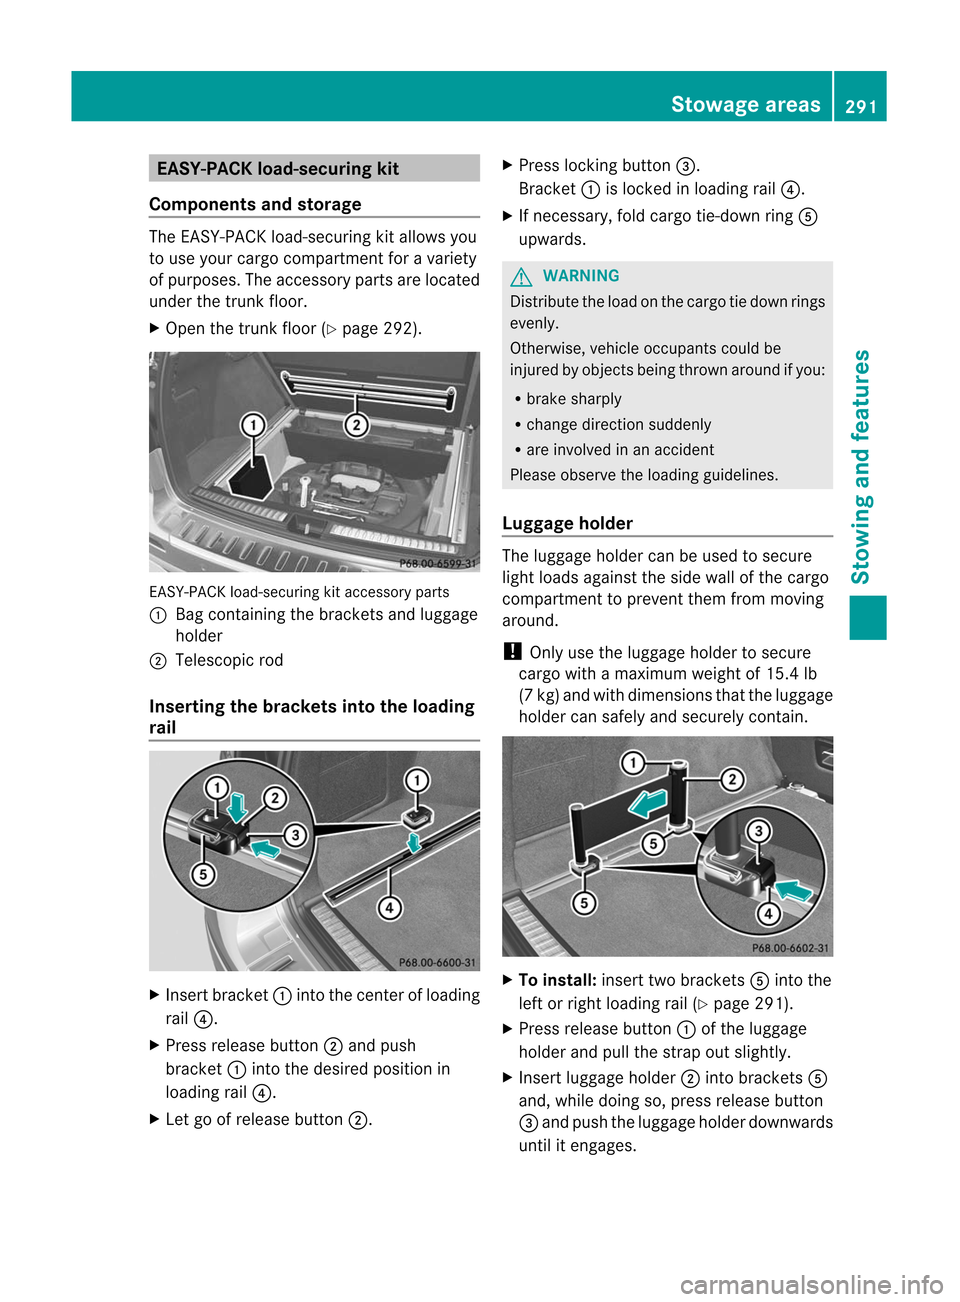
SY- PACK load- securin gkit acc esso rypart s
: Bag contain ingthebrac kets and luggage
holde r
; Teles copicrod
Inser tingth ebr ack ets intothe loadi ng
rail X
Insert bracket :into thecenter ofloa ding
rai l?.
X Press release button ;and push
bracket :into thedesi redposi tion in
loa ding rail?.
X Let goofrele ase button ;. X
Press locking button=.
Bracket :islocked inloa ding rail?.
X Ifnecessa ry,fold cargo tie-dow nring A
upwards. G
WARN
ING Dist
ribut ethe load onthe carg otie down rings
even ly.
Oth erwise, vehicleocc upant scould be
inj ured byobj ect sbeing thrown aroun difyou:
R brak esharply
R chan gedirec tionsudden ly
R are involved inan acc ident
Please observethe loading guidelines.
Lugga gehold er The
luggage holdercanbeused tosec ure
light loads against theside wallofthe carg o
com partmen tto prev entthemfro mmov ing
aroun d.
! Only usetheluggage holdertosecur e
carg owith amaxim umweight of15. 4lb
(7 kg) and with dimen sionsthat theluggage
holder cansafely andsecur elycon tain . X
To inst all:inse rttwo brac ketsA intothe
left orright loading rail(Ypage 291).
X Press release button: ofthe luggage
holder andpullthestrap out slight ly.
X Insert luggage holder;intobrac ketsA
and, while doing so,press release button
= and push theluggage holderdownwar ds
unt ilit eng ages. Stowa
geareas
291Stowing and features Z
Page 294 of 396
X
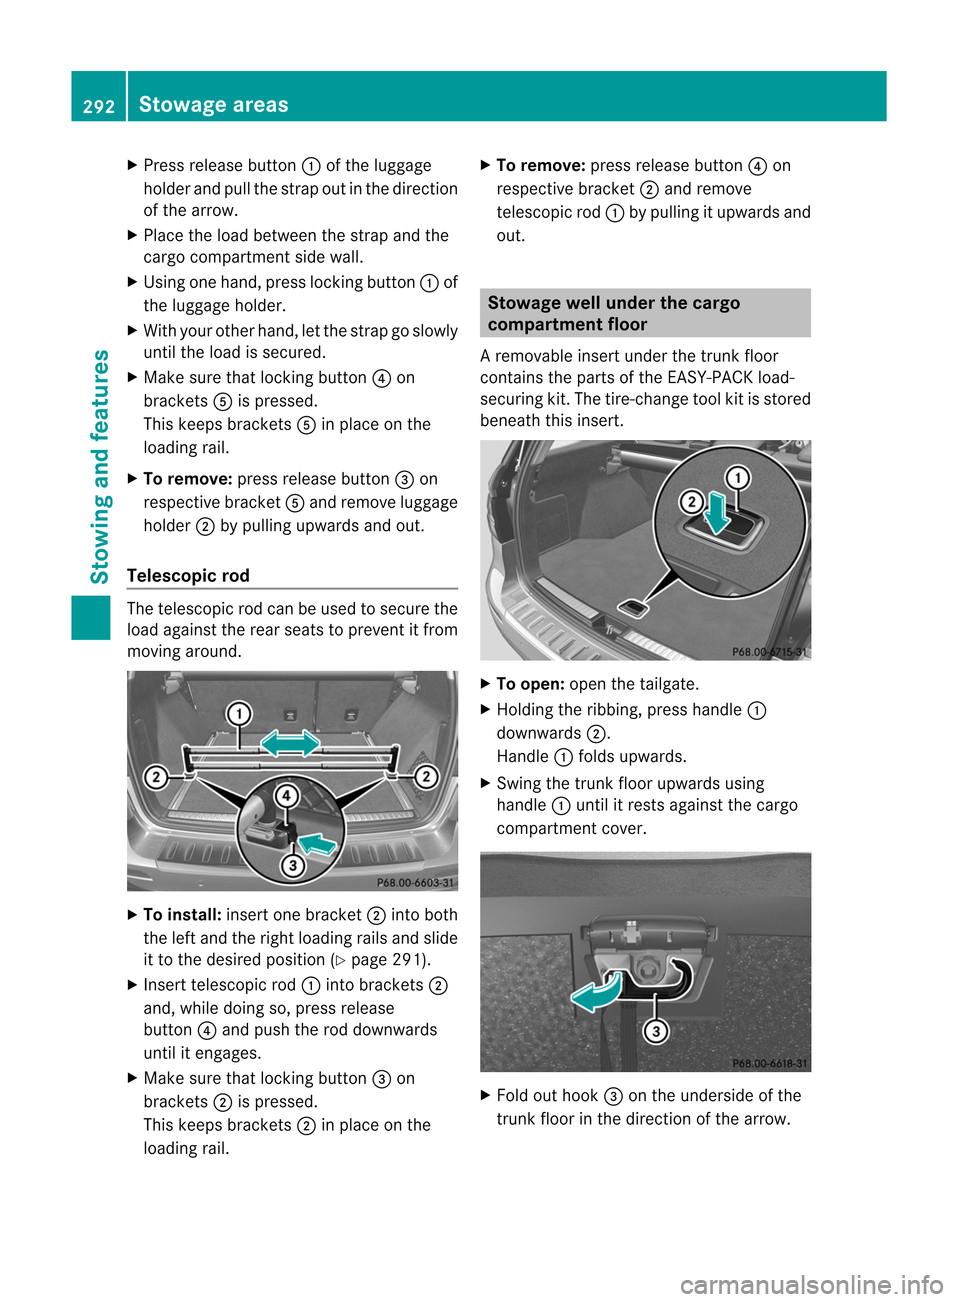
Press release button:ofthe luggage
holder andpullthestrap outinthe direction
of the arrow.
X Place theload between thestrap andthe
cargo compart mentsidewall.
X Using onehand, presslockingbutton :of
the luggage holder.
X With yourother hand, letthe strap goslowly
until theload issecured.
X Make surethatlockin gbutton ?on
bracket sA ispressed.
This keeps bracket sA inplace onthe
loading rail.
X To remove: pressrelease button=on
respect ivebracket Aand remove luggage
holder ;bypulling upwards andout.
Telescopic rod The
telescopic rodcan beused tosecure the
load against therear seats toprevent itfrom
moving around. X
To install: insertonebracket ;into both
the left and theright loading railsandslide
it to the desired position (Ypage 291).
X Inser ttelescopic rod:intobrack ets;
and, while doing so,press release
button ?and push therod downwards
until itengages.
X Make surethatlockin gbutton =on
brack ets;ispressed.
This keeps brackets;inplace onthe
loading rail. X
To rem ove: press release button?on
respect ivebrack et; and remove
telesc opicrod:bypulling itupwards and
out. Stowage
wellunder thecargo
compa rtment floor
A removable insertunder thetrun kfloor
con tains theparts ofthe EASY-PA CKload-
securin gkit .The tire-c hange toolkitisstored
beneath thisinsert. X
To open: openthetailgate.
X Holding theribbing, presshandle :
downwards ;.
Handle :folds upwards.
X Swing thetrunk floorupwa rdsusing
handle :until itrests against thecargo
compartmen tcover. X
Fold outhook =onthe underside ofthe
trunk floorinthe direction ofthe arrow. 292
Stowage
areasStowing and features
Page 295 of 396
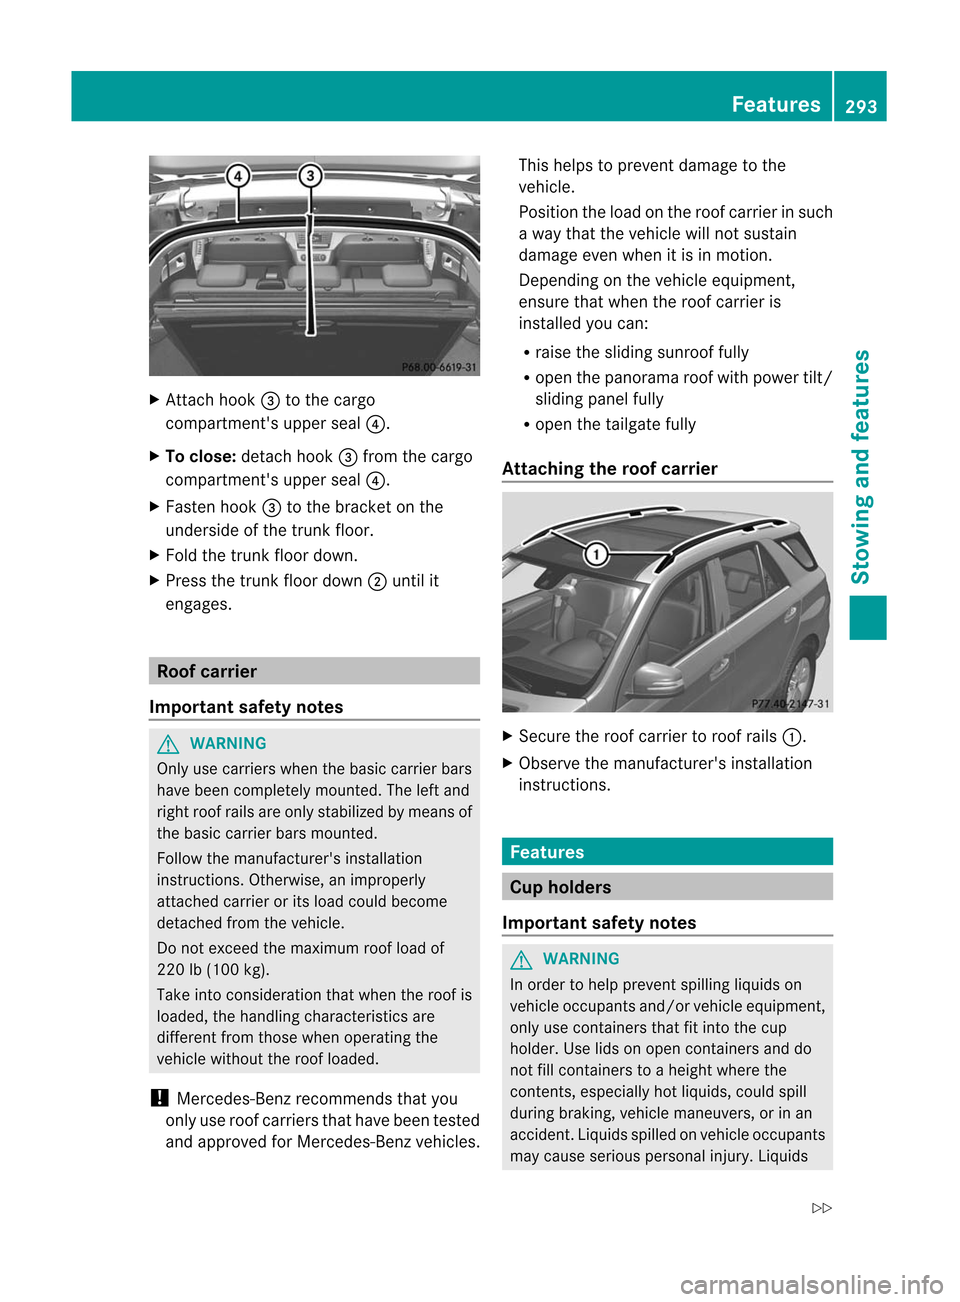
X
Attach hook= tothe cargo
comp artment' sup pers eal ?.
X To close: detach hook=from thecargo
compart ment'supper seal?.
X Fasten hook=tothe brack eton the
underside ofthe trun kfloor.
X Fold thetrunk floor down.
X Press thetrunk floor down ;untilit
eng ages. Roof
carrier
Imp ortant safety notes G
WARN
ING Only
usecarriers when thebasic carrierbars
have been complete lymoun ted.Theleftand
right roofrails areonly stabilized bymean sof
the basic carrierbars moun ted.
Follow themanuf acturer' sinsta llati on
ins truc tions. Othe rwise, animp roperly
atta chedcar riero rits load cou ldbe come
de tach edfromt hevehicle.
Do not exceed themaximum roofload of
220 lb(100 kg).
Take intoconsideration thatwhen theroof is
loaded, thehandling characterist icsare
different fromthose whenoperating the
vehicle without theroof loaded.
! Mercedes-Ben zrecomm endsthatyou
only useroof carriers thathave been tested
and approved forMercedes- Benzvehicles. This
helps topreven tdamage tothe
veh icle.
Posi tionthe load onthe roof carrier insuch
a way that thevehicle willnotsustain
damage evenwhen itis in motion.
Depending onthe vehicle equipment,
ensure thatwhen theroof carrier is
installed youcan:
R raise thesliding sunroof fully
R open thepanorama roofwith power tilt/
sliding panelfully
R open thetailgate fully
Attaching theroof carrier X
Secure theroof carrier toroof rails :.
X Observe themanufacturer's installation
instruct ions. Features
Cup
holders
Import antsafety notes G
WARNING In
order tohelp prevent spillingliquidson
vehicle occupants and/orvehicleequipment,
only usecont ainers thatfitinto thecup
holder. Uselidsonopen containers anddo
not fillcont ainers toah eight where the
con tents,especially hotliquids, couldspill
during braking ,vehicle maneuvers, orinan
acciden t.Liquids spilledonvehicle occupant s
may cause serious personal injury.Liquids Featur
es
293Stowing and features
Z
Page 296 of 396
spille
don vehicle equipment maycause
damage notcovered bythe Mercedes-Benz
Limited Warranty.
When notinuse, keep thecup holder closed.
An open cupholder maycause injurytoyou
or others whencontacted during braking,
vehicle maneuvers, orinan accident.
Keep inmind thatobjects placedinthe cup
holder maycome looseduring braking,
vehicle maneuvers, orinan accident andbe
thrown around inthe vehicle interior. Objects
thrown around inthe vehicle interior may
cause anaccident and/orserious personal
injury. G
WARNING Do
not transport anyheavy, sharp-edged or
fragile bottles inthe stowage compartment s.
In the event ofan accident, thestowage
compartment scannot securethebottles
adequ ately.Youand/or othervehicle
occupants couldbeinjured.
The stowage compartment sin the doors have
space forbottles containing upto34 fl.oz.
(1.0 l).
The bottles areneither secured inposition nor
prevented fromtipping over.Therefore, do
not place anyopen drink containers inthe
stowage compartment s.
Cup holder inthe front-compa rtment
center console You
canremove thecup holder's rubbermat
for cleaning. Cleanwithclear ,lukewarm
water only. :
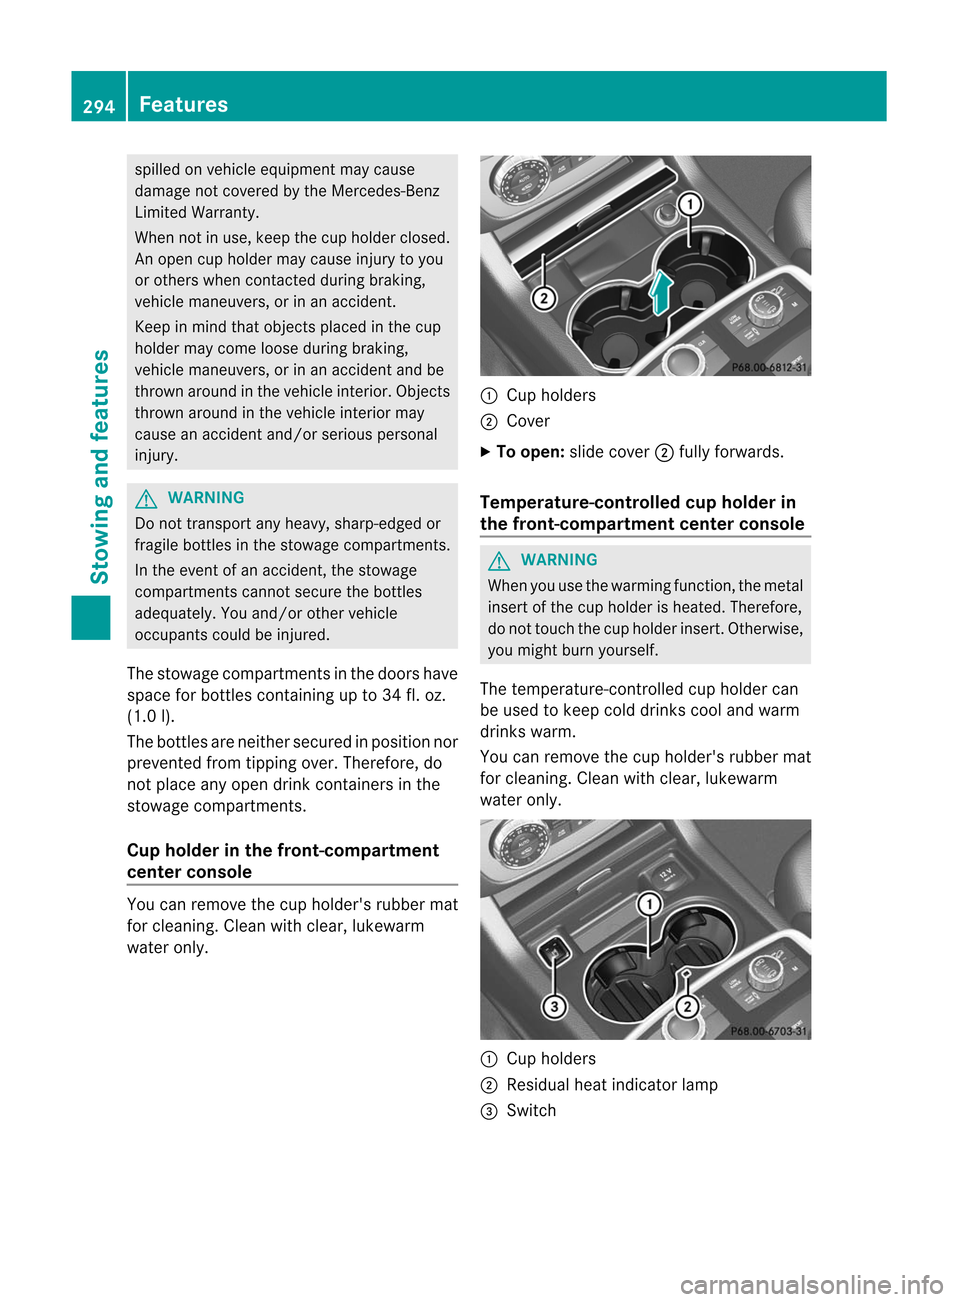
Cup holder s
; Cover
X To open: slidecover; fully forwards.
Tem peratur e-cont rolled cuphold erin
th efront- comp artm ent center console G
WARN
ING When
youusethewarmin gfunc tion,themet al
ins ert ofthecup hold erisheat ed.Ther efore,
do nottouch thecup holder insert.Othe rwise,
yo umi ght burn yourse lf.
Th etemp erature-co ntrol led cup holderc an
be used tokeep cold drin kscool and warm
drin kswarm .
You canremove thecup holde r'srubbe rmat
for cleanin g.Clean withcle ar, luke warm
wate ronly . :
Cuphol ders
; Residu alhea tindi cato rlamp
= Swit ch 294
Feat
uresStowing and features
Page 297 of 396
X
Turn theSmart Keytoposition 2in the
ignition lock.
X To switch oncooli ngfunction: press
switch =repeatedly untiltheblue
indicator lampinthe switch lightsup.
X To switch onwarm ingfunction: press
switch =repeatedly untilthered indicator
lamp inthe switch lightsup.
X To switch offfunction: pressswitch =
repeatedly untiltheindicator lampinthe
switch goesout.
When usingthewarming functionabove a
cert aintemperat ure,residual heatindicator
lamp ;lights up.This means thatthemetal
insert ofthe cup holder ishot.
Cup holder inthe rear seat armrest !
Donot siton orsupport yourbody weight
on the rear seat armrest whenitis folded
down, asyou could otherwise damageit. X
Fold down therear seat armrest .
Cup holder :isin the rear seat armrest . Sun
visors
Overview ofsun visors G
WARNIN
G Do
not use thevanity mirror whiledriving.
Keep thevanity mirrors inthe sun visors
closed whilethevehicle isin motion .
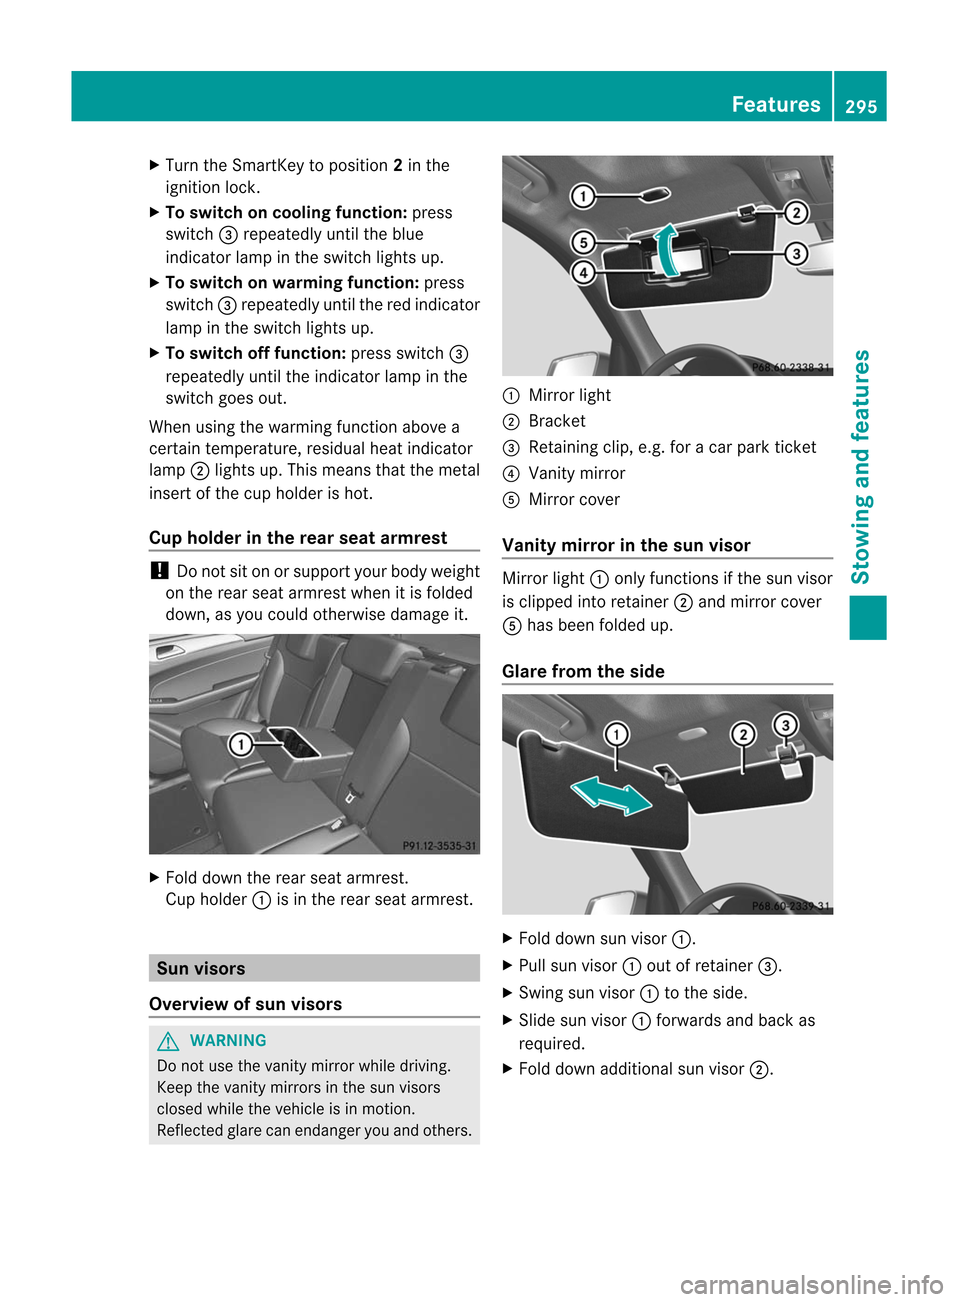
Reflected glarecanendanger youand others. :
Mirror light
; Brack et
= Retaining clip,e.g.foracar park ticket
? Vanity mirror
A Mirror cover
Vanit ymirr orinthe sun visor Mirror
light:only funct ionsifthe sun visor
is clipped intoretainer ;and mirror cover
A has been folded up.
Glare fromtheside X
Fold down sunvisor :.
X Pull sunvisor :out ofretainer =.
X Swing sunvisor :tothe side.
X Slide sunvisor :forwards andback as
required.
X Fold down additional sunvisor ;. Featur
es
295Stowing and features Z
Page 298 of 396
Asht
ray
Asht rayin thefront -com partmen t
cent erconsole !
The hold erund ertheasht rayisno th eat
resist ant.Befor eplacing litcigaret tesinthe
ashtray, makesurethattheashtray is
properly engaged. Otherwise, theholder
could bedamaged. X
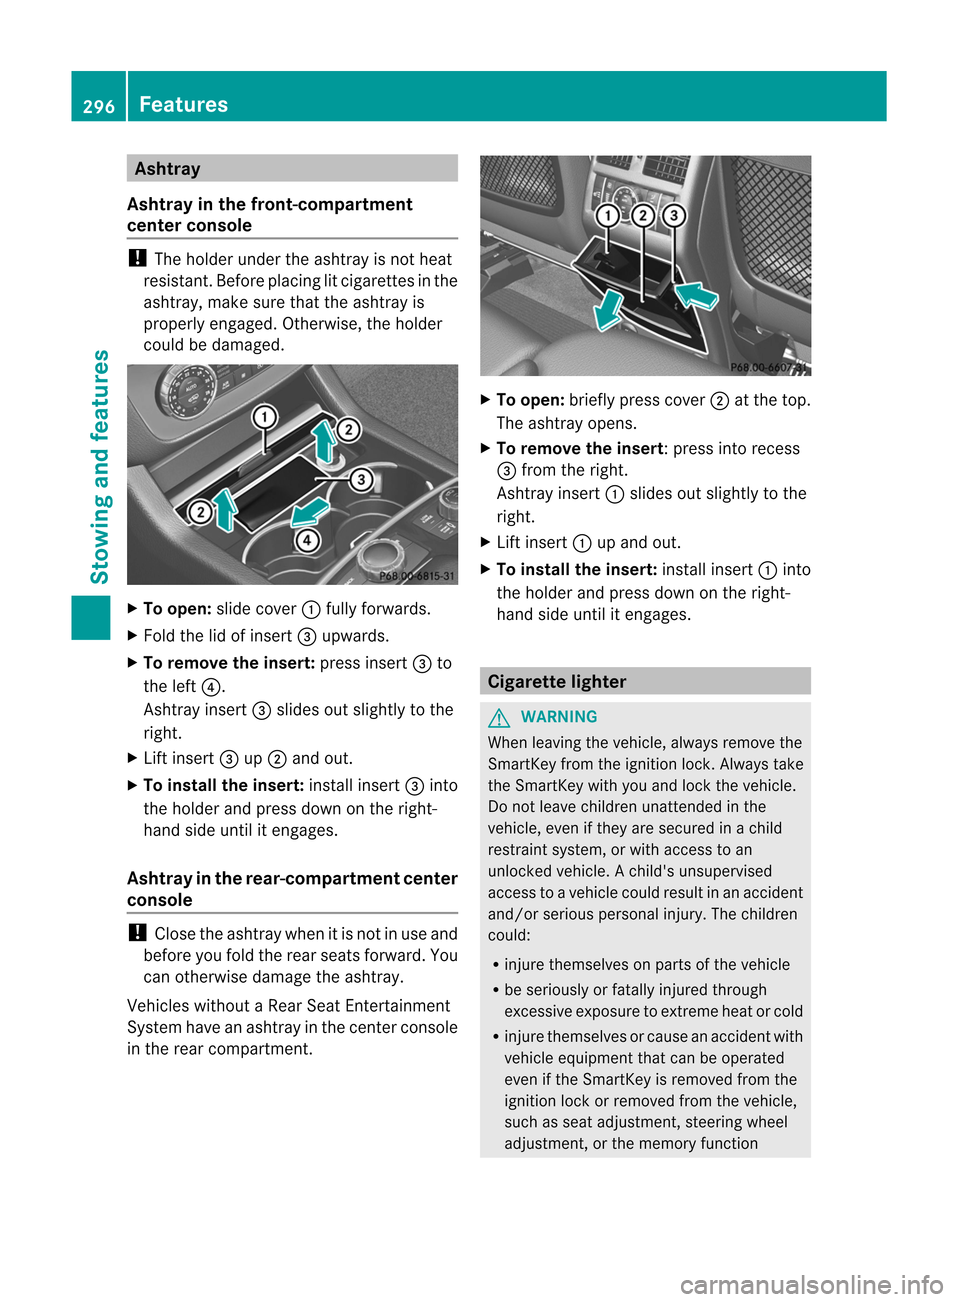
To open: slidecover :fully forwards.
X Fold thelidofinsert =upwards.
X To rem ove theinsert: pressinsert =to
the left ?.
Asht rayinsert =slides outslightly tothe
right.
X Lift insert =up; and out.
X To install theinsert: installinsert =into
the holder andpress downonthe right-
hand sideuntil itengages.
Ashtr ayinthe rear -comp artment center
console !
Close theashtray whenitis not inuse and
before youfold therear seats forward. You
can other wisedamage theashtray.
Vehicles withoutaRear SeatEntert ainmen t
System haveanashtray inthe centercon sole
in the rear compart ment. X
To open: briefly presscover ;atthe top.
The ashtray opens.
X To rem ove theinsert:p ressintorecess
= from theright.
Ashtray insert:slid esout slightly tothe
right.
X Lift insert :upand out.
X To install theinse rt:install insert:into
the hold erand press downonthe right-
hand sideuntil itengages. Cigarette
lighter G
WARNING When
leaving thevehicle, alwaysremove the
SmartK eyfrom theignition lock.Always take
the SmartK eywith youand lock thevehicle.
Do not leave children unattendedinthe
vehicle, evenifthey aresecured inachild
restraint system,orwith access toan
unlocked vehicle.Achild's unsupervised
access toavehicle couldresult inan accident
and/or serious personal injury.Thechildren
could:
R injure themselves onparts ofthe vehicle
R be seriously orfatally injured through
excessive exposuretoextrem eheat orcold
R injure themselves orcause anaccident with
vehicle equipment thatcanbeoperated
even ifthe SmartKey isremoved fromthe
ignition lockorremoved fromthevehicle,
such asseat adjustment ,steering wheel
adjustment ,or the memory function 296
FeaturesStowing and features
Page 299 of 396
If
childre nopen adoor, theycould injure other
person sor get out ofthe vehicle andinjure
them selves orbe injured byfollowing traffic.
Do not expose thechild restraint system to
direct sunlight .The child restraint system's
metal parts, forexample, couldbecome very
hot, andthechild could beburned onthese
parts. G
WARNING Never
touchtheheating element orsides of
the lighter; theyareextrem elyhot. Hold the
knob only.
Make sureanychildren traveling withyoudo
not injure themselves orstart afire with the
hot cigarette lighter.
! The cigarette lighterinthe cent erconsole
in the front compartmen tis not inten ded
for operating thetire inflation compressor. X
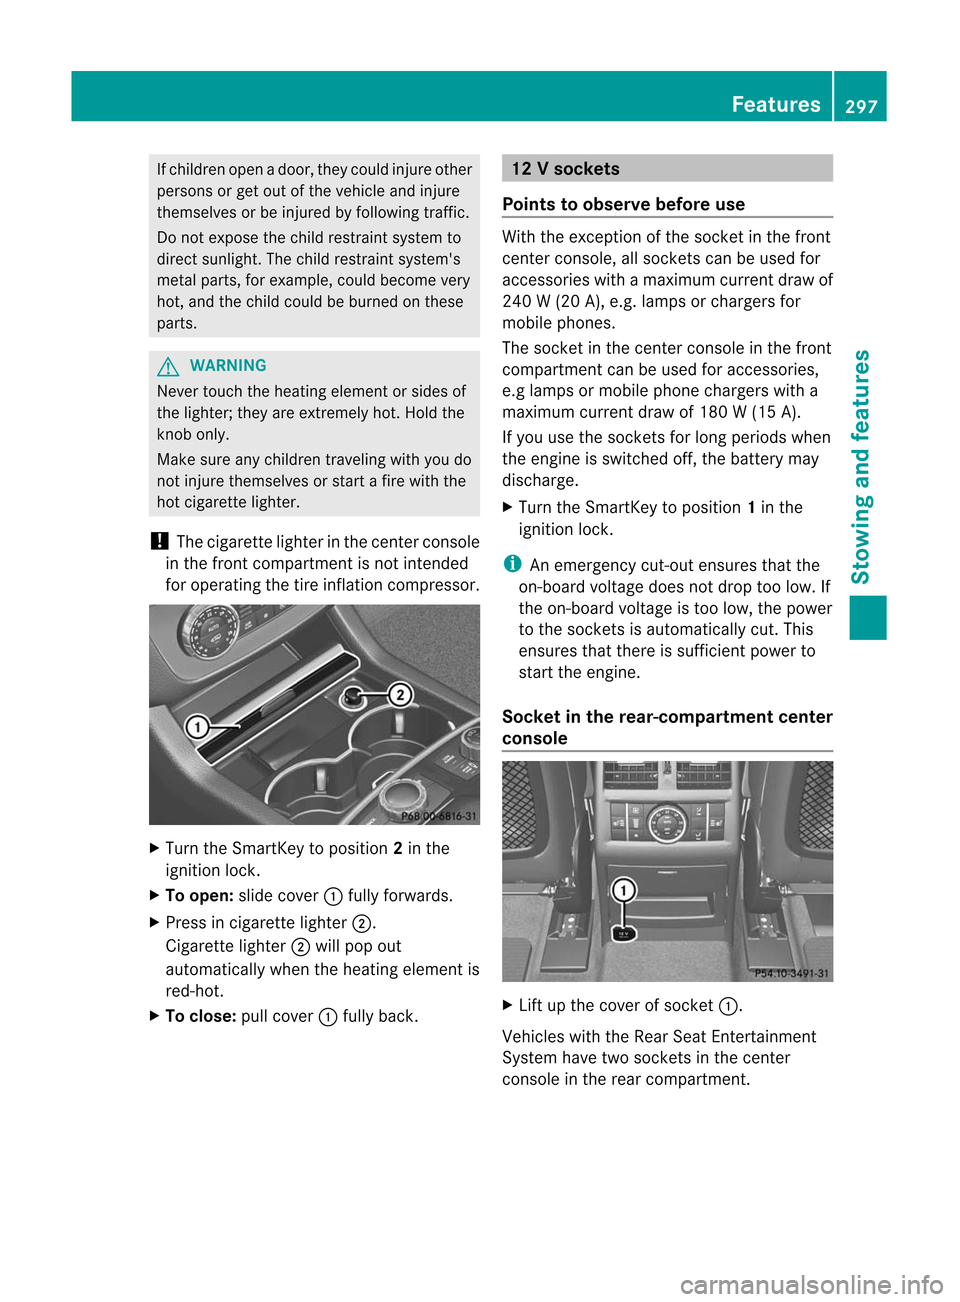
Turn theSmartK eytoposition 2in the
ignition lock.
X To open: slidecover :fully forwards.
X Press incigarette lighter;.
Ciga rettelighter ;will pop out
automatically whentheheating element is
red-hot.
X To close :pull cover :fully back. 12
Vsocket s
Point sto obser vebefor euse Wit
hth eexc eption ofthesoc ket inthefron t
cen terc onsole, allsocket scan be used for
acc essorie swit hamax imum curren tdraw of
240 W(20 A),e.g. lamp sor charge rsfor
mobil ephones.
The socket inthe center console inthe front
compartment canbeuse dfor accesso ries,
e.g lamp sor mobil ephone chargerswith a
maximu mcurrent drawof180 W(15 A).
If you usethesockets forlong periods when
the engine isswi tched off,thebattery may
discha rge.
X Turn theSmartKey toposi tion 1in the
ignitio nlock. i
An
emergenc ycut- out ensures thatthe
on-board voltagedoesnotdrop toolow. If
the on-board voltageistoo low, thepower
to the socket sis automatically cut.This
ensures thatthere issufficient powerto
start theengine.
Socket inthe rear -compa rtment center
consol e X
Lift upthe cover ofsocket :.
Vehicles withtheRear SeatEntert ainment
System havetwosocket sin the cent er
console inthe rear compartm ent. Featur
es
297Stowing and features Z
Page 300 of 396
Socket
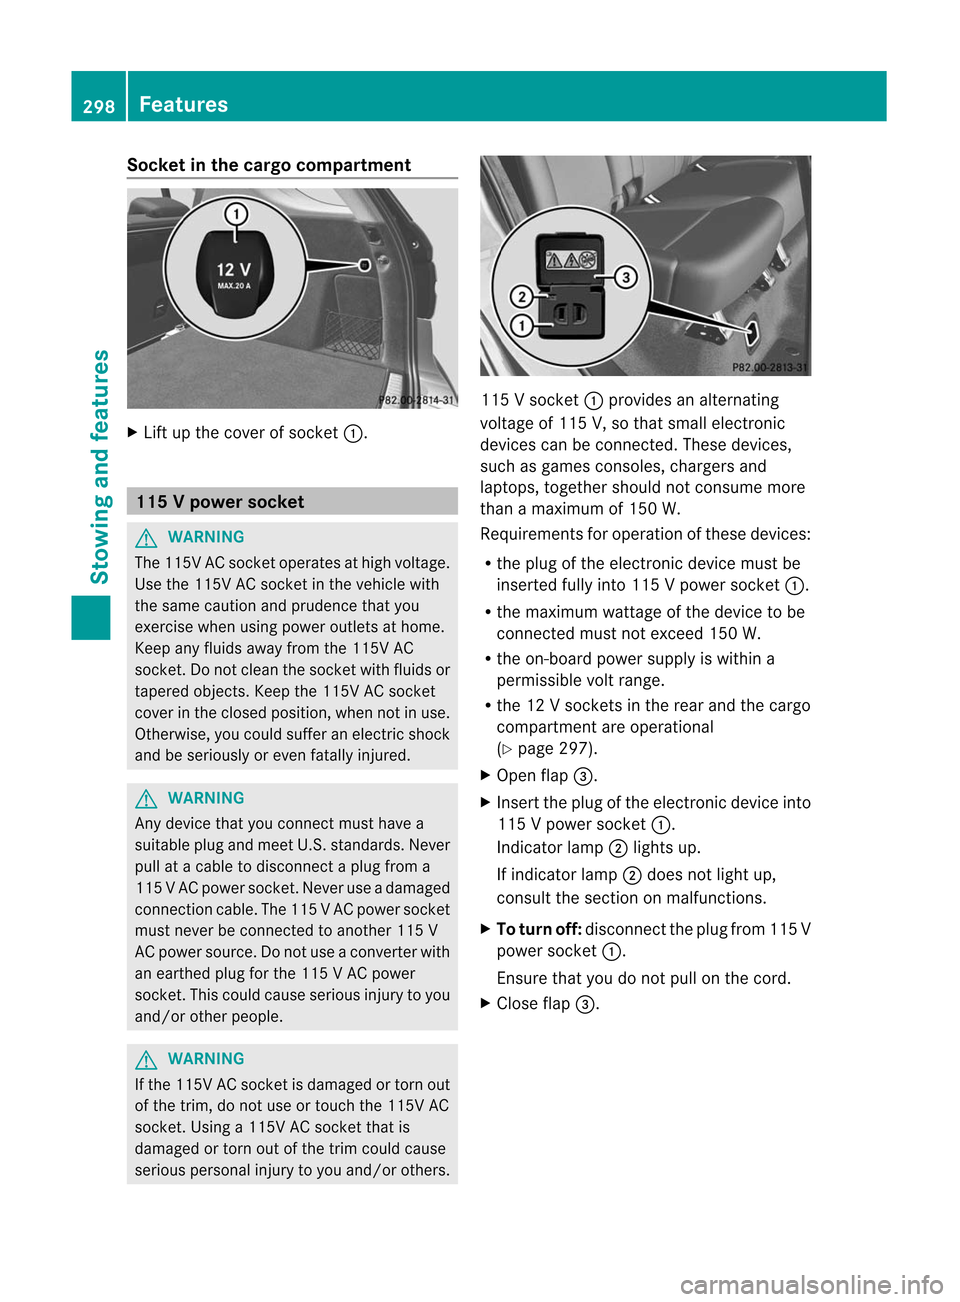
inthe cargo compar tment X
Lift upthe cover ofsocket :. 115
Vpower socket G
WAR
NING The
115V AC soc ket oper ates athigh voltage.
Use the11 5V AC socket intheveh icle with
th esame cautionand prude nceth at you
exe rcise when usingpower outletsat hom e.
Keep anyfluids awayfrom the11 5V AC
soc ket.Donot clean thesocket withfluids or
tapered objects.Keep the115V ACsocket
cover inthe closed position, whennotinuse.
Otherwise, youcould suffer anelectric shock
and beseriously oreven fatally injured. G
WARNING Any
device thatyouconn ectmust havea
suitable plugandmeet U.S.standards. Never
pull atacable todisconn ectaplug from a
115 VACpower socket.Nev eruse adamag ed
co nn ect ion cabl e.The 115VA Cpower socket
must never beconn ect edtoano ther 11 5V
AC power source.Donotuse aconvert erwith
an earthed plugforthe 115 VAC power
socket. Thiscould cause serious injurytoyou
and/or otherpeople. G
WARNING If
the 115V ACsocket isdamaged ortorn out
of the trim, donot use ortouch the115V AC
socket. Usinga115V ACsocket thatis
damaged ortorn outofthe trim could cause
serious personal injurytoyou and/or others. 115
Vsocket :provides analternating
voltage of115 V,so that small electronic
devices canbeconn ected. Thesedevices,
such asgames consoles, chargersand
laptops, together shouldnotconsume more
than amaximum of150 W.
Requ irements foroperation ofthese devices:
R the plug ofthe electronic devicemustbe
inserted fullyinto115 Vpower socket :.
R the maximum wattageofthe device tobe
conn ected mustnotexceed 150W.
R the on-board powersupplyis within a
permissible voltrange.
R the 12Vsocket sin the rear andthecargo
compartment areoperational
(Y page 297).
X Open flap=.
X Insert theplug ofthe electronic deviceinto
115 Vpower socket :.
Indicator lamp;lights up.
If indicator lamp;does notlight up,
consult thesection onmalfunctions.
X To tur noff:disconnect theplugfrom 115V
powe rsocket :.
En sure thatyoudonot pull onthe cord.
X Close flap=. 298
Featur
esStowing and features