MERCEDES-BENZ M-Class 2012 W166 Owner's Manual
Manufacturer: MERCEDES-BENZ, Model Year: 2012, Model line: M-Class, Model: MERCEDES-BENZ M-Class 2012 W166Pages: 396, PDF Size: 14.48 MB
Page 341 of 396
short
tripsorifyou leave itstanding idlefor
a lengthy period.
Only replace abattery withabattery thathas
been recommended byMercedes-Benz .
Consult anauthorized Mercedes-Benz Center
if you wish toleave yourvehicle parkedfora
long period oftime. G
WARNING Comply
withsafety precautions andtake
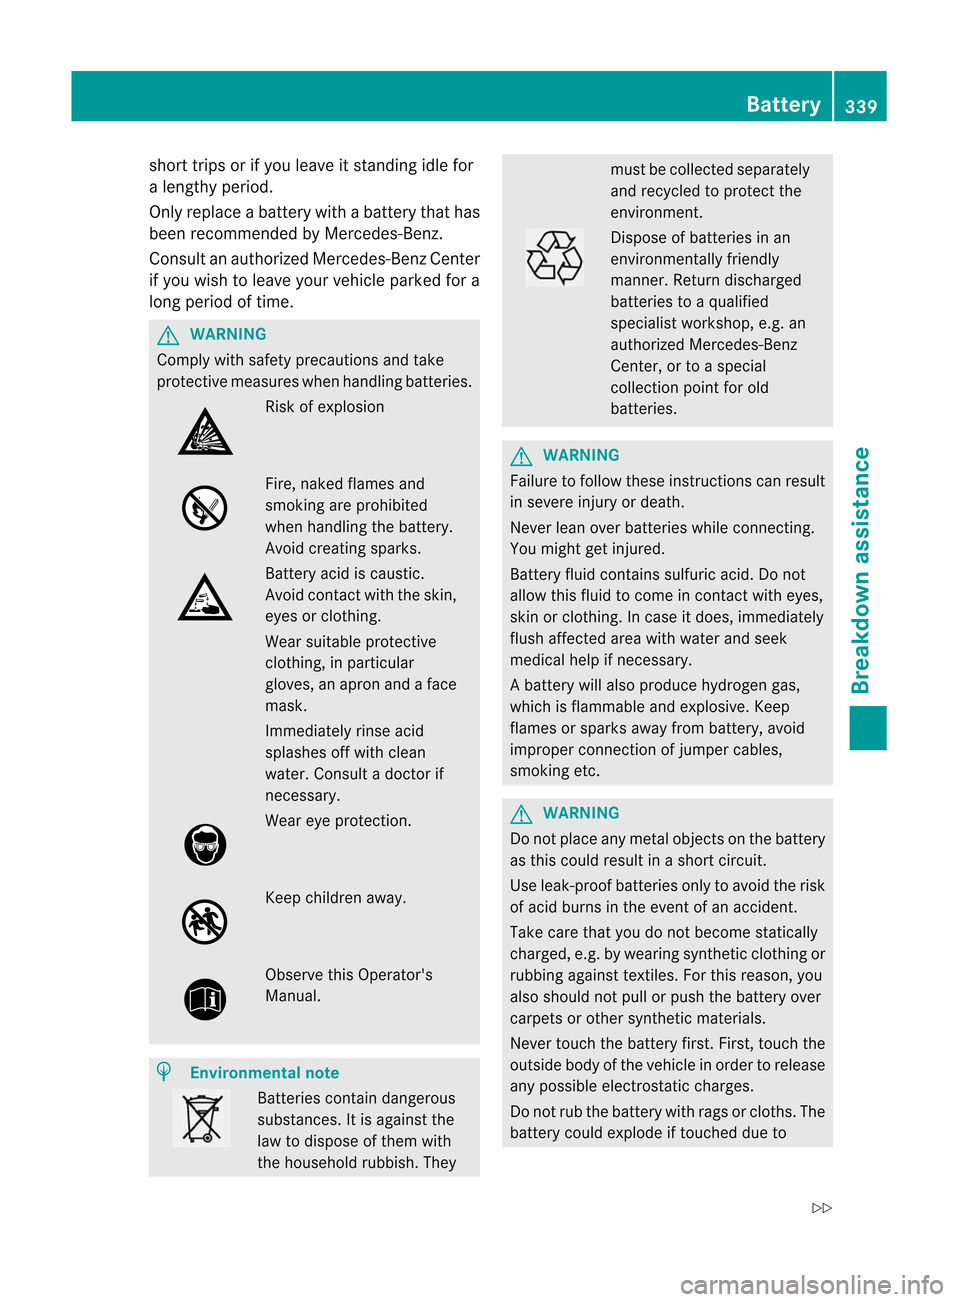
protective measureswhenhandling batteries. Risk
ofexplosion Fire,
naked flames and
smoking areprohibited
when handling thebattery.
Avoid creating sparks. Battery
acidiscaustic.
Avoid contactwith theskin,
eyes orclothing.
Wear suitable protective
clothing, inparticular
gloves, anapron andaface
mask.
Immediately rinseacid
splashes offwith clean
water. Consult adoctor if
necessary. Wear
eyeprotection . Keep
children away. Observe
thisOperator's
Manual . H
Environmental
note Batteries
containdangerous
substances. Itis agai nstthe
law todispose ofthem with
the household rubbish.They must
becollected separately
and recycled toprotect the
environmen t. Dispose
ofbatteries inan
environmen tallyfriendly
manner. Returndischarged
batteries toaqual ified
speciali stworkshop, e.g.an
authorized Mercedes-Benz
Center, ortoaspecial
collection pointforold
batteries. G
WARNING Failure
tofollow theseinstruct ionscanresult
in severe injuryordeath.
Never leanover batteries whileconnecting.
You might getinjured.
Battery fluidcontains sulfuric acid.Donot
allow thisfluid tocome incont actwith eyes,
skin orclothing. Incase itdoes, immediately
flush affected areawithwater andseek
medical helpifnecessary.
Ab attery will also produce hydro gengas,
whic his flam mable andexplosiv e.Keep
flam esorspar ksaway from battery, avoid
impr oper connectionof jum per cable s,
smo kinget c. G
WAR
NING Do
notp lace anymetalobje ctson the batt ery
as this could result inashor tcircuit .
Use leak- proof batteries onlytoavoid therisk
of acid burnsin the even tof an acc ident .
Take carethatyoudonot becom estat ically
char ged, e.g.bywearin gsynt het icclo thingor
rubb ing again sttextiles .For this reason, you
also should notpull orpush thebattery over
carpets orother synthet icmaterials.
Never touchthebattery first.First, touch the
outside bodyofthe vehicle inorder torelease
any possible electrostaticcharges.
Do not rub thebattery withrags orcloths. The
battery couldexplode iftouched dueto Bat
tery
339Breakdown assistance
Z
Page 342 of 396
electr
ostaticcharge ordue tospark
format ion.
! Befor eworkin gon the batter y,e.g.
loosenin gthe batter yterm inals, switch off
the engine andremove theSmart Keyfrom
the ignition .Onv ehicles withKEYLE SS-GO,
make surethattheignition isswitch edoff.
Check thatallthe indicat orlamps inthe
inst rument clusterareoff. You may
other wisedestr oyelectr oniccompon ents,
such asthe altern ator.
! Like other batter ies,thevehicle battery
may discharge overtime ifyou donot use
the vehicle. Inthis case have thebatter y
chec kedataqualified specialist workshop,
such asan authoriz edMercedes- Benz
Center .You can also charge thebattery
with acharger recomm endedbyMercedes-
Benz .Cont act anauthorized Mercedes-
Benz Center formore inform ation.
The battery andthecover ofthe positive
termin alclamp mustbeinstalled securely
during operation. i
Remove
theSmart Keyifyou park the
vehicle anddonot require anyelectric al
consumer s.The vehicle willthen usevery
little energy, thusconser vingbattery
power.
Mercedes-B enzrecomm endsthatyoudonot
carry outwork onbatteries yourself,e.g.
removing orcharging. Alwayshavethiswork
performed ataquali fiedspecialist workshop,
e.g. anauthorized Mercedes-B enzCenter. Charging
thebatt ery G
WARNIN
G Never
charge abattery stillinstalled inthe
vehicle unlessabattery charger unitapproved
by Mercedes-B enzisbeing used.Gases may
escape duringcharging andcause explosions
that may result inpaint damage, corrosion or
personal injury. Ab
attery charge runit spe cially ad apted for
Mer cedes-Be nzveh icles and teste dand
ap pro ved byMer cedes-Be nzisava ilab leas an
acce ssory.It pe rmi tsthe charging ofthe
ba ttery inits installed po sitio n.Co ntact an
au thor izedMer cedes-B enzCenter forfurther
info rma tiona nd ava ilab ility .
Ch arg ethe battery inacco rdance with the
sep arateins truc tions for the battery charger. G
WAR
NING The
reisaris ko facid burns during the
cha rging pro cess dueto the gases which
esca pefrom thebattery .Donot lean over the
battery duringthecharging process. G
WARNING Batt
eryacid iscaustic. Avoidcontactwith the
skin, eyesorclothin g.
! Only charge theinstalled batterywitha
battery charger whichhasbeen testedand
approved byMercedes-B enz.These battery
chargers allowthebattery tobe charged
while stillinstalled.
! Only usebattery chargers witha
maximum chargingvoltageof14.8 V.
! Only charge thebattery usingthejump-
start ingconn ection point.
The jump-st artingconnection pointisin the
engine compartm ent(Ypage 341).
X Open thehood (Ypage 312).
X Connect thebattery charger tothe positive
termin aland earth pointinthe same order
as when connectin gthe donor battery in
the jump-st artingprocedure
(Y page 341).
X Read thebattery charger's operating
instr uctions beforecharging thebattery. 340
Bat
teryBreakdown assistance
Page 343 of 396
Jump
-starting G
WARNING Failure
tofollow thesedirections willcause damage tothe electronic componen ts,and canlead
to abattery explosion andsevere injuryordeath.
Never leanover batteries whileconnecting orjump startin g.You might getinjured.
Battery fluidcontains sulfuric acid.Donot allow thisfluid tocome incont actwith eyes, skinor
clothing. Incase itdoes, immediately flushaffected areawithwater, andseek medical helpif
necessary.
Ab attery will also producehydro gengas, whichis flam mable andexplosiv e.Keep flamesor
spar ksaway from battery, avoid improper connectiono fjumpe rcables, smoking,etc.
At tempt ingtojum pstart afroz en bat tery can result initexp lodin g,caus ingpers onalinj ury.
Read allinstruct ionsbefo reproc eedin g.
! Avoid repe atedand lengthy start ing attempt s.Ot her wise, non-com bust edfuel may
damage thecat alytic converter27
and creat earisk offire.
Do notu se arapid-charging devicetostart theengine.
Make surethejumper cablesarenot damage d.
Make surethejumper cablesarenot touching anyother metal objects whentheyare
conn ected tothe battery.
If your vehicle's batteryisdischarged, theengine canbejump-start edfrom another vehicle
or from asecond batteryusingjumper cables.
Observe thefollowi ngpoints:
X The battery isnot accessible inall vehicles. Ifthe other vehicle's batteryisnot accessible,
jump-start thevehicle usingasecond batteryorajump- start ing device.
X On lyjum p-start theveh iclewhen theen gin eis co ldand thecat alyti cconvert ersystem has
cooled down28
.
X Do not start theengine ifthe battery isfroz en.Let the battery thawfirst.
X Jump-start ingmay onlybeperformed frombatteries withanominal voltageof12 V.
X Only usejumper cableswhichhaveasufficient cross-section andinsulated terminalclamps.
X Make surethatthejumper cablescannotcome intocontactwith parts, suchasthe pulley
or the fan. These partsmove whentheengine isstart edand while itis runnin g.
X Ifthe battery isfully discharged, leavethebattery thatisbeing usedtojump-st artconn ected
for afew minutes beforeattempt ingtostart .This charges theempty battery alittle. i
Jumper
cablesandfurther information aboutjump-st artingcanbeobtained fromany
authorized Mercedes-Ben zCent er,for example.
X Make surethatthetwo vehicles donot touch.
X Secure thevehicle byapplying theelectr icparkin gbrake.
X Shift thetran smission toposition P.
27 Only vehicles withagasoline engine.
28 Only vehicles withagasoline engine. Jum
p-starting
341Breakdown assistance Z
Page 344 of 396
X
Turn theSmart Keytoposition 0(Y page 139)inthe ignition lockandremove it.On vehicles
with KEYLE SS-GO, make suretheignition isswitched off(Ypage 139). Allindicator lamps
in the instr ument cluster mustbeoff.
X Switc hoff allelectric alcons umers (e.g.radio, blower, etc.).
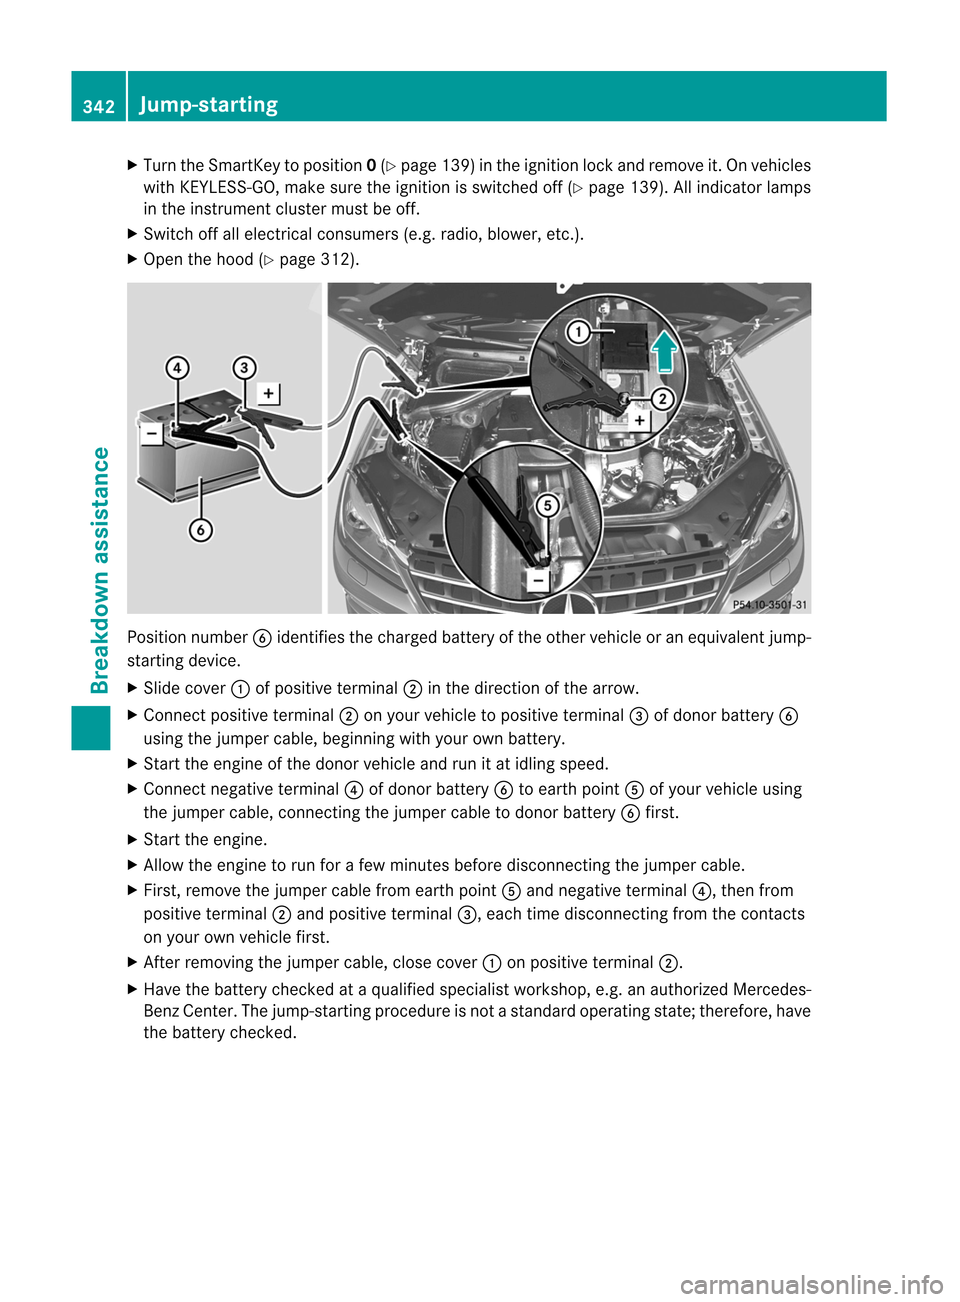
X Open thehood (Ypage 312). Position
numberBidentifies thecharged batteryofthe other vehicle oran equivalent jump-
start ingdevice.
X Slide cover :ofpositive terminal; inthe direction ofthe arrow.
X Connec tpositive terminal; onyour vehicle topositive terminal= ofdonor battery B
using thejumper cable,beginning withyour ownbattery.
X Start theengine ofthe donor vehicle andrunitat idling speed.
X Connect negative terminal? ofdonor battery Btoearth pointAofyour vehicle using
the jumper cable,connectin gthe jumper cabletodonor battery Bfirst.
X Start theengine.
X Allow theengine torun forafew minutes beforedisconn ectingthe jumper cable.
X First ,remove thejumper cablefromearth pointAand negative terminal?, then from
positive terminal; and positive terminal=, each timedisconn ectingfrom thecont acts
on your ownvehicle first.
X Aft erremoving thejumper cable,closecover :onpositive terminal;.
X Have thebattery checkedataquali fiedspecialist workshop, e.g.anauthorized Mercedes-
Benz Center. Thejump-st artingprocedure isnot astandard operating state;therefor e,have
the battery checked. 342
Jum
p-startingBreakdown assistance
Page 345 of 396
Tow
ingand tow-starti ng Impo
rtant safety notes G
WA
RNING If
yo utow thevehicle, youmu stusearig id
tow ingbarif:
R the engine isnot running.
R there isabrake system malfunction.
R there isamal function inthe pow ersup ply
or the vehicl e'selectrical system .
The pow erassi stance forthe steering andthe
brake forcebooste rdo not work when the
engine isnot running. Youwillneed more
force tosteer andbrake, youmay have to
depre ssthe brake pedalwith maximu mforce.
Before towing away,make surethatthe
steering canbemoved andisnot locked.
If you tow ortow-st artanother vehicle,its
weight mustnotexceed themaximum
permissible grossvehicle weightofyour
vehicle. G
WARNING The
vehicle isbraked whentheHOLD function
or DIS TRONIC PLUSisactivated. Therefore,
deactivate HOLDandDISTRONIC PLUSifthe
vehicle isto be towed.
It is better tohave thevehicle transported
than tohave ittowed.
! You may onlytowthevehicle amaximum
distance of30 miles (50km). Atowing
speed of30 mph (50km/ h)must notbe
exceeded.
For towing distances over30miles
(50 km), thevehicle mustloaded ontoa
trans porter.
! Make surethattheelectric parking brake
is released. Ifthe electric parking brakeis
faulty, visitaquali fiedspecialist workshop.
! Only secure thetow rope ortow baratthe
towing eyes.Otherwise, thevehicle could
be damaged. !
Donot use thetowing eyeforrecovery,
as this could damage thevehicle. Ifin
doubt, recover thevehicle withacrane.
! When towing, pullaway slowly and
smoothly. Ifthe tract ivepower istoo high,
the vehicles couldbedamaged.
! Donot tow with sling-t ypeequipment.
This could damage thevehicle.
! When towing vehicles withKEYLE SS-GO,
use thekey instead ofthe Start /Stop
button .Othe rwise, the automa tic
tra nsmi ssion mayshi ftto positio nP wh en
the driver 'sor fro nt-pa ssenge rdo or are
op ene d,wh ich cou ldlead todama getothe
tra nsmi ssion.
! Vehicle swi th diffe renti allocks: make
su re tha tthe differential locksarein
automatic mode.Whentowing, the
differential locksmustnotbeswitched on
by hand. Thiscould otherwise damagethe
transmission.
If the vehicle hassuffered transmission
damage, haveittransport edon atransport er
or trailer.
The automatic transmission mustbein
position Nwhen thevehicle isbeing towed.
The battery mustbeconn ected andcharged.
Otherwise, you:
R cannot turntheSmartK eytoposition 2in
the ignition lock
R cannot shifttheautomatic transmission to
position N i
Before
thevehicle istowed, switchoffthe
automatic lockingfeature(Ypage 235).
You could otherwise belocked outwhen
pushing ortowing thevehicle. Installing/
removingthetowing eye
Installing thetowing eye Vehicles
withatrailer towhitch: ifpossible,
secure thetowing deviceonthe trailer tow
hitch (Ypage 210). Towing
andtow-star ting
343Breakdown assistance Z
Page 346 of 396
X
Remo vetheto win geye require dfor fron tal
or rear couplin gfrom theveh icleto ol kit
(Y page 328).
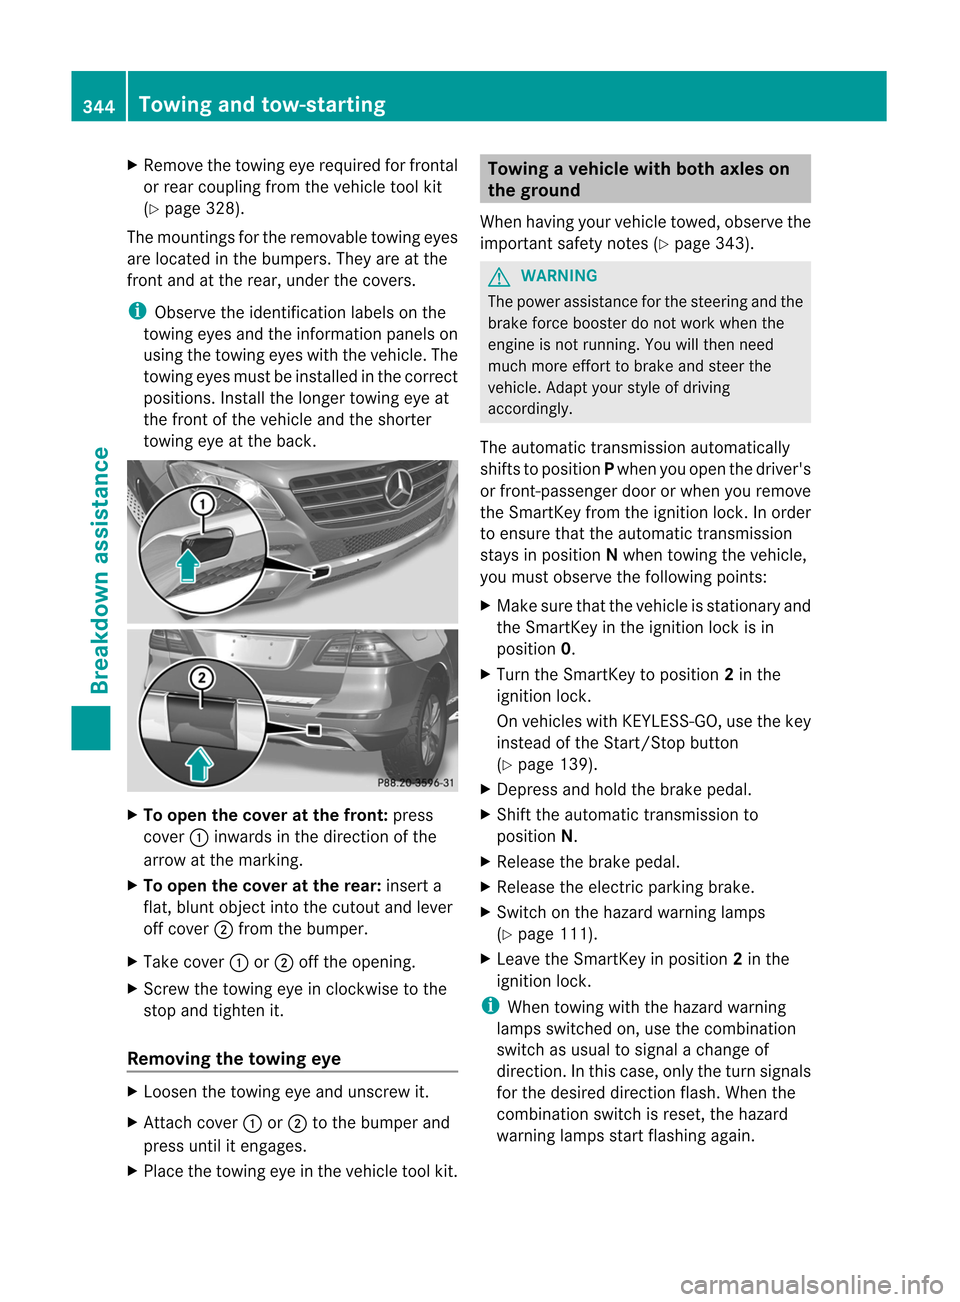
The moun ting sfor therem ovabletowin geyes
are locate din thebump ers.They areatthe
front andatthe rear, under thecovers. i
Observe
theidentification labelson the
towing eyesandtheinformation panelson
using thetowing eyeswiththevehicle. The
towing eyesmust beinstalled inthe correct
positions. Installthe longer towing eyeat
the front ofthe vehicle andtheshorter
towing eyeatthe back. X
To open thecover atthe front: press
cover :inwards inthe direction ofthe
arrow atthe marking.
X To open thecover atthe rear: insert a
flat, blunt object intothecutout andlever
off cover ;from thebumper.
X Take cover :or; offthe opening.
X Screw thetowing eyeinclockwise tothe
stop andtighten it.
Removing thetowing eye X
Loosen thetowing eyeand unscrew it.
X Att ach cover :or; tothe bumper and
press untilitengages.
X Place thetowing eyeinthe vehicle toolkit. Towing
avehicle withboth axles on
th egrou nd
When havingyour vehicletowed, obser vethe
impor tantsafe tyno tes(Y page 343). G
WAR
NING The
power assistancefor thest eerin gand the
brak efor ce boos terdonot work when the
eng ineisnot running.You willthen nee d
muc hmor eeff ort tobrak eand steer the
veh icle.Adapt yourstyle ofdriving
accor dingly.
The automatic transmission automatic ally
shift sto position Pwhen youopen thedriver's
or fron t-passenger doororwhen youremov e
the Smart Keyfrom theignit ionlock .In order
to ensure thattheautomatic transmission
stays inposition Nwhen towing thevehicle,
you must observe thefollowing points:
X Make surethatthevehicle isstat ionary and
the Smart Keyinthe ignit ionlock isin
position 0.
X Turn theSmart Keytoposition 2in the
ignit ionlock .
On vehicles withKEYL ESS-GO, usethekey
inst ead ofthe Start/ Stop butto n
(Y page 139).
X Depres sand hold thebrake pedal.
X Shift theautomatic transmission to
position N.
X Release thebrake pedal.
X Release theelect ricparkin gbrake.
X Switc hon the hazard warning lamps
(Y page 111).
X Leave theSmart Keyinposition 2in the
ignit ionlock . i
When
towing withthehazard warning
lamps switchedon, use thecombin ation
switch asusual tosignal achang eof
direct ion.Inthis case, onlytheturn signals
for the desired directionflash. When the
combin ationswitch isreset ,the hazard
warning lampsstartflashing again. 344
Towing
andtow-st artingBreakdown assistance
Page 347 of 396
Trans
portingthe vehic le
The towingeyes ortra iler tow hitch can be
us ed topullthe vehicleonto atra iler or
tra nsp orte rif yo uwi sh totra nsp ortit.
X Tu rn the Sma rtKeyto positio n2 in the
ig niti onlock.
X Shi ftthe automa tictransmi ssion to
po sitio nN.
As soon asthe vehic leisloade d:
X Pre vent thevehiclefro mr olling awayby
apply ingthe electric parking brake.
X Shift theautomatic transmission to
position P.
X Turn theSmart Keytoposition 0in the
ignition lockandremove theSmart Key
from theignition lock.
X Secure thevehicle.
! Only lashthevehicle downbythe wheels
or wheel rims,notbyparts ofthe vehicle
such asaxle orsteerin gcompon ents.
Otherwise, thevehicle couldbedamaged. Notes
for4MATIC vehicles
! Vehicles with4MATIC mustnotbetowed
with either thefront orthe rear axle raised,
as doing sowill damage thetrans mission.
If the vehicle hastrans mission damage or
damage tothe front orrear axle, have it
trans ported onatrans porter ortrailer.
In the event ofdam agetothe electrical
system
If the battery isdefectiv e,the automatic
trans mission willbelocked inposition P.To
shift theautomatic transmission toposition
N, you must provide powertothe vehicle's
electric alsystem inthe same wayaswhen
jump-st arting(Ypage 341).
Have thevehicle transported onatrans porter
or trailer. Recovering
avehicle that ha sbecome
stu ck
! Pull away smoothly, slowly, andina
st raigh tline when pulling outavehic lethat
has beco mestuck .Ex cess ivetract ive
power coulddamage thevehic les.
If the drive wheels havebecomestuck in
loose ormuddy ground,pull thevehic leout
with extreme caution,particularly ifit is
laden.
Neve rattemp ttorecover astuck vehicle with
a trailer attached.
Pull outthevehicle backwards, ifpossible
using thetrack sit made whenitbecame
stuck . Tow-star
ting(emergency starting)
! Vehicles withautomatic transmission
must notbestart edbytow-st arting. This
could otherwise damagethetrans mission. Fuses
Import
antsafety notes G
WARNIN
G Only
usefuses thathave been approved for
Mercedes-B enzvehicles andthat have the
correc tfuse rating forthe systems
conc erned. Donot attempt torepair orbridge
faulty fuses. Usingfusesthathave notbeen
approved orattempt ingtorepair orbridge
faulty fusescould cause thefuse tobe
overloaded andresult inaf ire. Have thecause
tr aced andrectified ataqualified specialist
work shop.
The fuses inyour vehic leserv eto clos edown
faulty circuits. Ifaf use blows ,all the
co mpo nentson thecir cuit andtheir fun ction s
st op oper ating.
Blo wn fuse smust berep lace dwithfuses of
the same rating, which youcan recogn izeby Fuses
345Breakdown assistance Z
Page 348 of 396
the
colorand value. Th efuse rating sare listed
in thefuse allocation chart .
If ane wly inserted fuse alsoblows ,have the
caus etrace dand rectified ataqualif ied
spec ialist workshop,e.g. an auth orized
Mer cedes- BenzCent er.
! Only usefuses thathave been approved
for Mercedes- Benzvehicles andwhich
have thecorr ectfuse ratingfor the system
con cern ed.For thefuse boxes inthe engin e
compart mentandunder therear bench
seat, onlyusefuses withthesuffix "S".
Other wise, compon entsor systems could
be damaged. Befor
echanging afuse
X Park thevehicle andapply theelectr ic
parkin gbrake.
X Switc hoff allelectr icalconsumers.
X Remove theSmart Keyfrom theignition
lock.
The fuses arelocated invarious fuseboxes:
R fuse boxonthe fron t-passenger sideofthe
dashboard
R fuse boxinthe engin ecompart mentonthe
right- hand sideofthe vehicle, whenviewed
in the direct ionoftravel
R fuse boxunder therear bench seat
The fuse allocation chartislocated inthe fuse
box under therear bench seat(Ypage 347). Dashboar
dfuse box
! Donot use apoint edobjec tsuch asa
sc rewd river to open theco ver inthe
dash board.You could damag eth e
dash boardor theco ver . X
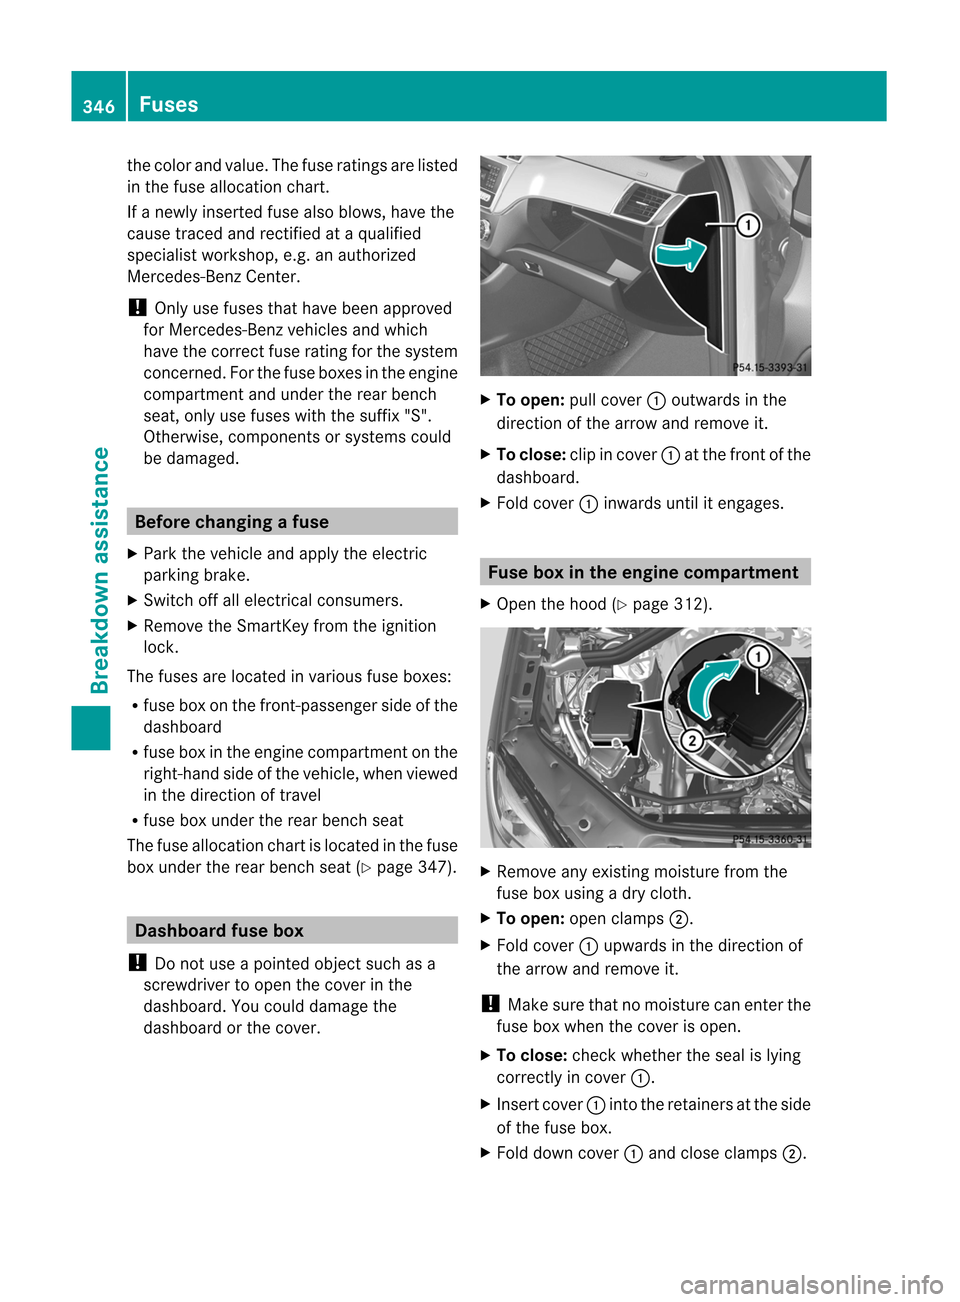
To open :pull cover :outwards inthe
dire ction ofthearr ow and remove it.
X To close: clipin co ver :atthef ront ofthe
das hboa rd.
X Fold cover :inwa rdsuntil itengag es. Fuse
boxinthe enginecompart ment
X Open thehood (Ypag e312). X
Remo veany existing moisturefrom the
fuse boxusing adry cloth.
X To open :open clamp s;.
X Fold cover :upw ards inthe direction of
the arrow andremove it.
! Make surethatnomoistu recan enter the
fuse boxwhen thecover isopen.
X To clo se: check whethe rthe seal islying
correct lyin cover :.
X Insert cover:into theretainers atthe side
of the fuse box.
X Fold down cover :and close clamps ;. 346
FusesBreakdown assistance
Page 349 of 396
!
The cover mustbepositioned properly.
Moisture ordirt could otherwise impairthe
operation ofthe fuses.
X Close thehood (Ypage 313). Fuse
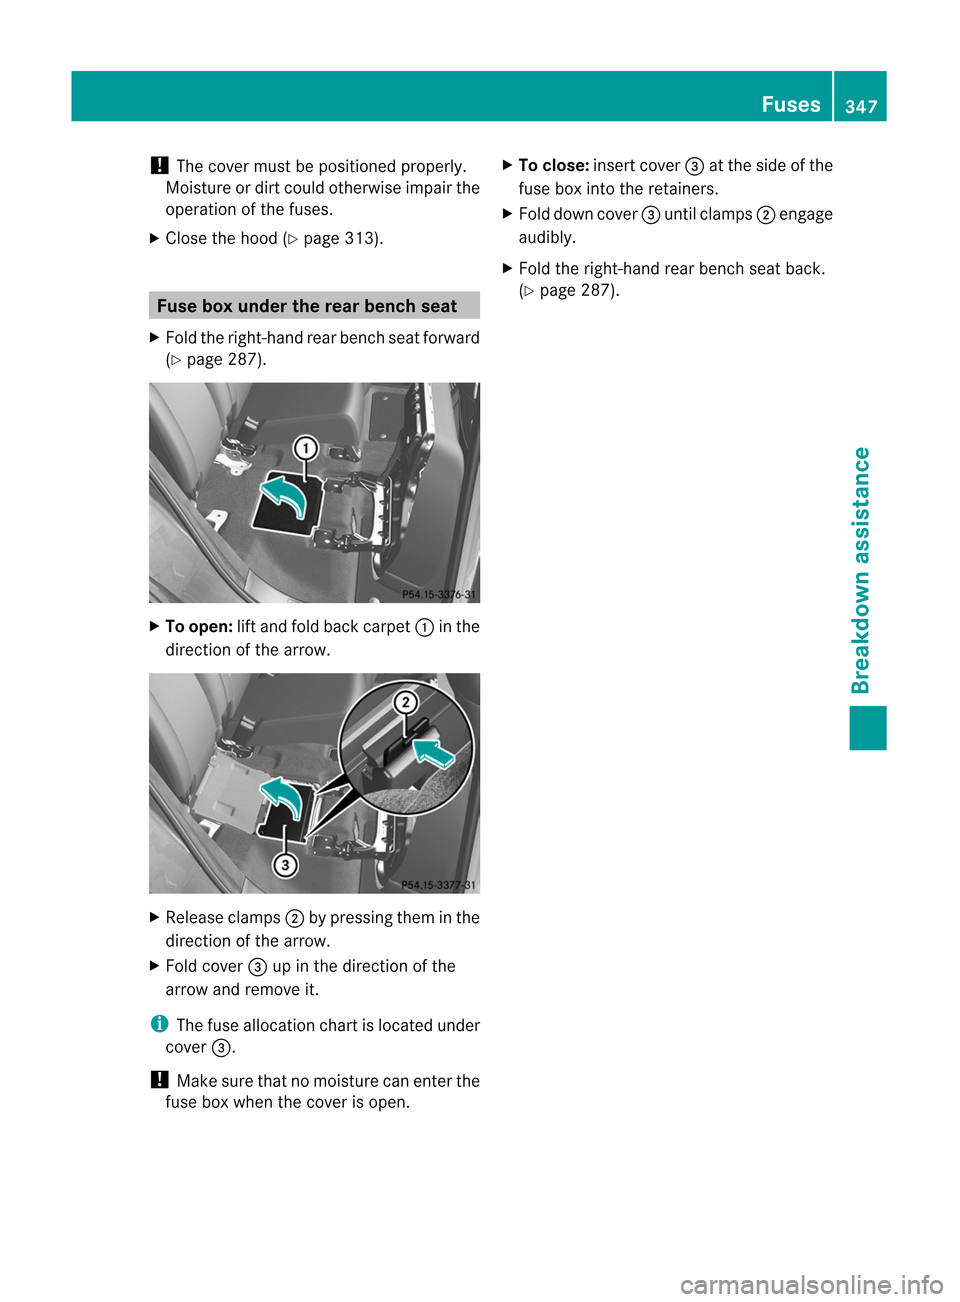
boxunder therear bench seat
X Fold theright-hand rearbench seatforward
(Y page 287). X
To open: liftand fold back carpet :inthe
direction ofthe arrow. X
Relea seclamps ;bypressing theminthe
direction ofthe arrow.
X Fold cover =upinthe direction ofthe
arrow andremove it. i
The
fuse allocation chartislocated under
cover =.
! Make surethatnomoisture canenter the
fuse boxwhen thecover isopen. X
To close :insert cover=atthe side ofthe
fuse boxinto theretainers.
X Fold down cover =until clamps ;engage
audi bly.
X Fold theright-hand rearbench seatback.
(Y page 287). Fuses
347Breakdown assistance Z
Page 350 of 396

348