Cargo MERCEDES-BENZ M-Class 2013 W166 User Guide
[x] Cancel search | Manufacturer: MERCEDES-BENZ, Model Year: 2013, Model line: M-Class, Model: MERCEDES-BENZ M-Class 2013 W166Pages: 458, PDF Size: 6.24 MB
Page 91 of 458
i
If a KEYLESS-GO key is detected in the
cargo compartment, the tailgate will not
lock. Opening/closing automatically from
outside
Important safety notes G
WARNING
Parts of the body could become trapped
during automatic closing of the tailgate.
Moreover, people, e.g. children, may be
standing in the closing area or may enter the
closing area during the closing process. There
is a risk of injury.
Make sure that nobody is in the vicinity of the
closing area during the closing process.
Use one of the following options to stop the
closing process:
R press the 0004button on the SmartKey.
R press the remote operating switch on the
driver's door.
R press the closing or locking button on the
tailgate.
R pull the handle on the tailgate. G
WARNING
Combustion engines emit poisonous exhaust
gases such as carbon monoxide. If the tailgate
is open when the engine is running,
particularly if the vehicle is moving, exhaust
fumes could enter the passenger
compartment. There is a risk of poisoning.
Turn off the engine before opening the
tailgate. Never drive with the tailgate open.
! The tailgate swings upwards and to the
rear when opened. Therefore, make sure
that there is sufficient clearance above and
behind the tailgate.
i Tailgate opening dimensions
(Y page 452).
i The tailgate is equipped with an
automatic reversing feature. If an object blocks or restricts the tailgate during the
closing process, the tailgate opens again
automatically.
Opening the tailgate automatically You can open the tailgate automatically with
the SmartKey or the handle in the tailgate.
X
Press and hold the 0004button on the
SmartKey until the tailgate opens.
or
X If the tailgate is unlocked, pull the handle
and let it go again immediately.
Closing the tailgate automatically G
WARNING
Parts of the body could become trapped
during automatic closing of the tailgate.
Moreover, people, e.g. children, may be
standing in the closing area or may enter the
closing area during the closing process. There
is a risk of injury.
Make sure that nobody is in the vicinity of the
closing area during the closing process.
Use one of the following options to stop the
closing process:
R press the 0004button on the SmartKey.
R press the remote operating switch on the
driver's door.
R press the closing or locking button on the
tailgate.
R pull the handle on the tailgate. Cargo compartment
89Opening and closing Z
Page 92 of 458
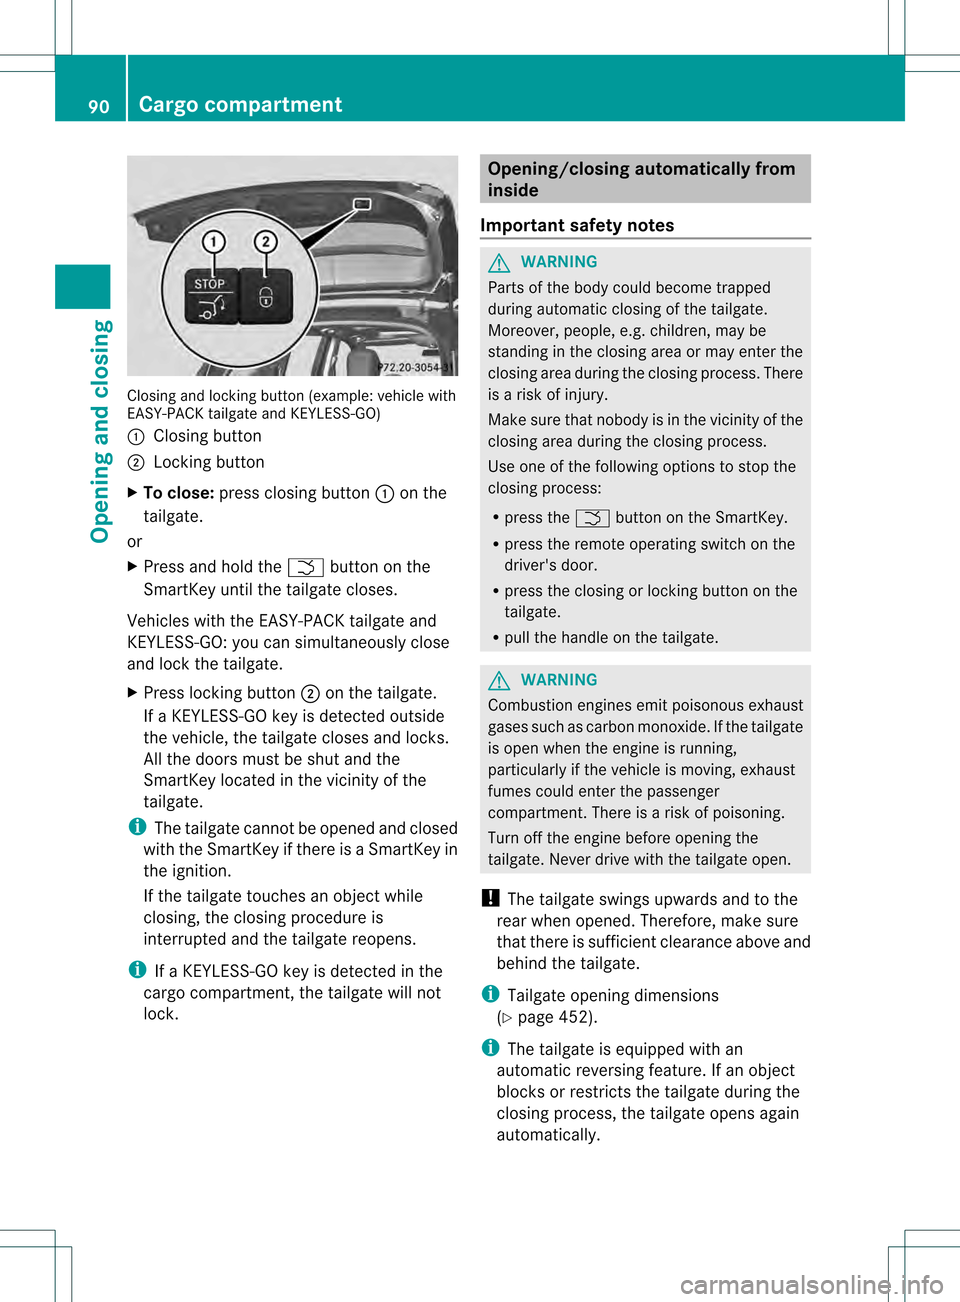
Closing and locking button (example
:vehicle with
EASY-PACK tailgate and KEYLESS-GO)
0002 Closing button
0003 Locking button
X To close: press closing button 0002on the
tailgate.
or
X Press and hold the 0004button on the
SmartKey until the tailgate closes.
Vehicles with the EASY-PACK tailgate and
KEYLESS-GO: you can simultaneously close
and lock the tailgate.
X Press locking button 0003on the tailgate.
If a KEYLESS-GO key is detected outside
the vehicle, the tailgate closes and locks.
All the doors must be shut and the
SmartKey located in the vicinity of the
tailgate.
i The tailgate cannot be opened and closed
with the SmartKey if there is a SmartKey in
the ignition.
If the tailgate touches an objec twhile
closing, the closing procedure is
interrupted and the tailgate reopens.
i If a KEYLESS-GO key is detected in the
cargo compartment, the tailgate will not
lock. Opening/closing automatically from
inside
Important safety notes G
WARNING
Parts of the body could become trapped
during automatic closing of the tailgate.
Moreover, people, e.g. children, may be
standing in the closing area or may enter the
closing area during the closing process. There
is a risk of injury.
Make sure that nobody is in the vicinity of the
closing area during the closing process.
Use one of the following options to stop the
closing process:
R press the 0004button on the SmartKey.
R press the remote operating switch on the
driver's door.
R press the closing or locking button on the
tailgate.
R pull the handle on the tailgate. G
WARNING
Combustion engines emit poisonous exhaust
gases such as carbon monoxide. If the tailgate
is open when the engine is running,
particularly if the vehicle is moving, exhaust
fumes could enter the passenger
compartment. There is a risk of poisoning.
Turn off the engine before opening the
tailgate. Never drive with the tailgate open.
! The tailgate swings upwards and to the
rear when opened. Therefore, make sure
that there is sufficient clearance above and
behind the tailgate.
i Tailgate opening dimensions
(Y page 452).
i The tailgate is equipped with an
automatic reversing feature. If an object
blocks or restricts the tailgate during the
closing process, the tailgate opens again
automatically. 90
Cargo compartmentOpening and closing
Page 93 of 458

Opening and closing
You can open and close the tailgate from the
driver's seat when the vehicle is stationary
and unlocked.
X To open: pull remote operating switch 0002
for the tailgate until the tailgate opens.
X To close: turn the SmartKey to position 1
or 2in the ignition lock.
X Press remote operating switch for
tailgate 0002until the tailgate is closed. Limiting the opening angle of the
tailgate
Important safety notes !
Make sure there is sufficien tclearance to
open the tailgate fully when setting the
opening angle. The tailgate could otherwise
be damaged. Ideally, set the opening angle
outside.
Activating You can limit the opening angle of the
tailgate. This is possible in the top half of its
opening range, up to approximately 4in
(10 cm) before the stop.
This could be useful, for example, if there is
insufficien tspace above the tailgate.
X To open the tailgate: pull the handle on
the tailgate.
X To stop the opening procedure at the
desired position: press the closing button (Y
page 89) in the tailgate or pull the handle
on the outside of the tailgate again.
X To store the position: press and hold the
closing button in the tailgate until you hear
a short tone.
The opening angle limiter is activated. The
tailgate will now stop in the stored position
when opening.
Deactivating X
Press and hold the closing button
(Y page 89) in the tailgate until you hear
two short tones. Tailgate emergency release
Important safety notes !
The tailgate swings upwards and to the
rear when opened. Therefore, make sure
that there is sufficient clearance above and
behind the tailgate.
i Tailgate opening dimensions
(Y page 452).
If the tailgate can no longer be opened from
outside the vehicle, use the emergency
release on the inside of the tailgate.
Opening X
Take the mechanical key out of the
SmartKey (Y page 80).
X Insert mechanical key 0003into the opening
in paneling 0002. Cargo compartment
91Opening and closing Z
Page 106 of 458

years old and under mus
tbe seated and
properly secured in an appropriately sized
child restraint system or booster seat
recommended for the size and weight of the
child. For additional information, see the
"Children in the vehicle" section.
Ac hild's risk of serious or fatal injuries is
significantly increased if the child restraints
are not properly secured in the vehicle and/
or the child is not properly secured in the child
restraint.
! To avoid damage to the seats and the seat
heating, observe the following information:
R keep liquids from spilling on the seats. If
liquid is spilled on the seats, dry them as
soon as possible.
R if the seat covers are damp or wet, do not
switch on the seat heating. The seat
heating should also not be used to dry
the seats.
R clean the seat covers as recommended;
see "Interior care".
R do not transport heavy loads on the
seats. Do not place sharp objects on the
seat cushions, e.g. knives, nails or tools.
The seats should only be occupied by
passengers, if possible.
R when the seat heating is in operation, do
not cover the seats with insulating
materials, e.g. blankets, coats, bags,
seat covers, child seats or booster seats.
! Make sure that there are no objects in the
footwell or behind the seats when resetting
the seats. There is a risk that the seats
and/or the objects could be damaged.
i It is not possible to remove the head
restraints from the front seats. The rear-
compartmenth ead restraints, however,
can be removed (Y page 106).
For more information, contact a qualified
specialist workshop. i
Further related subjects:
R Important safety notes on air bags
(Y page 44)
R Cargo compartment enlargement
(folding down the rear bench seat)
(Y page 335)
R Securing children in the vehicle
(Y page 60) Adjusting the seats electrically
0002
Head restraint height
0003 Seat cushion angle
001F Seat height
001E Seat fore-and-aft adjustment
001C Backrest angle
i Vehicles with memory function: if PRE-
SAFE ®
has been triggered, the front-
passenger seat will be moved to a better
position if it was previously in an
unfavorable position.
i You can store the seat settings using the
memory function (Y page 116). Adjusting the head restraints
General notes Pay attention to the important safety notes
(Y
page 103).
Do not rotate the head restraints of the front
and rear seats. Otherwise, you cannot adjust 104
SeatsSeats, steering wheel and mirrors
Page 134 of 458

Changing the rea
rbulbs
Opening and closing the service flap Left-hand service flap
Right-hand service flap
You must open the service flap in the cargo
compartment before you can change the
bulbs in the brake lamp.
X
To open: release service flap 0002at the top,
e.g. with a screwdriver, and swing it
downward in the direction of the arrow.
X Right side: remove the first-aid kit
beforehand and pull the parce lnet down.
X To close: reinsertservice flap 0002. Brake lamp X
Switch off the lights.
X Open the cargo compartment.
X Open the service flap (Y page 132).
X Turn bulb holder 0002counter-clockwise and
remove it.
X Take bulb out of bulb holder 0002.
X Inser tthe new bulb into bulb holder 0002.
X Insert bulb holder 0002into the lamp and turn
it clockwise.
X Close the service flap (Y page 132). Windshield wipers
Switching the windshield wipers on/
off
! Do not operate the windshield wipers
when the windshield is dry, as this could
damage the wiper blades. Moreover, dust
that has collected on the windshield can
scratch the glass if wiping takes place when
the windshield is dry.
If it is necessary to switch on the windshield
wipers in dry weather conditions, always
use washer fluid when operating the
windshield wipers.
! If the windshield wipers leave smears on
the windshield after the vehicle has been
washed in an automatic car wash, wax or
other residues may be the reason for this.
Cleant he windshield using washer fluid
after washing the vehicle in an automatic
car wash. 132
Windshield wipersLights and windshield wipers
Page 240 of 458

As a result, Active Blind Spot Assist may
neither give warnings nor intervene in such
situations. There is a ris
kofanaccident.
Always observe the traffi cconditions
carefully, and maintain a safe lateral distance.
i USA only: This device has been approved
by the FCC as a "Vehicular RadarS ystem".
The rada rsensor is intended for use in an
automotive radar system only. Removal,
tampering, or altering of the device will void
any warranties, and is not permitted by the
FCC. Do not tamper with, alter, or use in
any non-approved way.
Any unauthorized modification to this
device could void the user's authority to
operate the equipment.
i Canada only: This device complies with
RSS-210 of Industry Canada. Operation is
subject to the following two conditions:
1. This device may not cause harmful
interference, and
2. this device must accept any interference
received, including interference that may
cause undesired operation of the device.
Removal, tampering, or altering of the
device will void any warranties, and is not
permitted. Do not tamper with, alter, or use
in any non-approved way.
Any unauthorized modification to this
device could void the user's authority to
operate the equipment.
Monitoring area
In particular, the detection of obstacles can
be impaired if:
R dirt on the sensors or anything else
covering the sensors
R poor visibility, e.g. due to fog, heavy rain,
snow or spray
R narrow vehicles, e.g. motorcycles or
bicycles
R the road has very wide lanes
R the road has narrow lanes R
you are not driving in the middle of the lane
R there are barriers or similar lane borders
Vehicles in the monitoring range are then not
indicated. Active Blind Spot Assist monitors the area up
to 10 ft (3.0 m) behind your vehicle and
directly nextt
o your vehicle, as shown in the
diagram. For this purpose, Active Blind Spot
Assist uses radar sensors in the rear bumper.
If the lanes are narrow, vehicles driving in the
lane beyond the lane next to your vehicle may
be indicated, especially if the vehicles are not
driving in the middle of their lane. This may
be the case if there are vehicles at the inner
edge of your lane.
Due to the nature of the system:
R warnings may be issued in error when
driving close to crash barriers or similar
solid lane borders.
R warnings may be interrupted when driving
alongside particularly long vehicles, e.g.
trucks, for a prolonged time.
The Active Blind Spot Assist radar sensors are
integrated into the front and rear bumpers
and behind a cover in the radiator grill. Make
sure that the bumpers and the cover in the
radiator grill are free of dirt, ice or slush. The
rear sensors must not be covered, for
example by cycle racks or overhanging cargo.
Following a severe impact or in the event of 238
Driving systemsDriving and parking
Page 260 of 458
brake using the brake controller, and check
the brakes for correct function.
R Secure any objects on the trailer to prevent
the cargo from slipping when the vehicle is
in motion.
R If you couple up a trailer, regularly check
the cargo for secure fastening and make
sure that the trailer lamps and (if
applicable) the trailer brakes are
functioning correctly.
R Bear in mind that the handling will be less
stable when towing a trailer than when
driving without one. Avoid sudden steering
movements.
R The vehicle/trailer combination is heavier,
accelerates more slowly, has a decreased
gradient climbing capability and a longer
braking distance.
It is more susceptible to side winds and
requires more careful steering.
R If possible, avoid abrupt braking. Depress
the brake pedal moderately at first, so that
the trailer can activate its own brakes. Then
increase the pressure on the brake pedal.
R If the automatic transmission continues to
shift back and forth between two gears
when driving up or downhill, restrict the
shift range. Select shift range 4, 3, 2,or1.
Al ower gear and lower speed reduce the
risk of engine failure.
R When driving downhill, shift to a lower gear
to utilize the engine's braking effect.
Avoid continuous brake application as this
may overheat the vehicle brakes and, if
installed, the trailer brakes.
R If the coolant temperature increases
dramatically while the air-conditioning
system is switched on, switch off the air-
conditioning system.
Coolant heat can additionally be dissipated
by opening the windows and by setting the blower fan and the interior temperature to
maximum.
R When overtaking, pay particular attention
to the extended length of your vehicle/
trailer combination.
Due to the length of your vehicle/trailer
combination, you will have to travel an
additional distance beyond the vehicle you
are overtaking before returning to the
previous lane. Decoupling
atrailer G
WARNING
If you uncouple a trailer with the overrun
brake engaged, you could trap your hand
between the vehicle and the trailer drawbar.
There is a risk of injury.
Do not uncouple a trailer if the overru nbrake
is engaged. G
WARNING
Vehicles with level control:
The vehicle is lowered as soon as you
disconnect the trailer cable. This could result
in yourl imbs or those of other people that are
betwee nthe vehicle body and tires or
underneath the vehicle being trapped. There
is a risk of injury.
Make sure that nobody is in the immediate
vicinity of the wheel housings or under the
vehicle when you disconnectt he trailer cable.
! Do not disconnect a trailer with an
engaged overrun brake. Otherwise, your
vehicle could be damaged by the
rebounding of the overrun brake.
X Make sure that the automatic transmission
is set to position P.
X Apply the vehicle's electric parking brake.
X Start the engine.
X Close all doors and the tailgate.
X Apply the trailer's parking brake. 258
Towing
atrailerDriving an d parking
Page 261 of 458
X
Detach the trailer cable and decouple the
trailer.
X Switch off the engine. Permissible trailer loads and drawbar
loads
Weight specifications Maximum permissible gross vehicle
weight rating
The gross trailer weight is calculated by
adding the weight of the trailer to the weight
of the load and equipment on the trailer.
Permissible gross weight (all models except
the ML 350 BlueEFFICIENCY): 7,198 lbs
(3,265 kg).
Permissible gross weight
(ML 350 BlueEFFICIENCY): 6,613 lbs
(3,000 kg).
Permissible noseweight
The maximum permissible trailer drawbar
noseweigh tis the maximum weight with
which the trailer drawbarc an be loaded.
All models (excep tthe
ML 350 BlueEFFICIENCY: 575 lbs (261 kg).
ML 350 BlueEFFICIENCY: 529 lbs (240 kg).
Limit for Mercedes-Benz-approved trailer
couplings.
Loading atrailer R
When loading the trailer, make sure that
neithe rthe permissible gross weight of the
trailer nor the gross vehicle weight is
exceeded. The permissible gross vehicle
weight is indicated on the identification
plate on the B-pillar on the driver's side of
the vehicle.
You can find the maximum permissible
values on the type plates of your vehicle
and the trailer. When calculating how much
weight the vehicle and trailer may carry, pay attention to the respective lowest
values.
R The trailer drawbarl oad on the ball coupling
must be added to the rear axle load to avoid
exceeding the permissible gross axle
weight. The permissible gross vehicle
weight is indicated on the identification
plate on the B-pillar on the driver's side of
the vehicle.
i Mercedes-Benz recommends atrailer
load where the trailer drawbar noseweight
accounts for 8% to 15% of the trailer's
permissible gross weight.
i The weight of additional accessories,
passengers, and cargo reduces the
permissible trailer load and drawbar load
for yourv ehicle.
Checking the vehicle and trailer weight R
To chec kthat the weights of the towing
vehicle and the trailer comply with the
maximum permissible values, have the
vehicle/trailer combination (including the
driver, passengers, and cargo with a fully
laden trailer) weighed on a calibrated
weighbridge.
R Check the gross axle weight rating of the
front and rear axles, the gross weight of the
trailer and trailer drawbarl oad. Removing the ball coupling
X Remove the spring cotter.
X Remove the bolt from the ball coupling
recess.
X Remove the ball coupling from the ball
coupling recess.
X Clean the ball coupling if it is dirty.
Information on cleaning and care of the trailer
tow hitch can be found at (Y page 374). Towing
atrailer
259Driving an d parking Z
Page 334 of 458

Useful information
i This Operator's Manual describes all
models and all standard and optional
equipment of your vehicle available at the
time of publication of the Operator's
Manual. Country-specific differences are
possible. Please note that your vehicle may
not be equipped with all features
described. This also applies to safety-
related systems and functions.
i Read the information on qualified
specialist workshops: (Y page 27).Stowage areas
Loading guidelines
G
WARNING
If objects, luggage or loads are not secured or
not secured sufficiently, they could slip, tip
over or be flung around and thereby hit vehicle
occupants. There is a risk of injury,
particularly in the even tofsudden braking or
a sudde nchange in direction.
Always store objects so that they cannot be
flung around. Secure objects, luggage or
loads against slipping or tipping before the
journey. G
WARNING
Combustion engines emit poisonous exhaust
gases such as carbon monoxide. If the tailgate
is open when the engine is running,
particularly if the vehicle is moving, exhaust
fumes could enter the passenger
compartment. There is a risk of poisoning.
Turn off the engine before opening the
tailgate. Never drive with the tailgate open.
The gross vehicle weight (GVW) is the vehicle
weight including fuel, vehicle tool kit, spare
wheel, installed accessories, vehicle
occupants and luggage/cargo.
The gross load limit and the gross vehicle
weight rating (GVWR) for your vehicle must never be exceeded. The gross load limit and
the GVWR are specified on the vehicle
identification plate on the B-pillar of the
driver's door (Y
page 410).
The load must also be distributed so that the
weight on each axle never exceeds the gross
axle weight rating (GAWR) for the front and
rear axles. The specifications for GVWR and
GAWR are on the vehicle identification plate
on the B-pillar of the driver's door
(Y page 410).
Observe the notes on the loading the vehicle
(Y page 410).
The handling characteristics of a laden
vehicle are dependent on the distribution of
the load within the vehicle. For this reason,
you should observe the following notes when
transporting a load:
R Never exceed the maximum permissible
gross vehicle weight or the gross axle
weight rating of the vehicle (including
occupants).
R The cargo compartment is the preferred
place to carry objects.
R Position heavy loads as far forwards as
possible and as low down in the cargo
compartmenta s possible.
R The load must not protrude above the
upper edge of the seat backrests.
R Always place the load against the rear or
front seat backrests. Make sure that the
seat backrests are securely locked into
place.
R Always place the load behind unoccupied
seats if possible.
R Use the cargo tie down rings and the parcel
nets to transport loads and luggage.
R Use cargo tie-down rings and fastening
materials appropriate for the weight and
size of the load.
R Hook in the cargo net when loading.
R Secure the load with sufficiently strong and
wear-resistant tie-downs. pad sharp edges
for protection. 332
Stowage areasStowage and features
Page 335 of 458

Stowage space
Important safety notes G
WARNING
If objects in the passenger compartment are
stowed incorrectly, they can slide or be
thrown around and hit vehicle occupants.
There is a risk of injury, particularly in the
event of sudden braking or a sudden change
in direction.
R Always stow objects so that they cannot be
thrown around in such situations.
R Always make sure that objects do not
protrude from stowage spaces, parcel nets
or stowage nets.
R Close the lockable stowage spaces while
driving.
R Stow and secure objects that are heavy,
hard, pointy, sharp-edged, fragile or too
large in the cargo compartment.
Observe the loading guidelines (Y page 332).
Glove box X
To open: pull handle 0002and open glove box
flap 0003.
X To close: fold glove box flap 0003upwards
until it engages.
i The glove box can be cooled
(Y page 152). 0005
Glove box unlocked
0006 Glove box locked
The glove box can be locked and unlocked
using the mechanical key. Partition
0002for stowing flat objects is located
in the upper section of the glove box. It can
be removed to increase the stowage space in
the glove box.
X To remove: pull partition 0002forwards and
out
X To install: insert partition 0002and push it
back until it engages. Stowage areas
333Stowage and features Z