ECU MERCEDES-BENZ M-Class 2014 W166 Repair Manual
[x] Cancel search | Manufacturer: MERCEDES-BENZ, Model Year: 2014, Model line: M-Class, Model: MERCEDES-BENZ M-Class 2014 W166Pages: 462, PDF Size: 6.23 MB
Page 329 of 462
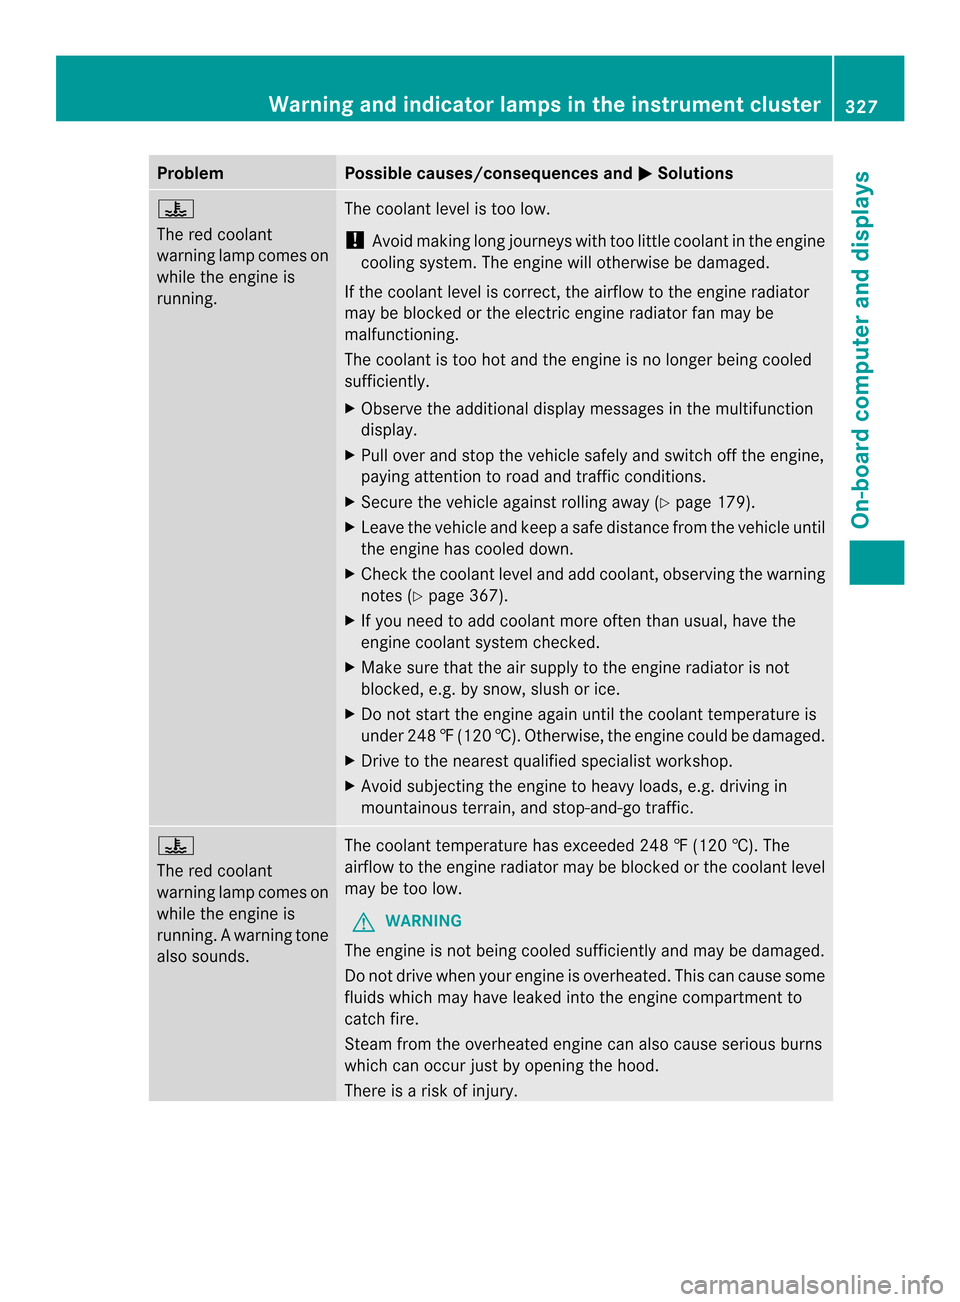
Problem Possible causes/consequences and
0001 Solutions
000E
The red coolant
warning lamp comes on
while the engine is
running. The coolant level is too low.
!
Avoid making long journeys with too little coolant in the engine
cooling system. The engine will otherwise be damaged.
If the coolant level is correct, the airflow to the engine radiator
may be blocked or the electric engine radiator fan may be
malfunctioning.
The coolant is too hot and the engine is no longer being cooled
sufficiently.
X Observe the additional display messages in the multifunction
display.
X Pull over and stop the vehicle safely and switch off the engine,
paying attention to road and traffic conditions.
X Secure the vehicle against rolling away (Y page 179).
X Leave the vehicle and keep a safe distance from the vehicle until
the engine has cooled down.
X Check the coolant level and add coolant, observing the warning
notes (Y page 367).
X If you need to add coolant more often than usual, have the
engine coolant system checked.
X Make sure that the air supply to the engine radiator is not
blocked, e.g. by snow, slush or ice.
X Do not start the engine again until the coolant temperature is
under 248 ‡(120 †). Otherwise, the engine could be damaged.
X Drive to the nearest qualified specialist workshop.
X Avoid subjecting the engine to heavy loads, e.g. driving in
mountainous terrain, and stop-and-go traffic. 000E
The red coolant
warning lamp comes on
while the engine is
running. A warning tone
also sounds.
The coolant temperature has exceeded 248 ‡ (120 †). The
airflow to the engine radiator may be blocked or the coolant level
may be too low.
G WARNING
The engine is not being cooled sufficiently and may be damaged.
Do not drive whe nyour engine is overheated. This can cause some
fluids which may have leaked into the engine compartment to
catch fire.
Steam from the overheated engine can also cause serious burns
which can occur just by opening the hood.
There is a risk of injury. Warning and indicator lamps in the instrument cluster
327On-board computer and displays Z
Page 330 of 462
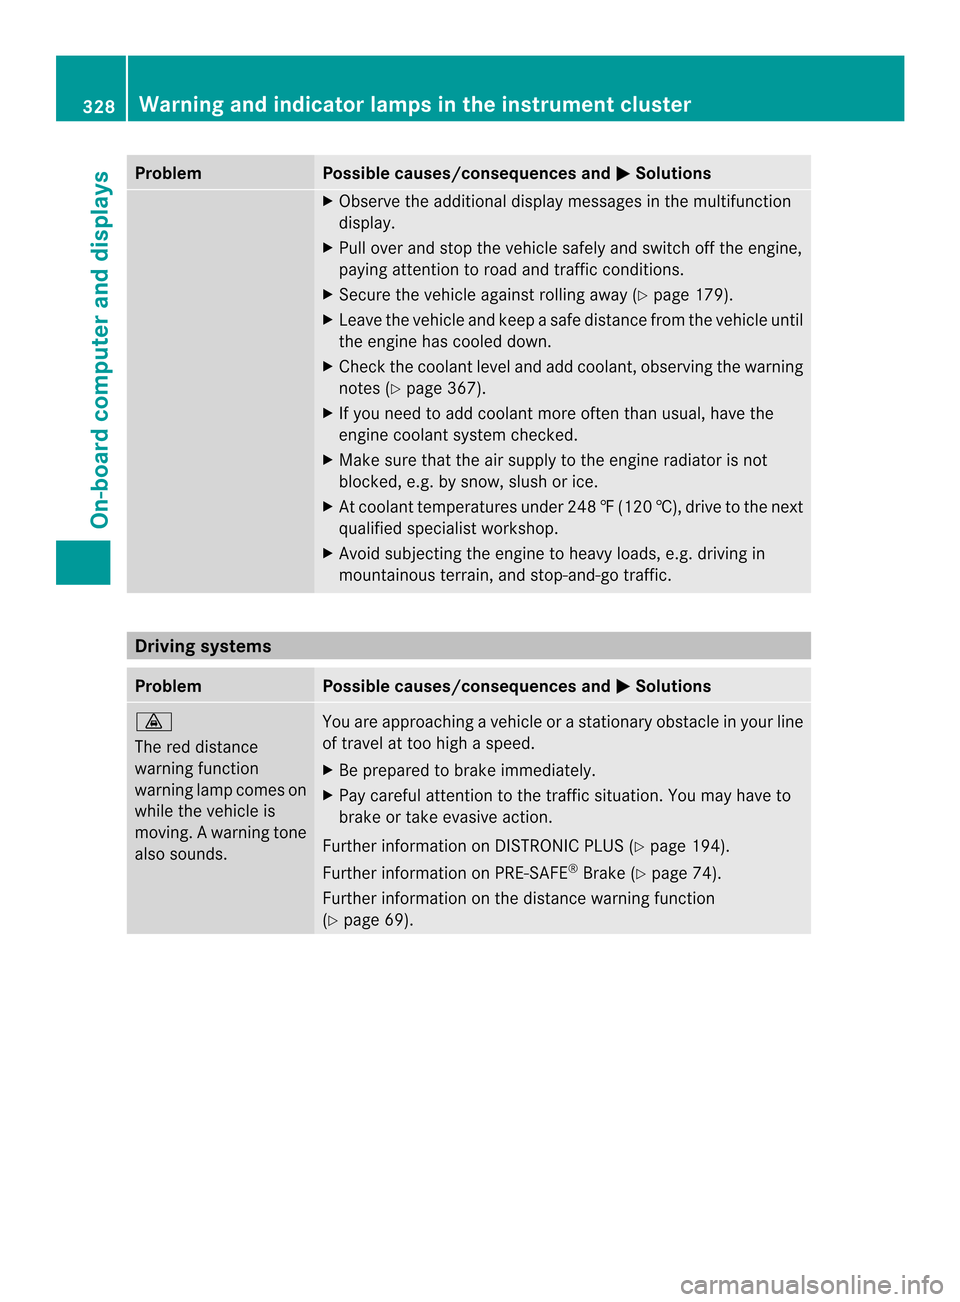
Problem Possible causes/consequences and
0001 Solutions
X
Observe the additional display messages in the multifunction
display.
X Pull over and stop the vehicle safely and switch off the engine,
paying attention to road and traffic conditions.
X Secure the vehicle against rolling away (Y page 179).
X Leave the vehicle and keep a safe distance from the vehicle until
the engine has cooled down.
X Check the coolant level and add coolant, observing the warning
notes (Y page 367).
X If you need to add coolant more often than usual, have the
engine coolant system checked.
X Make sure that the air supply to the engine radiator is not
blocked, e.g. by snow, slush or ice.
X At coolant temperatures under 248 ‡(120 †), drive to the next
qualified specialist workshop.
X Avoid subjecting the engine to heavy loads, e.g. driving in
mountainous terrain, and stop-and-go traffic. Driving systems
Problem Possible causes/consequences and
0001 Solutions
000E
The red distance
warning function
warning lamp comes on
while the vehicle is
moving. A warning tone
also sounds.
You are approaching a vehicle or a stationary obstacle in you
rline
of travel at too high a speed.
X Be prepared to brake immediately.
X Pay careful attention to the traffic situation. You may have to
brake or take evasive action.
Further information on DISTRONIC PLUS (Y page 194).
Further information on PRE-SAFE ®
Brake (Y page 74).
Further information on the distance warning function
(Y page 69). 328
Warning and indicator lamps in the instrument clusterOn-board computer and displays
Page 331 of 462
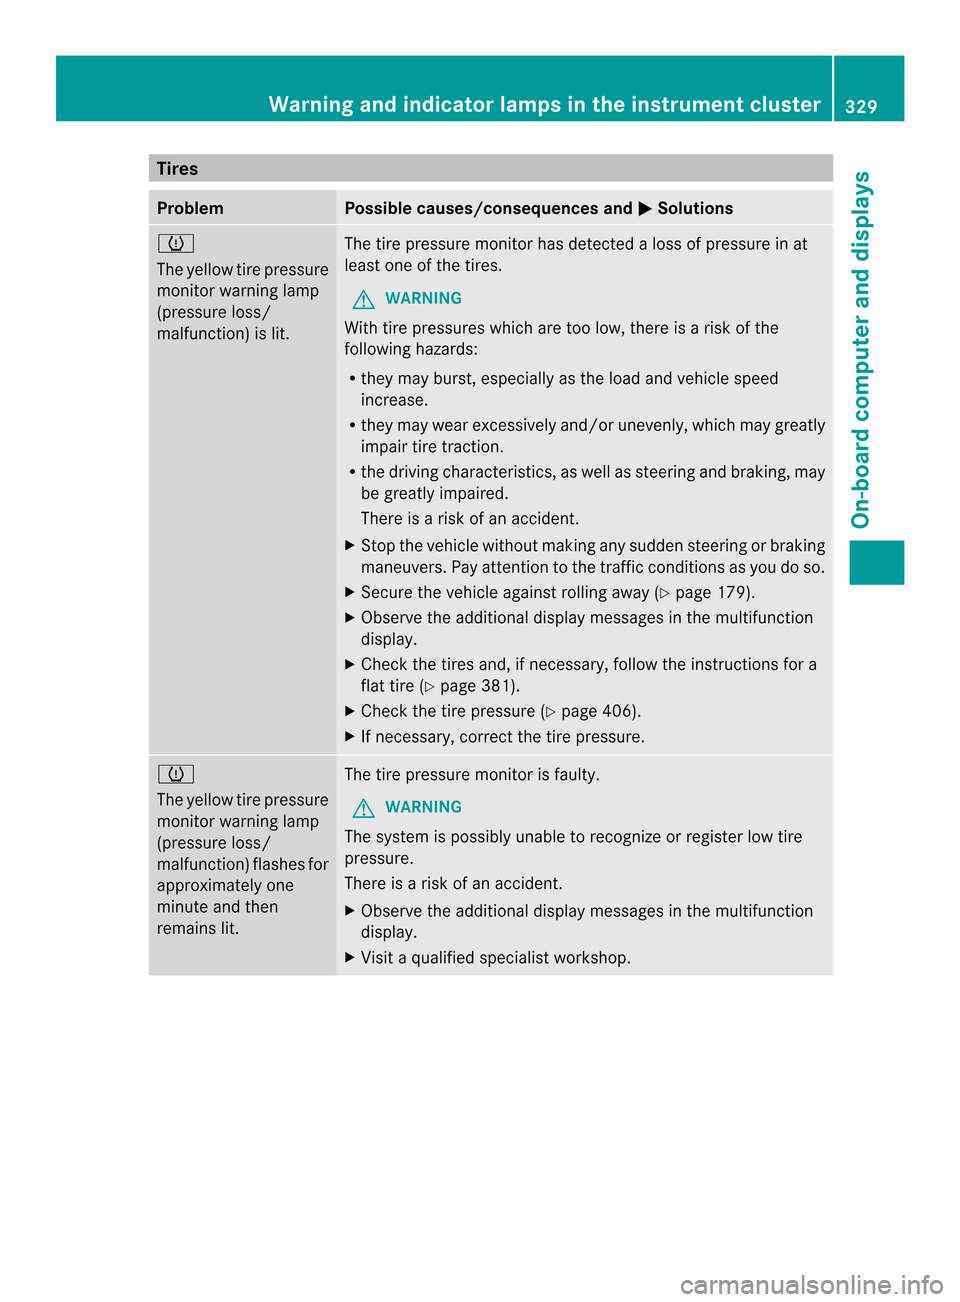
Tires
Problem Possible causes/consequences and
0001 Solutions
0012
The yellow tire pressure
monitor warning lamp
(pressure loss/
malfunction) is lit.
The tire pressure monitor has detected a loss of pressure in at
leas
tone of the tires.
G WARNING
With tire pressures which ar etoo low, there is a risk of the
following hazards:
R they may burst, especially as the load and vehicle speed
increase.
R they may wear excessively and/or unevenly, which may greatly
impair tire traction.
R the driving characteristics, as well as steering and braking, may
be greatly impaired.
There is a risk of an accident.
X Stop the vehicle without making any sudden steering or braking
maneuvers. Pay attention to the traffic conditions as you do so.
X Secure the vehicle against rolling away (Y page 179).
X Observe the additional display messages in the multifunction
display.
X Check the tires and, if necessary, follow the instructions for a
flat tire (Y page 381).
X Check the tire pressure (Y page 406).
X If necessary, correct the tire pressure. 0012
The yellow tire pressure
monitor warning lamp
(pressure loss/
malfunction) flashes for
approximately one
minute and then
remains lit.
The tire pressure monitor is faulty.
G WARNING
The system is possibly unable to recognize or register low tire
pressure.
There is a risk of an accident.
X Observe the additional display messages in the multifunction
display.
X Visit a qualified specialist workshop. Warning and indicator lamps in the instrument cluster
329On-board computer and displays Z
Page 334 of 462
Useful information
i This Operator's Manual describes all
models and all standard and optional
equipment of your vehicle available at the
time of publication of the Operator's
Manual. Country-specific differences are
possible. Please note that your vehicle may
not be equipped with all features
described. This also applies to safety-
related systems and functions.
i Read the information on qualified
specialist workshops: (Y page 28).Stowage areas
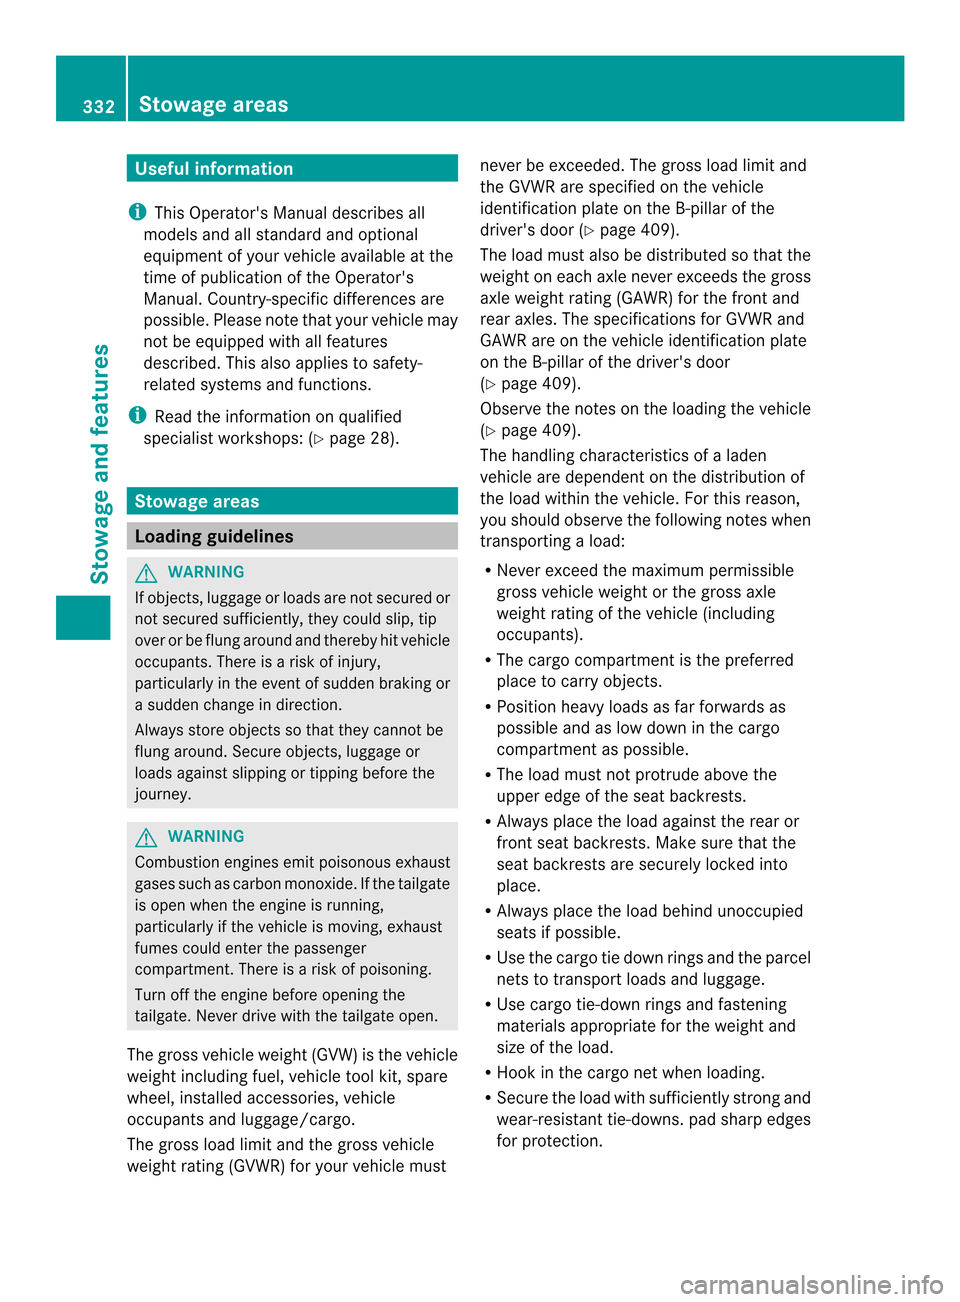
Loading guidelines
G
WARNING
If objects, luggage or loads are not secured or
not secured sufficiently, they could slip, tip
over or be flung around and thereby hit vehicle
occupants. There is a risk of injury,
particularly in the even tofsudden braking or
a sudde nchange in direction.
Always store objects so that they cannot be
flung around. Secure objects, luggage or
loads against slipping or tipping before the
journey. G
WARNING
Combustion engines emit poisonous exhaust
gases such as carbon monoxide. If the tailgate
is open when the engine is running,
particularly if the vehicle is moving, exhaust
fumes could enter the passenger
compartment. There is a risk of poisoning.
Turn off the engine before opening the
tailgate. Never drive with the tailgate open.
The gross vehicle weight (GVW) is the vehicle
weight including fuel, vehicle tool kit, spare
wheel, installed accessories, vehicle
occupants and luggage/cargo.
The gross load limit and the gross vehicle
weight rating (GVWR) for your vehicle must never be exceeded. The gross load limit and
the GVWR are specified on the vehicle
identification plate on the B-pillar of the
driver's door (Y
page 409).
The load must also be distributed so that the
weight on each axle never exceeds the gross
axle weight rating (GAWR) for the front and
rear axles. The specifications for GVWR and
GAWR are on the vehicle identification plate
on the B-pillar of the driver's door
(Y page 409).
Observe the notes on the loading the vehicle
(Y page 409).
The handling characteristics of a laden
vehicle are dependent on the distribution of
the load within the vehicle. For this reason,
you should observe the following notes when
transporting a load:
R Never exceed the maximum permissible
gross vehicle weight or the gross axle
weight rating of the vehicle (including
occupants).
R The cargo compartment is the preferred
place to carry objects.
R Position heavy loads as far forwards as
possible and as low down in the cargo
compartmenta s possible.
R The load must not protrude above the
upper edge of the seat backrests.
R Always place the load against the rear or
front seat backrests. Make sure that the
seat backrests are securely locked into
place.
R Always place the load behind unoccupied
seats if possible.
R Use the cargo tie down rings and the parcel
nets to transport loads and luggage.
R Use cargo tie-down rings and fastening
materials appropriate for the weight and
size of the load.
R Hook in the cargo net when loading.
R Secure the load with sufficiently strong and
wear-resistant tie-downs. pad sharp edges
for protection. 332
Stowage areasStowage and features
Page 335 of 462

Stowage space
Important safety notes G
WARNING
If objects in the passenger compartment are
stowed incorrectly, they can slide or be
thrown around and hit vehicle occupants.
There is a risk of injury, particularly in the
event of sudden braking or a sudden change
in direction.
R Always stow objects so that they cannot be
thrown around in such situations.
R Always make sure that objects do not
protrude from stowage spaces, parcel nets
or stowage nets.
R Close the lockable stowage spaces while
driving.
R Stow and secure objects that are heavy,
hard, pointy, sharp-edged, fragile or too
large in the cargo compartment.
Observe the loading guidelines (Y page 332).
Glove box X
To open: pull handle 0002and open glove box
flap 0003.
X To close: fold glove box flap 0003upwards
until it engages.
i The glove box can be cooled
(Y page 153). 0005
Glove box unlocked
0006 Glove box locked
The glove box can be locked and unlocked
using the mechanical key. Partition
0002for stowing flat objects is located
in the upper section of the glove box. It can
be removed to increase the stowage space in
the glove box.
X To remove: pull partition 0002forwards and
out
X To install: insert partition 0002and push it
back until it engages. Stowage areas
333Stowage and features Z
Page 337 of 462

i
Depending on the vehicle's equipment,
there may be open stowage spaces above
and below the stowage compartment. Stowage net
G
WARNING
Vehicles with the Occupant Classification
Syste m(OCS):
If the gross weight of the objects in the
stowage net on the back of the front-
passenger seat is greater than 4.4 lb (2 kg),
OCS cannot correctly assess the occupant's
weight category. The front-passenger front air
bag could deploy without cause, or may fail to
deploy in the event of an accident. This poses
an increased risk of injury or even fatal injury.
Never exceed the permissibleg ross weight of
4.4 lb (2 kg). Stow and secure heavy objects
in the cargo compartment.
Stowage nets are located in the front-
passenger footwell and on the back of the
driver's and the front-passenge rseat.
Observe the loading guidelines (Y page 332)
and the safety notes regarding stowage
spaces (Y page 333). Through-loading facility in the rear
If objects or loads are not secured when being
transported in the through-loading facility,
they could slip or be thrown around and
thereby hit vehicle occupants.
Observe the loading guidelines (Y page 332)
and the safety notes regarding stowage
spaces (Y page 333). The through-loading facility is opened from
the cargo compartment.
X
Release the seat backrests in the second
row of seats and tilt them in the cargo/load
position (Y page 108).
X Fold down the rear seat armrest.
X Pull the center head restraint on the rear
bench seat into the uppermost position
(Y page 106).
X Slide release catch 0002to the left and swing
flap 0003to the left until it is lying on the rear
side of the rear bench seat. X
Push cover 0023forward until it is lying on the
rear seat armrest. Cargo compartment enlargement
Important safety notes G
WARNING
If the rear bench seat/rear seat and seat
backrest are not engaged they could fold Stowage areas
335Stowage and features
Z
Page 339 of 462

Folding the rea
rbench seat back X
Fold seat backrest 0003back until it engages.
Make sure no tto trap the seat belt while
doing so.
X Swing seat cushion 0002back.
X Pull up and adjust the head restraints if
necessary (Y page 108). Securing cargo
Cargo tie-down rings General notes
G
WARNING
The Top Tether anchorages cannot secure a
load. If you secure a load with the Top Tether
anchorages, the Top Tether anchorages could
be pulled out during braking, abrupt changes
in direction or in the event of an accident .The
load could slip, tip over or be flung around and
thereby hit vehicle occupants. There is a risk
of injury.
Only use the cargo tie down rings when
securing a load.
Observe the following notes on securing
loads:
R Secure the load using the cargo tie-down
rings.
R Distribute the load on the cargo tie down
rings evenly.
R Do not use elastic straps or nets to secure
a load, as these are only intended as an
anti-slip protection for light loads. R
Do not route tie-downs across sharp edges
or corners.
R Pad sharp edges for protection.
Cargo compartment There are four cargo tie-down rings
0002in the
cargo compartment.
Before using the cargo tie-down rings on the
front right-hand side of the cargo
compartment, the stowage net must be
pushed down.
Bag hook G
WARNING
The bag hooks cannot restrain heavy objects
or items of luggage. Objects or items of
luggage could be flung around and thereby hit
vehicle occupants when braking or abruptly
changing directions. There is a risk of injury.
Only hang light objects on the bag hooks.
Never hang hard, sharp-edged or fragile
objects on the bag hooks.
! The bag hook can bear a maximum load
of 6.6lbs (3kg) and should not be used to
secure a load. Stowage areas
337Stowage and features Z
Page 340 of 462
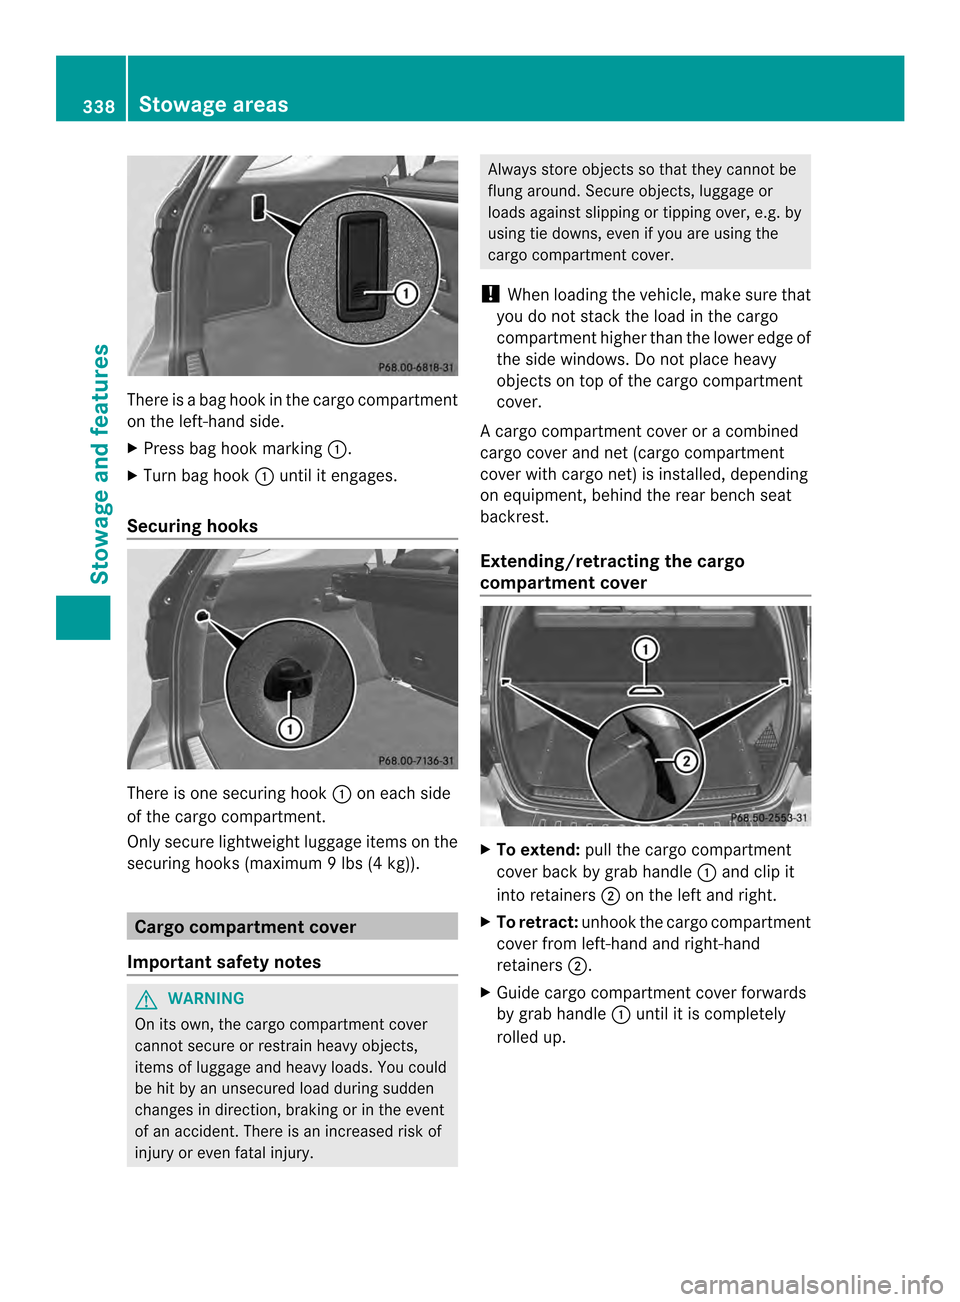
There is a bag hook in the cargo compartment
on the left-hand side.
X
Press bag hook marking 0002.
X Turn bag hook 0002until it engages.
Securing hooks There is one securing hook
0002on each side
of the cargo compartment.
Only secure lightweight luggage items on the
securing hooks (maximum 9lbs (4 kg)). Cargo compartment cover
Important safety notes G
WARNING
On its own, the cargo compartment cover
cannot secure or restrain heavy objects,
items of luggage and heavy loads. You could
be hit by an unsecured load during sudden
changes in direction, braking or in the event
of an accident. There is an increased risk of
injury or even fatal injury. Always store objects so that they cannot be
flung around. Secure objects, luggage or
loads against slipping or tipping over, e.g. by
using tie downs, even if you are using the
cargo compartment cover.
! When loading the vehicle, make sure that
you do not stac kthe load in the cargo
compartmenth igher than the lower edge of
the side windows .Do not place heavy
objects on top of the cargo compartment
cover.
A cargo compartment cover or a combined
cargo cover and net (cargo compartment
cover with cargo net) is installed, depending
on equipment, behind the rear bench seat
backrest.
Extending/retracting the cargo
compartment cover X
To extend: pull the cargo compartment
cover back by grab handle 0002and clip it
into retainers 0003on the left and right.
X To retract: unhook the cargo compartment
cover from left-hand and right-hand
retainers 0003.
X Guide cargo compartment cover forwards
by grab handle 0002until it is completely
rolled up. 338
Stowage areasStowage and features
Page 342 of 462
X
Make sure that red lock status
indicator 0022is no longer visible. The
combined cargo cover and net will
otherwise not be locked in place. Cargo net in combined cargo cover
and net
Important safety notes G
WARNING
On its own, the cargo net cannot secure or
restrain heavy objects, items of luggage and
heavy loads. You could be hit by an unsecured
load during sudden changes in direction,
braking or in the event of an accident. There
is an increased risk of injury or even fatal
injury.
Always store objects so that they cannot be
flung around. Secure objects, luggage or
loads against slipping or tipping over, e.g. by
using tie downs, even if you are using the
cargo net.
It is important to use a cargo net if you load
the vehicle with small objects above the seat
backrests.F or safety reasons, always use a
cargo net when transporting loads.
Attaching the cargo net X
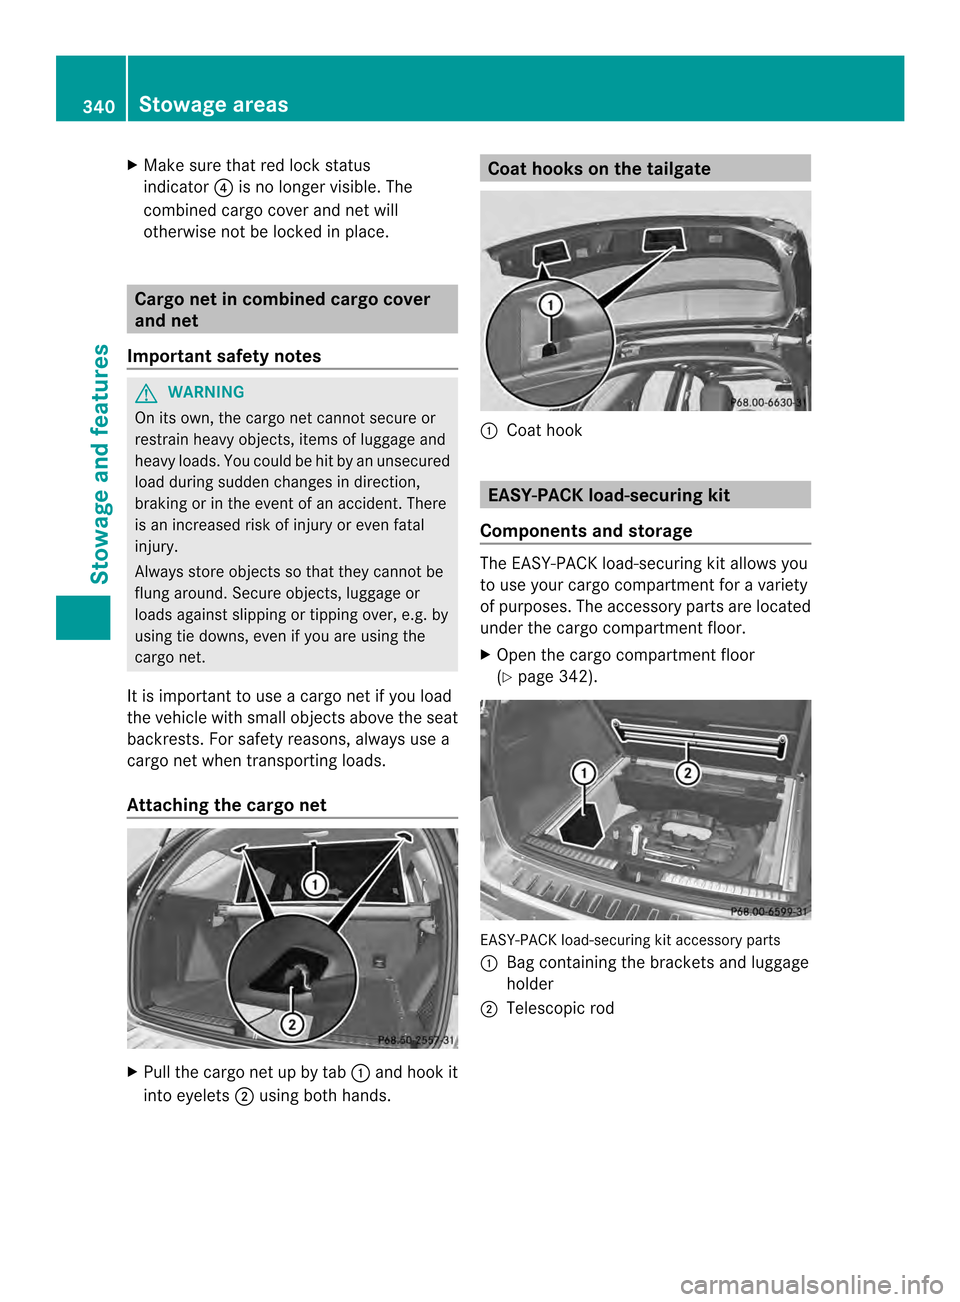
Pull the cargo net up by tab 0002and hook it
into eyelets 0003using both hands. Coat hooks on the tailgate
0002
Coat hook EASY-PACK load-securing kit
Components and storage The EASY-PACK load-securing kit allows you
to use your cargo compartment for a variety
of purposes. The accessory parts are located
under the cargo compartment floor.
X
Open the cargo compartment floor
(Y page 342). EASY-PACK load-securing kit accessory parts
0002
Bag containing the brackets and luggage
holder
0003 Telescopic rod 340
Stowage areasStowage and features
Page 343 of 462

Inserting the brackets int
othe loading
rail X
Insert bracket 0002into the center of loading
rail 0022.
X Press release button 0003and push
bracket 0002into the desired position in
loading rail 0022.
X Let go of release button 0003.
X Press locking button 0023.
Bracket 0002is locked in loading rail 0022.
X If necessary, fold cargo tie-dow nring 0020
upwards.
Luggage holder !
Only use the luggage holder to secure
cargo with a maximum weight of 15.4 lbs
(7 kg) and with dimensions that the luggage
holder can safely and securely contain. The luggage holder can be used to secure
light loads against the side wall of the cargo
compartment to prevent them from moving
around. X
To install: insert two brackets 0020into the
left or right loading rail (Y page 340).
X Press release button 0002of the luggage
holder and pull the strap out slightly.
X Insert luggage holder 0003into brackets 0020
and, while doing so, press release button
0023 and push the luggage holder downwards
until it engages.
X Press release button 0002of the luggage
holder and pull the strap out in the direction
of the arrow.
X Place the load between the strap and the
cargo compartmen tside wall.
X Using one hand, press locking button 0002of
the luggage holder.
X With your other hand, let the strap go slowly
until the load is secured.
X Make sure that locking button 0022on
brackets 0020is pressed.
This keeps brackets 0020in place on the
loading rail.
X To remove: press release button 0023on
respective bracket 0020and remove luggage
holder 0003by pulling upwards and out.
Telescopic rod The telescopic rod can be used to secure the
load against the rear seats to prevent it from
moving around. Stowage areas
341Stowage and features Z