MERCEDES-BENZ M-Class 2015 W166 Owner's Manual
Manufacturer: MERCEDES-BENZ, Model Year: 2015, Model line: M-Class, Model: MERCEDES-BENZ M-Class 2015 W166Pages: 466, PDF Size: 8.92 MB
Page 131 of 466
Crash-responsive emergency lighting
The interior lighting is activated automatically
if the vehicle is involved in an accident.
X To switch off the crash-responsive
emergency lighting: press the hazard
warning lamp button.
or X Lock and then unlock the vehicle using the
SmartKey. Replacing bulbs
Important safety notes
G
DANGER
Xenon bulbs carry a high voltage. You can get an electric shock if you remove the cover of
the Xenon bulb and touch the electrical con-
tacts. There is a risk of fatal injury.
Never touch the parts or the electrical con-
tacts of the Xenon bulb. Always have work on
the Xenon bulbs carried out at a qualified spe-
cialist workshop.
If your vehicle is equipped with Xenon bulbs,
you can recognize this by the following: the
cone of light from the Xenon bulbs moves
from the top to the bottom and back again
when you start the engine. For this to be
observed, the lights must be switched on
before starting the engine. G
WARNING
Bulbs, lamps and connectors can get very hot when operating. If you change a bulb, you
could burn yourself on these components.
There is a risk of injury.
Allow these components to cool down before changing a bulb.
Do not use a bulb that has been dropped or if
its glass tube has been scratched.
The bulb may explode if:
R you touch it
R it is hot R
you drop it
R you scratch it
Only operate bulbs in enclosed lamps
designed for that purpose. Only install spare
bulbs of the same type and the specified volt- age.
Marks on the glass tube reduce the service
life of the bulbs. Do not touch the glass tube
with your bare hands. If necessary, clean the
glass tube when cold with alcohol or spirit and
rub it off with a lint-free cloth.
Protect bulbs from moisture during opera-
tion. Do not allow bulbs to come into contact
with liquids.
There are bulbs other than the Xenon bulbs
that you cannot replace. Replace only the
bulbs listed (Y page 129). Have the bulbs that
you cannot replace yourself changed at a
qualified specialist workshop.
If you require assistance changing bulbs, con- sult a qualified specialist workshop.
If the new bulb still does not light up, consult
a qualified specialist workshop.
Bulbs and lamps are an important aspect of
vehicle safety. You must therefore make sure that these function correctly at all times.
Have the headlamp setting checked regularly. Overview: changing bulbs/bulb types
You can change the following bulbs. The bulb type can be found in the legend. Replacing bulbs
129Lights and windshield wipers Z
Page 132 of 466
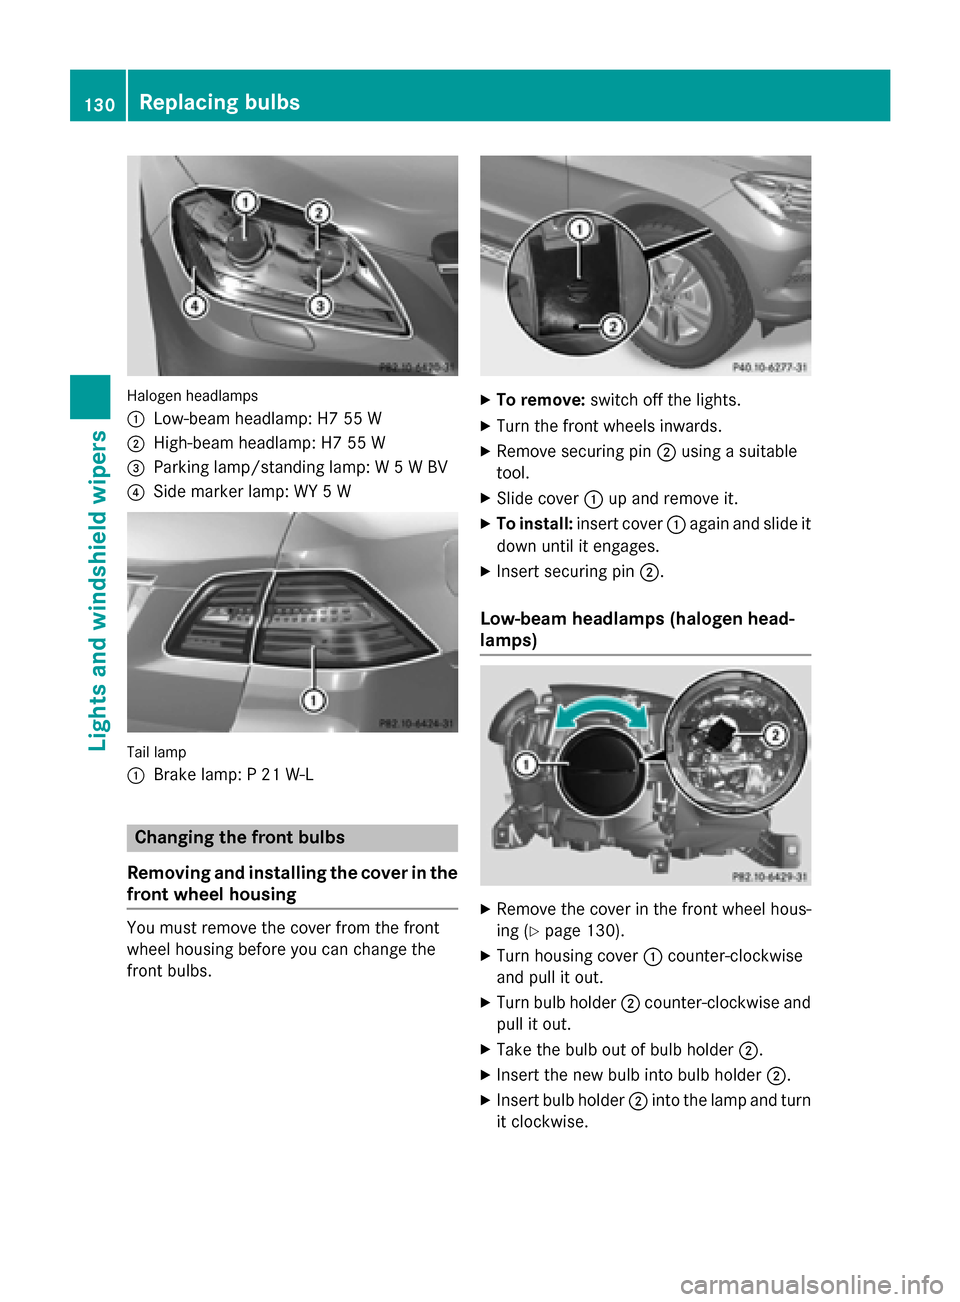
Halogen headlamps
0043
Low-beam headlamp: H7 55 W
0044 High-beam headlamp: H7 55 W
0087 Parking lamp/standing lamp: W 5 W BV
0085 Side marker lamp: WY 5 W Tail lamp
0043
Brake lamp: P 21 W-L Changing the front bulbs
Removing and installing the cover in the
front wheel housing You must remove the cover from the front
wheel housing before you can change the
front bulbs. X
To remove: switch off the lights.
X Turn the front wheels inwards.
X Remove securing pin 0044using a suitable
tool.
X Slide cover 0043up and remove it.
X To install: insert cover 0043again and slide it
down until it engages.
X Insert securing pin 0044.
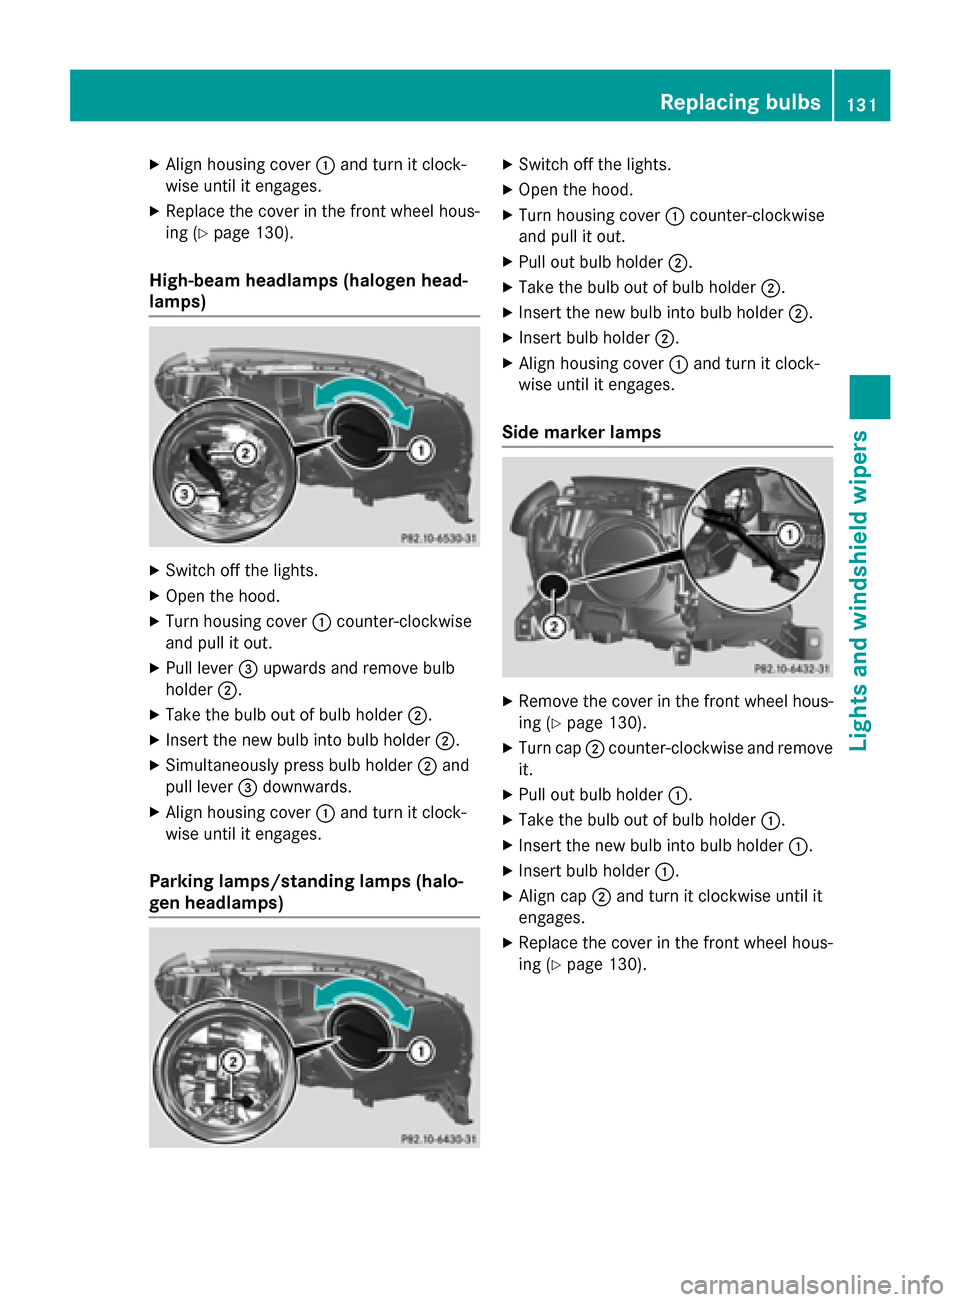
Low-beam headlamps (halogen head-
lamps) X
Remove the cover in the front wheel hous-
ing (Y page 130).
X Turn housing cover 0043counter-clockwise
and pull it out.
X Turn bulb holder 0044counter-clockwise and
pull it out.
X Take the bulb out of bulb holder 0044.
X Insert the new bulb into bulb holder 0044.
X Insert bulb holder 0044into the lamp and turn
it clockwise. 130
Replacing bulbsLights and windshield wipers
Page 133 of 466
X
Align housing cover 0043and turn it clock-
wise until it engages.
X Replace the cover in the front wheel hous-
ing (Y page 130).
High-beam headlamps (halogen head-
lamps) X
Switch off the lights.
X Open the hood.
X Turn housing cover 0043counter-clockwise
and pull it out.
X Pull lever 0087upwards and remove bulb
holder 0044.
X Take the bulb out of bulb holder 0044.
X Insert the new bulb into bulb holder 0044.
X Simultaneously press bulb holder 0044and
pull lever 0087downwards.
X Align housing cover 0043and turn it clock-
wise until it engages.
Parking lamps/standing lamps (halo-
gen headlamps) X
Switch off the lights.
X Open the hood.
X Turn housing cover 0043counter-clockwise
and pull it out.
X Pull out bulb holder 0044.
X Take the bulb out of bulb holder 0044.
X Insert the new bulb into bulb holder 0044.
X Insert bulb holder 0044.
X Align housing cover 0043and turn it clock-
wise until it engages.
Side marker lamps X
Remove the cover in the front wheel hous-
ing (Y page 130).
X Turn cap 0044counter-clockwise and remove
it.
X Pull out bulb holder 0043.
X Take the bulb out of bulb holder 0043.
X Insert the new bulb into bulb holder 0043.
X Insert bulb holder 0043.
X Align cap 0044and turn it clockwise until it
engages.
X Replace the cover in the front wheel hous-
ing (Y page 130). Replacing bulbs
131Lights andwindshield wipers Z
Page 134 of 466
Changing the rear bulbs
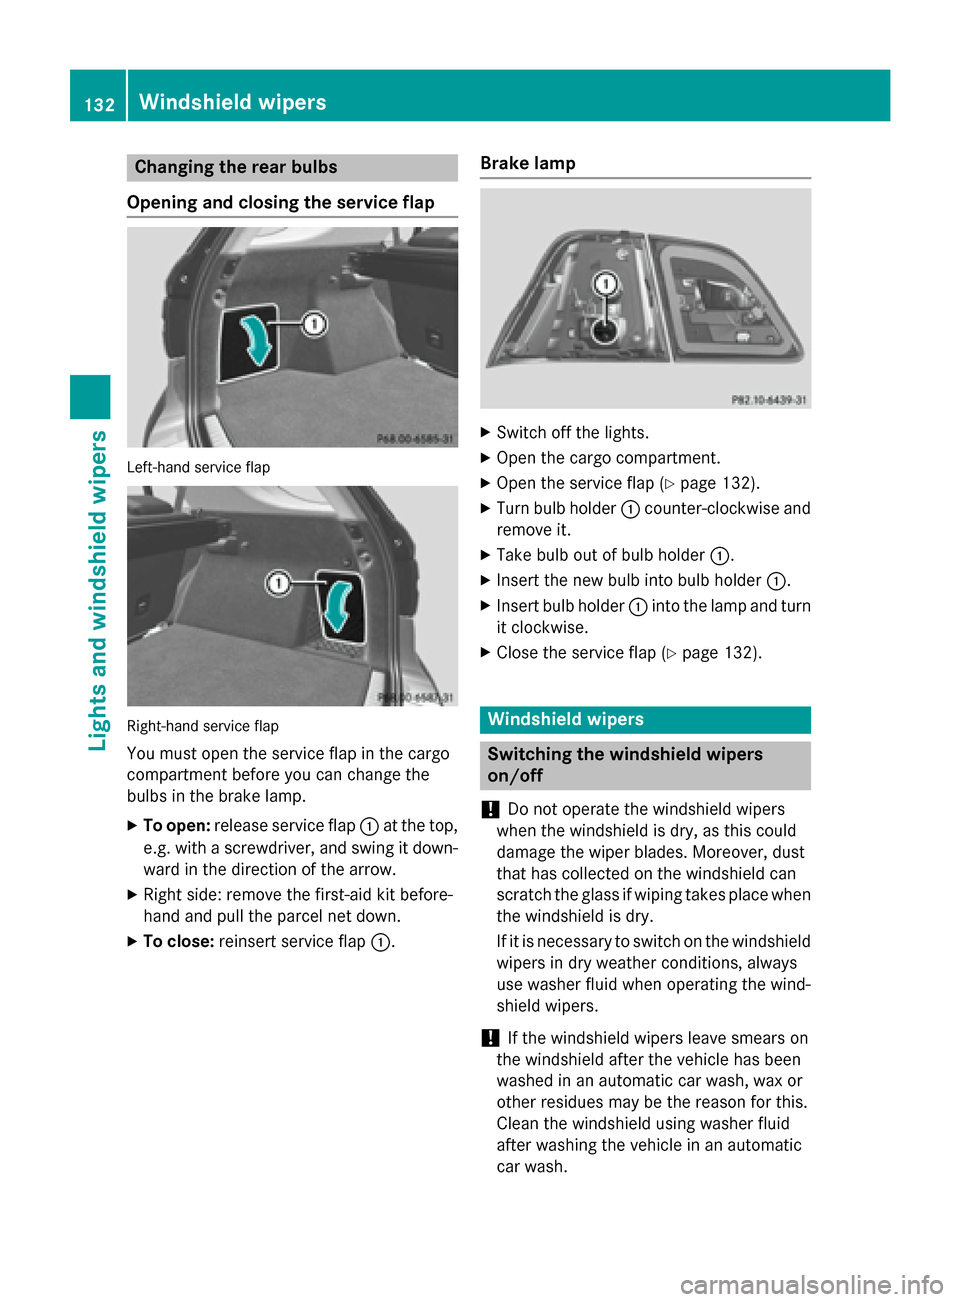
Opening and closing the service flap Left-hand service flap
Right-hand service flap
You must open the service flap in the cargo
compartment before you can change the
bulbs in the brake lamp.
X To open: release service flap 0043at the top,
e.g. with a screwdriver, and swing it down- ward in the direction of the arrow.
X Right side: remove the first-aid kit before-
hand and pull the parcel net down.
X To close: reinsert service flap 0043.Brake lamp X
Switch off the lights.
X Open the cargo compartment.
X Open the service flap (Y page 132).
X Turn bulb holder 0043counter-clockwise and
remove it.
X Take bulb out of bulb holder 0043.
X Insert the new bulb into bulb holder 0043.
X Insert bulb holder 0043into the lamp and turn
it clockwise.
X Close the service flap (Y page 132). Windshield wipers
Switching the windshield wipers
on/off
! Do not operate the windshield wipers
when the windshield is dry, as this could
damage the wiper blades. Moreover, dust
that has collected on the windshield can
scratch the glass if wiping takes place when the windshield is dry.
If it is necessary to switch on the windshield wipers in dry weather conditions, always
use washer fluid when operating the wind-
shield wipers.
! If the windshield wipers leave smears on
the windshield after the vehicle has been
washed in an automatic car wash, wax or
other residues may be the reason for this.
Clean the windshield using washer fluid
after washing the vehicle in an automatic
car wash. 132
Windshield wipersLights and windshield wipers
Page 135 of 466
!
Intermittent wiping with rain sensor: due
to optical influences and the windshield
becoming dirty in dry weather conditions,
the windshield wipers may be activated
inadvertently. This could then damage the
windshield wiper blades or scratch the
windshield.
For this reason, you should always switch
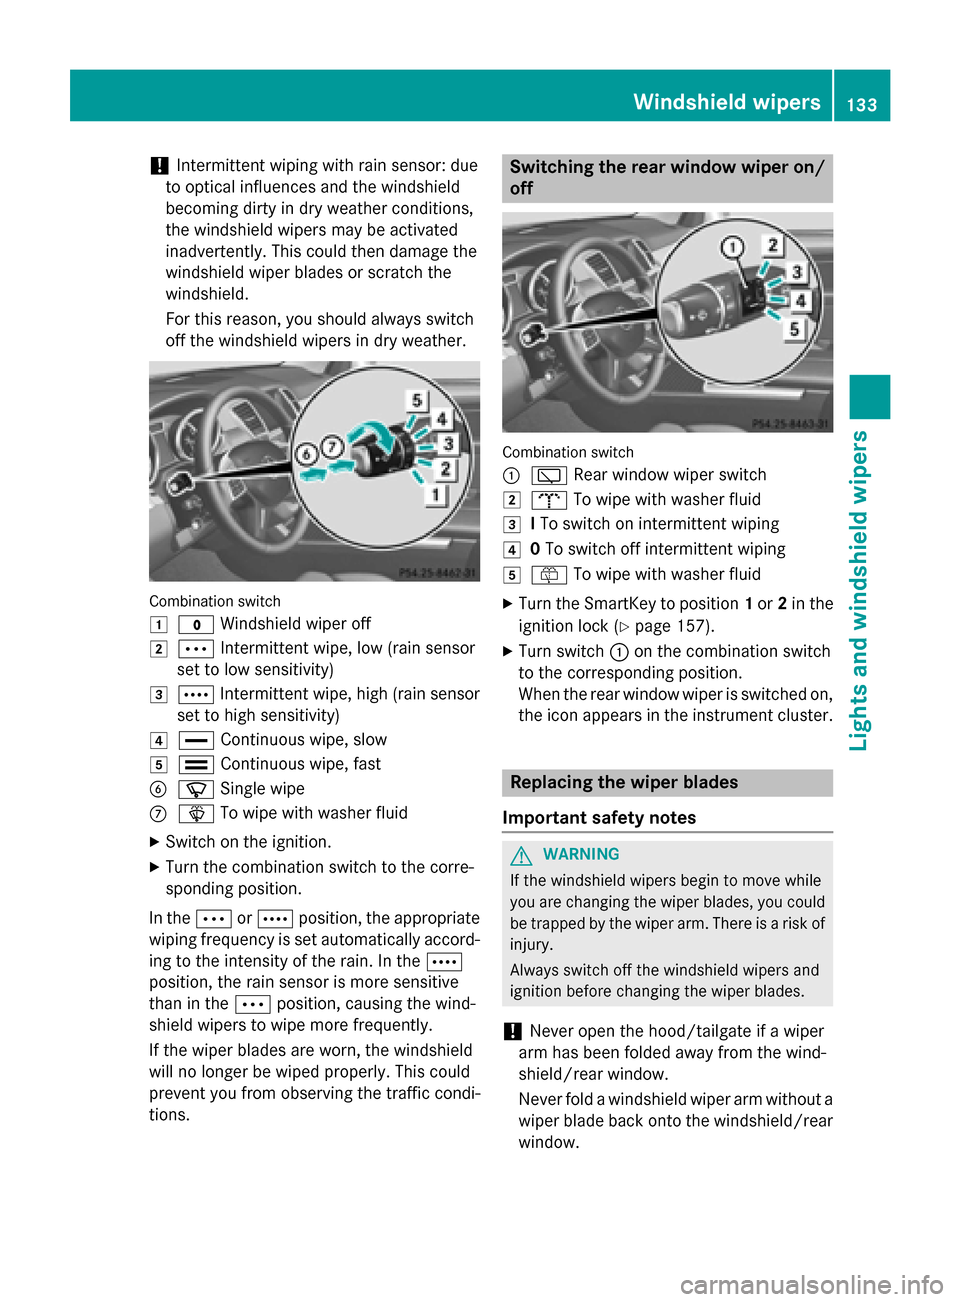
off the windshield wipers in dry weather. Combination switch
0047
003F Windshield wiper off
0048 0062 Intermittent wipe, low (rain sensor
set to low sensitivity)
0049 0063 Intermittent wipe, high (rain sensor
set to high sensitivity)
004A 00AA Continuous wipe, slow
004B 00A9 Continuous wipe, fast
0084 00D3 Single wipe
006B 00D4 To wipe with washer fluid
X Switch on the ignition.
X Turn the combination switch to the corre-
sponding position.
In the 0062or0063 position, the appropriate
wiping frequency is set automatically accord- ing to the intensity of the rain. In the 0063
position, the rain sensor is more sensitive
than in the 0062position, causing the wind-
shield wipers to wipe more frequently.
If the wiper blades are worn, the windshield
will no longer be wiped properly. This could
prevent you from observing the traffic condi-
tions. Switching the rear window wiper on/
off Combination switch
0043
00C5 Rear window wiper switch
0048 008E To wipe with washer fluid
0049 ITo switch on intermittent wiping
004A 0To switch off intermittent wiping
004B 00E2 To wipe with washer fluid
X Turn the SmartKey to position 1or 2in the
ignition lock (Y page 157).
X Turn switch 0043on the combination switch
to the corresponding position.
When the rear window wiper is switched on,
the icon appears in the instrument cluster. Replacing the wiper blades
Important safety notes G
WARNING
If the windshield wipers begin to move while
you are changing the wiper blades, you could be trapped by the wiper arm. There is a risk of
injury.
Always switch off the windshield wipers and
ignition before changing the wiper blades.
! Never open the hood/tailgate if a wiper
arm has been folded away from the wind-
shield/rear window.
Never fold a windshield wiper arm without a
wiper blade back onto the windshield/rear window. Windshield wipers
133Lights and windshield wipers Z
Page 136 of 466
Hold the windshield wiper arm firmly when
you change the wiper blade. If you release
the wiper arm without a wiper blade and it
falls onto the windshield/rear window, the
windshield/rear window may be damaged
by the force of the impact.
Mercedes-Benz recommends that you have the wiper blades changed at a qualified
specialist workshop.
! To avoid damaging the wiper blades,
make sure that you touch only the wiper
arm of the wiper.
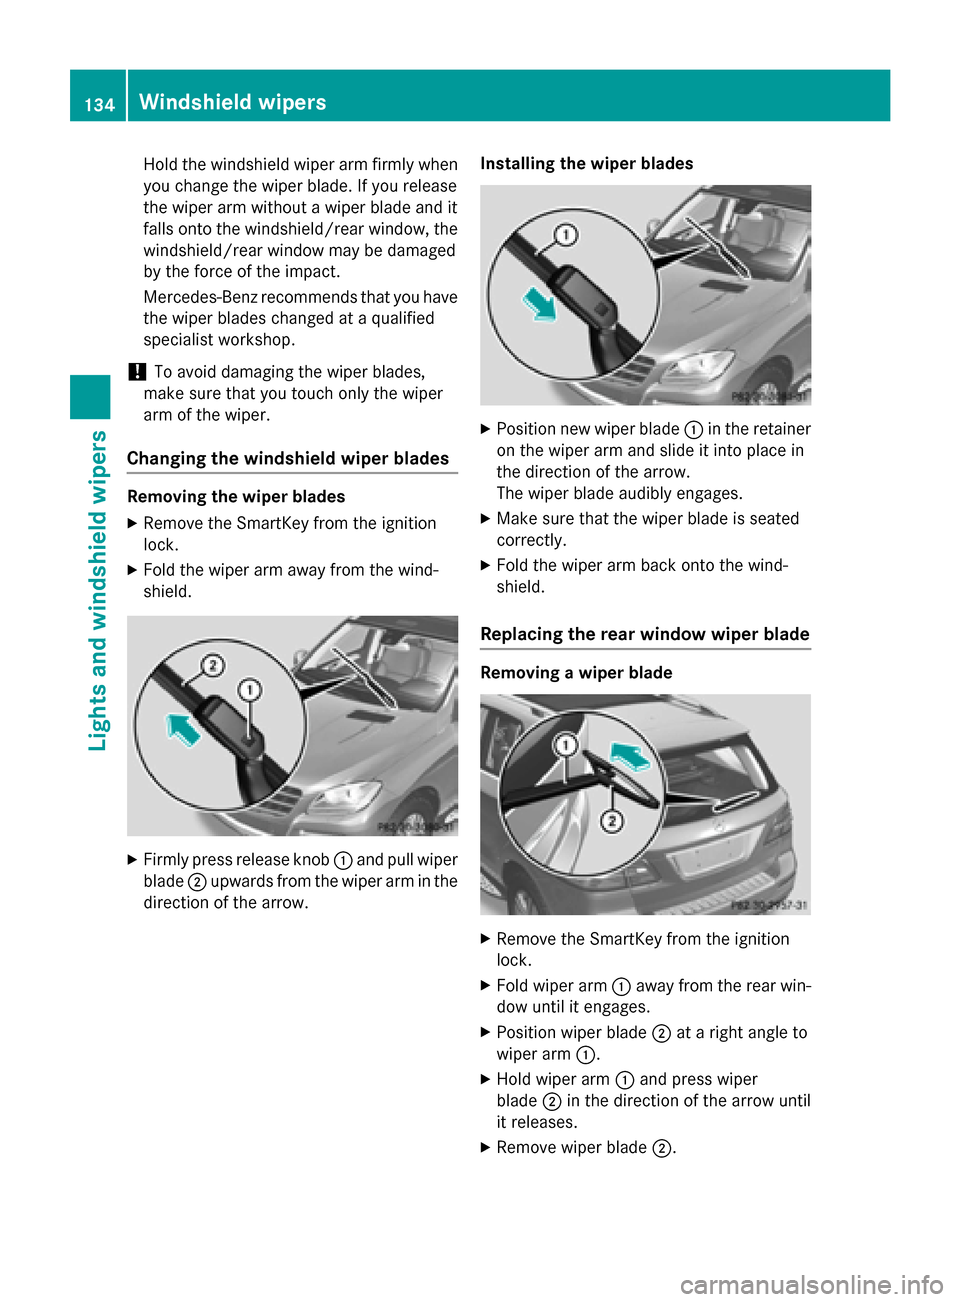
Changing the windshield wiper blades Removing the wiper blades
X Remove the SmartKey from the ignition
lock.
X Fold the wiper arm away from the wind-
shield. X
Firmly press release knob 0043and pull wiper
blade 0044upwards from the wiper arm in the
direction of the arrow. Installing the wiper blades X
Position new wiper blade 0043in the retainer
on the wiper arm and slide it into place in
the direction of the arrow.
The wiper blade audibly engages.
X Make sure that the wiper blade is seated
correctly.
X Fold the wiper arm back onto the wind-
shield.
Replacing the rear window wiper blade Removing a wiper blade
X
Remove the SmartKey from the ignition
lock.
X Fold wiper arm 0043away from the rear win-
dow until it engages.
X Position wiper blade 0044at a right angle to
wiper arm 0043.
X Hold wiper arm 0043and press wiper
blade 0044in the direction of the arrow until
it releases.
X Remove wiper blade 0044.134
Windshield wipersLights and windshield wipers
Page 137 of 466
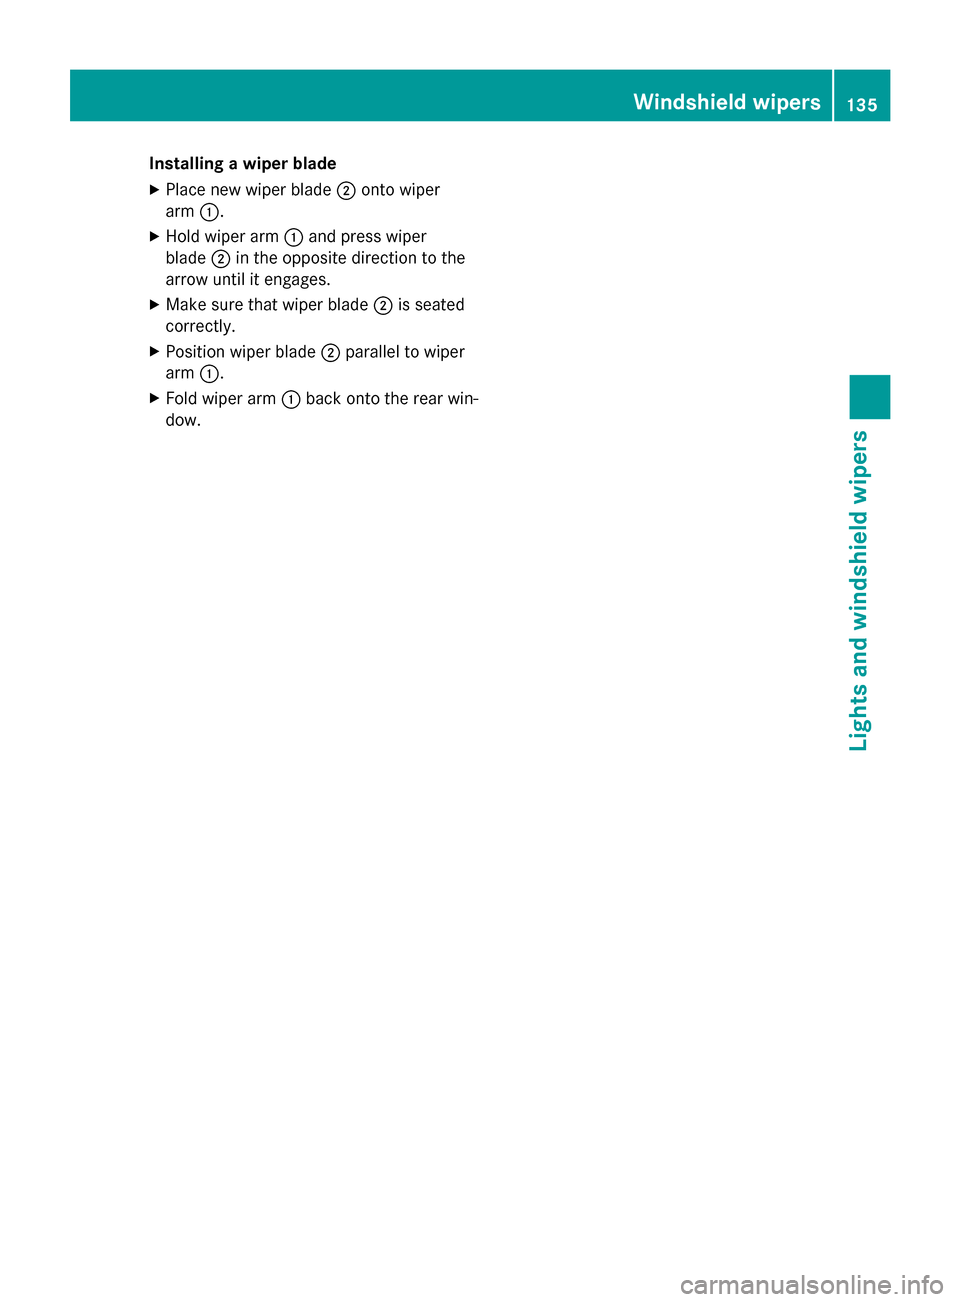
Installing a wiper blade
X Place new wiper blade 0044onto wiper
arm 0043.
X Hold wiper arm 0043and press wiper
blade 0044in the opposite direction to the
arrow until it engages.
X Make sure that wiper blade 0044is seated
correctly.
X Position wiper blade 0044parallel to wiper
arm 0043.
X Fold wiper arm 0043back onto the rear win-
dow. Windshield wipers
135Lights and windshield wipers Z
Page 138 of 466
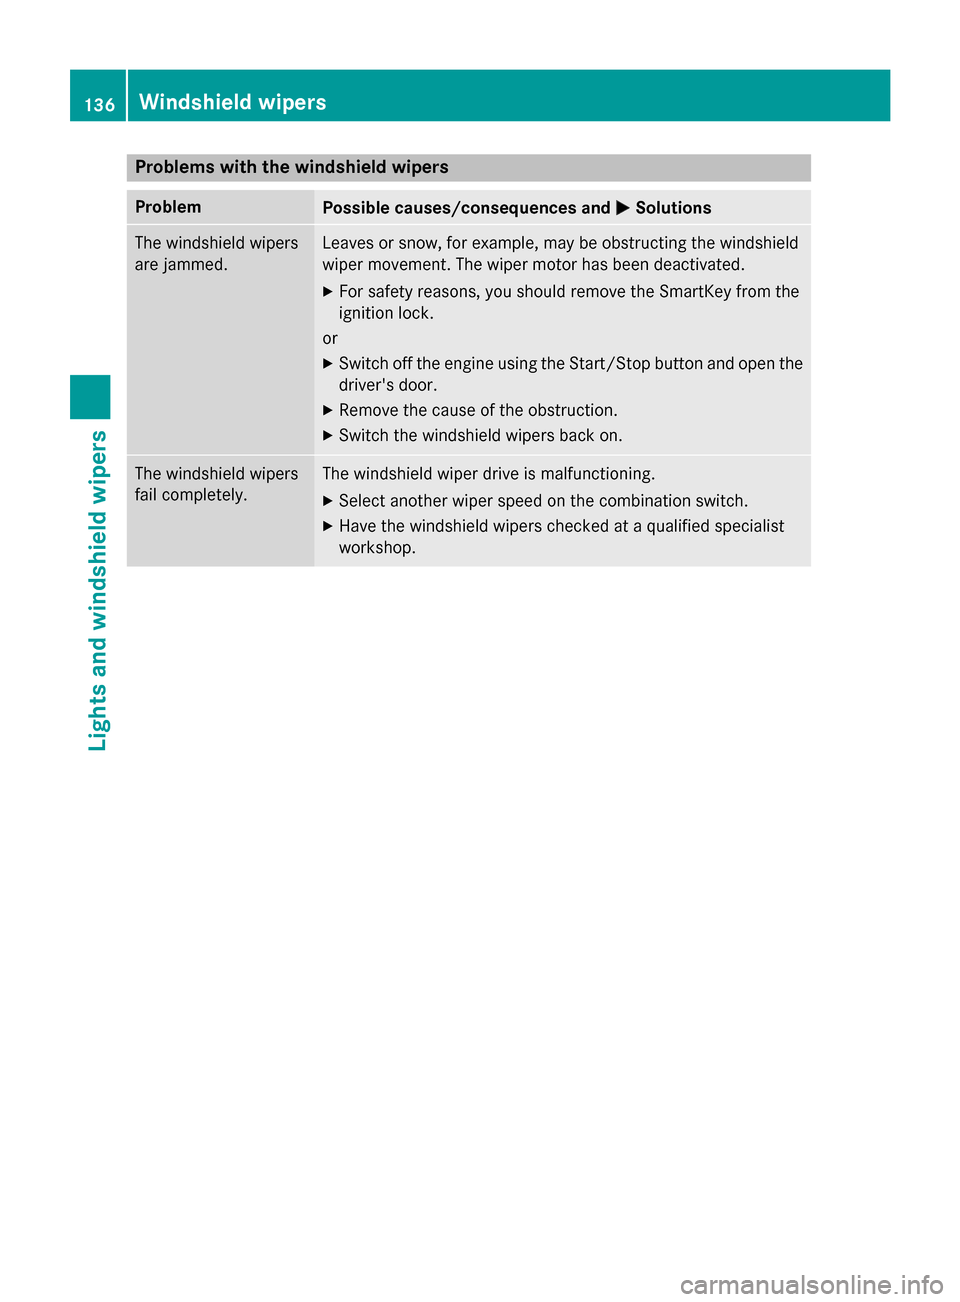
Problems with the windshield wipers
Problem
Possible causes/consequences and
0050
0050Solutions The windshield wipers
are jammed. Leaves or snow, for example, may be obstructing the windshield
wiper movement. The wiper motor has been deactivated.
X For safety reasons, you should remove the SmartKey from the
ignition lock.
or X Switch off the engine using the Start/Stop button and open the
driver's door.
X Remove the cause of the obstruction.
X Switch the windshield wipers back on. The windshield wipers
fail completely. The windshield wiper drive is malfunctioning.
X Select another wiper speed on the combination switch.
X Have the windshield wipers checked at a qualified specialist
workshop. 136
Windshield wipersLights and windshield wipers
Page 139 of 466
Useful information
............................138
Overview of climate control sys-
tems ................................................... 138
Operating the climate control sys-
tems ................................................... 144
Setting the air vents .........................152 137Climate control
Page 140 of 466

Useful information
i This Operator's Manual describes all
models and all standard and optional equip- ment of your vehicle available at the time of
publication of the Operator's Manual.
Country-specific differences are possible.
Please note that your vehicle may not be
equipped with all features described. This
also applies to safety-related systems and
functions.
i Read the information on qualified special-
ist workshops (Y page 29). Overview of climate control systems
General notes
Observe the settings recommended on the
following pages. The windows could other-
wise fog up.
To prevent the windows from fogging up:
R switch off climate control only briefly
R switch on air-recirculation mode only
briefly
R switch on the cooling with air dehumidifi-
cation function
R switch on the defrost windshield function
briefly, if required
Climate control regulates the temperature
and the humidity in the vehicle interior and
filters undesirable substances out of the air.
Climate control can only be operated when
the engine is running. Optimum operation is
only achieved with the side windows and roof closed.
The residual heat function can only be acti-
vated or deactivated with the ignition
switched off (Y page 151).
i Ventilate the vehicle for a brief period
during warm weather, e.g. using the con-
venience opening feature (Y page 95).
This will speed up the cooling process and
the desired interior temperature will be
reached more quickly. i
The integrated filter filters out most par-
ticles of dust and soot and completely fil-
ters out pollen. It also reduces gaseous pol-
lutants and odors. A clogged filter reduces the amount of air supplied to the vehicle
interior. For this reason, you should alwaysobserve the interval for replacing the filter,which is specified in the Maintenance
Booklet. As it depends on environmental
conditions, e.g. heavy air pollution, the
interval may be shorter than stated in the
Maintenance Booklet.
i It is possible that the residual heat func-
tion may be activated automatically an hour
after the SmartKey has been removed in
order to dry the air-conditioning system.
The vehicle is then ventilated for 30
minutes. 138
Overview of climate control systemsClimate control