safety belt MERCEDES-BENZ M-Class 2015 W166 Owner's Guide
[x] Cancel search | Manufacturer: MERCEDES-BENZ, Model Year: 2015, Model line: M-Class, Model: MERCEDES-BENZ M-Class 2015 W166Pages: 466, PDF Size: 8.92 MB
Page 63 of 466
R
in vehicles with a memory function: the
electrically adjustable steering wheel is
raised
R the engine is switched off
R vehicles with mbrace: automatic emer-
gency call Children in the vehicle
Important safety notes
Accident statistics show that children
secured in the rear seats are safer than chil-
dren secured in the front-passenger seat. For this reason, Mercedes-Benz strongly advises
that you install a child restraint system on a
rear seat. Children are generally better pro-
tected there.
If a child younger than 12 years and under 5 ft
(1.50 m) in height is traveling in the vehicle:
R always secure the child in a child restraint
system suitable for Mercedes-Benz vehi-
cles. The child restraint system must be
appropriate to the age, weight and size of
the child
R be sure to observe the instructions and
safety notes in this section in addition to
the child restraint system manufacturer's
installation instructions
R be sure to observe the instructions and
safety notes on the "Occupant classifica-
tion system (OCS)" (Y page 53)G
WARNING
If you leave children unsupervised in the vehi- cle, they could set it in motion by, for example:
R release the parking brake.
R shift the automatic transmission out of the
parking position P.
R start the engine.
In addition, they may operate vehicle equip-
ment and become trapped. There is a risk of
an accident and injury. When leaving the vehicle, always take the
SmartKey with you and lock the vehicle. Never
leave children unsupervised in the vehicle. G
WARNING
If persons, particularly children are subjected to prolonged exposure to extreme heat or
cold, there is a risk of injury, possibly even
fatal. Never leave children unattended in the
vehicle. G
WARNING
If the child restraint system is subjected to
direct sunlight, parts may get very hot. Chil-
dren may burn themselves on these parts,
particularly on the metal parts of the child
restraint system. There is a risk of injury.
If you leave the vehicle, taking the child with
you, always ensure that the child restraint
system is not exposed to direct sunlight. Pro- tect it with a blanket, for example. If the child
restraint system has been exposed to direct
sunlight, let it cool down before securing the
child in it. Never leave children unattended in the vehicle.
Always ensure that all vehicle occupants have
their seat belts fastened correctly and are sit- ting properly. Particular attention must be
paid to children.
Observe the safety notes on the seat belt
(Y page 46) and the notes on correct use of
seat belts (Y page 47).
A booster seat may be necessary to achieve
proper seat belt positioning for children over
41 lbs (18 kg) or until they reach a height
where a lap/shoulder belt fits properly with-
out a booster seat. Special seat belt retractor
G
WARNING
If the seat belt is released while driving, the
child restraint system will no longer be
secured properly. The special seat belt retrac- tor is disabled and the inertia real draws in a Children in the vehicle
61Safety
Z
Page 64 of 466
portion of the seat belt. The seat belt cannot
be immediately refastened. There is an
increased risk of injury, possibly even fatal.
Stop the vehicle immediately, paying atten-
tion to road and traffic conditions. Reactivate the special seat belt retractor and secure the
child restraint system properly.
All seat belts in the vehicle, except the driv-
er's seat belt, are equipped with a special seat belt retractor. When activated, the special
seat belt retractor ensures that the seat belt
cannot slacken once the child seat is secured.
Installing a child restraint system:
X Make sure you observe the child restraint
system manufacturer's installation instruc-
tions.
X Pull the seat belt smoothly from the belt
outlet.
X Engage seat belt tongue in belt buckle.
Activating the special seat belt retractor:
X Pull the seat belt out fully and let the inertia
reel retract it again.
While the seat belt is retracting, you should hear a ratcheting sound. The special seat
belt retractor is enabled.
X Push the child restraint system down so
that the seat belt is tight and does not
loosen.
Removing a child restraint system/deactivat-
ing the special seat belt retractor:
X Make sure you observe the child restraint
system manufacturer's installation instruc- tions.
X Press the belt buckle release button, hold
the belt tongue and guide it back towards
the belt outlet.
The special seat belt retractor is deactiva-
ted. Child restraint system
The use of seat belts and child restraint sys-
tems is required by law in:
R all 50 states
R the U.S. territories
R the District of Columbia
R all Canadian provinces
If you install a rearward-facing child restraint
system on the center rear seat, the rear arm
rest must be folded back as far as possible.
You can obtain further information about the correct child restraint system from any
authorized Mercedes-Benz Center. G
WARNING
If the child restraint system is installed incor- rectly on a suitable seat, it cannot protect as
intended. The child cannot then be restrained in the event of an accident, heavy braking or
sudden changes of direction. There is an
increased risk of injury, possibly even fatal.
Make sure that you observe the child restraint
system manufacturer's installation instruc-
tions and the notes on use. Please ensure,
that the base of the child restraint system is
always resting completely on the seat cush-
ion. Never place objects, e.g. cushions, under or behind the child restraint system. Only use
child restraint systems with the original cover
designed for them. Only replace damaged
covers with genuine covers. G
WARNING
If the child restraint system is installed incor- rectly or is not secured, it can come loose in
the event of an accident, heavy braking or a
sudden change in direction. The child
restraint system could be thrown about, strik- ing vehicle occupants. There is an increased
risk of injury, possibly even fatal.
Always install child restraint systems prop-
erly, even if they are not being used. Make
sure that you observe the child restraint sys-
tem manufacturer's installation instructions. 62
Children in the vehicleSafety
Page 65 of 466
You will find further information on stowing
objects, luggage or loads under "Loading
guidelines" (Y page 334). G
WARNING
Child restraint systems or their securing sys-
tems which have been damaged or subjected to a load in an accident can no longer protect
as intended. The child cannot then be
restrained in the event of an accident, heavy
braking or sudden changes of direction. There is an increased risk of injury, possibly even
fatal.
Replace child restraint systems which have
been damaged or subjected to a load in an
accident as soon as possible. Have the secur-
ing systems on the child restraint system
checked at a qualified specialist workshop,
before you install a child restraint system
again.
If it is absolutely necessary to carry a child on the front-passenger seat, be sure to observe
the information on the "Occupant Classifica-
tion System (OCS)" (Y page 53). There you
will also find information on deactivating the
front-passenger front air bag.
All child restraint systems must meet the fol- lowing standards:
R U.S. Federal Motor Vehicle Safety Stand-
ards 213 and 225
R Canadian Motor Vehicle Safety Standards
213 and 210.2
Confirmation that the child restraint system
corresponds to the standards can be found
on an instruction label on the child restraint
system. This confirmation can also be found
in the installation instructions that are inclu-
ded with the child restraint system.
Observe the warning labels in the vehicle inte-
rior and on the child restraint system. LATCH-type (ISOFIX) child seat secur-
ing system G
WARNING
LATCH-type (ISOFIX) child restraint systems
do not offer sufficient protective effect for
children whose weight is greater than 48 lbs
(22 kg) who are secured using the safety belt integrated in the child restraint system. In the
event of an accident, a child might not be
restrained correctly. This poses an increased
risk of injury or even fatal injury.
If the child weighs more than 48 lbs (22 kg),
only use LATCH-type (ISOFIX) child restraint
systems with which the child is also secured
with the vehicle seat belt. Also secure the
child restraint system with the Top Tether
belt, if available.
Always comply with the manufacturer's
installation and operating instructions for the child restraint system used.
Before every trip, make sure that the LATCH- type (ISOFIX) child restraint system is
engaged correctly in both LATCH-type (ISO-
FIX) securing rings
! When installing the child restraint system,
make sure that the seat belt for the middle seat does not get trapped. The seat belt
could otherwise be damaged. 0043
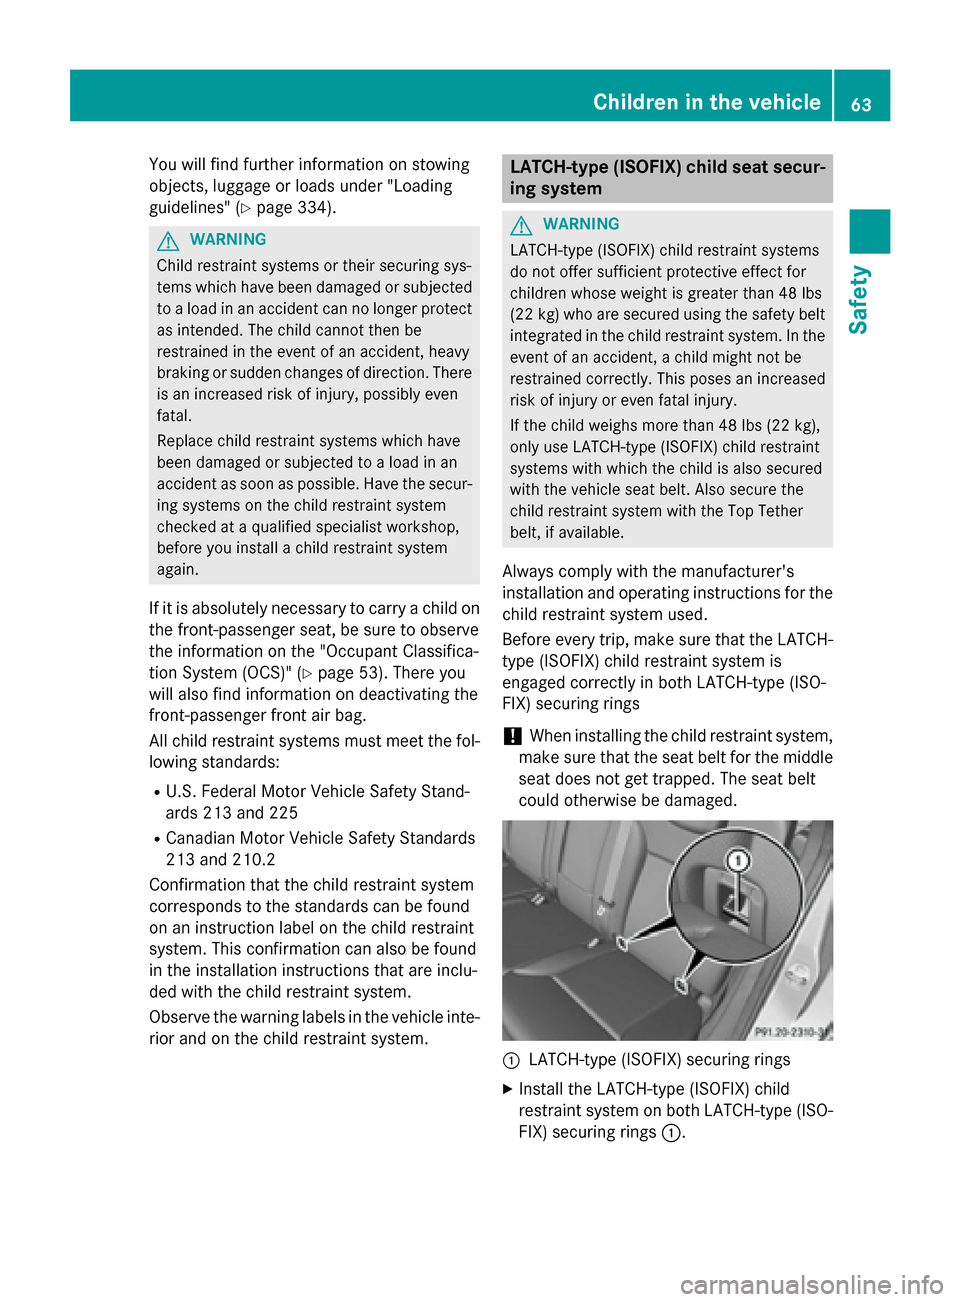
LATCH-type (ISOFIX) securing rings
X Install the LATCH-type (ISOFIX) child
restraint system on both LATCH-type (ISO-
FIX) securing rings 0043. Children in the vehicle
63Safety Z
Page 66 of 466
ISOFIX is a standardized securing system for
specially designed child restraint systems on
the rear seats. LATCH-type (ISOFIX) securing rings 0043for two LATCH-type (ISOFIX) child
restraint systems are installed on the left and
right rear seats.
Non-LATCH-type (ISOFIX) child seats may
also be used and can be installed using the
vehicle's seat belt system. Install child seats
according to the manufacturer's instructions. Top Tether
Introduction Top Tether provides an additional connection
between a child restraint system, secured
with a LATCH-type (ISOFIX) child seat mount,and the rear seat. This helps reduce the risk of
injury even further. If the child restraint sys-
tem has a Top Tether belt, this should be used at all times.
Important safety notes G
WARNING
If the rear seats or the rear seat backrests are not locked, they could fold forwards in the
event of an accident, heavy braking or sudden changes of direction. As a result, child
restraint systems cannot perform their inten-
ded protective function. Rear seats and rear
seat backrests that are not locked can also
cause additional injuries, e.g. in the event of
an accident. This poses an increased risk of
injury or even fatal injury.
Always lock the rear seats and rear seat
backrests after installing a Top Tether belt.
Observe the lock verification indicator. Adjust the rear seat backrests so that they are in an
upright position. Top Tether anchorage points
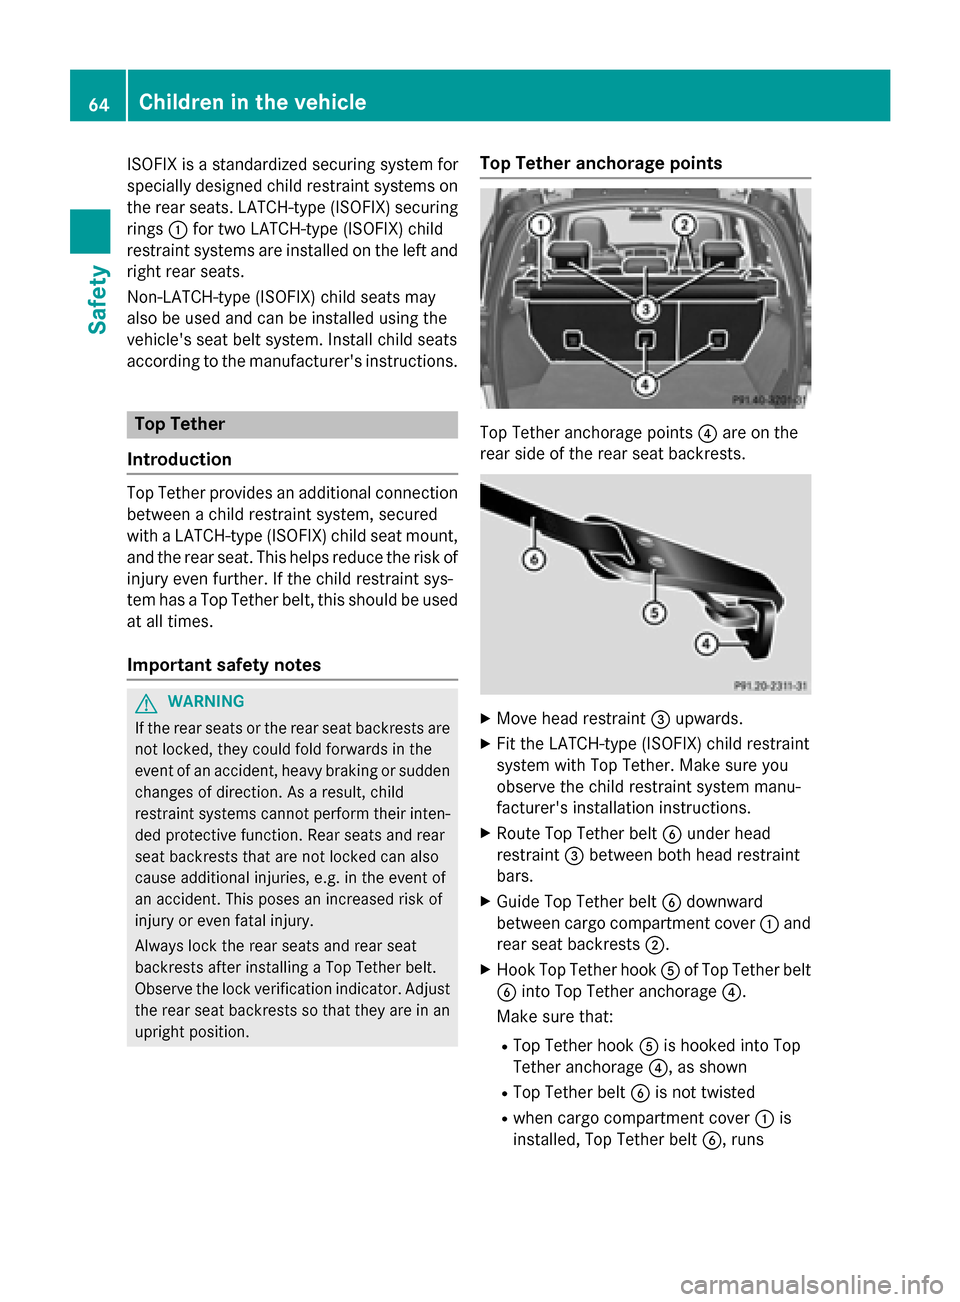
Top Tether anchorage points
0085are on the
rear side of the rear seat backrests. X
Move head restraint 0087upwards.
X Fit the LATCH-type (ISOFIX) child restraint
system with Top Tether. Make sure you
observe the child restraint system manu-
facturer's installation instructions.
X Route Top Tether belt 0084under head
restraint 0087between both head restraint
bars.
X Guide Top Tether belt 0084downward
between cargo compartment cover 0043and
rear seat backrests 0044.
X Hook Top Tether hook 0083of Top Tether belt
0084 into Top Tether anchorage 0085.
Make sure that:
R Top Tether hook 0083is hooked into Top
Tether anchorage 0085, as shown
R Top Tether belt 0084is not twisted
R when cargo compartment cover 0043is
installed, Top Tether belt 0084, runs64
Children in the vehicleSafety
Page 67 of 466
between rear seat backrests
0044and
cargo compartment cover 0043
R when the safety net is installed, Top
Tether belt 0084runs between rear seat
backrests 0044and the safety net.
X Tension Top Tether belt 0084. Make sure you
observe the child restraint system manu-
facturer's installation instructions.
X If necessary, push head restraint 0087back
down slightly (Y page 108). Make sure you
do not interfere with the correct routing of
Top Tether belt 0084. Child restraint system on the front-
passenger seat
General notes Accident statistics show that children
secured in the rear seats are safer than chil-
dren secured in the front-passenger seat. For this reason, Mercedes-Benz strongly advises
that you install a child restraint system on a
rear seat.
If it is absolutely necessary to install a child
restraint system to the front-passenger seat,
be sure to observe the instructions and safety
notes on the "Occupant classification system (OCS)" (Y page 53).
You can thus avoid the risks that could arise
as a result of:
R an incorrectly categorized person in the
front-passenger seat
R the unintentional deactivation of the front-
passenger front air bag
R the unsuitable positioning of the child
restraint system, e.g. too close to the dash-
board
Rearward-facing child restraint system If it is absolutely necessary to install a rear-
ward-facing child restraint system on the
front-passenger seat, always make sure that
the front-passenger front air bag is deactiva-
ted. Only if the PASSENGER AIR BAG OFF indicator lamp is permanently lit (Y
page 45)
is the front-passenger front air bag deactiva-
ted.
Always observe the child restraint system
manufacturer's installation and operating
instructions.
Forward-facing child restraint system If it is absolutely necessary to install a
forward-facing child restraint system on the
front-passenger seat, always move the front-
passenger seat as far back as possible. The
entire base of the child restraint system must always rest on the seat cushion of the front-
passenger seat. The backrest of the child
restraint system must, as far as possible, lie
flat against the backrest of the front-
passenger seat. The child restraint system
must not touch the roof or be put under strain
by the head restraint. Adjust the angle of the
seat backrest and the head restraint position accordingly. Always make sure that the shoul-
der belt strap is correctly routed from the
vehicle belt sash guide to the shoulder belt
guide on the child restraint system. The shoul- der belt strap must be routed forwards and
downwards from the vehicle belt sash guide.
If necessary, adjust the vehicle belt sash
guide and the front-passenger seat accord-
ingly.
Always observe the child restraint system
manufacturer's installation and operating
instructions. Children in the vehicle
65Safety Z
Page 78 of 466
G
WARNING
PRE-SAFE ®
Brake does not react:
R to people or animals
R to oncoming vehicles
R to crossing traffic
R when cornering
As a result, PRE-SAFE ®
Brake may neither
give warnings nor intervene in all critical sit-
uations. There is a risk of an accident.
Always pay careful attention to the traffic sit-
uation and be ready to brake.
In the event of snowfall or heavy rain, the rec-
ognition can be impaired.
Recognition by the radar sensor system is
also impaired in the event of:
R dirt on the sensors or anything else cover-
ing the sensors
R interference by other radar sources
R strong radar reflections, for example in
parking garages
R a narrow vehicle traveling in front, e.g. a
motorbike
R a vehicle traveling in front on a different line
relative to the center of your vehicle
Following damage to the front end of the vehi-
cle, have the configuration and operation of
the radar sensors checked at a qualified spe-
cialist workshop. This also applies to colli-
sions at low speeds where there is no visible
damage to the front of the vehicle.
Function X
To activate/deactivate: activate or deac-
tivate PRE-SAFE ®
Brake in the on-board
computer (Y page 276).
If the PRE-SAFE ®
Brake is not activated, the
00D4 symbol appears in the multifunction
display.
Starting at a speed of around 4 mph (7 km/h),
this function warns you if you rapidly
approach a vehicle in front. An intermittent
warning tone will then sound and the 00BAdistance warning lamp will light up in the
instrument cluster.
X Brake immediately to defuse the situation.
or
X Take evasive action provided it is safe to do
so.
PRE-SAFE ®
Brake can also brake the vehicle
automatically under the following conditions:
R the driver and front-passenger have their
seat belts fastened
and
R the vehicle speed is between approx-
imately 4 mph (7 km/h) and 124 mph
(200 km/h)
At speeds of up to approximately 40 mph
(70 km/h) PRE-SAFE ®
Brake can also detect
stationary objects. Examples of stationary
objects are stopped or parked vehicles.
i If there is an increased risk of collision,
preventive passenger protection measures
(PRE-SAFE ®
) are activated.
If the risk of collision with the vehicle in front
remains and you do not brake, take evasive
action or accelerate significantly, the vehicle
may perform automatic emergency braking,
up to the point of full brake application. Auto- matic emergency braking is not performed
until immediately prior to an imminent acci-
dent.
You can prevent the intervention of the PRE-
SAFE ®
Brake at any time by:
R depressing the accelerator pedal further.
R activating kickdown.
R releasing the brake pedal.
The braking action of PRE-SAFE ®
Brake is
ended automatically if:
R you maneuver to avoid the obstacle.
R there is no longer any danger of a collision.
R there is no longer an obstacle detected in
front of your vehicle.
If you have activated DSR (Y page 250), PRE-
SAFE ®
Brake is deactivated. 76
Driving safety systemsSafety
Page 106 of 466
Useful information
i This Operator's Manual describes all
models and all standard and optional equip- ment of your vehicle available at the time of
publication of the Operator's Manual.
Country-specific differences are possible.
Please note that your vehicle may not be
equipped with all features described. This
also applies to safety-related systems and
functions.
i Read the information on qualified special-
ist workshops (Y page 29). Correct driver's seat position
G
WARNING
You could lose control of your vehicle if you do the following while driving:
R adjust the driver's seat, head restraint,
steering wheel or mirrors
R fasten the seat belt
There is a risk of an accident.
Adjust the driver's seat, head restraint, steer-
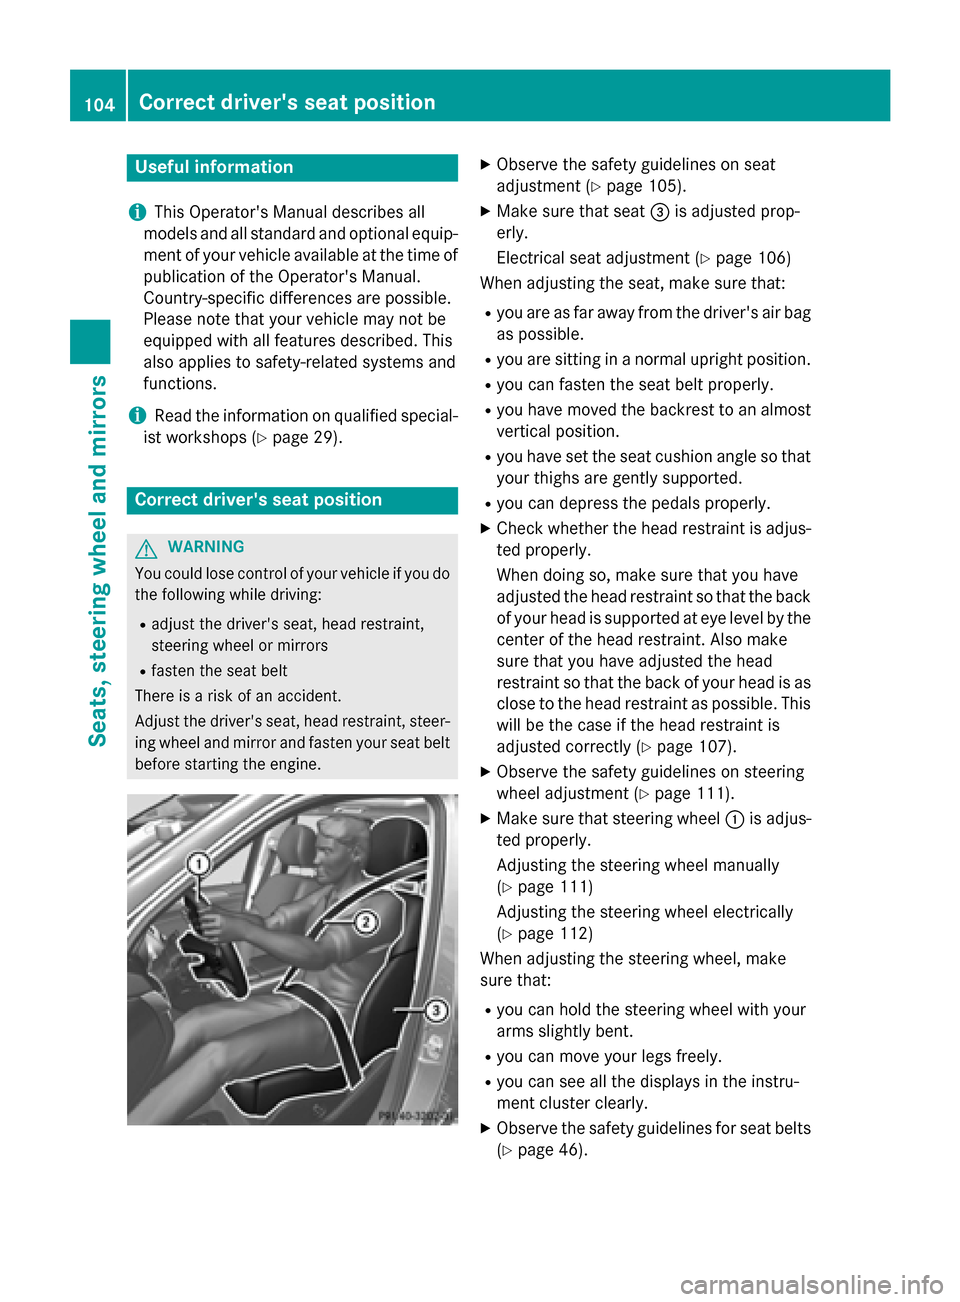
ing wheel and mirror and fasten your seat belt before starting the engine. X
Observe the safety guidelines on seat
adjustment (Y page 105).
X Make sure that seat 0087is adjusted prop-
erly.
Electrical seat adjustment (Y page 106)
When adjusting the seat, make sure that:
R you are as far away from the driver's air bag
as possible.
R you are sitting in a normal upright position.
R you can fasten the seat belt properly.
R you have moved the backrest to an almost
vertical position.
R you have set the seat cushion angle so that
your thighs are gently supported.
R you can depress the pedals properly.
X Check whether the head restraint is adjus-
ted properly.
When doing so, make sure that you have
adjusted the head restraint so that the back of your head is supported at eye level by the
center of the head restraint. Also make
sure that you have adjusted the head
restraint so that the back of your head is as close to the head restraint as possible. Thiswill be the case if the head restraint is
adjusted correctly (Y page 107).
X Observe the safety guidelines on steering
wheel adjustment (Y page 111).
X Make sure that steering wheel 0043is adjus-
ted properly.
Adjusting the steering wheel manually
(Y page 111)
Adjusting the steering wheel electrically
(Y page 112)
When adjusting the steering wheel, make
sure that:
R you can hold the steering wheel with your
arms slightly bent.
R you can move your legs freely.
R you can see all the displays in the instru-
ment cluster clearly.
X Observe the safety guidelines for seat belts
(Y page 46). 104
Correct driver's seat positionSeats, steering wheel and mirrors
Page 107 of 466
X
Check whether you have fastened seat
belt 0044properly (Y page 48).
The seat belt should:
R fit snugly across your body
R be routed across the middle of your shoul-
der
R be routed in your pelvic area across the hip
joints
X Before starting off, adjust the rear-view mir-
ror and the exterior mirrors in such a way
that you have a good view of road and traf-
fic conditions (Y page 114).
X Vehicles with a memory function: save
the seat, steering wheel and exterior mirror settings with the memory function
(Y page 116). Seats
Important safety notes
G
WARNING
Children could become trapped if they adjust the seats, particularly when unattended.
There is a risk of injury.
When leaving the vehicle, always take the
SmartKey with you and lock the vehicle. Never leave children unsupervised in the vehicle. G
WARNING
You could lose control of your vehicle if you do the following while driving:
R adjust the driver's seat, head restraint,
steering wheel or mirrors
R fasten the seat belt
There is a risk of an accident.
Adjust the driver's seat, head restraint, steer-
ing wheel and mirror and fasten your seat belt before starting the engine. G
WARNING
If you adjust the seat height carelessly, you or other vehicle occupants could be trapped andthereby injured. Children in particular could accidentally press the electrical seat adjust-
ment buttons and become trapped. There is a
risk of injury.
While moving the seats, make sure that your
hands or other body parts do not get under the
lever assembly of the seat adjustment sys-
tem. G
WARNING
When you adjust a seat, you or other vehicle
occupants could become trapped, e.g. on the seat guide rail. There is a risk of injury.
Make sure when adjusting a seat that no one
has any body parts in the sweep of the seat. G
WARNING
If head restraints are not installed and adjus-
ted correctly, they cannot provide protection
as intended. There is an increased risk of
injury in the head and neck area, e.g. in the
event of an accident or when braking.
Always drive with the head restraints instal-
led. Before driving off, make sure for every
vehicle occupant that the center of the head
restraint supports the back of the head at
about eye level. G
WARNING
The seat belt does not offer the intended level of protection if you have not moved the back-
rest to an almost vertical position. When brak-
ing or in the event of an accident, you could
slide underneath the seat belt and sustain
abdomen or neck injuries, for example. This
poses an increased risk of injury or even fatal injury.
Adjust the seat properly before beginning
your journey. Always ensure that the backrest
is in an almost vertical position and that the
shoulder section of your seat belt is routed
across the center of your shoulder. G
WARNING
According to accident statistics, children are
safer when properly restrained on the rear
seats than on the front-passenger seat. Thus, Seats
105Seats, steering wheel and mirrors
Z
Page 113 of 466
Problems with the seat ventilation
Problem
Possible causes/consequences and
0050
0050Solutions The seat ventilation has
switched off prema-
turely or cannot be
switched on. The on-board voltage is too low because too many electrical con-
sumers are switched on.
X Switch off electrical consumers that you do not need, such as
the rear window defroster or interior lighting.
Once the battery is sufficiently charged, the seat ventilation will
switch back on automatically. Steering wheel
Important safety notes
G
WARNING
You could lose control of your vehicle if you do the following while driving:
R adjust the driver's seat, head restraint,
steering wheel or mirrors
R fasten the seat belt
There is a risk of an accident.
Adjust the driver's seat, head restraint, steer-
ing wheel and mirror and fasten your seat belt before starting the engine. G
WARNING
Children could injure themselves if they
adjust the steering wheel. There is a risk of
injury.
When leaving the vehicle, always take the
SmartKey with you and lock the vehicle. Never leave children unsupervised in the vehicle. Adjusting the steering wheel man-
ually
G
WARNING
If the steering wheel is unlocked while the
vehicle is in motion, it could change position
unexpectedly. This could cause you to lose
control of the vehicle. There is a risk of an
accident. Before starting off, make sure the steering
wheel is locked. Never unlock the steering
wheel while the vehicle is in motion.
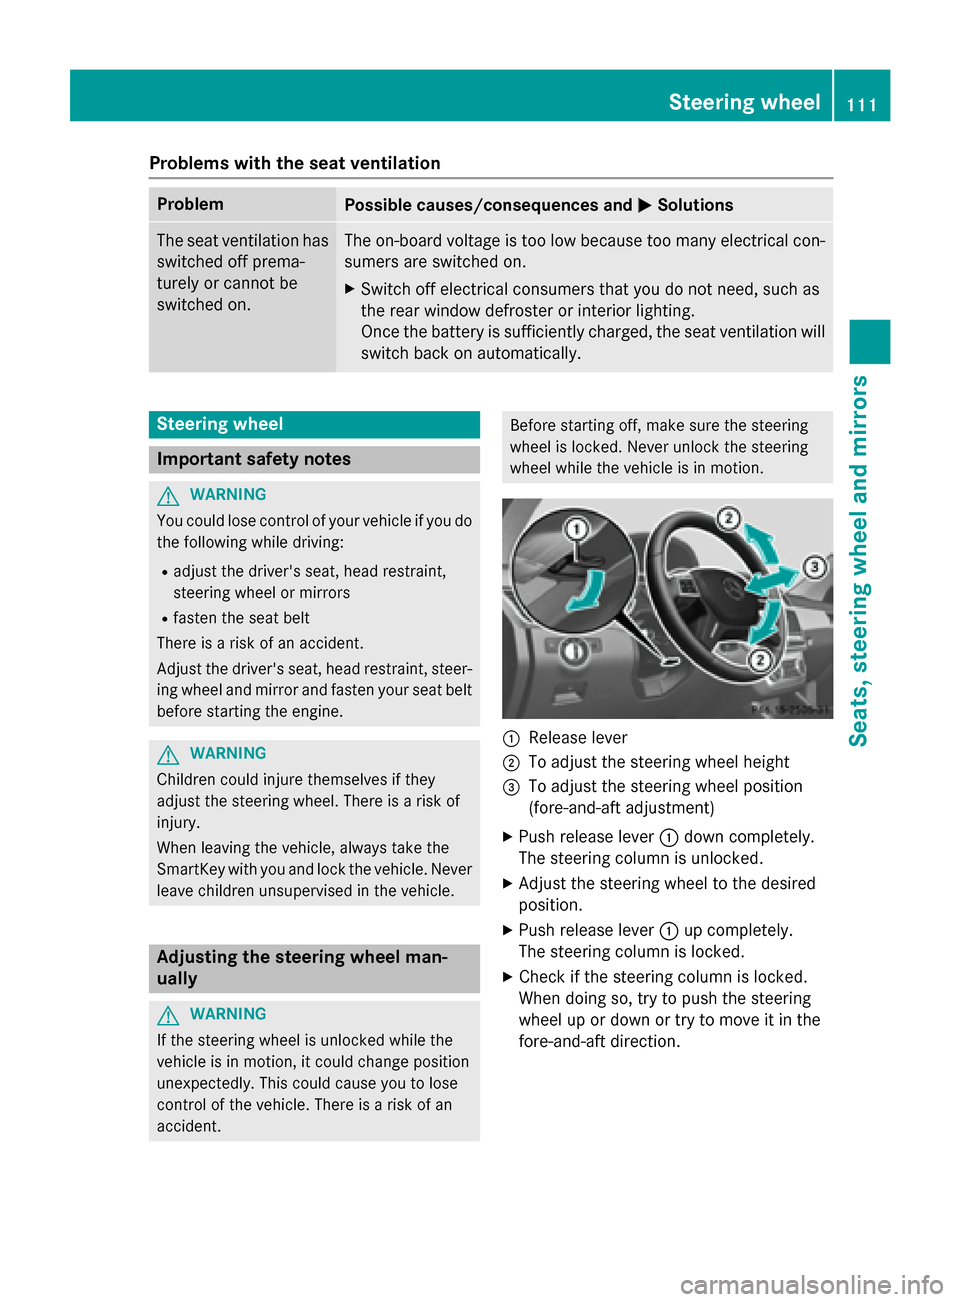
0043
Release lever
0044 To adjust the steering wheel height
0087 To adjust the steering wheel position
(fore-and-aft adjustment)
X Push release lever 0043down completely.
The steering column is unlocked.
X Adjust the steering wheel to the desired
position.
X Push release lever 0043up completely.
The steering column is locked.
X Check if the steering column is locked.
When doing so, try to push the steering
wheel up or down or try to move it in the
fore-and-aft direction. Steering wheel
111Seats, steering wheel and mirrors Z
Page 164 of 466
ECO start/stop function (all vehicles
except the ML 250 BlueTEC 4MATIC)
Introduction This section describes the ECO start/stop
function for all vehicles except the ML 250
BlueTEC 4MATIC. Information about the ECO
start/stop function on the ML 250 BlueTEC
4MATIC (Y page 164).
The ECO start/stop function switches the
engine off automatically if the vehicle is stop- ped under certain conditions.
The engine starts automatically when the
driver wants to pull away again. The ECO
start/stop function thereby helps you to
reduce the fuel consumption and emissions
of your vehicle.
Important safety notes G
WARNING
If the engine is switched off automatically and you exit the vehicle, the engine is restarted
automatically. The vehicle may begin moving. There is a risk of accident and injury.
If you wish to exit the vehicle, always turn off
the ignition and secure the vehicle against
rolling away.
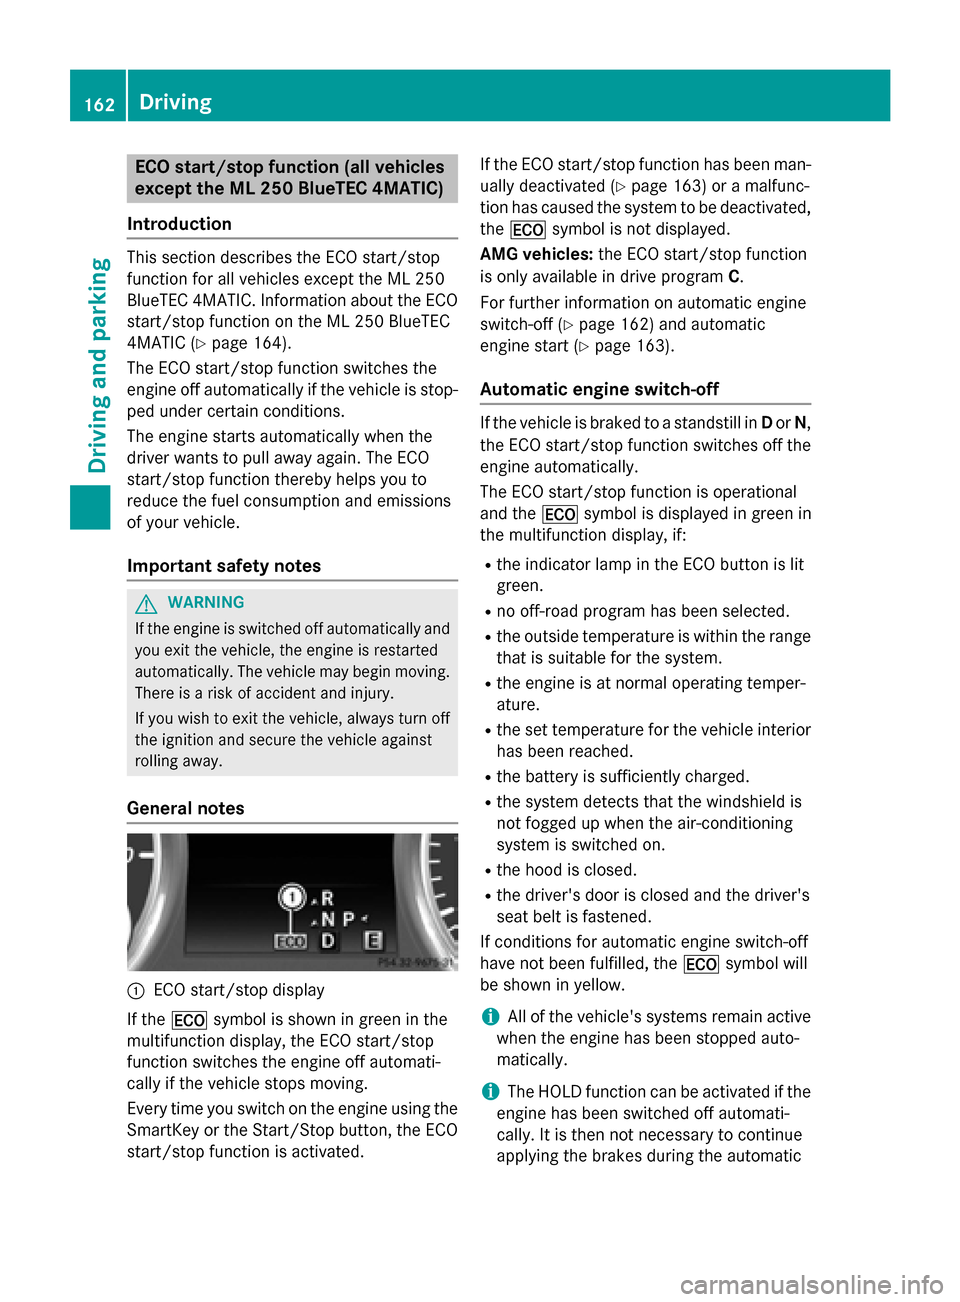
General notes 0043
ECO start/stop display
If the 00A7 symbol is shown in green in the
multifunction display, the ECO start/stop
function switches the engine off automati-
cally if the vehicle stops moving.
Every time you switch on the engine using the SmartKey or the Start/Stop button, the ECO
start/stop function is activated. If the ECO start/stop function has been man-
ually deactivated (Y page 163) or a malfunc-
tion has caused the system to be deactivated, the 00A7 symbol is not displayed.
AMG vehicles: the ECO start/stop function
is only available in drive program C.
For further information on automatic engine
switch-off (Y page 162) and automatic
engine start (Y page 163).
Automatic engine switch-off If the vehicle is braked to a standstill in
Dor N,
the ECO start/stop function switches off the engine automatically.
The ECO start/stop function is operational
and the 00A7symbol is displayed in green in
the multifunction display, if:
R the indicator lamp in the ECO button is lit
green.
R no off-road program has been selected.
R the outside temperature is within the range
that is suitable for the system.
R the engine is at normal operating temper-
ature.
R the set temperature for the vehicle interior
has been reached.
R the battery is sufficiently charged.
R the system detects that the windshield is
not fogged up when the air-conditioning
system is switched on.
R the hood is closed.
R the driver's door is closed and the driver's
seat belt is fastened.
If conditions for automatic engine switch-off
have not been fulfilled, the 00A7symbol will
be shown in yellow.
i All of the vehicle's systems remain active
when the engine has been stopped auto-
matically.
i The HOLD function can be activated if the
engine has been switched off automati-
cally. It is then not necessary to continue
applying the brakes during the automatic 162
DrivingDriving and parking