tire pressure MERCEDES-BENZ M-Class 2015 W166 Owner's Manual
[x] Cancel search | Manufacturer: MERCEDES-BENZ, Model Year: 2015, Model line: M-Class, Model: MERCEDES-BENZ M-Class 2015 W166Pages: 466, PDF Size: 8.92 MB
Page 22 of 466
Roadside Assistance butto
n ..........354
Search & Send ............................... 357
Self-test ......................................... 353
Speed alert ................................... .360
System .......................................... 353
Triggering the vehicle alarm ........... 360
Vehicle remote malfunction diag-
nosis .............................................. 359
Vehicle remote unlocking .............. 358
Telephone
Accepting a call ............................ .274
Display message ............................ 316
Menu (on-board computer) ............ 273
Number from the phone book ....... .274
Redialing ........................................ 274
Rejecting/ending a call ................. 274
Telescopic rod (EASY-PACK load-
securing kit) ....................................... 343
Temperature Coolant .......................................... 266
Coolant (on-board computer) ......... 281
Engine oil (on-board computer) ...... 281
Outside temperature ..................... .267
Setting (climate control) ................ 147
Theft deterrent systems
ATA (Anti-Theft Alarm system) ......... 77
Immobilizer ...................................... 77
Through-loading ................................ 337
Time see separate operating instructions
Timing (RACETIMER) ......................... 282
TIREFIT kit .......................................... 384
Tire pressure Calling up (on-board computer) ..... 408
Checking manually ........................ 407
Display message ............................ 312
Important safety notes .................. 408
Maximum ....................................... 406
Notes ............................................. 405
Not reached (TIREFIT) .................... 386
Reached (TIREFIT) .......................... 386
Recommended ............................... 404
Tire pressure loss warning sys-
tem
General notes ................................ 407
Important safety notes .................. 407
Restarting ...................................... 408 Tire pressure monitor
Checking the tire pressure elec-
tronically ........................................ 410
Function/notes ............................ .408
General notes ................................ 408
Important safety notes .................. 409
Radio type approval for the tire
pressure monitor ........................... 411
Restarting ...................................... 411
Warning lamp ................................. 331
Warning message .......................... 410
Tires
Aspect ratio (definition) ................. 422
Average weight of the vehicle
occupants (definition) .................... 421
Bar (definition) ............................... 420
Changing a wheel .......................... 423
Characteristics .............................. 420
Checking ........................................ 401
Curb weight (definition) ................. 422
Definition of terms ......................... 420
Direction of rotatio n...................... 423
Display message ............................ 312
Distribution of the vehicle occu-
pants (definition) ............................ 423
DOT, Tire Identification Number
(TIN) ............................................... 420
DOT (Department of Transporta-
tion) (definition) ............................. 421
GAWR (Gross Axle Weight Rating)
(definition) ..................................... 421
GTW (Gross Trailer Weight) (defi-
nition) ............................................ 421
GVW (Gross Vehicle Weight) (def-
inition) ........................................... 421
GVWR (Gross Vehicle Weight Rat-
ing) (definition) .............................. 421
Important safety notes .................. 400
Increased vehicle weight due to
optional equipment (definition) ...... 421
Kilopascal (kPa) (definition) ........... 421
Labeling (overview) ........................ 417
Load bearing index (definition) ...... 422
Load index ..................................... 419
Load index (definition) ................... 421
M+S tire s....................................... 402
Maximum loaded vehicle weight
(definition) ..................................... 421 20
Index
Page 23 of 466
Maximum load on a tire (defini-
tion) ............................................... 422
Maximum permissible tire pres-
sure (definition) ............................. 422
Maximum tire load .........................4 19
Maximum tire load (definition) ....... 422
MOExtended tires .......................... 402
Optional equipment weight (defi-
nition) ............................................ 422
PSI (pounds per square inch) (def-
inition) .......................................... .422
Replacing ....................................... 423
Service life ..................................... 402
Sidewall (definition) ....................... 422
Speed rating (definition) ................ 421
Storing .......................................... .424
Structure and characteristics
(definition) ..................................... 420
Temperature .................................. 416
TIN (Tire Identification Number)
(definition) ..................................... 422
Tire bead (definition) ..................... .422
Tire pressure (definition) ................ 422
Tire pressures (recommended) ...... 421
Tire size (data) ............................... 428
Tire size designation, load-bearing capacity, speed rating .................... 417
Tire tread ....................................... 401
Tire tread (definition) ..................... 422
Total load limit (definition) ............. 423
Traction ......................................... 416
Traction (definition) ....................... 422
Tread wea r..................................... 416
TWR (permissible trailer drawbar
noseweight) (definition) ................. 422
Uniform Tire Quality Grading
Standards ...................................... 415
Uniform Tire Quality Grading
Standards (definition) .................... 421
Wear indicator (definition) ............. 423
Wheel and tire combination ........... 430
Wheel rim (definition) .................... 421
see Flat tire
Top Tether ............................................ 64
Towing a trailer Active Parking Assist ..................... 224
Axle load, permissibl e.................... 460
Cleaning the trailer tow hitch ......... 376 Coupling up a traile
r...................... 259
Decoupling a trailer ....................... 261
Driving tips .................................... 257
ESP ®
(Electronic Stability Pro-
gram) ............................................... 74
Important safety notes .................. 256
Installing the ball coupling ............. 258
Mounting dimensions .................... 459
Power supply ................................. 263
Pulling away with a traile r.............. 161
Removing the ball coupling ............ 262
Storing the ball coupling ................ 262
Trailer drive progra m..................... 249
Trailer load s................................... 460
Towing away
Important safety guidelines ........... 393
Installing the towing eye ................ 394
Removing the towing eye ............... 395
With both axles on the ground ....... 395
With the rear axle raised ................ 395
Tow-starting
Emergency engine starting ............ 396
Important safety notes .................. 393
Trailer coupling
see Towing a trailer
Trailer loads and drawbar nose-
weights ............................................... 262
Trailer towing Active Blind Spot Assist ................. 244
Active Lane Keeping Assist ............ 247
Blind Spot Assist ............................ 239
PARKTRONIC ................................. 219
Permissible trailer loads and
drawbar noseweights ..................... 262
Transfer case ..................................... 177
Transmission see Automatic transmission
Transmission position display ......... 168
Transmission position display
(DIRECT SELECT lever) ...................... 168
Transporting the vehicle .................. 395
Traveling uphill Brow of hill ..................................... 195
Driving downhill ............................. 195
Maximum gradient-climbing capa-
bility ............................................... 195 Index
21
Page 24 of 466
Trim pieces (cleaning instruc-
tions)
.................................................. 378
Trip computer (on-board com-
puter) .................................................. 269
Trip odometer Calling up ....................................... 269
Resetting (on-board computer) ...... 270
Trunk
see Tailgate
Turn signals
Display message ............................ 297
Switching on/off ........................... 123
TWR (Tongue Weight Rating) (defi-
nition) ................................................. 422
Type identification plate see Vehicle identification plate U
Unlocking Emergency unlocking ....................... 88
From inside the vehicle (central
unlocking button) ............................. 87 V
Vanity mirror (in the sun visor) ........ 347
Vehicle Correct use ...................................... 29
Data acquisition ............................... 30
Display message ............................ 315
Equipment ....................................... 25
Individual settings .......................... 277
Limited Warranty ............................. 30
Loading .......................................... 412
Locking (in an emergency) ............... 88
Locking (SmartKey) .......................... 80
Lowering ........................................ 428
Maintenance .................................... 26
Parking for a long period ................ 185
Pulling away ................................... 160
Raising ........................................... 425
Reporting problems ......................... 29
Securing from rolling away ............ 424
Towing away .................................. 393
Transporting .................................. 395
Unlocking (in an emergency) ........... 88 Unlocking (SmartKey) ...................... 80
Vehicle data ................................... 456
Vehicle battery
see Battery (vehicle)
Vehicle data ....................................... 456
Vehicle data (off-road driving) Approach/departure angle ............ 458
Fording depth ................................ 457
Maximum gradient climbing abil-
ity .................................................. 458
Vehicle dimensions ........................... 456
Vehicle emergency locking ................ 88
Vehicle identification number see VIN
Vehicle identification plate .............. 446
Vehicle level AMG adaptive sport suspension
system ........................................... 216
Vehicle level (display message) ....... 304
Vehicle maintenance see ASSYST PLUS
Vehicle tool kit .................................. 382
Video Operating the DVD ........................ .273
VIN ...................................................... 446 W
Warning and indicator lamps ABS ................................................ 321
Brakes .......................................... .320
Check Engine ................................. 327
Coolant .......................................... 328
Distance warning ........................... 330
DISTRONIC PLUS ........................... 330
ESP ®
.............................................. 323
ESP ®
OFF ....................................... 324
Overview .......................................... 36
PASSENGER AIR BAG OFF .............. .45
Reserve fuel .................................. .327
Restraint system ............................ 326
Seat belt ........................................ 318
Tire pressure monitor .................... 331
Warranty .............................................. 25
Washer fluid Display message ............................ 316 22
Index
Page 26 of 466
Protection of the environment
General notes
H
Environmental note
Daimler's declared policy is one of compre-
hensive environmental protection.
The objectives are for the natural resources
that form the basis of our existence on this
planet to be used sparingly and in a manner
that takes the requirements of both nature
and humanity into account.
You too can help to protect the environment
by operating your vehicle in an environmen-
tally responsible manner.
Fuel consumption and the rate of engine,
transmission, brake and tire wear are affected by these factors:
R operating conditions of your vehicle
R your personal driving style
You can influence both factors. You should
bear the following in mind:
Operating conditions:
R avoid short trips as these increase fuel con-
sumption.
R always make sure that the tire pressures
are correct.
R do not carry any unnecessary weight.
R remove roof racks once you no longer need
them.
R a regularly serviced vehicle will contribute
to environmental protection. You should
therefore adhere to the service intervals.
R always have service work carried out at a
qualified specialist workshop.
Personal driving style:
R do not depress the accelerator pedal when
starting the engine.
R do not warm up the engine when the vehicle
is stationary.
R drive carefully and maintain a safe distance
from the vehicle in front.
R avoid frequent, sudden acceleration and
braking. R
change gear in good time and use each gear
only up to 00C3of its maximum engine speed.
R switch off the engine in stationary traffic.
R keep an eye on the vehicle's fuel consump-
tion. Environmental concerns and recom-
mendations
Wherever the operating instructions require
you to dispose of materials, first try to regen-
erate or re-use them. Observe the relevant
environmental rules and regulations when
disposing of materials. In this way you will
help to protect the environment. Genuine Mercedes-Benz parts
H
Environmental note
Daimler AG also supplies reconditioned major
assemblies and parts which are of the same
quality as new parts. They are covered by the same Limited Warranty entitlements as new
parts.
! Air bags and Emergency Tensioning Devi-
ces, as well as control units and sensors for these restraint systems, may be installed inthe following areas of your vehicle:
R doors
R door pillars
R door sills
R seats
R cockpit
R instrument cluster
R center console
Do not install accessories such as audio
systems in these areas. Do not carry out
repairs or welding. You could impair the
operating efficiency of the restraint sys-
tems.
Have aftermarket accessories installed at a qualified specialist workshop. 24
Introduction
Page 38 of 466
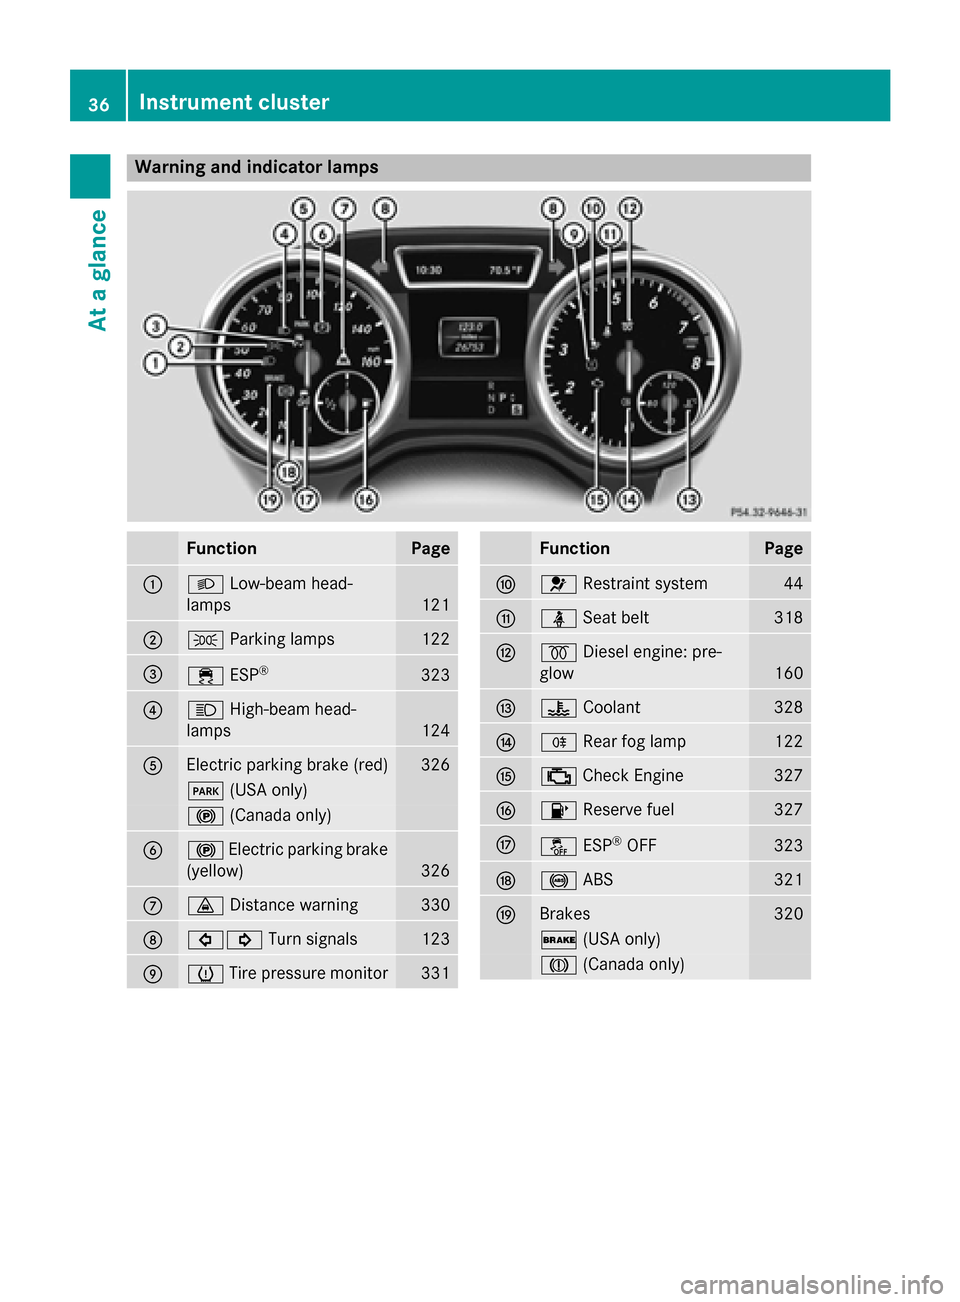
Warning and indicator lamps
Function Page
0043
0058
Low-beam head-
lamps 121
0044
0060
Parking lamps 122
0087
00E5
ESP® 323
0085
0057
High-beam head-
lamps 124
0083
Electric parking brake (red) 326
0049
(USA only) 0024
(Canada only) 0084
0024
Electric parking brake
(yellow) 326
006B
00BA
Distance warning 330
006C
003E003D
Turn signals 123
006D
0077
Tire pressure monitor 331 Function Page
006E
0075
Restraint system 44
006F
00E9
Seat belt 318
0070
0028
Diesel engine: pre-
glow 160
0071
00AC
Coolant 328
0072
005E
Rear fog lamp 122
0073
00B9
Check Engine 327
0074
00B6
Reserve fuel 327
0075
00BB
ESP®
OFF 323
0076
0025
ABS 321
0077
Brakes 320
0027
(USA only) 004D
(Canada only) 36
Instrument clusterAt a glance
Page 181 of 466
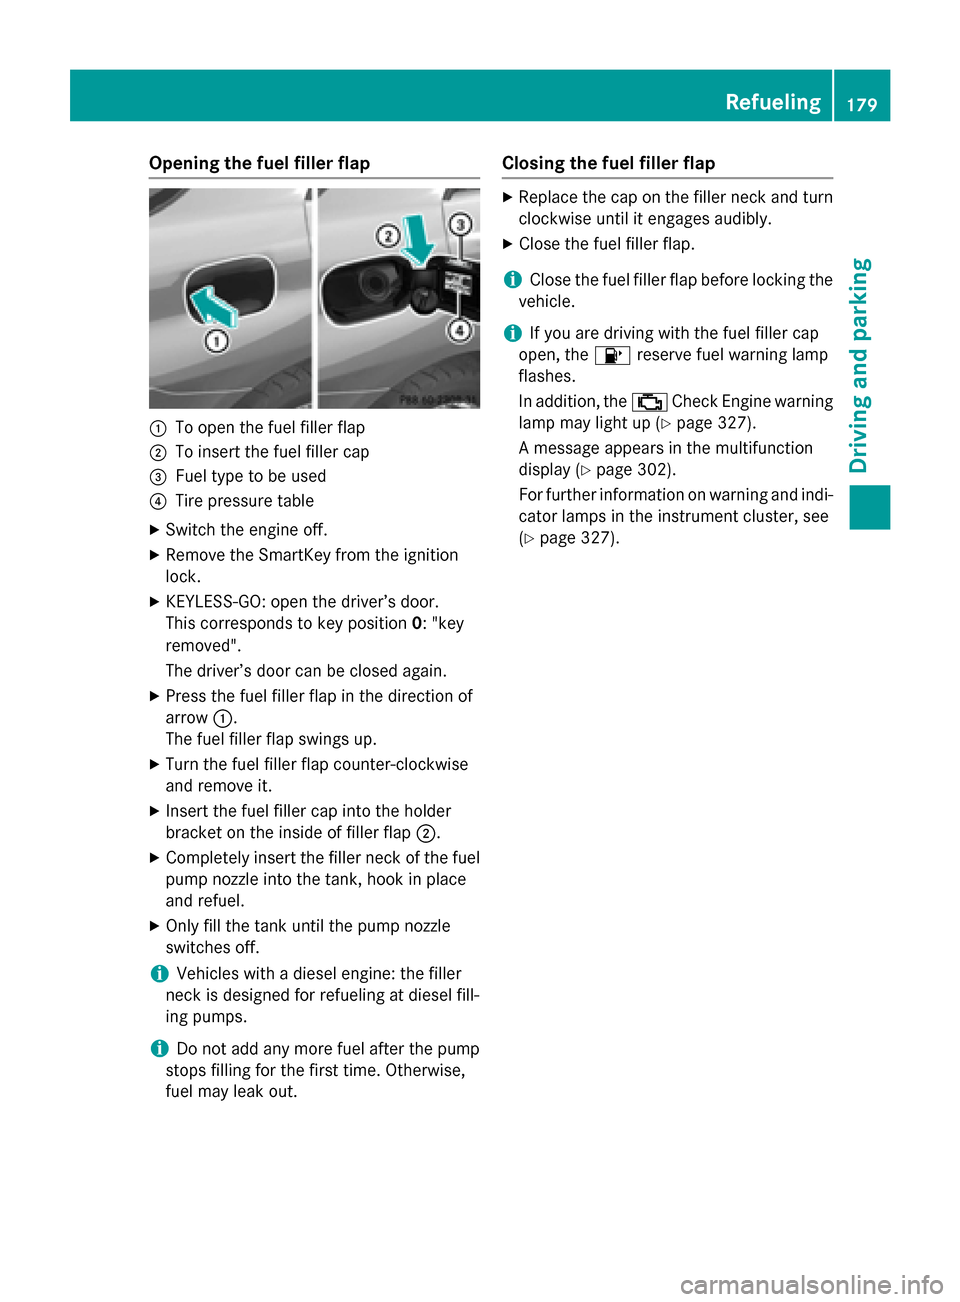
Opening the fuel filler flap
0043
To open the fuel filler flap
0044 To insert the fuel filler cap
0087 Fuel type to be used
0085 Tire pressure table
X Switch the engine off.
X Remove the SmartKey from the ignition
lock.
X KEYLESS-GO: open the driver’s door.
This corresponds to key position 0: "key
removed".
The driver’s door can be closed again.
X Press the fuel filler flap in the direction of
arrow 0043.
The fuel filler flap swings up.
X Turn the fuel filler flap counter-clockwise
and remove it.
X Insert the fuel filler cap into the holder
bracket on the inside of filler flap 0044.
X Completely insert the filler neck of the fuel
pump nozzle into the tank, hook in place
and refuel.
X Only fill the tank until the pump nozzle
switches off.
i Vehicles with a diesel engine: the filler
neck is designed for refueling at diesel fill-
ing pumps.
i Do not add any more fuel after the pump
stops filling for the first time. Otherwise,
fuel may leak out. Closing the fuel filler flap X
Replace the cap on the filler neck and turn
clockwise until it engages audibly.
X Close the fuel filler flap.
i Close the fuel filler flap before locking the
vehicle.
i If you are driving with the fuel filler cap
open, the 00B6reserve fuel warning lamp
flashes.
In addition, the 00B9Check Engine warning
lamp may light up (Y page 327).
A message appears in the multifunction
display (Y page 302).
For further information on warning and indi-
cator lamps in the instrument cluster, see
(Y page 327). Refueling
179Driving and parking Z
Page 188 of 466
X
Visit a qualified specialist workshop and
seek advice. Driving tips
General notes
Important safety notes G
WARNING
If you switch off the ignition while driving,
safety-relevant functions are only available
with limitations, or not at all. This could affect, for example, the power steering and the brake
boosting effect. You will require considerably
more effort to steer and brake. There is a risk of an accident.
Do not switch off the ignition while driving. G
WARNING
If you operate mobile communication equip-
ment while driving, you will be distracted from traffic conditions. You could also lose controlof the vehicle. There is a risk of an accident.
Only operate this equipment when the vehicleis stationary.
Observe the legal requirements for the coun- try in which you are driving. Some jurisdic-
tions prohibit the driver from using a mobile
phone while driving a vehicle.
If you make a call while driving, always use
hands-free mode. Only operate the telephone
when the traffic situation permits. If you are
unsure, pull over to a safe location and stop
before operating the telephone.
Bear in mind that at a speed of only 30 mph
(approximately 50 km/h) the vehicle covers a
distance of 44 ft (approximately 14 m) per
second. Drive sensibly – save fuel Observe the following tips to save fuel:
X The tires should always be inflated to the
recommended tire pressure.
X Remove unnecessary loads.
X Remove roof carriers when they are not
needed.
X Warm up the engine at low engine speeds.
X Avoid frequent acceleration or braking.
X Have all maintenance work carried out as
indicated by the service intervals in the
Maintenance Booklet or by the service
interval display.
Fuel consumption also increases when driv-
ing in cold weather, in stop-start traffic and in
hilly terrain.
Drinking and driving G
WARNING
Drinking and driving and/or taking drugs and driving are very dangerous combinations.
Even a small amount of alcohol or drugs can
affect your reflexes, perceptions and judg-
ment.
The possibility of a serious or even fatal acci-
dent is greatly increased when you drink or
take drugs and drive.
Do not drink or take drugs and drive or allow
anyone to drive who has been drinking or tak-
ing drugs.
Emission control G
WARNING
Combustion engines emit poisonous exhaust
gases such as carbon monoxide. Inhaling
these exhaust gases leads to poisoning. There is a risk of fatal injury. Therefore never leave
the engine running in enclosed spaces with-
out sufficient ventilation.
Certain engine systems are designed to keep
the level of poisonous components in exhaust fumes within legal limits. 186
Driving tipsDriving and parking
Page 189 of 466
These systems only work at peak efficiency if
they are serviced exactly in accordance with
the manufacturer's specifications. For this
reason, all work on the engine must be carried out by qualified and authorized Mercedes-
Benz technicians.
The engine settings must not be changed
under any circumstances. Furthermore, all
specific service work must be carried out at
regular intervals and in accordance with the
Mercedes-Benz service requirements. Details
can be found in the Maintenance Booklet. ECO display
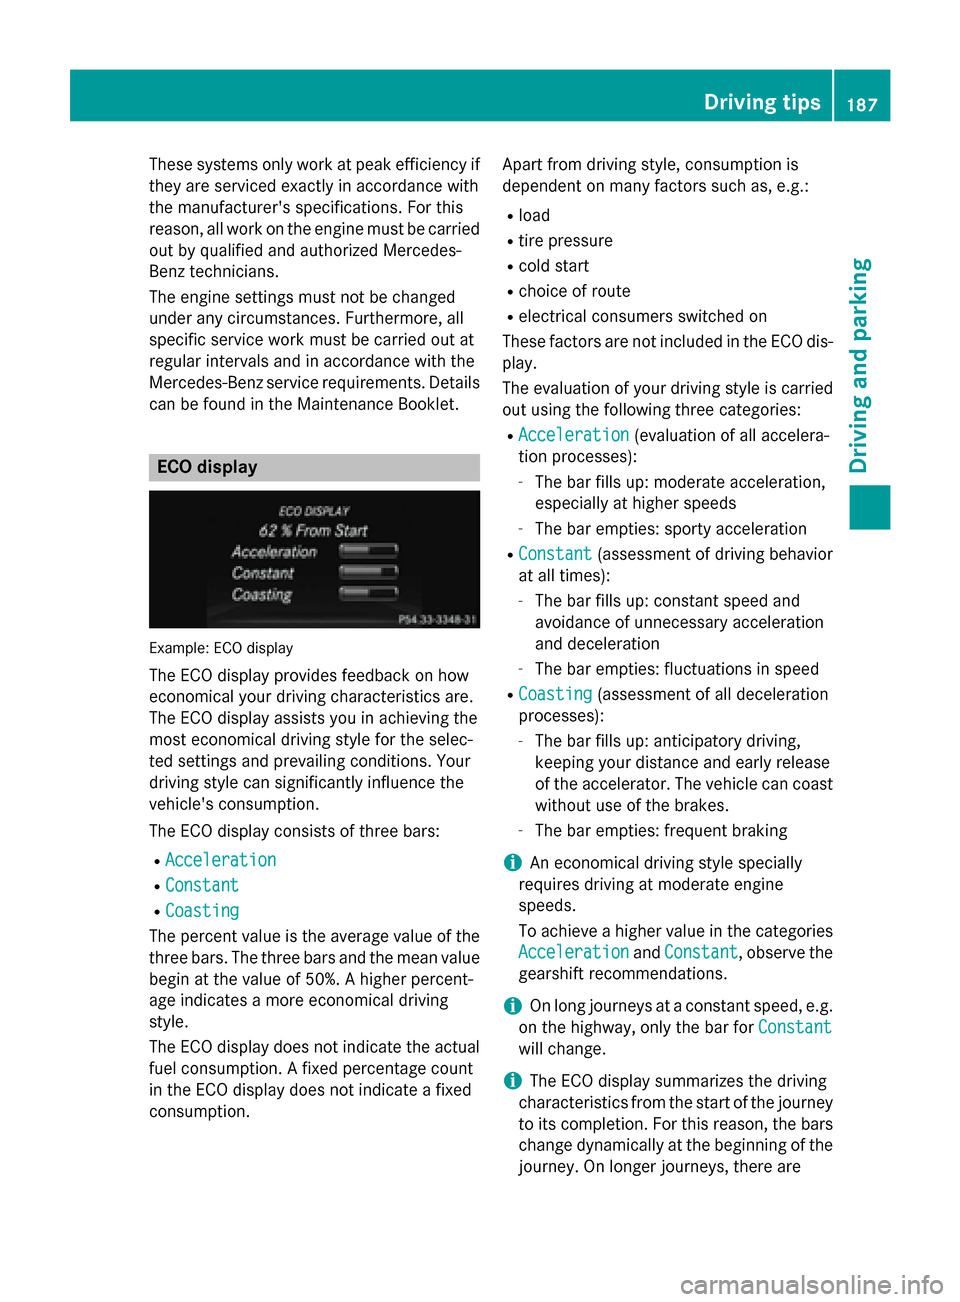
Example: ECO display
The ECO display provides feedback on how
economical your driving characteristics are.
The ECO display assists you in achieving the
most economical driving style for the selec-
ted settings and prevailing conditions. Your
driving style can significantly influence the
vehicle's consumption.
The ECO display consists of three bars:
R Acceleration
Acceleration
R Constant Constant
R Coasting
Coasting
The percent value is the average value of the three bars. The three bars and the mean value
begin at the value of 50%. A higher percent-
age indicates a more economical driving
style.
The ECO display does not indicate the actual fuel consumption. A fixed percentage count
in the ECO display does not indicate a fixed
consumption. Apart from driving style, consumption is
dependent on many factors such as, e.g.:
R load
R tire pressure
R cold start
R choice of route
R electrical consumers switched on
These factors are not included in the ECO dis-
play.
The evaluation of your driving style is carried
out using the following three categories:
R Acceleration
Acceleration (evaluation of all accelera-
tion processes):
- The bar fills up: moderate acceleration,
especially at higher speeds
- The bar empties: sporty acceleration
R Constant Constant (assessment of driving behavior
at all times):
- The bar fills up: constant speed and
avoidance of unnecessary acceleration
and deceleration
- The bar empties: fluctuations in speed
R Coasting Coasting (assessment of all deceleration
processes):
- The bar fills up: anticipatory driving,
keeping your distance and early release
of the accelerator. The vehicle can coast
without use of the brakes.
- The bar empties: frequent braking
i An economical driving style specially
requires driving at moderate engine
speeds.
To achieve a higher value in the categories
Acceleration
Acceleration andConstant Constant, observe the
gearshift recommendations.
i On long journeys at a constant speed, e.g.
on the highway, only the bar for Constant
Constant
will change.
i The ECO display summarizes the driving
characteristics from the start of the journey
to its completion. For this reason, the bars
change dynamically at the beginning of the
journey. On longer journeys, there are Driving tips
187Driving and parking Z
Page 195 of 466
Check the engine oil level. The engine oil
warning lamp warning must not be ignored. Continuing the journey while the symbol is
displayed could lead to engine damage.
X Engine oil level: check the engine oil level
and add oil if necessary.
When driving on steep gradients, the
engine oil level must be sufficiently high to
ensure a correct oil supply in the vehicle.
X DEF tank (BlueTEC vehicles): check the
level and top up if necessary (Y page 180).
X Tire-changing tool kit: check that the jack
is working and make sure you have the lug
wrench, a robust tow cable and a folding
spade in the vehicle.
X Wheels and tires: check the tire tread
depth and tire pressure.
X Check for damage and remove any foreign
objects, e.g. small stones, from the
wheels/tires.
X Replace any missing valve caps.
X Replace dented or damaged wheels.
X Rims: dented or bent rims can result in a
loss of tire pressure and damage the tire
bead. Therefore, check your rims before
driving off-road and replace them as
required.
Checklist after driving off-road !
If you detect damage to the vehicle after
driving off-road, have the vehicle checked
immediately at a qualified specialist work-
shop.
X Vehicles with the ON&OFFROAD pack-
age: activate the on-road program
(Y page 251).
X Deactivate the LOW RANGE off-road gear
(Y page 253).
X Deactivate DSR (Y page 250).
X Vehicles with the AIRMATIC package:
lower the vehicle to a ride height suitable
for the road conditions, e.g. to the high-
way/high-speed level. X
Clean the headlamps and rear lights and
check for damage.
X Clean the front and rear license plates.
X Clean the wheels/tires with a water jet and
remove any foreign objects.
X Clean the wheels, wheel housings and the
vehicle underside with a water jet; check
for any foreign objects and damage.
X Check whether twigs or other parts of
plants have become trapped. These
increase the risk of fire and can damage
fuel pipes, brake hoses or the rubber bel-
lows of the axle joints and propeller shafts.
X After the trip, examine without fail the
entire undercarriage, wheels, tires, brakes,
bodywork structure, steering, chassis and
exhaust system for damage.
X After driving for extended periods across
sand, mud, gravel, water or in similarly dirty
conditions, have the brake discs, wheels,
brake pads/linings and axle joints checked
and cleaned.
X If you detect strong vibrations after off-road
travel, check for foreign objects in the
wheels and drive train and remove them if
necessary. Foreign objects can disturb the
balance and cause vibrations.
Driving over rough terrain places greater
demands on your vehicle than driving on nor-
mal roads. After driving off-road, check the
vehicle. This allows you to detect damage
promptly and reduce the risk of an accident to
yourself and other road users.
Driving on sand Observe the following rules when driving on
sand:
R Vehicles with the ON&OFFROAD pack-
age: select off-road program 1
(Y page 251).
R Vehicles with the AIRMATIC package:
select a raised vehicle level.
R Avoid high engine speeds. Driving tips
193Driving and pa rking Z
Page 223 of 466
Active Parking Assist may possibly indicate
parking spaces which are not suitable for
parking, for example:
R where parking or stopping is prohibited
R in front of driveways or entrances and exits
R on unsuitable surfaces
Parking tips:
R On narrow roads, drive as close to the park-
ing space as possible.
R Parking spaces that are littered or over-
grown might be identified or measured
incorrectly.
R Parking spaces that are partially occupied
by trailer drawbars might not be identified
as such or be measured incorrectly.
R Snowfall or heavy rain may lead to a parking
space being measured inaccurately.
R Pay attention to the PARKTRONIC
(Y page 218 )warning messages during the
parking procedure.
R At any time, you can intervene in the steer-
ing procedure to correct it. Active Parking
Assist will then be canceled.
R When transporting a load which protrudes
from your vehicle, you should not use
Active Parking Assist.
R Never use Active Parking Assist when snow
chains are installed.
R Make sure that the tire pressures are
always correct. This has a direct influence
on the parking characteristics of the vehi-
cle.
Use Active Parking Assist for parking spaces:
R that are parallel to the direction of travel
R that are on straight roads, not bends
R that are on the same level as the road, e.g.
not on the pavement
Detecting parking spaces Objects located above the height range of
Active Parking Assist will not be detected
when the parking space is measured. These
are not taken into account when the parking procedure is calculated, e.g. overhanging
loads, tail sections or loading ramps of goods
vehicles. G
WARNING
If there are objects above the detection range, Active Parking Assist may turn prematurely.
You may cause a collision as a result. There is
a risk of an accident.
If there are objects above the detection range,
stop and deactivate Active Parking Assist.
For further information on the detection
range (Y page 217).
Active Parking Assist does not support you
with parking spaces parallel to the direction
of travel if:
R the parking space is on a curb
R the system reads the parking space as
being blocked, for example by foliage or
grass paving blocks
R the area is too small for the vehicle to
maneuver into
R the parking space is bordered by an obsta-
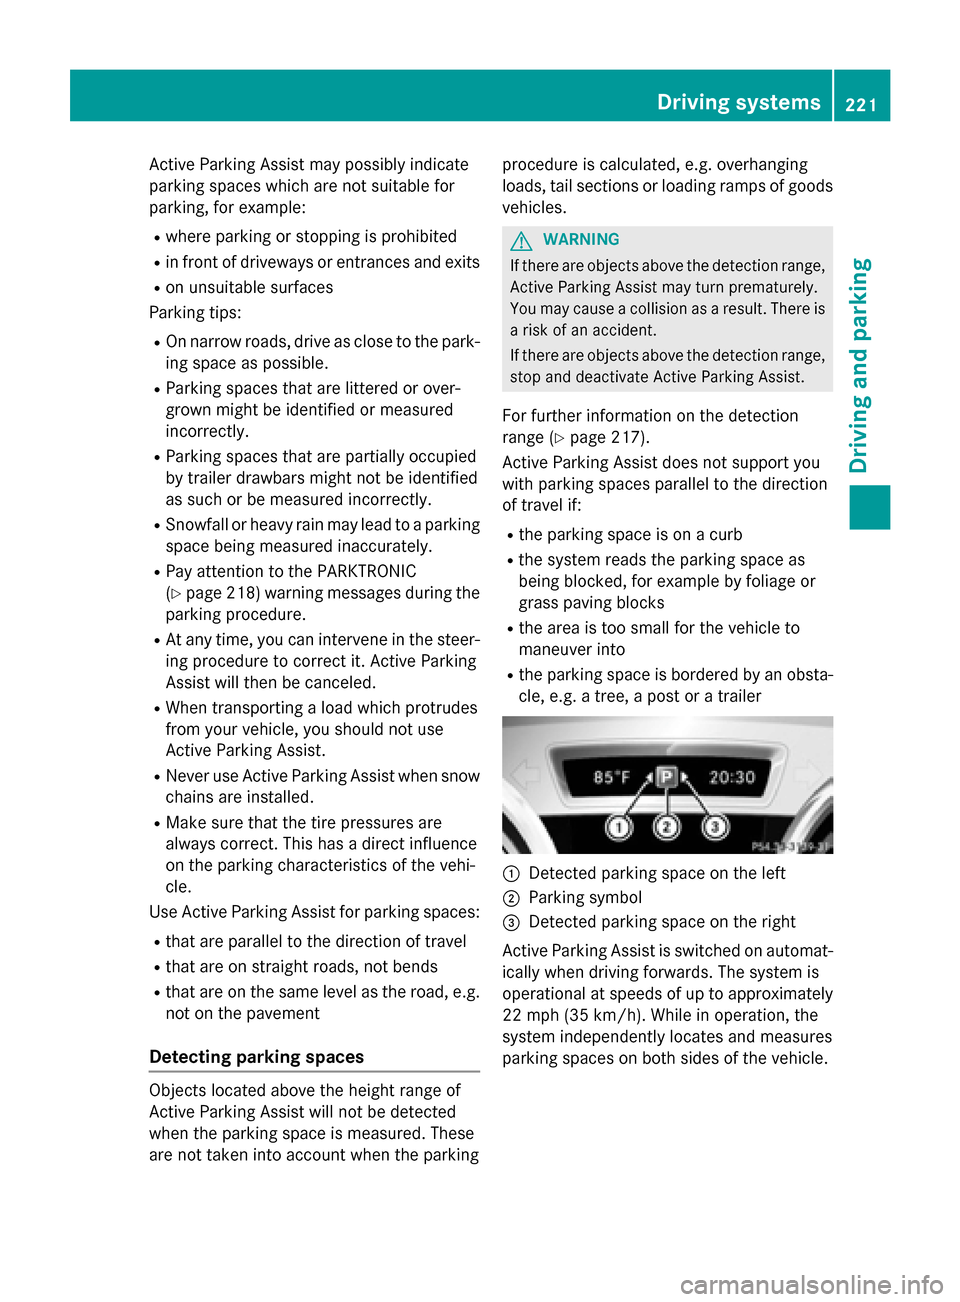
cle, e.g. a tree, a post or a trailer 0043
Detected parking space on the left
0044 Parking symbol
0087 Detected parking space on the right
Active Parking Assist is switched on automat-
ically when driving forwards. The system is
operational at speeds of up to approximately 22 mph (35 km/h). While in operation, the
system independently locates and measures
parking spaces on both sides of the vehicle. Driving systems
221Driving and parking Z