open bonnet MERCEDES-BENZ M-CLASS SUV 2011 Owners Manual
[x] Cancel search | Manufacturer: MERCEDES-BENZ, Model Year: 2011, Model line: M-CLASS SUV, Model: MERCEDES-BENZ M-CLASS SUV 2011Pages: 389, PDF Size: 9.22 MB
Page 31 of 389
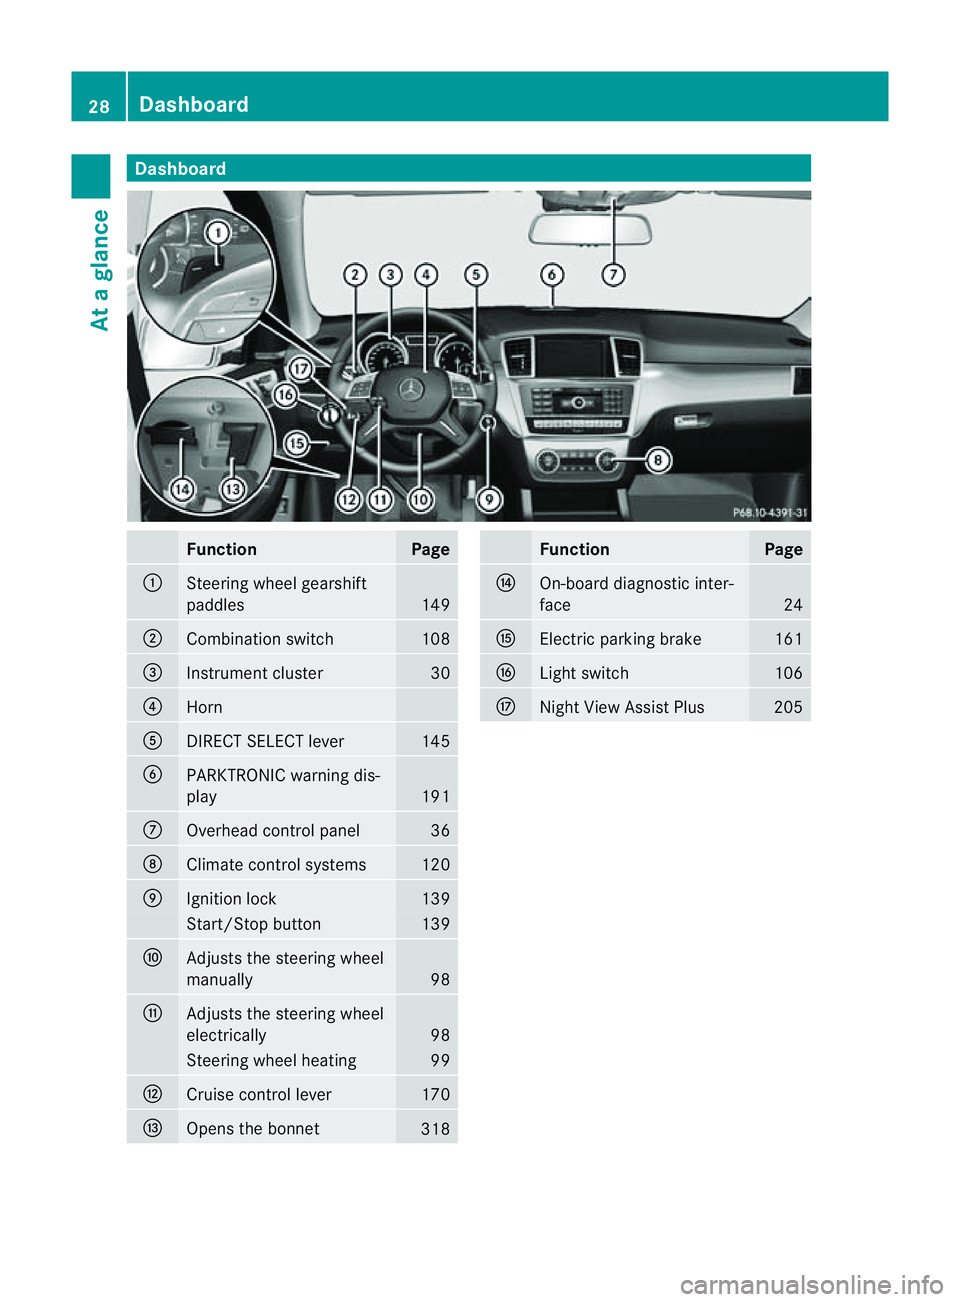
Dashboard
Function Page
:
Steerin
gwhee lgearshift
paddles 149
;
Combination switch 108
=
Instrumen
tcluster 30
?
Horn
A
DIRECT SELECT
lever 145
B
PARKTRONIC warnin
gdis-
play 191
C
Overhead contro
lpanel 36
D
Climat
econtrol systems 120
E
Ignition lock 139
Star
t/Stop button 139
F
Adjust
sthe steerin gwheel
ma nually 98
G
Adjust
sthe steerin gwheel
electrically 98
Steerin
gwhee lheating 99
H
Cruis
econtrol lever 170
I
Opens th
ebonnet 318 Fu
nction Page
J
On-boar
ddiagn ostic inter-
face 24
K
Electric parking brake 161
L
Light switch 106
M
Night Vie
wAssist Plus 20528
DashboardAt
ag lance
Page 32 of 389
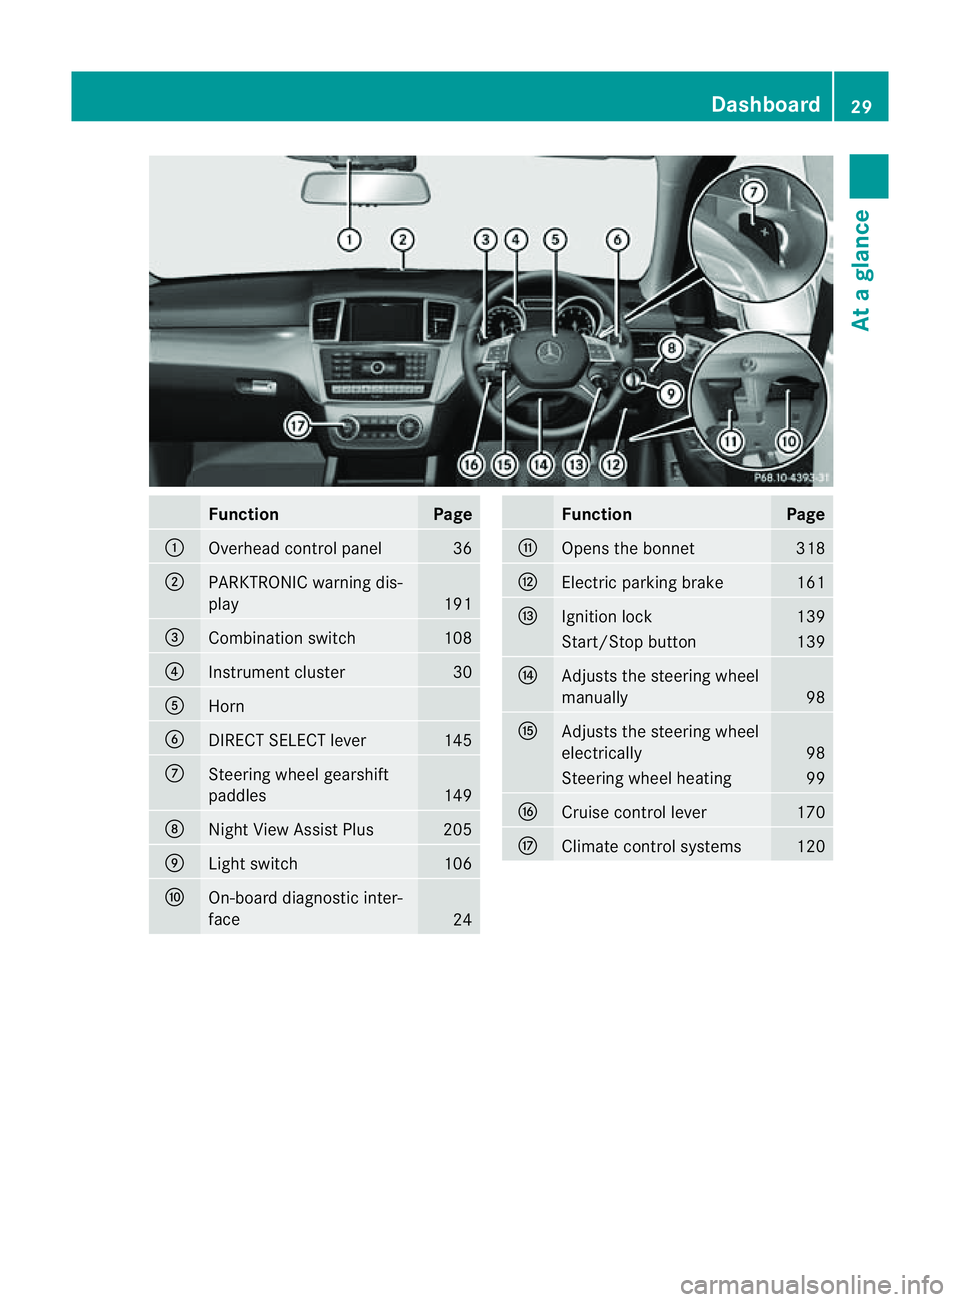
Function Page
:
Overhead con
trol panel 36
;
PARKTRONI
Cwarning dis-
play 191
=
Combination switch 108
?
Instrument cluster 30
A
Horn
B
DIRECT SELECT lever 145
C
Steerin
gwheel gearshift
paddles 149
D
Nigh
tView Assist Plus 205
E
Light switch 106
F
On-board diagnostic inter-
face 24 Function Page
G
Opens the bonnet 318
H
Electric parking brake 161
I
Ignition lock 139
Start/Stop button 139
J
Adjusts the steerin
gwheel
manually 98
K
Adjusts the steeri
ngwheel
electrically 98
Steerin
gwheel heati ng 99
L
Cruise control lever 170
M
Climate control systems 120Dashbo
ard
29Atag lance
Page 71 of 389
The radar sensor system must be switched off
using the on-boar dcomputer in the vicinit yof
radio telescop efacilities in the following vehi-
cles:
R vehicles without COMAND Online and nav-
igation
R vehicles without Audio 20 and Becker ®
MAP PILOT
R vehicles for Australia
Information about switching off the rad ar sen-
so rs ystem using the on-board computer can
be found in the "On-board computer and dis-
plays “section (Y page 249).
For PRE- SAFE®
Brake to assist you whe ndriv-
ing ,the radar sensor system must be
switc hed on (Y page 249) an dbeopera-
tional.
Followin gdamage to the fron tend of the vehi-
cle ,havet he configuration and operation of
the radar sensors checked at aqualified spe-
cialist workshop. This also applie stoc olli-
sions at slow speeds where ther eisnovisible
damage to the fron tofthe vehicle. STEE
RCONTROL
The steering assistan tSTEE RCONTROL helps
you by transmittin ganoticeable steering
force to the steering wheel in the direction
required for vehicle stabilisation.
This steering assistance is provided in partic-
ular if:
R both right wheels or both left wheels ar eon
aw et or slippery road surface when you
brake
R the vehicle starts to skid
You have control over the steerin gatall
times. G
WARNING
If there is an ESP ®
malfunction, you will not
receiv eany steering assistance from the
STEER CONTROL. The steering continues to
function with steering assistance. Anti-theft systems
Immobiliser
The immobilise rprevents your vehicl efrom
being starte dwithout the correct key.
X To activate with the key: removethe key
from the ignition lock.
X To activate wit hKEYLESS-GO: switch the
ignition off and open the driver' sdoor.
X To deactivate: switchont he ignition.
i The immobiliser is always deactivated
when you star tthe engine. ATA (Anti-Thef
tAlarm system)
Av isual and audible alarm is triggered if the
alarm system is prime dand you ope n:
R ad oor
R the vehicle with the emergency key ele-
ment
R the tailgate
R the bonnet
The alar misnot switched off ,even if you
close th eopen door that has triggere dit, for
example. X
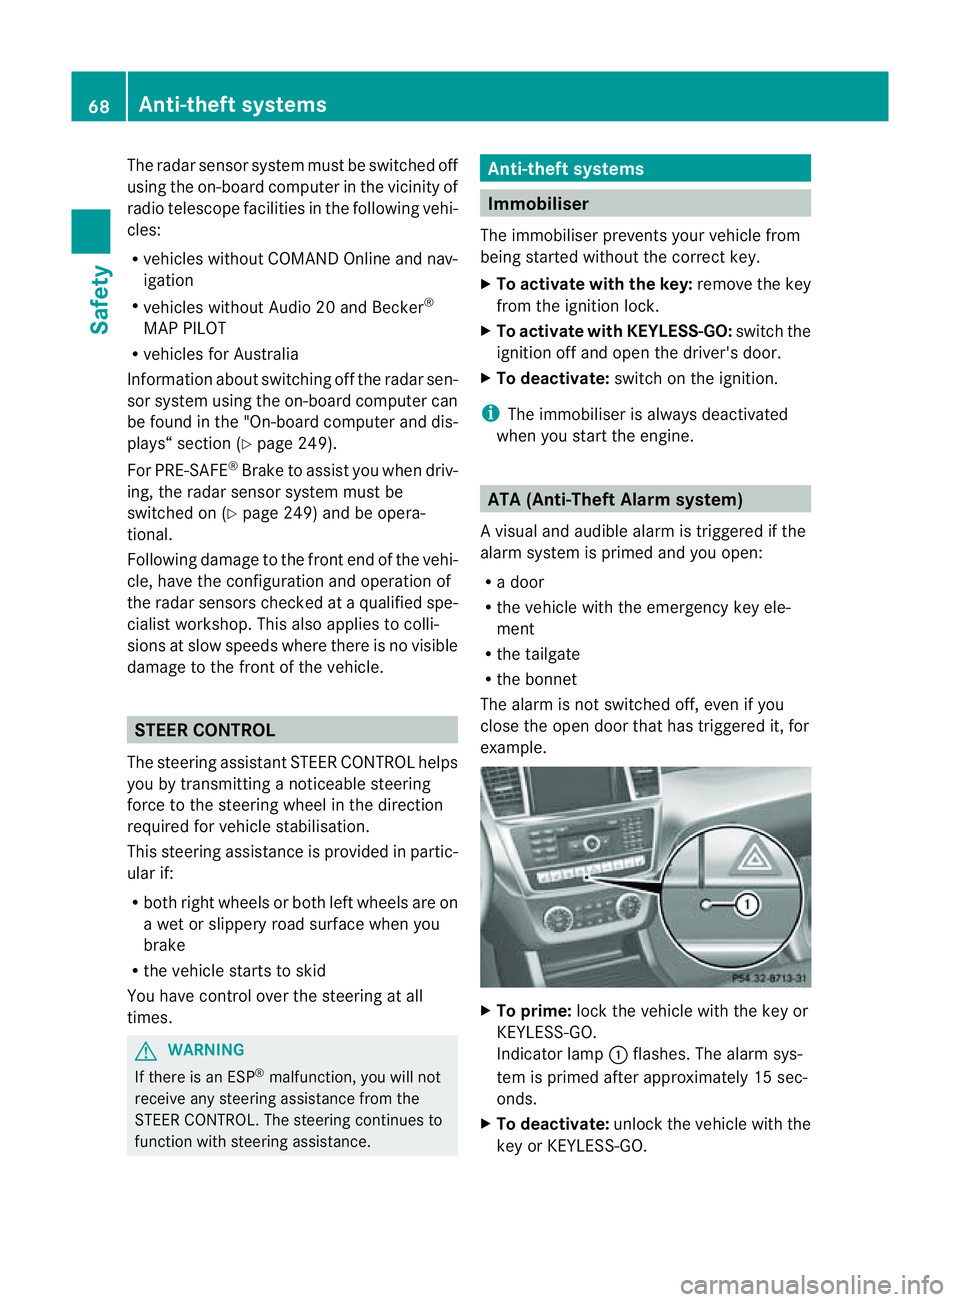
To prime: lock the vehicle with the key or
KEYLESS-GO.
Indicator lamp :flashes. The alarm sys-
tem is primed after approximately 15 sec-
onds.
X To deactivate: unlock the vehicle with the
key or KEYL ESS-GO.68
Anti-thef
tsystemsSafety
Page 118 of 389
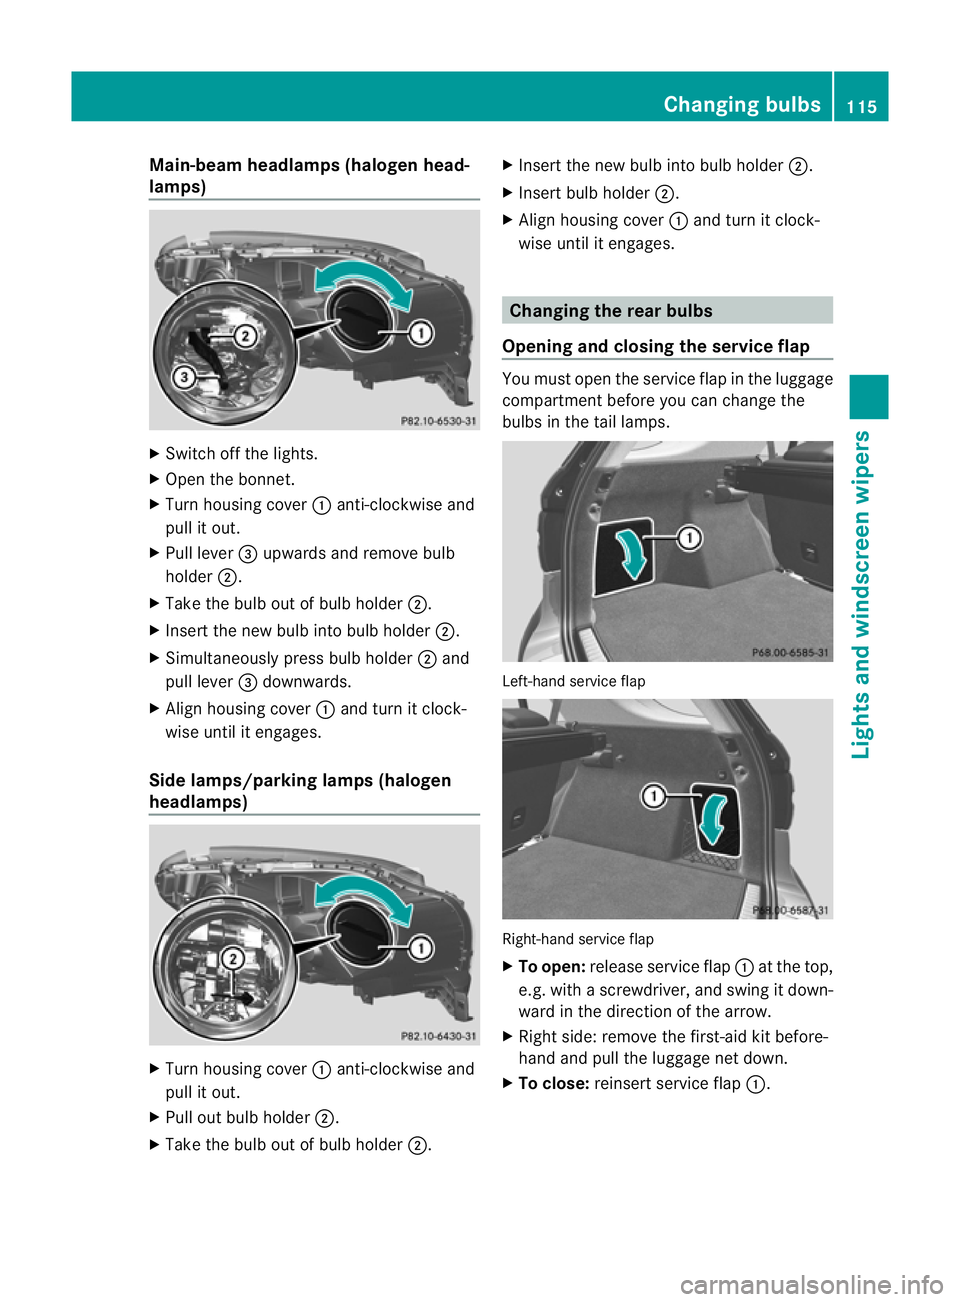
Main-beam headlamps (hal
ogen head-
lamps) X
Switch off the lights.
X Open the bonnet.
X Turn housing cover :anti-clockwis eand
pul lito ut.
X Pul llever =upwards and remove bulb
holder ;.
X Take the bulb out of bulb holder ;.
X Insert the new bulb into bulb holder ;.
X Simultaneously press bulb holder ;and
pull lever =downwards.
X Align housing cover :and tur nitclock-
wis euntil it enga ges.
Side lamps/parking lamps (halogen
headlamps) X
Tur nhousing cover :anti-clockwise and
pull it out.
X Pull out bulb holder ;.
X Take the bulb out of bulb holder ;.X
Insert the new bulb int obulbh older ;.
X Insert bulb holder ;.
X Align housing cover :and tur nitclock-
wis euntil it enga ges. Changing th
erear bulbs
Opening and closin gthe serv icef lap You must open the service flap in the luggage
compartm entb efor eyou can change the
bulbs in the tail lamps. Left-hand service flap
Right-han
dservice flap
X To open: release servic eflap :at the top,
e.g. with ascrewdriver, and swing it do wn-
ward in the direction of the arrow.
X Right side :remov ethe first-ai dkit before-
hand and pull the luggage net down.
X To close: reinsertservice flap :. Changing bulbs
115Lightsand windscreen wipers Z
Page 120 of 389
position
,the rain senso rismore sensitive
than in the Äposition ,causing the wind-
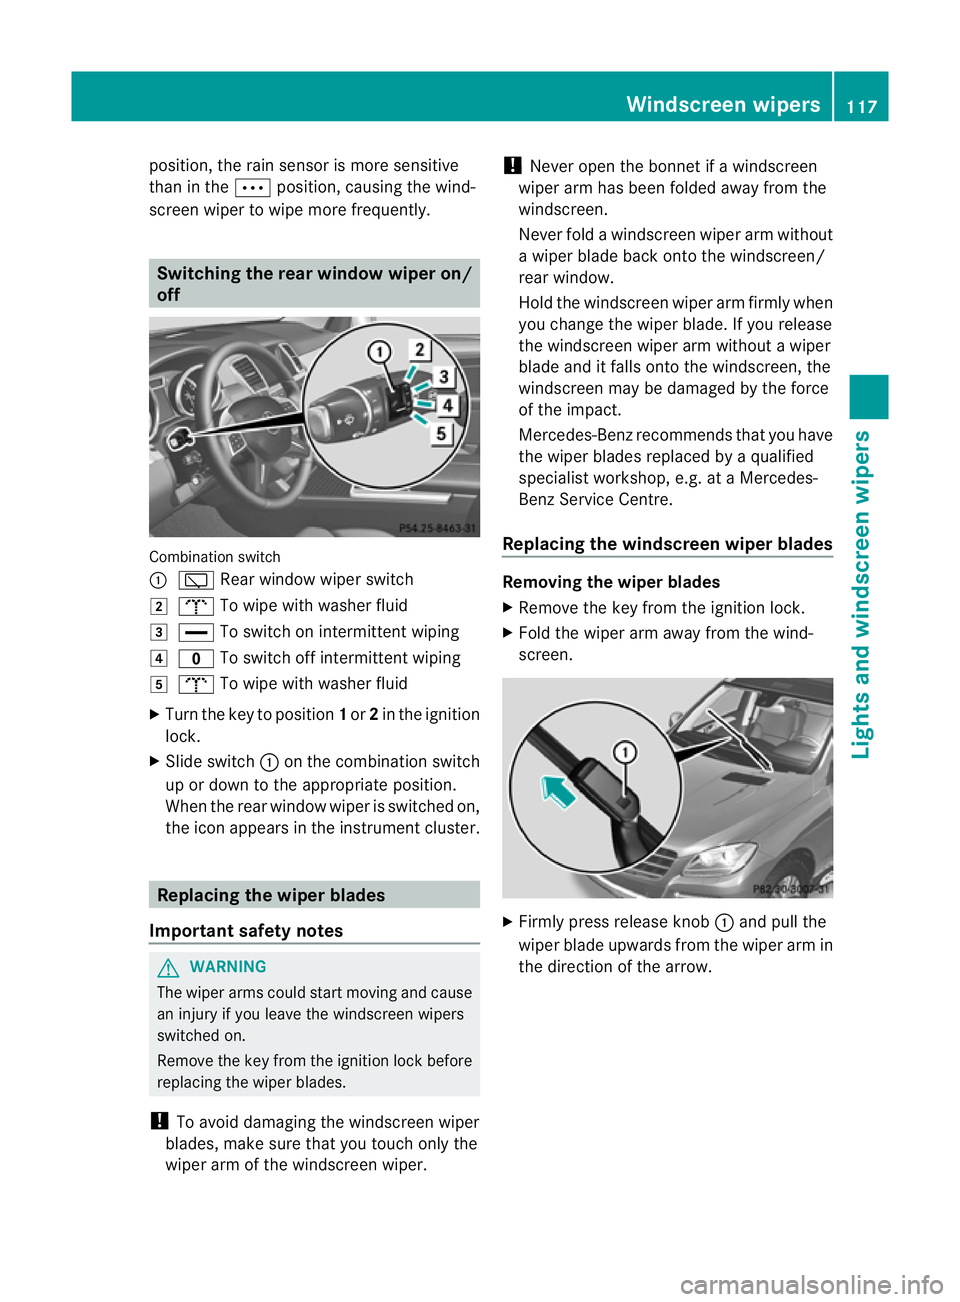
screen wiper to wipe more frequently. Switching the rear window wiper on/
off Combination switch
:
è Rear window wiper switch
2 b To wipe with washe rfluid
3 ° To switch on intermittent wiping
4 e To switch off intermittent wiping
5 b To wipe with washer fluid
X Turn the key to position 1or 2in the ignition
lock.
X Slide switch :on the combination switch
up or down to the appropriate position.
When the rear window wiper is switched on,
the icon appears in the instrument cluster. Replacing the wiper blades
Import ants afety notes G
WARNING
Th ew iper arm scould star tmovin gand cause
an injury if you leave the windscreen wipers
switched on.
Remove the key from the ignition lock before
replacing the wipe rblades.
! To avoid damaging the windscreen wiper
blades, make sure that you touch only the
wiper arm of the windscreen wiper. !
Never open the bonnet if awindscreen
wiper arm has been folded away from the
windscreen.
Never fold awindscreen wiper arm without
aw iper blade back onto the windscreen/
rear window.
Hold the windscreen wiper arm firmly when
you change the wiper blade .Ifyou release
the windscreen wiper ar mwithout awiper
blade and it falls ont othe windscreen ,the
windscreen ma ybedamaged by the force
of the impact.
Mercedes-Benz recommends that you have
the wiper blades replaced by aqualified
specialist workshop, e.g. at aMercedes-
Ben zServic eCentre.
Replacin gthe windscreen wiper blades Removin
gthe wiper blades
X Remov ethe key fro mtheignition lock.
X Fold th ewiper arm away from th ewind-
screen. X
Firmly press release knob :and pull the
wiper blade upward sfromt he wi per arm in
the direction of the arrow. Windscreen wipers
117Lightsand windscr een wipers Z
Page 138 of 389
Displa
ymessages Possible causes/consequences and
M Solutions
If th
eauxiliar yheating is faulty:
X Hav ethe auxil iaryh eatin gchecked at aqualified specialist
workshop. Adjusting th
eair vents Important safet
ynotes G
WARNING
Ver yhot or ver ycold ai rcan flo wfromt he air
vents. This coul dcause burns or frostbite to
bare skin in the immediate vicinity of the
vents. Keep bare skin away from these air
outlets. If necessary, direct the airflow away
to ad ifferent area of the vehicle interior.
In order to ensure the direct flow of fresh air
through the air vent sinto the vehicl einterior,
please observe the following notes:
R keep the air inlet grill eonthe bonnet and
in the engin ecompartmen tonthe front-
passenger side free of blockages, such as
ice, snow or leaves.
R never cover the ven tsor ven tilation grilles
in the vehicle interior.
i For virtually draught-free ventilation,
adjust the sliders of the air vent stothe
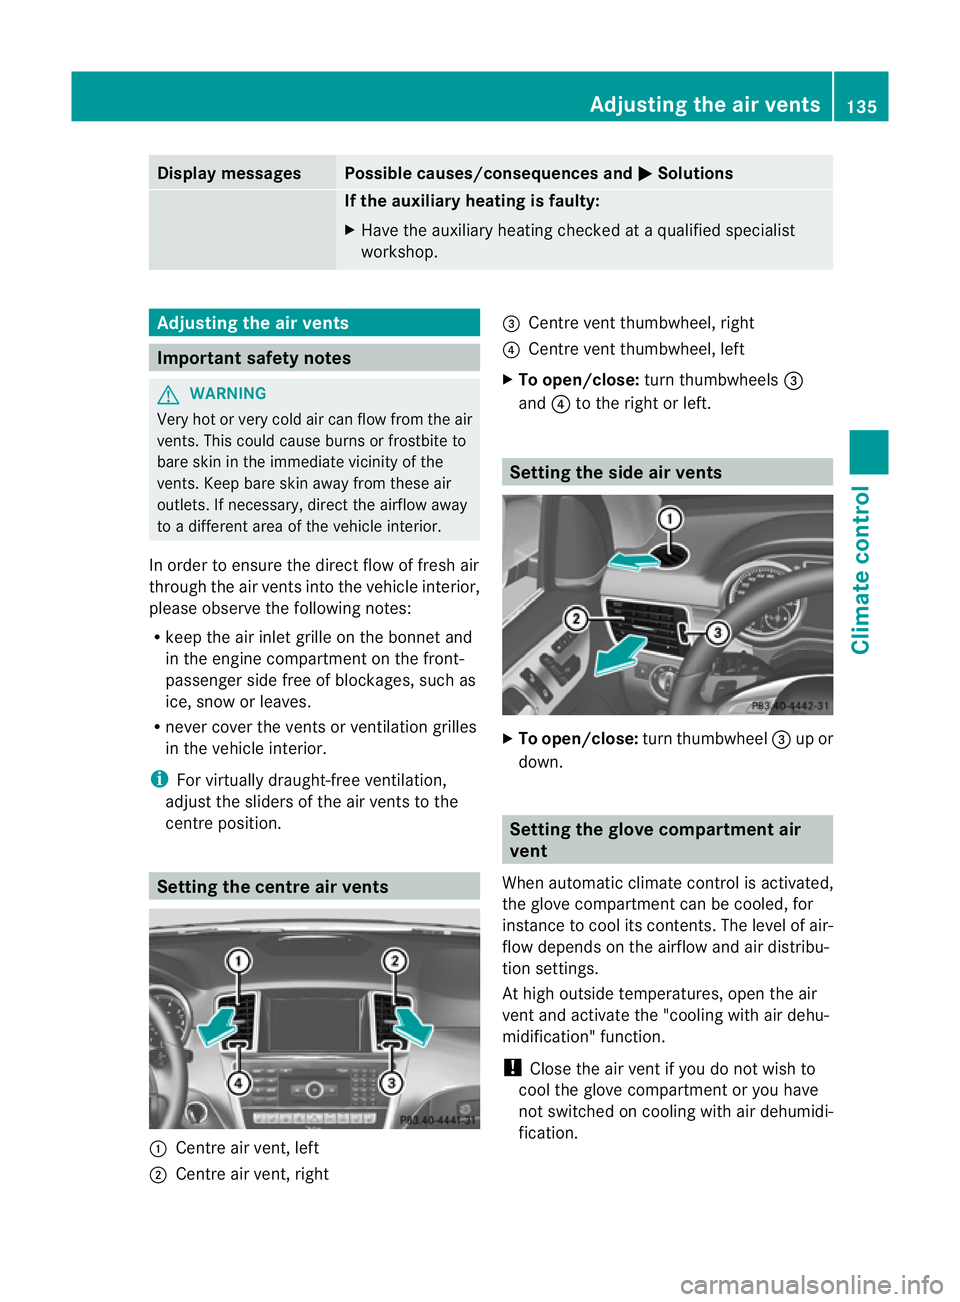
cen treposition. Setting the centre air vents
:
Centr eair vent ,left
; Centre air ven t, right =
Centre ven tthumbwheel, right
? Centre ven tthumbwheel, left
X To open/close: turnthumbwheels =
and ?to the right or left. Setting th
eside air vents X
To open/close: turnthumbwheel =up or
down. Setting th
eglove compartment air
vent
When automatic climate control is activated,
the glove compartmen tcan be cooled, for
instance to cool its con tents.The level of air-
flo wd epends on the airflow and air distribu-
tion settings.
At high outside temperatures, open the air
ven tand activate the "cooling with air dehu-
midification" function.
! Clos ethe air ven tifyou do not wish to
cool the glove compartmen toryou have
not switched on coolin gwith air dehumidi-
fication. Adjusting the air vents
135Climate control Z
Page 145 of 389
X
Take your foot off the brake pedal.
i Onc eyou have taken your foot off the
brake pedal, the vehicle is held for around
one second.
X Pull away.
Hill star tassist will not func tion if:
R you ar epulling away on alevel road or a
downhill gradient.
R the transmission is in position N.
R the electric parking brak eisapplied.
R ESP ®
is malfunc tioning. ECO sta
rt/stop function
General notes The ECO start/stop func
tion switches the
engin eoff automatically if th evehicle stops
moving.
The engine star tsautomatically when you pull
away again. The ECO start/stop function
thereby helps you to reduce the fuel con-
sumption and emissions of your vehicle.
The ECO start/stop function is activated each
time the engine is switched on. The system is
operational when ECO symbol ¤is shown
in the multifunc tion display.
If the ECO star t/stop func tion is deactivated
(Y page 143), ECO symbol ¤is not
shown. G
WARNING
If the ECO symbol appears in the multifunc-
tion displa ywhen the engin eisswitched off,
the engine was switched off automatically.
However, all vehicle systems remain active. If
you open the door, unfasten your seat belt or
remove your foot from the brake pedal, the
engine will automatically start .The vehicle
ma ybegin moving. There is arisk of accident.
To prevent the vehicle from accidentally pull-
ing away, do not release the brake pedal until
you want to drive on. Do not leave the vehicle until you have
switched off the ignition and secured the vehi-
cle to prevent it from rolling away.
! Always switch the ignition off and take the
key with you when leaving the vehicle.
Automa tice ngine switch-off The ECO start/stop function switches the
engin
eoff automatically in certain situations.
To do this ,the vehicle must brake to astand-
still and the brakes must remain depressed
with the transmission in position Dor N.
The engine is only switched off if:
R the vehicle is at astandstill.
R the outside temperature is withi nthe range
that is suitable for the system.
R the engin eisatnormal operatin gtemper-
ature.
R the set temperature for the vehicle interior
has been reached.
R the batter yissufficiently charged.
R the system detects that the windscreen is
not misted up when the air-conditioning
system is switched on.
R the bonnet is closed.
R the driver' sdoor is closed and the seat belt
is fastened.
i If you shift the transmission from Rto D,
the ECO start/stop func tion is available
again onc ethe ¤ ECO symbol reap-
pear sint he multifunction display.
i The engin ecan be switched off automat-
ically amaximum of three times in succes-
sion. The automatic engine switch-off is
then available again after the ¤ECO
symbol appears in the multifunction dis-
play.
i You can still activate the HOLD function
when the vehicle is stationary, even if the
engine has been switched off automati-
cally. It is then not necessary to continue
applying the brakes during the automatic
stop phase .When you depress the accel- 142
DrivingDriving and parking
Page 146 of 389
erator pedal, the engin
estart sautomati-
cally and the brakin geffect of th eHOLD
function is deactivated. Depress the accel-
erator pedal carefully ,asthe engin emust
be started first.
Automatic engin estart The engi
neis started automatically if:
R you depress the accelerator pedal.
R you release the brakes when in transmis-
sion position Dor N,w hen the HOL Dfunc-
tion is not active.
R the ECO start/stop function is deactivated
by pressing the ECO button.
R the vehicle start storoll.
R the driver's seat belt is removed or the driv-
er' sd oor is opened.
R you shift the transmission to position R.
R you switc htodrive program M.
R yo us witch to an off-road program.
R the brake system requires this.
R the system detect smoistur eont he wind-
screen when the air-conditionin gsystem is
switched on.
R the battery' scharge status is too low.
R the bonnet is opened.
R the temperature in the vehicle interior devi-
ates from the set range.
i Shif ting the transmissio ntoposition P
does not star tthe engine.
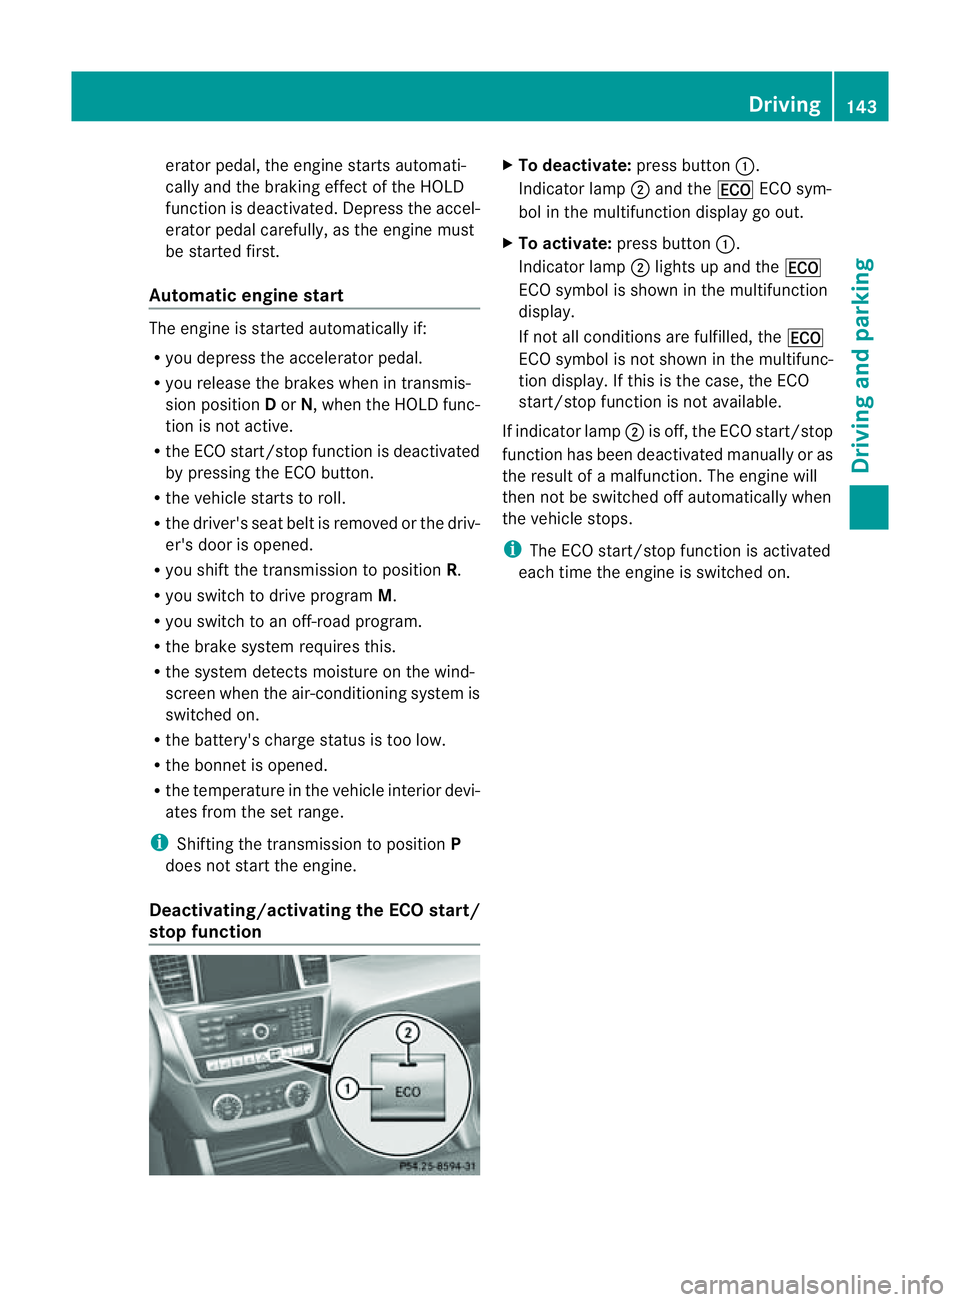
Deactiva ting/activa ting th eECO start/
stop function X
To deactivate: press button:.
Indicator lamp ;and the ¤ECO sym-
bol in the multifunction display go out.
X To activate: press button :.
Indicator lamp ;lights up and the ¤
ECO symbol is shown in the multifunction
display.
If not all conditions are fulfilled, the ¤
ECO symbol is not shown in the multifunc-
tion display. If this is the case, the ECO
start/stop function is not available.
If indicator lamp ;is off, the ECO start/stop
function has been deactivated manually or as
the result of amalfunction. The engine will
then not be switched off automatically when
the vehicle stops.
i The ECO start/stop function is activated
each time the engine is switched on. Driving
143Drivingand parking Z
Page 284 of 389
Displa
ymessages Possible causes/consequences and
M Solutions
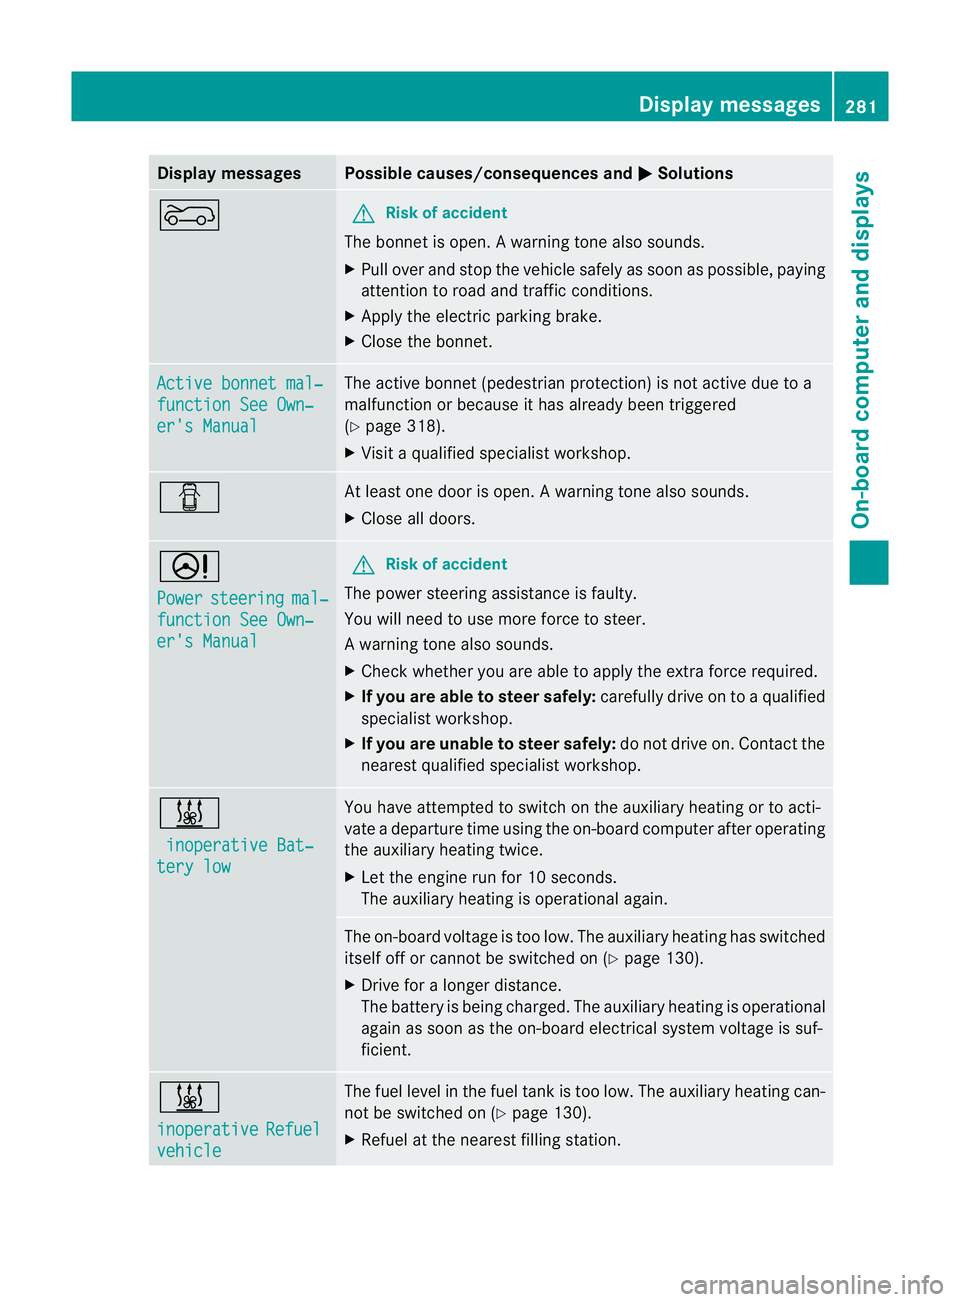
? G
Risk of acc
ident
The bonne tisopen. Awarning ton ealso sounds.
X Pull ove rand sto pthe vehicle safel yassoonasp ossible, paying
attention to roa dand traffic conditions.
X Appl ythe electric parkin gbrake.
X Close th ebonnet. Active bonnet mal‐
function Se
eOwn‐ er's Manual Th
ea ctive bonnet (pedestrian protection) is not active due to a
malfunction or because it has already bee ntriggered
(Y page 318).
X Visit aqualified special istworkshop. C At least one door is open.
Awarning ton ealso sounds.
X Close all doors. D
Po
wer steering mal‐
function See Own‐
er'
sM anual G
Risk of accident
Th ep ower steering assistance is faulty.
You will nee dtouse mor eforce to steer.
Aw arning ton ealso sounds.
X Chec kwhether you ar eable to apply the extr aforc erequired.
X If you are able to steer safely: carefully driveontoaqualified
specialist workshop.
X If you are unable to steer safely: do not drive on. Contact the
nearest qualified specialist workshop. &
inoperativ eBat‐ tery low Yo
uh ave attempted to switch on the auxiliary heating or to acti-
vate adeparture tim eusing the on-boar dcomputer after operating
the auxiliary heatin gtwice.
X Let the engine run for 10 seconds.
The auxiliary heating is operational again. The on-board voltage is too low. The auxiliary heating has switched
itself off or cannot be switched on (Y
page 130).
X Driv efor alonger distance.
The battery is being charged. The auxiliary heatin gisoperational
again as soon as the on-boar delectrical system voltage is suf-
ficient. &
inoperative
Refuel
vehicle The fuel level in the fuel tank is too low. The auxiliary heating can-
not be switched on (Y page 130).
X Refuel at the nearest filling station. Display messages
281On-boardcomputer and displays Z
Page 321 of 389
Usefu
linfor mati on
i This Owner's Manual describes all models
and all standard and optional equipment
available to your vehicle at the time of pub-
lication of the Owner's Manual. Country-
specific deviation sare possible .Please
not ethat your vehicle ma ynot be equipped
with all featur es described. This also
applies to safety-releva ntsystems and
functions.
i Please read the information on qualified
specialist workshops (Y page 24).Engine compartment
Bonnet
Active bonnet (pedestrian protection) Operating principle
i The active bonnet is only available in cer-
tai nc ountries.
The active bonnet can reduce the risk of injury
to pedestrians in certain accident situations.
Raising the active bonnet increases the clear-
anc etoh ard components, such as the engine.
If the active bonnet has been triggered, it is
raised in the area of the bonnet hinges by
abou t100 mm. Th eactive bonnet is trigg ered
by pyrotechnics.
! Once triggered, an active bonnet must be
reset at aqualified specialist workshop,
e.g. aMercedes-Ben zService Centre. The
active bonnet function will then be availa-
ble again. The additional pedestrian pro-
tection provided by the active bonnet will
then be restored.
For the driv etot he workshop, reset the trig-
gere dactive bonnet yourself. After being
reset, the active bonnet rest sinthe area of
the bonnet hinges on the seals, and the bon-
net hinges do not engage. For this reason, we
recommend that you do not exceed amaxi-
mum top spee dof130 km/h on the wa ytothe workshop
.Ifthe active bonnet has been
triggered, pedestrian protection ma ybelimi-
ted.
Resetting G
WARNING
There is arisk of injur yifthe bonnet is open,
even if the engin eisnot running.
Som eengine compone ntsc an become very
hot.
To avoid the risk of burns, only touch those
component sdescribed in the Owner's Manual
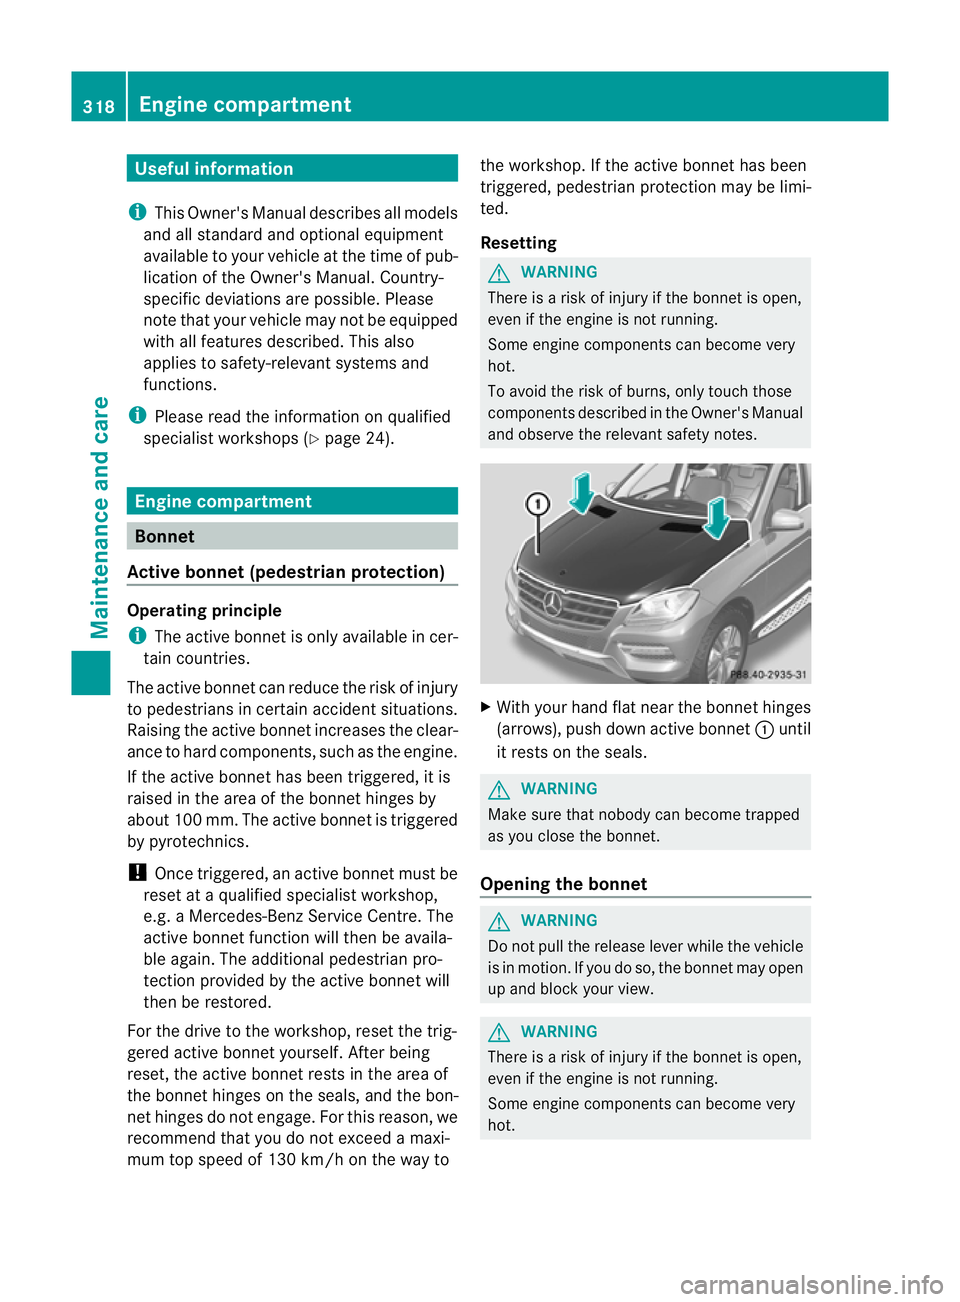
and observ ethe relevant safety notes. X
With your hand fla tnear the bonnet hinges
(arrows), push down active bonnet :until
it rests on the seals. G
WARNING
Make sure that nobody can becom etrapped
as you close th ebonnet.
Opening th ebonnet G
WARNING
Do not pull the release lever while the vehicle
is in motion. If you do so, the bonnet may open
up and block your view. G
WARNING
There is arisk of injur yifthe bonnet is open,
even if the engin eisnot running.
Som eengine compone ntsc an become very
hot. 318
Eng
inecompartmentMaintenance and care