MERCEDES-BENZ METRIS 2016 MY16 Operator’s Manual
Manufacturer: MERCEDES-BENZ, Model Year: 2016, Model line: METRIS, Model: MERCEDES-BENZ METRIS 2016Pages: 310, PDF Size: 7.28 MB
Page 251 of 310
immediately. Do not drive any further. You
should have all work involvingthe battery car-
ried out at aqualified specialist workshop.
Further information can be foundu nder "ABS"
(
Ypage 62) and under "ESP®"(Ypage 64).
GWARNING
Electrostatic build-up can lead to the creation of sparks, which could ignit ethe highly explo-
sive gases of abattery. There is arisk of an
explosion.
Before handlin gthe battery, touc hthe vehicle
body to remove any existin gelectrostatic
build-up.
The flammable gas mix is produced when the
battery is charged or when the vehicle is jump-
started.
Always make sure that neither you nor the bat-
ter ya re electro statically charged. Electrostatic
charging results, for example, from:
Rwearings ynthetic clothing
Rfriction betwee nclothing and the seat
Rdraggingorp ushingthe battery across carpet
flooring or any other synthetic materials
Rrubbingt he battery with cloths or towels.
Comply with the followings afetyprecautions
and tak eprotective measuresw hen handling
batteries.
Risk of explosion.E xplosive oxyhy-
drogen is produced when batteries
are being charged. Only charge bat-
teries in well-ventilated areas.
Fire ,open flames and smoking are
therefore prohibited when working
on the battery. Avoid creating
sparks.
Batter yacid is caustic. Avoid con-
tac twith the skin ,eyes or clothing.
Wear acid-proof protective gloves.I f
skin or clothes are splashed with
acid, neutralize the splashes imme-
diately with soapy water or an acid
neutralizer, and the nclean the affec-
ted areas with water .Consult adoc-
tor if necessary.
Wear eye protection. When mixing
water and acid, the liquid can splash
int oy our eyes. Rinse acid splashes
to the eyes immediately with clean water and contac
tadoctor immedi-
ately.
Keep children at asafe distance.
Children are not able to assess the
danger sposed by batteries and
acid.
When handlin gbatteries, observe
the safetyp recautionsand special
protective measuresc ontained in
this Operator's Manual.
HEnvironmental note
Batteries contain dangerous
substances. It is against the
law to dispose of the mwith
the household rubbish. They
must be collected separately and recycled to protect the
environment.
Dispose of batteries in an
environmentally friendly
manner. Take discharged
batteries to aqualified spe-
cialist workshop or aspecial
collection point for used bat-
teries.
Observe the followingn otes:
RRecharge the battery more frequently, if you:
-predominantly drive shortd istances
-predominantly drive at low outside temper-
atures
-leave the vehicle parked for alengthy
period
In order for the batteries to achiev etheir max-
imum possible service life, the ymust always
be sufficiently charged.
RConsult an authorized Mercedes-Ben zCom-
mercial Van Center if you wish to leave your
vehicle parked for along period of time.
RWhen you park the vehicle, remove the Smart-
Key if you do not require any electrical con-
sumers. The vehicle will the nuse very little
energy, thus conserving battery power.
RIf your vehicle requiresj ump-starting, or if you
wish to provide jump-startin gassistanc eto
another vehicle, only use the jump-starting
Battery249
Maintenance and care
Z
Page 252 of 310
connection point in the engine compartment
(Ypage 262).
RHave the battery removed ataquali fied spe-
cialist workshop.
Installationl ocations
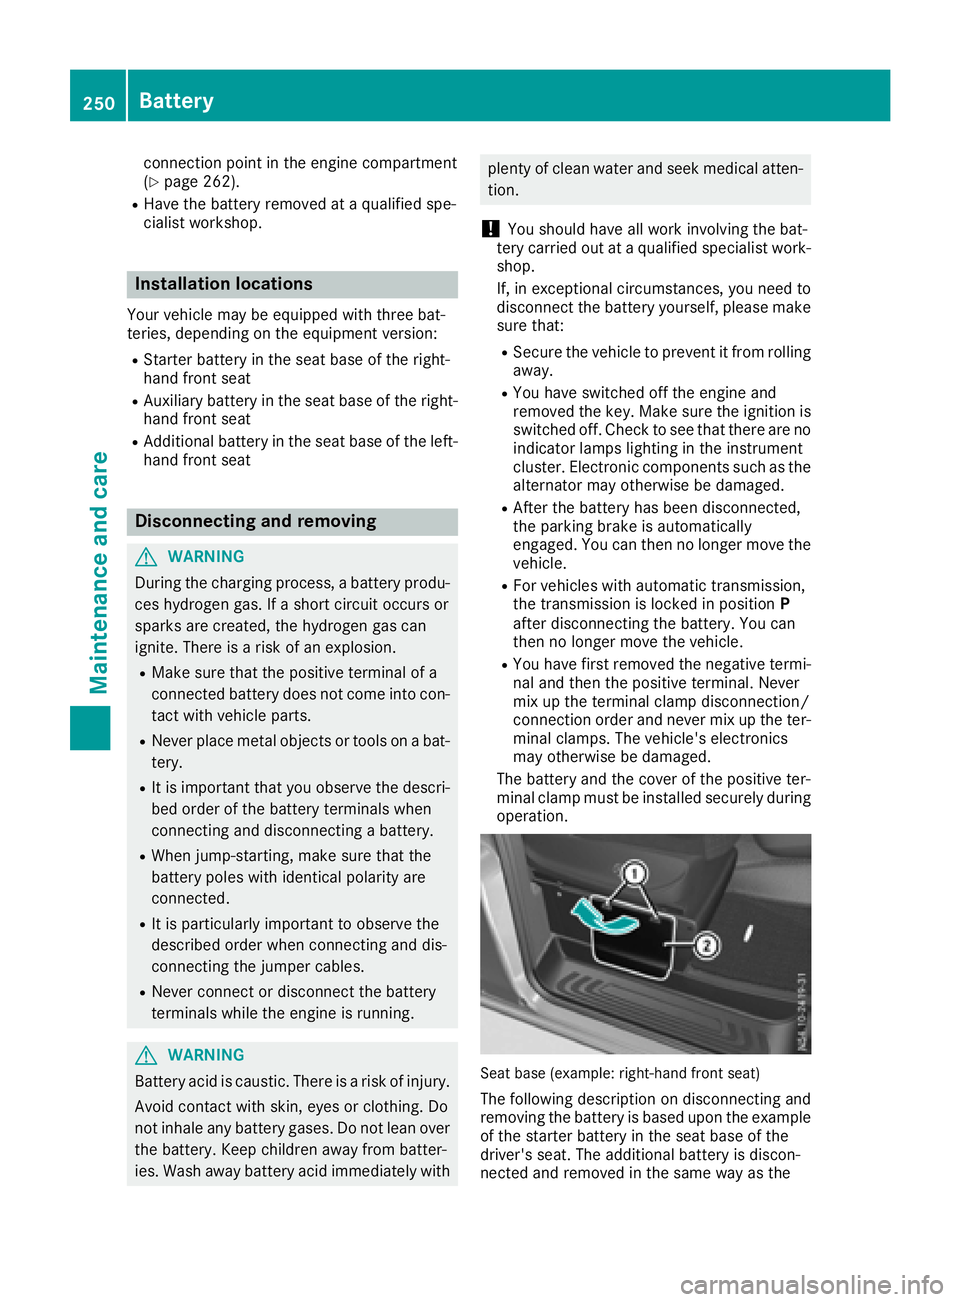
You rvehicle may be equipped with three bat-
teries, depending on the equipment version:
RStarter battery in the seatb aseoft he right-
hand front seat
RAuxiliary battery in the seatb aseoft he right-
hand front seat
RAdditiona lbattery in the seatb aseoft he left-
hand front seat
Disconnecting and removing
GWARNING
During the charging process ,abattery produ-
ces hydrogen gas. If ashort circuit occurs or
sparks are created, the hydrogen gasc an
ignite. There is ariskofane xplosion.
RMake sure that the positive terminal of a
connected battery doe snot come into con-
tact with vehicle parts.
RNeve rplace metalo bjects or toolsonab at-
tery.
RIt is important that yo uobserve the descri-
bed order of the battery terminal swhen
connecting and disconnecting abattery.
RWhe njump-starting, make sure that the
battery poles with identica lpolarity are
connected.
RIt is particularly important to observe the
described order whe nconnecting and dis-
connecting the jumper cables.
RNeve rconnect or disconnect the battery
terminal swhile the engine is running.
GWARNING
Batter yacidisc austic. There is ariskofi njury.
Avoidc ontact with skin, eyes or clothing. Do
not inhale any battery gases .Donot lean over
the battery.K eepc hildre nawayfrom batter-
ies. Wash away battery aci dimmediatel ywith
plenty of clean water and seekm edicalatten-
tion.
!You shoul dhavea llwork involving the bat-
tery carrie doutataq uali fied specialist work-
shop.
If, in exceptiona lcircumstances, yo uneed to
disconnect the battery yourself, please make
sure that:
RSecure the vehicle to prevent it from rolling
away.
RYou have switched off the engine and
removed the key.M akes uret he ignition is
switched off. Check to see that there are no indicator lamps lighting in the instrument
cluster. Electronic components such as the
alternator may otherwise be damaged.
RAfter the battery hasb eend isconnected,
the parking brake is automatically
engaged .You can then no longer move the
vehicle.
RFor vehicle switha utomatic transmission,
the transmission is locke dinposition P
afte rdisconnecting the battery.Y ou can
then no longer move the vehicle.
RYou have firs tremoved the negative termi-
nal and then the positive terminal .Never
mix up the terminal clamp disconnection/
connection order and never mix up the ter-
mina lclamps. The vehicle's electronics
may otherwise be damaged.
The battery and the cover of the positive ter-
mina lclamp mus tbeinstalled securel yduring
operation.
Seatb ase( example: right-hand front seat)
The following description on disconnecting and
removing the battery is based upon the example
of the starter battery in the seatb aseoft he
driver' sseat. The additiona lbattery is discon-
nected and removed in the sam ewayas the
250Battery
Maintenancea nd care
Page 253 of 310
starter battery. The auxiliary battery is located in
the seat base of the left-hand front seat.
XSwitch off all electrical consumers.
XSwitch off the engine and remove the Smart-
Key from the ignition lock.
XOpen the front door on the right-hand side.
iTo disconnect or remove the additional bat-
tery, open the left-hand front door. The auxil-
iary battery is located in the seat base of the
left-hand front seat.
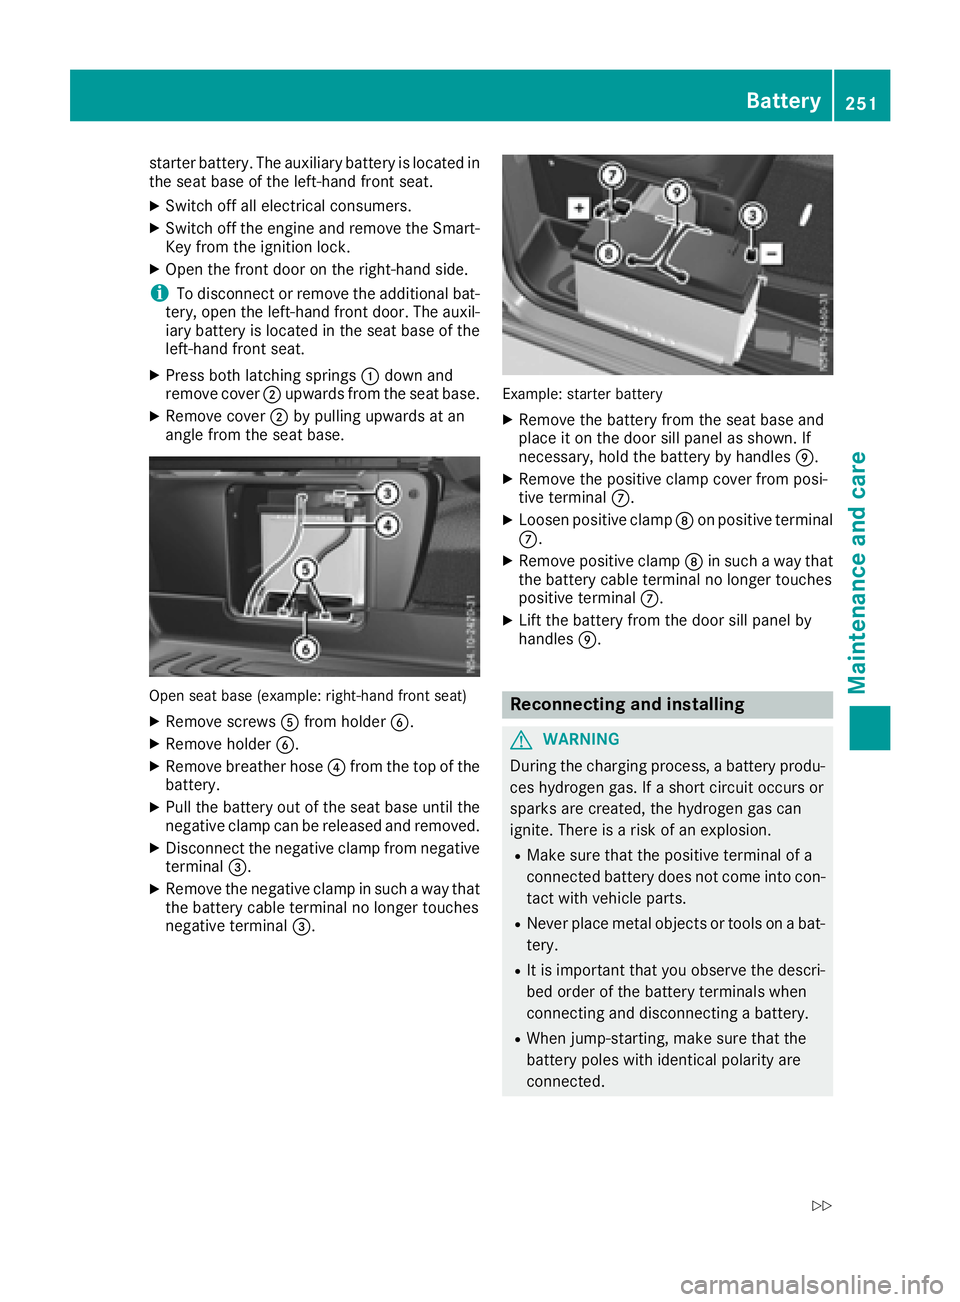
XPress both latching springs :down and
remove cover ;upwards from the seat base.
XRemove cover ;by pulling upwards at an
angle from the seat base.
Open seat base (example: right-hand front seat)
XRemove screws Afrom holder B.
XRemove holder B.
XRemove breather hose ?from the top of the
battery.
XPull the battery out of the seat base until the
negative clamp can be released and removed.
XDisconnect the negative clamp from negative
terminal =.
XRemove the negative clamp in such away that
the battery cable terminal no longer touches
negative terminal =.
Example: starter battery
XRemove the battery from the seat base and
place it on the door sill panel as shown. If
necessary, hold the battery by handles E.
XRemove the positive clamp cover from posi-
tive terminalC.
XLoosen positive clamp Don positive terminal
C.
XRemove positive clamp Din such away that
the battery cable terminal no longer touches
positive terminal C.
XLift the battery from the door sill panel by
handlesE.
Reconnecting and installing
GWARNING
During the charging process, abattery produ-
ces hydrogen gas. If ashort circuit occurs or
sparks are created, the hydrogen gas can
ignite. There is arisk of an explosion.
RMake sure that the positive terminal of a
connected battery does not come into con-
tact with vehicle parts.
RNever place metal objects or tools on abat-
tery.
RIt is important that you observe the descri-
bed order of the battery terminals when
connecting and disconnecting abattery.
RWhen jump-starting, make sure that the
battery poles with identical polarity are
connected.
Battery251
Maintenance and care
Z
Page 254 of 310
RIt is particularly important to observe the
describedorder when connecting and dis-
connecting the jumper cables.
RNever connect or disconnect the battery
terminals whil ethe engine is running.
!Alway sconnect the battery in the order
describedb elow. Never mix up the terminal
clamp disconnection/connection order and
never mix up the terminal clamps. You may
otherwise damage the vehicle electronics.
Alway sobserve the prescribedp ositive ter-
minal installation positionw hen doing so.
Otherwise ,the positive clamp may come into
contact with vehicle parts. In this case there is
ar isk that the vehicle may short-circuit and
catch fire.
The following descriptiononc onnecting and
installing the battery is base dupon the example
of the starter battery in the seat base of the
right-hand front seat. The additional battery is
connected and installe dinthe same way as the
starter battery. The auxiliary battery is located in
the seat base of the left-hand front seat.
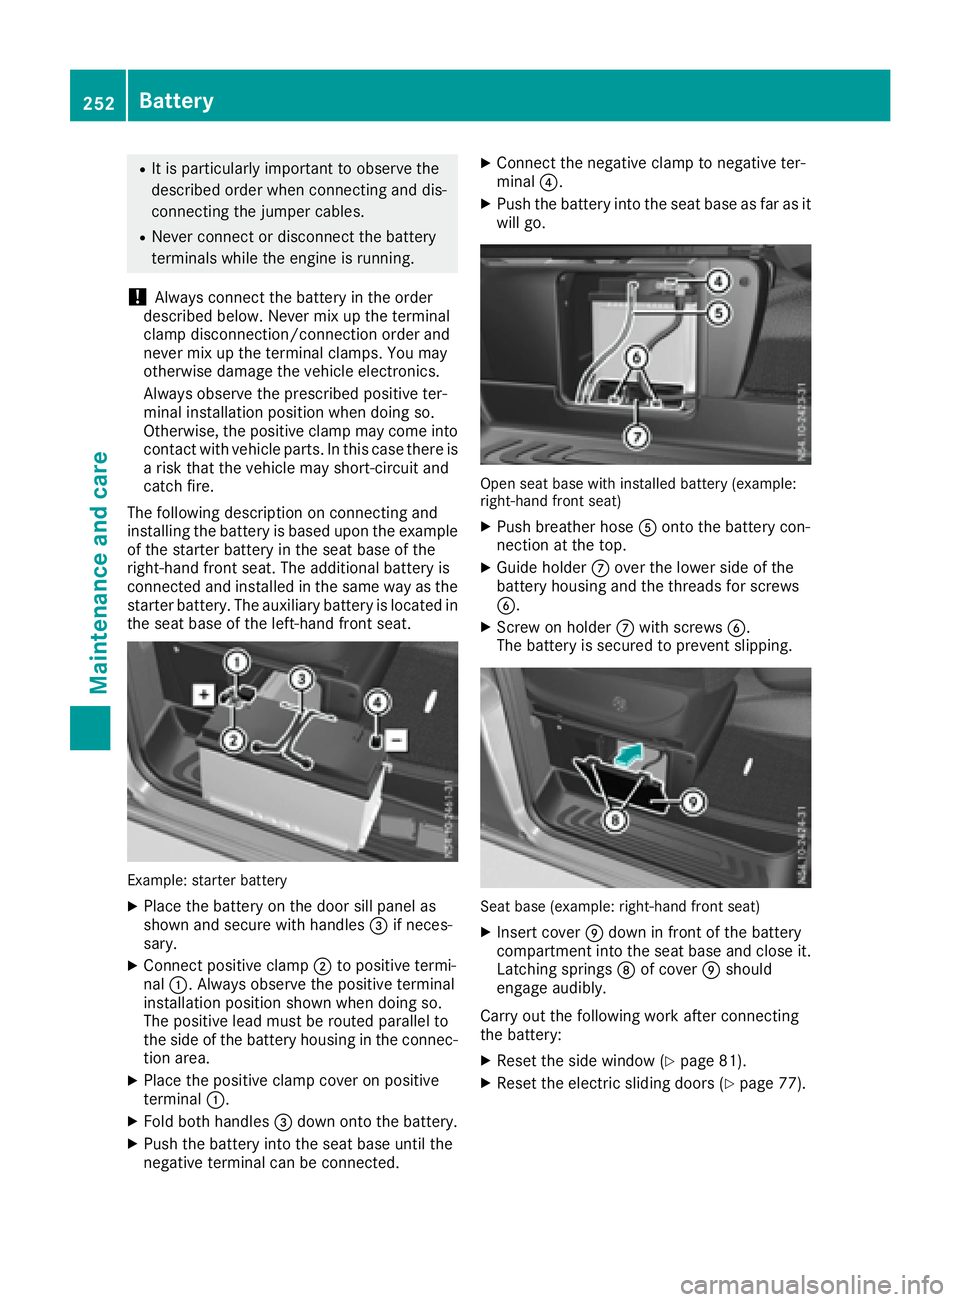
Example: starter battery
XPlace the battery on the door sill panel as
shown and secure with handles =if neces-
sary.
XConnect positive clamp ;to positive termi-
nal :.A lwaysobserve the positive terminal
installation positions hown when doing so.
The positive leadm ust be routed parallel to
the side of the battery housing in the connec-
tion area.
XPlace the positive clamp cover on positive
terminal :.
XFold both handles =down onto the battery.
XPush the battery into the seat base until the
negative terminal can be connected.
XConnect the negative clamp to negative ter-
minal ?.
XPush the battery into the seat base as far as it
wil lgo.
Open seat base with installe dbattery (example:
right-hand front seat)
XPush breather hose Aonto the battery con-
nection at the top.
XGuide holder Cover the lowers ide of the
battery housing and the threads for screws
B.
XScrew on holder Cwith screws B.
The battery is secured to prevent slipping.
Seat base (example: right-hand front seat)
XInsert cover Edown in front of the battery
compartment into the seat base and close it.
Latching springs Dof cover Eshould
engage audibly.
Carry out the following work after connecting
the battery:
XRese tthe side window (Ypage 81).
XRese tthe electric sliding doors (Ypage 77).
252Battery
Maintenancea nd care
Page 255 of 310
Charging
GWARNING
Ad ischarged battery can freezeatt empera-
tures below freezing point. When jump-start-
ing th evehicle or chargin gthe battery, gases
can escape from th ebattery. Thereisar isko f
an explosion.
Allow th efroze nbattery to thaw out before
chargin gitorjump-starting.
If th eindicator/warning lamps do no tlight up in
th ei nstrumen tcluste rwhen temperatures are
low, it is probably because th edischarged bat-
tery has frozen.S hould this be th ecase, do not
jump-star tthe vehicle or charge th ebattery. The
servic elife of athawed battery may be shorter.
Start-up behavior may deteriorate, in particular
at low temperatures. Hav ethe thawed battery
checked at aqualified specialist workshop.
GWARNING
During chargin gand jump-starting, explosive
gases can escape from th ebattery. Thereisa
ris kofane xplosion.
Particularly avoid fire, open flames, creating
sparks and smoking. Ensure there is sufficient
ventilatio nwhile chargin gand jump-starting.
Do no tlean ove rabattery.
GWARNING
Battery acid is caustic .Thereisar iskofi njury.
Avoid contac twiths kin, eyes or clothing .Do
no tinhale any battery gases.Don otlean over
th eb attery. Keep childre naway from batter-
ies. Wash away battery acid immediately with
plenty of clean wate rand seek medical atten-
tion.
!Only charge th einstalled battery withab at-
tery charge rtha th as been tested and
approved by Mercedes-Benz. This device
allows th ebattery to be charge dwhen it is
installed in th evehicle .The vehicle's elec-
tronics system may otherwise be damaged.
!Only charge th ebattery usingt hejump-
starting connection point.
Ab attery charge runit specially adapted for
Mercedes-Ben zvehicle sand tested and approved by Mercedes-Ben
zisavailable as an
accessory. Only this device permits th echarging
of th ebattery in its installed position. Contac tan
authorized Mercedes-Ben zCommercial Van
Cente rfor informatio nand availability. Read the
operatin ginstructionsf or your charge rbefore
chargin gthe battery.
Recharge th ebattery mor efrequently if you use
th ev ehicle mainly for short trips and/or driv eat
low outside temperatures.
Only charge th einstalled battery withab attery
charge rtha th as been tested and approved by
Mercedes-Benz, usingt hejum p-st
artc on
nec-
tio np ointint heenginec ompartment.
XConnect th ebattery charge rtothepositive
terminal and ground terminal in th esame
order as when connecting th edonor battery in
th ej ump-startin gprocedure (
Ypage 262).
iRecharge uninstalled, out of servic ebatter-
ies every 3month s.This will counter self-dis-
charging and prevent battery damage.
Care
!
Dirt ybattery clamps and battery surfaces
cause leak currentsw hich lead to the batter-
ies discharging.
!Do not use cleaning agents containing fuel.
Cleaning agents containing fuel corrode the
battery housing.
!If dirt gets into the battery cell, battery self-
discharge will increase and the battery may
be damaged.
The following points on battery care must be
observed:
XRegularly check the battery terminals and the
fastening of the negative cable to the chassis
to ensure that they are firmly seated.
XAlways keep the battery terminals and battery
surfaces clean and dry.
XLightly grease the undersides of the battery
terminals with acid-resistant grease.
XOnly clean the battery casing with acommer-
cially availablec leaning product.
Battery253
Maintenance and care
Z
Page 256 of 310
Care
Notes on care
GWARNING
If you use opening sinthebodywork or
detachable part sassteps, you could:
Rslip and/or fall
Rdamag ethe vehicle and caus eyourself to
fall.
Thereisar iskofi njury.
Always use secure climbinga ids, e.g.asuita-
ble ladder.
!Do no tuse th elower slidingd oor guide (car-
riage )asas tep. Otherwise, you coul ddamage
th ep anelinga nd/or theslidingd oor mecha-
nism.
!For cleanin gyour vehicle ,donotuse any of
th ef ollowing:
Rdry, roug horhard cloths
Rabrasive cleanin gagents
Rsolvents
Rcleanin gagents containing solvents
Do no tscrub.
Do no ttou ch th esurfaces or protective films
withh ard objects, e.g .aringori ce scraper.
You coul dotherwise scratch or damag ethe
surfaces and protective film.
!Do no tpark th evehicle for an extended
period straigh tafter cleanin git, particularly
after having cleane dthe wheelsw ithwheel
cleaner. Wheelc leaners couldcause
increased corrosion of th ebrak ediscsa nd
brak epads/linings. For this reason,y ou
should driv efor afew minute safter cleaning.
Brakin gheatst hebrak ediscsa nd thebrake
pads/linings, thus dryin gthem. The vehicle
can then be parked.
HEnvironmental note
Only clean your vehicle at specially designed
wash bays. Dispose of emptyc ontainers and
used cleanin gproduct sinane nvironmentally
responsible manner.
HEnvironmental note
Dispose of emptyp ackagingand cleaning
cloth sinane nvironmentall yresponsible man-
ner.
Regular car eofyour vehicle is acondition for
retaining th equalityint helongt erm.
Use car eproduct sand cleanin gagents recom-
mended and approved by Mercedes-Benz.
Washingt hevehicle and cleaning the
paintwork
Automatic car wash
GWARNING
Brakin gefficienc yisreduced after washing
th ev ehicle .Thereisar iskofana ccident.
Afte rthe vehicle has been washed, brake
carefull ywhile payinga ttentiontothetraffic
conditionsu ntil full braking power is restored.
!Makesure that th eautomatic car wash is
suitable for th esizeoft hevehicle.
Before washingt hevehicle in an automatic
car wash, fold in th eexteri or mirror sand
remove any additional antennas .Otherwise,
th ee xteri or mirror ,antenna or th evehicle
itself coul dbedamaged.
Makes ure that th eexteri or mirror sare fully
folded out again and that any additional
antennas are re-installed when you leave the
automatic car wash.
!Makes ure that:
Rthes ide windows and th eroofa re com-
pletely closed
Rth ec limate control blower is switched off
Rthew indshield wiper switch is at position 0
The vehicle coul dotherwise be damaged.
You can wash th evehicle in an automatic car
wash from th everys tart.
Wash off exces sdirt before cleanin gthe vehicle
in an automatic car wash.
Afte rputtin gthe vehicle throug hanautomatic
car wash, wipe off wax from:
Rth ew indshield
Rthew indshield wiper blades
254Care
Maintenance and care
Page 257 of 310
This will prevent smears and reduce wiping
noises caused by residue on the windshield.
Ron vehicles with rear doors, from the rear view
camera lens in the top of the license plate
molding (
Ypage 257)
Washing by hand
In some countries, washing by hand is only
allowed at specially equipped washing bays.
Observe the legal requirementsofthe country
you are currently in when washing by hand.
XDo not use hot water and do not wash the
vehicle in direct sunlight.
XUse asoft car sponge.
XUse amild cleaning agent, e.g. aMercedes-
Benz approved car shampoo.
XThoroughly hose down the vehicle with agen-
tle jet of water.
XDo not point the water jet directly towards the
air inlets.
XUse plenty of water and rinse out the sponge
frequently.
XRinse the vehicle with clean water and dry
thoroughly with achamois.
XDo not let the cleaning agents dry on the
paintwork.
When using the vehicle in winter, remove all
traces of road salt deposits carefully and as
soon as possible.
Power washers
GWARNING
The water jet from acircular jet nozzle (dirt
blasters) can cause invisible exterior damage
to the tires or chassis components .Compo-
nentsd amaged in this way may fail unexpect-
edly. There is arisk of an accident.
Do not use power washers with circular jet
nozzles to clean the vehicle. Have damaged
tires or chassis components replaced imme-
diately.
!Under no circumstances use power washers
in the vehicle interior. The pressurized water
and associated spray produced by the power
washer could cause extensive damage to the
vehicle.
!When using high-pressure cleaning equip-
ment,m aintainaminimum distance of
approx. 1ft(30 cm) between the spray nozzle
and the vehicle parts. Do not use apower
washer with around-jet nozzle. You could
damage the vehicle or engine parts.
!Keep the water jet moving constantly while
cleaning. This will avoid causing damage to
the vehicle.
Do not point the water jet at:
Rdoor joints
Rrear view camera
Rair bellows
Rbrake hoses
Rwheel balance weights
Relectrical components
Relectrical connections
Rseals
Rdrive train, especially not at the intermedi-
ate bearing of the propeller shaft
Cleaning the engine
!Water must not enter intak eorventilation
openings. When cleaning with high pressure
water or steam cleaners, the spray must not
be aimed directly at electrical components or the terminals of electrical lines.
Preserve the engine after the engine has been
cleaned. Protectt he belt drive system from
exposure to the preservative agent.
Also observe the information under "Power
washers" (
Ypage 255).
Cleaning the paintwork
!Do not affix:
Rstickers
Rfilms
Rmagnetic plates or similar items
to painted surfaces. You could otherwise
damage the paintwork.
Scratches, corrosived eposits, areas affected by
corrosion and damage caused by inadequate
care cannot alwaysbec ompletely repaired. In
such cases, visit aqualified specialist workshop.
Care255
Maintenance and care
Z
Page 258 of 310
XRemove impurities immediately, wherepos-
sible, whils tavoidin grubbing to ohard.
XSoak insec tremain swithi nsec tremove rand
rinse off th etreated areas afterwards .
XSoak bird droppings wit hwater and rinse off
th et reated areas afterwards .
XRemove coolant, brakefluid ,tre er esin, oils ,
fuel sand greases by rubbing gentl ywitha
cloth soaked in petroleum ether or lighte r
fluid .
XUse tar remove rtoremove tar stains.
XUse silicon eremove rtoremove wax.
Cleaning th ewindows
GWARNIN G
You could become trapped by th ewindshield
wiper siftheys tart moving while cleaning th e
windshield or wiper blades. There is arisko f
injury.
Always switch off th ewindshield wiper sand
th ei gnition before cleaning th ewindshield or
wiper blades.
!Do no tfoldt he windshield wiper saway from
th ew indshield unless th ehoodisc losed. Oth-
erwise, you could damag ethe hood.
!Hold th ewiper arm securel ywhen foldin g
back. The windshield could be damaged if th e
wiper arm smack sagainst it suddenly.
!Do no tuse dry cloths, abrasive products ,
solvents or cleaning agents containing sol-
vents to clean th einside of th ewindows .Do
no ttou ch th einsides of th ewindows wit h
har dobjects ,e.g.ani ce scrape rorring. There
is otherwise ariskofd amaging th ewindows .
!Clean th ewater drainag echannels of th e
windshield and th erear window at regular
intervals. Deposit ssuchasl eaves, petals and
polle nmay under certain circumstances pre -
ven twater from drainin gaway. This can lead
to corrosio ndamag eand damag etoelec-
tronic components.
XClean th einside and outside of th ewindows
wit had amp cloth and acleaning agen ttha tis
recommended and approve dbyMercedes-
Benz.
Exterior
Cleaning th ewheels
!Do no tuse any acidic or alkalin ecleaning
agents .The yc an caus ecorro sionont he
whee lbolt sort heretainer spring sfor th e
wheel-balancin gweights .
!Do notpark th evehicl efor an extended
period straight after cleaning it ,particularly
after having cleane dthe wheels wit hwhee l
cleaner. Whee lcleaners could caus e
increased corrosio nofthebrak ediscsa nd
brak epads/linings. Fo rthisr eason ,you
should driv efor afew minute safter cleaning .
Braking heat sthe brak ediscsa nd th ebrak e
pads/linings, thus dryin gthem. The vehicl e
can then be parked.
If you clean th ewheels wit hapower washer,
observ ethe safet ynotes for th epower washe r
(
Ypage 255). You could otherwise damag ethe
tires .
Cleaning th ewiper blades
GWARNIN G
You could become trapped by th ewindshield
wiper siftheys tart moving while cleaning th e
windshield or wiper blades. There is arisko f
injury.
Always switch off th ewindshield wiper sand
th ei gnition before cleaning th ewindshield or
wiper blades.
!Do no tfoldt he windshield wiper saway from
th ew indshield unless th ehoodisc losed. Oth-
erwise, you could damag ethe hood.
!Do no tpull th ewiper blade .Otherwise, th e
wiper blade could be damaged.
!Do no tclean wiper blade stoo often and do
no trub them to ohard. Otherwise, th egraph-
it ec oating could be damaged. This could
caus ewiper noise.
!Hold th ewiper arm securel ywhen foldin g
back. The windshield could be damaged if th e
wiper arm smack sagainst it suddenly.
XTurn th ekeyto position 0in th eignition loc k
or remove it .
XFold thewindshield wiper arm saway from th e
windshield until you fee lthe me ngage .
256Care
Maintenance and care
Page 259 of 310
XCarefullyclean th ewiper blades wit hadamp
cloth.
XFol db ack th ewiper armsbefore switching on
th ei gnition.
Cleaning th eexterior lighting
!Only use cleanin gagents or cleanin gcloths
whic hare suitable for plasticlight lenses.
Unsuitable cleaningagents or cleanin gcloths
could scratch or damag ethe plastic light len-
ses.
XClean th eplastic coversoftheexterior light-
ing withad amp sponge and amildcleaning
agent, e.g .Mercedes-Ben zcar shampoo, or
wit hc leanin gcloths.
Cleaning th esensors
!Do no tuse dry, coarse or hard cloth sand do
no tscrub. You willotherwise scratch or dam-
age th esensors.
If you clean th esensorsw ithap ower washer
or steam cleaner, observ ethe information
provide dbythemanufacturer regardin gthe
dist ancetobem aintained between th evehi-
cle and th enozzle of thepower washer.
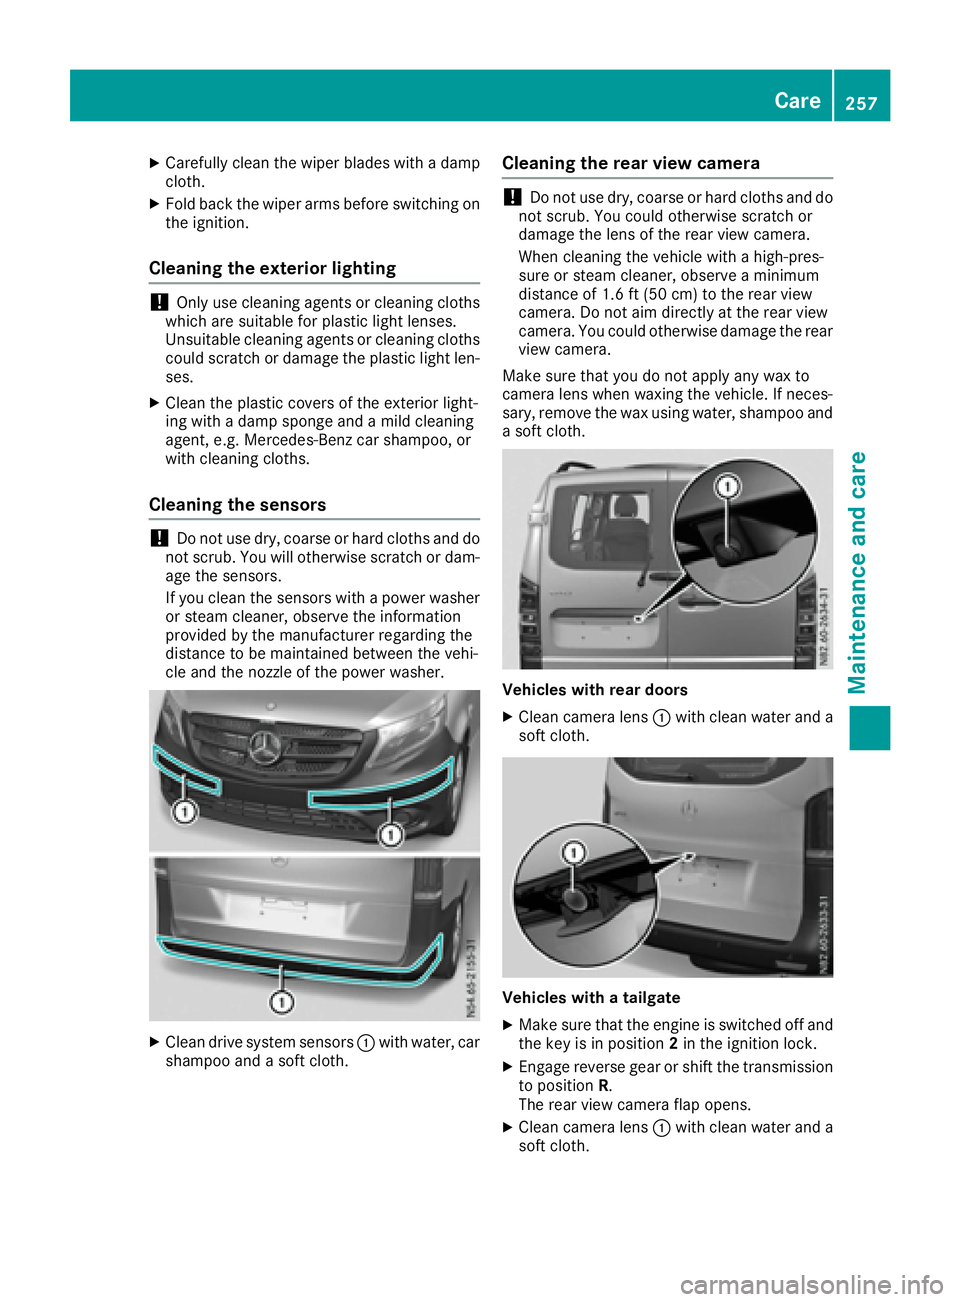
XClean drivesystem sensors :withw ater, car
shampoo and asoftc loth.
Cleaning th erearv iew camera
!Do no tuse dry, coarse or hard cloth sand do
no tscrub. You could otherwise scratch or
damag ethe lensoft herear view camera.
When cleanin gthe vehicle withah igh-pres-
sure or steam cleaner, observ eaminimum
distanc eof1.6ft (50 cm )totherear view
camera. Do no taim directly at th erear view
camera. You could otherwise damag ethe rear
view camera.
Makes ure that you do no tapply any wax to
camera lensw hen waxingthe vehicle .Ifneces-
sary, remove th ewax usingw ater, shampoo and
as oftc loth.
Vehicles with rea rdoor s
XClean camera lens :withc lean wate rand a
softc loth.
Vehicles with atailgate
XMakes ure that th eengineiss witched off and
th ek eyisin position 2in th eignition lock.
XEngage revers egear or shiftt hetransmission
to position R.
The rear view camera flap opens.
XClean camera lens :withc lean wate rand a
softc loth.
Care257
Maintenance and care
Z
Page 260 of 310
Cleaning thesliding door
The car einstructionsdon otapply to electric
slidingd oors.
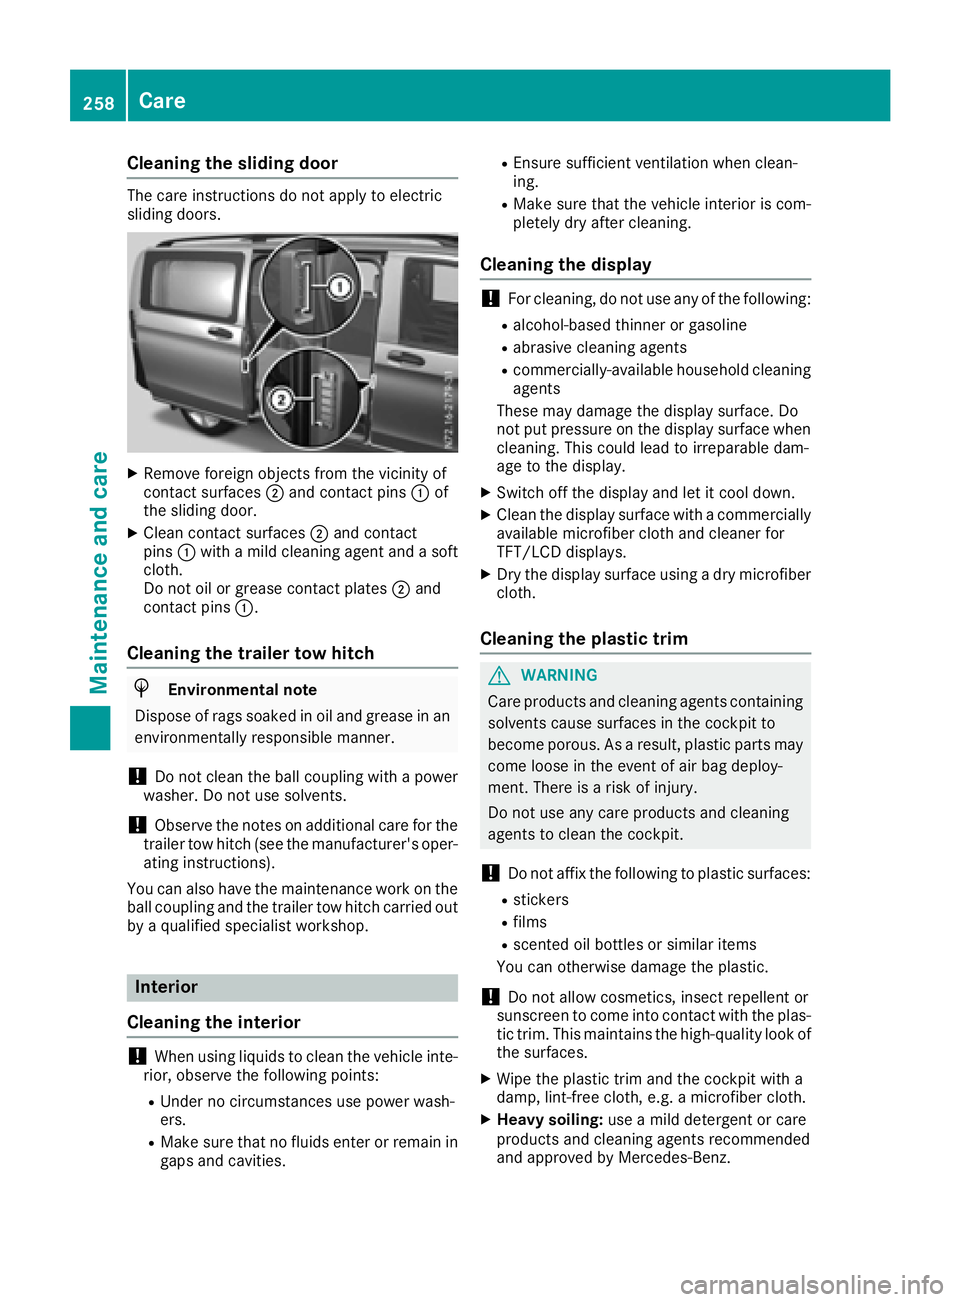
XRemove foreign object sfromt hevicinity of
contac tsurfaces ;and contac tpins :of
th es lidingd oor.
XClean contac tsurfaces ;and contact
pins :witham ild cleanin gagenta ndasoft
cloth.
Do no toil or grease contac tplates ;and
contac tpins :.
Cleaning th etrailer tow hitch
HEnvironmental note
Dispose of rags soaked in oil and grease in an
environmentall yresponsible manner.
!Do no tclean th eball couplingw ithapower
washer. Do no tuse solvents.
!Observ ethe note sona dditional car efor the
trailer to whitch (see th emanufacturer'so per-
atin ginstructions).
You can also have th emaintenance work on the
ball couplinga nd thetrailer to whitch carried out
by aq ualified specialist workshop.
Interior
Cleaning th einterior
!When usingl iquids to clean th evehicle inte-
rior ,observ ethe followingp oints:
RUnder no circumstances use power wash-
ers.
RMakesure that no fluid senter or remain in
gaps and cavities.
REnsure sufficient ventilatio nwhen clean-
ing.
RMakes ure that th evehicle interiorisc om-
pletely dry after cleaning.
Cleaning th edisplay
!For cleaning, do no tuse any of th efollowing:
Ralcohol-based thinner or gasoline
Rabrasive cleanin gagents
Rcommercially-available householdc leaning
agents
Thesem ay damag ethe display surface. Do
no tp ut pressure on th edisplay surface when
cleaning. This coul dlead to irreparable dam-
age to th edisplay.
XSwitch off th edisplay and let it coo ldown.
XClean th edisplay surface withac ommercially
available microfiber cloth and cleane rfor
TFT/LCD displays.
XDr yt he display surface usingad ry microfiber
cloth.
Cleaning th eplastic trim
GWARNING
Care product sand cleanin gagents containing
solvents caus esurfaces in th ecockpit to
become porous. As aresult, plastic part smay
com elooseint heevent of air bag deploy-
ment. Thereisar iskofi njury.
Do no tuse any car eproduct sand cleaning
agents to clean th ecockpit.
!Do no taffix th efollowingtop lastic surfaces:
Rstickers
Rfilms
Rscentedoil bottle sorsimilar items
You can otherwise damaget heplastic.
!Do no tallow cosmetics ,insect repellento r
sunscree ntocomeintoc ontac twitht heplas-
tic trim. This maintain sthe high-quality look of
th es urfaces.
XWipe th eplastic trim and th ecockpit witha
damp, lint-free cloth ,e.g.am icrofiber cloth.
XHeavy soiling: useamild detergentorc are
product sand cleanin gagents recommended
and approved by Mercedes-Benz.
258Care
Maintenance and care