change wheel MERCEDES-BENZ METRIS 2016 MY16 Operator’s Manual
[x] Cancel search | Manufacturer: MERCEDES-BENZ, Model Year: 2016, Model line: METRIS, Model: MERCEDES-BENZ METRIS 2016Pages: 310, PDF Size: 7.28 MB
Page 172 of 310
On-boardcomputer (vehicles without
steering wheel buttons)
Operating the on-board computer
Overview
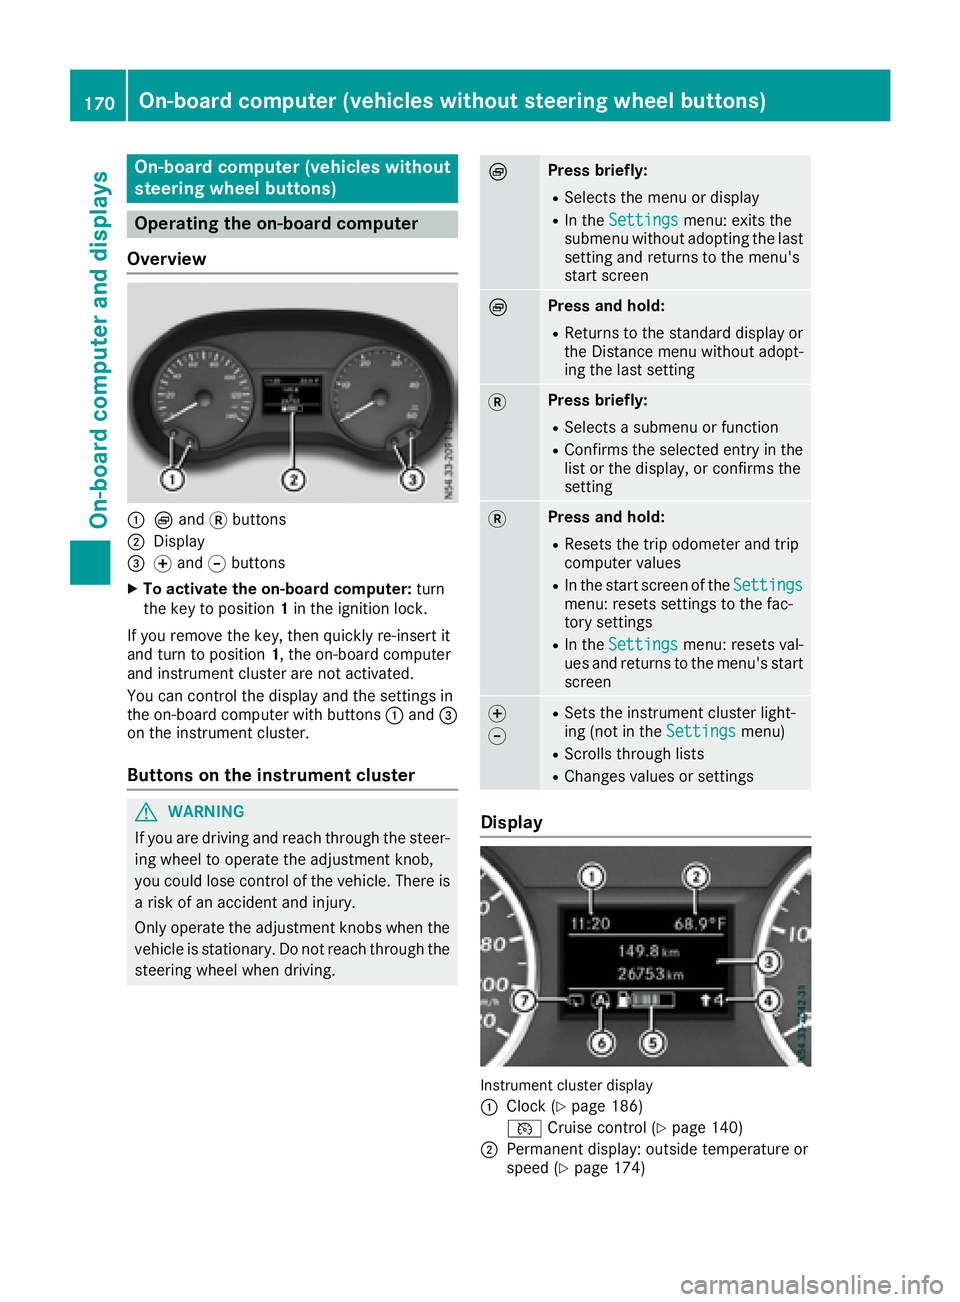
:È and 3buttons
;Display
=f and gbuttons
XTo activate the on-board computer: turn
the key to position 1in the ignition lock.
If you remove the key, then quickly re-insert it
and turn to position 1,the on-board computer
and instrument cluster are not activated.
You can control the display and the settings in
the on-board computer with buttons :and =
on the instrument cluster.
Buttons on the instrument cluster
GWARNING
If you are driving and reach through the steer- ing wheel to operate the adjustment knob,
you could lose control of the vehicle. There is
ar isk of an accidenta nd injury.
Only operate the adjustment knobs when the vehicle is stationary. Do not reach through the
steering wheel when driving.
ÈPress briefly:
RSelectst he menu or display
RIn theSettingsmenu: exits the
submenu without adopting the last
setting and return stothe menu's
start screen
ÈPress and hold:
RReturns to the standard display or the Distance menu without adopt-
ing the last setting
3Press briefly:
RSelectsas ubmenu or function
RConfirmsthe selected entry in the
list or the display, or confirms the
setting
3Press and hold:
RResets the trip odometer and trip
computer values
RIn the start screen of the Settingsmenu: resetssettings to the fac-
tory settings
RIn the Settingsmenu: resetsv al-
ues and return stothe menu's start
screen
f
gRSetst he instrument cluster light-
ing (not in the Settingsmenu)
RScrolls through lists
RChanges values or settings
Display
Instrument cluster display
:
Clock (Ypage 186)
V Cruise control (
Ypage 140)
;Permanen tdisplay: outside temperature or
speed (Ypage 174)
170On-boardc omputer (vehicles without steering wheel buttons)
On-boardcomputer and displays
Page 176 of 310
message with3,the display shows the next
submenu.
XPress forg to activate or deactivate ESP.
XPress 3to confirm.
The next submenu is shown in the display.
If the å warning lamp in the instrument
cluster lights up when the vehicleisr eadyto
drive, ESP
®is deactivated.
Observe the informatio nonwarning lamps
(
Ypage 221) and display messages
(Ypage 193).
Setting the sensitivity of the rain sensor
The vehiclem ust be stationary .Use the buttons
in the instrument cluster.
XPress Èto select the Settingsmenu.
XPress3to select the Rain Sensorsub-
menu.
The display shows the current sensitivity set-
ting.
XPress forg to select the Low,Standardor
Sensitivesetting. This setting controls the
rain sensor's sensitivity to precipitation. The
windshieldw iper willthen wip emore or less
frequently at the same precipitation intensity.
XPress 3to confirm.
The next submenu is shown in the display.
You can find further informatio nunder "Wind-
shiel dwiper" (
Ypage 101).
Activating/deactivatin gATTENTION
ASSIST
The vehiclem ust be stationary .Use the buttons
in the instrument cluster.
XPress Èto select the Settingsmenu.
XPress3to select the Attention Assistsubmenu.
The display shows the current status.
If theAttention Assist Inoperative
message is shown in the display ,ATTENTION
ASSIST is not available due to amalfunction
and is deactivated. If you confirm the mes-
sage with 3,the display shows the next sub-
menu.
XPress forg to activate or deactivate
ATTENTION ASSIST.
XPress 3to confirm.
The next submenu is shown in the display. Further informatio
ncan be found under "ATTEN-
TION ASSIST" (
Ypage 149).
Selecting the permanent display func-
tion
With the Permanent Display:function, you
can switch the display in the header between
outsid etemperature and speed.
If the display shows the speed in the header, the
outsid etemperature is shown with the odome-
ters (
Ypage 171).
The additional speedometer unit in the header is
alway sinverse to the speedometer unit.
The vehiclem ust be stationary .Use the buttons
in the instrument cluster.
XUsing Èselect the Settingsmenu.
XUsing3select the Permanent Display:submenu.
The display indicates the selected setting of
Outside Temp.
orSpeedometer.
XChange the setting by pressing forg.
XPress 3to confirm.
The next submenu is shown in the display.
Selecting the unit for the distance
In the Distance Unit:submenu, you can
select whether the display shows certain infor-
mation in kilometers or miles.
The vehiclem ust be stationary .Use the buttons
in the instrument cluster.
XPress Èto select the Settingsmenu.
XPress3to select the Distance Unit:sub-
menu.
The display indicates the selected setting of
km
or Miles.
XChange the setting by pressing forg.
XPress 3to confirm.
The display shows the next submenu or the
Settings
menu again.
The selected distance units are used for the dis- plays:
RDigital speedometer
ROdometer and trip odometer
RTrip computer
RRange
RCurrent consumption
RCruise control
RService intervals
174On-board computer (vehicles without steerin gwheel buttons)
On-board computer and displays
Page 182 of 310
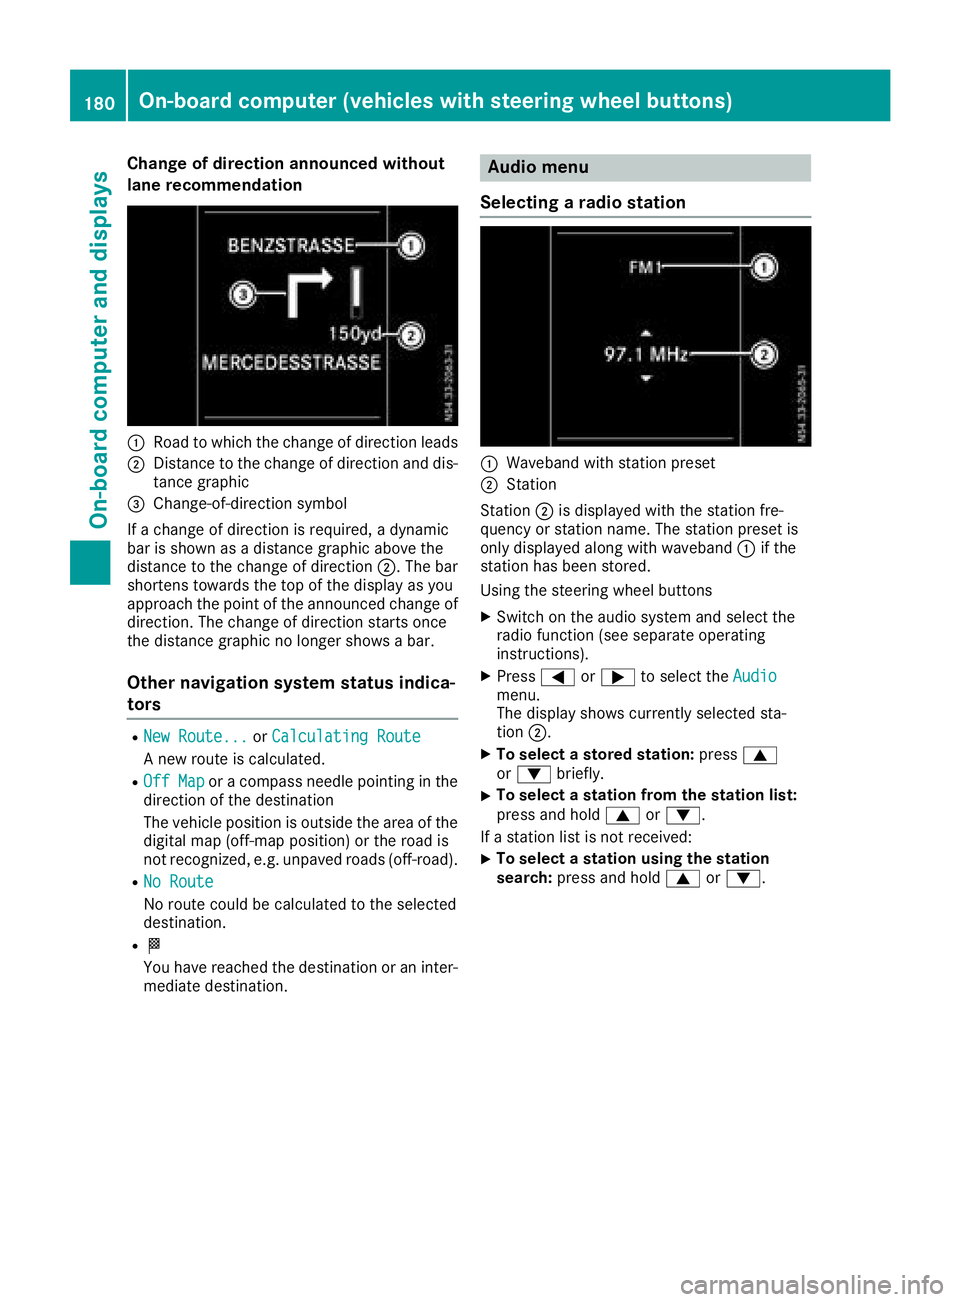
Change of direction announced without
lane recommendation
:Road to whichthechange of direction leads
;Distance to th echange of direction and dis-
tance graphic
=Change-of-direction symbol
If ac hange of direction is required, adynamic
bar is shownasadistanc egraphic above the
distanc etothechange of direction ;.The bar
shortens towards th etop of th edisplay as you
approach th epointoft heannounced change of
direction.T he change of direction start sonce
th ed istanc egraphic no longer showsab ar.
Other navigation system status indica-
tors
RNew Route...orCalculating Route
An ew rout eiscalculated.
ROff Maporac ompass needle pointin ginthe
direction of th edestination
The vehicle position is outside th earea of the
digital map (off-map position)ort heroad is
no trecognized, e.g .unpaved roads (off-road).
RNo Route
No rout ecoul dbec alculate dtotheselected
destination.
RO
You have reached th edestination or an inter-
mediate destination.
Audio menu
Selecting aradio station
:Waveband with statio npreset
;Station
Station ;is displayedw ith thestatio nfre-
quency or statio nname. The statio npreset is
only displayeda longwith waveband :if the
statio nhas been stored.
Usingt hesteering wheel buttons
XSwitch on th eaudio system and selectt he
radio function (see separate operating
instructions).
XPress =or; to selectt heAudiomenu.
The display showsc urrently selectedsta-
tion ;.
XTo select astored stati on:press 9
or : briefly.
XTo select astatio nfromt hestation list:
pres sand hold 9or:.
If as tatio nlist is no treceived:
XTo select astatio nusingthe station
search: pressand hold 9or:.
180On-boardc omputer (vehicles with steerin gwheel buttons)
On-boardc omputer and displays
Page 186 of 310
XPressato confirm.
The currents tatus is shown.
XTo activate/deactivate: pressaagain.
If the å warning lamp in the instrument
cluster lights up when the vehicle is ready to
drive, ESP
®is deactivated.
If the ÷ warning lamp lights up continuously,
ESP
®is not availabled ue toamalfunction.
Observe the information on warning lamps
(
Ypage 221) and display messages
(Ypage 207).
Activating/deactivating the distance
warning function
Using the steerin gwheel buttons
XPress =or; to select the Assist.menu.
XPress9or: to select DistanceWarning.
XPressato confirm.
The currents tatus is shown.
XTo activate/deactivate: press theabut-
ton again.
If the distanc ewarning function of COLLISION
PREVENTION ASSIST is activated, the display
shows the Äsymbol in the header.
At speeds up to approx 20 mph (30 km/h),
the display in vehicles with Active Parking
Assist first shows the ístatus indicator.
Only from aspeed of about 20 mph (30 km/ h)
does the display show the Äsymbol
instead of the ístatus indicator.
Further information can be found under "COL-
LISION PREVENTION ASSIST" (
Ypage 143).
Setting ATTENTION ASSIST
Using the steering wheel buttons
XPress =or; to select the Assist.menu.
XPress:or9 to select AttentionAssist.
XPressato confirm.
The currents etting is displayed.
XTo change the setting: pressaagain.
XPress :or9 to set Deactivated,
Standardor Sensitive.
XPress ato confirm the choice.
If ATTENTION ASSISTisa ctivated, theÀ
symbol is shown in the status area of the dis- play. The selection
Standard
orSensitivesets the sensitivity with which the system
determines the attention level.
Further information can be found under "ATTEN-
TION ASSIST" (
Ypage 149).
Activating/deactivating Blind Spot
Assist
Using the steering wheel buttons
XPress =or; to select the Assist.menu.
XPress:or9 to select Blind SpotAssist.
XPressato confirm.
The currents tatus is shown.
XTo activate/deactivate: press theabut-
ton again.
Further information can be found under "Blind
Spot Assist "(
Ypage 145).
Setting Lane Keeping Assist
Using the steering wheel buttons
XPress=or; to select the Assist.menu.
XPress:or9 to select LaneKeepingAssist.
XPressato confirm.
The currents electionStandardorAdaptiveis displayed.
XTo change the setting: pressaagain.
Further information can be found under "Lane
Keeping Assist "(
Ypage 147).
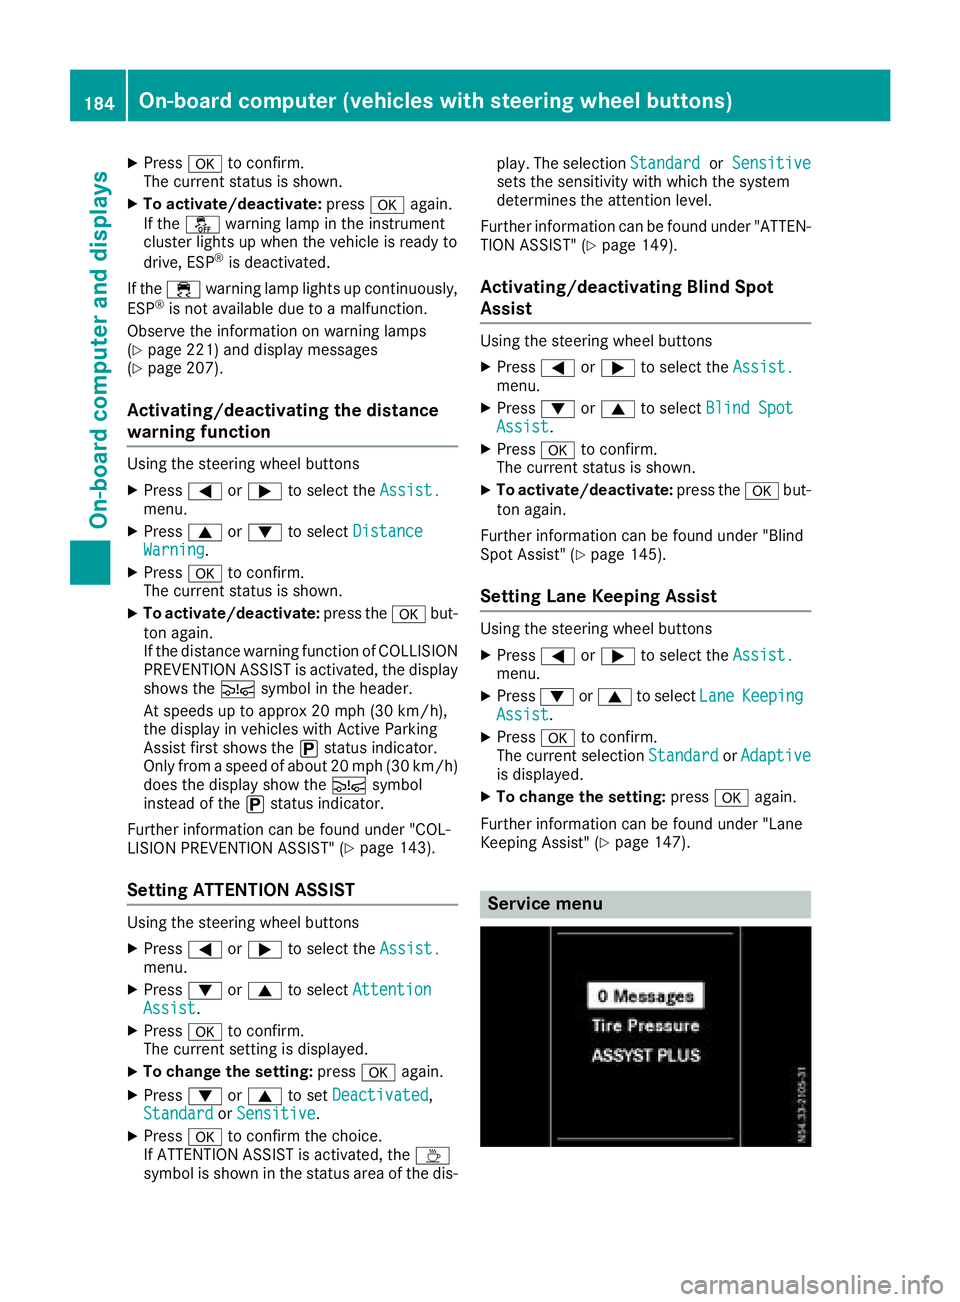
Service menu
184On-boardcomputer (vehicles with steering wheel buttons)
On-boardcomputer and displays
Page 187 of 310
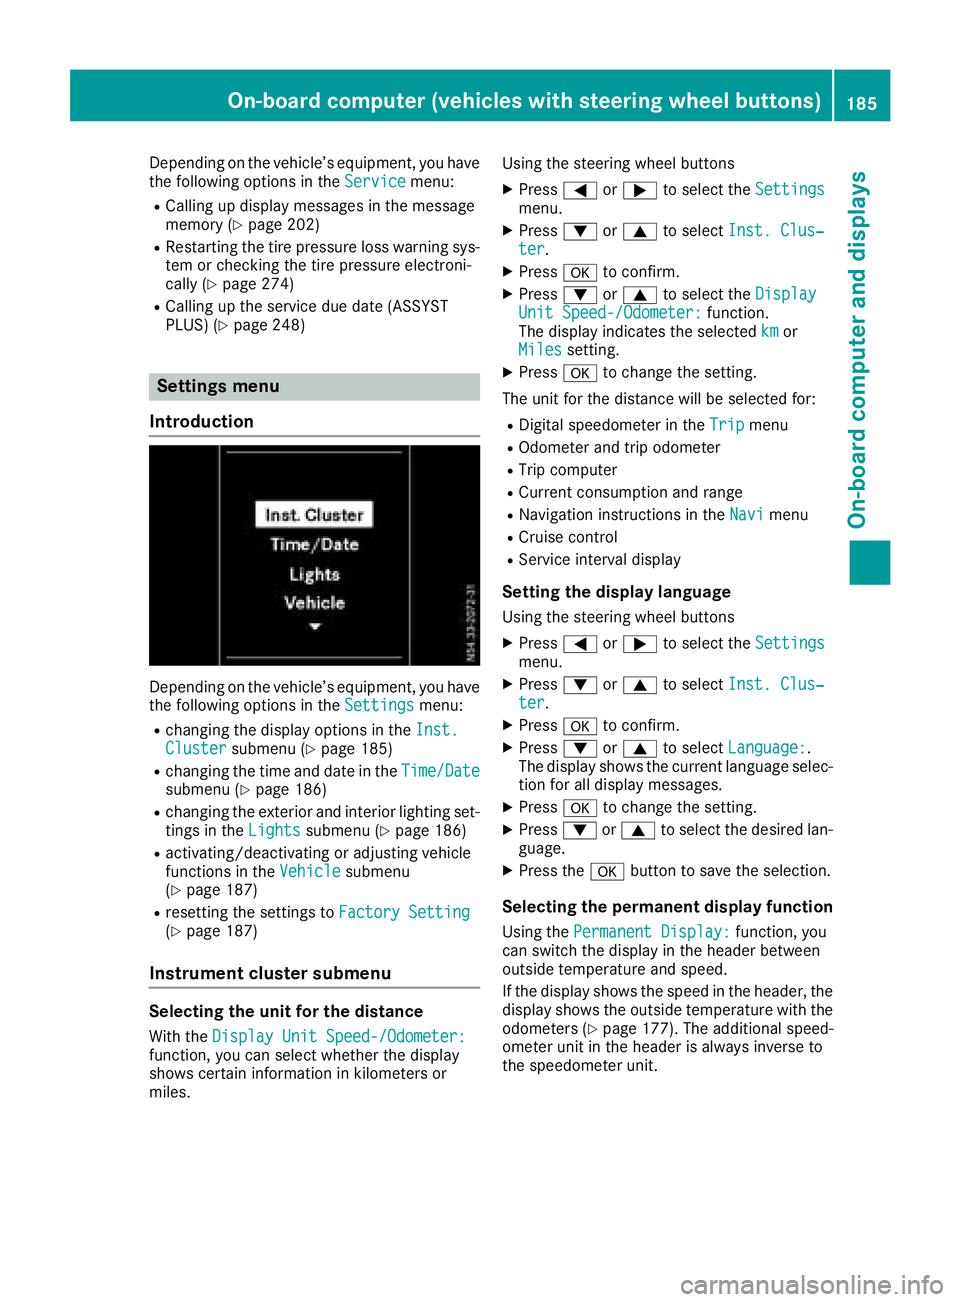
Depending on the vehicle’sequipment ,you have
the following options in the Servicemenu:
RCalling up displaymessage sinthe message
memory (Ypage 202)
RRestartin gthe tire pressure loss warning sys-
tem or checking the tire pressure electroni-
cally (
Ypage 274)
RCalling up the servic eduedate (ASSYST
PLUS) (Ypage 248)
Settings menu
Introduction
Depending on the vehicle’ sequipment ,you have
the following options in the Settingsmenu:
Rchanging the displayoptions in the Inst.Clustersubmenu (Ypage 185)
Rchanging the time and date in the Time/Datesubmenu (Ypage 186)
Rchanging the exteriorand interio rlighting set-
ting sint heLightssubmenu (Ypage 186)
Ractivating/deactivating or adjusting vehicle
functions in the Vehiclesubmenu
(Ypage 187)
Rresetting the settings to FactorySetting(Ypage 187)
Instrument cluste rsubmenu
Selecting the uni tfor the distance
With the DisplayUnitS peed-/Odometer:function, yo ucan select whether the display
shows certain informatio ninkilometers or
miles. Using the steerin
gwheel buttons
XPress =or; to select the Settingsmenu.
XPress:or9 to select Inst. Clus‐ter.
XPressato confirm.
XPress :or9 to select the DisplayUnitSpeed-/Odometer:function.
The displa yindicates the selected kmor
Milessetting.
XPress ato change the setting.
The uni tfor the distance will be selecte dfor:
RDigita lspeedom eterint heTripmenu
ROdometer and trip odometer
RTripc omputer
RCurrent consumption and range
RNavigation instructions in the Navimenu
RCruise control
RService intervaldisplay
Settingthe display language
Using the steerin gwheel buttons
XPress =or; to select the Settingsmenu.
XPress:or9 to select Inst. Clus‐ter.
XPressato confirm.
XPress :or9 to select Language:.
The displa yshows the current languag eselec-
tio nfor al ldisplay messages.
XPressato change the setting.
XPress :or9 to select the desired lan-
guage.
XPress the abutton to save the selection.
Selecting the permanent display function
Using the Permanent Display:function, you
can switch the displa yinthe header between
outside temperatur eand speed.
If the displa yshows the spee dinthe header, the
displa yshows the outside temperatur ewitht he
odometers (
Ypage 177). The additional speed-
ometer uni tinthe header is always invers eto
the speedomete runit.
On-board computer (vehicle swiths teering whee lbuttons)18 5
On-board computera nd displays
Z
Page 188 of 310
Using the steering wheel buttons
XPress=or; to select the Settingsmenu.
XPress:or9 to select Inst. Clus‐ter.
XPressato confirm.
XPress :or9 to select PermanentDisplay:.
XPressato confirm.
The displays hows the current selection of
Outside Temp.
or Speedom..
XPress ato change the setting.
Clock/Date submenu
Setting the time
Using the steering wheel buttons
XPress =or; to select the Settingsmenu.
XPress:or9 to select Time/Date.
XPressato confirm.
XPress :or9 to select the Time:func-
tion.
The displays hows the current time.
XTo set the time: pressaagain.
XPress =or; to switch between hours
and minutes.
XPress :or9 to set the hours or
minutes.
XThen press ato confirm.
The displays hows the updated time.
Setting the date
Using the steering wheel buttons
XPress=or; to select the Settingsmenu.
XPress:or9 to select Time/Date.
XPressato confirm.
XPress :or9 to select the Date:func-
tion.
The displays hows the current date.
XTo set the date: pressaagain.
XPress =or; to switch between day,
month and year.
XPress :or9 to set the day, month or
year.
XThen press ato confirm.
The displays hows the updated date.
Lights submenu
Activating/deactivating the surround
lighting and exterior lighting delayed
switch-off
If you activate the Locator Lightingfunction
and the light switch is turned to the Ãposi-
tion, the following functions are activated when
it is dark:
RSurround lighting: the exterior lighting
remains on for 40 seconds after the doors are
unlocked. When you start the engine, the sur-
round lighting is deactivated and the auto-
matic headlamp feature is activated
(
Ypage 93).
RExterior lighting delayed switch-off: the
exterior lighting remains on for 60 seconds
after the engine is switched off. If you close all
the doors and the tailgate/rear doors, the
exterior lighting switches off after
15 seconds.
Using the steering wheel buttons
XPress =or; to select the Settingsmenu.
XPress:or9 to select Lights.
XPressato confirm.
XPress :or9 to select the LocatorLightingfunction.
The current status is shown.
XTo activate/deactivate: pressaagain.
If you change the setting, conversion does not
take place until the next time the vehicle is
stationary.
Temporarilyd eactivating the exterior lighting
delayed switch-off:
XBefore leaving the vehicle, turn the key to
position 0in the ignition lock.
XTurn the key to position 2in the ignition lock.
The exterior lighting delayed switch-off is
deactivated until the next time the engine is
started.
With surround lighting and exterior lighting
delayed switch-off, the following light up
depending on the vehicle's equipment:
RParking lamps
RFog lamps
RLow-beam headlamps
RDaytime running lamps
186On-board computer (vehicles with steering wheelb uttons)
On-board computer and displays
Page 196 of 310
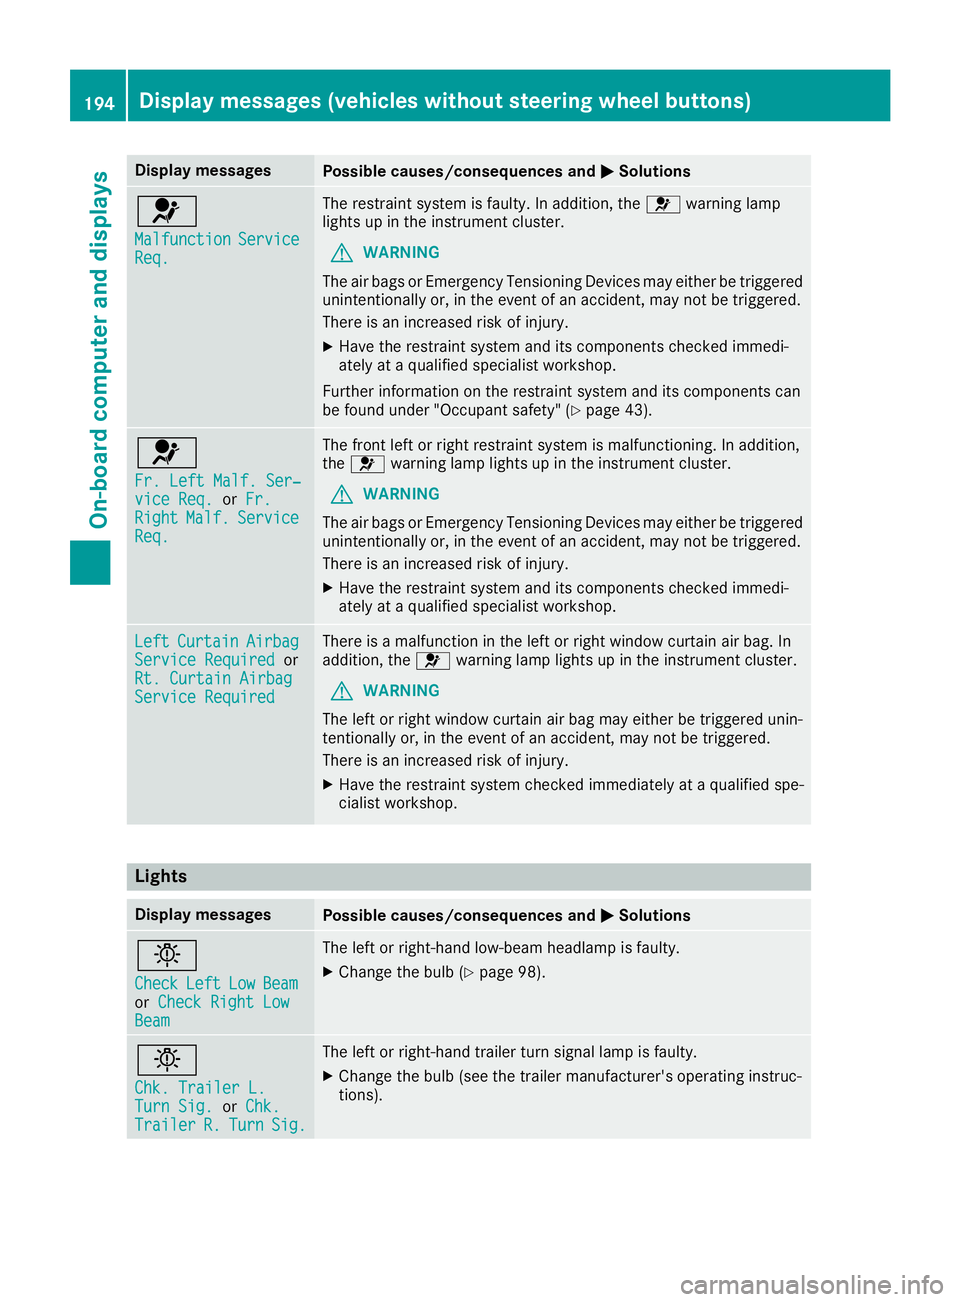
Display messagesPossible causes/consequences andMSolutions
6
MalfunctionServiceReq.
The restrain tsystem is faulty. In addition ,the 6 warning lamp
lights up in th einstrumen tcluster.
GWARNIN G
The air bags or Emergency Tensioning Devices may either be triggered
unintentionally or, in th eevent of an accident, may no tbetriggered .
There is an increased ris kofinjury.
XHavethe restrain tsystem and it scom ponent schecked immedi-
ately at aqualified specialist workshop .
Further information on th erestrain tsystem and it scom ponent scan
be found under "Occupant safety" (
Ypage 43).
6
Fr. LeftMalf. Ser ‐viceReq.or Fr.RightMalf.Servic eReq.
The fron tleftorr ight restrain tsystem is malfunctioning .Inaddition ,
th e6 warning lamp lights up in th einstrumen tcluster.
GWARNIN G
The air bags or Emergency Tensioning Devices may either be triggered
unintentionally or, in th eevent of an accident, may no tbetriggered .
There is an increased ris kofinjury.
XHavethe restrain tsystem and it scom ponent schecked immedi-
ately at aqualified specialist workshop .
LeftCurtai nAirbagServiceRequiredor
Rt. Curtai nAirbag
Servic eRequired
There is amalfunction in th eleftorr ight window curtai nair bag. In
addition ,the 6 warning lamp lights up in th einstrumen tcluster.
GWARNIN G
The lef torright window curtai nair bag may either be triggered unin-
tentionally or, in th eevent of an accident, may no tbetriggered .
There is an increased ris kofinjury.
XHavethe restrain tsystem checke dimmediately at aqualified spe -
cialist workshop .
Lights
Display messagesPossible causes/consequences and MSolutions
b
CheckLeftLowBeamorCheck Right LowBea m
The lef torright-hand low-beam headlamp is faulty.
XChange th ebulb (Ypage 98).
b
Chk .Traile rL.TurnSig.or Chk .Traile rR.TurnSig.
The lef torright-hand trailer tur nsignal lamp is faulty.
XChange th ebulb (see th etrailer manufacturer' soperating instruc-
tions).
194Display message s(vehicles withou tsteering wheelbuttons)
On-board computera nd displays
Page 197 of 310
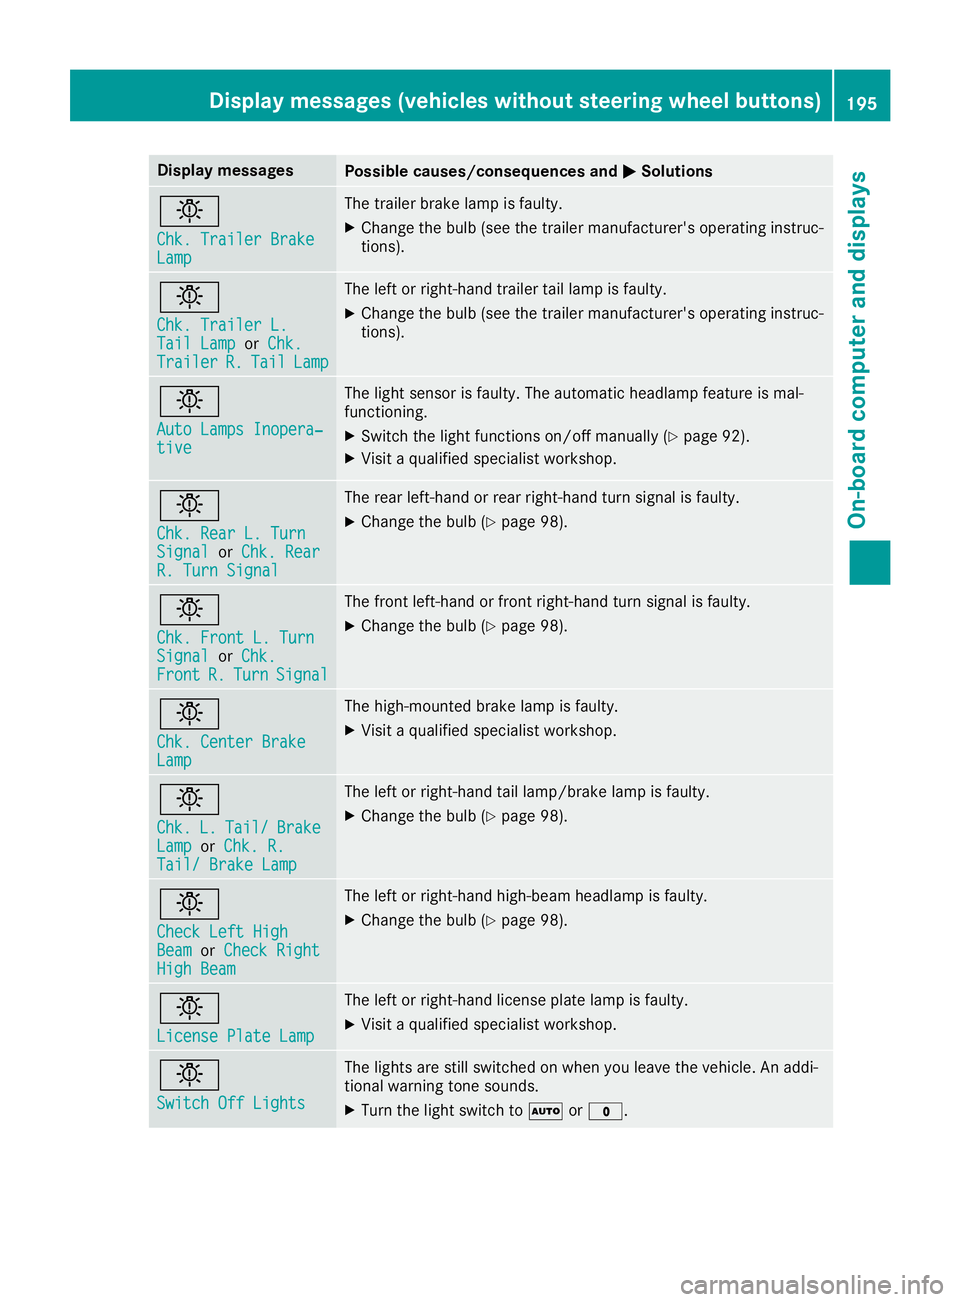
Display messagesPossible causes/consequences andMSolutions
b
Chk.Traile rBrakeLamp
The trailer brak elamp is faulty.
XChange th ebulb (see th etrailer manufacturer' soperating instruc-
tions).
b
Chk .Traile rL.TailLampor Chk .Traile rR.TailLamp
The lef torright-hand trailer tai llamp is faulty.
XChange th ebulb (see th etrailer manufacturer' soperating instruc-
tions).
b
Aut oLamps Inopera‐tive
The ligh tsensor is faulty. The automatic headlamp feature is mal-
functioning .
XSwitchthe ligh tfunction son/of fmanually (Ypage 92).
XVisitaqualified specialist workshop .
b
Chk.RearL.T urnSignalor Chk .RearR. Tur nSignal
The rear left-han dorrear right-hand tur nsignal is faulty.
XChange th ebulb (Ypage 98).
b
Chk .Front L. Tur nSignalorChk .FrontR.TurnSignal
The fron tleft-han dorfrontright-hand tur nsignal is faulty.
XChange th ebulb (Ypage 98).
b
Chk .Center BrakeLamp
The high-mounte dbrak elamp is faulty.
XVisit aqualified specialist workshop .
b
Chk.L.Tail/BrakeLamporChk .R.Tail/ Brake Lam p
The leftorright-hand tai llamp/brake lamp is faulty.
XChange th ebulb (Ypage 98).
b
Check Lef tHighBea morCheck RightHig hBeam
The lef torright-hand high-beam headlamp is faulty.
XChange th ebulb (Ypage 98).
b
Licens ePlate Lam p
The leftorright-hand license plat elamp is faulty.
XVisit aqualified specialist workshop .
b
Switch Off Lights
The lights are still switched on when you leav ethe vehicle. An addi-
tional warning tone sounds.
XTurn th eligh tswitch to Ãor$.
Display message s(vehicles withou tsteering wheelbuttons)19 5
On-board computera nd displays
Z
Page 198 of 310
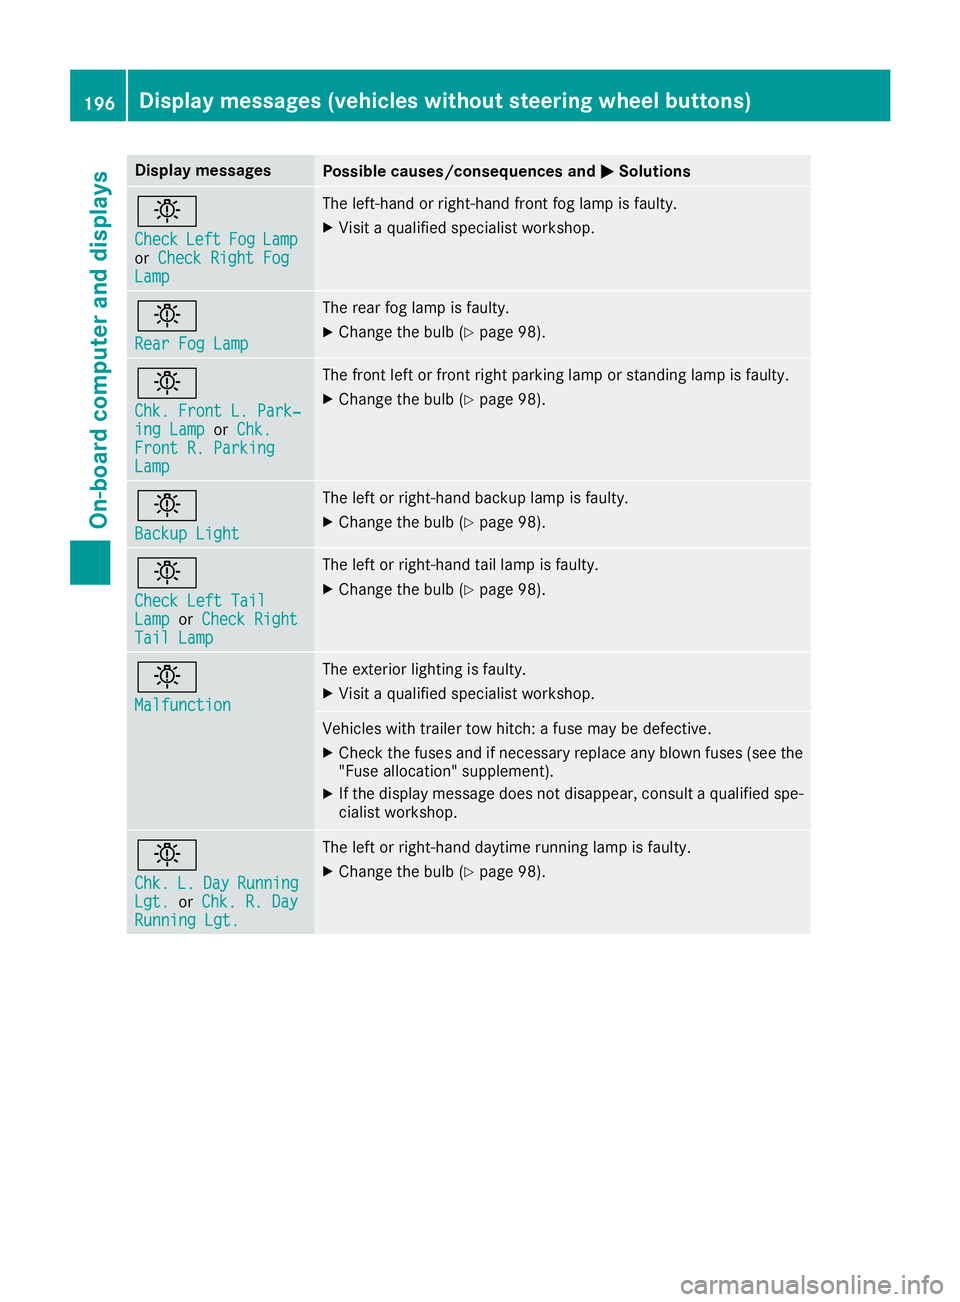
Display messagesPossible causes/consequences andMSolutions
b
CheckLeftFogLamporCheck Right FogLam p
The left-han dorright-hand fron tfog lamp is faulty.
XVisit aqualified specialist workshop .
b
RearFog Lam p
The rear fog lamp is faulty.
XChange th ebulb (Ypage 98).
b
Chk .Front L. Park‐ing Lam porChk .Front R. Parkin gLamp
The fron tleftorf rontright parking lamp or standing lamp is faulty.
XChange th ebulb (Ypage 98).
b
Backup Light
The lef torright-hand backup lamp is faulty.
XChange th ebulb (Ypage 98).
b
Check Lef tTailLam porCheck RightTai lLamp
The lef torright-hand tai llamp is faulty.
XChange th ebulb (Ypage 98).
b
Malfunction
The exterio rlighting is faulty.
XVisit aqualified specialist workshop .
Vehicles withtrailer to whitch :af usem ay be defective.
XChec kthe fuses and if necessar yreplace any blown fuses (see th e
"Fus eallocation "supplement) .
XIf thedisplay message does no tdisappear ,consul taqualified spe -
cialist workshop .
b
Chk.L.DayRunnin gLgt.orChk .R.D ayRunningLgt.
The lef torright-hand daytime runnin glamp is faulty.
XChange th ebulb (Ypage 98).
196Display message s(vehicles withou tsteering wheelbuttons)
On-board computera nd displays
Page 201 of 310
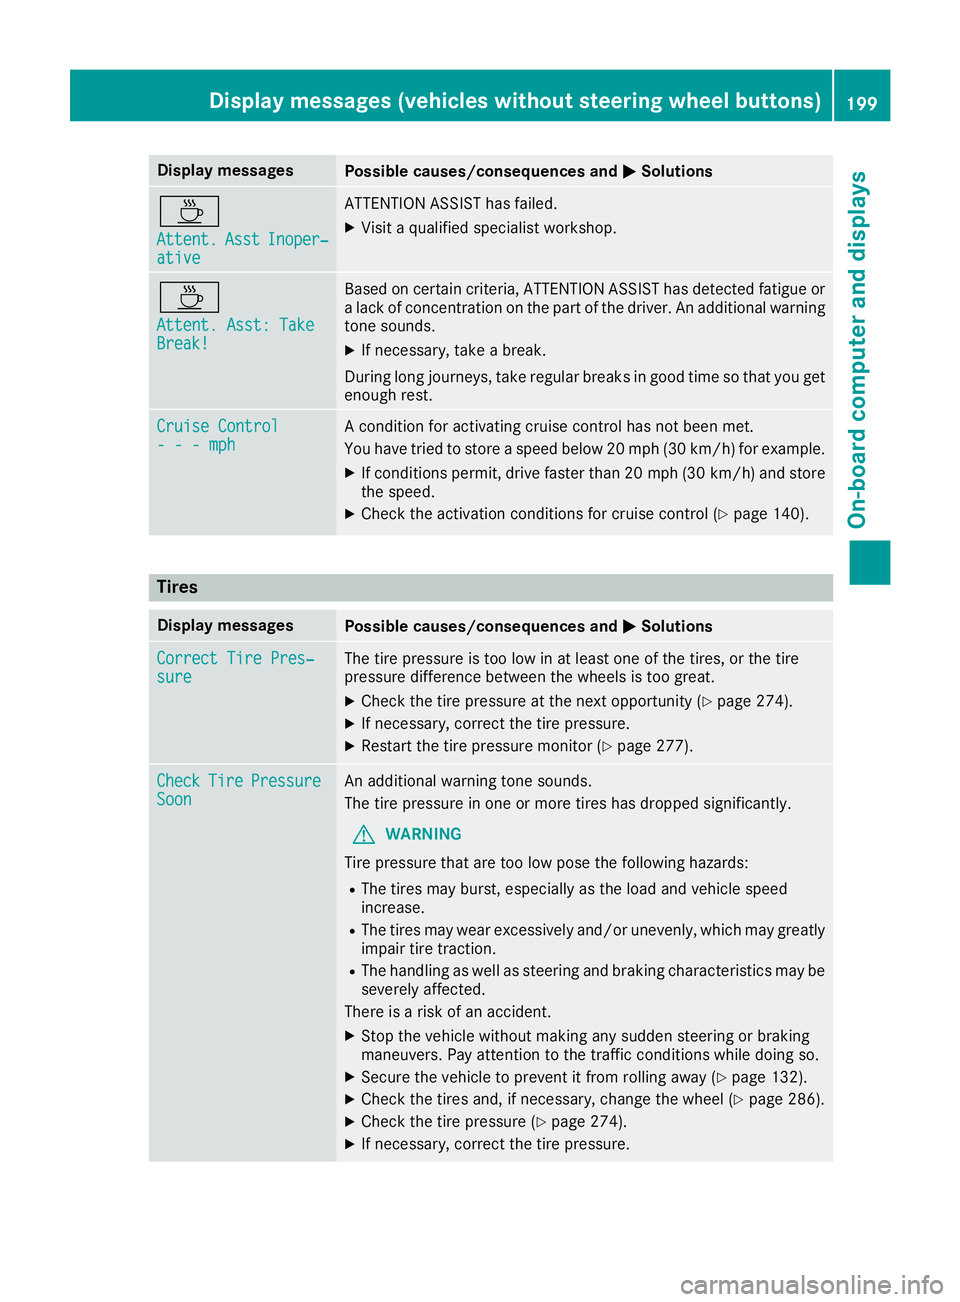
Display messagesPossible causes/consequences andMSolutions
À
Attent.AsstInoper ‐ative
ATTENTION ASSIST has failed.
XVisitaqualified specialist workshop .
À
Attent.Asst: Tak eBreak!
Based on certain criteria, ATTENTION ASSIST has detecte dfatigue or
al ack of concentration on th epart of th edriver .Ana dditional warning
tone sounds.
XIf necessary, tak eabreak.
During lon gjou rneys, tak eregular breaks in goo dtimesot hatyou get
enough rest.
Cruise Contro l---mphAconditi on for activating cruise control has no tbeen met .
You hav etried to store aspeed belo w20m ph(30 km/ h)for example.
XIf conditions permit, drive faster than 20 mph (30 km/h )and store
the speed.
XCheck the activation conditions for cruis econtrol (Ypag e140).
Tires
Display messagesPossiblec auses/consequence sand MSolutions
Correct Tire Pres‐sureThe tire pressure is too low in at least one of the tires, or the tire
pressure difference between the wheels is too great.
XCheck the tire pressure at the next opportunity (Ypag e274).
XIf necessary, correct the tire pressure.
XRestart the tire pressure monitor (Ypag e277).
CheckTirePressureSoonAn additiona lwarning tone sounds.
The tire pressure in one or more tires has dropped significantly.
GWARNING
Tire pressure that are too low pose the following hazards:
RThe tires may burst, especially as the loa dand vehicl espeed
increase.
RThe tires may wea rexcessively and/or unevenly, which may greatly
impair tire traction.
RThe handling as wel lassteering and braking characteristics may be
severely affected.
There is arisk of an accident.
XStop the vehicl ewithout making any sudden steering or braking
maneuvers. Pay attention to the traffic conditions while doing so.
XSecure the vehicl etoprevent it from rolling away (Ypage132).
XCheck the tires and, if necessary, change the whee l(Ypage286).
XCheck the tire pressure (Ypag e274).
XIf necessary, correct the tire pressure.
Display messages (vehiclesw ithout steering wheel buttons)199
On-board computer and displays
Z