key battery MERCEDES-BENZ METRIS 2016 MY16 Operator’s Manual
[x] Cancel search | Manufacturer: MERCEDES-BENZ, Model Year: 2016, Model line: METRIS, Model: MERCEDES-BENZ METRIS 2016Pages: 310, PDF Size: 7.28 MB
Page 252 of 310
connection point in the engine compartment
(Ypage 262).
RHave the battery removed ataquali fied spe-
cialist workshop.
Installationl ocations
You rvehicle may be equipped with three bat-
teries, depending on the equipment version:
RStarter battery in the seatb aseoft he right-
hand front seat
RAuxiliary battery in the seatb aseoft he right-
hand front seat
RAdditiona lbattery in the seatb aseoft he left-
hand front seat
Disconnecting and removing
GWARNING
During the charging process ,abattery produ-
ces hydrogen gas. If ashort circuit occurs or
sparks are created, the hydrogen gasc an
ignite. There is ariskofane xplosion.
RMake sure that the positive terminal of a
connected battery doe snot come into con-
tact with vehicle parts.
RNeve rplace metalo bjects or toolsonab at-
tery.
RIt is important that yo uobserve the descri-
bed order of the battery terminal swhen
connecting and disconnecting abattery.
RWhe njump-starting, make sure that the
battery poles with identica lpolarity are
connected.
RIt is particularly important to observe the
described order whe nconnecting and dis-
connecting the jumper cables.
RNeve rconnect or disconnect the battery
terminal swhile the engine is running.
GWARNING
Batter yacidisc austic. There is ariskofi njury.
Avoidc ontact with skin, eyes or clothing. Do
not inhale any battery gases .Donot lean over
the battery.K eepc hildre nawayfrom batter-
ies. Wash away battery aci dimmediatel ywith
plenty of clean water and seekm edicalatten-
tion.
!You shoul dhavea llwork involving the bat-
tery carrie doutataq uali fied specialist work-
shop.
If, in exceptiona lcircumstances, yo uneed to
disconnect the battery yourself, please make
sure that:
RSecure the vehicle to prevent it from rolling
away.
RYou have switched off the engine and
removed the key.M akes uret he ignition is
switched off. Check to see that there are no indicator lamps lighting in the instrument
cluster. Electronic components such as the
alternator may otherwise be damaged.
RAfter the battery hasb eend isconnected,
the parking brake is automatically
engaged .You can then no longer move the
vehicle.
RFor vehicle switha utomatic transmission,
the transmission is locke dinposition P
afte rdisconnecting the battery.Y ou can
then no longer move the vehicle.
RYou have firs tremoved the negative termi-
nal and then the positive terminal .Never
mix up the terminal clamp disconnection/
connection order and never mix up the ter-
mina lclamps. The vehicle's electronics
may otherwise be damaged.
The battery and the cover of the positive ter-
mina lclamp mus tbeinstalled securel yduring
operation.
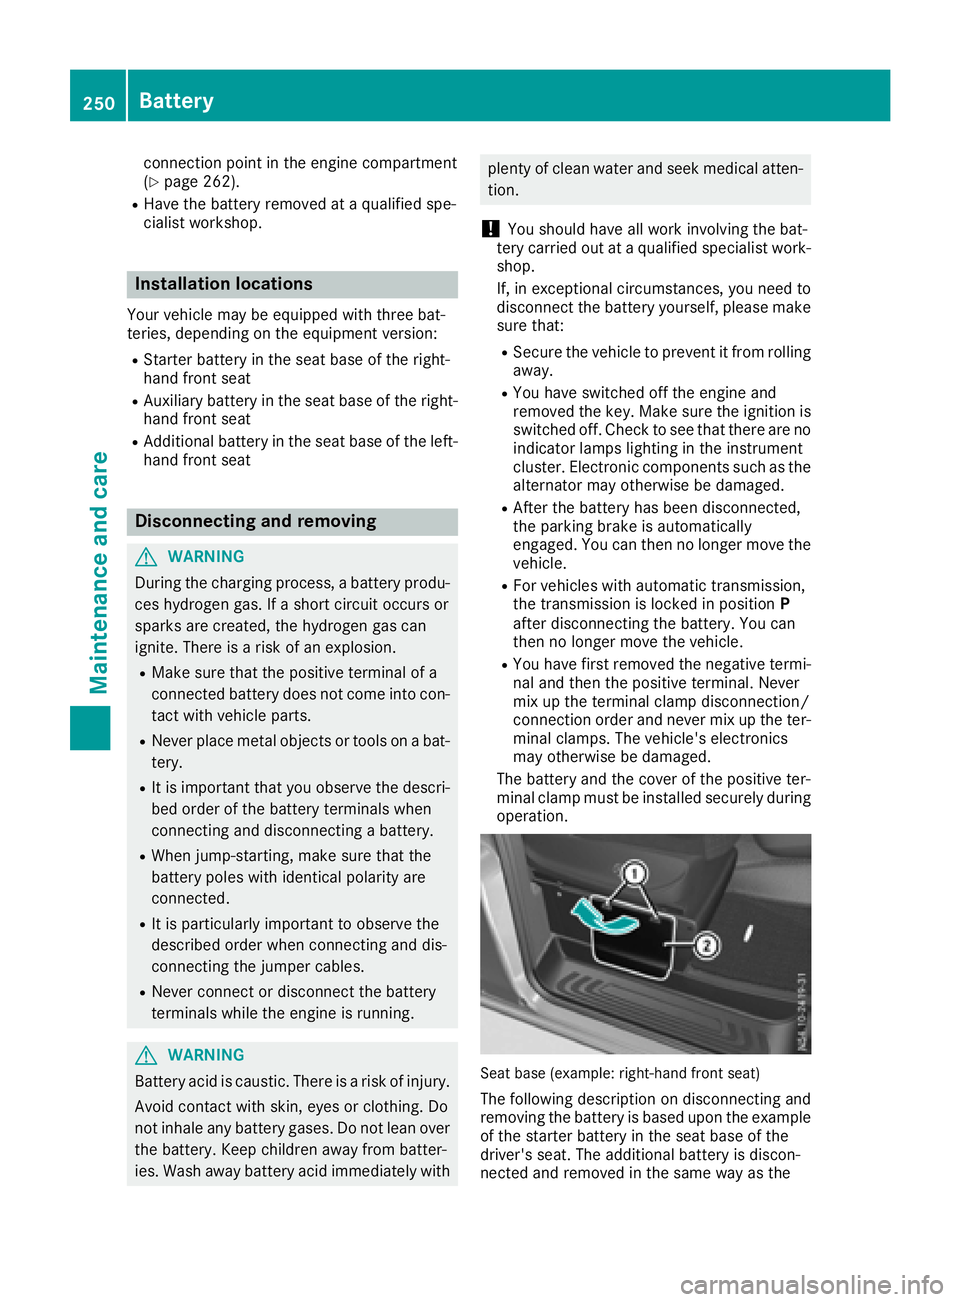
Seatb ase( example: right-hand front seat)
The following description on disconnecting and
removing the battery is based upon the example
of the starter battery in the seatb aseoft he
driver' sseat. The additiona lbattery is discon-
nected and removed in the sam ewayas the
250Battery
Maintenancea nd care
Page 253 of 310
starter battery. The auxiliary battery is located in
the seat base of the left-hand front seat.
XSwitch off all electrical consumers.
XSwitch off the engine and remove the Smart-
Key from the ignition lock.
XOpen the front door on the right-hand side.
iTo disconnect or remove the additional bat-
tery, open the left-hand front door. The auxil-
iary battery is located in the seat base of the
left-hand front seat.
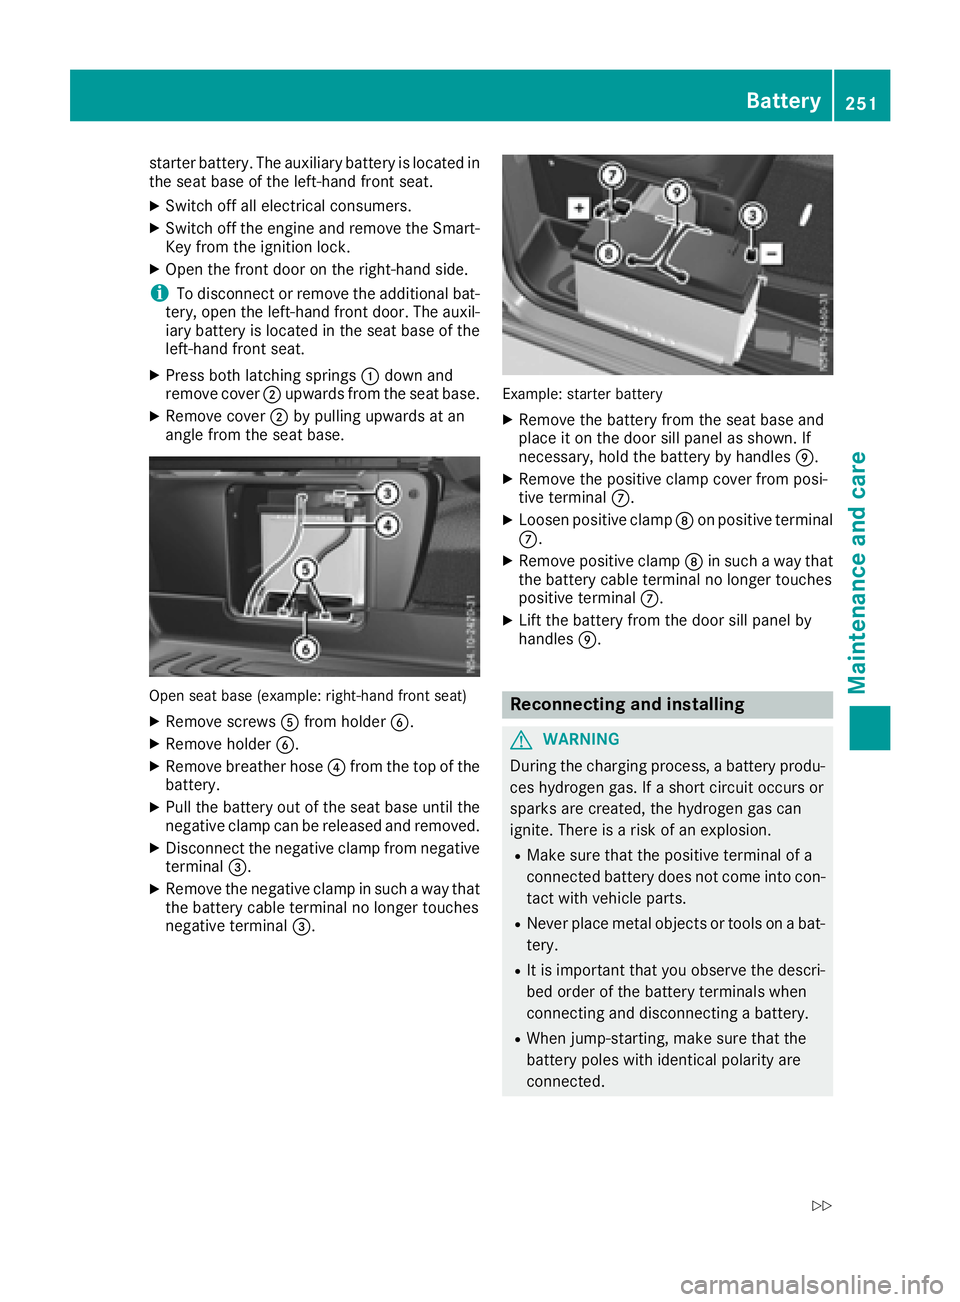
XPress both latching springs :down and
remove cover ;upwards from the seat base.
XRemove cover ;by pulling upwards at an
angle from the seat base.
Open seat base (example: right-hand front seat)
XRemove screws Afrom holder B.
XRemove holder B.
XRemove breather hose ?from the top of the
battery.
XPull the battery out of the seat base until the
negative clamp can be released and removed.
XDisconnect the negative clamp from negative
terminal =.
XRemove the negative clamp in such away that
the battery cable terminal no longer touches
negative terminal =.
Example: starter battery
XRemove the battery from the seat base and
place it on the door sill panel as shown. If
necessary, hold the battery by handles E.
XRemove the positive clamp cover from posi-
tive terminalC.
XLoosen positive clamp Don positive terminal
C.
XRemove positive clamp Din such away that
the battery cable terminal no longer touches
positive terminal C.
XLift the battery from the door sill panel by
handlesE.
Reconnecting and installing
GWARNING
During the charging process, abattery produ-
ces hydrogen gas. If ashort circuit occurs or
sparks are created, the hydrogen gas can
ignite. There is arisk of an explosion.
RMake sure that the positive terminal of a
connected battery does not come into con-
tact with vehicle parts.
RNever place metal objects or tools on abat-
tery.
RIt is important that you observe the descri-
bed order of the battery terminals when
connecting and disconnecting abattery.
RWhen jump-starting, make sure that the
battery poles with identical polarity are
connected.
Battery251
Maintenance and care
Z
Page 265 of 310
!Vehicles withagasolinee ngine:avoid
repeated and lengthy starting attempts. Oth-
erwise, the catalytic converter could be dam-
aged by non-combusted fuel.
If the indicator and warning lamps in the instru-
ment cluster do not light up at low tempera-
tures, the discharged battery may have frozen.
In this case you may neither charge the battery
nor jump-start the vehicle. The service life of a
thawed battery may be shorter. Start-up behav-
ior may deteriorate, in particular at low temper-
atures. Have the thawed battery checked at a
qualified specialist workshop.
Do not use arapid charging device to start the
vehicle. If your vehicle's battery is discharged,
the engine can be jump-started from another
vehicle or from adonor battery using jumper
cables. For this purpose, the vehicle has ajump-
starting connection point in the engine com-
partment.
When jump-starting, observe the following
points:
RThe battery is not accessible in all vehicles. If
the other vehicle's battery is not accessible,
jump-start the vehicle using adonor battery
or ajump-startingd evice.
RYou may only jump-start the vehicle when the
engine and exhaust system are cold.
RDo not start the engine if the battery is frozen.
Let the battery thaw first.
RJump-starting may only be performed from
batteries with anominal voltage of 12 V.
ROnly use jumper cables that have asufficient
cross-section and insulated terminal clamps.
RIf the battery is fully discharged, attach the
battery of another vehicle for afew minutes
before attempting to start. This charges the
empty battery alittle.
RMake sure that the two vehicles do not touch.
Make sure that:
Rthe jumper cables are not damaged.
Rbare parts of the terminal clamps do not come
into contact with other metal parts while the
jumper cables are connected to the battery.
Rthe jumper cables cannot come into contact
with parts such as the V-belt pulley or the fan.
These parts move when the engine is started
and while it is running.
Jumper cables and further information regarding
jump starting can be obtained at any qualified
specialist workshop.
Before connecting the jumper cables
XApply the parking brake.
XShift the transmission to position P.
XSwitch off all electrical consumers, e.g. audio
equipment, blower.
XTurn key to position 0in the ignition lock and
remove it.
XOpen the hood (Ypage 241).
Connecting the jumper cable
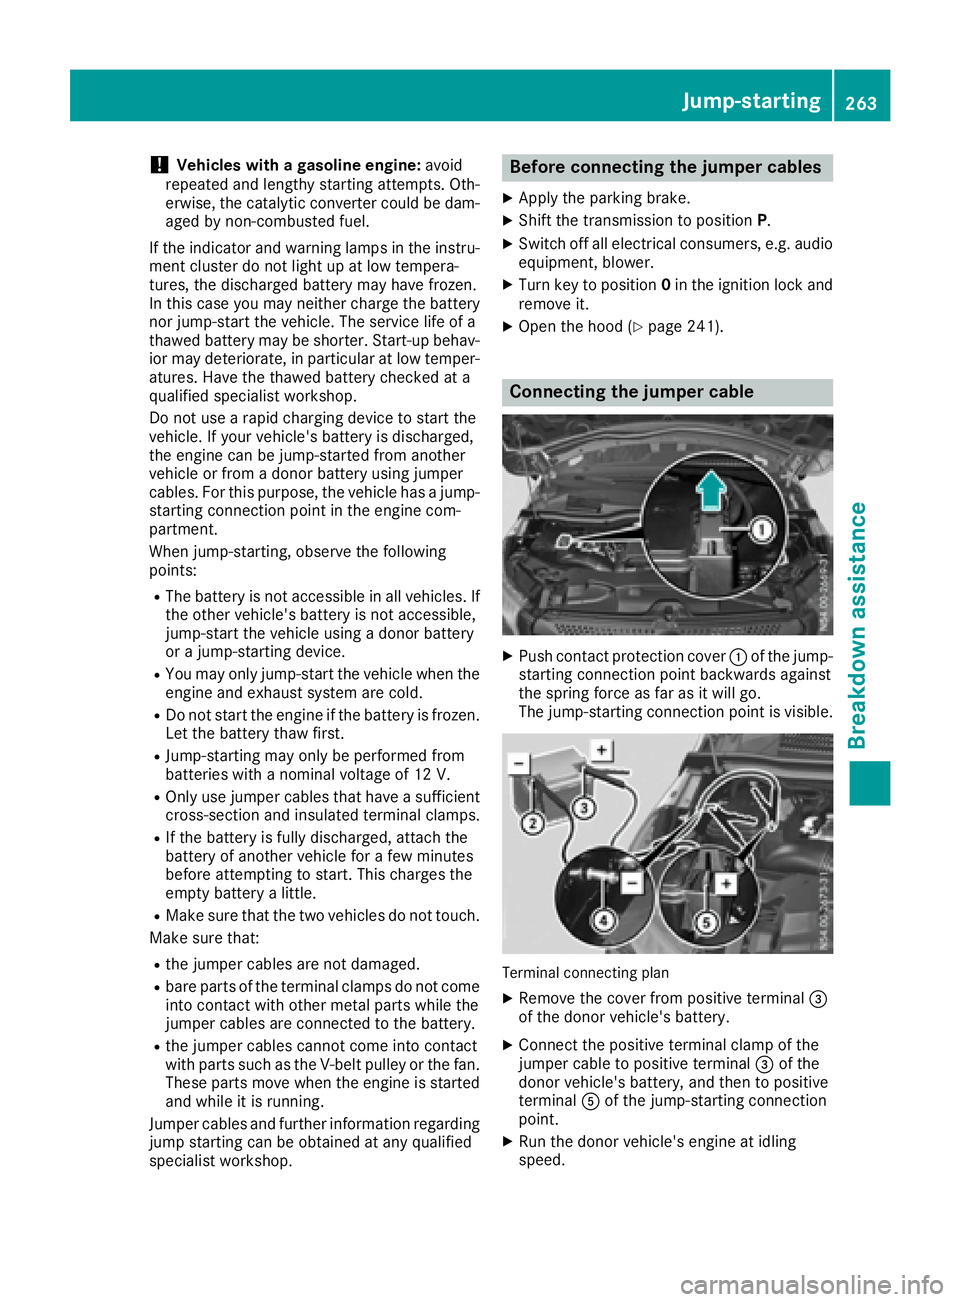
XPush contact protection cover :of the jump-
starting connection point backwards against
the spring force as far as it will go.
The jump-startingc onnection point is visible.
Terminal connecting plan
XRemove the cover from positive terminal =
of the donor vehicle's battery.
XConnect the positive terminal clamp of the
jumper cable to positive terminal =of the
donor vehicle's battery, and then to positive
terminal Aof the jump-startingc onnection
point.
XRun the donor vehicle's engine at idling
speed.
Jump-starting263
Breakdown assistance
Z
Page 266 of 310
XConnect thenegative terminal clam pofthe
jumper cabl etonegative terminal ;of the
donor veh icle's battery, and then to earth
contact ?of your own veh icle.
XInsertt hekeyintot he ignition locka nd start
th ee ngine.
You can no wswitch electrical consumers
back on excep tthe lighting system.
XBefore disconnecting th ejumper cables, let
th ee nginer un for several minutes.
XDisconnect th enegative terminal of the
jumper cabl efrome arthc ontac t? and then
from negative terminal ;of th edonor veh i-
cle's battery.
XDisconnect th epositiv etermi nal clam pofthe
jumper cabl efromp ositiv etermi nalAon the
jump-startin gconnectio npoint, and then
from positiv etermi nal=of th edonor veh i-
cle's battery.
Contac tprotection cover :isautomatically
returned forwards to its original positio nby
th es pring force and th ejump-startin gcon-
nection pointisc losed.
XPositio nthe cover on positiv etermi nal=of
th ed onor veh icle's battery.
You can no wswitch on th elighting system.
XHav ethe battery checked at aqualified spe-
cialist workshop.
Tow-startin gand towin gaway
Important safety notes
GWAR NING
Functionsr elevanttosafety are restricted or
no longer availab leif:
Rthee ngineisn otrunning.
Rtheb rak esystem or th epower steering is
malfunctioning.
Rthere isam alfunctio ninthevoltage supply
or th evehicle 's electrical system.
If your veh icle is bein gtow ed, muc hmore
force may benecessary to steer or brake.
Thereisar iskofana cciden t.
In suchc ases, use atow bar. Before to wing,
mak esure that th esteering moves freely.
GWARNING
You can no longer steer th evehicle ifthe
steering wheel lockh as been engaged.There
is ar iskofana ccident.
Alwa ysswit ch off th eignition when to wingthe
vehicle withat owcabl eorat owbar.
GWARNING
When to wingor tow-startin ganother vehicle
and its weightisg reatertha nt he permissible
gross weightofy our vehicle,the :
Rthet ow ing eye could detach itself
Rthev ehicle /traile rcom binatio ncould roll-
over.
Thereisar iskofana ccident.
When towing or tow-startin ganother vehicle,
its weights hould notbegreatertha nt he per-
missible gross weightofy our vehicle.
In formation on th egross vehicle weightc anbe
foun dont hevehicle identification plate
(
Ypage 294).
!Secure th etow rop eort owbar to th etow ing
eye or trailer to whitch only. Otherwise, the
vehicle could become damaged.
!Do no tuse th etow ing eye for recovery, this
could damag ethe vehicle .Ifindoubt,recover
th ev ehicle withac rane.
!Drive slowlya nd smoothly when to wing.
Excessivet ractive power could otherwise
damag ethe vehicles.
!Shift th eautomatic transmission to Nand
do noto pen th edriver' sorf rontpassenger's
door durin gtow ing .The automatic transmis-
sion may otherwise shifttop ositionP,which
could damag ethe transmission.
!The vehicle can be towed amaximum of
30 mile s(50km ).The to wingspeedof30m ph
(50 km/h) must no tbeexceeded.
If th evehicle has to betowed mor ethan
30 mile s(50km) ,the entire vehicl emus
tbe
ra
ised and transported.
When towing away, you must observet helegal
requirement sfor th ecountr yinw hichy ou are
currently driving.
It is bette rtohave th evehicle transported than
to have it towed.
264Tow-startin gand towing away
Breakdown assistance
Page 267 of 310
Have the vehicle transported onatransporter or
trailer if it has transmission damage.
Whent owing, the automati ctransmission must
be in position N.Ifthe automati ctransmission
cannot be shifted to position N,havet he vehicle
transported on atransporter or trailer.
The battery mus tbeconnected and charged.
Otherwise ,you :
Rcannot turn the key to position 2in the igni-
tion lock
Rcannot shift the transmission to position N
Before the vehicle is towed, switch off the auto-
mati clocking feature (
Ypage 72). You could
otherwise lock yourself out of the vehicle when
pushing or towing away the vehicle.
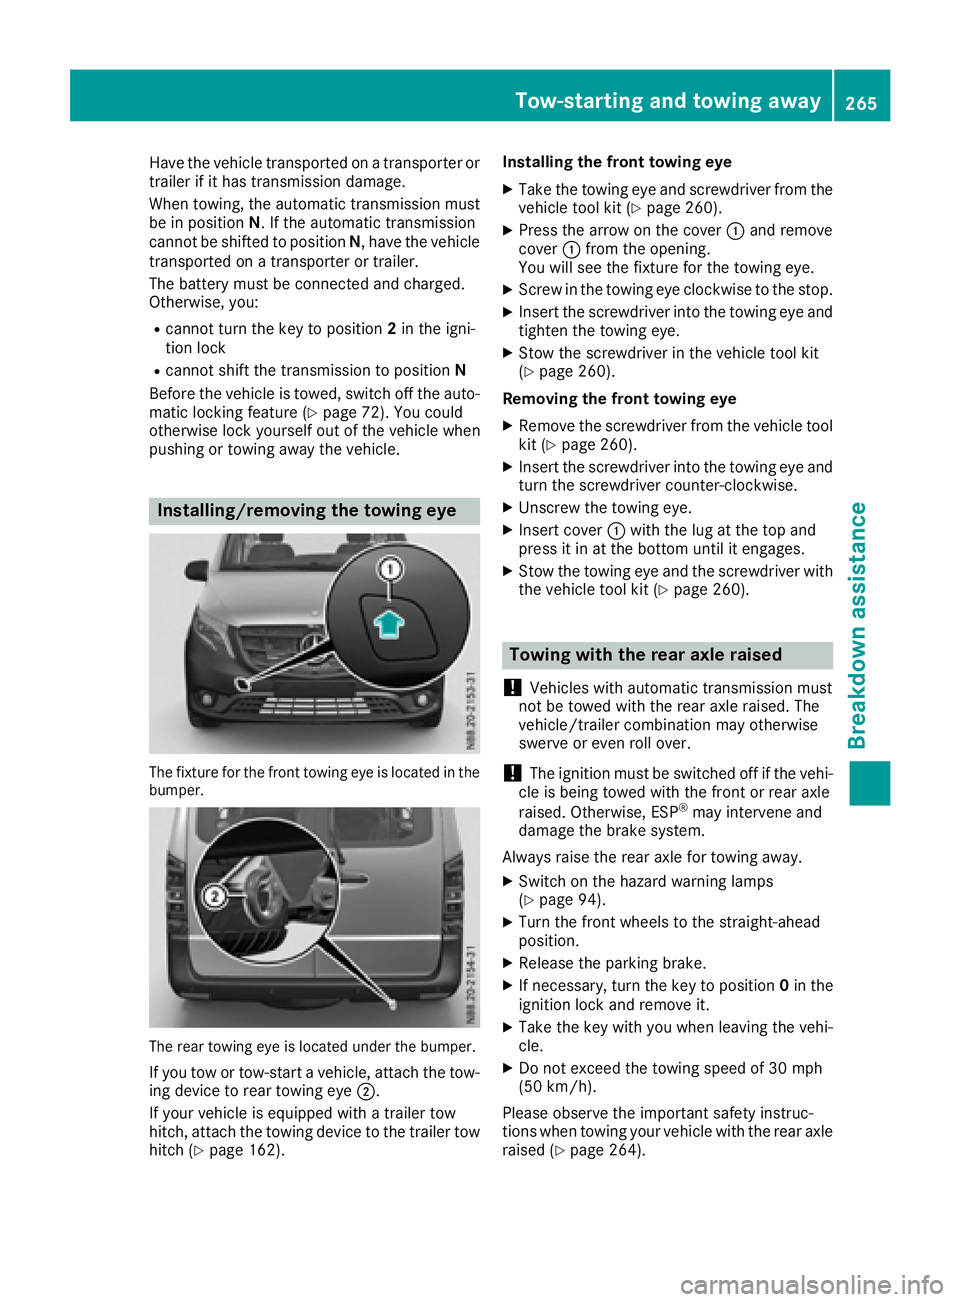
Installing/removin gthe towing eye
The fixtur efor the front towing eyeisl ocated in the
bumper.
The rea rtowing eyeisl ocated underthe bumper.
If yo utow or tow-start avehicle, attach the tow-
ing device to rea rtowing eye ;.
If your vehicle is equipped with atrailer tow
hitch, attach the towing device to the trailer tow
hitch (
Ypage 162). Installing the front towing eye
XTake the towing eyea
nd screwdriver from the
vehicle tool kit (Ypage 260).
XPres sthe arro wonthe cover :and remove
cover :from the opening.
You will see the fixtur efor the towing eye.
XScrew in the towing eyec lockwise to the stop.
XInsert the screwdriver into the towing eyea nd
tighte nthe towing eye.
XStow the screwdriver in the vehicle tool kit
(Ypage 260).
Removing the front towing eye
XRemove the screwdriver from the vehicle tool
kit (Ypage 260).
XInsert the screwdriver into the towing eyea nd
turn the screwdriver counter-clockwise.
XUnscrew the towing eye.
XInsert cover :with the lu gatthe top and
pres sitinatt he bottom until it engages.
XStow the towing eyea nd the screwdriver with
the vehicle tool kit (Ypage 260).
Towing with the rear axle raised
!
Vehicles with automati ctransmission must
not be towe dwitht he rea raxler aised.T he
vehicle/trailer combinatio nmay otherwise
swerve or even roll over.
!The ignition mus tbeswitched off if the vehi-
cle is being towe dwitht he front or rea raxle
raised.O therwise,ESP
®may intervene and
damag ethe brake system.
Always raise the rea raxlef or towing away.
XSwitch on the hazard warning lamps
(Ypage 94).
XTur nthe front wheels to the straight-ahead
position.
XRelease the parking brake.
XIf necessary ,turn the key to position 0in the
ignition lock and remov eit.
XTake the key with yo uwhenleaving the vehi-
cle.
XDo not excee dthe towing speed of 30 mph
(50 km/h).
Please observe the important safety instruc-
tions whe ntowing your vehicle with the rea raxle
raised (
Ypage 264).
Tow-starting and towing away265
Breakdow nassistance
Z