steering wheel MERCEDES-BENZ METRIS 2016 MY16 Operator’s Manual
[x] Cancel search | Manufacturer: MERCEDES-BENZ, Model Year: 2016, Model line: METRIS, Model: MERCEDES-BENZ METRIS 2016Pages: 310, PDF Size: 7.28 MB
Page 91 of 310
XTo movebackwards: press and hol ddown
release button ;(luxury hea drestraints
only) and slid ethe hea drestraint back to the
desired position.
XLet go of release button ;(luxury head
restraints only).
XEnsure thatt he headrestraint hase ngaged
properly.
The hea drestraints for the front seats or for a
standard rea rben ch sea tcan onlybei nstalledor
remove dasdescribe dbelow .
XTo remove: pull the headrestraint for the
front sea torstandard rea rbench sea tupa s
far as it will go.
XPress release button :and pull outt he head
restraint.
XTo install: insert the hea drestraints for the
front sea torstandard rea rbench sea tsuch
thatt he rod with the detents is on the left
when viewe dinthe direction of travel.
XPush the hea drestraint down unti litengages.
Armrests
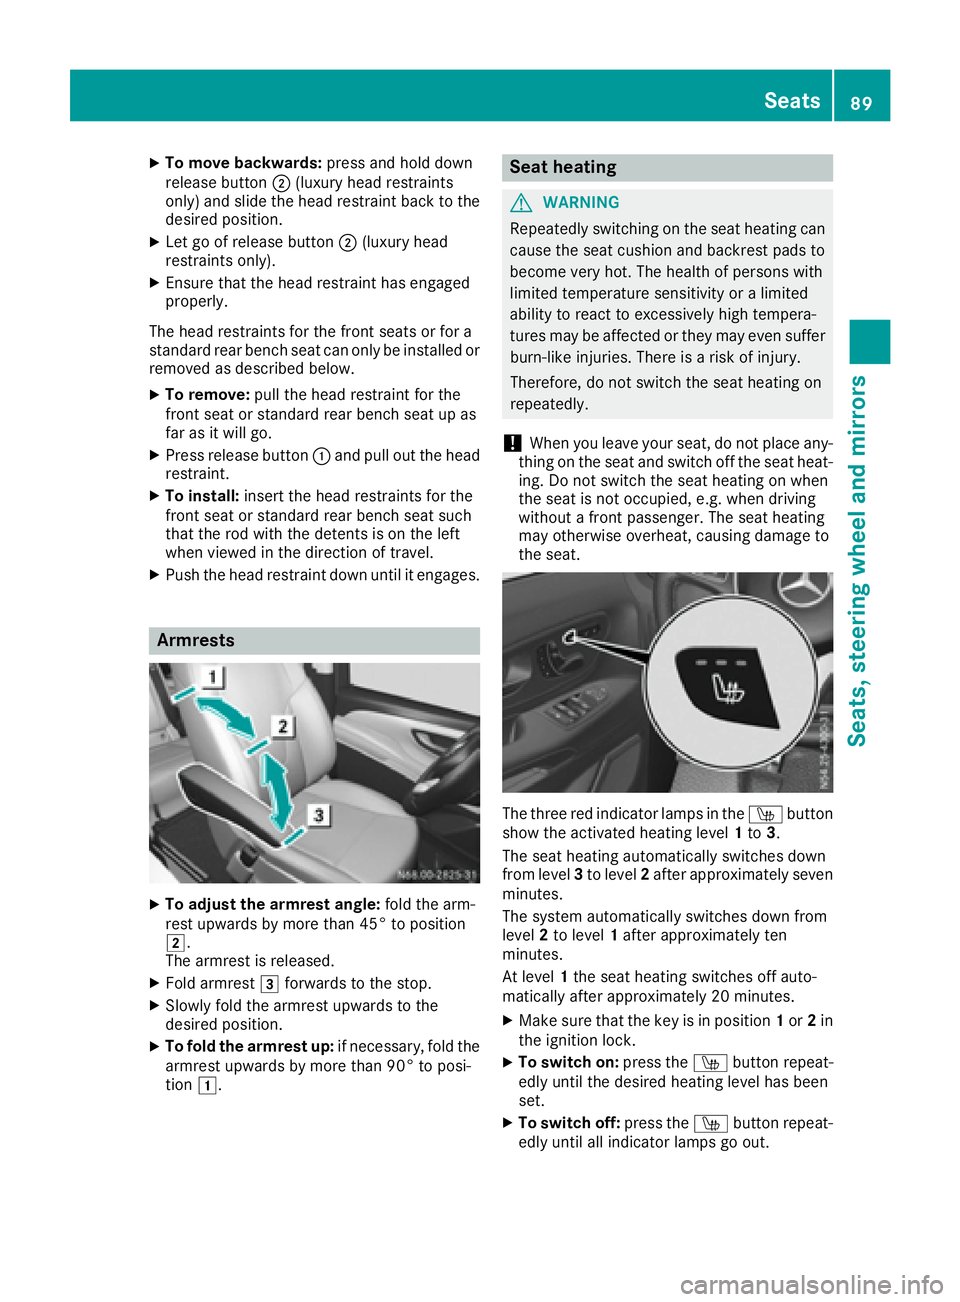
XTo adjust the armres tangle: foldt he arm-
res tupwar ds by more than4 5° to position
2.
The armres tisr eleased.
XFol da rmrest 3forward stothe stop.
XSlowl yfoldt he armres tupwar ds to the
desired position.
XTo fol dthe armres tup:if necessary,f oldt he
armres tupwar ds by more than9 0° to posi-
tion 1.
Seat heating
GWARNING
Repeatedl yswitching on the sea theating can
cause the sea tcushion and backres tpadst o
become very hot. The health of persons with
limite dtemperature sensitivity or alim ited
ability to react to excessivel yhight empera-
ture smaybe affecte dorthey maye vens uffer
burn-like injuries. There is ariskofi njury.
Therefore, do not switch the sea theating on
repeatedly.
!Whe nyou leave your seat, do not place any-
thing on the sea tand switch off the sea theat-
ing .Don ot switch the sea theating on when
the sea tisn ot occupied ,e.g.w hend riving
withou tafront passenger .The sea theating
mayo therwise overheat, causing damag eto
the seat.
The thre ered indicator lamps in the Íbutton
sho wthe activate dheating level 1to 3.
The sea theating automaticall yswitches down
from level 3to level 2afte rapp roximatelys even
minutes.
The system automaticall yswitches down from
level 2to level 1afte rapproximatelyt en
minutes.
At level 1the sea theating switches off auto-
maticall yafterapproximately2 0minutes.
XMake sure thatt he key is in position 1or 2in
the ignition lock.
XTo switc hon:press the Íbutton repeat-
edly unti lthe desired heating level hasb een
set.
XTo switc hoff:press the Íbutton repeat-
edly unti lallindicator lamps go out.
Seats89
Seats, steering wheel andmirrors
Z
Page 92 of 310
If the on-board voltage is too low, the seat heat-
ing willeither switch itself off prematurely or not
come on at all .Inthis case, too many electrical
consumers are switched on or the battery
charge is not sufficient. The seat heating will
automatically switch back to the current heating
level when enough on-board voltage is available
again.
Steering wheel
GWARNING
You could lose control of you rvehicle if you do
the following whil edriving:
Radjust the driver's seat, head restraint,
steering wheel or mirrors
Rfasten the seat belt
There is arisk of an accident.
Adjust the driver's seat, head restraint, steer-
ing wheel and mirror and fasten you rseat belt
before starting the engine.
GWARNING
If the steering wheel is unlocked whil ethe
vehicle is in motion, it could change position
unexpectedly .This could cause you to lose
control of the vehicle.T here isarisk of an
accident.
Before starting off, make sure the steering
wheel is locked. Never unlock the steering
wheel whil ethe vehicle is in motion.
GWARNING
Children could injure themselves if they
adjust the steering wheel .There is arisk of
injury.
When leaving the vehicle,a lways take the
SmartKey with you and lock the vehicle.N ever
leave childrenu nsupervised in the vehicle.
The steering wheel can still be adjusted if the
key has been removed.
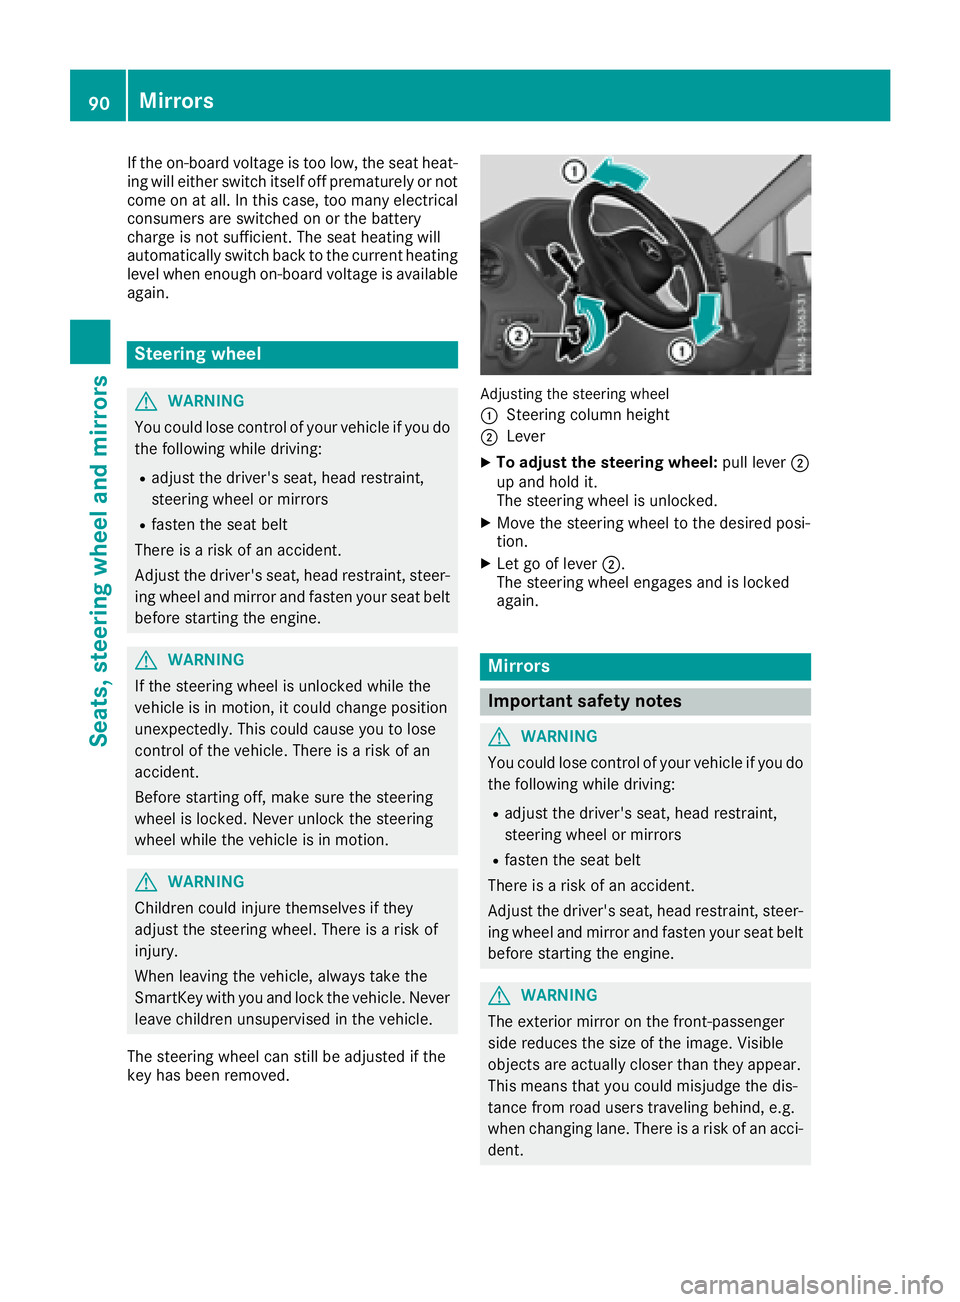
Adjusting the steering wheel
:
Steering column height
;Lever
XTo adjust the steering wheel: pulllever ;
up and hold it.
The steering wheel is unlocked.
XMove the steering wheel to the desiredp osi-
tion.
XLet go of lever ;.
The steering wheel engages and is locked
again.
Mirrors
Important safety notes
GWARNING
You could lose control of you rvehicle if you do
the following whil edriving:
Radjust the driver's seat, head restraint,
steering wheel or mirrors
Rfasten the seat belt
There is arisk of an accident.
Adjust the driver's seat, head restraint, steer-
ing wheel and mirror and fasten you rseat belt
before starting the engine.
GWARNING
The exterior mirror on the front-passenger
side reduces the size of the image .Visible
objects are actually closer than they appear.
This means that you could misjudge the dis-
tance from road users traveling behind, e.g.
when changing lane. There is arisk of an acci-
dent.
90Mirrors
Seats, steerin gwheel and mirrors
Page 93 of 310
For this reason, always make sureofthe
actual distance from the roadu sers traveling
behind by glancing over your shoulder.
Rear-view mirror
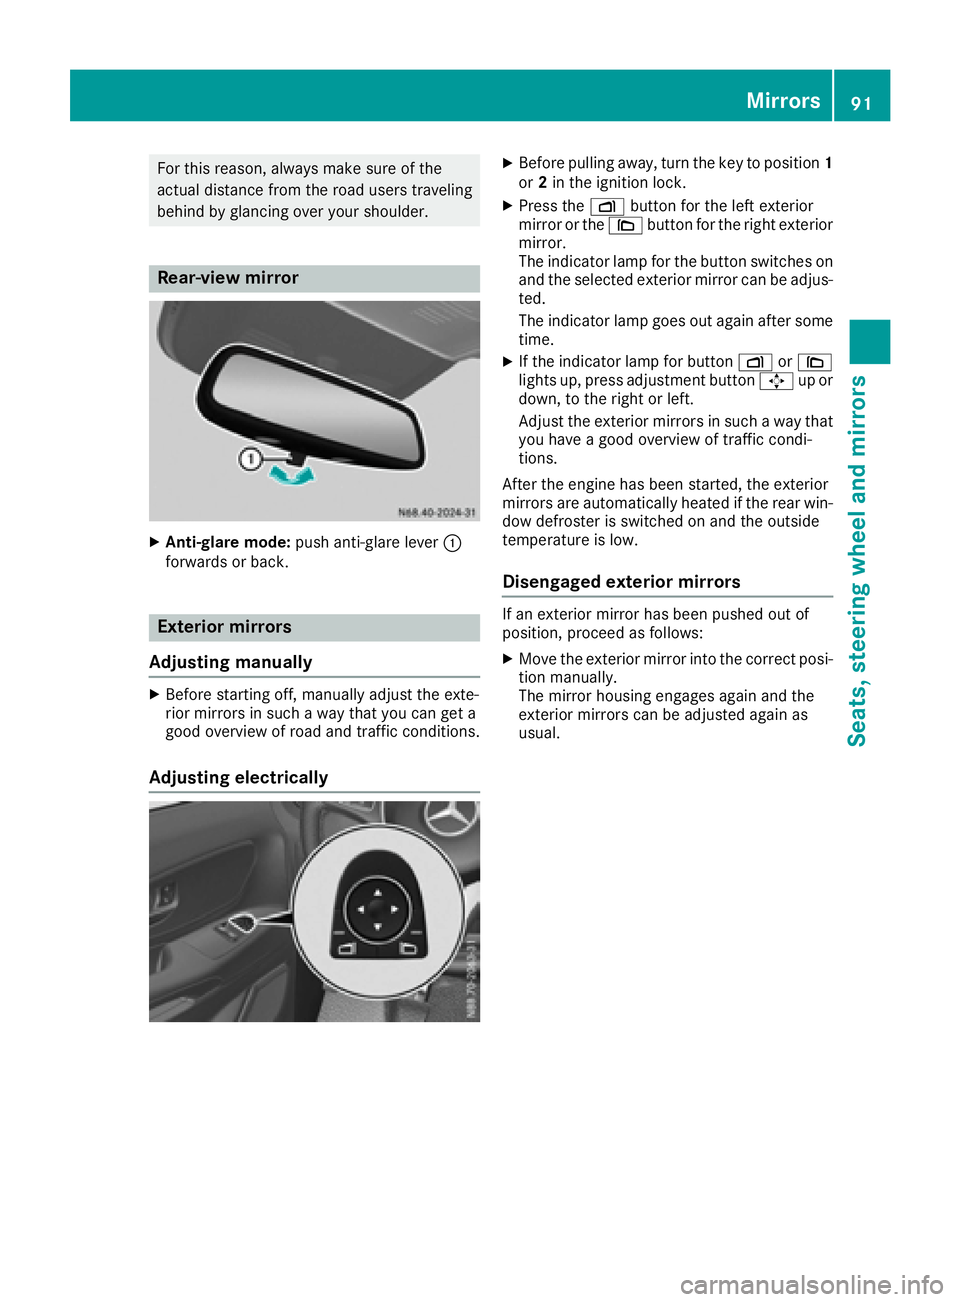
XAnti-glare mode: push anti-glare lever :
forward sorback.
Exterior mirrors
Adjusting manually
XBefores tarting off, manually adjust the exte-
rio rm irrors in such awaythat yo ucan get a
goodo verviewofroadand traffi cconditions.
Adjusting electrically
XBeforep ulling away ,turn the key to position 1
or 2in the ignition lock.
XPres sthe Z button for the lef texterior
mirro rorthe\ button for the right exterior
mirror.
The indicator lamp for the button switches on
and the selected exterior mirro rcan be adjus-
ted.
The indicator lamp goeso utagai naftersome
time.
XIf the indicator lamp for button Zor\
lights up ,press adjustment button 7up or
down, to the right or left.
Adjus tthe exterior mirrors in such awaythat
yo uh aveag oodo vervie woftrafficcondi-
tions.
After the engine has bee nstarted, the exterior
mirrors are automaticall yheated if the rearw in-
dow defroster is switched on and the outside
temperature is low.
Disengaged exterior mirrors
If an exterior mirro rhas bee npushedo utof
position, proceed as follows:
XMove the exterior mirro rinto the correct posi-
tion manually.
The mirro rhousing engages agai nand the
exterior mirrors can be adjuste dagain as
usual.
Mirrors91
Seats, steering wheel and mirrors
Z
Page 101 of 310
Frontlam pclusters
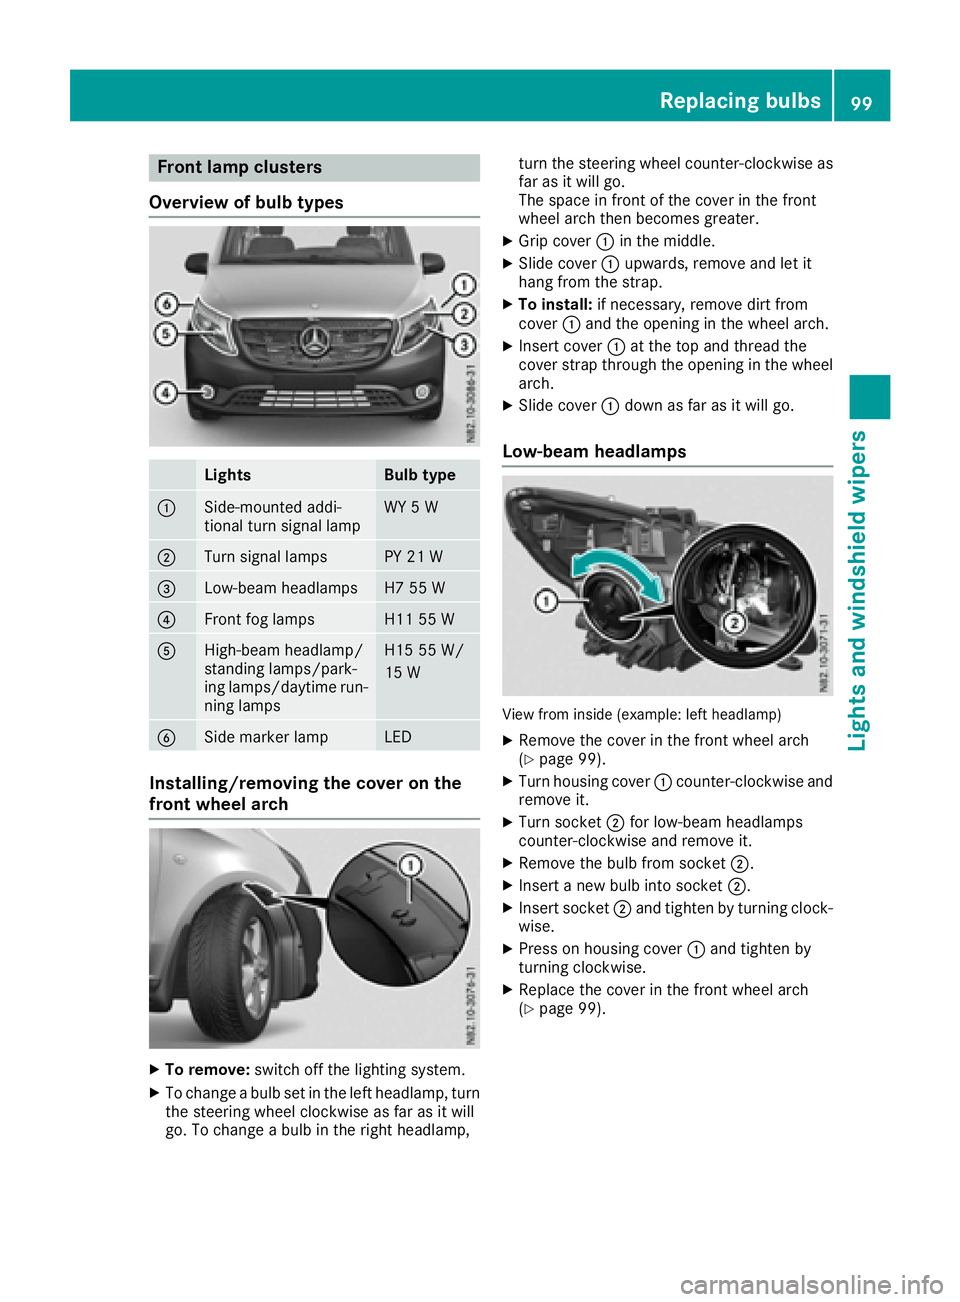
Overview of bul btypes
LightsBulb type
:Side-mounte daddi-
tional tur nsignal lampWY 5W
;Turn signal lamp sPY 21W
=Low-beam headlampsH7 55 W
?Frontfog lamp sH1155W
AHigh-beam headlamp/
standing lamps/park -
ing lamps/daytime run -
nin glamp sH1555W /
15 W
BSidem arke rlampLE D
Installing/removing th ecover on the
front wheel arch
XTo remove: switch off thelighting system.
XTo chang eabulb set in th elefth eadlamp, tur n
th es teering whee lclockwise as far as it will
go. To chang eabulb in th eright headlamp, tur
nthe steering whee lcou nter-clockwise as
far as it will go.
The spac einfrontof thecover in th efront
whee larcht henb ecome sgreater.
XGrip cover :in th emiddle.
XSlide cover :upwards, remove and let it
han gfromt hestrap.
XTo install: if necessary, remove dirt from
cover :and th eopening in th ewhee larch.
XInser tcover : at th etop and thread th e
cover strap throug hthe opening in th ewhee l
arch.
XSlide cover :down as far as it will go.
Low-beam headlamps
View from inside (example: lef theadlamp )
XRemove th ecover in th efront whee larch
(Ypage 99).
XTurn housing cover :counter-clockwise and
remove it .
XTurn socke t; for low-beam headlamps
counter-clockwise and remove it .
XRemove thebulb from socke t;.
XInser tanewbulb int osocke t;.
XInser tsocke t; and tighten by turnin gclock -
wise.
XPress on housing cover :and tighten by
turnin gclockwise.
XReplac ethe cover in th efront whee larch
(Ypage 99).
Replacingb ulbs99
Lightsand windshield wipers
Z
Page 121 of 310
Useful information
This Operator's Manual describes all models as
well as standard and optional equipment of your
vehicle that were available at the time of going
to print.Country-specific variation sare possi-
ble. Note that your vehicle may not be equipped
with all of the described functions. This also
applies to system sand function srelevantt o
safety.
Read the information on qualified specialist
workshops (
Ypage 29).
Breaking-in notes
Important safetyn otes
In certain drivingand drivingsafetysystems, the
sensors adjust automatically while acertain dis-
tance is being driven after the vehicle has been
delivered or after repairs. Full system effective- ness is not reached until the end of this teach-in
procedure.
New or replaced brake pads and brake discs
only reach their optimal brakin geffecta fter a
few hundred kilometers of driving. Until then,
compensat efor this by applying greater forcet o
the brake pedal.
The first 1000 miles (1500 km)
For the servicel ife and economy of your vehicle
it is crucial that you break in the engin ewith due
care.
RTherefore, protect the engin efor the first
1000m iles (1500k m) by drivingatv arying
vehicle and engin espeeds.
RAvoid overstraining the vehicle and high
engin espeeds during this period, e.g. driving
at full throttle. Do not exceed Øof the max-
imum speed for each gear.
RDo not change down agear manually in order
to brake.
RTry to avoid depressingt he accelerator pedal
beyond the point of resistance (kickdown).
After 1000m iles (1500km), you can increase
the engin espeed gradually and accelerate the
vehicle to full speed.
iYou should also observet hesenotes on
breaking-in if the engin eorparts of the drive
train on your vehicle have been replaced.
Driving
Important safetyn otes
GWARNING
Flammable materials introduced through
environmental influence or by animals can
ignit eifinc ontact with the exhaust system or
parts of the engin ethat heat up. There is arisk
of fire.
Carry out regular checks to make sure that
ther eare no flammable foreign materials in
the engin ecompartmen torinthe exhaust
system.
GWARNING
If you switc hoff the ignition while driving,
safety-relevant function sare only available
with limitations, or not at all. This could affect, for example, the power steering and the brake
boosting effect. You will require considerably
more efforttos teer and brake. There is arisk
of an accident.
Do not switc hoff the ignition while driving.
GWARNING
If the parkin gbrake has not been fully
released when driving, the parkin gbrake can:
Roverheat and cause afire
Rlose its hold function.
There is arisk of fire and an accident. Release
the parkin gbrake fully before drivingo ff.
!Warm up the enginequickly. Do not use the
engine's full performanc euntil it has reached
operatin gtemperature.
Only shift the automatic transmission to the
desired drive position when the vehicle is sta-
tionary.
Where possible, avoid spinning the drive
wheels when pulling away on slippery roads.
You could otherwise damage the drive train.
Driving119
Driving and parking
Z
Page 122 of 310
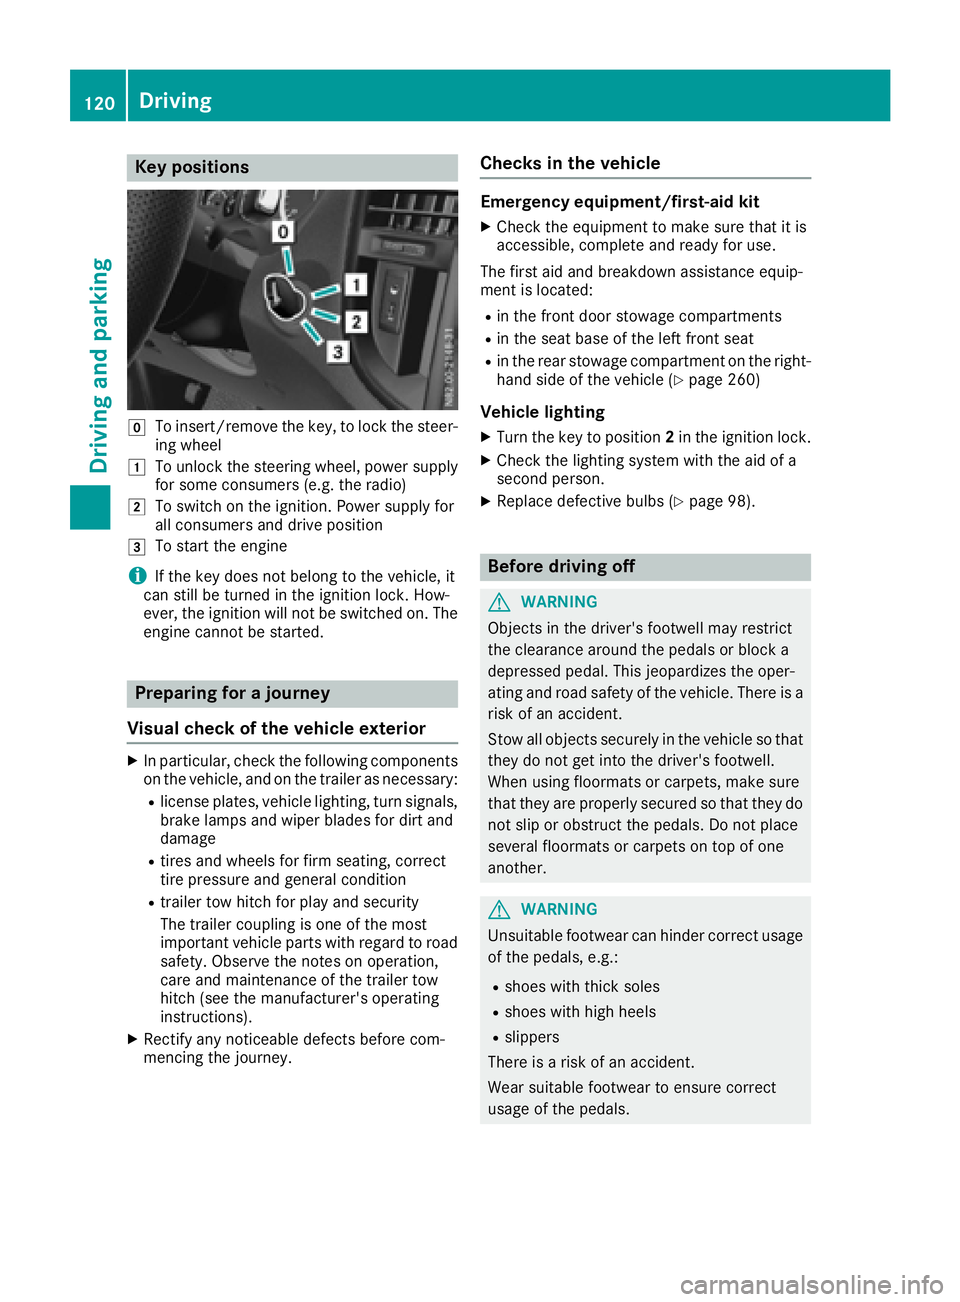
Key positions
gTo insert/remove thekey,tol oc kt he steer -
ing whee l
1To unlockthe steering wheel, powe rsupply
for som econsum ers( e.g. th eradio)
2To switch on th eignition .Powe rsupply for
all consumer sand drive position
3To start th eengine
iIf th ekeydoes no tbelong to th evehicle, it
can still be turne dintheignition lock. How-
ever, th eignition will no tbeswitched on .The
engin ecanno tbes tarted.
Prepa ring for ajourne y
Visua lcheck ofthev ehicle exteri or
XIn particular, chec kthe followin gcom ponent s
on th evehicle, and on th etrailer as necessary:
Rlicense plates, vehicl elighting ,tur ns ignals,
brak elamp sand wiper blade sfor dir tand
damag e
Rtires and wheels for fir mseating ,correct
tire pressur eand general condition
Rtrailer to whitch for play and securit y
The trailer couplin gisoneof th emost
important vehicl epartsw ithr egard to roa d
safety. Observ ethe note sono peration ,
car eand maintenance of th etrailer to w
hitch (see th emanufacturer' soperating
instructions).
XRectify any noticeable defects before com-
mencin gthe journey.
Check sinthevehicle
Emergency equipment/first-aid kit
XChec kthe equipmen ttomakes uret hatiti s
accessible, complet eand read yfor use.
The first aid and breakdown assistanc eequip -
men tislocated:
Rin th efront door stowage compartments
Rin theseat base of th eleftf ront seat
Rin therear stowage compartmen tontheright -
han dside of th evehicl e(Ypage 260)
Vehicle lighting
XTurn th ekeyto position 2in th eignition lock.
XChec kthe lighting system wit hthe aid of a
secon dperson .
XReplac edefective bulbs (Ypage 98).
Before drivingo ff
GWARNING
Objects in th edriver's footwell may restrict
th ec learance around th epedal sorb locka
depressed pedal .This jeopardizes th eoper -
ating and roa dsafet yoft hevehicle. There is a
ris kofana ccident.
Stow all objects securel yint he vehicl esothat
they do no tget int othe driver's footwell.
Whe nusingfloormats or carpets, mak esure
that they are properly secured so that they do no tslip or obstruct th epedals. Do no tplac e
several floormats or carpet sontopof on e
another.
GWARNIN G
Unsuitable footwear can hinder correc tusage
of th epedals, e.g. :
Rshoes withthick sole s
Rshoes wit hhigh heel s
Rslippers
There is ariskofana ccident.
Wear suitable footwear to ensur ecorrect
usage of th epedals.
120Driving
Driving and parking
Page 124 of 310
Hill start assist
Hill start assist helpsyou when pulling awa yfor-
wards or in reverse on an uphill gradient. Hill
start assist automatically maintains the brake
pressure for about another second, after you
have taken you rfoot off the brake pedal. This
gives you enoug htime to move you rfoot from
the brake pedaltot he accelerator pedala nd
depress it before the vehicleb egins to roll.
GWARNING
After ashort time, hil lstart assist wil lnolon-
ger brake you rvehicl eand it coul droll away.
There is arisk of an accident and injury.
Therefore, quickly move you rfoot from the
brake pedaltot he accelerator pedal. Never
leave the vehiclew hen it is held by hillstart
assist.
Hill start assist is not active if:
Ryou are pulling awa yonalevelroad or a
downhill gradient
Rthe transmission is in position N
Rthe parking brake is applied
RESP®is malfunctioning
Reverse warningdevice
GWARNING
Other road users may ignore or fail to heart he
warning tone of the reverse warning feature.
There is arisk of injury if you fail to ensure that
the area in which you are maneuvering is
clear.
Make sure that there are no persons or
objects in the area in which you are maneu-
vering. It may be necessary to enlis tthe help
of as econd personw hen maneuvering.
The reverse warning feature is asystem
designed to assist you in ensuring the safety of
other road users.
Aw arning signals oundstoa lert other road
users when reverse gearise ngaged. The volume
of the warning tone can be reduced for night-
time driving.
XTo reduce the volume of the warnin gtone:
engag ereverse geart wice in quick succes-
sion.
The warning tone is now quieter.
iThe warning tone sound satanormal vol-
ume by default. The volume of the warning
tone has to be reduced each time you engage
reverse gearifn ecessary.
ECOstart/stop function
General notes
When the ECO start/stop function is opera-
tional ,itswitches the engine off automatically if
the vehicleiss lowed toastop under certain
conditions.
When pulling awa yagain, it starts the engine
automatically .The ECO start/stop function
thereby help syou to reduce the fuel consump-
tion and emissions of you rvehicle.
The stop/start function is automatically activa-
ted each time you start the engine with the igni-
tion key.
In transmission program Mthe ECO start/stop
function is automatically deactivated. You can
manually activate the ECO start/stop function if
required.
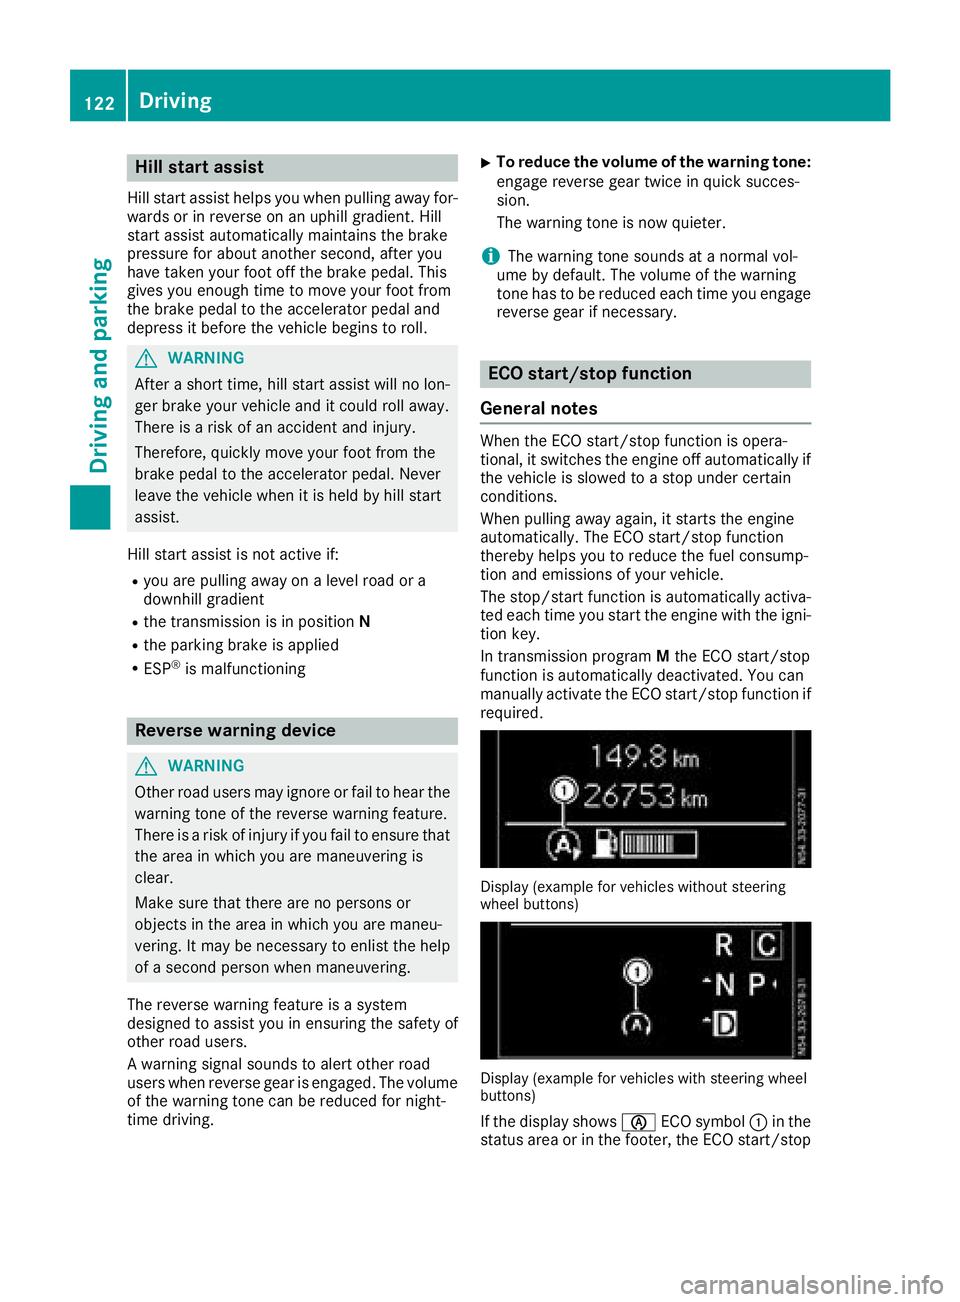
Display (example for vehicles without steering
whee lbuttons)
Display (example for vehicles with steering wheel
buttons)
If the display shows èECO symbol :in the
status area or in the footer, the ECO start/stop
122Driving
Driving and parking
Page 130 of 310
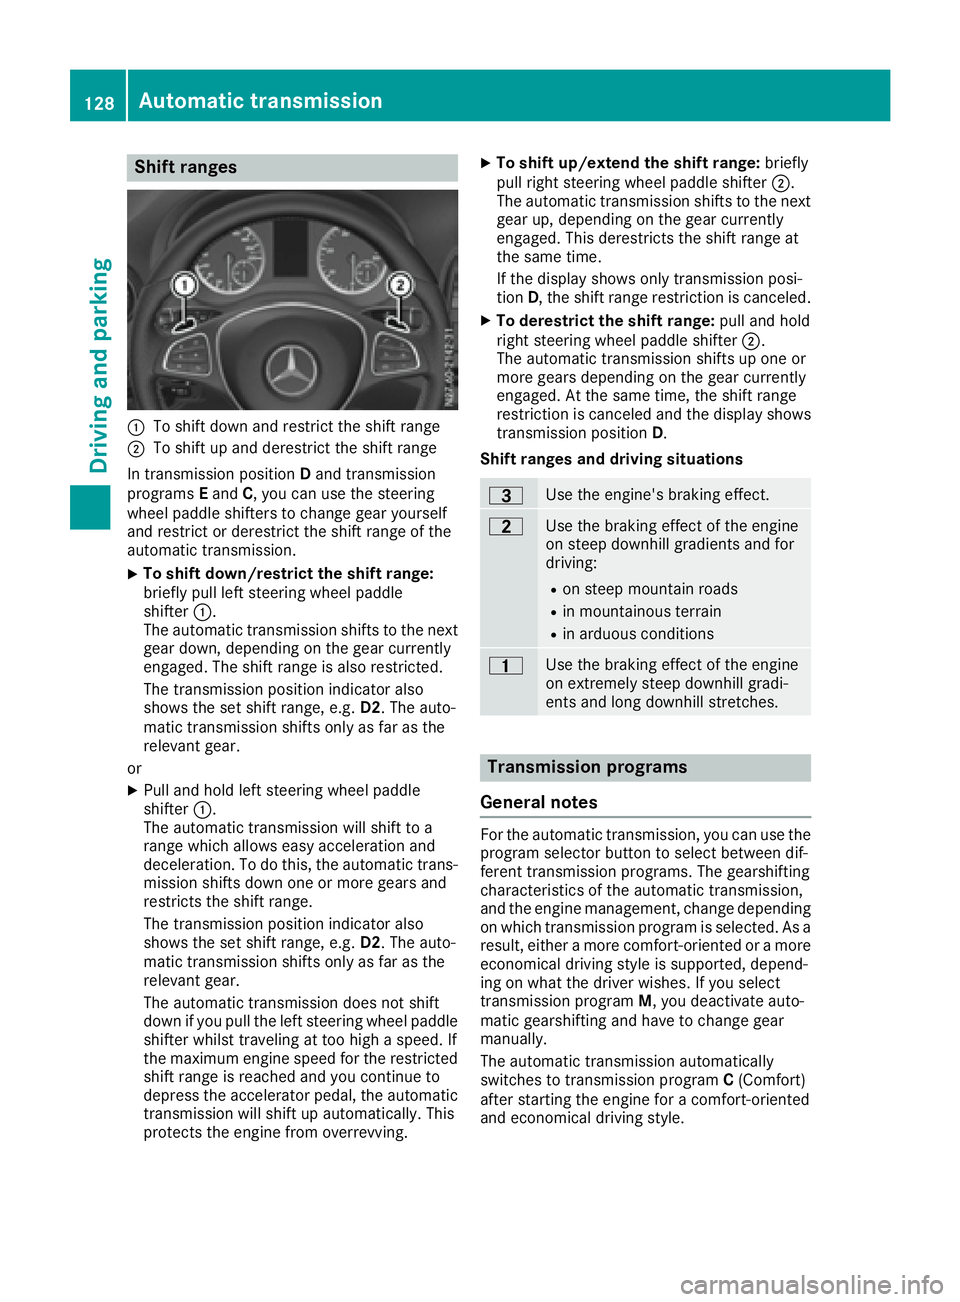
Shift ranges
:To shift down and restrict the shift range
;To shift up and derestrict the shift range
In transmission position Dand transmission
programs Eand C,you can use the steering
wheel paddle shifters to change gear yourself
and restrict or derestrict the shift range of the
automatic transmission.
XTo shift down/restrict the shift range:
briefly pull left steering wheel paddle
shifter :.
The automatic transmission shifts to the next gear down, depending on the gear currently
engaged. The shift range is also restricted.
The transmission position indicator also
shows the set shift range, e.g. D2.The auto-
matic transmission shifts only as far as the
relevant gear.
or
XPull and hold left steering wheel paddle
shifter :.
The automatic transmission will shift to a
range which allowse asy acceleration and
deceleration. To do this, the automatic trans-
mission shifts down one or more gears and
restrictst he shift range.
The transmission position indicator also
shows the set shift range, e.g. D2.The auto-
matic transmission shifts only as far as the
relevant gear.
The automatic transmission does not shift
down if you pull the left steering wheel paddle
shifter whilst traveling at too high aspeed. If
the maximum engine speed for the restricted
shift range is reached and you continue to
depress the accelerator pedal, the automatic
transmission will shift up automatically. This
protectst he engine from overrevving.
XTo shift up/extend the shift range: briefly
pull right steering wheel paddle shifter ;.
The automatic transmission shifts to the next
gear up, depending on the gear currently
engaged. This derestrict sthe shift range at
the same time.
If the display shows only transmission posi-
tion D,the shift range restriction is canceled.
XTo derestrict the shift range: pull and hold
right steering wheel paddle shifter ;.
The automatic transmission shifts up one or
more gears depending on the gear currently
engaged. At the same time, the shift range
restriction is canceled and the display shows
transmission position D.
Shift ranges and driving situations
=Use the engine's braking effect.
5Use the braking effect of the engine
on steep downhill gradients and for
driving:
Ron steep mountain roads
Rin mountainous terrain
Rin arduous conditions
4Use the braking effect of the engine
on extremely steep downhill gradi-
ents and long downhill stretches.
Transmission programs
General notes
For the automatic transmission, you can use the
program selector button to select between dif-
ferent transmission programs. The gearshifting
characteristics of the automatic transmission,
and the engine management, change depending
on which transmission program is selected. As a
result, either amore comfort-oriented or amore
economical driving style is supported, depend-
ing on what the driver wishes. If you select
transmission program M,you deactivate auto-
matic gearshifting and have to change gear
manually.
The automatic transmission automatically
switches to transmission program C(Comfort)
after startin gthe engine for acomfort-oriented
and economical driving style.
128Automatic transmission
Driving and parking
Page 140 of 310
have sufficient tread depth, depending on the
depth of water on the road. There isarisk of
an accident.
For this reason, avoid tire ruts and brake care-
fully.
Therefore, in heavy rain or other conditions in
which hydroplaning can occur, drive as follows:
Rreduce your speed
Ravoid tire ruts
Rapply the brakes with care
Driving on flooded roads
!Do not drive through flooded areas. Check
the depth of any water before driving through
it. Drive slowly through standing water. Oth-
erwise, water may enter the vehicle interior or
the engine compartment. This can damage
the electronic components in the engine or
the automatic transmission. Water can also
be drawn in by the engine's air suction nozzles
and this can cause engine damage.
If you have to drive on stretches of road on which
water has collected, please bear in mind that:
Rthe water level of standing water should not
be above the lower edge of the front bumper
Rdo not drive faster than walking speed
Driving in winter
GWARNING
If you shift down on aslippery road surface in
an attempt to increase the engine's braking
effect,t he drive wheels could lose their grip.
There is an increased danger of skidding and
accidents.
Do not shift down for additional engine brak-
ing on aslippery road surface.
!Vehicles with automatic transmission may
roll only briefly in the neutral position N.Pro-
longed rolling of the wheels, e.g. when being
towed, will result in transmission damage.
Have your vehicle winterproofed at aqualified
specialist workshop at the onset of winter. Drive particularly carefully on slippery roads.
Avoid sudden acceleration, steering and braking
maneuvers. Do not use cruise control.
If the vehicle threaten stoskid or cannot be
stopped when moving at low speed:
XShift the transmission to position N.
XTry to maintain control of the vehicle using
corrective steering.
The outside temperature indicator is not
designed to serve as an ice-warning device and
is therefore unsuitable for that purpose.
Changes in the outside temperature are dis-
played after ashort delay.
Indicated temperatures just above the freezing
point do not guarantee that the road surface is
free of ice. The road may still be icy, especially in
wooded areas or on bridges. If you do not adjust
your driving style, the vehicle may start to skid.
Always adapt your driving style and drive at a
speed to suit the prevailing weather conditions.
You should pay special attention to road condi-
tions when temperatures are around freezing
point.
You can find further information under:
R"M+S tires" (Ypage 269)
R"Snow chains" (Ypage 270)
R"Driving with summer tires" (Ypage 269)
Also observe the notes under "Winter operation" (
Ypage 269).
Driving off-road
Important safety notes
GWARNING
If you drive on asteep incline at an angle or
turn when driving on an incline, the vehicle
could slip sideways, tip and rollover. There is a risk of an accident.
Always drive on asteep incline in the line of
fall (straight up or down) and do not turn the
vehicle.
GWARNING
When driving off-road, your body is subject to
forces from all directions, due to the uneven
surface. You could be thrown from your seat,
for instance. There is arisk of injury.
138Driving tips
Driving and parking
Page 141 of 310
Alwayswearas eatb elt, eve nwhend riving off-
road.
GWARNING
If yo udrive ove robstacle sorinr uts, the steer-
ing whee lmayjerk outofy ourg rip, causing
injury to your hands.
Alway sholdt he steering whee lfirmly with
both hands. Whe ndriving ove robstacles, you
must expect steering forces to increase
briefl yand suddenly.
GWARNING
Flammabl ematerial such as leaves, grass or
twigs mayi gnite if they come into contact with
hot parts of the exhaus tsystem .There is arisk
of fire.
Whe ndriving off roa doronunpaved roads,
check the vehicle's undersid eregularly .In
particular, remove parts of plants or other
flammabl ematerial swhich have become
trapped. In the cas eofdamage, contact a
qualified specialist workshop.
!Whe ndriving off-roadoronu npaved surfa-
ces ,check the undersid eofthe vehicl eand
the wheels and tire satregular intervals .In
particular, remove any trappe dforeign
objects, e.g .stone sand branches.
Such foreig nobjects may:
Rdamage the chassis, the fuel tank or the
brake system
Rcause imbalance sand thusv ibrations
Rbe flung outw heny ou continue driving
If ther eisany damage, inform aquali fied spe-
cialist workshop.
Whe ndriving off-roada nd on construction sites,
sand, muda nd water mixe dwitho il,f or exam-
ple, mayg et into the brakes. Thi smaylead to a
reduction in braking performance or totalb rake
failure, also as aresul tofi ncreased wear .The
braking characteristics will vary depending on
the material thath asgot into the system .Clean
the brakes afte rdriving o
ff-road. If yo uth
en
notice reduce dbraking performance or hear
scraping noises ,hav et he brake system checked
at aq uali fied specialist workshop.A djust your
driving style to the changedb raking character-
istics. Driving off-roadoronc
onstruction sites increa-
ses the possibility of vehicl edamag ewhich may
in turn lead to the failure of certain assemblies
and systems. Adapt your driving style to the off- roa ddriving conditions. Driv ecarefully. Have
any vehicl edamag erectifie dataq ualified spe-
cialist workshop as soo naspossible.
Whe nloadin gyourvehicl efor driving off-roado r
on aconstruction site, kee pthe vehicle's center
of gravity as lo waspossible.
Rule sfor drivin goff-road
!Alway sbearthe vehicle's ground clearance
in mind and avoido bstacles, e.g .deepr uts.
Obstacles mayd amagethe following parts of
the vehicle:
Rthe chassis
Rthe drive train
Rthe fuel and supply tanks
For thisr eason, yo ushoul dalway sdrive
slowly when driving off-road. If yo uhavet o
drive ove robstacles, have the front
passengerd irect you.
iWe recommend thaty ouadditionally carry a
shovel and arecover yrop ew iths hackle in the
vehicle.
REnsure thatl oadsand items of luggage are
securel ystowed or lashe ddown
(
Ypage 232).
RBefore driving off-road, stop the vehicl eand
shift to alow gear.
RIf the surface requires ,temporaril ydeactivate
ESP®when pulling away (Ypage 64).
ROnlyd rive off-roadw itht he engine running
and ageare ngaged.
RDriv eslowly and smoothly. Walking pace is
necessary in many situations.
RAvoi dspinning the drive wheels.
RMake sure thatt he wheels always remai nin
contact with the ground.
RDriv ewithe xtreme car eoveru nknown terrain
where yo ucan onlys ee forashort distance.
As aprecaution, get outoft he vehicletotake
al oo katt he route to be take ninadvance.
RCheck the water depth before fording.
RWatch outf or obstacles(e.g. rocks ,holes,
tree stumps and ruts).
RAvoi dedges where the surface could crumble
or break away.
Driving tips139
Driving an dparking
Z