warning light MERCEDES-BENZ METRIS 2016 MY16 Operator’s Manual
[x] Cancel search | Manufacturer: MERCEDES-BENZ, Model Year: 2016, Model line: METRIS, Model: MERCEDES-BENZ METRIS 2016Pages: 310, PDF Size: 7.28 MB
Page 139 of 310
!Depressing the brake pedal constantly
results in excessive and premature wear to
the brake pads.
If the brakes have been subjected to aheavy
load, do not stop the vehicle immediately.D rive
on for ashort while.T he brakes are cooled down
more quickly in the airflow.
Wet road surfaces
If you have been driving for along time in heavy
rain without braking, there may be adelayed
response when you first apply the brakes. This
may also occur after driving through acar wash
or deep water.
You must depress the brake pedal more firmly.
Maintain alonger distance to the vehicle in
front.
While paying attention to the traffic conditions,
you should brake the vehicle firmly after driving
on aw et road surface or through acar wash. This
heats the brake discs, so that they dry more
quickly, which protects them against corrosion.
Limited braking performance on salt-
treated roads
When driving on salted roads, salt may start to
buildupont he brake disks and brake pads. This
can increase braking distances considerably.
Maintain agreater distance to the vehicle in
front.
To remove any build-up of salt that may have
formed:
XApply the brakes at the start of the journey,
occasionally during journey and at the end of
the journey. Make sure that you do not endan-
ger other road users when doing so.
New brake discs and brake pads/
linings
New brake pads and brake discs only reach their
optimal braking effect after about60m iles
(100 kilometers). Until then, compensate for
this by applying greater force to the brake pedal. For safety reasons, Mercedes-Benz recom-
mends only installing the following brake discs
and brake pads/linings:
Rbrake discs that have been approved by
Mercedes-Benz
Rbrake pads/linings that have been approved
by Mercedes-Benz or are of an equivalent
standard of quality
Other brake discs or brake pads/linings can
compromise the safety of your vehicle.
Alwaysr eplace all brake discs or brake pads/
linings on an axle at the same time and only have
them replaced at aqualified specialist work-
shop. When replacing the brake discs, always
have the brake pads/linings replaced at the
same time.
Parking brake
GWARNING
If you must brake the vehicle with the parking brake, the braking distance is considerably
longer and the wheels could lock. There is an
increased danger of skidding and accidents.
Only use the parking brake to brake the vehi-
cle when the service brake is faulty. Do not
apply the parking brake too firmly. If the
wheels lock, release the parking brake until
the wheels begin turning again.
When driving on wet roads or dirt-covered sur-
faces, road salt and/or dirt may get into the
parking brake. This causes corrosion and a
reduction of braking force.
In order to prevent this, drive with the parking
brake lightly applied from time to time. When
doing so, drive for adistance of approximately
110 yds (100 m) at amaximum speed of 12 mph
(20 km/h).
The brake lamps are not illuminated when you
brake the vehicle using the parking brake.
Driving in wet conditions
Hydroplaning
GWARNING
There is adanger of hydroplaning occurring,
even if you are driving slowly and your tires
Driving tips137
Driving and parking
Z
Page 144 of 310
Storing and maintaining the current
speed
XAccelerate the vehicle to the desired speed
above 20 mph (30 km/h).
XBriefly push the cruise control lever up:or
down =.
XRelease the accelerator pedal.
Cruise control is activated. The current speed
is stored and shown briefly in the display's
text field.
The display also shows the Vsymbol and
the stored speed:
Rin the header on vehicles without steering
wheel buttons (Ypage 170)
Rin the status area on vehicles with steering
wheel buttons (Ypage 176)
Resuming the stored speed
GWARNING
If you call up the stored speed and it differs
from the current speed, the vehicle acceler-
ates or decelerates. If you do not know the
stored speed, the vehicle could accelerate or brake unexpectedly. There is arisk of an acci-
dent.
Pay attention to the road and traffic condi-
tions before calling up the stored speed. If you
do not know the stored speed, store the
desired speed again.
XBriefly pull the cruise control lever towards
you ;.
XRelease the accelerator pedal.
Cruise control is activated and resumes the
vehicle's speed to the last speed stored.
The stored speed is shown briefly in the dis-
play.
The display also shows the Vsymbol and
the stored speed:
Rin the header on vehicles without steering
wheel buttons (Ypage 170)
Rin the status area on vehicles with steering
wheel buttons (Ypage 176)
iWhen you pull the cruise control lever
towards you for the first time after startin gthe
engine, cruise control adopts the current
speed.
Setting the speed
It may be amoment before the vehicle starts to
accelerate or brake to the set speed. Take this
delay into account when settingt he speed.
XPress the cruise control lever up:to
increase the speed or down =to reduce the
speed.
The vehicle will accelerate or decelerate. The
speed is shown in the display.
XRelease the cruise control lever once the
desired speed is reached.
The displayed speed is stored.
or
XBriefly press the cruise control lever as far as
the 1st pressure point up :or down =.
The last speed stored is increased/reduced in increments of 1mph (1 km/h).
or
XBriefly press the cruise control lever beyond
the pressure point up :or down =.
The last speed stored is increased/reduced in increments of 5mph (10 km/h).
iCruise control is not deactivated if you
depress the accelerator pedal. If you acceler-
ate briefly to overtake, for example, cruise
control resumes the vehicle’s speed to the
last speed stored after you have finished over-
taking.
To deactivatec ruise control
There are various ways to deactivate cruise con-
trol:
XBriefly press the cruise control lever for-
wards?.
or
XApply the brakes.
The last speed set remains stored. The last
speed stored is deleted when you switch off the
engine.
Cruise control is deactivated automatically
when:
Ryou apply the brakes
Ryou apply the parking brake and the F
(only USA) or J(only Canada) indicator
lamp in the instrumentc luster lights up
Ryou are driving slower than 20 mph (30 km/h)
Ryou shift the automatic transmission to neu-
tral positionNwhile the vehicle is in motion
142Driving systems
Driving and parking
Page 148 of 310
sufficient distance to the side for other road
users and obstacles.
In particular, the detection of obstacles can be
impaired in the case of:
Rdirt on the sensors or anything else covering
the sensors
Rfog, heavy rain or snow
Rnarrow vehicles, e.g. motorcycles or bicycles
Rvery wide lanes
Rnarrow lanes
Rvehicles not driving in the middle of their lane
Rbarriers or other road boundaries
Vehicles in the monitoring range are then not
indicated.
iUSA only:
This device has been approved by the FCC as
a" Vehicular Rada rSystem". The radar sensor
is intended for use in an automotive radar
system only. Removal, tampering, or altering
of the device will void any warranties, and is
not permitted by the FCC. Do not tamper with,
alter, or use in any non-approved way.
Any unauthorized modification to this device
could void the user’s authority to operate the
equipment.
Monitoring range of the sensors
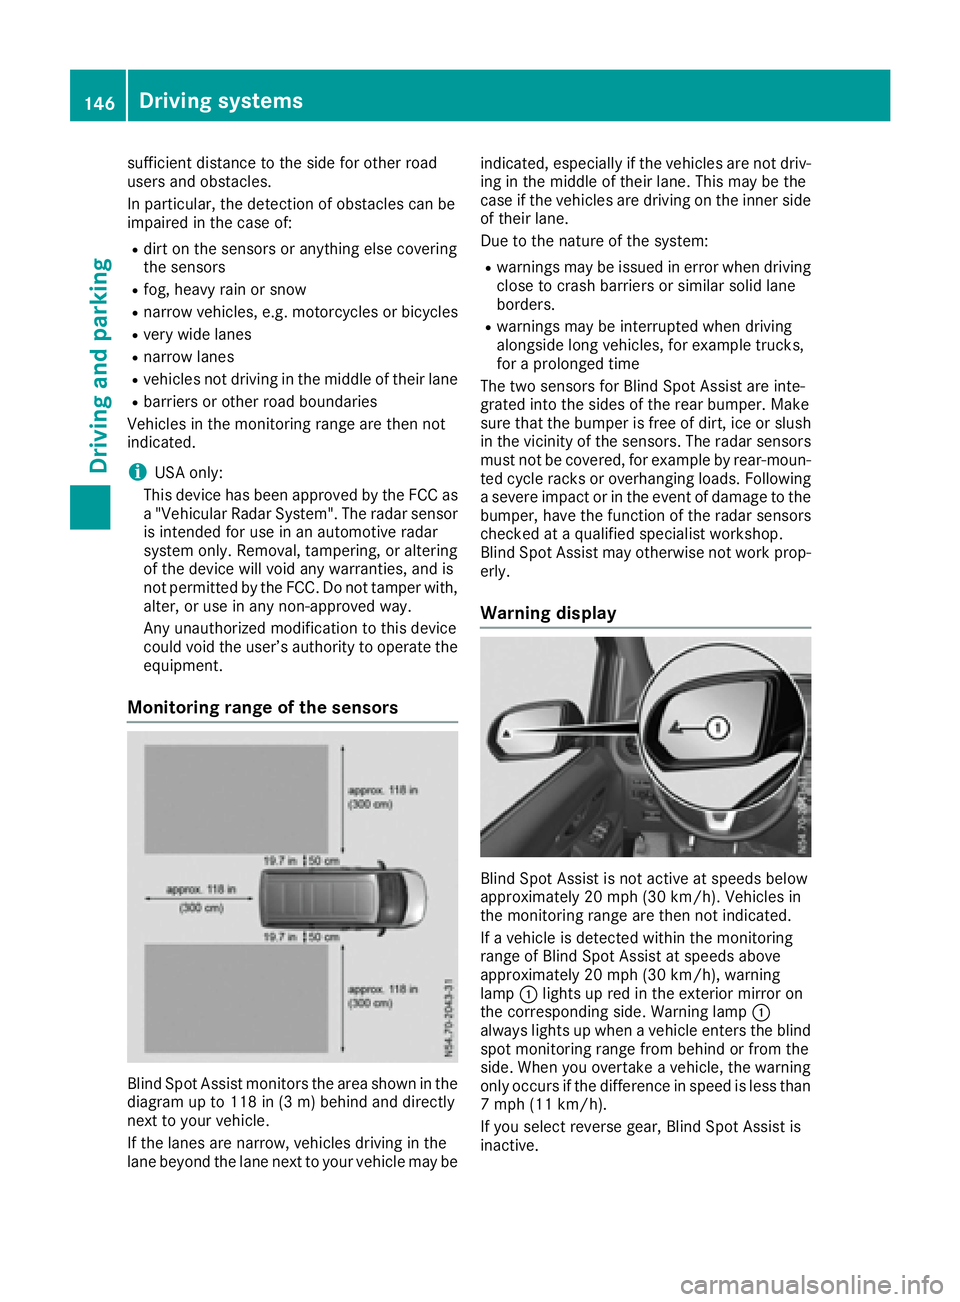
Blind Spot Assist monitors the area shown in the
diagramupt o118 in (3 m) behind and directly
next to your vehicle.
If the lanes are narrow, vehicles driving in the
lane beyond the lane next to your vehicle may be indicated, especially if the vehicles are not driv-
ing in the middle of their lane. This may be the
case if the vehicles are driving on the inner side
of their lane.
Due to the nature of the system:
Rwarnings may be issued in error when driving
close to crash barriers or similars olid lane
borders.
Rwarnings may be interrupted when driving
alongside long vehicles, for example trucks,
for aprolonged time
The two sensors for Blind Spot Assist are inte-
grated into the sides of the rear bumper. Make
sure that the bumper is free of dirt, ice or slush
in the vicinity of the sensors. The radar sensors
must not be covered, for example by rear-moun-
ted cycle racks or overhanging loads. Following
as evere impact or in the event of damage to the
bumper, have the function of the radar sensors
checked at aqualified specialist workshop.
Blind Spot Assist may otherwise not work prop-
erly.
Warning display
Blind Spot Assist is not active at speeds below
approximately 20 mph (30 km/h). Vehicles in
the monitoring range are then not indicated.
If av ehicle is detected within the monitoring
range of Blind Spot Assist at speeds above
approximately 20 mph (30 km/h), warning
lamp :lights up red in the exterior mirror on
the corresponding side. Warning lamp :
always lights up when avehicle enters the blind
spot monitoring range from behind or from the
side. When you overtake avehicle, the warning
only occurs if the difference in speed is less than
7m ph (11 km/h).
If you select reverse gear, Blind Spot Assist is
inactive.
146Driving systems
Driving and parking
Page 149 of 310
The intensity of warning lamps:depends on
the brightness of the ambient light and is con-
trolled automatically.
Collision warning
If av ehicle is detected in the monitoring range of
Blind Spot Assist and you switch on the corre-
sponding turn signal, adouble warning tone
sounds once. The warning lamp in the corre-
sponding exterior mirror flashes. If the turn sig-
nal remains on, detected vehicles are indicated
by the flashing of the warning lamp in the exte-
rior mirror. There are no further warning tones.
Activating Blind Spot Assist
XMake sure that Blind Spot Assist is activated
in the on-board computer (Ypage 184).
XTurn the key to position 2in the ignition lock.
The warning lamps in the exterior mirrors light
up for approximately 1.5 seconds.
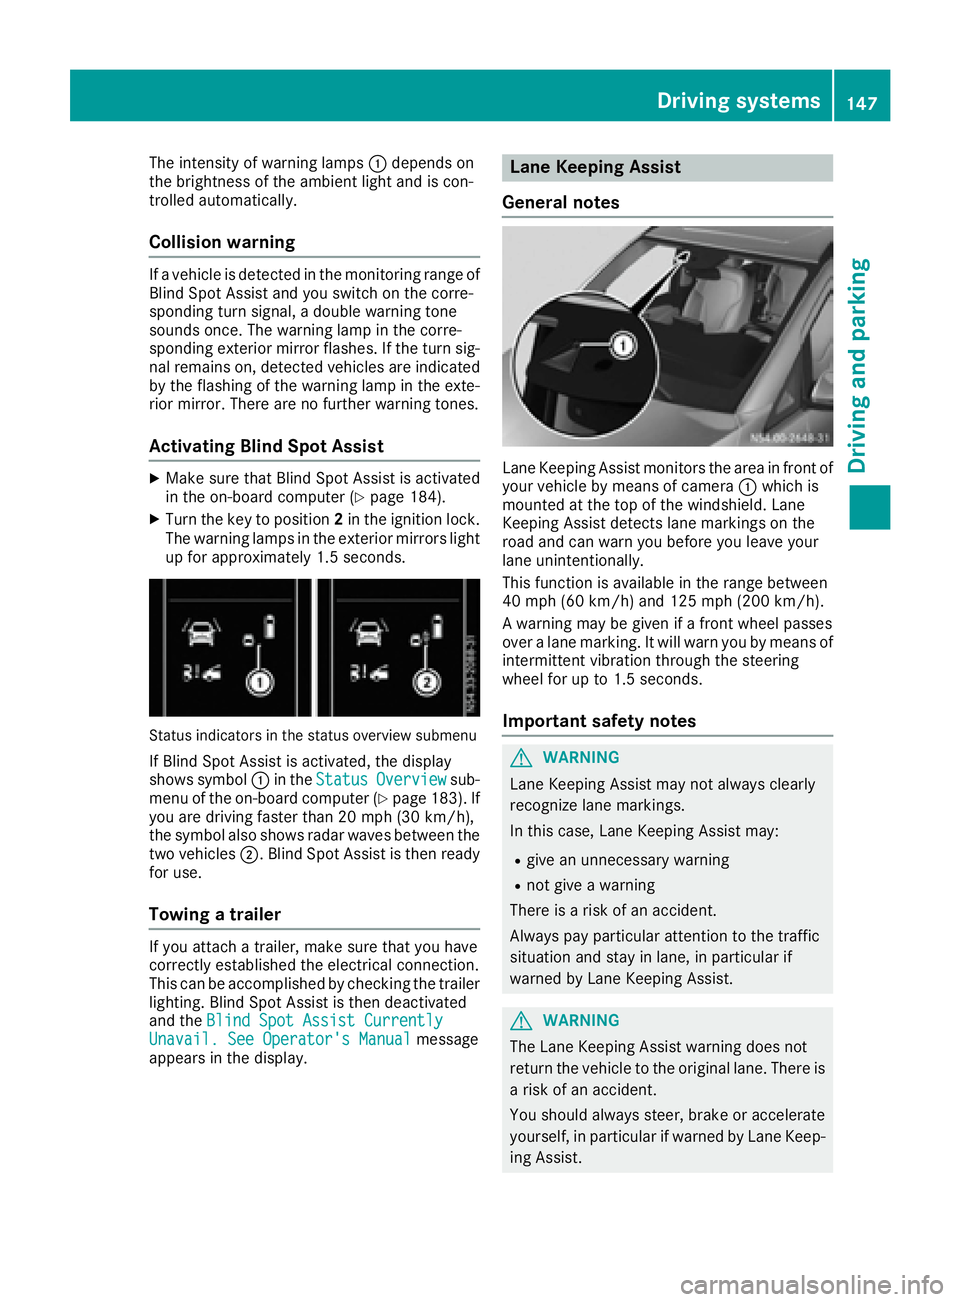
Status indicators in the status overview submenu
If Blind Spot Assist is activated, the display
shows symbol :in the StatusOverviewsub-
menu of the on-board computer (Ypage 183). If
you are driving faster than 20 mph (30 km/h) ,
the symbo lalsos hows rada rwaves between the
two vehicles ;.Blind Spo tAssist is thenr eady
for use.
Towin gatrailer
If youattach atrailer, make sure thaty ouhave
correctl yestablishe dthe electrical connection.
Thi scan be accomplishe dbychecking the trailer
lighting. Blind Spo tAssist is thend eactivated
and the Blind Spo tAssist Currently
Unavail. See Operator' sManualmessage
appear sinthe display.
Lane Keeping Assist
General notes
Lane Keeping Assist monitors the area in front of
your vehicl ebymeans of camera :which is
mounted at the top of the windshield. Lane
Keeping Assist detects lane markings on the
roa dand can warn yo ubefor ey ou leav eyour
lane unintentionally.
This functio nisa vailable in the range between
40 mph (60 km/h )and 125 mph (20 0km/h).
Aw arning maybeg iven if afront whee lpasses
ove ralanem arking. It will warn yo ubymeans of
intermittent vibratio nthroug hthe steering
whee lfor up to 1.5 second s.
Importan tsafety notes
GWARNING
Lane Keeping Assist may not always clearly
recognize lane markings.
In this case, Lane Keeping Assist may:
Rgive an unnecessary warning
Rnot give awarning
There is ariskofana ccident.
Alway spayparticula rattention to the traffic
situation and stay in lane, in particula rif
warned by Lane Keeping Assist.
GWARNING
The Lane Keeping Assist warning doe snot
return the vehicl etothe original lane. There is
ar iskofana ccident.
Yo us houl dalway ssteer, brake or accelerate
yourself, in particula rifwarned by Lane Keep-
ing Assist.
Driving systems147
Driving and parking
Z
Page 150 of 310
If you fail to adapt yourdriving style, Lane Keep-
ing Assist can neither reduce the risk of accident
nor override the law sofphysics. Lane Keeping
Assist cannot take into account road, weather or
traffic conditions. Lane Keeping Assist is only an aid .You are responsible for the distance to the
vehicle in front, for vehicle speed,b raking in
good time and for staying in you rlane.
Lane Keeping Assist does not keep you rvehicle
in its lane.
The system may be impaired or may not function
if:
Rthere is poor visibility, e.g. due to insufficient
illuminatio nofthe road, or due to snow, rain,
fog or spray
Rthere is glare ,e.g. from oncoming traffic, the
sun or reflection from other vehicles( e.g. if
the road surface is wet)
Rthe windshield is dirty, fogged up, damaged or
covered, for instance by asticker, in the vicin-
ity of the camera
Rno, or several ,unclea rlane markings are pres-
ent for one lane, e.g. in aconstruction area
Rthe lane markings are worn away, dark or cov-
ered up, e.g. by dirt or snow
Rthe distance to the vehicle in front is too small
and the lane markings thus cannot be detec-
ted
Rthe lane markings change quickly, e.g. lanes
branch off, cross one another or merge
Rthe road is narrow and winding
Rthere are highlyv ariable shade conditions on
the road
Deactivating and activating Lane Keep-
ing Assist
XPress the Çbutton.
If the indicator lamp in the button lights up
and the display shows the Çsymbo linthe status area
,Lane Keeping Assist is switched
on but not ready for use.
If you drive at speedsa bove 40 mph
(60 km/h) and lane markings are detected,
the display shows the highlighted Çsym-
bol in the status area when Lane Keeping
Assist is activated. Lane Keeping Assist is
then ready for use.
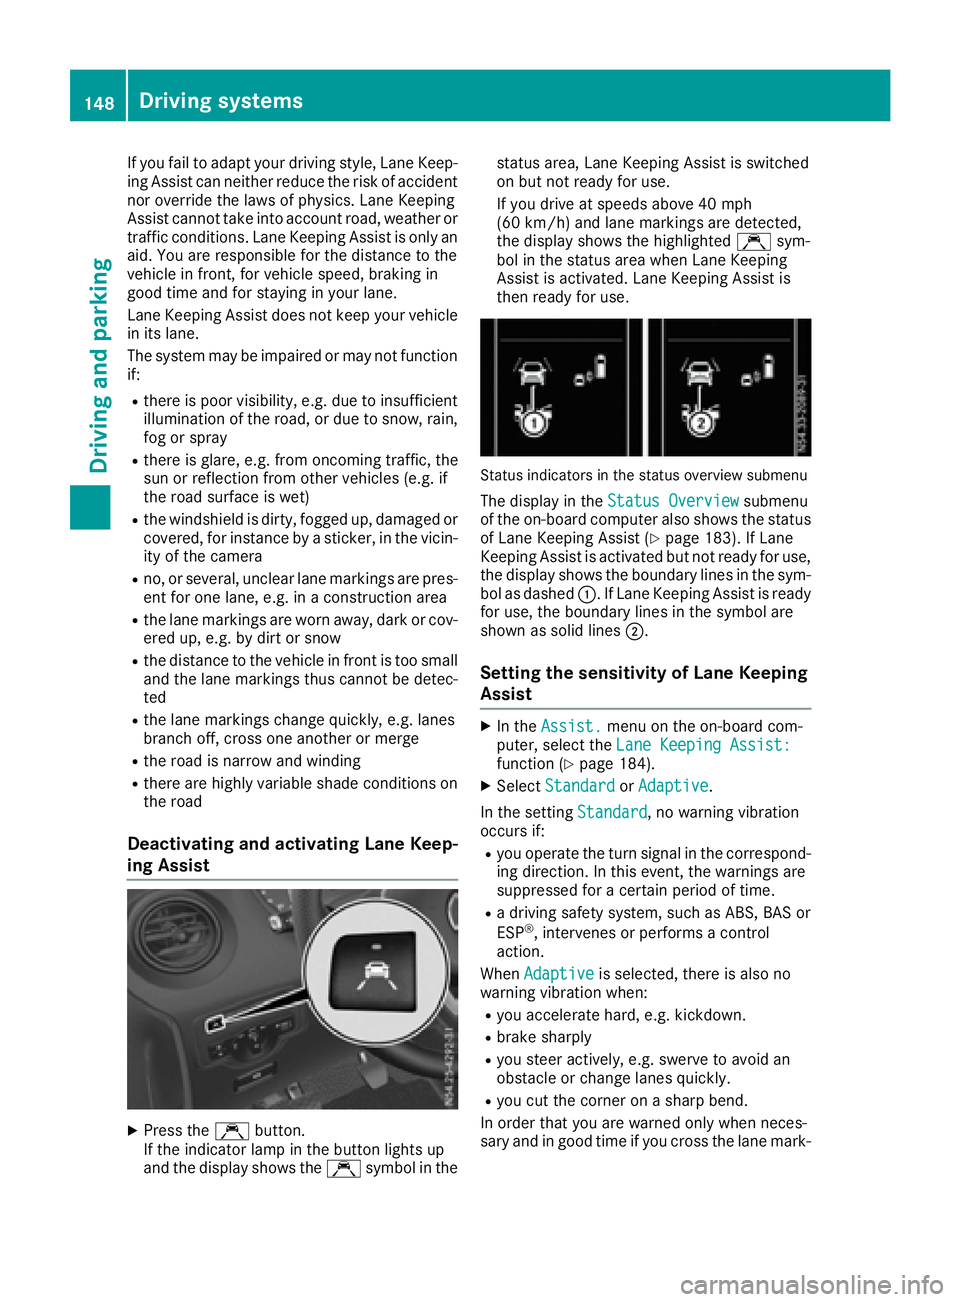
Status indicators in the status overview submenu
The display in the Status Overviewsubmenu
of the on-board computer also shows the status
of Lane Keeping Assist (
Ypage 183). If Lane
Keeping Assist is activated but not ready for use,
the display shows the boundary lines in the sym-
bol as dashed :.IfLane Keeping Assist is ready
for use, the boundary lines in the symbo lare
shown as solid lines ;.
Setting the sensitivity of Lane Keeping
Assist
XIn theAssist.menu on the on-board com-
puter, select the Lane Keeping Assist:
function (Ypage 184).
XSelectStandardorAdaptive.
In the setting Standard
,now arning vibration
occurs if:
Ryou operate the turn signal in the correspond-
ing direction. In this event, the warnings are
suppressed for acertain period of time.
Rad riving safety system, such as ABS, BAS or
ESP®,i ntervenes or performs acontrol
action.
When Adaptive
is selected, there is also no
warning vibratio nwhen:
Ryou accelerate hard, e.g. kickdown.
Rbrake sharply
Ryou steer actively ,e.g. swerve to avoid an
obstacle or change lanes quickly.
Ryou cut the corner on asharp bend.
In order that you are warned only when neces-
sary and in good time if you cross the lane mark-
148Driving systems
Driving and parking
Page 152 of 310
Standard:the sensitivity with which the sys-
tem determines the attention level is set to
normal.
Sensitive: the sensitivity is set higher. The
driver is warned earlier.
When ATTENTION ASSIST is switched on and
the vehicle engine is running:
Ron vehicles without steering wheel buttons,
the À indicator lamp in the instrument
cluster lights up
Ron vehicles with steering-wheel buttons, the
display shows the Àsymbol:
-in the status area
-in the Status Overviewof the Assist.menu (Ypage 183)
For vehicles with steering wheel buttons, if you
deactivate ATTENTION ASSIST, the system is
automatically re-activated when you start the
engine. The system sensitivity then corresponds to the last selection activated –standard or sen-
sitive.
If you switch off ATTENTION ASSIST in avehicle
without steering wheel buttons, the system
remains switched off even after you start the
engine. The status of the system after switching
on the engine always corresponds to the status
last selected.
Warning in the display
If the system detectst iredness or increasing
lapses in concentration, the warning Atten‐
tion Assist: TakeaBreak!orAttent.Asst: Take Break!is shown in the display.
An additional warning tone sounds.
XIf necessary, take abreak.
XConfirm the message by pressing the a
button on the steering wheel.
On long journeys, take regular breaks in good
time to allow yourself to rest. If you do not take
ab reak and ATTENTION ASSIST continues to
detect increasing lapses in concentration, you
will be warned again after 15 minutes at the
earliest. This will only happen if ATTEN-
TION ASSIST still detectst ypical indicators of
fatigue or increasing lapses in concentration.
PARKTRONIC
General notes
PARKTRONIC is an electronic parking aid. The
system is equipped with ultrasonic sensors in
the front and rear bumpers to monitor the area
around your vehicle. PARKTRONIC indicates vis-
uallya nd audibly the distance between your
vehicle and an object.
Your vehicle features two separate sound emit-
ters with different frequencies for the warning
tones. The warning ranges in front of and behind the vehicle are indicated by different warning
tones.
PARKTRONIC is activated automatically when
you:
Rturn the key to position 2in the ignition lock
Rrelease the parking brake and
Rmove the selector lever to D,Nor R
PARKTRONIC is deactivated at speeds above
11 mph (18 km/h). PARKTRONIC is reactivated
at speeds below 10 mph (16 km/h).
Important safety notes
PARKTRONIC is only an aid. It cannot replace
your own awareness of the immediate surround-
ings. You are responsible for safe maneuvering,
parking and pulling away.W hen maneuvering,
parking and pulling away,m ake sure that there
are no persons, animals or object sinthe maneu-
vering area.
!Pay particular attention to obstacles above
or below the sensors when parking, such as
flower pots or trailer towbars. PARKTRONIC
does not recognizes uch objectswhen they
are in the immediate vicinity of the vehicle.
You could damage the vehicle or objects.
PARKTRONIC can suffer interference from:
Rultrasonic sources such as atruck's
compressed-air brakes, an automatic car
wash or apneumatic drill
Rattachments to the vehicle, e.g. rear moun-
ted racks
Rnumber plates (vehicle license plates) that
are not affixed flat against the bumper
Rdirty or icy sensors
Remove adetachable trailer coupling if it is no
longer required. PARKTRONIC measures the
minimum detection range to an obstacle from
the bumper, not the ball coupling.
150Driving systems
Driving and parking
Page 153 of 310
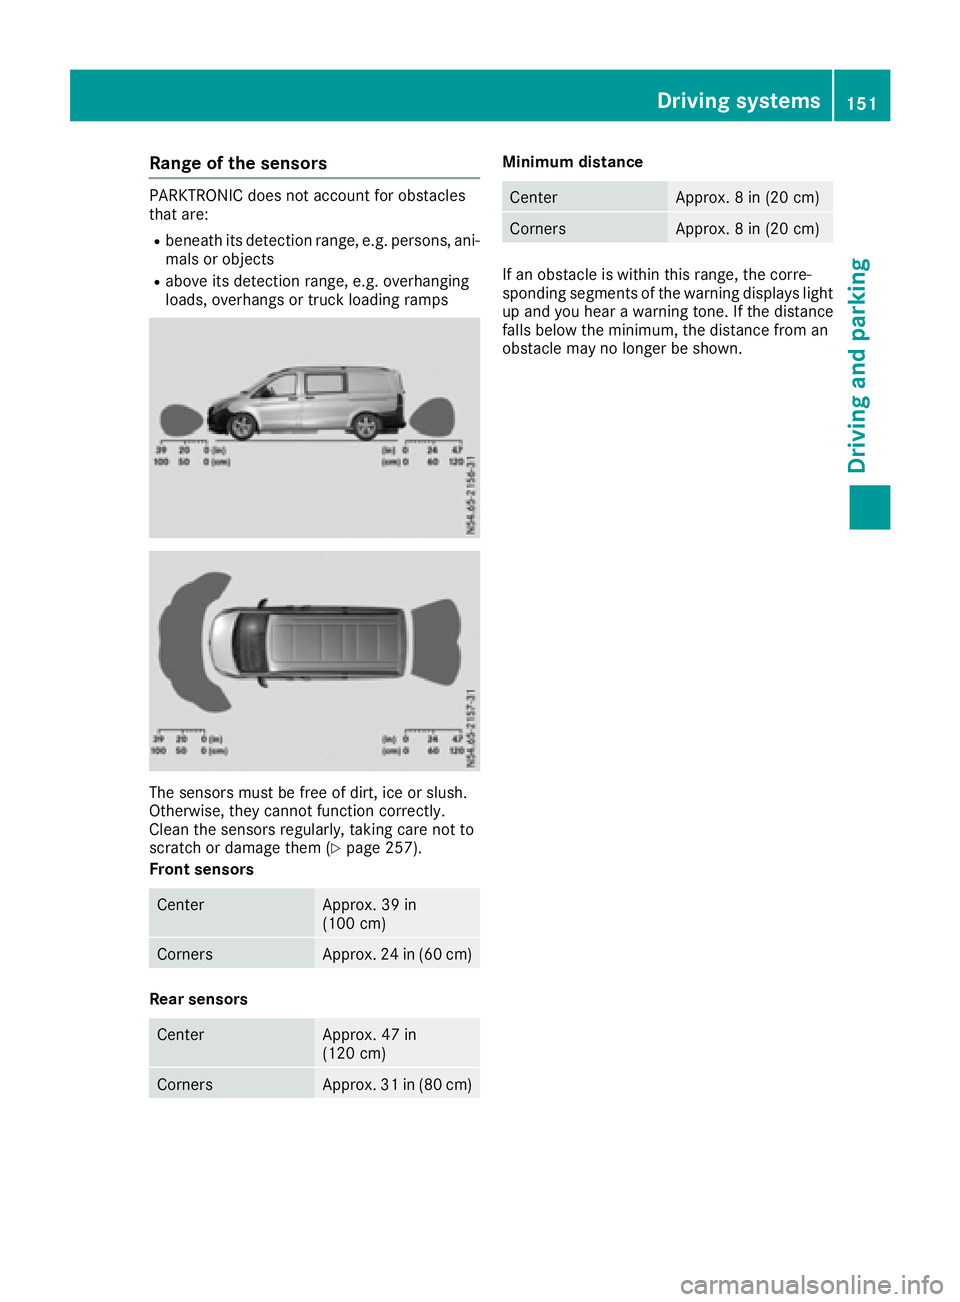
Rangeoft he sensors
PARKTRONIC doe snot account for obstacles
that are:
Rbeneath its detection range, e.g. persons,a ni-
mal soro bjects
Rabove its detection range, e.g. overhanging
loads, overhangs or truck loading ramps
The sensors mus tbefree of dirt, ice or slush.
Otherwise, they canno tfunction correctly.
Cleant he sensors regularly, taking care not to
scratch or damag ethem (
Ypage 257).
Front sensors
CenterApprox. 39 in
(100 cm)
CornersApprox. 24 in (60 cm)
Rear sensors
CenterApprox. 47 in
(120 cm)
CornersApprox. 31 in (80 cm)
Minimum distance
CenterApprox. 8in(20 cm)
CornersApprox. 8in(20 cm)
If an obstacl eiswithin this range, the corre-
sponding segments of the warning display slight
up and yo uhearaw arning tone. If the distance
falls below the minimum ,the distance from an
obstacl emay no longer be shown.
Driving systems151
Driving and parking
Z
Page 154 of 310
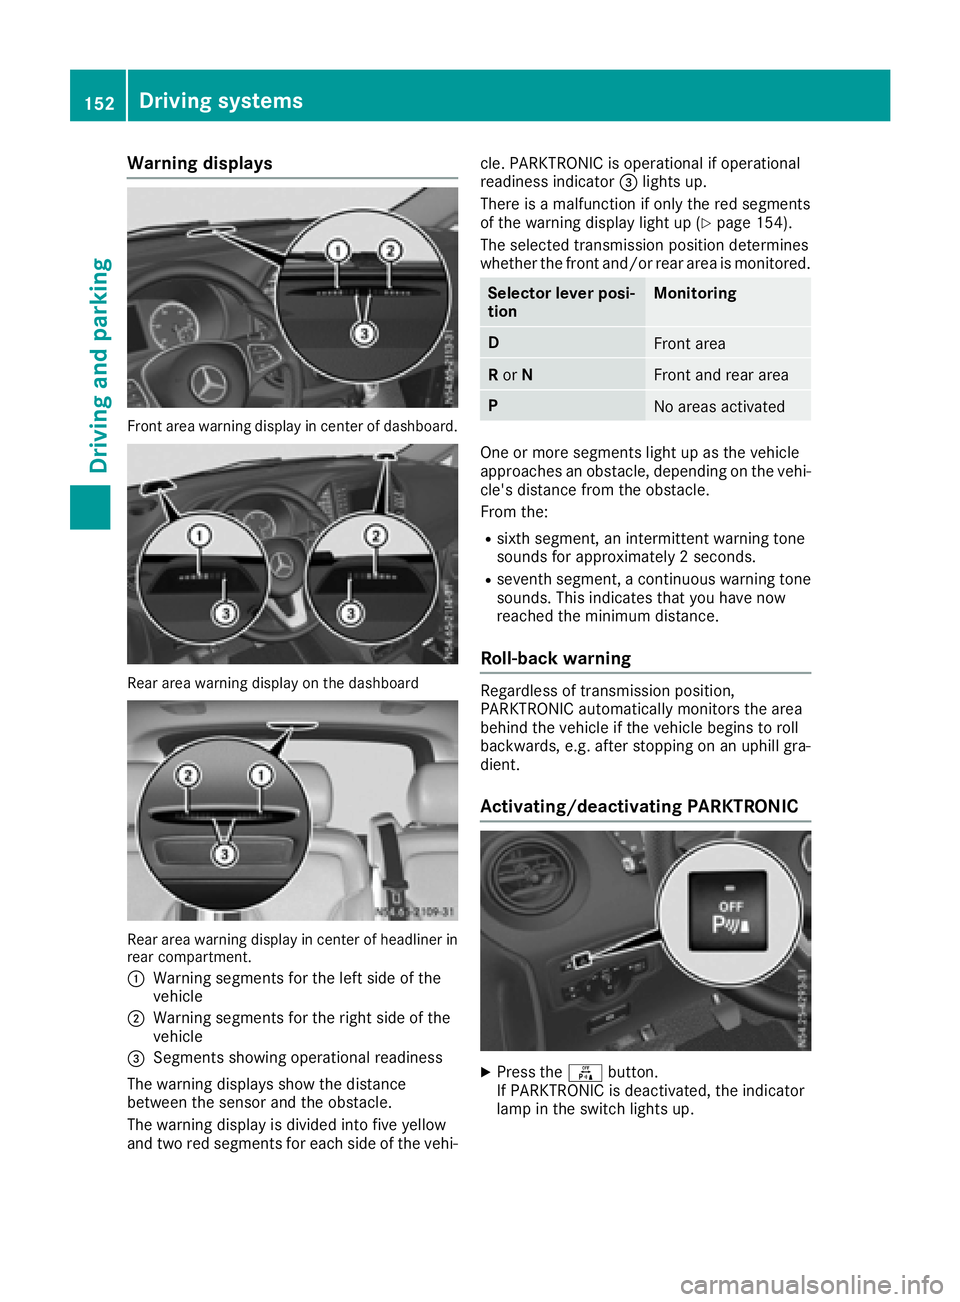
Warning displays
Front area warning display in center of dashboard.
Reararea warning display on the dashboard
Rea rarea warning display in center of headliner in
rear compartment.
:
Warning segments for the left side of the
vehicle
;Warning segments for the right side of the
vehicle
=Segments showing operational readiness
The warning display sshow the distance
between the sensor and the obstacle.
The warning display is divided into five yellow
and two red segments for each side of the vehi- cle. PARKTRONIC is operational if operational
readiness indicator
=lights up.
There is amalfunction if only the red segments
of the warning display light up (
Ypag e154).
The selected transmission position determines
whethe rthe front and/or rear area is monitored.
Selector lever posi-
tionMonitoring
DFront area
R or NFront and rear area
PNo area sactivated
One or more segments light up as the vehicle
approache sanobstacle, depending on the vehi-
cle's distance from the obstacle.
From the:
Rsixth segment, an intermittent warning tone
sound sfor approximately 2seconds.
Rseventh segment, acontinuou swarning tone
sounds. This indicates that you have now
reache dthe minimu mdistance.
Roll-back warning
Regardless of transmission position,
PARKTRONIC automatically monitors the area
behind the vehicl eifthe vehicl ebegins to roll
backwards, e.g. after stopping on an uphill gra-
dient.
Activating/deactivating PARKTRONIC
XPress the fbutton.
If PARKTRONIC is deactivated, the indicator
lam pint he switch lights up.
152Driving systems
Driving and parking
Page 156 of 310
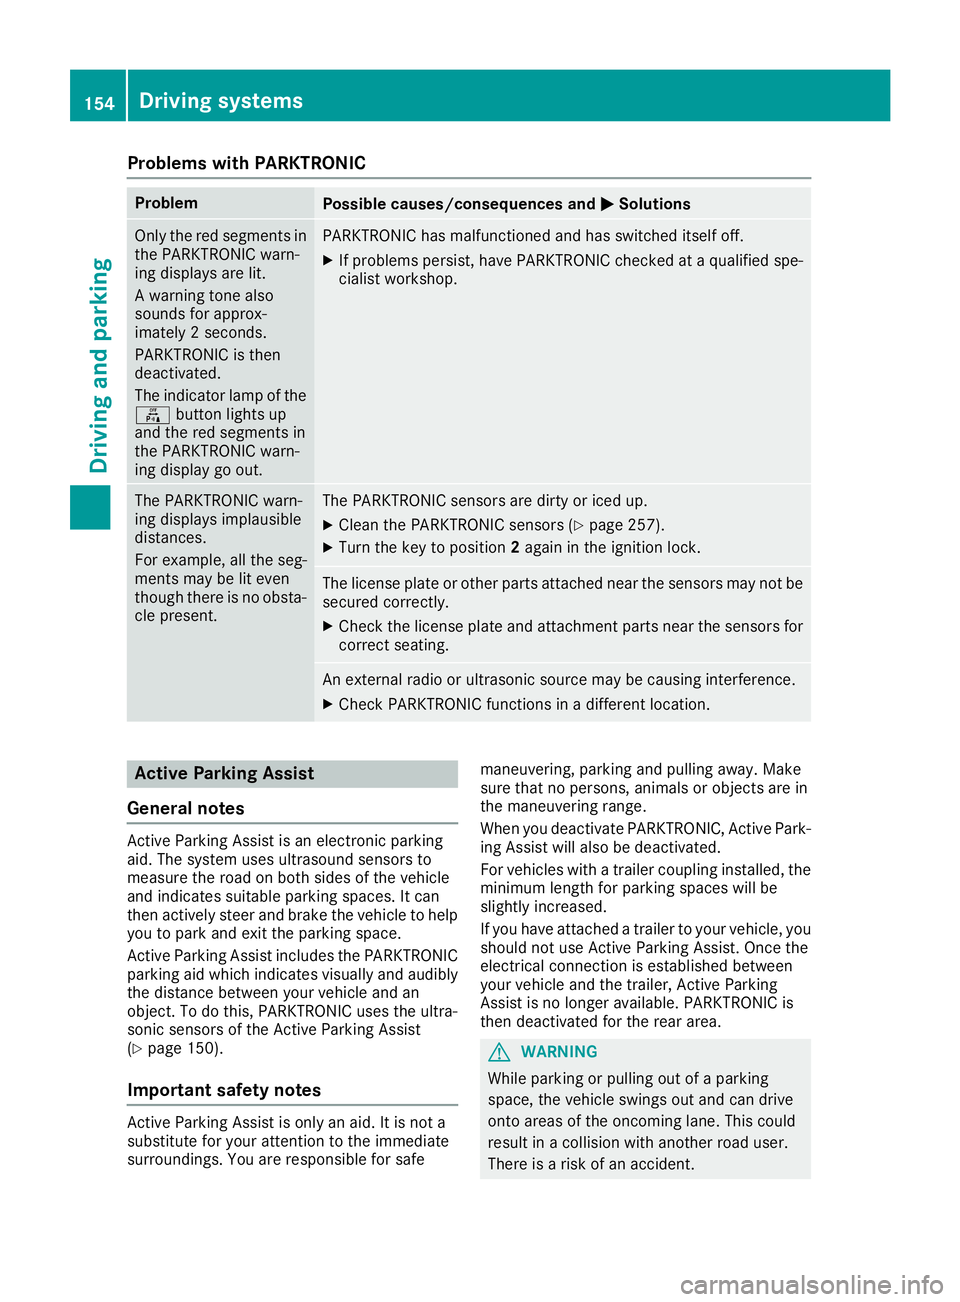
Problems with PARKTRONIC
ProblemPossible causes/consequences andMSolutions
Only the red segments in
the PARKTRONIC warn-
ing displaysare lit.
Aw arning tone also
sounds for approx-
imately 2seconds.
PARKTRONIC is then
deactivated.
The indicator lamp of the
f button lights up
and the red segments in
the PARKTRONIC warn-
ing display go out.PARKTRONIC has malfunctioned and has switched itself off.
XIf problems persist, have PARKTRONIC checked at aqualified spe-
cialist workshop.
The PARKTRONIC warn-
ing displaysi mplausible
distances.
For example, all the seg-
mentsm ay be lit even
though there is no obsta-
cle present.The PARKTRONIC sensors are dirty or iced up.
XClean the PARKTRONIC sensors (Ypage 257).
XTurn the key to position 2again in the ignition lock.
The license plate or other parts attached near the sensors may not be
secured correctly.
XCheck the license plate and attachmentp arts near the sensors for
correct seating.
An external radio or ultrasonic source may be causing interference.
XCheck PARKTRONIC functions in adifferent location.
Active Parking Assist
General notes
Active Parking Assist is an electronic parking
aid. The system uses ultrasound sensors to
measure the road on both sides of the vehicle
and indicates suitable parking spaces. It can
then actively steer and brake the vehicle to help
you to park and exit the parking space.
Active Parking Assist includes the PARKTRONIC
parking aid which indicates visuallya nd audibly
the distance between your vehicle and an
object .Todot his, PARKTRONIC uses the ultra-
sonic sensors of the Active Parking Assist
(
Ypage 150).
Important safety notes
Active Parking Assist is only an aid. It is not a
substitute for your attention to the immediate
surroundings. You are responsible for safe maneuvering, parking and pulling away.M
ake
sure that no persons, animals or object sare in
the maneuvering range.
When you deactivate PARKTRONIC, Active Park-
ing Assist will also be deactivated.
For vehicles with atrailer coupling installed, the
minimum length for parking spaces will be
slightly increased.
If you have attached atrailer to your vehicle, you
should not use Active Parking Assist. Once the
electrical connection is established between
your vehicle and the trailer, Active Parking
Assist is no longer available. PARKTRONIC is
then deactivated for the rear area.
GWARNING
While parking or pulling out of aparking
space, the vehicle swings out and can drive
onto areas of the oncomingl ane. This could
result in acollision with another road user.
There is arisk of an accident.
154Driving systems
Driving and parking
Page 162 of 310
or
XShift the automatic transmission toP.
In vehicles with Active Parking Assist,t he rear
view camera remains switched on after the ini-
tial shift to reverse gear for the whole duration of
active parking assistance. You can find informa-
tion on active parking assistance under "Active
Parking Assist“(
Ypage 154).
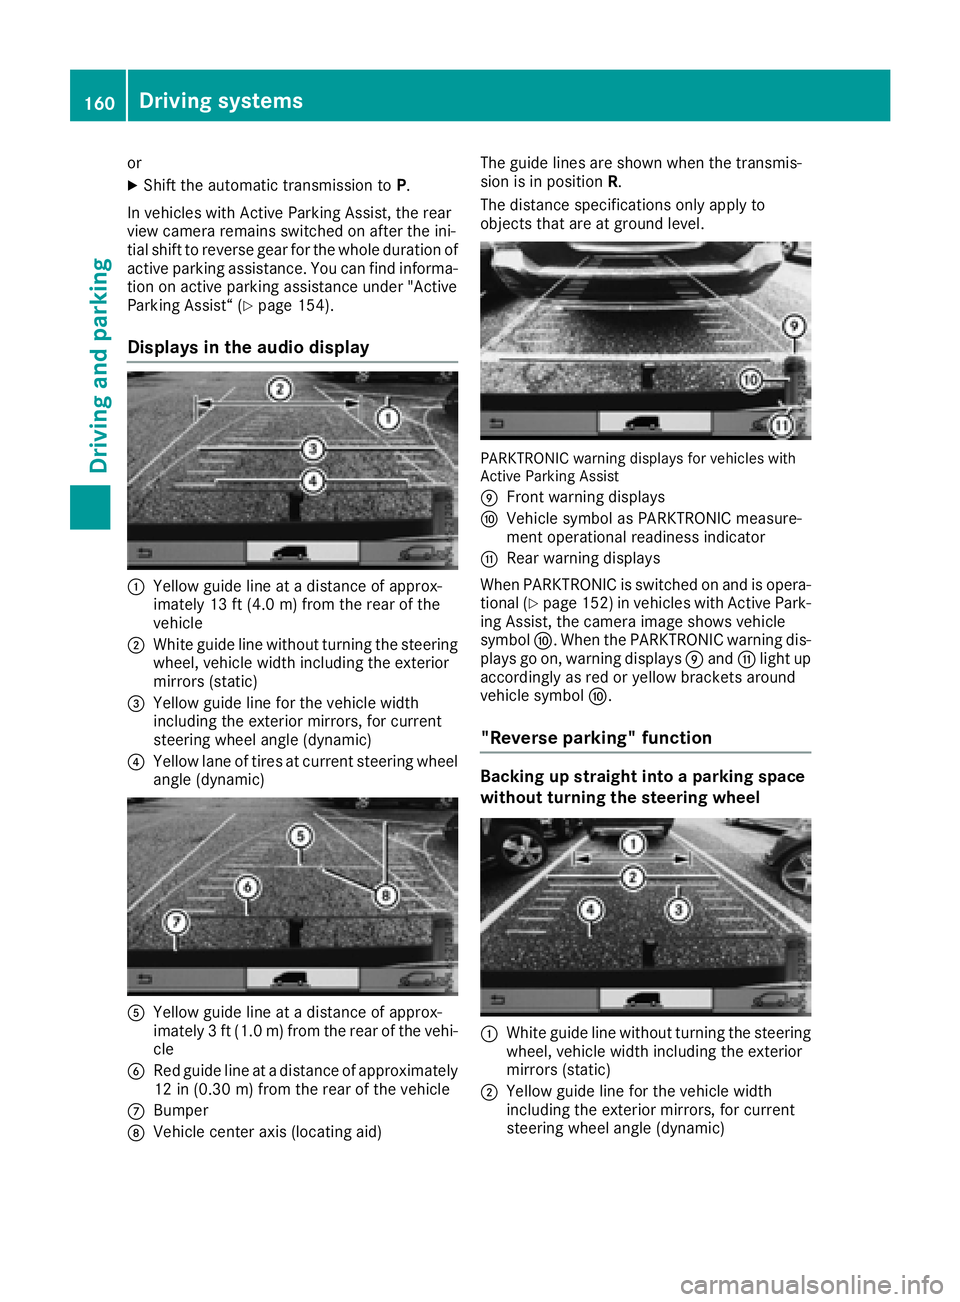
Displays in the audio display
:Yellow guide line at adistance of approx-
imately 13 ft (4.0 m) from the rear of the
vehicle
;White guide line without turnin gthe steering
wheel, vehicle width including the exterior
mirrors (static)
=Yellow guide line for the vehicle width
including the exterior mirrors, for current
steering wheel angle (dynamic)
?Yellow lane of tires at current steering wheel
angle (dynamic)
AYellow guide line at adistance of approx-
imately 3ft(1.0 m) from the rear of the vehi-
cle
BRed guide line at adistance of approximately
12 in (0.30 m) from the rear of the vehicle
CBumper
DVehicle center axis (locating aid) The guide lines are shown when the transmis-
sion is in position
R.
The distance specification sonly apply to
object sthat are at ground level.
PARKTRONIC warning displaysf or vehicles with
Active Parking Assist
E
Frontw arning displays
FVehicle symbol as PARKTRONIC measure-
ment operational readiness indicator
GRear warning displays
When PARKTRONIC is switched on and is opera- tional (
Ypage 152) in vehicles with Active Park-
ing Assist,t he camera image shows vehicle
symbol F.When the PARKTRONIC warning dis-
plays go on, warning displays Eand Glight up
accordingly as red or yellow bracket saround
vehicle symbol F.
"Reverse parking" function
Backing up straight into aparking space
without turning the steering wheel
:White guide line without turnin gthe steering
wheel, vehicle width including the exterior
mirrors (static)
;Yellow guide line for the vehicle width
including the exterior mirrors, for current
steering wheel angle (dynamic)
160Driving systems
Driving and parking