check engine light MERCEDES-BENZ METRIS 2017 MY17 Operator’s Manual
[x] Cancel search | Manufacturer: MERCEDES-BENZ, Model Year: 2017, Model line: METRIS, Model: MERCEDES-BENZ METRIS 2017Pages: 318, PDF Size: 5.01 MB
Page 128 of 318
ProblemPossible causes/consequences andMSolutions
The engine does not
start.
The starter motor cannot
be heard.The battery is discharged or faulty.
XCheck the battery for damage.
XCharge the battery (Ypage 262).
The engine is not running
smoothly and is misfir-
ing.There is a malfunction in the engine electronics or a mechanical com-
ponent of the engine management system.
XOnly depress the accelerator pedal slightly.
Unburnt fuel may otherwise get into the catalytic converter and
damage it.
XHave the cause rectified immediately at a qualified specialist work-
shop.
Automatic transmission
Important safety notes
GWARNING
If the engine speed is above the idling speed
and you engage transmission position Dor R,
the vehicle could pull away suddenly. There is
a risk of an accident.
When engaging transmission position Dor R,
always firmly depress the brake pedal and do not simultaneously accelerate.
GWARNING
The automatic transmission switches to neu-
tral position Nwhen you switch off the engine.
The vehicle may roll away. There is a risk of an
accident.
Before switching off the engine, always switch
to parking position P. Prevent the parked vehi-
cle from rolling away by applying the parking
brake.
!If the engine is switched off, rolling in neutral
N can damage the power transmission and
result in transmission damage.
Always observe the instructions and safety
notes under "Tow starting and towing away"
(
Ypage 274).
Bear in mind that power transmission between
the engine and the transmission is interrupted
when the engine is switched off. For this reason,
shift the automatic transmission to Pbefore the engine is switched off and with the vehicle is
stationary. Apply the parking brake to prevent
the vehicle from rolling away.
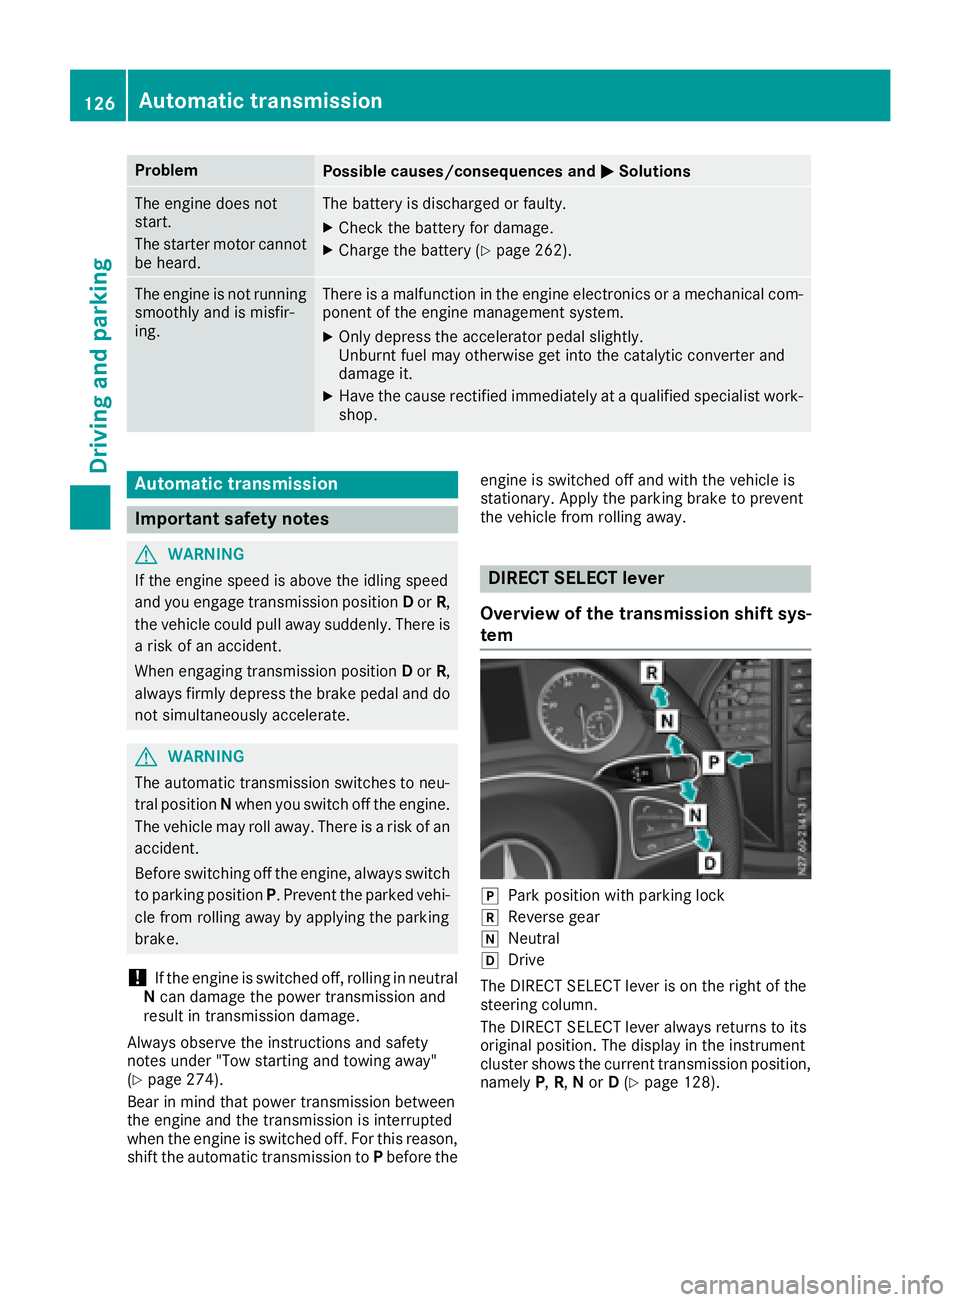
DIRECT SELECT lever
Overview of the transmission shift sys-
tem
jPark position with parking lock
kReverse gear
iNeutral
hDrive
The DIRECT SELECT lever is on the right of the
steering column.
The DIRECT SELECT lever always returns to its
original position. The display in the instrument
cluster shows the current transmission position,
namely P,R, Nor D(
Ypage 128).
126Automatic transmission
Driving and parking
Page 161 of 318
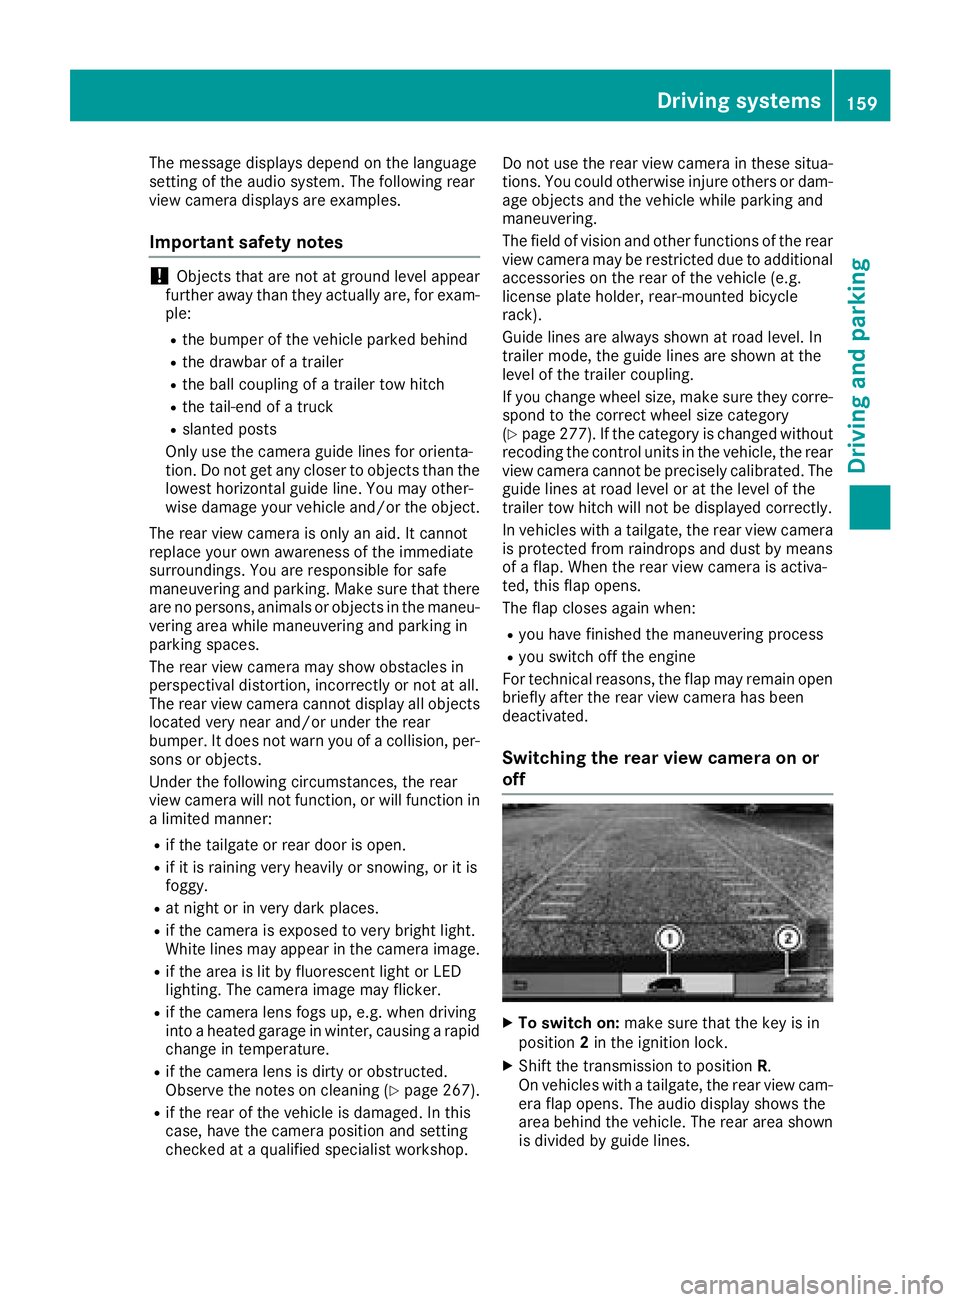
The message displays depend on the language
setting of the audio system. The following rear
view camera displays are examples.
Important safety notes
!Objects that are not at ground level appear
further away than they actually are, for exam-
ple:
Rthe bumper of the vehicle parked behind
Rthe drawbar of a trailer
Rthe ball coupling of a trailer tow hitch
Rthe tail-end of a truck
Rslanted posts
Only use the camera guide lines for orienta-
tion. Do not get any closer to objects than the
lowest horizontal guide line. You may other-
wise damage your vehicle and/or the object.
The rear view camera is only an aid. It cannot
replace your own awareness of the immediate
surroundings. You are responsible for safe
maneuvering and parking. Make sure that there
are no persons, animals or objects in the maneu- vering area while maneuvering and parking in
parking spaces.
The rear view camera may show obstacles in
perspectival distortion, incorrectly or not at all.
The rear view camera cannot display all objects
located very near and/or under the rear
bumper. It does not warn you of a collision, per-
sons or objects.
Under the following circumstances, the rear
view camera will not function, or will function in
a limited manner:
Rif the tailgate or rear door is open.
Rif it is raining very heavily or snowing, or it is
foggy.
Rat night or in very dark places.
Rif the camera is exposed to very bright light.
White lines may appear in the camera image.
Rif the area is lit by fluorescent light or LED
lighting. The camera image may flicker.
Rif the camera lens fogs up, e.g. when driving
into a heated garage in winter, causing a rapid
change in temperature.
Rif the camera lens is dirty or obstructed.
Observe the notes on cleaning (Ypage 267).
Rif the rear of the vehicle is damaged. In this
case, have the camera position and setting
checked at a qualified specialist workshop. Do not use the rear view camera in these situa-
tions. You could otherwise injure others or dam-
age objects and the vehicle while parking and
maneuvering.
The field of vision and other functions of the rear view camera may be restricted due to additional
accessories on the rear of the vehicle (e.g.
license plate holder, rear-mount
ed bicycle
rack).
Guide lines are always shown at road level. In
trailer mode, the guide lines are shown at the
level of the trailer coupling.
If you change wheel size, make sure they corre- spond to the correct wheel size category
(
Ypage 277). If the category is changed without
recoding the control units in the vehicle, the rear
view camera cannot be precisely calibrated. The
guide lines at road level or at the level of the
trailer tow hitch will not be displayed correctly.
In vehicles with a tailgate, the rear view camera
is protected from raindrops and dust by means
of a flap. When the rear view camera is activa-
ted, this flap opens.
The flap closes again when:
Ryou have finished the maneuvering process
Ryou switch off the engine
For technical reasons, the flap may remain open
briefly after the rear view camera has been
deactivated.
Switching the rear view camera on or
off
XTo switch on: make sure that the key is in
position 2in the ignition lock.
XShift the transmission to position R.
On vehicles with a tailgate, the rear view cam-
era flap opens. The audio display shows the
area behind the vehicle. The rear area shown
is divided by guide lines.
Driving systems159
Driving and parking
Z
Page 168 of 318
tened to the vehicle's trailer coupling, not to
the bumper or the axle.
Leave enough slack in the chains. This allows
you to drive round tight corners.
Ra separate brake system for certain types of
trailer.
Ra safety shut-off for braked trailers. Find out
the specific requirements according to the
applicable laws.
If the trailer becomes detached from the tow-
ing vehicle, the safety shut-off applies the
trailer brakes.
Towing a trailer
There are numerous legal requirements con-
cerning the towing of a trailer, e.g. speed restric-
tions. Many states require a separate functional
braking system for your trailer once a certain
weight limit is exceeded. For reasons of safety,
it is recommended that all trailers use a sepa-
rate functional braking system. Make sure yourvehicle/trailer combination complies with local
laws. This not only means where you live, but
also anywhere you are driving to. Information on
this can be obtained from the police and local
authorities.
Observe the following when towing a trailer:
RPractice driving around bends, stopping and
backing up at a place where there is no traffic.
This enables you to gain experience and get
used to the new handling characteristics.
RBefore driving, check:
-that the trailer tow hitch and ball coupling
are secure
-that the safety switch for a braked trailer is
functioning properly
-that the safety chains are secure and not
damaged
-that the electrical connections are secure
-that the lights are working
-that the wheels are in good order and the
tire pressure is correct
RAdjust the exterior mirrors to provide an
unobstructed view of the rear section of the
trailer.
RIf the trailer is equipped with a separate func-
tional braking system, check before each
journey whether the brakes are functioning
correctly.
RSecure the load on the trailer according to the
applicable specifications and current stand-
ards on securing loads (
Ypage 244).
RWhen driving with a trailer, check at regular
intervals that the load is secured and that the
brakes and lights are working.
RBear in mind that the handling will be less
stable when towing a trailer than when driving
without one. Avoid sudden steering move-
ments.
RThe vehicle/trailer combination is heavier,
accelerates more slowly and has a decreased
gradient climbing capability and a longer
braking distance.
It is more susceptible to crosswinds and
requires cautious steering.
RIf possible, do not brake suddenly, but rather
moderately at first so that the trailer can acti-
vate its brakes. Then increase the force on the
brake pedal.
RIf the automatic transmission repeatedly
shifts between gears when driving on inclines,
restrict the shift range. Select shift range
4,3 ,
2 o
r 1.
Driving in a low gear and at a low speed
reduces the risk of damaging the engine.
RWhen driving on a downhill gradient, shift to a
low gear and take advantage of the engine's
braking effect.
Avoid continuous brake application as this
may overheat the vehicle brakes and, if instal-
led, the trailer brakes.
RIf the coolant temperature increases dramat-
ically while the air-conditioning system is
switched on, switch off the air-conditioning
system.
Coolant heat can also be dissipated by
switching the airflow and the temperature of
the air conditioning to the maximum level.
Open the windows if necessary.
RWhen overtaking, pay particular attention to
the extended length of your vehicle/trailer
combination.
Due to the length of your vehicle/trailer com- bination you need an additional distance
before you can return to your original lane.
166Towing a trailer
Driving an d parking
Page 192 of 318
Safety systems
Display messagesPossible causes/consequences andMSolutions
ABS,ESPInoperative
+
ABS, BAS, hill start assist, and ESP®as well as its driving safety sys-
tems are unavailable due to a malfunction.
ATTENTION ASSIST is deactivated and other driving systems could be
automatically deactivated.
GWARNING
The brake system continues to function normally, but without the
functions listed above. The wheels could therefore lock if you brake
hard, for example.
This causes steerability and braking to be greatly impaired. The brak-
ing distance can increase in emergency braking situations.
If ESP
®is not operational, ESP®will not stabilize the vehicle.
There is an increased risk of skidding and accidents.
XSwitch the engine off, wait briefly and start the engine again.
XCheck if the display message has disappeared and ESP®is opera-
tional.
XIf the display message continues to be displayed:
RDrive on with care.
RVisit a qualified specialist workshop immediately.
ABS, ESP Curr.Unavail.
+
ABS, BAS, hill start assist, and ESP®as well as its driving safety sys-
tems are temporarily unavailable.
ATTENTION ASSIST is deactivated and other driving systems could be
automatically deactivated.
For example, the on-board voltage may be insufficient.
GWARNING
The brake system continues to function normally, but without the
functions listed above. The wheels could therefore lock if you brake
hard, for example.
This causes steerability and braking to be greatly impaired. The brak-
ing distance can increase in emergency braking situations.
If ESP
®is not operational, ESP®will not stabilize the vehicle.
There is an increased risk of skidding and accidents.
XDrive on with care and on a suitable stretch of road make slight
steering movements at a speed above 12 mph (20 km/h).
XSwitch the engine off, wait briefly and start the engine again.
XCheck if the display message has disappeared and ESP®is opera-
tional.
XIf the display message continues to be displayed:
RDrive on with care.
RVisit a qualified specialist workshop immediately.
190Display messages (vehicles without steering wheel buttons)
On-board computer and displays
Page 196 of 318
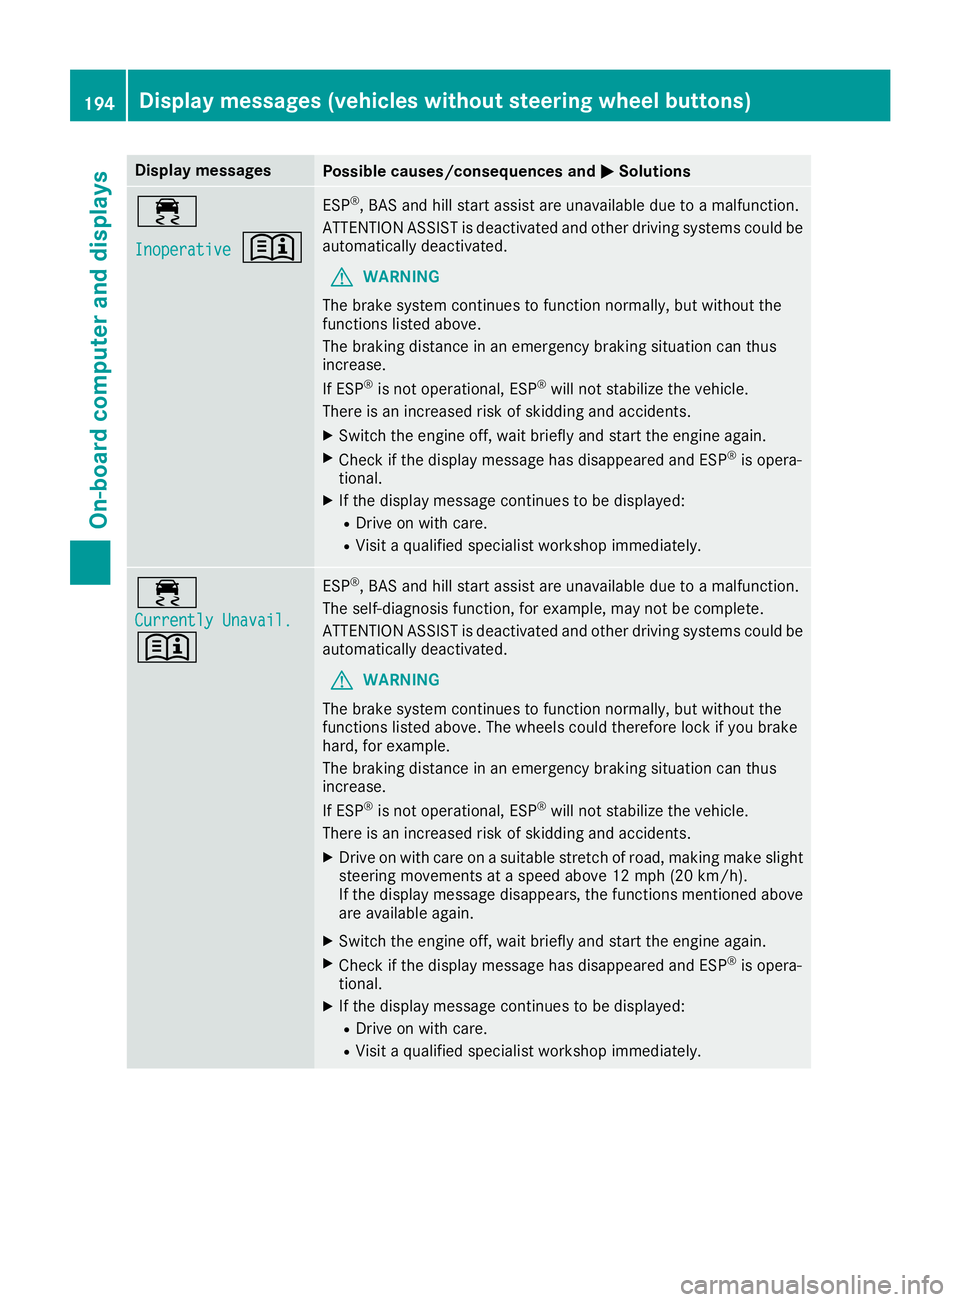
Display messagesPossible causes/consequences andMSolutions
÷
Inoperative+
ESP®,BA Sand hill start assist are unavailable due to amalfunction .
ATTENTION ASSIST is deactivated and other drivin gsystems could be
automatically deactivated.
GWARNIN G
The brak esystem continues to function normally, but without th e
function slisted above.
The braking distanc ein an emergenc ybraking situation can thus
increase.
If ES P
®is no toperational, ES P®will notstabiliz eth evehicle.
There is an increased ris kof skiddin gand accidents .
XSwitchth eengin eoff ,wait briefl yand start th eengin eagain .
XCheckif th edisplay message has disappeared and ES P®is opera-
tional.
XIf th edisplay message continues to be displayed:
RDrive on wit hcare.
RVisit aqualified specialist workshop immediately.
÷
Currently Unavail.
+
ES P®,BA Sand hill start assist are unavailable due to amalfunction .
The self-diagnosis function ,for example, may no tbe complete.
ATTENTION ASSIST is deactivated and other drivin gsystems could be
automatically deactivated.
GWARNIN G
The brak esystem continues to function normally, but without th e
function slisted above. The wheels could therefor eloc kif you brak e
hard, for example.
The braking distanc ein an emergenc ybraking situation can thus
increase.
If ES P
®is no toperational, ES P®will notstabiliz eth evehicle.
There is an increased ris kof skiddin gand accidents .
XDrive on withcar eon asuitable stretch of road, making mak eslight
steering movement sat aspeed abov e12 mph (20 km/ h).
If the display message disappears, the functions mentioned above
are available again.
XSwitch the engine off, wait briefly and start the engine again.
XCheck if the display message has disappeared and ESP®is opera-
tional.
XIf the display message continues to be displayed:
RDrive on with care.
RVisit a qualified specialist workshop immediately.
194Display messages (vehicles without steering wheel buttons)
On-board computer and displays
Page 227 of 318
Engine
Warning/
indicator
lampNSignal type
Possible causes/consequences and M
Solutions
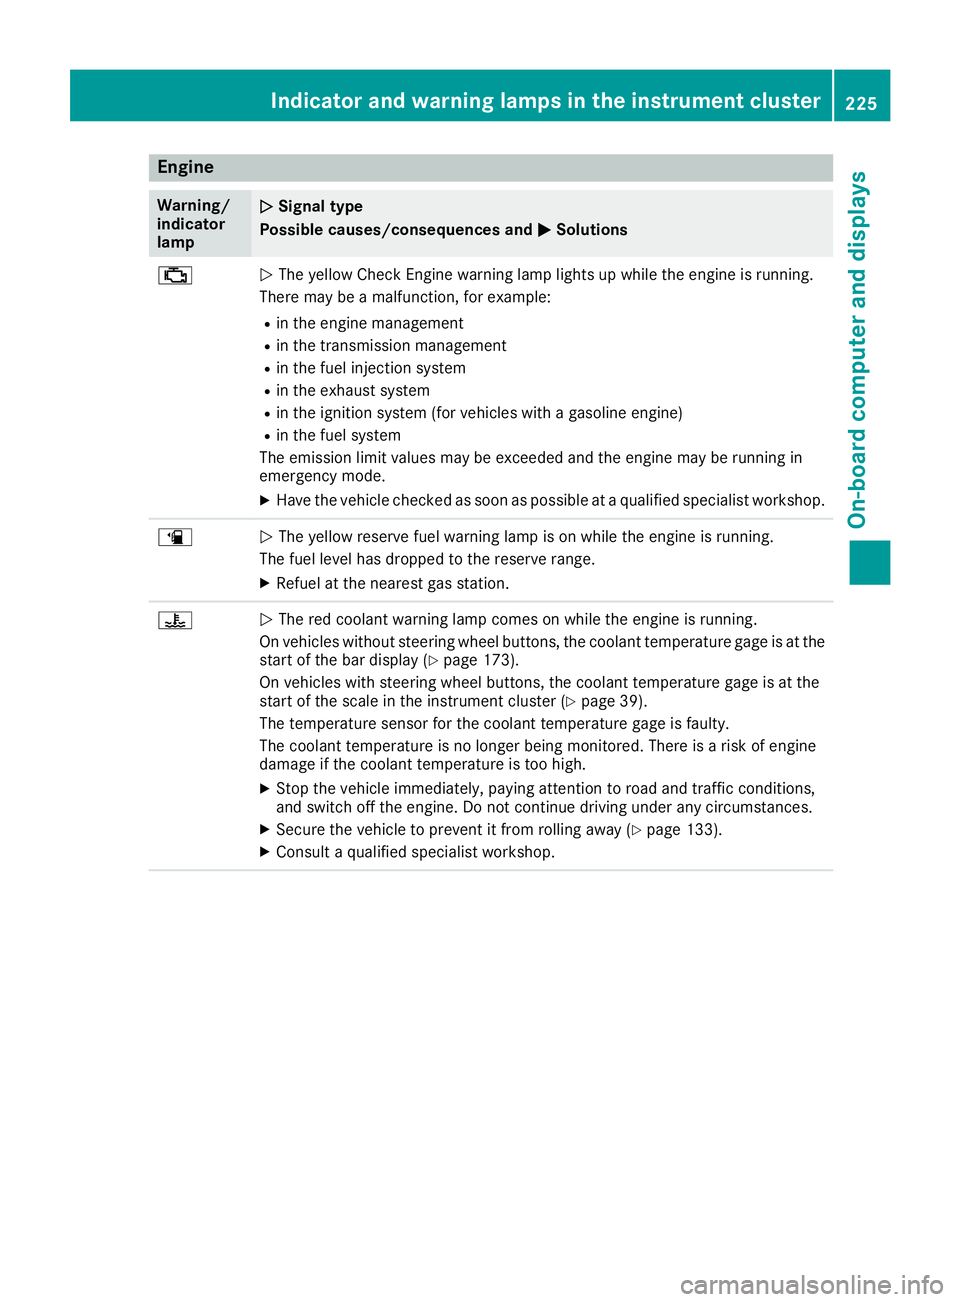
;NThe yellow Check Engine warning lamp lights up while the engine is running.
There may be a malfunction, for example:
Rin the engine management
Rin the transmission management
Rin the fuel injection system
Rin the exhaust system
Rin the ignition system (for vehicles with a gasoline engine)
Rin the fuel system
The emission limit values may be exceeded and the engine may be running in
emergency mode.
XHave the vehicle checked as soon as possible at a qualified specialist workshop.
æN The yellow reserve fuel warning lamp is on while the engine is running.
The fuel level has dropped to the reserve range.
XRefuel at the nearest gas station.
?N The red coolant warning lamp comes on while the engine is running.
On vehicles without steering wheel buttons, the coolant temperature gage is at the
start of the bar display (
Ypage 173).
On vehicles with steering wheel buttons, the coolant temperature gage is at the
start of the scale in the instrument cluster (
Ypage 39).
The temperature sensor for the coolant temperature gage is faulty.
The coolant temperature is no longer being monitored. There is a risk of engine
damage if the coolant temperature is too high.
XStop the vehicle immediately, paying attention to road and traffic conditions,
and switch off the engine. Do not continue driving under any circumstances.
XSecure the vehicle to prevent it from rolling away (Ypage 133).
XConsult a qualified specialist workshop.
Indicator and warning lamps in the instrument cluster225
On-board computer and displays
Z
Page 229 of 318
Warning/
indicator
lampNSignal type
Possible causes/consequences and M
Solutions
XExit the vehicle and keep a safe distance from the vehicle until the engine has
cooled down.
XCheck the coolant level and add coolant, observing the warning notes
(Ypage 253).
XIf you have to add coolant more frequently, have the engine cooling system
checked.
XMake sure that the air supply to the radiator is not obstructed, by frozen slush
for example.
XCheck the coolant temperature:
Rusing the display in the on-board computer on vehicles without steering wheel
buttons (Ypage 173)
Rusing the analog display in the instrument cluster on vehicles with steering
wheel buttons (Ypage 39)
XIf the coolant temperature is below the maximum value specified below, you can
continue driving to the nearest qualified specialist workshop.
Avoid heavy loads on the engine, e.g. driving in mountainous terrain, and stop-
start traffic.
Under normal operating conditions and with the specified coolant level, the cool-
ant temperature gage may rise to 248 ‡ (120 †).
Driving systems
Warning/
indicator
lampNSignal type
Possible causes/consequences and M
Solutions
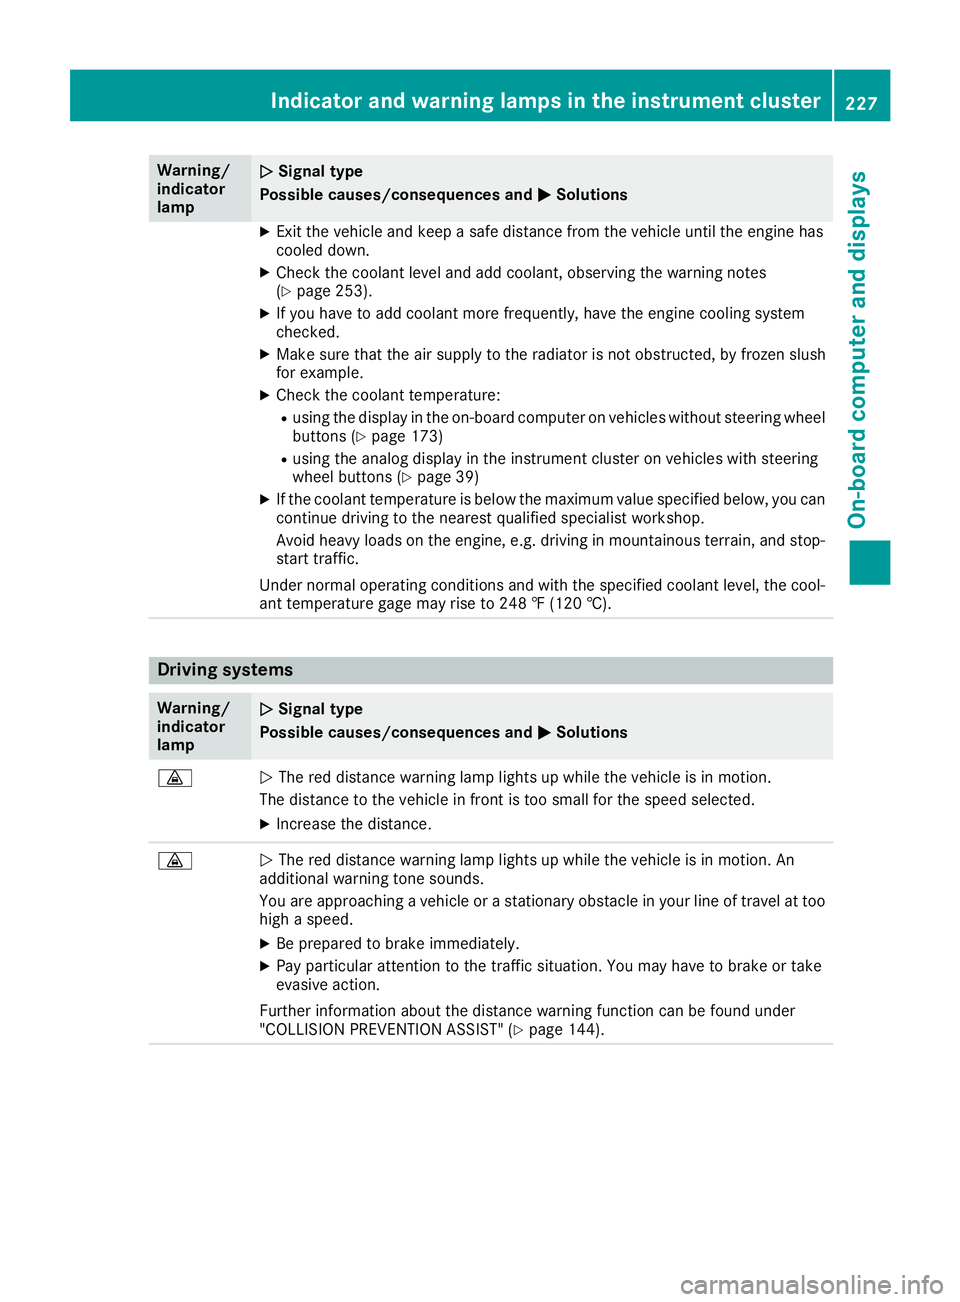
·NThe red distance warning lamp lights up while the vehicle is in motion.
The distance to the vehicle in front is too small for the speed selected.
XIncrease the distance.
·N The red distance warning lamp lights up while the vehicle is in motion. An
additional warning tone sounds.
You are approaching a vehicle or a stationary obstacle in your line of travel at too
high a speed.
XBe prepared to brake immediately.
XPay particular attention to the traffic situation. You may have to brake or take
evasive action.
Further information about the distance warning function can be found under
"COLLISION PREVENTION ASSIST" (
Ypage 144).
Indicator and warning lamps in the instrument cluster227
On-board computer and displays
Z
Page 254 of 318
XHold support strut?and lift the hood
slightly.
XGuide support strut ?towards retainer =
and apply slight pressure to make it engage.
XLower the hood and allow it to fall with
momentum from a height of approximately
1 ft (30 cm).
The hood locks audibly.
XCheck that the hood is correctly locked.
If the hood can be raised slightly, it is not
properly engaged. If the hood is not correctly
engaged, open the hood again. Let the hood
fall with a little more momentum.
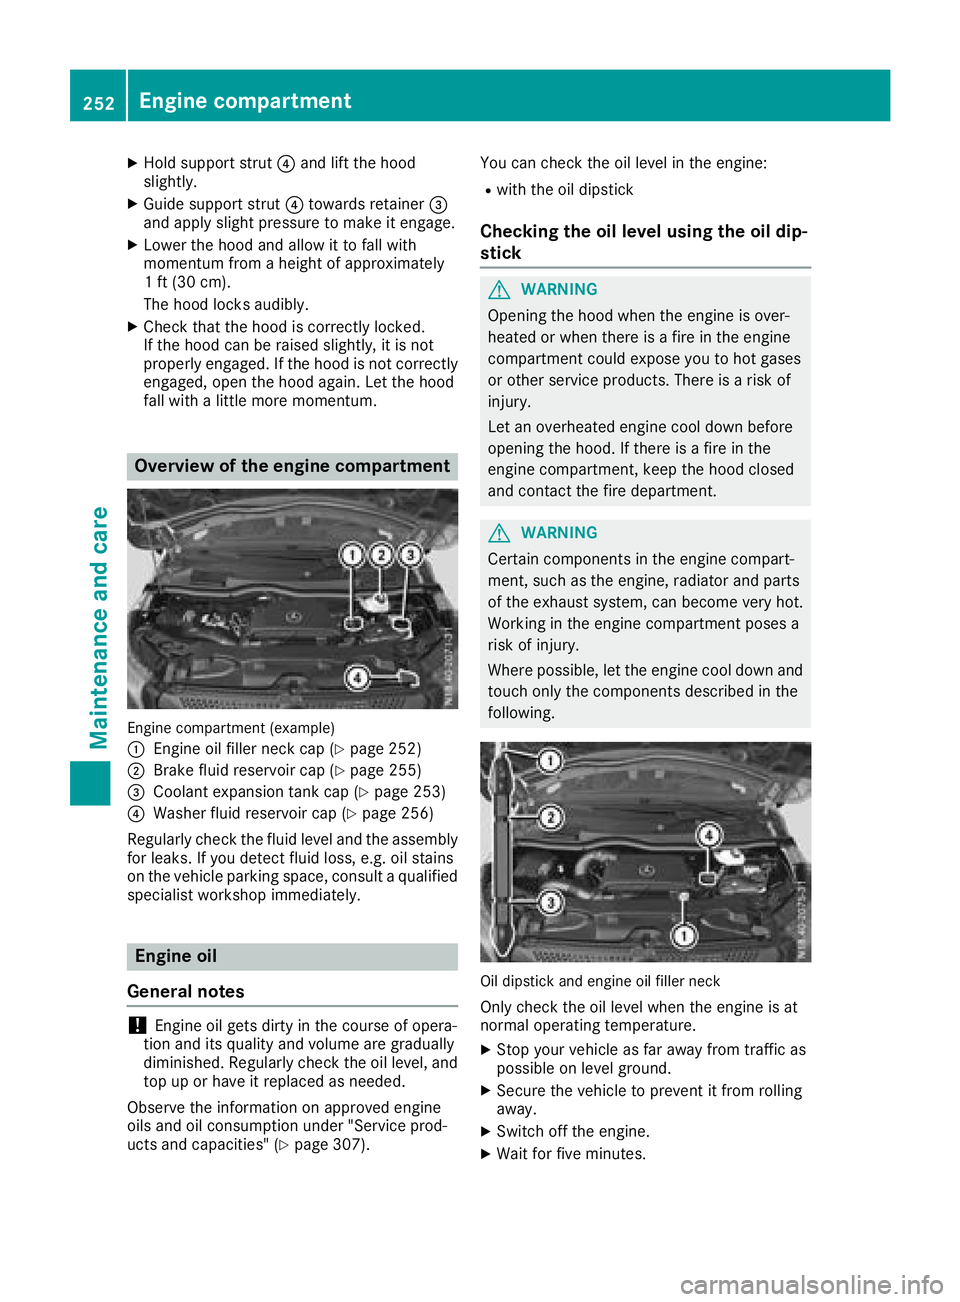
Overview of the engine compartment
Engine compartment (example)
:
Engine oil filler neck cap (Ypage 252)
;Brake fluid reservoir cap (Ypage 255)
=Coolant expansion tank cap (Ypage 253)
?Washer fluid reservoir cap (Ypage 256)
Regularly check the fluid level and the assembly
for leaks. If you detect fluid loss, e.g. oil stains
on the vehicle parking space, consult a qualified
specialist workshop immediately.
Engine oil
General notes
!Engine oil gets dirty in the course of opera-
tion and its quality and volume are gradually
diminished. Regularly check the oil level, and
top up or have it replaced as needed.
Observe the information on approved engine
oils and oil consumption under "Service prod-
ucts and capacities" (
Ypage 307). You can check the oil level in the engine:
Rwith the oil dipstick
Checking the oil level using the oil dip-
stick
GWARNING
Opening the hood when the engine is over-
heated or when there is a fire in the engine
compartment could expose you to hot gases
or other service products. There is a risk of
injury.
Let an overheated engine cool down before
opening the hood. If there is a fire in the
engine compartment, keep the hood closed
and contact the fire department.
GWARNING
Certain components in the engine compart-
ment, such as the engine, radiator and parts
of the exhaust system, can become very hot.
Working in the engine compartment poses a
risk of injury.
Where possible, let the engine cool down and touch only the components described in the
following.
Oil dipstick and engine oil filler neck
Only check the oil level when the engine is at
normal operating temperature.
XStop your vehicle as far away from traffic as
possible on level ground.
XSecure the vehicle to prevent it from rolling
away.
XSwitch off the engine.
XWait for five minutes.
252Engine compartment
Maintenance and care
Page 260 of 318
Rfrequent operation in mountainous terrain or
on poor road surfaces
Rleaving the engine idling for long periods on a
frequent basis
In these or similar operating conditions, have
the air filter, engine oil and oil filter, for example,
replaced more frequently. Under more arduous
operating conditions, the tires must be checked more often. Further information can be obtained
at a qualified specialist workshop, e.g. an
authorized Mercedes-Benz Commercial Van
Center.
Hiding service messages
Vehicles without steering wheel buttons
XPress the 3button on the instrument clus-
ter.
Vehicles with steering wheel buttons
XPress the aor% button on the steering
wheel.
Calling up the service due date
Vehicles without steering wheel buttons
The vehicle must be stationary. Use the buttons
in the instrument cluster.
XTurn the SmartKey to position 2in the ignition
lock.
XPress Èto select the service display.
The display shows a possible service mes-
sage.
Vehicles with steering wheel buttons
Using the steering wheel buttons
XTurn the SmartKey to position 2in the ignition
lock.
XPress =or; to select the Servicemenu.
XPress9or: to select the ASSYSTPLUSsubmenu and press ato confirm.
The display shows the service due date.
Battery
Important safety notes
Work on the battery, e.g. removing or installing,
requires specialist knowledge and the use of
special tools. Therefore, always have work on the battery carried out at a qualified specialist
workshop.
GWARNING
Work carried out incorrectly on the battery
can lead, for example, to a short circuit and
thus damage the vehicle electronics. This can
lead to function restrictions applying to
safety-relevant systems, e.g the lighting sys-
tem, the ABS (anti-lock braking system) or the
ESP
®(Electronic Stability Program). The oper-
ating safety of your vehicle may be restricted.
You could lose control of the vehicle, for
example:
Rwhen braking
Rin the event of abrupt steering maneuvers
and/or when the vehicle's speed is not
adapted to the road conditions
There is a risk of an accident.
In the event of a short circuit or a similar inci-
dent, contact a qualified specialist workshop
immediately. Do not drive any further. You
should have all work involving the battery car- ried out at a qualified specialist workshop.
Further information can be found under "ABS"
(
Ypage 64) and under "ESP®" (Ypage 65).
GWARNING
Electrostatic build-up can lead to the creation of sparks, which could ignite the highly explo-
sive gases of a battery. There is a risk of an
explosion.
Before handling the battery, touch the vehicle
body to remove any existing electrostatic
build-up.
The flammable gas mix is produced when the
battery is charged or when the vehicle is jump-
started.
Always make sure that neither you nor the bat-
tery are electro statically charged. Electrostatic
charging results, for example, from:
Rwearing synthetic clothing
Rfriction between clothing and the seat
Rdragging or pushing the battery across carpet
flooring or any other synthetic materials
Rrubbing the battery with cloths or towels.
258Battery
Maintenance and care
Page 262 of 318
RIt is important that you observe the descri-
bed order of the battery terminals when
connecting and disconnecting a battery.
RWhen jump-starting, make sure that the
battery poles with identical polarity are
connected.
RIt is particularly important to observe the
described order when connecting and dis-
connecting the jumper cables.
RNever connect or disconnect the battery
terminals while the engine is running.
GWARNING
Battery acid is caustic. There is a risk of injury.
Avoid contact with skin, eyes or clothing. Do
not inhale any battery gases. Do not lean over
the battery. Keep children away from batter-
ies. Wash away battery acid immediately with
plenty of clean water and seek medical atten-
tion.
!You should have all work involving the bat-
tery carried out at a qualified specialist work-
shop.
If, in exceptional circumstances, you need to
disconnect the battery yourself, please make
sure that:
RSecure the vehicle to prevent it from rolling
away.
RYou have switched off the engine and
removed the key. Make sure the ignition is
switched off. Check to see that there are no
indicator lamps lighting in the instrument
cluster. Electronic components such as the
alternator may otherwise be damaged.
RAfter the battery has been disconnected,
the parking brake is automatically
engaged. You can then no longer move the
vehicle.
RFor vehicles with automatic transmission,
the transmission is locked in position P
after disconnecting the battery. You can
then no longer move the vehicle.
RYou have first removed the negative termi- nal and then the positive terminal. Never
mix up the terminal clamp disconnection/
connection order and never mix up the ter-
minal clamps. The vehicle's electronics
may otherwise be damaged. The battery and the cover of the positive ter-
minal clamp must be installed securely during
operation.
Seat base (example: right-hand front seat)
The following description on disconnecting and
removing the battery is based upon the example
of the starter battery in the seat base of the
driver's seat. The additional battery is discon-
nected and removed in the same way as the
starter battery. The auxiliary battery is located in the seat base of the left-hand front seat.
XSwitch off all electrical consumers.
XSwitch off the engine and remove the key
from the ignition lock.
XOpen the front door on the right-hand side.
iTo disconnect or remove the additional bat-
tery, open the left-hand front door. The auxil-
iary battery is located in the seat base of the
left-hand front seat.
XPress both latching springs :down and
remove cover ;upwards from the seat base.
XRemove cover ;by pulling upwards at an
angle from the seat base.
Open seat base (example: right-hand front seat)
XRemove screws Afrom holder B.
XRemove holder B.
260Battery
Maintenance and care