clock MERCEDES-BENZ METRIS 2018 MY18 Operator’s Manual
[x] Cancel search | Manufacturer: MERCEDES-BENZ, Model Year: 2018, Model line: METRIS, Model: MERCEDES-BENZ METRIS 2018Pages: 318, PDF Size: 5.07 MB
Page 10 of 318
Climate controlAir conditioning in the rear com-
partment ........................................ 113
Control panel for dual-zone auto-
matic climate control .................... .112
Controlling automatically ...............1 15
Cooling with air dehumidification .. 114
Defrosting the windows ................. 118
Defrosting the windshield .............. 117
Important safety notes .................. 110
Information on dual-zone auto-
matic climate control ..................... 112
Information on TEMPMATIC (air-
conditioning system) ..................... 111
Overview of systems ......................1 10
Problem with the rear window
defroster ........................................ 118
Rear-compartment air condition-
ing ................................................. 113
Refrigerant ..................................... 312
Refrigerant filling capacity ............. 312
Setting the air distribution ............. 116
Setting the air vents ......................1 20
Setting the airflow ......................... 116
Setting the temperature ................ 115
Switching air-recirculation mode
on/off ............................................ 118
Switching on/off ........................... 113
Switching residual heat on/off ...... 119
Switching the rear window
defroster on/off ............................ 118
Switching the synchronization
function on and off ........................ 117
TEMPMATIC control panel (air
conditioning) .................................. 111
Clock
Setting (vehicle without steering
wheel buttons) ............................... 178
Cockpit
Instrument cluster (vehicle with
steering wheel buttons) ................... 39
Instrument cluster (vehicle with-
out steering wheel buttons) ............. 37
Overview .......................................... 36
see Instrument cluster
Coffee cup symbol
see ATTENTION ASSIST COL
LISION PREVENTION ASSIST
Activating/deactivating the dis-
tance warning function .................. 187
Adaptive Brake Assist .................... 147
Display message ............................ 216
Distance warning function ............. 146
Operation/notes ............................ 146
Collision warning
see COLLISION PREVENTION ASSIST
COMAND display
Cleaning ......................................... 270
Combination switch ............................ 98
Communications equipment
Operation ....................................... 243
Type approval/frequency .............. 305
Consumption statistics
Fuel (vehicle with steering wheel
buttons) ......................................... 181
Fuel (vehicle without steering
wheel buttons) ............................... 174
Control panel
Above the windshield ....................... 43
Center console ................................ 42
Climate control ................................ 42
Driver's door ....................................4 3
Convenience closing feature .............. 83
Convenience opening
With the SmartKey ........................ .119
Convenience opening feature ............ 83
Conversions/equipment .................... 32
Coolant (engine)
Adding ...........................................2 57
Checking the level ......................... 255
Display messages (vehicle with
steering wheel buttons) ................. 215
Display messages (vehicle with-
out steering wheel buttons) ........... 200
Displaying the temperature (on-
board computer) ............................ 175
Filling capacity ............................... 312
Notes ............................................. 311
Temperature display in the instru-
ment cluster .................................. 172
Warning lamp ................................. 227
Cooling
see Climate control
Crosswind Assist ................................. 67
8Index
Page 30 of 318
Benz, LLC has been informed in writing of
the necessity of such a repair.
(2) the same defect or damage, although less serious than described in (1), has been
repaired at least four times and Mercedes-
Benz has been informed of the necessity of
such a repair in writing.
(3) the vehicle cannot be operated for more than 30 calendar days due to repairs result-
ing from the same or other major defects ordamage.
Please send written notification to:
Mercedes-Benz USA, LLC
Customer Assistance Center
One Mercedes Drive
Montvale, NJ 07645-0350
Maintenance
USA only:
Always bring the Maintenance Booklet with you
when taking the vehicle to a Mercedes-Benz
Commercial Van Center. Your customer service
advisor enters each service into the Mainte-
nance Booklet.
Canada only:
Have every service carried out by a qualified
specialist workshop recorded in your service
report.
Roadside Assistance
The Mercedes-Benz Roadside Assistance Pro-
gram provides you with technical assistance in
the case of a breakdown. Your toll-free calls to
the Roadside Assistance Hotline are answered
by our staff around the clock. 365 days a year.
1-800-FOR-MERCedes (1-800-367-6372)
(USA)
1-800-387-0100 (Canada)
Further information can be found in the
Mercedes-Benz Roadside Assistance-Program
brochure (USA) or the "Roadside Assistance"
section of the Service and Warranty Information booklet (Canada). Both are located in your vehi-
cle document wallet.
Change of address or owner
Please use the "Notice of Change of Address"
form in the Service and Warranty Information
booklet to inform us of a change of address, or
simply phone the Mercedes-Benz Customer
Assistance Center (USA) on hotline number
1-800-FOR-MERCedes (1-800-367-6372) or
Customer Service (Canada) on
1-800-387-0100. This enables us, if necessary,
to contact you at any time.
If you sell your Mercedes, please leave all the
literature in the vehicle so that it is available for
the next owner.
If your vehicle was purchased as a used vehicle,
please send us the "Notice of Purchase of Used
Car" from the Service and Warranty Information
booklet or phone the Mercedes-Benz Customer
Assistance Center (USA) on hotline number
1-800-FOR-MERCedes (1-800-367-6372) or
Customer Service (Canada) on
1-800-387-0100.
Operating the vehicle outside of the
USA and Canada
When traveling abroad with your vehicle,
observe the following points:
RService facilities or replacement parts may
not be available immediately.
RUnleaded fuel for vehicles with a catalytic
converter may not be available. Leaded fuel
can cause damage to the catalytic converter.
RThe fuel may have a considerably lower
octane rating. Unsuitable fuel can cause
engine damage.
Certain Mercedes-Benz models are available in
Europe through our European Delivery Program.
Please consult a Mercedes-Benz Commercial
Van Center for further information, or write to
one of the following addresses:
In the USA
Mercedes-Benz USA, LLC
European Delivery Department
One Mercedes Drive
Montvale, NJ 07645-0350
In Canada
Mercedes-Benz Canada, Inc.
European Delivery Department
98 Vanderhoof Avenue
Toronto, Ontario M4G 4C9
28Introduction
Page 73 of 318
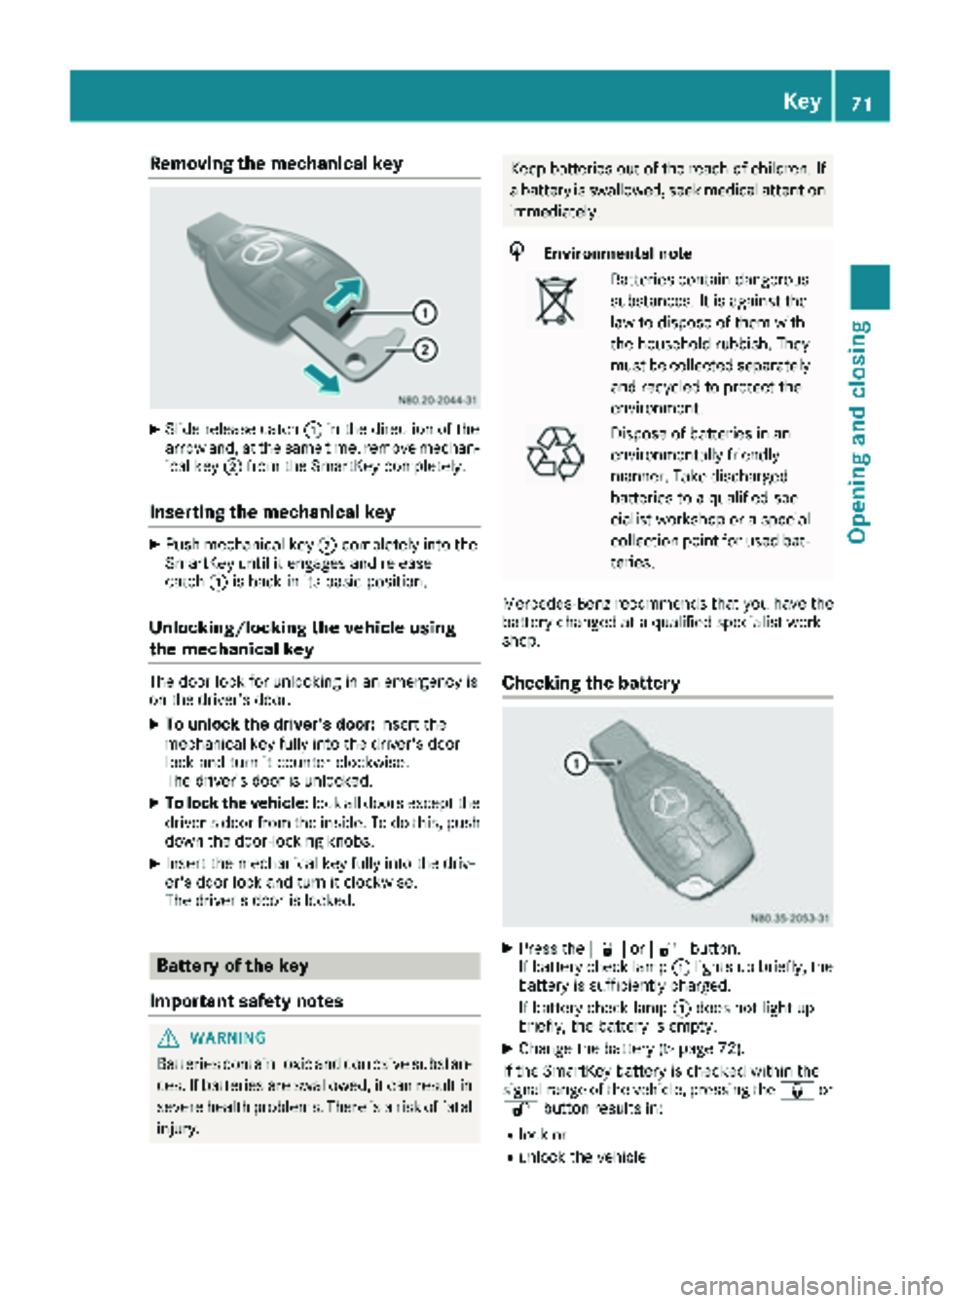
Removing the mechanical key
XSlide release catch:in the direction of the
arrow and, at the same time, remove mechan-
ical key ;from the SmartKey completely.
Inserting the mechanical key
XPush mechanical key ;completely into the
SmartKey until it engages and release
catch :is back in its basic position.
Unlocking/locking the vehicle using
the mechanical key
The door lock for unlocking in an emergency is
on the driver’s door.
XTo unlock the driver's door: insert the
mechanical key fully into the driver's door
lock and turn it counter-clockwise.
The driver’s door is unlocked.
XTo lock the vehicle: lock all doors except the
driver's door from the inside. To do this, push
down the door-locking knobs.
XInsert the mechanical key fully into the driv-
er's door lock and turn it clockwise.
The driver's door is locked.
Battery of the key
Important safety notes
GWARNING
Batteries contain toxic and corrosive substan- ces. If batteries are swallowed, it can result in
severe health problems. There is a risk of fatalinjury.
Keep batteries out of the reach of children. If
a battery is swallowed, seek medical attention
immediately.
HEnvironmental note
Batteries contain dangerous
substances. It is against the
law to dispose of them with
the household rubbish. They
must be collected separately and recycled to protect the
environment.
Dispose of batteries in an
environmentally friendly
manner. Take discharged
batteries to a qualified spe-
cialist workshop or a special
collection point for used bat-
teries.
Mercedes-Benz recommends that you have the
battery changed at a qualified specialist work-
shop.
Checking the battery
XPress the &or% button.
If battery check lamp :lights up briefly, the
battery is sufficiently charged.
If battery check lamp :does not light up
briefly, the battery is empty.
XChange the battery (Ypage 72).
If the SmartKey battery is checked within the
signal range of the vehicle, pressing the &or
% button results in:
Rlock or
Runlock the vehicle
Key71
Opening and closing
Z
Page 103 of 318
Rear compartment and cargo com-
partment lamps
You cannot change the following bulbs yourself:
Rin a Passenger Van, the bulbs in the trunk
lamp and those of the rear interior lights in the
grab handles
Rin a Cargo Van with an LED light strip in the
cargo compartment, the LED light strip
Have these bulbs or the LED light strip changed in a qualified specialist workshop only.
Information on changing the bulb of the trunk
lamp in the side trim panel of vehicles with a
cargo compartment stowage tray can be found
under "Additional interior and ambient lighting"
(
Ypage 101)
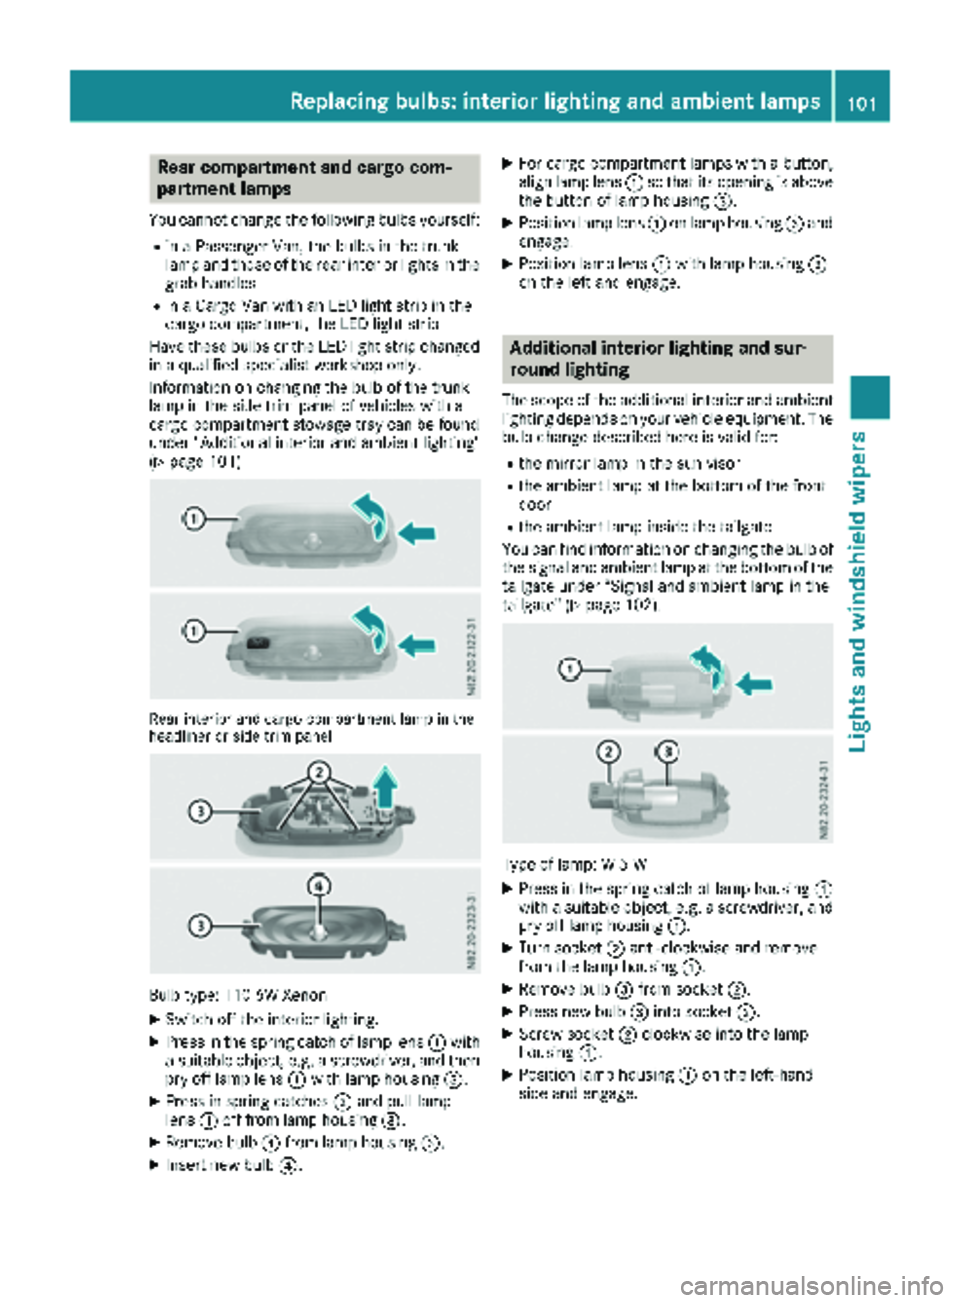
Rear interior and cargo compartment lamp in the
headliner or side trim panel
Bulb type: T10 6W Xenon
XSwitch off the interior lighting.
XPress in the spring catch of lamp lens :with
a suitable object, e.g. a screwdriver, and then pry off lamp lens :with lamp housing =.
XPress in spring catches ;and pull lamp
lens :off from lamp housing =.
XRemove bulb?from lamp housing =.
XInsert new bulb?.
XFor cargo compartment lamps with a button,
align lamp lens:so that its opening is above
the button of lamp housing =.
XPosition lamp lens:on lamp housing =and
engage.
XPosition lamp lens :with lamp housing =
on the left and engage.
Additional interior lighting and sur-
round lighting
The scope of the additional interior and ambient
lighting depends on your vehicle equipment. The
bulb change described here is valid for:
Rthe mirror lamp in the sun visor
Rthe ambient lamp at the bottom of the front
door
Rthe ambient lamp inside the tailgate
You can find information on changing the bulb of the signal and ambient lamp at the bottom of the
tailgate under “Signal and ambient lamp in the
tailgate" (
Ypage 102).
Type of lamp: W 5 W
XPress in the spring catch of lamp housing :
with a suitable object, e.g. a screwdriver, and
pry off lamp housing :.
XTurn socket;anti-clockwise and remove
from the lamp housing :.
XRemove bulb=from socket ;.
XPress new bulb =into socket ;.
XScrew socket ;clockwise into the lamp
housing :.
XPosition lamp housing :on the left-hand
side and engage.
Replacing bulbs: interior lighting and ambient lamps101
Lights and windshield wipers
Z
Page 104 of 318
Signal and ambient light in the tail-
gate
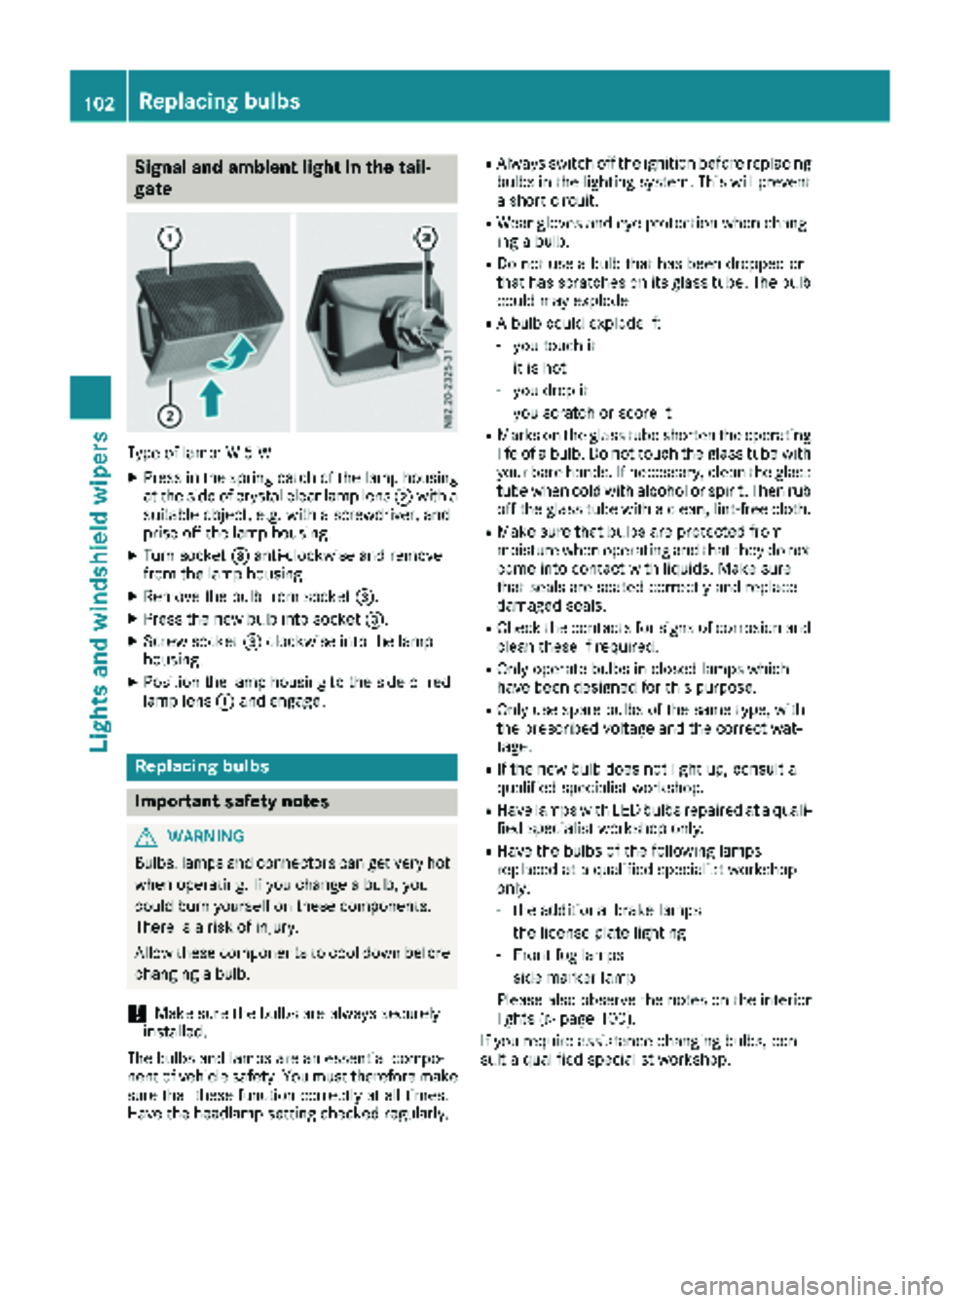
Type of lamp: W 5 W
XPress in the spring catch of the lamp housing
at the side of crystal clear lamp lens;with a
suitable object, e.g. with a screwdriver, and
prise off the lamp housing.
XTurn socket =anti-clockwise and remove
from the lamp housing.
XRemove the bulb from socket =.
XPress the new bulb into socket =.
XScrew socket=clockwise into the lamp
housing.
XPosition the lamp housing to the side of red
lamp lens :and engage.
Replacing bulbs
Important safety notes
GWARNING
Bulbs, lamps and connectors can get very hot
when operating. If you change a bulb, you
could burn yourself on these components.
There is a risk of injury.
Allow these components to cool down before
changing a bulb.
!Make sure the bulbs are always securely
installed.
The bulbs and lamps are an essential compo-
nent of vehicle safety. You must therefore make
sure that these function correctly at all times.
Have the headlamp setting checked regularly.
RAlways switch off the ignition before replacing bulbs in the lighting system. This will prevent
a short circuit.
RWear gloves and eye protection when chang-
ing a bulb.
RDo not use a bulb that has been dropped or
that has scratches on its glass tube. The bulb
could may explode.
RA bulb could explode if:
-you touch it
-it is hot
-you drop it
-you scratch or score it
RMarks on the glass tube shorten the operating
life of a bulb. Do not touch the glass tube with
your bare hands. If necessary, clean the glass
tube when cold with alcohol or spirit. Then rub
off the glass tube with a clean, lint-free cloth.
RMake sure that bulbs are protected from
moisture when operating and that they do not
come into contact with liquids. Make sure
that seals are seated correctly and replace
damaged seals.
RCheck the contacts for signs of corrosion and
clean these if required.
ROnly operate bulbs in closed lamps which
have been designed for this purpose.
ROnly use spare bulbs of the same type, with
the prescribed voltage and the correct wat-
tage.
RIf the new bulb does not light up, consult a
qualified specialist workshop.
RHave lamps with LED bulbs repaired at a quali- fied specialist workshop only.
RHave the bulbs of the following lamps
replaced at a qualified specialist workshop
only:
-the additional brake lamps
-the license plate lighting
-Front fog lamps
-side marker lamp
Please also observe the notes on the interior
lights (
Ypage 100).
If you require assistance changing bulbs, con-
sult a qualified specialist workshop.
102Replacing bulbs
Lights and windshield wipers
Page 105 of 318
Front lamp clusters
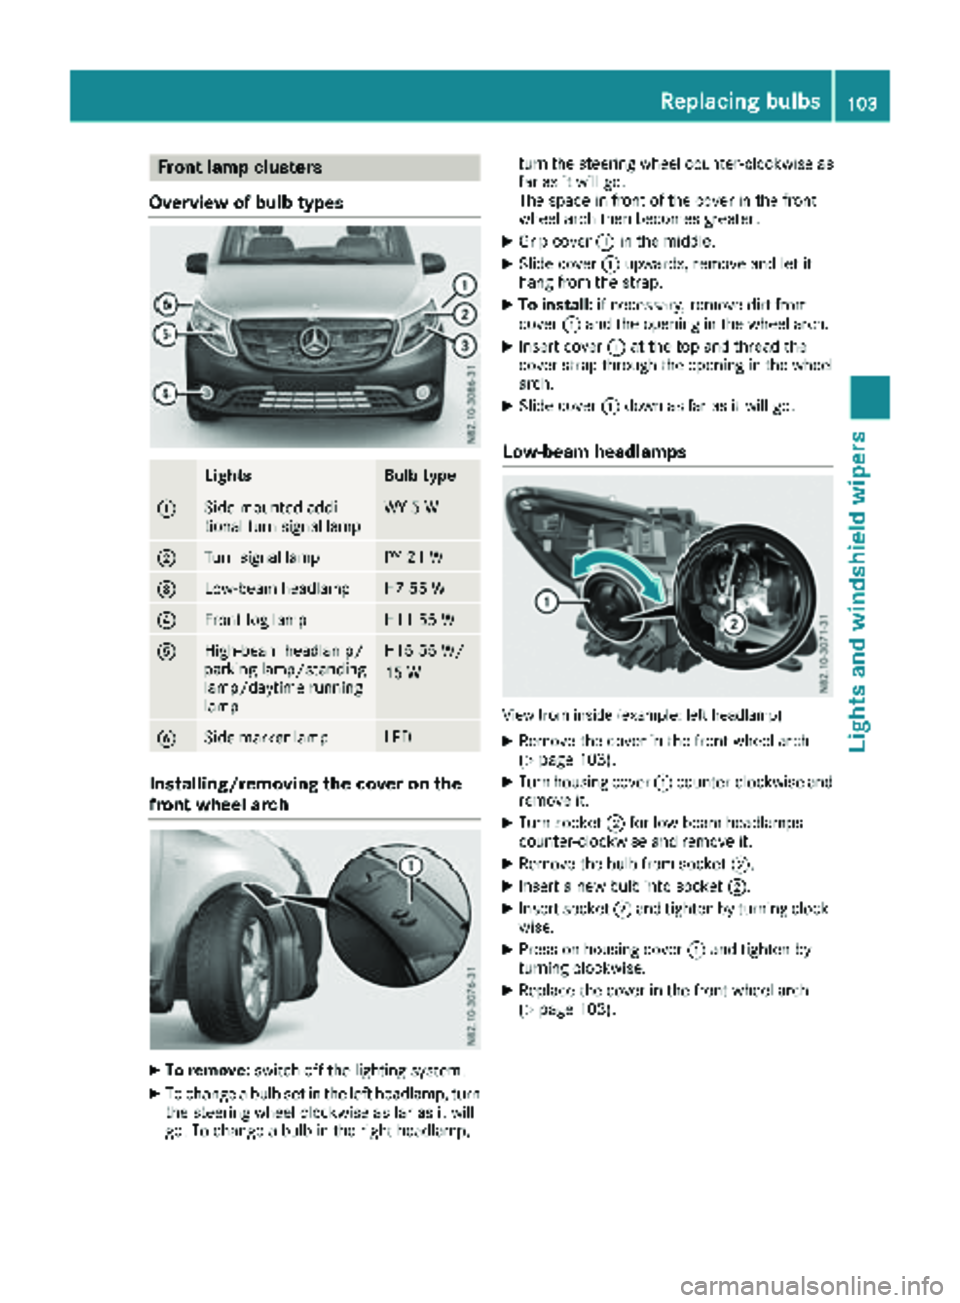
Overview of bulb types
LightsBulb type
:Side-mounte daddi-
tional tur nsignal lampWY 5 W
;Turn signal lampPY 21 W
=Low-beam headlampH7 55 W
?Frontfog lampH1 155 W
AHigh-beam headlamp/
parking lamp/standin g
lamp/daytim erunnin g
lampH1 555 W/
15 W
BSidemarke rlampLE D
Installing/removing the cover on the
front wheel arch
XTo remove: switch off thelighting system.
XTo chang e abulb set in th elef theadlamp, tur n
th esteering whee lclockwise as far as it will
go. To chang e abulb in th eright headlamp, tur
nth esteering whee lcounter-clockwise as
far as it will go.
The spac ein fron tof th ecover in th efron t
whee larc hthen become sgreater.
XGrip cover :in th emiddle.
XSlide cover :upwards, remove and let it
han gfrom th estrap.
XTo install: if necessary, remove dirt from
cover :and th eopening in th ewhee larch.
XInser tcover :at th eto pand thread th e
cover strap throug hth eopening in th ewhee l
arch.
XSlide cover :down as far as it will go.
Low-beam headlamps
View from inside (example: lef theadlamp )
XRemove th ecover in th efron twhee larc h
(Ypage 103).
XTurn housing cover :counter-clockwise and
remove it .
XTurn socke t; for low-beam headlamps
counter-clockwise and remove it .
XRemove thebulb from socke t;.
XInser t anewbulb int osocke t;.
XInser tsocke t; and tighten by turnin gclock -
wise.
XPress on housing cover :and tighten by
turnin gclockwise.
XReplac eth ecover in th efron twhee larc h
(Ypage 103).
Replacing bulbs103
Lights and windshield wipers
Z
Page 106 of 318
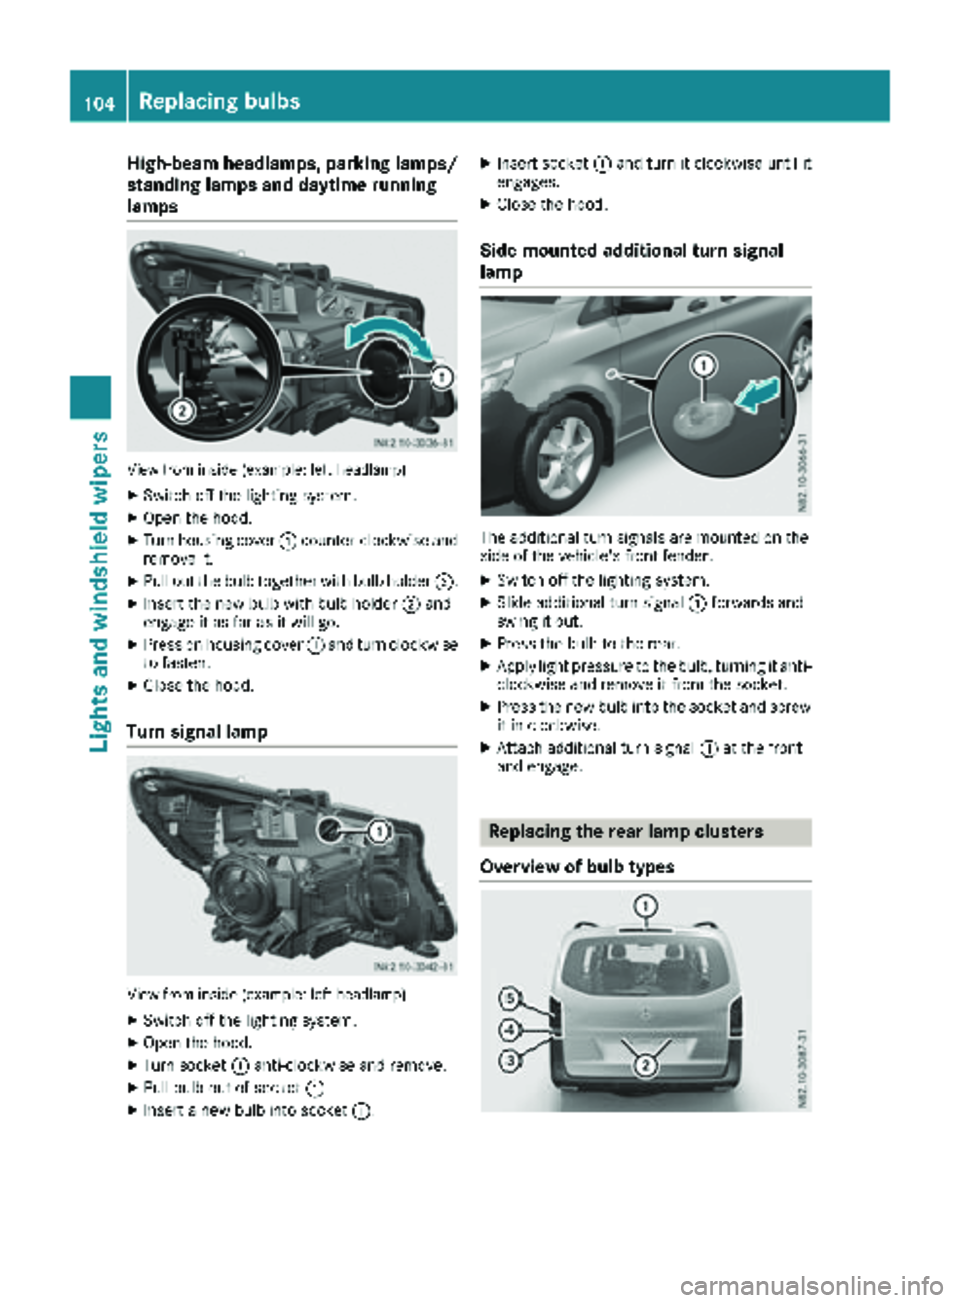
High-beam headlamps, parking lamps/
standing lamps and daytime running
lamps
View from inside (example: left headlamp)
XSwitch off the lighting system.
XOpen the hood.
XTurn housing cover:counter-clockwise and
remove it.
XPull out the bulb together with bulb holder ;.
XInsert the new bulb with bulb holder;and
engage it as far as it will go.
XPress on housing cover :and turn clockwise
to fasten.
XClose the hood.
Turn signal lamp
View from inside (example: left headlamp)
XSwitch off the lighting system.
XOpen the hood.
XTurn socket :anti-clockwise and remove.
XPull bulb out of socket :.
XInsert a new bulb into socket :.
XInsert socket:and turn it clockwise until it
engages.
XClose the hood.
Side-mounted additional turn signal
lamp
The additional turn signals are mounted on the
side of the vehicle's front fender.
XSwitch off the lighting system.
XSlide additional turn signal :forwards and
swing it out.
XPress the bulb to the rear.
XApply light pressure to the bulb, turning it anti- clockwise and remove it from the socket.
XPress the new bulb into the socket and screw
it in clockwise.
XAttach additional turn signal :at the front
and engage.
Replacing the rear lamp clusters
Overview of bulb types
104Replacing bulbs
Lights and windshield wipers
Page 107 of 318
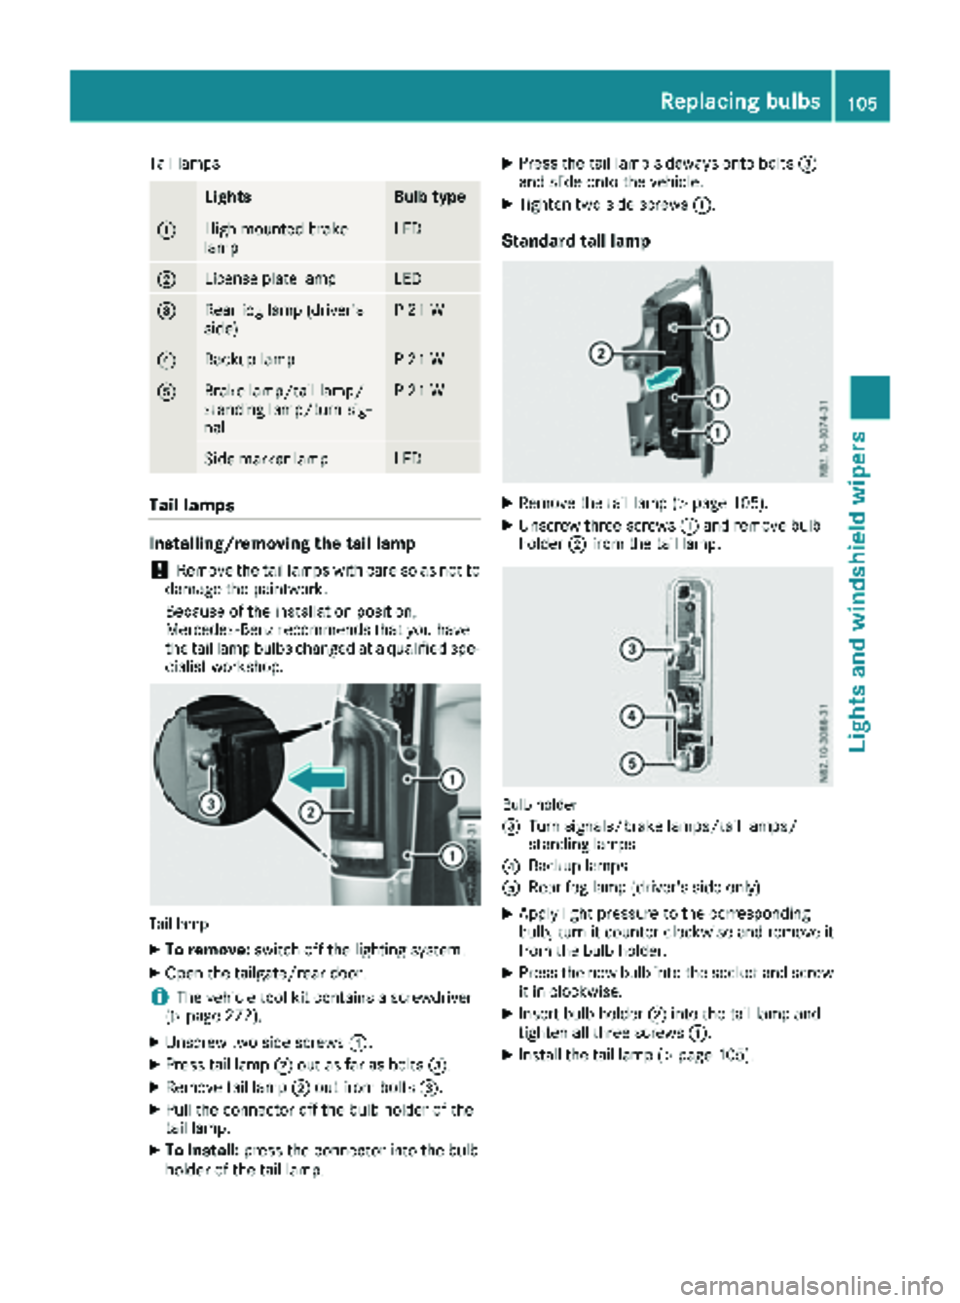
Tail lamps
LightsBulb type
:High-mounted brake
lampLED
;License plate lampLED
=Rear fog lamp (driver's
side)P 21 W
?Backup lampP 21 W
ABrake lamp/tail lamp/
standing lamp/turn sig-
nalP 21 W
Side marker lampLED
Tail lamps
Installing/removing the tail lamp
!Remove the tail lamps with care so as not to
damage the paintwork.
Because of the installation position,
Mercedes-Benz recommends that you have
the tail lamp bulbs changed at a qualified spe-
cialist workshop.
Tail lamp
XTo remove: switch off the lighting system.
XOpen the tailgate/rear door.
iThe vehicle tool kit contains a screwdriver
(Ypage 272).
XUnscrew two side screws :.
XPress tail lamp;out as far as bolts =.
XRemove tail lamp;out from bolts =.
XPull the connector off the bulb holder of the
tail lamp.
XTo install:press the connector into the bulb
holder of the tail lamp.
XPress the tail lamp sideways onto bolts =
and slide onto the vehicle.
XTighten two side screws :.
Standard tail lamp
XRemove the tail lamp (Ypage 105).
XUnscrew three screws:and remove bulb
holder ;from the tail lamp.
Bulb holder
=
Turn signals/brake lamps/tail lamps/
standing lamps
?Backup lamps
ARear fog lamp (driver's side only)
XApply light pressure to the corresponding
bulb, turn it counter-clockwise and remove it
from the bulb holder.
XPress the new bulb into the socket and screw
it in clockwise.
XInsert bulb holder ;into the tail lamp and
tighten all three screws :.
XInstall the tail lamp (Ypage 105).
Replacing bulbs105
Lights and windshield wipers
Z
Page 115 of 318
RIf you wish to use the driver's side settings on
the front-passenger side and, for vehicles
with rear-compartment air conditioning, for
the rear compartment as well, use the "Syn-
chronization" function. The indicator lamp in
the0 button comes on when the function
is switched on.
RAfter long journeys, you can use the residual
heat of the engine to heat the stationary vehi-
cle. The residual heat utilization can only be
switched on or off while the ignition is
switched off. The indicator lamp in the Ì
button comes on when the function is
switched on.
Approximately 60 minutes after parking the
vehicle, dual-zone automatic climate control
can switch on automatically, depending on the
outside temperature. The vehicle is then venti-
lated for about 30 minutes at low fan setting and
dual-zone automatic climate control is dried out.
During automatic engine switch-off, the climate
control system only operates at a reduced capa-
city. Further information on the automatic
engine switch-off can be found under "ECO
start/stop function" (
Ypage 125).
Optimum use of rear-compartment air
conditioning
Vehicles with air-conditioning system
Switch the rear-compartment air-conditioning
system on and off using the air-conditioning sys-
tem control panel. When you switch on the rear-
compartment air conditioning, your settings for
temperature, airflow and air distribution are
automatically adopted on the control panel for
the rear-compartment air conditioning.
The indicator lamp in the /button comes on
when the rear-compartment air-conditioning is
switched on (
Ypage 111).
Vehicles with dual-zone automatic climate
control
To operate the rear-compartment air condition-
ing, use the control panel of the dual-zone auto-
matic climate control system. When you switch
on the rear-compartment air conditioning, you
can set the temperature and airflow separately
on the control panel. The airflow setting is auto-
matically adopted for the rear-compartment air
conditioning. When dual-zone automatic cli-
mate control is in Ãautomatic mode, the air
distribution of the rear-compartment air condi-
tioning is also automatically adjusted. When you set the temperature and airflow of the
rear-compartment air conditioning, the indica-
tor lamp of the
/button (
Ypage 112)
flashes. When the rear-compartment air condi-
tioning is switched on, the indicator lamp on
the / button lights up.
For optimum climate control, set the tempera-
ture to 72 ‡ (22 †) and switch on Ãauto-
matic mode. Only change the temperature in
small increments.
Operating the climate control system
Switching the climate control on/off
Important safety notes
When the climate control is switched off, air
intake and air circulation also stop. Only use this
setting for a brief period. Otherwise, the win-
dows could fog up.
Air-conditioning system
XTurn the key to position 2in the ignition lock.
XTo switch on: turn airflow control Aclock-
wise to at least level 1– (Ypage 111).
XTo switch off: turn airflow control Acoun-
ter-clockwise to position 0.
Dual-zone automatic climate control
XTurn the key to position2in the ignition lock.
XTo switch on: press theÃbutton.
The indicator lamp in the Ãbutton and the
display are switched on. The climate control is
automatically adjusted depending on the set
temperature (
Ypage 115).
or
XPress the Kbutton and set blower setting
1 or above.
The blower settings are shown in the display
as a bar graph.
XTo switch off: press theIbutton and,
after reaching the lowest blower speed, press
it again.
The control panel display goes off.
Preferably switch on climate control using the
à button.
Operating the climate control system113
Climate control
Page 117 of 318
Regulating climate control automati-
cally
General notes
When dual-zone automatic climate control is in
automatic mode, the set temperature is auto-
matically kept constant. The system automati-
cally regulates the temperature of the dis-
pensed air, the airflow and the air distribution.
Automatic mode will achieve optimal operation
if the cooling with air dehumidification function
is also activated. If desired, the cooling with air
dehumidification function can be deactivated
(
Ypage 114).
Dual-zone automatic climate control
Automatic mode for automatic climate control
settings can only be activated or deactivated on
the first menu level. If you do not set a new value
for the rear-compartment climate control in the second menu level within approx. ten seconds,
the control panel display goes back to the first
menu level.
XSwitch on climate control (Ypage 113).
XSet temperature for the driver's and front-
passenger side and, for vehicles with rear-
compartment air conditioning, for the rear
compartment, too (
Ypage 115).
XTo switch automatic mode on or off: press
the à button.
If the indicator lamp in the Ãbutton lights
up, automatic mode is activated. The airflow
and air distribution are controlled automati-
cally and the windshield defrosting function is
deactivated.
If you deactivate automatic mode, the auto-
matic climate control system saves the current
settings.
In automatic mode, if you adjust the airflow or
air distribution manually, the indicator lamp
above the Ãbutton goes out. The function
which has not been changed manually, however,
continues to be controlled automatically.
Setting the temperature
Air-conditioning system
XSwitch on climate control (Ypage 113).
XTo increase or reduce: turn temperature
control :clockwise or counter-clockwise.
When doing so, only change the temperature
in small increments, and start in the center
position or at 72 ‡ (22 †) (
Ypage 111).
Dual-zone automatic climate control
You can set the temperature separately for the
driver's and front-passenger side. In vehicles
with rear-compartment air conditioning, the
temperature for the rear can be set additionally.
Each set temperature is automatically main-
tained at a constant level.
XSwitch on climate control (Ypage 113).
XTo increase or reduce: turn temperature
control :orE clockwise or counter-clock-
wise (
Ypage 112). When doing so, only
change the temperature in small increments
starting at 72 ‡ (22 †).
The control panel display shows the set tem-
perature for the left and right side at the
respective edge of the display.
Rear-compartment air-conditioning
system
Vehicles with air-conditioning system
XSwitch on climate control (Ypage 113).
The air conditioning settings for temperature,
airflow and, for rear-compartment air condi-
tioning, also the setting for air distribution are
also applied to the rear-compartment climate
control.
Vehicles with dual-zone automatic cli-
mate control
XSwitch on climate control (Ypage 113).
XTo increase or decrease: press the/
button on the control panel of the automatic
climate control.
The indicator lamp in the /button flashes.
The control panel display shows the second
menu level for the temperature and airflow
Operating the climate control system115
Climate control