ignition MERCEDES-BENZ METRIS 2019 MY19 Operator’s Manual
[x] Cancel search | Manufacturer: MERCEDES-BENZ, Model Year: 2019, Model line: METRIS, Model: MERCEDES-BENZ METRIS 2019Pages: 318, PDF Size: 5.07 MB
Page 15 of 318
G
Gasoline............................................. 307
Gearshift recommendation
Display (vehicle with steering
wheel buttons) ...............................1 79
Display (vehicle without steering
wheel buttons) ............................... 173
Genuine parts ...................................... 33
Glove box ...........................................2 40
GTW (Gross Trailer Weight) (defini-
tion) .................................................... 296
Guide rail
Maximum tensile strength ............. 315
H
Handbrakesee Parking brake
Handling control system
see ESP
®(Electronic Stability Program)
Hands-free system
see Mobile phone
Hazard warning lamps ........................ 98
Head restraints
Adjusting (electrically) ..................... 91
Adjusting (manually) ........................ 91
Important safety notes .................... 90
Removing/installing ........................ 91
Headlamps
Changing bulbs (halogen head-
lamps) ............................................ 102
Fogging up ....................................... 99
see Automatic headlamp mode
Heating
see Climate control
High-beam headlamps
Display messages (vehicle with
steering wheel buttons) ................. 212
Display messages (vehicle with-
out steering wheel buttons) ........... 199
Replacing bulbs .............................1 04
Switching on/off .............................. 98
Hill start assist .................................. 125
Hood
Closing ...........................................2 53
Display messages (vehicle with
steering wheel buttons) ................. 221 Display messages (vehicle with-
out steering wheel buttons) ........... 204
Important safety notes .................. 252
Opening ......................................... 253
Hydroplaning ..................................... 141
I
Ignition lock
see SmartKey positions (ignition lock)
Immobilizer .......................................... 67
Indicator lamps
see Warning and indicator lamps
Indicators
see Turn signals
Insect protection on the radiator ...... 33
Instrument cluster
Buttons (vehicle without steering
wheel buttons) ............................... 173
Overview (vehicle with steering
wheel buttons) ................................. 39
Overview (vehicle without steer-
ing wheel buttons) ........................... 37
Warning and indicator lamps
(vehicle with steering wheel but-
tons) ................................................ 40
Warning and indicator lamps
(vehicle without steering wheel
buttons) ...........................................3 8
Instrument cluster lighting .............. 171
Interior lighting
Automatic control ............................ 99
Delayed switch-off (on-board
computer) ...................................... 190
General notes .................................. 99
Manual control .............................. .100
Notes on changing bulbs ...............1 00
Overview .......................................... 99
Reading lamp ................................... 99
Rear interior light in the grab han-
dle ................................................. 100
Replacing bulbs .............................1 00
Switching the cargo compartment
lighting on/off (cargo compart-
ment) ............................................. 100
Switching the cargo compartment
lighting on/off (dashboard) ........... 100
Index13
Page 16 of 318
Switching the rear compartment
lighting on centrally ....................... 100
J
JackHolder in the cargo compartment .. 274
Jacking points ................................ 299
Scope of tire-changing tools .......... 272
Storage location ............................ 272
Stowage compartment in the rear. .272
Stowage space in the cargo com-
partment ........................................ 273
Using ............................................. 299
Jump starting (engine) ......................274
K
Key
Display messages (vehicle with
steering wheel buttons) ................. 221
Display messages (vehicle with-
out steering wheel buttons) ........... 205
Position in the ignition lock ............ 123
Kickdown ...........................................1 32
L
Lamps
Display messages (vehicle with-
out steering wheel buttons) ........... 198
see Warning and indicator lamps
Lane detection (automatic)
see Lane Keeping Assist
Lane Keeping Assist
Activating/deactivating ................. 151
Display message ............................ 217
Function/information .................... 150
Setting sensitivity (on-board com-
puter) ............................................. 187
Setting the sensitivity .................... 152
Language
Display (vehicle with steering
wheel buttons) ............................... 188
Display (vehicle without steering
wheel buttons) ............................... 176
Lashing points and tie downs
Permissible tensile load ................. 314 Lashing strap
Important safety notes .................. 247
Tensioning strap .................... 248, 249
LATCH-type (ISOFIX) child seat
anchors ................................................ 61
License plate lamp
Changing bulbs .............................. 102
License plate lamps
Display messages (vehicle with
steering wheel buttons) ................. 212
Display messages (vehicle with-
out steering wheel buttons) ........... 199
Light sensor
Display messages (vehicle with
steering wheel buttons) ................. 212
Display messages (vehicle with-
out steering wheel buttons) ........... 198
Lighting
see Lights
Lights
Activating/deactivating the inte-
rior lighting delayed switch-off ....... 190
Automatic headlamp mode .............. 97
Changing bulbs (halogen head-
lamps) ............................................ 102
Changing bulbs (interior lights) ...... 100
Display messages (vehicle with
steering wheel buttons) ................. 211
Driving abroad ............................... 139
Fog lamps ........................................ 97
Hazard warning lamps ..................... 98
High beam flasher ............................ 98
Hi
gh-beam headlamps ..................... 98
Important safety notes .................... 96
Light switch ..................................... 96
Low-beam headlamps ...................... 97
Parking lamps .................................. 96
Rear fog lamp .................................. 97
Replacing bulbs (halogen head-
lamps) ............................................ 102
Standing lamps ................................ 96
Switching the daytime running
lamps on/off (switch) ...................... 97
Switching the exterior lighting
delayed switch-off on/off (on-
board computer) ............................ 189
Switching the surround lighting
on/off (on-board computer) .......... 189
14Index
Page 22 of 318
Important safety notes .................. 306
Refrigerant (air-conditioning sys-
tem) ............................................... 312
Transmission oil .....................310, 311
Washer fluid ................................... 313
Setting the air distribution ...............116
Setting the airflow ............................ 116
Setting the speed
see Cruise control
Settings
Factory (vehicle with steering
wheel buttons) ............................... 190
Factory (vehicle without steering
wheel buttons) ............................... 176
On-board computer (vehicle with
steering wheel buttons) ................. 188
On-board computer (vehicle with-
out steering wheel buttons) ........... 176
Side impact air bag .............................5 1
Side windows
Cleaning ......................................... 267
Convenience closing feature ............ 83
Convenience opening feature ..........8 3
Hinged side windows ....................... 82
Important safety information ........... 82
Opening/closing .............................. 82
Overview .......................................... 82
Problem (malfunction) ..................... 83
Resetting ......................................... 83
Signal and ambient light
Changing a bulb ............................. 102
Sliding door
Child-proof locks .............................. 63
Cleaning ......................................... 269
Important safety notes .................... 74
Indicator lamp ................................ 231
Opening/closing from the inside ..... 75
Opening/closing from the out-
side .................................................. 75
see Electric sliding door
SmartKey
Changing the battery ....................... 72
Changing the programming ............. 70
Checking the battery ....................... 71
Convenience closing feature ... 83, 119
Convenience opening feature .......... 83
Door central locking/unlocking ....... 69
Important safety notes .................... 69 Loss ................................................. 72
Mechanical key ................................ 70
Problem (malfunction) .....................
72
SmartK
ey positions (ignition lock) .. 123
Snow chains ...................................... 282
Sockets .............................................. 243
Spare wheel
General notes ................................ 303
Important safety notes .................. 303
Removing/mounting ...................... 303
Special seat belt retractor .................. 59
Specialist workshop ............................ 31
Speed, controlling
see Cruise control
Speedometer
Activating/deactivating the addi-
tional speedometer (vehicle with
steering wheel buttons) ................. 188
Activating/deactivating the addi-
tional speedometer (vehicle with-
out steering wheel buttons) ........... 177
Digital (vehicle with steering
wheel buttons) ............................... 181
Digital (vehicle without steering
wheel buttons) ............................... 175
General notes ................................ 172
In the instrument cluster (vehicle
with steering wheel buttons) ............ 39
In the instrument cluster (vehicle
without steering wheel buttons) ...... 37
Setting the display unit (vehicle
with steering wheel buttons) ......... 188
Setting the display unit (vehicle
without steering wheel buttons) .... 177
SRS (Supplemental Restraint Sys-
tem)
see Restraint system
Standing lamp
Display messages (vehicle with
steering wheel buttons) ................. 213
Standing lamps
Display messages (vehicle with-
out steering wheel buttons) ........... 199
Replacing bulbs (front) ................... 104
Replacing bulbs (rear) .................... 105
Switching on/off .............................. 96
20Index
Page 38 of 318
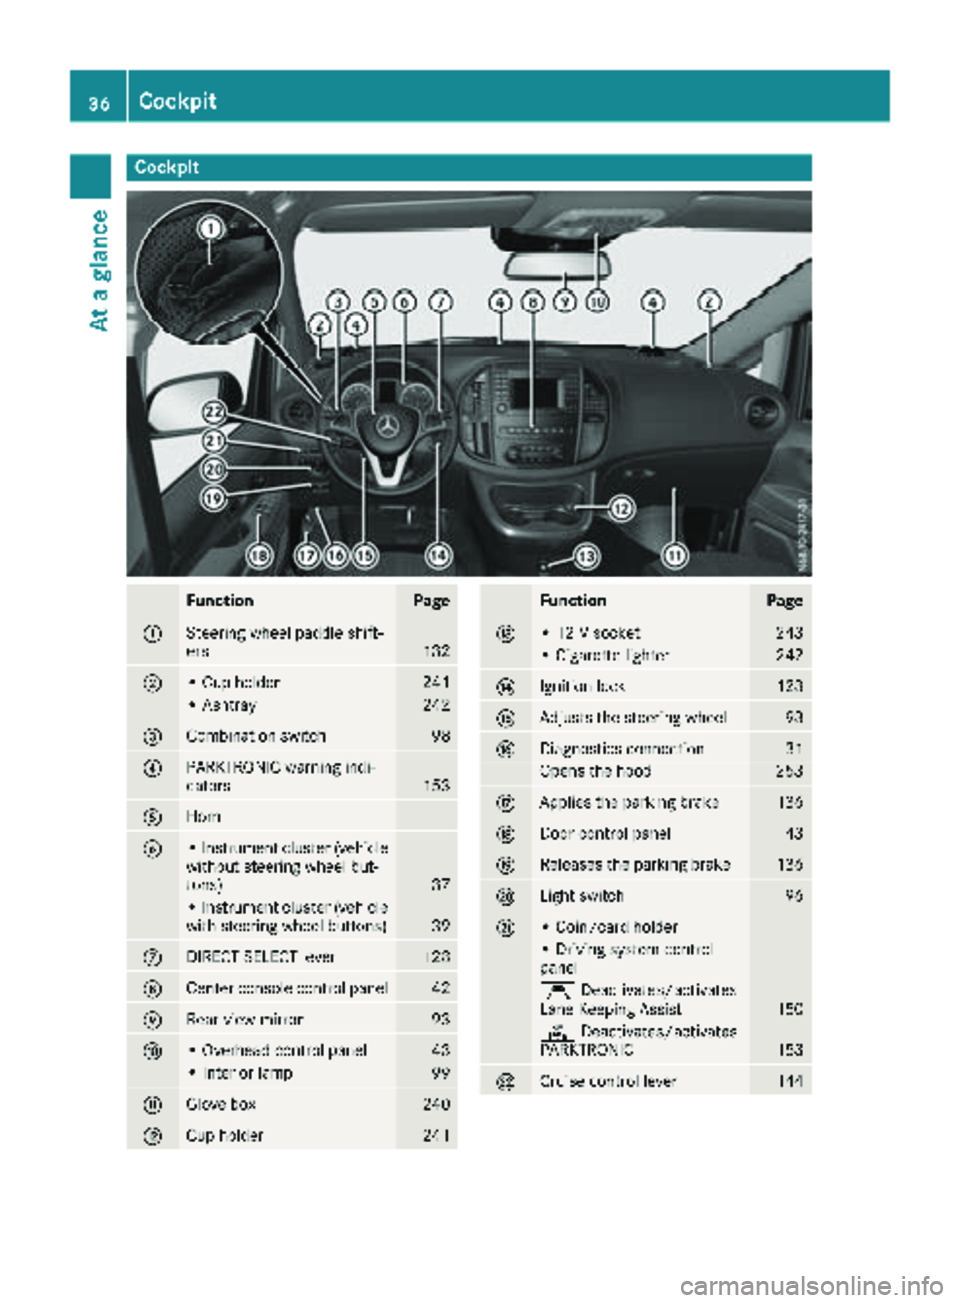
Cockpit
FunctionPage
:Steering wheel paddle shift-
ers132
;• Cup holder241
• Ashtray242
=Combination switch98
?PARKTRONIC warning indi-
cators153
AHorn
B• Instrument cluster (vehicle
without steering wheel but-
tons)
37
• Instrument cluster (vehicle
with steering wheel buttons)39
CDIRECT SELECT lever128
DCenter console control panel42
ERear-view mirror93
F• Overhead control panel43
• Interior lamp99
GGlove box240
HCup holder241
FunctionPage
I• 12 V socket243
• Cigarette lighter242
JIgnition lock123
KAdjusts the steering wheel93
LDiagnostics connection31
Opens the hood253
MApplies the parking brake136
NDoor control panel43
OReleases the parking brake136
PLight switch96
Q• Coin/card holder
• Driving system control
panel
ÇDeactivates/activates
Lane Keeping Assist150
c Deactivates/activates
PARKTRONIC153
RCruise control lever144
36Cockpit
At a glance
Page 47 of 318
Useful information
This Operator's Manual describes all models as
well as standard and optional equipment of your
vehicle that were available at the time of going
to print. Country-specific variations are possi-
ble. Note that your vehicle may not be equipped
with all of the described functions. This also
applies to systems and functions relevant to
safety.
Read the information on qualified specialist
workshops (
Ypage 31).
Occupant safety
Restraint system introduction
The restraint system can reduce the risk of vehi-cle occupants coming into contact with parts of
the vehicle's interior in the event of an accident.
The restraint system can also reduce the forces to which vehicle occupants are subjected during
an accident.
The restraint system comprises:
RSeat belt system
RAir bags
RChild restraint system
RChild seat securing systems
The components of the restraint system work in
conjunction with each other. They can only
deploy their protective function if, at all times, all
vehicle occupants:
Rhave fastened their seat belts correctly
(Ypage 48)
Rhave the seat and head restraint adjusted
properly (Ypage 85)
As the driver, you also have to make sure that
the steering wheel is adjusted correctly.
Observe the information relating to the correct
driver's seat position (
Ypage 85).
You also have to make sure that an air bag can
inflate properly if deployed (
Ypage 50).
An air bag supplements a correctly worn seat
belt. As an additional safety device, the air bag
increases the level of protection for vehicle
occupants in the event of an accident. For exam-
ple, if, in the event of an accident, the protection
offered by the seat belt is sufficient, the air bags are not deployed. When an accident occurs, only
the air bags that increase protection in that par-
ticular accident situation are deployed. How- ever, seat belts and air bags generally do not
protect against objects penetrating the vehicle
from the outside.
Information on restraint system operation can
be found under "Triggering of the Emergency
Tensioning Devices and air bags" (
Ypage 56).
See "Children in the vehicle" for information on
children traveling with you in the vehicle as well
as on child restraint systems (
Ypage 58).
Important safety notes
GWARNING
Modifications to the restraint system may
cause it to no longer work as intended. The
restraint system may then not perform its
intended protective function and may fail in an
accident or trigger unexpectedly, for example.
This poses an increased risk of injury or even fatal injury.
Never modify parts of the restraint system.
Never tamper with the wiring, the electronic
components or their software.
If it is necessary to modify components of the
restraint system to accommodate a person with
disabilities, contact a Mercedes-Benz Commer-
cial Van Center for details. USA only: contact
our Mercedes-Benz Customer Assistance Cen-
ter on 1‑ 877‑762‑8267 for details.
Restraint system warning lamp
The functions of the restraint system are
checked after the ignition is switched on and at
regular intervals while the engine is running.
Therefore, malfunctions can be detected in
good time.
The 6 restraint system warning lamp on the
instrument cluster lights up when the ignition is
switched on. It goes out no later than a few sec- onds after the vehicle is started. The compo-
nents of the restraint system are in operational
readiness.
Occupant safety45
Safety
Z
Page 48 of 318
A malfunction has occurred if the6restraint
system warning lamp:
Rdoes not light up after the ignition is switched
on
Rdoes not go out after a few seconds with the
engine running
Rlights up again while the engine is running
GWARNING
If the restraint system is malfunctioning,
restraint system components may be trig-
gered unintentionally or may not deploy as
intended during an accident. This can affect
for example the Emergency Tensioning
Device or the air bag. This poses an increased
risk of injury or even fatal injury.
Have the restraint system checked and
repaired in a qualified specialist workshop as
soon as possible.
PASSENGER AIR BAG OFF indicator
lamp
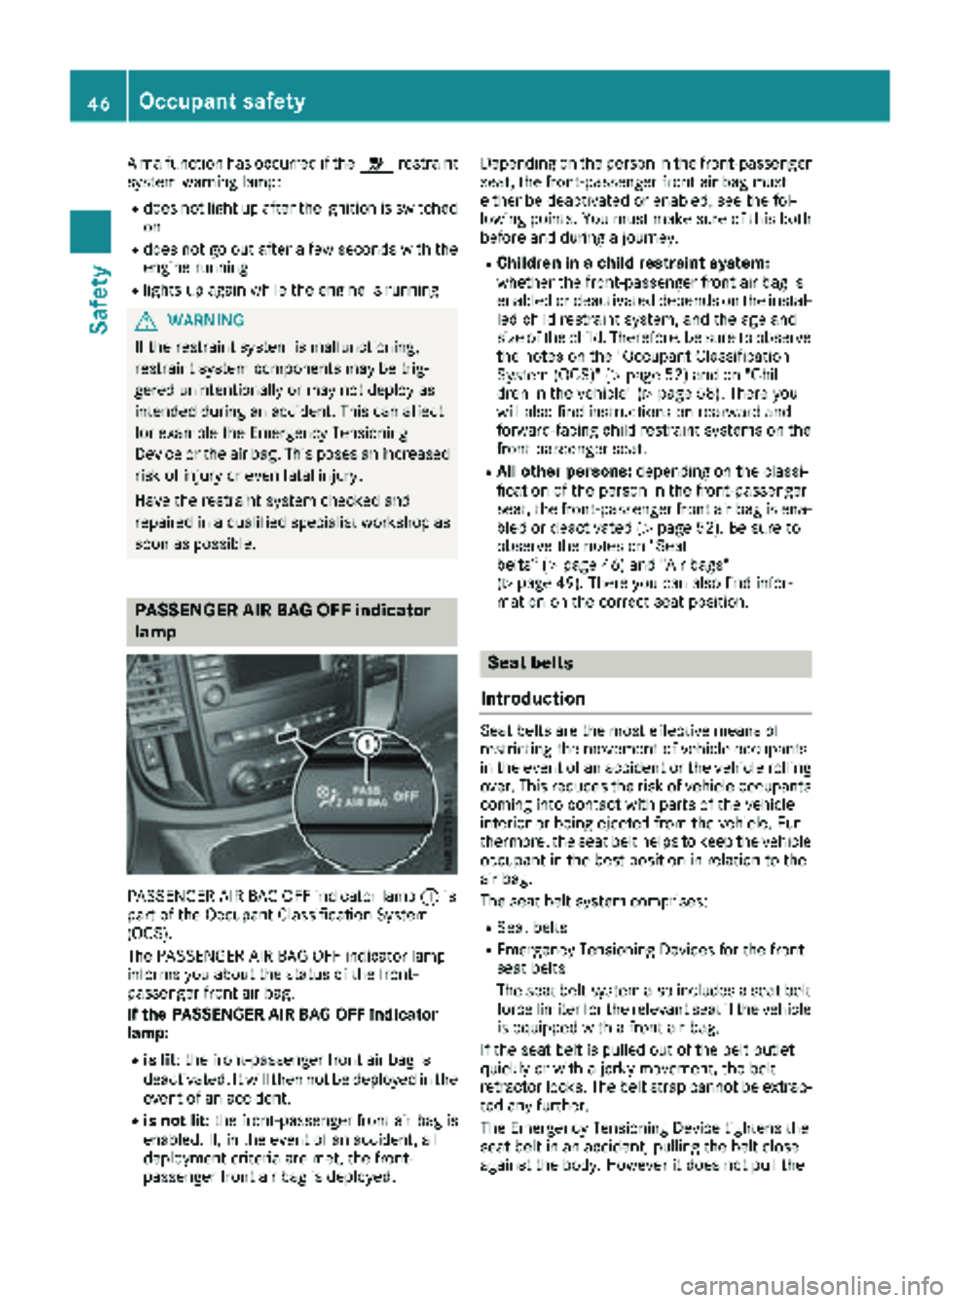
PASSENGER AIR BAG OFF indicator lamp :is
part of the Occupant Classification System
(OCS).
The PASSENGER AIR BAG OFF indicator lamp
informs you about the status of the front-
passenger front air bag.
If the PASSENGER AIR BAG OFF indicator
lamp:
Ris lit: the front-passenger front air bag is
deactivated. It will then not be deployed in the
event of an accident.
Ris not lit : the front-passenger front air bag is
enabled. If, in the event of an accident, all
deployment criteria are met, the front-
passenger front air bag is deployed. Depending on the person in the front-passenger
seat, the front-passenger front air bag must
either be deactivated or enabled; see the fol-
lowing points. You must make sure of this both
before and during a journey.
RChildren in a child restraint system:
whether the front-passenger front air bag is
enabled or deactivated depends on the instal-
led child restraint system, and the age and
size of the child. Therefore, be sure to observe
the notes on the "Occupant Classification
System (OCS)" (
Ypage 52) and on "Chil-
dren in the vehicle" (Ypage 58). There you
will also find instructions on rearward and
forward-facing child restraint systems on the
front-passenger seat.
RAll other persons:
depending on the classi-
fication of the person in the front-passenger
seat, the front-passenger front air bag is ena-
bled or deactivated (
Ypage 52). Be sure to
observe the notes on "Seat
belts“ (
Ypage 46) and "Air bags"
(Ypage 49). There you can also find infor-
mation on the correct seat position.
Seat belts
Introduction
Seat belts are the most effective means of
restricting the movement of vehicle occupants
in the event of an accident or the vehicle rolling
over. This reduces the risk of vehicle occupants coming into contact with parts of the vehicle
interior or being ejected from the vehicle. Fur-
thermore, the seat belt helps to keep the vehicle
occupant in the best position in relation to the
air bag.
The seat belt system comprises:
RSeat belts
REmergency Tensioning Devices for the front
seat belts
The seat belt system also includes a seat belt
force limiter for the relevant seat if the vehicle
is equipped with a front air bag.
If the seat belt is pulled out of the belt outlet
quickly or with a jerky movement, the belt
retractor locks. The belt strap cannot be extrac-
ted any further.
The Emergency Tensioning Device tightens the
seat belt in an accident, pulling the belt close
against the body. However it does not pull the
46Occupant safety
Safety
Page 55 of 318
Occupant Classification System (OCS)
operation
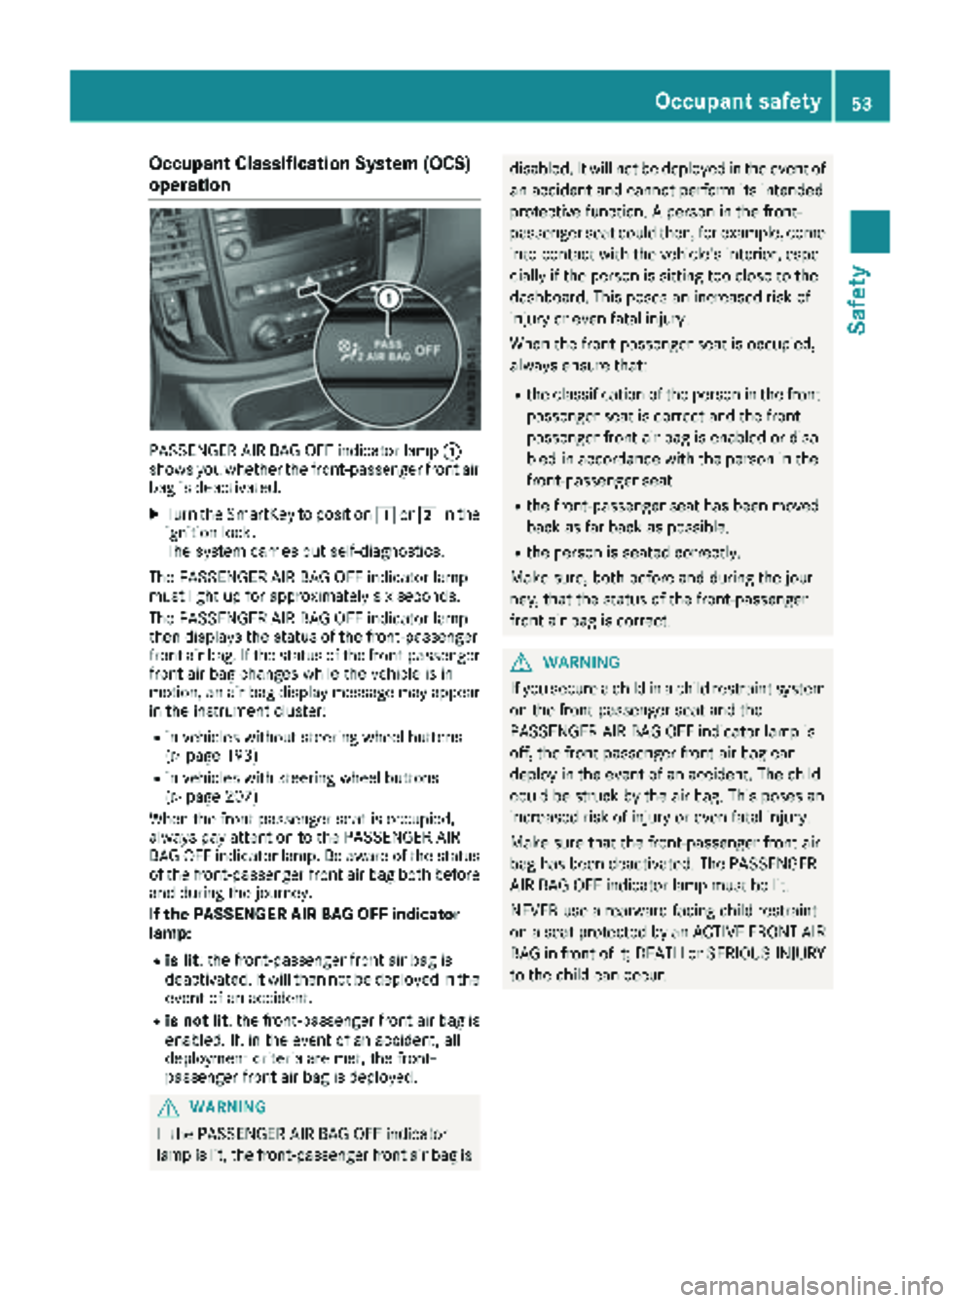
PASSENGER AIR BAG OFF indicator lamp:
shows you whether the front-passenger front air
bag is deactivated.
XTurn the SmartKey to position 1or2 in the
ignition lock.
The system carries out self-diagnostics.
The PASSENGER AIR BAG OFF indicator lamp
must light up for approximately six seconds.
The PASSENGER AIR BAG OFF indicator lamp
then displays the status of the front-passenger
front air bag. If the status of the front-passenger
front air bag changes while the vehicle is in
motion, an air bag display message may appear
in the instrument cluster:
Rin vehicles without steering wheel buttons
(Ypage 193)
Rin vehicles with steering wheel buttons
(Ypage 207)
When the front-passenger seat is occupied,
always pay attention to the PASSENGER AIR
BAG OFF indicator lamp. Be aware of the status
of the front-passenger front air bag both before
and during the journey.
If the PASSENGER AIR BAG OFF indicator
lamp:
Ris lit : the front-passenger front air bag is
deactivated. It will then not be deployed in the
event of an accident.
Ris not lit : the front-passenger front air bag is
enabled. If, in the event of an accident, all
deployment criteria are met, the front-
passenger front air bag is deployed.
GWARNING
If the PASSENGER AIR BAG OFF indicator
lamp is lit, the front-passenger front air bag is
disabled. It will not be deployed in the event of an accident and cannot perform its intended
protective function. A person in the front-
passenger seat could then, for example, come
into contact with the vehicle's interior, espe-
cially if the person is sitting too close to the
dashboard. This poses an increased risk of
injury or even fatal injury.
When the front-passenger seat is occupied,
always ensure that:
Rthe classification of the person in the front-passenger seat is correct and the front-
passenger front air bag is enabled or disa-
bled in accordance with the person in the
front-passenger seat
Rthe front-passenger seat has been moved
back as far back as possible.
Rthe person is seated correctly.
Make sure, both before and during the jour-
ney, that the status of the front-passenger
front air bag is correct.
GWARNING
If you secure a child in a child restraint system on the front-passenger seat and the
PASSENGER AIR BAG OFF indicator lamp is
off, the front-passenger front air bag can
deploy in the event of an accident. The child
could be struck by the air bag. This poses an
increased risk of injury or even fatal injury.
Make sure that the front-passenger front air
bag has been deactivated. The PASSENGER
AIR BAG OFF indicator lamp must be lit.
NEVER use a rearward-facing child restraint
on a seat protected by an ACTIVE FRONT AIR
BAG in front of it; DEATH or SERIOUS INJURY
to the child can occur.
Occupant safety53
Safety
Z
Page 59 of 318
Have the vehicle towed to a qualified special-
ist workshop in order to have a deployed air
bag replaced.
It is important for your safety and that of your
passenger to have deployed air bags replaced
and to have any malfunctioning air bags
repaired. This will help to make sure the air bags
continue to perform their protective function for
the vehicle occupants in the event of a crash.
GWARNING
Emergency Tensioning Devices that have
deployed pyrotechnically are no longer opera-
tional and are unable to perform their inten-
ded protective function. This poses an
increased risk of injury or even fatal injury.
Have pyrotechnically triggered Emergency
Tensioning Devices replaced immediately at a
qualified specialist workshop.
If Emergency Tensioning Devices are triggered
or air bags are deployed, you will hear a bang,
and some powder may also be released. The
6 restraint system warning lamp lights up.
Only in rare cases will the bang affect your hear-
ing. The powder that is released generally does
not constitute a health hazard, but it may cause
short-term breathing difficulties in people with
asthma or other respiratory problems. Provided
it is safe to do so, you should leave the vehicle
immediately or open the window in order to pre-
vent breathing difficulties.
Air bags and pyrotechnic Emergency Tensioning
Devices (ETDs) contain perchlorate material,
which may require special handling and regard
for the environment. National guidelines must
be observed during disposal. In California, see
www.dtsc.ca.gov/HazardousWaste/
Perchlorate/index.cfm.
Method of operation
During the first stage of a collision, the restraint
system control unit evaluates important physi-
cal data relating to vehicle deceleration or accel-
eration, such as:
Rduration
Rdirection
Rintensity
Based on the evaluation of this data, the
restraint system control unit triggers the Emer- gency Tensioning Devices during a frontal or
rear collision.
An Emergency Tensioning Device can only be
triggered, if:
Rthe ignition is switched on
Rthe components of the restraint system are
operational. You can find further information
under "Restraint system warning lamp"
(
Ypage 45)
Rthe seat belt buckle tongue has engaged in
the belt buckle of the respective front seat
If the restraint system control unit detects a
more severe accident, further components of
the restraint system are activated independ-
ently of each other in certain frontal collision
situations:
RFront air bags
RWindow curtain air bag, if the system deter-
mines that deployment can offer additional
protection to that provided by the seat belt
The front-passenger front air bag is activated or
deactivated depending on the person on the
front-passenger seat. The front-passenger front
air bag can only deploy in an accident if the
PASSENGER AIR BAG OFF indicator lamp is off.
Observe the information on the PASSENGER AIR
BAG OFF indicator lamp (
Ypage 46).
Your vehicle has two-stage front air bags. In the
first deployment stage, the front air bag is filled
with propellant gas. The front air bag is fully
deployed with the ma
ximum amount of propel-
lant gas if a second deployment threshold is
reached within a few milliseconds.
The activation threshold of the Emergency Ten-
sioning Devices and the air bags is determined
by evaluating the rate of vehicle deceleration or
acceleration which occurs at various points in
the vehicle. This process is pre-emptive in
nature. Deployment should take place in good
time at the start of the collision.
The rate of vehicle deceleration or acceleration
and the direction of the force are essentially
determined by:
Rthe distribution of forces during the collision
Rthe collision angle
Rthe deformation characteristics of the vehicle
Rthe characteristics of the object with which
the vehicle has collided
Factors which can only be seen and measured
after a collision has occurred do not play a deci-
sive role in the deployment of an air bag. Nor do
Occupant safety57
Safety
Z
Page 66 of 318
the electric sliding door using the corresponding
ÅorÆ sliding door button in the center
console (
Ypage 77).
Pets in the vehicle
GWARNING
If you leave animals unattended or unsecured
in the vehicle, they could press buttons or
switches, for example.
As a result, they could:
Ractivate vehicle equipment and become
trapped, for example
Ractivate or deactivate systems, thereby
endangering other road users
Unsecured animals could also be flung around
the vehicle in the event of an accident or sud-
den steering or braking, thereby injuring vehi-
cle occupants. There is a risk of an accident
and injury.
Never leave animals unattended in the vehi-
cle. Always secure animals properly during
the journey, e.g. use a suitable animal trans-
port box.
Driving safety systems
Overview
In this section, you will find information about
the following driving safety systems:
REBD ( Electronic Brake Force Distribution)
RABS ( Anti-lock Braking System)
RBAS ( Brake Assist System)
RESP®(E lectronic Stability Program)
Important safety notes
If you fail to adapt your driving style or if you are
inattentive, the driving safety systems can nei-
ther reduce the risk of accident nor override the
laws of physics. Driving safety systems are
merely aids designed to assist driving. You are
responsible for the distance to the vehicle in
front, for vehicle speed, braking in good time
and for staying in your lane. Always adapt your driving style to the prevailing road and weather
conditions and maintain a sufficient, safe dis-
tance from other road users. Drive carefully.
Please note that the driving safety systems
described only work optimally when:
Rthere is adequate contact between the tires
and the road surface
Ryou use winter tires (M+S tires), with snow
chains if necessary, when the road conditions
are wintry
Rthe speed information determined by the
vehicle is within the legally prescribed display
accuracy
Pay particular attention to the information
regarding tires, tire tread and winter operation
under "Wheels and tires" (
Ypage 279).
ABS (Anti-lock Braking System)
General notes
ABS regulates brake pressure in such a way that the wheels do not lock when you brake. This
allows you to continue steering the vehicle when
braking.
The ò warning lamp in the instrument cluster
lights up when the ignition is switched on. The
lamp goes out when the engine starts running.
Important safety notes
Observe the important safety guidelines for the
driving safety system (Ypage 64).
ABS works from a speed of about 5 mph
(8 km/h), regardless of road-surface conditions. ABS works on slippery surfaces, even when you
only brake gently.
GWARNING
If ABS is faulty, the wheels could lock when
braking. The steerability and braking charac-
teristics may be severely impaired. Addition-
ally, further driving safety systems are deac-
tivated. There is an increased danger of skid-
ding and accidents.
Drive on carefully. Have ABS checked imme-
diately at a qualified specialist workshop.
If ABS is malfunctioning, the òwarning lamp
(
Ypage 224) lights up while the engine is run-
ning and the display shows a message:
64Driving safet ysystem s
Safety
Page 69 of 318
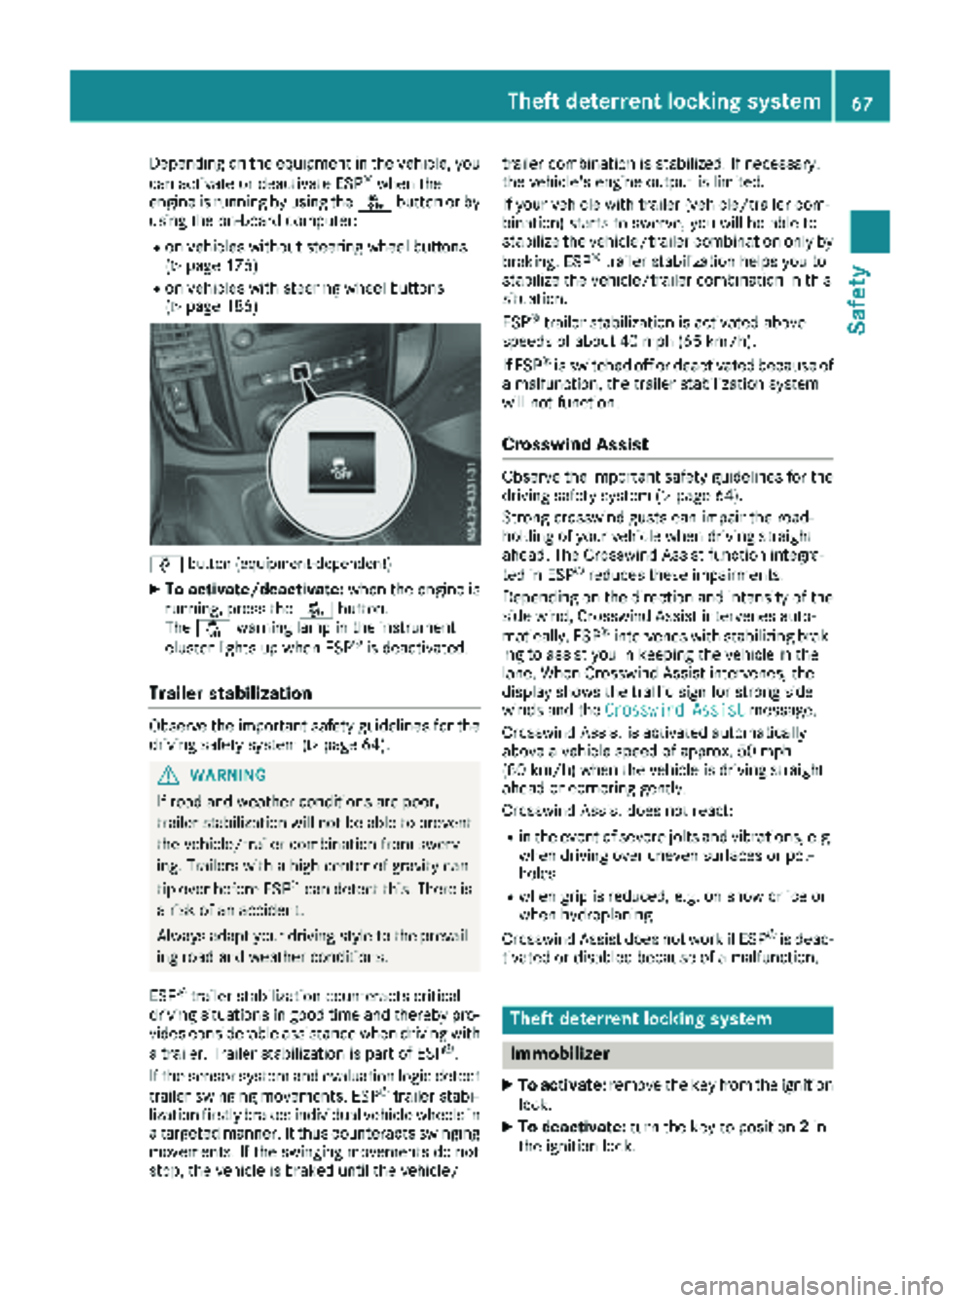
Depending on the equipment in the vehicle, you
can activate or deactivate ESP®when the
engine is running by using the åbutton or by
using the on-board computer:
Ron vehicles without steering wheel buttons
(Ypage 176)
Ron vehicles with steering wheel buttons
(Ypage 186)
å button (equipment-dependent)
XTo activate/deactivate: when the engine is
running, press the åbutton.
The å warning lamp in the instrument
cluster lights up when ESP
®is deactivated.
Trailer stabilization
Observe the important safety guidelines for the
driving safety system (Ypage 64).
GWARNING
If road and weather conditions are poor,
trailer stabilization will not be able to prevent
the vehicle/trailer combination from swerv-
ing. Trailers with a high center of gravity can
tip over before ESP
®can detect this. There is
a risk of an accident.
Always adapt your driving style to the prevail-
ing road and weather conditions.
ESP
®trailer stabilization counteracts critical
driving situations in good time and thereby pro- vides considerable assistance when driving with
a trailer. Trailer stabilization is part of ESP
®.
If the sensor system and evaluation logic detect
trailer swinging movements, ESP
®trailer stabi-
lization firstly brakes individual vehicle wheels in
a targeted manner. It thus counteracts swinging
movements. If the swinging movements do not
stop, the vehicle is braked until the vehicle/ trailer combination is stabilized. If necessary,
the vehicle's engine output is limited.
If your vehicle with trailer (vehicle/trailer com-
bination) starts to swerve, you will be able to
stabilize the vehicle/trailer combination only by
braking. ESP
®trailer stabilization helps you to
stabilize the vehicle/trailer combination in this
s
ituation.
ESP
®trailer stabilization is activated above
speeds of about 40 mph (65 km/h).
If ESP
®is switched off or deactivated because of
a malfunction, the trailer stabilization system
will not function.
Crosswind Assist
Observe the important safety guidelines for the
driving safety system (Ypage 64).
Strong crosswind gusts can impair the road-
holding of your vehicle when driving straight
ahead. The Crosswind Assist function integra-
ted in ESP
®reduces these impairments.
Depending on the direction and intensity of the
side wind, Crosswind Assist intervenes auto-
matically. ESP
®intervenes with stabilizing brak-
ing to assist you in keeping the vehicle in the
lane. When Crosswind Assist intervenes, the
display shows the traffic sign for strong side
winds and the Crosswind Assist
message.
Crosswind Assist is activated automatically
above a vehicle speed of approx. 50 mph
(80 km/h) when the vehicle is driving straight
ahead or cornering gently.
Crosswind Assist does not react:
Rin the event of severe jolts and vibrations, e.g.
when driving over uneven surfaces or pot-
holes
Rwhen grip is reduced, e.g. on snow or ice or
when hydroplaning
Crosswind Assist does not work if ESP
®is deac-
tivated or disabled because of a malfunction.
Theft deterrent locking system
Immobilizer
XTo activate: remove the key from the ignition
lock.
XTo deactivate: turn the key to position 2in
the ignition lock.
Theft deterrent locking system67
Safety
Z