ESP MERCEDES-BENZ METRIS 2020 MY20 Operator’s Manual
[x] Cancel search | Manufacturer: MERCEDES-BENZ, Model Year: 2020, Model line: METRIS, Model: MERCEDES-BENZ METRIS 2020Pages: 320, PDF Size: 26.38 MB
Page 270 of 320
X
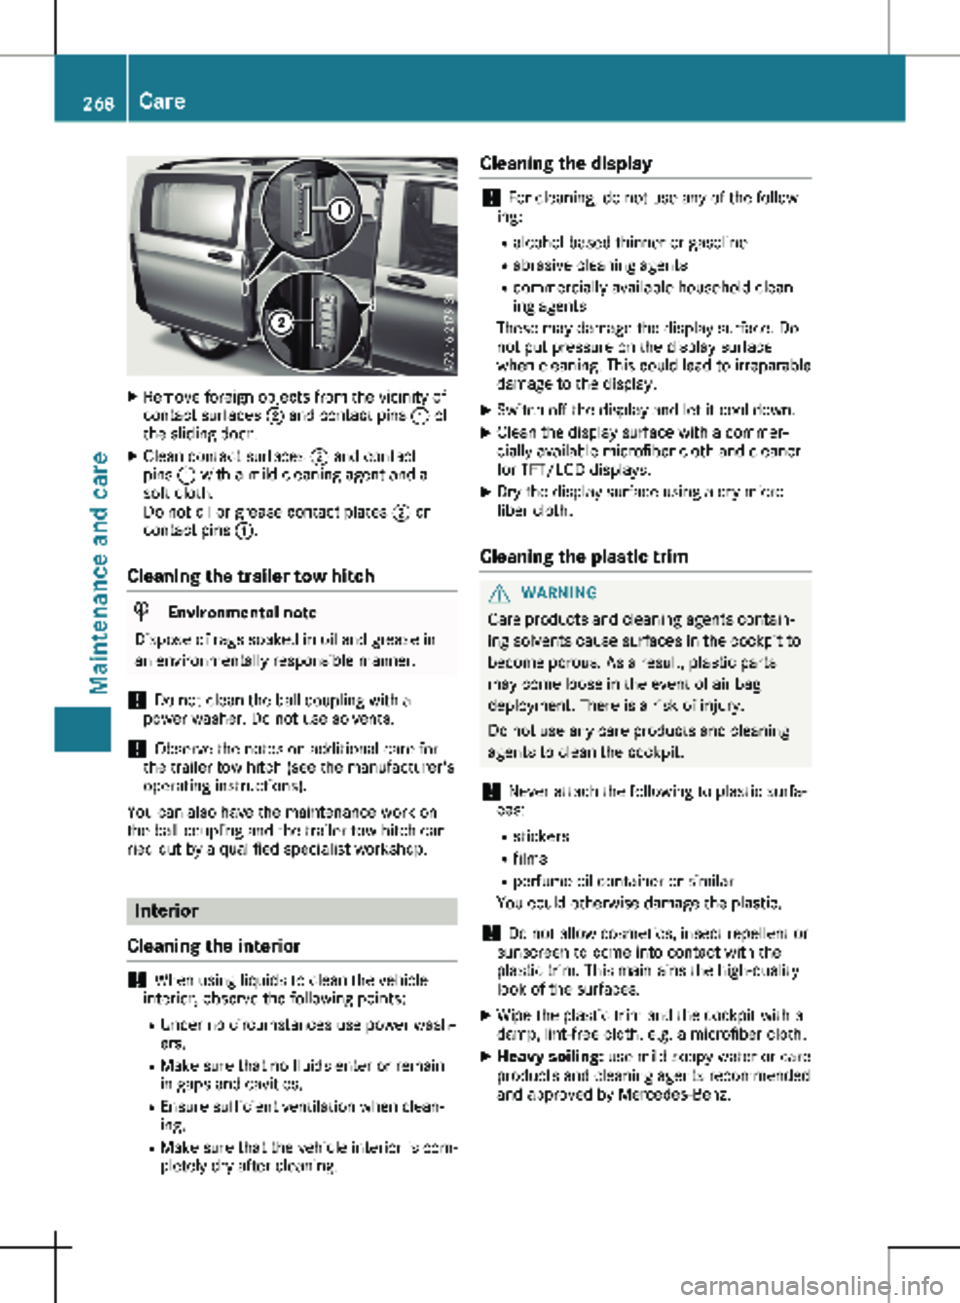
Remove foreign objects from the vicinity of
contact surfaces ; and contact pins : of
the sliding door.
X Clean contact surfaces ; and contact
pins : with a mild cleaning agent and a
soft cloth.
Do not oil or grease contact plates ; or
contact pins :.
Cleaning the trailer tow hitch H
Environmental note
Dispose of rags soaked in oil and grease in
an environmentally responsible manner.
! Do not clean the ball coupling with a
power washer. Do not use solvents.
! Observe the notes on additional care for
the trailer tow hitch (see the manufacturer's
operating instructions).
You can also have the maintenance work on
the ball coupling and the trailer tow hitch car-
ried out by a qualified specialist workshop. Interior
Cleaning the interior !
When using liquids to clean the vehicle
interior, observe the following points:
R Under no circumstances use power wash-
ers.
R Make sure that no fluids enter or remain
in gaps and cavities.
R Ensure sufficient ventilation when clean-
ing.
R Make sure that the vehicle interior is com-
pletely dry after cleaning. Cleaning the display !
For cleaning, do not use any of the follow-
ing:
R alcohol-based thinner or gasoline
R abrasive cleaning agents
R commercially-available household clean-
ing agents
These may damage the display surface. Do
not put pressure on the display surface
when cleaning. This could lead to irreparable
damage to the display.
X Switch off the display and let it cool down.
X Clean the display surface with a commer-
cially available microfiber cloth and cleaner
for TFT/LCD displays.
X Dry the display surface using a dry micro-
fiber cloth.
Cleaning the plastic trim G
WARNING
Care products and cleaning agents contain-
ing solvents cause surfaces in the cockpit to
become porous. As a result, plastic parts
may come loose in the event of air bag
deployment. There is a risk of injury.
Do not use any care products and cleaning
agents to clean the cockpit.
! Never attach the following to plastic surfa-
ces:
R stickers
R films
R perfume oil container or similar
You could otherwise damage the plastic.
! Do not allow cosmetics, insect repellent or
sunscreen to come into contact with the
plastic trim. This maintains the high-quality
look of the surfaces.
X Wipe the plastic trim and the cockpit with a
damp, lint-free cloth, e.g. a microfiber cloth.
X Heavy soiling: use mild soapy water or care
products and cleaning agents recommended
and approved by Mercedes-Benz. 268
CareMaintenance and care
Page 271 of 320
Cleaning the steering wheel and selec-
tor lever
X
Thoroughly wipe with a damp cloth.
X Vehicles with leather upholstery: after
cleaning, use leather care agents that have
been recommended and approved by
Mercedes-Benz.
Cleaning the trim elements !
Do not use solvent-based cleaning agents
such as tar remover, wheel cleaners, pol-
ishes or waxes. There is otherwise a risk of
damaging the surface.
X Wipe the trim elements with a damp, lint-
free cloth, e.g. a microfiber cloth.
X Heavy soiling: use care products and
cleaning agents recommended and
approved by Mercedes-Benz.
Cleaning the seat covers !
Do not use microfiber cloths to clean gen-
uine leather or artificial leather covers. If
used often, a microfiber cloth can damage
the cover.
! Clean:
R artificial leather covers with a cloth mois-
tened with a solution containing 1% deter-
gent, e.g. dish washing liquid.
R cloth covers with a microfiber cloth mois-
tened with a solution containing 1% deter-
gent, e.g. dish washing liquid. Wipe entire
seat sections carefully to avoid leaving
visible lines. Leave the seat to dry after-
wards. Cleaning results depend on the
type of dirt and how long it has been
there.
R genuine leather covers carefully with a
damp cloth, then wipe the covers down
with a dry cloth. Make sure that the
leather does not become soaked. Other-
wise, the leather could become rough or
cracked. Only use leather care agents
that have been tested and approved by
Mercedes-Benz. You can obtain these
from a qualified specialist workshop.
i Please keep in mind that:
R leather covers are a natural product and,
as such, are subject to a natural aging process. Leather may react differently,
e.g. increased wrinkling, to certain envi-
ronmental influences (such as high
humidity or intense heat).
R regular care is essential to make sure that
the appearance and comfort of the covers
are retained over time.
To clean genuine leather covers: X Remove any dust, crumbs etc. If necessary,
carefully vacuum-clean the seat covers.
X Carefully wipe the leather seat covers with a
damp cloth.
X Wipe over again with a dry cloth.
Make sure that the leather does not become
soaked, especially perforated parts.
X Then treat the leather seats with a leather
care foam.
Only use leather care agents that have been
tested and approved by Mercedes-Benz.
Observe the manufacturer's instructions.
Cleaning the seat belts G
WARNING
Seat belts can become severely weakened if
bleached or dyed. This could cause the seat
belts to tear or fail, for instance, in the event
of an accident. This poses an increased risk
of injury or fatal injury.
Never bleach or dye the seat belts.
! Do not clean the seat belts using chemical
cleaning agents. Do not dry the seat belts
by heating at temperatures above
176 ‡
(80 †) or in direct sunlight.
Remove any stains or dirt immediately. This
will avoid residue or damage. X Use clean, lukewarm water and soap solu-
tion.
Cleaning the headliner and carpets X
Headliner: if it is very dirty, use a soft brush
or dry shampoo.
X Carpets: use the carpet and textile cleaning
agents recommended and approved by
Mercedes-Benz. Care
269
Maintenance and care Z
Page 278 of 320
X
Unscrew the towing eye.
X Insert cover : with the lug at the top and
press it in at the bottom until it engages.
X Stow the towing eye and the screwdriver
with the vehicle tool kit (Y page
270).Towing with the rear axle raised
! Vehicles with automatic transmission must
not be towed with the rear axle raised. The
vehicle/trailer combination may otherwise
swerve or even roll over.
! The ignition must be switched off if the
vehicle is being towed with the front or rear
axle raised. Otherwise, ESP ®
may intervene
and damage the brake system.
X Switch on the hazard warning lamps
(Y page
101).
X Turn the front wheels to the straight-ahead
position.
X Release the parking brake.
X If necessary, turn the key in the ignition lock
to position g and remove the key from the
ignition lock.
X Take the key with you when leaving the vehi-
cle.
X Do not exceed the towing speed of 30 mph
(50 km/h
).
Please observe the important safety instruc-
tions when towing your vehicle with the rear
axle raised
(Y page 274). Towing the vehicle with both axles
on the ground
Important safety notes G
WARNING
You can no longer steer the vehicle if the
steering wheel lock has been engaged.
There is a risk of an accident.
Always switch off the ignition when towing
the vehicle with a tow cable or a tow bar.
! Do not exceed the towing speed of
30 mph
(50 km/h). You could otherwise
damage the transmission. Please observe the important safety notes
before towing your vehicle
(Y page 274).
Towing vehicles with automatic trans-
mission X
Turn the key to position 2 in the ignition
lock.
X Depress the brake pedal and keep it
depressed.
X Shift the automatic transmission to position
i.
X Leave the key in position 2 in the ignition
lock.
X Switch on the hazard warning lamps
(Y page
101).
X Release the parking brake.
X Release the brake pedal.
X Do not exceed the towing speed of 30 mph
(50 km/h
). Recovering a vehicle that is stuck
! When recovering a vehicle that has
become stuck, pull it as smoothly and
evenly as possible. If the tractive power is
too high, the vehicles could be damaged.
If the drive wheels get trapped on loose or
muddy ground, recover the vehicle with the
utmost care. This is especially the case if the
vehicle is laden.
Never attempt to recover a vehicle with a
trailer attached.
Pull out the vehicle backwards, if possible,
using the tracks it made when it became
stuck. Transporting the vehicle
! You may only secure the vehicle by the
wheels, not by parts of the vehicle such as
axle or steering components. Otherwise, the
vehicle could be damaged.
The towing eye or trailer tow hitch can be used
to pull the vehicle onto a trailer or transporter
if you wish to transport it. 276
Tow-starting and towing away
Breakdown assistance
Page 282 of 320
R
Break in new tires at moderate speeds for
the first
65 miles (100 km).
R Do not drive with tires which have too little
tread depth, as this significantly reduces the
traction on wet roads (hydroplaning).
R Replace the tires after six years at the lat-
est, regardless of wear. This also applies to
the spare wheel. Operation in winter
General notes
Have your vehicle winterized at a qualified spe-
cialist workshop at the onset of winter.
Only use wheels with tire sizes approved for
Mercedes-Benz.
Prior to the onset of winter, ensure that snow
chains are stowed in the vehicle
(Y page
281). Snow chains cannot be moun-
ted on all wheel/tire combinations. Observe
the restrictions on the use of snow chains
under "Wheel/tire combinations"
(Y page 302).
Also observe the notes in the "Changing a
wheel" section ( Y page 297).Driving with summer tires
At temperatures below 45 ‡
(+7 †), summer
tires lose elasticity and therefore traction and
braking power. Change the tires on your vehi-
cle to M+S tires. Using summer tires at very
cold temperatures could cause tears to form,
thereby damaging the tires permanently.
Mercedes-Benz cannot accept responsibility
for this type of damage. M+S tires
G
WARNING
Wheel and tire dimensions as well as the
type of tire can vary between the spare
wheel and the wheel to be replaced. When
the spare wheel is mounted, driving charac-
teristics may be severely affected. There is a
risk of an accident. In order to reduce risks:
R you should therefore adapt your driving
style and drive carefully.
R never mount more than one spare wheel
that differs from the wheel to be replaced.
R only use a spare wheel that differs from
the wheel to be replaced for a short time.
R have a spare wheel that differs from the
wheel that has been changed replaced at
the nearest qualified specialist workshop.
You must observe the correct wheel and
tire dimensions as well as the wheel type. G
WARNING
M+S tires with a tire tread depth of less than
ã in
(4 mm) are not suitable for use in win-
ter and do not provide sufficient traction.
There is a risk of an accident.
M+S tires with a tread depth of less than ã
in (4 mm) must be replaced immediately.
Use winter tires or all-season tires at tempera-
tures below 45 ‡ (+7 †). Both types of tire
are identified by the M+S marking.
Only winter tires bearing the i snowflake
symbol in addition to the M+S marking provide
the best possible grip in wintry road condi-
tions.
Only these tires will allow driving safety sys-
tems such as ABS and ESP ®
to function opti-
mally in winter. These tires have been devel-
oped specifically for driving in snow.
For safe driving, use M+S tires of the same
make and tread pattern on all wheels.
Always observe the maximum permissible
speed specified for the M+S tires you have
mounted.
If you mount M+S tires that have a lower maxi-
mum permissible speed than the maximum
design speed of the vehicle, affix a corre-
sponding warning label in the driver's field of
vision. You can obtain this at a qualified spe-
cialist workshop.
Once you have mounted the winter tires:
X Check the tire pressure (Y page
282).
X Restart the tire pressure monitor
(Y page
288).280
Operation in winter
Wheels and tires
Page 283 of 320
Snow chains
G
WARNING
If snow chains are installed to the front
wheels, they may drag against the vehicle
body or chassis components. This could
cause damage to the vehicle or the tires.
There is a risk of an accident.
To avoid hazardous situations:
R never install snow chains to the front
wheels
R always install snow chains in pairs to the
rear wheels. G
WARNING
If you drive too fast with snow chains moun-
ted, they may snap. As a result, you could
injure others and damage the vehicle. There
is a risk of an accident.
Observe the maximum permissible speed for
operation with snow chains.
When driving with snow chains installed, do
not exceed the maximum permissible speed of
30 mph (50 km/h
). Observe the country-spe-
cific laws and regulations for operation with
snow chains.
! Check the snow chains for damage before
mounting them. Damaged or worn snow
chains may snap and damage the following
components:
R wheel
R wheel housing
R wheel suspension
For this reason, you must use only snow
chains that are free of defects. Observe the
manufacturer's mounting instructions.
! Vehicles with steel wheels:
if you mount
snow chains on steel wheels, you may dam-
age the hub caps. Remove the hub caps
from the relevant wheels before mounting
the snow chains.
Snow chains increase traction on roads in win-
try conditions.
For safety reasons, Mercedes-Benz recom-
mends that you only use snow chains or trac-
tion aids which have been approved for
Mercedes-Benz vehicles. The snow chains or traction aids must be of class U or meet the
SAE type U
specification.
Information about snow chains can be
obtained from any Mercedes-Benz Commercial
Van Center.
When mounting snow chains, please bear the
following points in mind:
R Snow chains cannot be mounted on all
wheel/tire combinations. When mounting
the snow chains, note the permissible tire
and snow chain dimensions. Observe the
restrictions on the use of snow chains under
"Wheel/tire combinations" (Y page 302).
R Mount snow chains only in pairs and only to
the rear wheels. Observe the manufacturer's
mounting instructions.
R Only use snow chains when the road is cov-
ered by a layer of snow. Remove the snow
chains as soon as possible when you come
to a road that is not snow-covered.
R The use of snow chains may be restricted by
local regulations. Observe the appropriate
regulations before mounting snow chains.
R When driving with snow chains installed, do
not exceed the maximum permissible speed
of 30 mph (50 km/h).
R Check the tension of the chains after a dis-
tance of approximately 0.5 miles (1.0 km)
and tighten the chains if required.
You may wish to deactivate ESP ®
when pulling
away with snow chains installed ( Y page 69).
This allows the wheels to spin in a controlled
manner, achieving an increased driving force
(cutting action). Operation in winter
281
Wheels and tires Z
Page 284 of 320
Tire pressure
Tire pressure specifications
Important safety notes G
WARNING
Underinflated or overinflated tires pose the
following risks:
R the tires may burst, especially as the load
and vehicle speed increase.
R the tires may wear excessively and/or
unevenly, which may greatly impair tire
traction.
R the driving characteristics, as well as
steering and braking, may be greatly
impaired.
There is a risk of an accident.
Follow recommended tire inflation pressures
and check the pressure of all the tires
including the spare wheel:
R monthly, at least
R if the load changes
R before beginning a long journey
R under different operating conditions, e.g.
off-road driving
If necessary, correct the tire pressure.
The tire pressure monitor will not warn you of: R an incorrectly set tire pressure
R sudden loss of tire pressure, for example
caused through intrusion from a foreign
object G
WARNING
If you fit unsuitable accessories onto tire
valves, the tire valves may be overloaded
and malfunction, which can cause tire pres-
sure loss. Due to their design, retrofitted tire
pressure monitors keep the tire valve open.
This can also result in tire pressure loss.
There is a risk of an accident.
Only screw the standard valve cap or other
valve caps approved by Mercedes-Benz for
your vehicle onto the tire valve. !
The pressure difference between tires on
any one axle must be no greater than
10 kPa
(0.1 bar/1.5 psi).
i The specifications shown on the sample
Tire and Loading Information placard and
tire pressure table are examples. Tire pres-
sure data are vehicle-specific and may devi-
ate from the data illustrated here. The tire
pressure specifications that are valid for
your vehicle can be found on the Tire and
Loading Information placard and the tire
pressure table on the vehicle. H
Environmental note
Check the tire pressure regularly, at least
every
14 days.
General notes You will find information on tire pressure for
the vehicle's factory-mounted tires on the
plates described here.
The recommended tire pressure for various
operating conditions can be found on the Tire
and Loading Information placard on the B-pillar
on the driver's side of the vehicle or on the tire
pressure table inside the fuel filler flap.
Further information on tire pressure can be
obtained at a qualified specialist workshop.
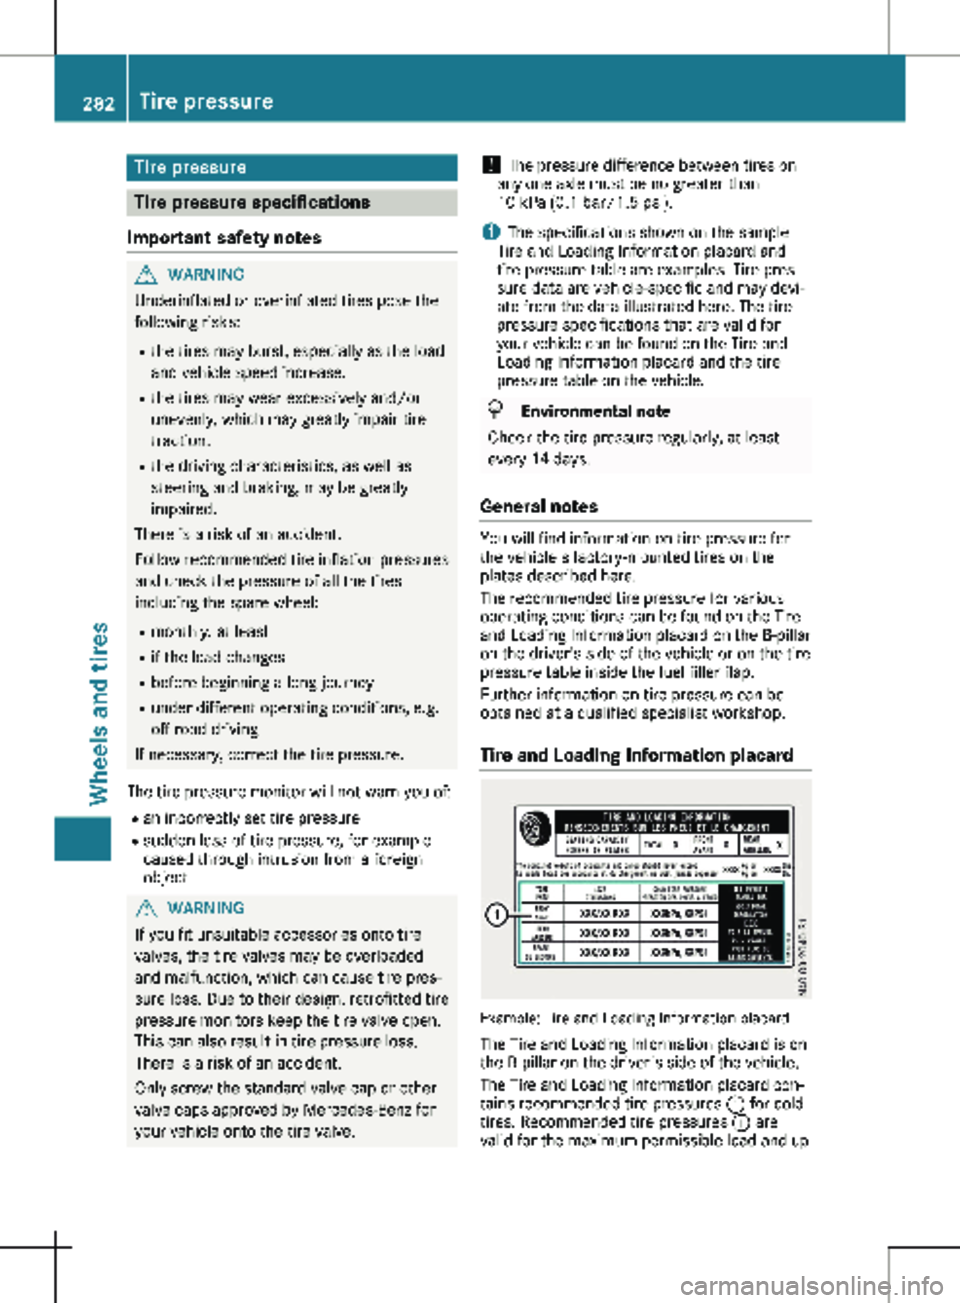
Tire and Loading Information placard Example: Tire and Loading Information placard
The Tire and Loading Information placard is on
the B-pillar on the driver's side of the vehicle.
The Tire and Loading Information placard con-
tains recommended tire pressures : for cold
tires. Recommended tire pressures : are
valid for the maximum permissible load and up 282
Tire pressure
Wheels and tires
Page 287 of 320

Maximum tire pressures
:
Maximum permitted tire pressure (exam-
ple)
Never exceed the maximum permissible tire
inflation pressure. When adjusting the tire
pressures always observe the recommended
tire pressure for your vehicle
(Y page 282).
i The actual values for tires are specific to
each vehicle and may deviate from the val-
ues in the illustration. Tire valve (snap-in valve)
Important safety notes G
WARNING
Tire valve that are not approved for your
vehicle by the distributor named on the
inside cover page may result in a loss of tire
pressure. This may affect road safety. There
is a risk of an accident.
Only use tire valve that are approved for
your vehicle by the distributor named on the
inside cover page. Always make sure you
have the correct tire valve type for the tires
on your vehicle.
! Do not screw additional weights (check
valves, etc.) onto the tire valves. The elec-
tronic components could thus be damaged.
i For safety reasons, Mercedes-Benz recom-
mends that you only use tire valves that
have been tested for use on your vehicle. Checking the tire pressure manually
In order to determine and adjust the tire pres-
sures, proceed as follows: X Remove the valve cap of the tire you wish to
check.
X Press the tire pressure gauge securely onto
the valve.
X Read the tire pressure and compare it with
the recommended value on the loading
information table or the tire pressure table
( Y page
282).
X If the tire pressure is too low, increase it to
the recommended value.
X If the tire pressure is too high, release air by
pressing down the metal pin in the valve.
Use the tip of a pen, for example. Then,
check the tire pressure again using the tire
pressure gauge.
X Screw the valve cap onto the valve.
X Repeat the steps for the other tires. Tire pressure monitor
General notes In vehicles with a tire pressure monitor sys-
tem, the vehicle's wheels have sensors instal-
led which monitor the tire pressure in all four
tires. The tire pressure monitor warns you if
the pressure drops in one or more of the tires.
The tire pressure monitor only functions if the
corresponding sensors are installed on all
wheels.
Tire pressure display (only on vehicles with steer-
ing wheel buttons)
On vehicles with steering-wheel buttons, the
current pressure of the individual wheels in the
display can be shown via the Service menu. Tire pressure
285
Wheels and tires Z
Page 288 of 320
For further information on displaying the cur-
rent tire pressures, refer to "Checking the tire
pressure electronically"
(Y page 287).
Important safety notes G
WARNING
Risk of accident due to incorrect tire
pressure
Each tire, including the spare (if provided),
should be checked monthly when cold and
inflated to the inflation pressure recommen-
ded by the vehicle manufacturer on the vehi-
cle placard or tire inflation pressure label. (If
your vehicle has tires of a different size than
the size indicated on the vehicle placard or
the tire inflation pressure label, you should
determine the proper tire inflation pressure
for those tires.)
As an added safety feature, your vehicle has
been equipped with a tire pressure monitor-
ing system (TPMS) that illuminates a low tire
pressure telltale when one or more of your
tires is significantly under-inflated. Accord-
ingly, when the low tire pressure telltale illu-
minates, you should stop and check your
tires as soon as possible, and inflate them to
the proper pressure. Driving on a signifi-
cantly under-inflated tire causes the tire to
overheat and can lead to tire failure. Under-
inflation also reduces fuel efficiency and tire
tread life, and may affect the vehicle's han-
dling and stopping ability.
Please note that the TPMS is not a substi-
tute for proper tire maintenance, and it is
the driver's responsibility to maintain cor-
rect tire pressure, even if under-inflation has
not reached the level to trigger illumination
of the TPMS low tire pressure telltale.
Your vehicle has also been equipped with a
TPMS malfunction indicator to indicate
when the system is not operating properly.
The TPMS malfunction indicator is combined
with the low tire pressure telltale. When the
system detects a malfunction, the telltale
will flash for approximately one minute and
then remain continuously illuminated. This sequence will continue upon subsequent
vehicle start-ups as long as the malfunction
exists.
When the malfunction indicator is illumina-
ted, the system may not be able to detect or
signal low tire pressure as intended. TPMS
malfunctions may occur for a variety of rea-
sons, including the installation of replace-
ment or alternate tires or wheels on the
vehicle that prevent the TPMS from func-
tioning properly.
Always check the TPMS malfunction telltale
after replacing one or more tires or wheels
on your vehicle to ensure that the replace-
ment or alternate tires and wheels allow the
TPMS to continue to function properly.
It is the driver's responsibility to set the tire
pressure to the recommended cold tire pres-
sure suitable for the operating conditions
(Y page
282).
Note that the correct tire pressure for the cur-
rent operating conditions must first be pro-
gramed into the tire pressure monitor. If a sub-
stantial pressure loss occurs, the warning
threshold for the warning message is aligned
to the taught-in reference values. Restart the
tire pressure monitor after adjusting the cold
tire pressure ( Y page 288). The current pres-
sures are saved as new reference values. This
will ensure that a warning message will only
appear if the tire pressure drops significantly.
The tire pressure monitor does not warn you if
a tire pressure is incorrect. Observe the notes
on the recommended tire pressure
(Y page 282).
The tire pressure monitor is not able to warn
you of a sudden loss of pressure, e.g. following
penetration by a foreign object. In this event,
brake the vehicle until it comes to a standstill.
Avoid sudden steering movements.
The tire pressure monitor has a yellow h
warning lamp in the instrument cluster for indi-
cating pressure loss/malfunctions (USA) or
pressure loss (Canada). Depending on how the
warning lamp flashes or lights up, an underin-
flated tire or a malfunction in the tire pressure
monitor is displayed:
R if the h warning lamp is lit continuously,
the tire pressure on one or more tires is sig- 286
Tire pressure
Wheels and tires
Page 291 of 320
Tire pressure tables
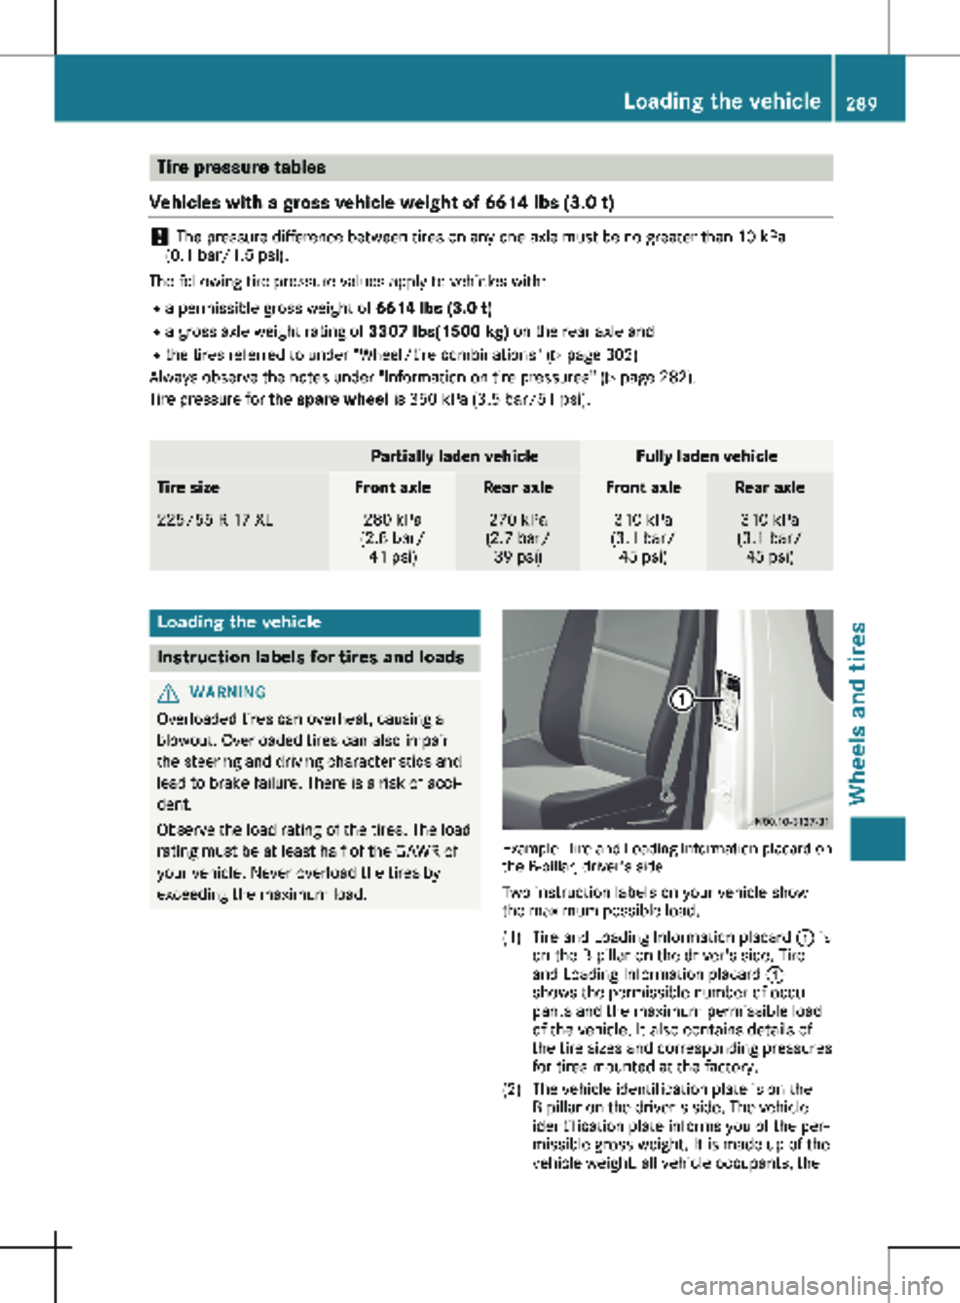
Vehicles with a gross vehicle weight of 6614 lbs (3.0 t)!
The pressure difference between tires on any one axle must be no greater than
10 kPa
(0.1 bar/1.5 psi).
The following tire pressure values apply to vehicles with: R a permissible gross weight of 6614 lbs (3.0 t)
R a gross axle weight rating of 3307 lbs(1500 kg) on the rear axle and
R the tires referred to under "Wheel/tire combinations" (Y page 302)
Always observe the notes under "Information on tire pressures" (Y page 282).
Tire pressure for the spare wheel is 350 kPa (3.5 bar/51 psi).
Partially laden vehicle Fully laden vehicle
Tire size Front axle Rear axle Front axle Rear axle
225/55 R 17 XL 280 kPa
(2.8 bar/ 41 psi) 270 kPa
(2.7 bar/ 39 psi) 310 kPa
(3.1 bar/ 45 psi) 310 kPa
(3.1 bar/ 45 psi) Loading the vehicle
Instruction labels for tires and loads
G
WARNING
Overloaded tires can overheat, causing a
blowout. Overloaded tires can also impair
the steering and driving characteristics and
lead to brake failure. There is a risk of acci-
dent.
Observe the load rating of the tires. The load
rating must be at least half of the GAWR of
your vehicle. Never overload the tires by
exceeding the maximum load. Example: Tire and Loading Information placard on
the B-pillar, driver's side
Two instruction labels on your vehicle show
the maximum possible load.
(1) Tire and Loading Information placard : is
on the
B-pillar on the driver's side. Tire
and Loading Information placard :
shows the permissible number of occu-
pants and the maximum permissible load
of the vehicle. It also contains details of
the tire sizes and corresponding pressures
for tires mounted at the factory.
(2) The vehicle identification plate is on the B-pillar on the driver's side. The vehicle
identification plate informs you of the per-
missible gross weight. It is made up of the
vehicle weight, all vehicle occupants, the Loading the vehicle
289
Wheels and tires Z
Page 296 of 320
ing the tire traction on snow. They have
been especially developed for driving on
snow.
Further information on the reading of tire infor-
mation can be obtained at any qualified spe-
cialist workshop.
Load index Load index (example)
In addition to the load-bearing index, load rat-
ing : may be imprinted after the letters that
identify speed rating on the sidewall of the tire
(Y page
293).
R If no specification is given: no text (as in the
example above), represents a standard load
(SL) tire
R RF or Reinforced: represents a reinforced
tire. Alternatively, depending on the manu-
facturer, the designation XL (Extra Load) can
be used.
R Light Load: represents a light load tire
R C, D, E: represents a load range that
depends on the maximum load that the tire
can carry at a certain pressure
i Tire data is vehicle-specific and may devi-
ate from the data in the example. Maximum tire load Example: maximum tire load
Maximum tire load : is the maximum permis-
sible weight for which the tire is approved.
Do not overload the tires by exceeding the
specified load limit. The maximum permissible
load can be found on the vehicle's Tire and
Loading Information placard on the B-pillar
on
the driver's side (Y page 289).
i The actual values for tires are specific to
each vehicle and may deviate from the val-
ues in the illustration.
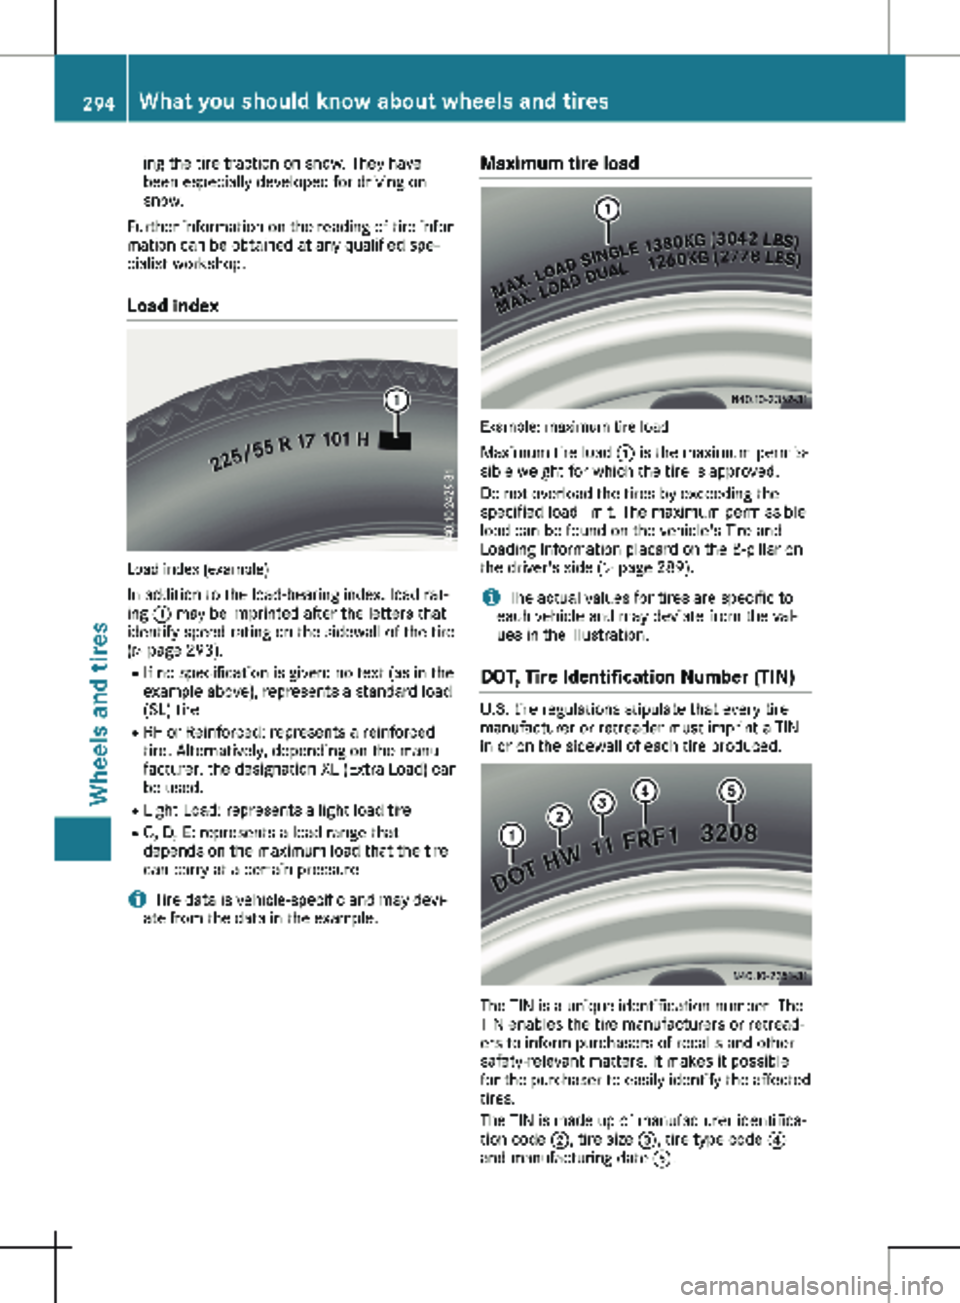
DOT, Tire Identification Number (TIN) U.S. tire regulations stipulate that every tire
manufacturer or retreader must imprint a TIN
in or on the sidewall of each tire produced. The TIN is a unique identification number. The
TIN enables the tire manufacturers or retread-
ers to inform purchasers of recalls and other
safety-relevant matters. It makes it possible
for the purchaser to easily identify the affected
tires.
The TIN is made up of manufacturer identifica-
tion code ;, tire size =, tire type code ?
and manufacturing date A. 294
What you should know about wheels and tires
Wheels and tires