set clock MERCEDES-BENZ METRIS 2020 MY20 Operator’s Manual
[x] Cancel search | Manufacturer: MERCEDES-BENZ, Model Year: 2020, Model line: METRIS, Model: MERCEDES-BENZ METRIS 2020Pages: 320, PDF Size: 26.38 MB
Page 178 of 320

On-board computer (vehicles with-
out steering wheel buttons)
Operating the on-board computer
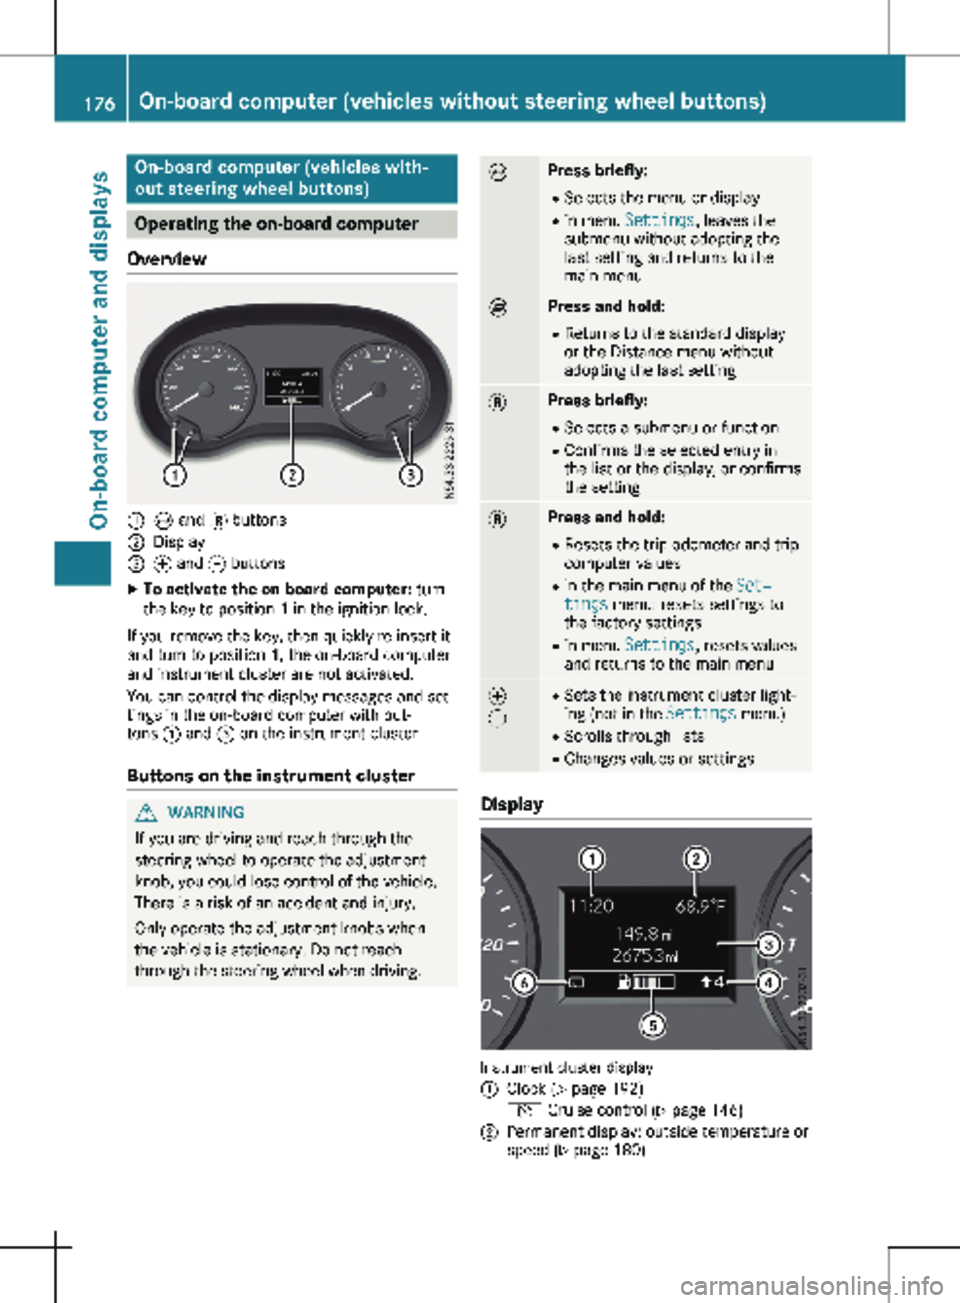
Overview :
È and 3 buttons
; Display
= f and g buttons
X To activate the on-board computer: turn
the key to position 1 in the ignition lock.
If you remove the key, then quickly re-insert it
and turn to position 1, the on-board computer
and instrument cluster are not activated.
You can control the display messages and set-
tings in the on-board computer with but-
tons : and = on the instrument cluster.
Buttons on the instrument cluster G
WARNING
If you are driving and reach through the
steering wheel to operate the adjustment
knob, you could lose control of the vehicle.
There is a risk of an accident and injury.
Only operate the adjustment knobs when
the vehicle is stationary. Do not reach
through the steering wheel when driving. È Press briefly:
R Selects the menu or display
R in menu Settings, leaves the
submenu without adopting the
last setting and returns to the
main menu È Press and hold:
R
Returns to the standard display
or the Distance menu without
adopting the last setting 3 Press briefly:
R Selects a submenu or function
R Confirms the selected entry in
the list or the display, or confirms
the setting 3 Press and hold:
R
Resets the trip odometer and trip
computer values
R in the main menu of the Set‐
tings menu: resets settings to
the factory settings
R in menu Settings, resets values
and returns to the main menu f
g R
Sets the instrument cluster light-
ing (not in the Settings menu)
R Scrolls through lists
R Changes values or settings Display
Instrument cluster display
:
Clock (Y page 192)
V Cruise control (Y page
146)
; Permanent display: outside temperature or
speed
(Y page 180)176
On-board computer (vehicles without steering wheel buttons)
On-board computer and displays
Page 185 of 320

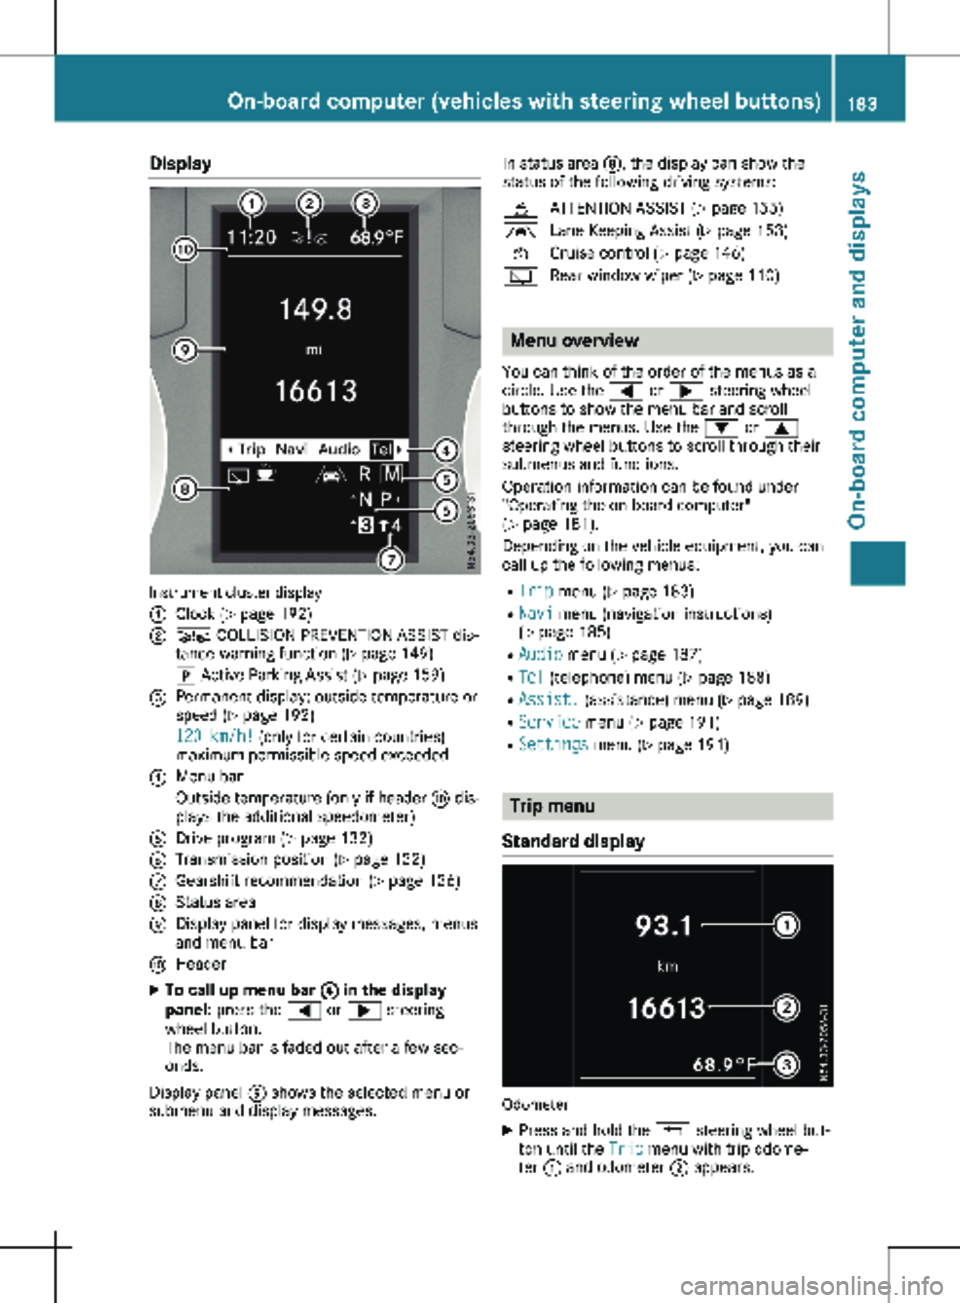
Display
Instrument cluster display
:
Clock (Y page 192)
; Ä COLLISION PREVENTION ASSIST dis-
tance warning function
(Y page 149)
j Active Parking Assist
(Y page 159)
= Permanent display: outside temperature or
speed ( Y page
192)
120 km/h! (only for certain countries)
maximum permissible speed exceeded
? Menu bar
Outside temperature (only if header F dis-
plays the additional speedometer)
A Drive program ( Y page 132)
B Transmission position ( Y page
132)
C Gearshift recommendation ( Y page
136)
D Status area
E Display panel for display messages, menus
and menu bar
F Header
X To call up menu bar ? in the display
panel: press the = or ; steering
wheel button.
The menu bar is faded out after a few sec-
onds.
Display panel E shows the selected menu or
submenu and display messages. In status area D, the display can show the
status of the following driving systems:
À ATTENTION ASSIST ( Y page
155)
à Lane Keeping Assist ( Y page
153)
V Cruise control (Y page
146)
è Rear window wiper (Y page
110) Menu overview
You can think of the order of the menus as a
circle. Use the = or ; steering wheel
buttons to show the menu bar and scroll
through the menus. Use the : or 9
steering wheel buttons to scroll through their
submenus and functions.
Operation information can be found under
"Operating the on-board computer"
(Y page
181).
Depending on the vehicle equipment, you can
call up the following menus:
R Trip menu (Y page 183)
R Navi menu (navigation instructions)
(Y page 185)
R Audio menu ( Y page 187)
R Tel (telephone) menu (Y page 188)
R Assist. (assistance) menu ( Y page 189)
R Service menu (Y page 191)
R Settings menu (Y page 191) Trip menu
Standard display Odometer
X Press and hold the % steering wheel but-
ton until the Trip menu with trip odome-
ter : and odometer ; appears. On-board computer (vehicles with steering wheel buttons)
183
On-board computer and displays Z
Page 194 of 320

R
activating/deactivating or adjusting vehicle
functions in the Vehicle submenu
(Y page
193)
R resetting the settings to Factory Setting
( Y page 194)
Instrument cluster submenu Selecting the unit for the distance
With the Display Unit Speed-/Odometer:
function, you can select whether the display
shows certain information in kilometers or
miles.
Using the steering wheel buttons
X Press = or ; to select the Settings
menu.
X Press : or 9 to select Inst. Clus‐
ter.
X Press a to confirm.
X Press : or 9 to select the Display
Unit Speed-/Odometer: function.
The display indicates the selected km or
Miles setting.
X Press a to change the setting.
The unit for the distance will be selected for:
R Digital speedometer in the Trip menu
R Odometer and trip odometer
R Trip computer
R Current consumption and range
R Navigation instructions in the Navi menu
R Cruise control
R Service interval display
Setting the display language Using the steering wheel buttons
X Press = or ; to select the Settings
menu.
X Press : or 9 to select Inst. Clus‐
ter.
X Press a to confirm.
X Press : or 9 to select Language:.
The display shows the current language
selection for all display messages.
X Press a to change the setting.
X Press : or 9 to select the desired
language.
X Press the a button to save the selection. Selecting the permanent display func-
tion
Using the Permanent Display: function, you
can switch the display in the header between
outside temperature and speed.
If the display shows the speed in the header,
the display shows the outside temperature
with the odometers (Y page
183). The addi-
tional speedometer unit in the header is
always inverse to the speedometer unit.
Using the steering wheel buttons
X Press = or ; to select the Settings
menu.
X Press : or 9 to select Inst. Clus‐
ter.
X Press a to confirm.
X Press : or 9 to select Permanent
Display:.
X Press a to confirm.
The display shows the current selection of
Outside Temp. or Speedom..
X Press a to change the setting.
Clock/Date submenu Setting the time
Using the steering wheel buttons
X Press = or ; to select the Settings
menu.
X Press : or 9 to select Time/Date.
X Press a to confirm.
X Press : or 9 to select the Time:
function.
The display shows the current time.
X To set the time: press a again.
X Press = or ; to switch between
hours and minutes.
X Press : or 9 to set the hours or
minutes.
X Then press a to confirm.
The display shows the updated time.
Setting the date Using the steering wheel buttons
X Press = or ; to select the Settings
menu.
X Press : or 9 to select Time/Date.
X Press a to confirm.192
On-board computer (vehicles with steering wheel buttons)
On-board computer and displays
Page 257 of 320

X
Turn cap : further and remove it from cool-
ant expansion tank ;.
X Check the coolant level.
If the coolant is up to marker bar =
in the
filler neck when cold, there is a sufficient
amount of coolant in coolant expansion
tank ;.
If the coolant is approximately 0.59 in
(1.5 cm) above marker bar = in the filler
neck when warm, there is a sufficient
amount of coolant in coolant expansion
tank ;.
Adding coolant X If the coolant drops under marker bar = in
the filler neck, add coolant.
Observe the information on the correct cool-
ant mixture ratio and the required water
quality under "Service products and capaci-
ties" ( Y page
310). To prevent damage to
the engine cooling system, use only
approved corrosion inhibitor/antifreeze that
complies with the Mercedes-Benz Specifica-
tions for Service Products.
X Replace cap : and tighten in a clockwise
direction.
X Start the engine.
X Set the temperature in the vehicle interior to
the maximum output on the air-conditioning
system control panel.
X After approximately five minutes, switch off
the engine again and allow it to cool down.
X Check the coolant level again and add cool-
ant if necessary.
X Close the hood. Brake fluid
G
WARNING
Service products may be poisonous and haz-
ardous to health. There is a risk of injury.
Comply with instructions on the use, storage
and disposal of service products on the
labels of the respective original containers.
Always store service products sealed in their
original containers. Always keep service
products out of the reach of children. G
WARNING
Opening the hood when the engine is over-
heated or when there is a fire in the engine
compartment could expose you to hot gases
or other service products. There is a risk of
injury.
Let an overheated engine cool down before
opening the hood. If there is a fire in the
engine compartment, keep the hood closed
and contact the fire department. G
WARNING
Certain components in the engine compart-
ment, such as the engine, radiator and parts
of the exhaust system, can become very
hot. Working in the engine compartment
poses a risk of injury.
Where possible, let the engine cool down
and touch only the components described in
the following.
Brake fluid is hazardous to health. Also
observe the safety notes under "Service prod-
ucts and capacities"
(Y page 305). G
WARNING
The brake fluid constantly absorbs moisture
from the air. This lowers the boiling point of
the brake fluid. If the boiling point of the
brake fluid is too low, vapor pockets may
form in the brake system when the brakes
are applied hard. This would impair braking
efficiency. There is a risk of an accident.
You should have the brake fluid renewed at
the specified intervals.
! If the brake fluid level in the brake fluid
reservoir has fallen to the MIN mark or
below, check the brake system immediately
for leaks. Also check the thickness of the
brake linings. Visit a qualified specialist
workshop immediately.
Do not add brake fluid. This does not cor-
rect the malfunction.
! Brake fluid corrodes paint, plastic and rub-
ber. If paint, plastic or rubber has come into
contact with brake fluid, rinse with water
immediately. Engine compartment
255
Maintenance and care Z