height MERCEDES-BENZ METRIS 2020 MY20 Operator’s Manual
[x] Cancel search | Manufacturer: MERCEDES-BENZ, Model Year: 2020, Model line: METRIS, Model: MERCEDES-BENZ METRIS 2020Pages: 320, PDF Size: 26.38 MB
Page 21 of 320
Fuel gauge (vehicle without
steering wheel buttons) .................
176
Refueling procedure (fuel) ............. 137
see Fuel
Remote control
see Key
Replacing bulbs
Important safety notes .................. 105
Replacing bulbs
see Replacing bulbs
Reporting safety defects .................... 32
Rescue card ......................................... 35
Reserve (fuel tank) see Fuel
Reserve fuel
Display messages (vehicle with
steering wheel buttons) ................. 221
Display messages (vehicle with-
out steering wheel buttons) ........... 206
Warning lamp ................................. 233
Residual heat (climate control) ........ 123
Restraint system
Display message (vehicle with
steering wheel buttons) ................. 215
Display message (vehicle without
steering wheel buttons) ................. 201
Important safety notes .................... 46
Introduction ..................................... 46
PASSENGER AIR BAG OFF indica-
tor lamp ........................................... 47
Warning lamp ................................. 232
Warning lamp (function) ................... 46
Reverse warning feature .................. 129
Reversing feature
Electric sliding door ......................... 78
Side windows ................................... 84
Roadside Assistance (breakdown) .... 28
Roof carrier
Maximum payload .......................... 314
Notes ............................................. 249
Roof lining and carpets (cleaning
guidelines) ......................................... 269
Roof load (roof carrier) ..................... 314S
Safety Children in the vehicle
..................... 60 Operating safety and registration .... 30
see Occupant safety
Safety system
see Driving safety systems
Seat
Correct driver's seat position ...........
87
Seat belts
Adjusting the height ......................... 50
Cleaning ......................................... 269
Correct usage .................................. 49
Fastening ......................................... 50
Important safety guidelines ............. 48
Introduction ..................................... 47
Releasing ......................................... 50
Warning lamp ................................. 228
Warning lamp (function) ................... 50
Seat sliders
Problems ......................................... 89
Seats
Adjusting (electrically) ..................... 88
Adjusting (manually) ........................ 88
Adjusting lumbar support ................ 89
Adjusting the head restraint ............ 93
Armrest ............................................ 95
Cleaning the cover ......................... 269
Important safety notes .................... 87
Seat heating .................................... 95
Storing settings (memory func-
tion) ................................................. 97
Selecting a gear
see Automatic transmission
Selector lever
Cleaning ......................................... 269
see Automatic transmission
Sensors (cleaning instructions) ....... 267
Service interval display
Calling up the service due date ...... 258
Hiding service messages ............... 258
Notes ............................................. 257
Service menu (on-board com-
puter) .................................................. 191
Service phone number ...................... 272
Service products
Brake fluid ..................................... 310
Coolant (engine) ............................ 310
Engine oil ....................................... 308
Fuel ................................................ 306
Important safety notes .................. 305 Index
19
Page 50 of 320
back in the direction of the seat backrest,
however.
In addition, the Emergency Tensioning Device
cannot compensate for the seat position being
incorrect or for an incorrectly worn seat belt.
When triggered, seat belt force limiters help to
reduce the peak force exerted by the seat belt
on the vehicle occupant.
The belt force limiters on the front seats are
synchronized with the front air bags, which
take on a part of the deceleration force. This
helps to reduce the forces to which vehicle
occupants are subjected during an accident.
! If the front-passenger seat is not occupied,
do not engage the seat belt tongue in the
buckle on the front-passenger seat. Other-
wise, in addition to other systems, the Emer-
gency Tensioning Device could also be trig-
gered in the event of an accident and would
need to be replaced.
Important safety notes The use of seat belts and child restraint sys-
tems is required by law in:
R all 50 states
R the US territories
R the District of Columbia
R all Canadian provinces
Even where this is not required by law, all vehi-
cle occupants should correctly fasten their
seat belts before starting the journey. G
WARNING
If the seat belt is not worn correctly, it can-
not perform its intended protective function.
An incorrectly fastened seat belt can also
cause injuries, for example, in the event of
an accident or when braking or changing
direction abruptly. This poses an increased
risk of injury or even fatal injury.
Always ensure that all vehicle occupants
have their seat belts fastened correctly and
are sitting properly. The various components of the restraint sys-
tem work complementary to one another. They
can only perform their intended protective
function if all vehicle occupants:
R have correctly fastened their seat belt
(Y page
49)
R have correctly adjusted their seat and head
restraint ( Y page 87) G
WARNING
The seat belt does not offer the intended
level of protection if you have not moved the
backrest to an almost vertical position.
When braking or in the event of an accident,
you could slide underneath the seat belt and
sustain abdomen or neck injuries, for exam-
ple. This poses an increased risk of injury or
even fatal injury.
Adjust the seat properly before beginning
your journey. Always ensure that the back-
rest is in an almost vertical position and that
the shoulder section of your seat belt is
routed across the center of your shoulder. G
WARNING
Persons less than 5 ft (1.50 m) tall cannot
wear the seat belt correctly without an addi-
tional and suitable restraint system. If the
seat belt is not worn correctly, it cannot per-
form its intended protective function. An
incorrectly fastened seat belt can also cause
injuries, for example, in the event of an acci-
dent or when braking or changing direction
abruptly. This poses an increased risk of
injury or even fatal injury.
For this reason, always secure persons
under 5 ft
(1.50 m) tall in suitable additional
restraint systems.
If a child younger than twelve years old and
under 5 ft (1.50 m) in height is traveling in the
vehicle: R always secure the child in a child restraint
system suitable for this Mercedes-Benz
vehicle. The child restraint system must be
appropriate to the age, weight and size of
the child.
R ensure that you observe the instructions
and safety notes in the "Children in the vehi- 48
Occupant safety
Safety
Page 51 of 320
cle" section (Y page
60) in addition to the
child restraint system operating instructions
and manufacturer's instructions
R always observe the instructions and safety
notes on the "Occupant Classification Sys-
tem (OCS)" ( Y page 54)G
WARNING
Seat belts may not be able to perform their
protective function in the following situa-
tions, in particular:
R The seat belt is damaged, modified,
extremely dirty, bleached or dyed
R The seat belt buckle is damaged or
extremely dirty
R Modifications have been performed on the
Emergency Tensioning Device, belt
anchorage or inertia reel
Seat belts may be damaged in an accident,
although the damage may not be visible, e.g.
due to splinters of glass. Modified or dam-
aged seat belts may tear or fail, e.g. in an
accident. Modified Emergency Tensioning
Devices could accidentally trigger or not
function as intended. This poses an
increased risk of injury or even fatal injury.
Never modify the seat belts, Emergency Ten-
sioning Devices, belt anchorages or inertia
reels. Make sure that the seat belts are
undamaged, not worn out and clean. Have
the seat belts checked immediately at a
qualified specialist workshop after an acci-
dent.
Only use seat belts that have been approved
for your vehicle by Mercedes-Benz.
Proper use of the seat belts Observe the safety notes on the seat belt
(Y page
48).
In order for the correctly worn seat belt to pro-
vide the intended level of protection, each
vehicle occupant must observe the following
information. Also make sure that all vehicle
occupants have their seat belt correctly fas-
tened during the journey. When fastening the seat belt, always make
sure that:
R the seat belt tongue is only inserted into the
correct belt buckle for the corresponding
seat
R the seat belt fits closely across your body
Avoid wearing bulky clothing, e.g. a winter
coat.
R the seat belt is not twisted
Only then can the forces produced during an
accident be distributed across the surface
of the seat belt.
R the shoulder section of the belt is routed
across the center of your shoulder
The shoulder section of the seat belt should
not touch your neck nor be routed under
your arm or behind your back. If possible,
adjust the seat belt to the appropriate
height.
R the lap belt is fastened closely and routed
as low as possible across your lap, i.e.
across your hips
The lap belt must always be routed across
the hip joints and never across your stom-
ach or abdomen. This is of particular impor-
tance for pregnant women. If necessary,
push the lap belt downwards into your pelvic
area and pull it tight using the shoulder sec-
tion of the belt.
R the seat belt is not routed across sharp-
edged, pointed or breakable objects
Should you have such objects on or in your
clothing, e.g. pens, keys or spectacles, stow
these in a suitable place.
R only one person uses each seat belt at any
one time
Infants and children must never travel sit-
ting on the lap of another vehicle occupant.
In the event of an accident, they could be
crushed between the vehicle occupant and
the seat belt.
R objects are never secured with a seat belt if
the seat belt is also being used by a vehicle
occupant
Also make sure that there are never any
objects between a person and the seat, e.g.
cushions.
Seat belts are solely intended to secure and
restrain vehicle occupants. When securing
objects, luggage or loads, always observe the
instructions and safety notes in "Loading
guidelines"
(Y page 242). Occupant safety
49
Safety Z
Page 53 of 320
Air bags
Introduction The installation point of an airbag can be rec-
ognized by the AIRBAG marking.
An airbag complements the correctly fastened
seat belt. It is no substitute for the seat belt.
When deployed, an airbag can increase the
protection provided for the respective vehicle
occupant.
Not all airbags are deployed in an accident.
The various airbags work independently of
each other (Y page
58).
However, no system available today can com-
pletely eliminate injuries and fatalities.
It is also not possible to rule out a risk of injury
caused by an airbag due to the high speed at
which the airbag must be deployed.
Important safety notes G
WARNING
If the front passenger air bag has been acti-
vated, a child on the front passenger seat
may be hit by the front passenger air bag in
the event of an accident. There is a risk of
injury or fatal injury.
NEVER use a rearward-facing child restraint
system on a seat protected by an ACTIVE
FRONT AIRBAG; DEATH or SERIOUS INJURY
to the CHILD can occur.
When installing a child restraint system on the
front-passenger seat observe the vehicle-spe-
cific notes
(Y page 64). You must observe
the notes on rearward and forward-facing child
restraint systems on the front-passenger seat. G
WARNING
If you deviate from the correct seat position,
the air bag cannot perform its intended pro-
tective function and deployment may even
cause further injuries. This poses an
increased risk of injury or even fatal injury.
To avoid any risks, each vehicle occupant
must always make sure of the following:
R Fasten the seat belt correctly. In the case
of pregnant women in particular, make sure that the lap belt is never routed
across the stomach or abdomen.
R Adopt the correct seat position and keep
as far away as possible from the air bags.
R Observe the following notes.
Always make sure that there are no objects
between the air bag and vehicle occupant.
All vehicle occupants must observe the follow-
ing notes to avoid risks posed by the air bag
when it deploys.
R Adjust the seats properly before beginning
your journey. Always make sure that the
seat is in an almost upright position. The
center of the head restraint must support
the head at about eye level.
R Move the driver's and front-passenger seats
as far back as possible. The driver's seat
position must allow the vehicle to be driven
safely.
R Only hold the steering wheel on the outside.
This allows the air bag to be fully deployed.
R Always lean against the backrest while driv-
ing. Do not lean forward or lean against the
door or side window. You may otherwise be
in the deployment area of the air bags.
R Always keep your feet in the footwell in
front of the seat. Do not put your feet on the
dashboard, for example. Your feet may oth-
erwise be in the deployment area of the air
bag.
R For this reason, always secure persons less
than 5 ft
(1.50 m) tall in suitable restraint
systems. Up to this height, the seat belt
cannot be worn correctly.
If a child is traveling in your vehicle, also
observe the following notes:
R Always secure children under twelve years
of age and less than 5 ft (1.50 m) tall in suit-
able child restraint systems.
R Child restraint systems should preferably be
installed on the rear seats.
R Secure a child to the front-passenger seat
only when the front-passenger front air bag
is deactivated, and then only in a rearward-
facing child restraint system. The front-
passenger front air bag is deactivated when
the PASSENGER AIR BAG OFF indicator
lamp is lit continuously (Y page 47).
R Always observe the instructions and safety
notes on the "Occupant Classification Sys- Occupant safety
51
Safety Z
Page 62 of 320
ation is not high. Conversely, air bags may be
deployed even though the vehicle suffers only
minor deformation. This is the case if, for
example, very rigid vehicle parts such as longi-
tudinal body members are hit, and sufficient
deceleration occurs as a result.
If the restraint system control unit detects a
side impact or if the vehicle rolls over, the
applicable components of the restraint system
are deployed independently of each other
depending on the apparent type of accident.
R Side impact air bag and pelvis air bag on the
side on which an impact occurs, independ-
ent from the Emergency Tensioning Device
and seat belt usage
The side impact air bag on the front
passenger side deploys under the following
conditions:
- the OCS system detects that the front
passenger seat is occupied or
- the seat belt buckle tongue is engaged in
the belt buckle of the front passenger
seat
R Window curtain air bag on the side of
impact, independently of the use of the seat
belt and independently of whether the front-
passenger seat is occupied
R Emergency Tensioning Devices, if the sys-
tem determines that deployment can offer
additional protection in this situation
R Window curtain air bags on the driver's and
front-passenger side in certain situations
when the vehicle rolls over, if the system
determines that deployment can offer addi-
tional protection to that provided by the
seat belt
i Not all air bags are deployed in an acci-
dent. The various air bags work independ-
ently of each other.
How the air bag works is determined by the
severity of the accident detected, especially
the vehicle deceleration or acceleration and
the apparent type of accident:
R Head-on collision
R Side impact
R Rollover Automatic measures after an acci-
dent
Immediately after an accident, the following
measures are implemented, depending on the
type and severity of the impact:
R the hazard warning lamps are switched on
R the emergency lighting in the interior is acti-
vated
R the vehicle doors are unlocked
R the front side windows are lowered
R air-recirculation mode is activated
R climate control is switched off
R the engine is switched off and the fuel sup-
ply is cut off Children in the vehicle
Important safety notes
Accident statistics show that children secured
on the rear seats are safer than children
secured on the front seats. For this reason,
Mercedes-Benz strongly advises that you fit
the child restraint system to a rear seat. The
child is generally better protected there.
If a child younger than twelve years old and
under 5 ft
(1.50 m) in height is traveling in the
vehicle:
R always secure the child in a child restraint
system suitable for Mercedes-Benz vehicles.
The child restraint system must be appropri-
ate to the age, weight and size of the child.
R always observe the instructions and safety
notes in this section in addition to the child
restraint system manufacturer's instruc-
tions.
R always observe the instructions and safety
notes on the "Occupant Classification Sys-
tem (OCS)" ( Y page 54). G
WARNING
If children are left unsupervised in the vehi-
cle, they could, in particular:
R open doors, thereby endangering other
persons or road users.
R get out and be struck by oncoming traffic.
R operate vehicle equipment and become
trapped, for example.60
Children in the vehicle
Safety
Page 63 of 320
In addition, children could set the vehicle in
motion, for example, if they:
R release the parking brake.
R change the transmission position.
R start the vehicle.
There is a risk of accident and injury.
Never leave children unsupervised in the
vehicle.
When leaving the vehicle, always take the
SmartKey with you and lock the vehicle.
Keep the SmartKey out of the reach of chil-
dren. G
WARNING
If persons, particularly children are subjec-
ted to prolonged exposure to extreme heat
or cold, there is a risk of injury, possibly
even fatal. Never leave children unattended
in the vehicle. G
WARNING
If the child restraint system is subjected to
direct sunlight, parts may get very hot. Chil-
dren may burn themselves on these parts,
particularly on the metal parts of the child
restraint system. There is a risk of injury.
If you leave the vehicle, taking the child with
you, always ensure that the child restraint
system is not exposed to direct sunlight.
Protect it with a blanket, for example. If the
child restraint system has been exposed to
direct sunlight, let it cool down before secur-
ing the child in it. Never leave children unat-
tended in the vehicle.
Make sure that all vehicle occupants have fas-
tened their seat belts properly and are seated
correctly. This is particularly important for chil-
dren.
Observe the safety notes on seat belts
(Y page
48) and the notes on the correct use
of the seat belt (Y page 49).
A booster seat may be necessary to achieve
proper seat belt positioning for children over
40 lbs (18 kg) until they reach a height where
a three-point seat belt fits properly without a
booster seat. Special seatbelt retractor
G
WARNING
If the seat belt is released while driving, the
child restraint system will no longer be
secured properly. The special seat belt
retractor is disabled and the inertia real
draws in a portion of the seat belt. The seat
belt cannot be immediately refastened.
There is an increased risk of injury, possibly
even fatal.
Stop the vehicle immediately, paying atten-
tion to road and traffic conditions. Reacti-
vate the special seat belt retractor and
secure the child restraint system properly.
All seat belts in the vehicle, except the driver's
seat belt, are equipped with a special seat belt
retractor. When activated, the special seat belt
retractor ensures that the seat belt cannot
slacken once the child seat is secured.
Installing a child restraint system:
X Make sure you observe the child restraint
system manufacturer's installation instruc-
tions.
X Pull the seat belt smoothly from the belt
outlet.
X Engage seat belt tongue in belt buckle.
Activating the special seat belt retractor:
X Pull the seat belt out fully and let the inertia
reel retract it again.
While the seat belt is retracting, you should
hear a ratcheting sound. The special seat
belt retractor is enabled.
X Push the child restraint system down so that
the seat belt is tight and does not loosen.
Removing the child restraint system and deac-
tivating the special seat belt retractor:
X Make sure you observe the child restraint
system manufacturer's installation instruc-
tions.
X Press the release button of the seat belt
buckle and guide the seat belt tongue back
towards the belt sash guide.
The special seat belt retractor is deactiva-
ted. Children in the vehicle
61
Safety Z
Page 90 of 320
!
To prevent damage to the seats and the
seat heating, observe the following notes:
R Do not spill liquids onto the seats. Dry the
seats as soon as possible if liquid does
get spilled on the seats.
R If the seat covers are damp or wet, do not
switch on the seat heating. Also, do not
use the seat heating to dry the seats.
R Clean the seat covers as recommended;
see the "Interior care" section.
R Do not transport heavy loads on the
seats. Do not place pointed objects on
the seat cushions such as knives, nails or
tools. Where possible, use the seats only
for carrying passengers.
R When operating the seat heating, do not
cover the seats with insulating materials,
e.g. blankets, coats, bags, protective cov-
ers, child seats or booster seats.
R When the seat heating is switched on, the
seat surface can be damaged as a result
of objects being placed on the seats, for
example, seat cushions, child seats and
protective covers not approved by
Mercedes-Benz.
Your seat must be adjusted in such a way that
you can wear the seat belt correctly.
Observe the following points:
R Position the backrest in an almost vertical
position so that you are sitting virtually
upright. Do not drive with the backrest
reclined too far back.
R Your arms should be slightly bent when you
are holding the steering wheel.
R Avoid seat positions that prevent the seat
belt from being correctly routed. The shoul-
der section of the belt must be routed over
the middle of your shoulder and be pulled
tight against your upper body. The lap belt
must always pass across your lap as low
down as possible, i.e. over your hip joints.
R Adjust the head restraint so that it supports
the back of the head at eye level.
R The distance from the pedals should be
such that you can depress them fully.
Please also observe the important safety notes
on "Air bags"
(Y page 51), "Seat belts"
(Y page 48) and "Child restraint systems" ( Y page 62). Adjusting the seat manually
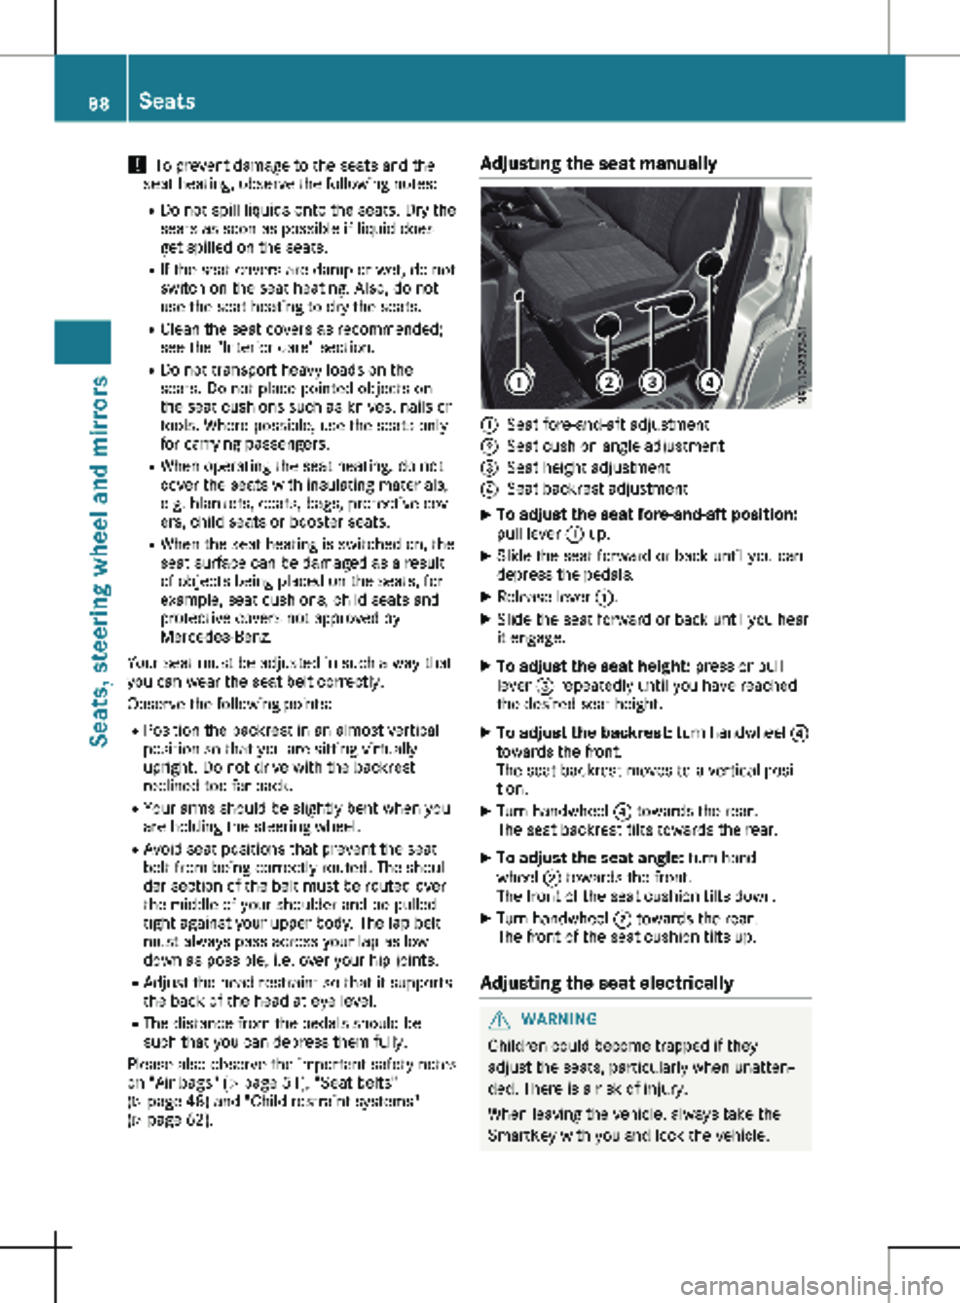
:
Seat fore-and-aft adjustment
; Seat cushion angle adjustment
= Seat height adjustment
? Seat backrest adjustment
X To adjust the seat fore-and-aft position:
pull lever
: up.
X Slide the seat forward or back until you can
depress the pedals.
X Release lever :.
X Slide the seat forward or back until you hear
it engage.
X To adjust the seat height: press or pull
lever = repeatedly until you have reached
the desired seat height.
X To adjust the backrest: turn handwheel ?
towards the front.
The seat backrest moves to a vertical posi-
tion.
X Turn handwheel ? towards the rear.
The seat backrest tilts towards the rear.
X To adjust the seat angle: turn hand-
wheel ; towards the front.
The front of the seat cushion tilts down.
X Turn handwheel ; towards the rear.
The front of the seat cushion tilts up.
Adjusting the seat electrically G
WARNING
Children could become trapped if they
adjust the seats, particularly when unatten-
ded. There is a risk of injury.
When leaving the vehicle, always take the
SmartKey with you and lock the vehicle. 88
Seats
Seats, steering wheel and mirrors
Page 91 of 320
Never leave children unsupervised in the
vehicle.
The seats can be adjusted when the key is
removed and the door is open. Buttons for electric seat adjustment on the door
trim
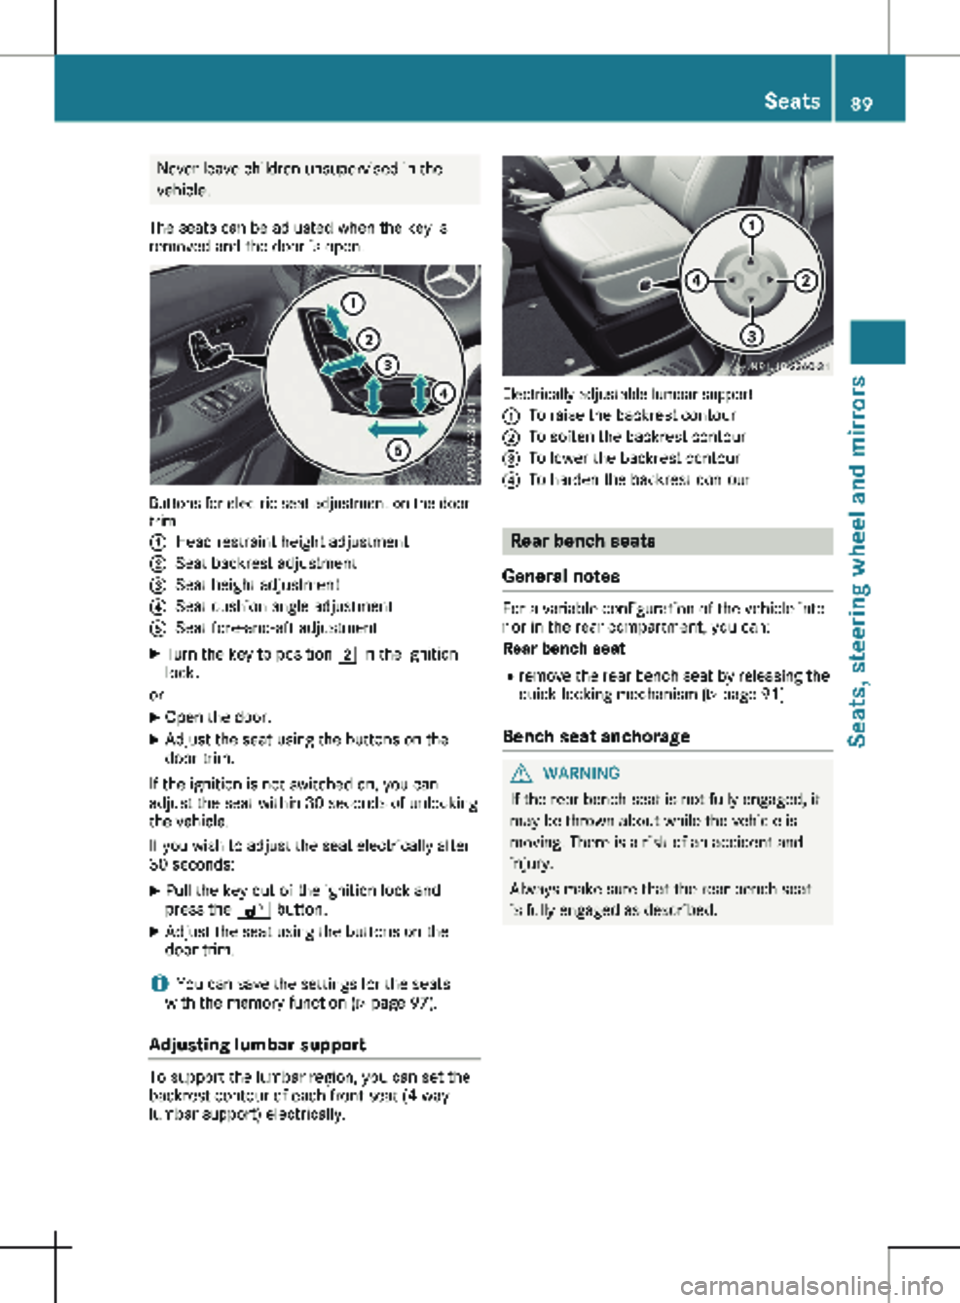
:
Head restraint height adjustment
; Seat backrest adjustment
= Seat height adjustment
? Seat cushion angle adjustment
A Seat fore-and-aft adjustment
X Turn the key to position 2 in the ignition
lock.
or X Open the door.
X Adjust the seat using the buttons on the
door trim.
If the ignition is not switched on, you can
adjust the seat within 30 seconds of unlocking
the vehicle.
If you wish to adjust the seat electrically after
30 seconds:
X Pull the key out of the ignition lock and
press the % button.
X Adjust the seat using the buttons on the
door trim.
i You can save the settings for the seats
with the memory function (Y page
97).
Adjusting lumbar support To support the lumbar region, you can set the
backrest contour of each front seat (4-way
lumbar support) electrically. Electrically adjustable lumbar support
:
To raise the backrest contour
; To soften the backrest contour
= To lower the backrest contour
? To harden the backrest contour Rear bench seats
General notes For a variable configuration of the vehicle inte-
rior in the rear compartment, you can:
Rear bench seat
R remove the rear bench seat by releasing the
quick-locking mechanism (Y page
91)
Bench seat anchorage G
WARNING
If the rear bench seat is not fully engaged, it
may be thrown about while the vehicle is
moving. There is a risk of an accident and
injury.
Always make sure that the rear bench seat
is fully engaged as described. Seats
89
Seats, steering wheel and mirrors Z
Page 96 of 320
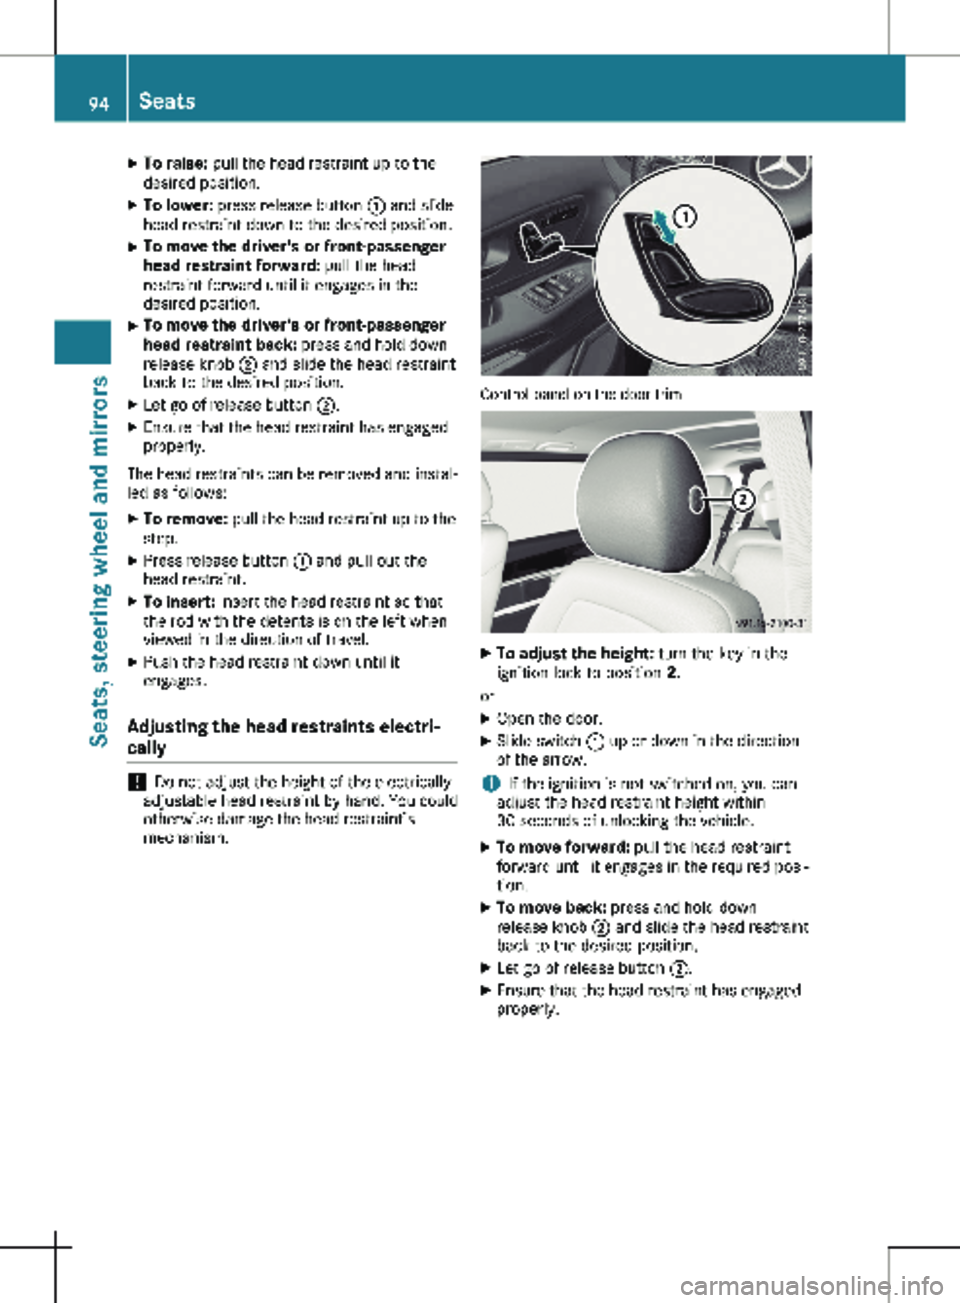
X
To raise: pull the head restraint up to the
desired position.
X To lower: press release button : and slide
head restraint down to the desired position.
X To move the driver's or front-passenger
head restraint forward: pull the head
restraint forward until it engages in the
desired position.
X To move the driver's or front-passenger
head restraint back: press and hold down
release knob ; and slide the head restraint
back to the desired position.
X Let go of release button ;.
X Ensure that the head restraint has engaged
properly.
The head restraints can be removed and instal-
led as follows:
X To remove: pull the head restraint up to the
stop.
X Press release button : and pull out the
head restraint.
X To insert: insert the head restraint so that
the rod with the detents is on the left when
viewed in the direction of travel.
X Push the head restraint down until it
engages.
Adjusting the head restraints electri-
cally !
Do not adjust the height of the electrically
adjustable head restraint by hand. You could
otherwise damage the head restraint’s
mechanism. Control panel on the door trim
X
To adjust the height: turn the key in the
ignition lock to position 2.
or X Open the door.
X Slide switch : up or down in the direction
of the arrow.
i If the ignition is not switched on, you can
adjust the head restraint height within
30 seconds of unlocking the vehicle.
X To move forward: pull the head restraint
forward until it engages in the required posi-
tion.
X To move back: press and hold down
release knob ; and slide the head restraint
back to the desired position.
X Let go of release button ;.
X Ensure that the head restraint has engaged
properly.94
SeatsSeats, steering wheel and mirrors
Page 98 of 320
Adjust the driver's seat, head restraint,
steering wheel and mirror and fasten your
seat belt before starting the engine.
G
WARNING
If the steering wheel is unlocked while the
vehicle is in motion, it could change position
unexpectedly. This could cause you to lose
control of the vehicle. There is a risk of an
accident.
Before starting off, make sure the steering
wheel is locked. Never unlock the steering
wheel while the vehicle is in motion. G
WARNING
Children could injure themselves if they
adjust the steering wheel. There is a risk of
injury.
When leaving the vehicle, always take the
SmartKey with you and lock the vehicle.
Never leave children unsupervised in the
vehicle.
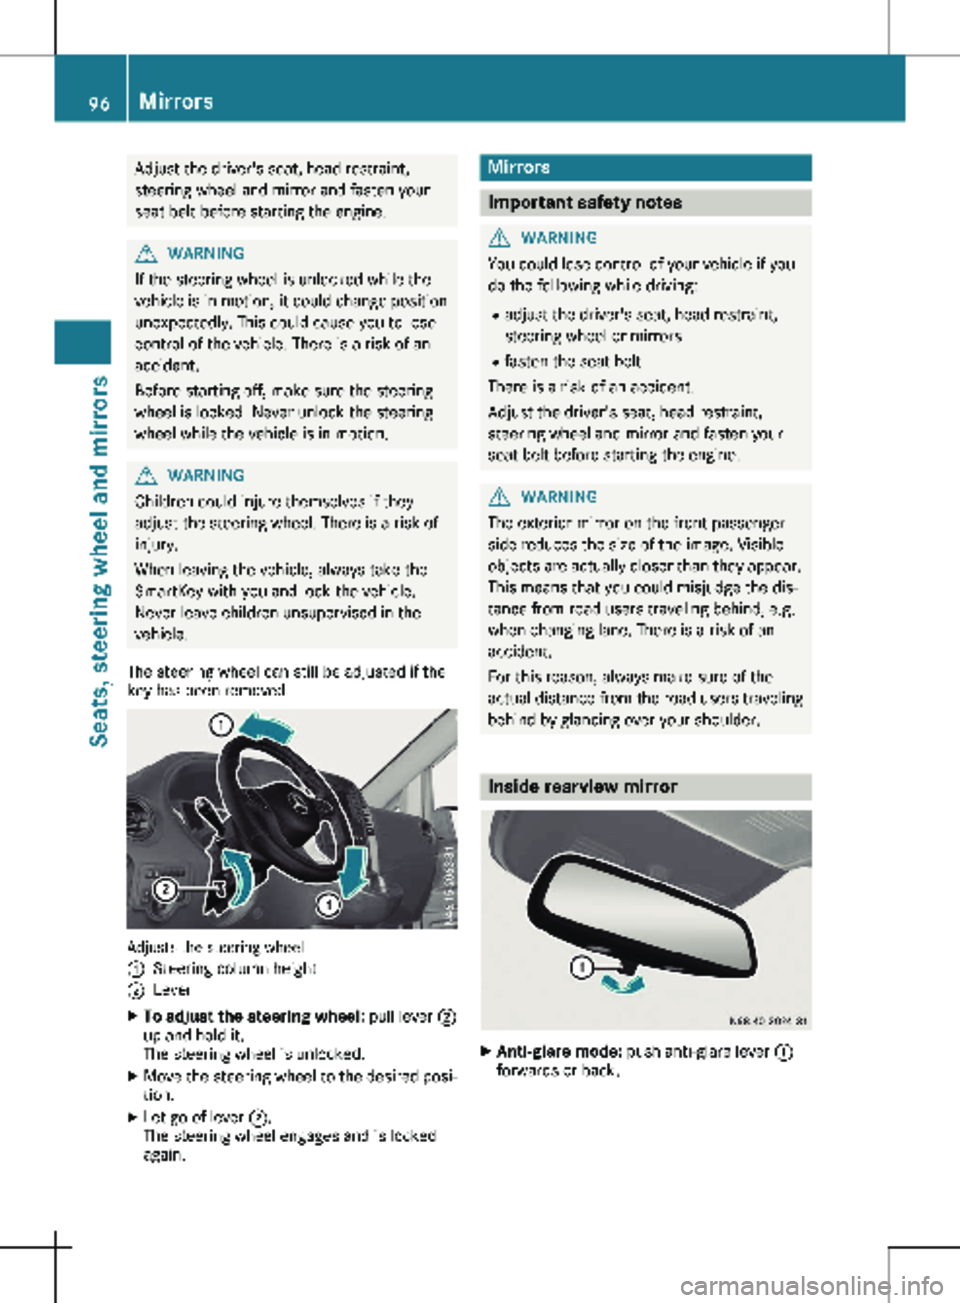
The steering wheel can still be adjusted if the
key has been removed. Adjusts the steering wheel
:
Steering column height
; Lever
X To adjust the steering wheel: pull lever ;
up and hold it.
The steering wheel is unlocked.
X Move the steering wheel to the desired posi-
tion.
X Let go of lever ;.
The steering wheel engages and is locked
again. Mirrors
Important safety notes
G
WARNING
You could lose control of your vehicle if you
do the following while driving:
R adjust the driver's seat, head restraint,
steering wheel or mirrors
R fasten the seat belt
There is a risk of an accident.
Adjust the driver's seat, head restraint,
steering wheel and mirror and fasten your
seat belt before starting the engine. G
WARNING
The exterior mirror on the front-passenger
side reduces the size of the image. Visible
objects are actually closer than they appear.
This means that you could misjudge the dis-
tance from road users traveling behind, e.g.
when changing lane. There is a risk of an
accident.
For this reason, always make sure of the
actual distance from the road users traveling
behind by glancing over your shoulder. Inside rearview mirror
X
Anti-glare mode: push anti-glare lever :
forwards or back. 96
MirrorsSeats, steering wheel and mirrors