key battery MERCEDES-BENZ METRIS 2020 MY20 Operator’s Manual
[x] Cancel search | Manufacturer: MERCEDES-BENZ, Model Year: 2020, Model line: METRIS, Model: MERCEDES-BENZ METRIS 2020Pages: 320, PDF Size: 26.38 MB
Page 7 of 320
Function/notes ............................. 155
Attention Assist
see ATTENTION ASSIST
ATTENTION ASSIST
see ATTENTION ASSIST
Authorized workshop
see Qualified specialist workshop
AUTO lamp
Display messages (vehicle with-
out steering wheel buttons) ...........
202
AUTO lights
Display messages (vehicle with
steering wheel buttons) ................. 216
see Lights
Automatic car wash (care) ............... 264
Automatic headlamp mode .............. 100
Automatic locking ............................... 76
Automatic transmission
Accelerator pedal position ............. 134
Changing gear ............................... 132
DIRECT SELECT lever ..................... 131
Display message ............................ 225
Drive program display .................... 132
Driving tips .................................... 134
Emergency running mode .............. 136
Engaging drive position .................. 131
Engaging neutral ............................ 131
Engaging reverse gear ................... 131
Engaging the park position ............ 131
Gearshift recommendation ............ 136
Important safety notes .................. 130
Kickdown ....................................... 135
Manual shifting .............................. 135
Overview ........................................ 130
Problem (malfunction) ................... 136
Program selector button ................ 134
Rocking the vehicle free ................ 135
Shift ranges ................................... 133
Starting the engine ........................ 128
Steering wheel paddle shifters ...... 135
Trailer towing ................................. 135
Transmission oil change ................ 310
Transmission position display
(DIRECT SELECT lever) ................... 132
Transmission positions .................. 132
Automatic transmission emer-
gency mode ....................................... 136 Axle load, permissible (trailer
towing) ...............................................
315 B
Back support see Lumbar support
Backup lamp
Display messages (vehicle with
steering wheel buttons) .................
217
Backup lamps
Display messages (vehicle with-
out steering wheel buttons) ........... 203
Replacing bulbs ............................. 108
BAS (Brake Assist System)
Function/notes ................................ 67
Basic settings
see Settings
Battery (SmartKey)
Checking .......................................... 73
Important safety notes .................... 73
Replacing ......................................... 73
Battery (vehicle)
Care ............................................... 263
Charging ........................................ 262
Connecting and installing .............. 261
Disconnecting and removing ......... 260
Display messages (vehicle with
steering wheel buttons) ................. 219
Display messages (vehicle with-
out steering wheel buttons) ........... 204
Important safety notes .................. 258
Jump starting ................................. 272
Location ......................................... 259
Before driving off
Important safety notes .................. 127
Belt
see Seat belts
Belt warning ......................................... 50
Blind Spot Assist
Activating ....................................... 153
Activating/deactivating (vehicle
with steering wheel buttons) ......... 191
Collision warning ........................... 153
Display message ............................ 223
Important safety notes .................. 152
Monitoring range of the sensors .... 152
Notes/function .............................. 151 Index
5
Page 22 of 320
Refrigerant (air-conditioning sys-
tem) ............................................... 311
Transmission oil ............................. 310
Washer fluid ................................... 312
Setting a speed
see Cruise control
Setting the air distribution ............... 120
Setting the airflow ............................ 120
Settings
Factory (vehicle with steering
wheel buttons) ............................... 194
Factory (vehicle without steering
wheel buttons) ............................... 179
On-board computer (vehicle with
steering wheel buttons) ................. 191
On-board computer (vehicle with-
out steering wheel buttons) ........... 179
Side impact air bag ............................. 52
Side windows
Cleaning ......................................... 265
Convenience closing feature ............ 85
Convenience opening feature .......... 85
Hinged side windows ....................... 84
Important safety information ........... 84
Opening/closing .............................. 85
Overview .......................................... 84
Problem (malfunction) ..................... 86
Resetting ......................................... 86
Signal and ambient light
Changing a bulb ............................. 105
Sliding door
Child-proof locks .............................. 66
Cleaning ......................................... 267
Important safety notes .................... 77
Indicator lamp ................................ 237
Opening/closing from the inside ..... 77
Opening/closing from the out-
side .................................................. 77
see Electric sliding door
SmartKey
Changing the battery ....................... 73
Changing the programming ............. 72
Checking the battery ....................... 73
Convenience closing feature ... 85, 123
Convenience opening feature .......... 85
Door central locking/unlocking ....... 71
Important safety notes .................... 71
Loss ................................................. 74 Mechanical key ................................ 72
Problem (malfunction)
..................... 74
SmartKey positions (ignition
lock) .................................................... 127
Snow chains ...................................... 281
Sockets .............................................. 241
Spare wheel
General notes ................................ 302
Important safety notes .................. 302
Removing/mounting ...................... 303
Special seat belt retractor .................. 61
Specialist workshop ............................ 32
Speed, controlling
see Cruise control
Speedometer
Activating/deactivating the addi-
tional speedometer (vehicle with
steering wheel buttons) ................. 192
Activating/deactivating the addi-
tional speedometer (vehicle with-
out steering wheel buttons) ........... 180
Digital (vehicle with steering
wheel buttons) ............................... 185
Digital (vehicle without steering
wheel buttons) ............................... 178
General notes ................................ 175
In the instrument cluster (vehicle
with steering wheel buttons) ............ 40
In the instrument cluster (vehicle
without steering wheel buttons) ...... 38
Setting the display unit (vehicle
with steering wheel buttons) ......... 192
Setting the display unit (vehicle
without steering wheel buttons) .... 180
SRS (Supplemental Restraint Sys-
tem)
see Restraint system
Standing lamp
Display messages (vehicle with
steering wheel buttons) ................. 217
Standing lamps
Display messages (vehicle with-
out steering wheel buttons) ........... 203
Replacing bulbs (front) ................... 107
Replacing bulbs (rear) .................... 108
Switching on/off .............................. 99 20
Index
Page 26 of 320
Selecting the display units (vehi-
cle without steering wheel but-
tons) ..............................................
180
Trip meter
see Trip odometer
Trip odometer
Displaying (vehicle with steering
wheel buttons) ............................... 183
Displaying (vehicle without steer-
ing wheel buttons) ......................... 177
Resetting (vehicle with steering
wheel buttons) ............................... 185
Resetting (vehicle without steer-
ing wheel buttons) ......................... 177
Setting the display unit (vehicle
with steering wheel buttons) ......... 192
Setting the display unit (vehicle
without steering wheel buttons) .... 180
Truck
see Vehicle
Truck key
see SmartKey
Turn signal
Changing bulbs (additional turn
signals) .......................................... 107
Turn signals
Display messages (vehicle with
steering wheel buttons) ................. 216
Display messages (vehicle with-
out steering wheel buttons) ........... 202
Replacing bulbs (front) ................... 107
Replacing bulbs (rear) .................... 108
Switching on/off ........................... 101
Trailer display messages (vehicle
with steering wheel buttons) ......... 216
Trailer display messages (vehicle
without steering wheel buttons) .... 202
Turn signals
see Turn signals
Two-way radios
Type approval/frequency .............. 304
TWR (Tongue Weight Rating) (def-
inition) ................................................ 297
Type identification plate
see Vehicle identification plate U
Unlocking Emergency unlocking
....................... 73
From inside the vehicle (central
unlocking button) ............................. 75
With emergency key element ........... 72
USB (audio)
Playing ........................................... 187 V
Vanity mirror Changing a bulb (mirror lamp)
....... 104
Sun visor ........................................ 239
Vehicle
Data acquisition ............................... 35
Display messages (vehicle with
steering wheel buttons) ................. 225
Display messages (vehicle with-
out steering wheel buttons) ........... 208
Electronics ..................................... 304
Emergency unlocking ....................... 72
Equipment ....................................... 27
Limited Warranty ............................. 27
Loading .......................................... 289
Locking (in an emergency) ............... 73
Locking (SmartKey) .......................... 71
Lowering ........................................ 300
Maintenance .................................... 28
Operating safety .............................. 30
Parking for a long period ................ 140
Pulling away ................................... 128
Raising ........................................... 298
Registration ..................................... 33
Reporting problems ......................... 32
Securing from rolling away ............ 138
Towing away .................................. 274
Transporting .................................. 276
Unlocking (in an emergency) ........... 73
Unlocking (SmartKey) ...................... 71
Vehicle battery
see Battery (vehicle)
Vehicle bodies ..................................... 33
Body/equipment mounting
directives for trucks ......................... 33
Vehicle check
see Preparing for a journey24
Index
Page 73 of 320
Useful information
This Operator's Manual describes all models
as well as standard and optional equipment of
your vehicle that were available at the time of
going to print. Country-specific variations are
possible. Note that your vehicle may not be
equipped with all of the described functions.
This also applies to systems and functions rel-
evant to safety.
Read the information on qualified specialist
workshops (Y page
32).Key
Important safety notes
G
WARNING
If children are left unsupervised in the vehi-
cle, they could:
R open the doors, thus endangering other
people or road users.
R get out and disrupt traffic.
R operate the vehicle's equipment.
Additionally, children could set the vehicle in
motion if, for example, they:
R release the parking brake.
R shift the automatic transmission out of
park position P.
R start the engine.
There is a risk of an accident and injury.
When leaving the vehicle, always take the
SmartKey with you and lock the vehicle.
Never leave children or animals unattended
in the vehicle. Always keep the SmartKey
out of reach of children. G
WARNING
If you attach heavy or large objects to the
SmartKey, the SmartKey could be uninten-
tionally turned in the ignition lock. This
could cause the engine to be switched off.
There is a risk of an accident.
Do not attach any heavy or large objects to
the SmartKey. Remove any bulky key rings before inserting the SmartKey into the igni-
tion lock.
! Keep the key away from strong magnetic
fields. The remote control function may oth-
erwise be damaged.
Strong magnetic fields can occur in the
vicinity of powerful electrical installations.
Do not keep the key:
R with electronic devices, e.g. a mobile phone
or another key
R with metallic objects, e.g. coins or metal foil
R in metallic objects, e.g. metal cases
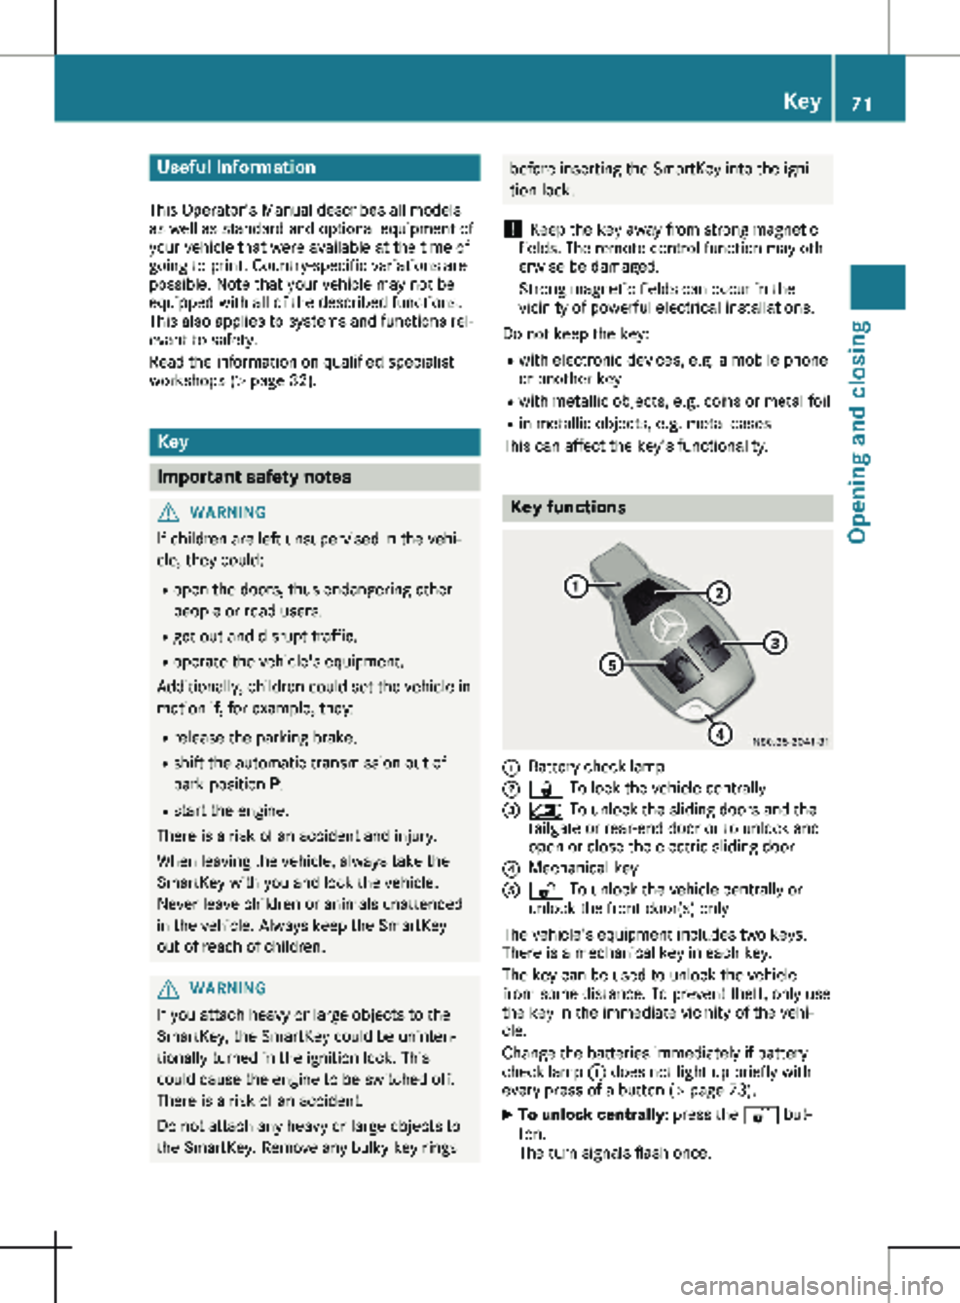
This can affect the key's functionality. Key functions
:
Battery check lamp
; & To lock the vehicle centrally
= 5 To unlock the sliding doors and the
tailgate or rear-end door or to unlock and
open or close the electric sliding door
? Mechanical key
A % To unlock the vehicle centrally or
unlock the front door(s) only
The vehicle's equipment includes two keys.
There is a mechanical key in each key.
The key can be used to unlock the vehicle
from some distance. To prevent theft, only use
the key in the immediate vicinity of the vehi-
cle.
Change the batteries immediately if battery
check lamp : does not light up briefly with
every press of a button (Y page
73).
X To unlock centrally: press the % but-
ton.
The turn signals flash once. Key
71
Opening and closing Z
Page 75 of 320
X
Slide release catch : in the direction of the
arrow and, at the same time, remove
mechanical key ; from the key completely.
Inserting the mechanical key X
Push mechanical key ; completely into the
key until it engages and release catch : is
back in its basic position.
Unlocking/locking the vehicle using
the mechanical key The door lock for unlocking in an emergency is
on the driver’s door.
X To unlock the driver's door: insert the
mechanical key fully into the driver's door
lock and turn it counter-clockwise.
The driver’s door is unlocked.
X To lock the vehicle: lock all doors except
the driver's door from the inside. To do this,
push down the door-locking knobs.
X Insert the mechanical key fully into the driv-
er's door lock and turn it clockwise.
The driver's door is locked. Battery of the key
Important safety notes G
WARNING
Batteries contain toxic and corrosive sub-
stances. If batteries are swallowed, it can
result in severe health problems. There is a
risk of fatal injury.
Keep batteries out of the reach of children.
If a battery is swallowed, seek medical
attention immediately. H
Environmental note Batteries contain pollutants.
It is illegal to dispose of
them with the household
rubbish. They must be col-
lected separately and dis-
posed of in an environmen- tally responsible recycling
system. Dispose of batteries in an
environmentally responsible
manner. Take discharged
batteries to a qualified spe-
cialist workshop or to a col-
lection point for used bat-
teries.
Mercedes-Benz recommends that you have
the battery changed at a qualified specialist
workshop.
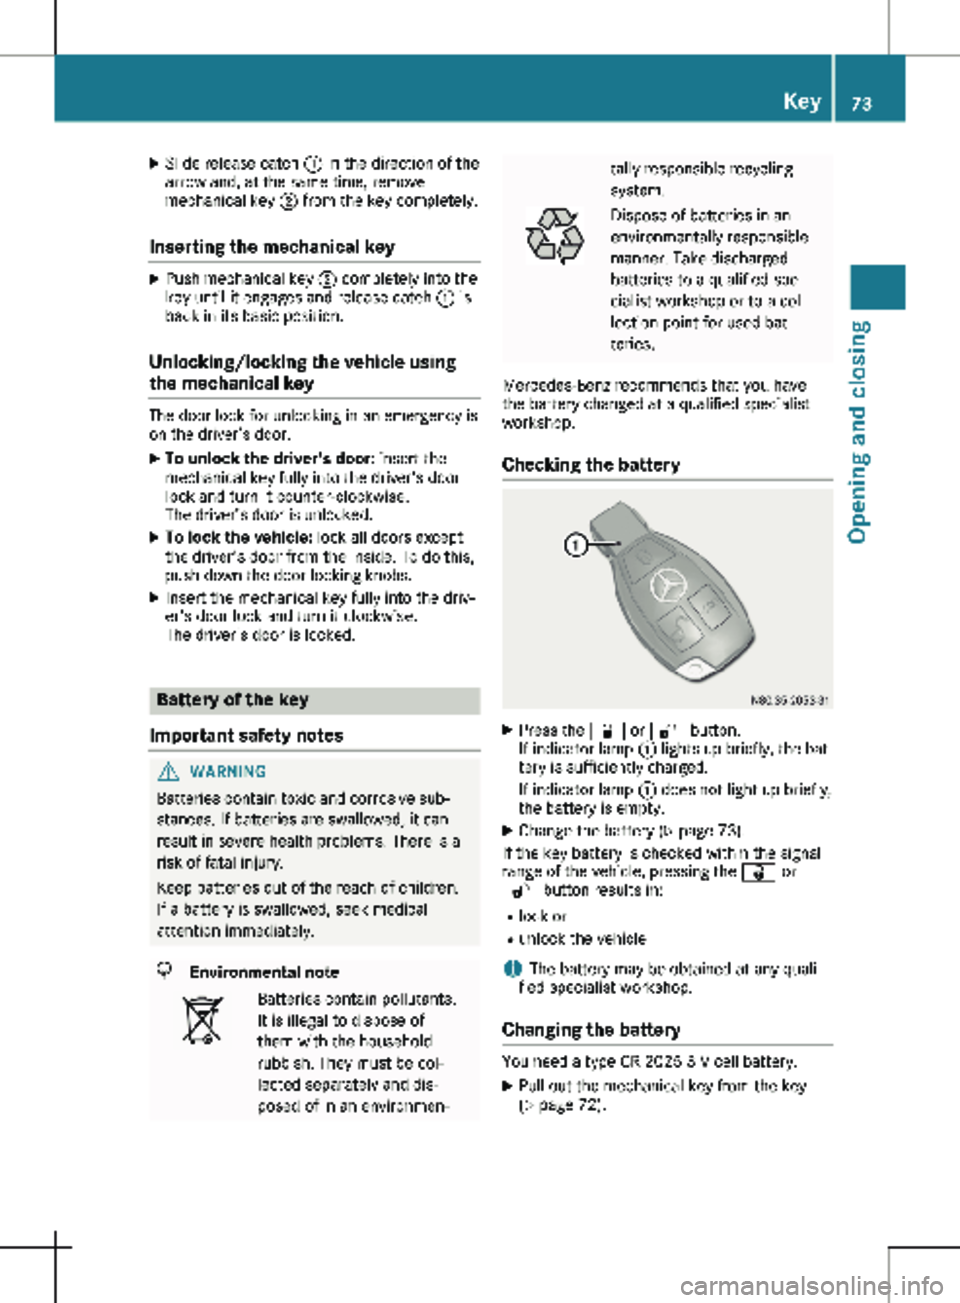
Checking the battery X
Press the & or % button.
If indicator lamp : lights up briefly, the bat-
tery is sufficiently charged.
If indicator lamp : does not light up briefly,
the battery is empty.
X Change the battery ( Y page 73).
If the key battery is checked within the signal
range of the vehicle, pressing the & or
% button results in:
R lock or
R unlock the vehicle
i The battery may be obtained at any quali-
fied specialist workshop.
Changing the battery You need a type CR 2025 3 V cell battery.
X Pull out the mechanical key from the key
(Y page
72). Key
73
Opening and closing Z
Page 76 of 320
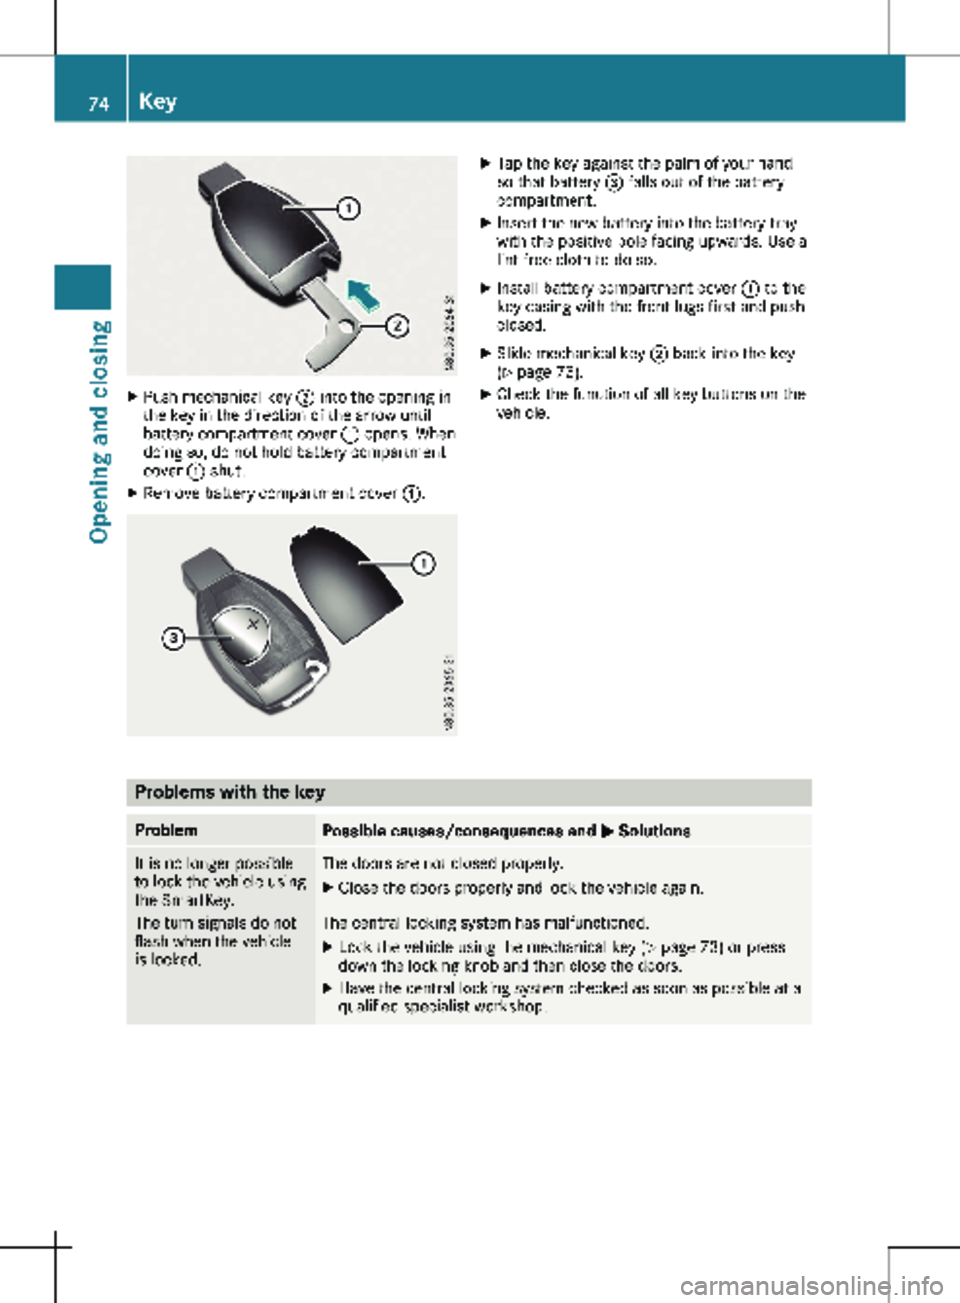
X
Push mechanical key ; into the opening in
the key in the direction of the arrow until
battery compartment cover : opens. When
doing so, do not hold battery compartment
cover : shut.
X Remove battery compartment cover :. X
Tap the key against the palm of your hand
so that battery = falls out of the battery
compartment.
X Insert the new battery into the battery tray
with the positive pole facing upwards. Use a
lint-free cloth to do so.
X Install battery compartment cover : to the
key casing with the front lugs first and push
closed.
X Slide mechanical key ; back into the key
( Y page
73).
X Check the function of all key buttons on the
vehicle. Problems with the key
Problem
Possible causes/consequences and
M SolutionsIt is no longer possible
to lock the vehicle using
the SmartKey.
The turn signals do not
flash when the vehicle
is locked. The doors are not closed properly.
X Close the doors properly and lock the vehicle again. The central locking system has malfunctioned.
X Lock the vehicle using the mechanical key (Y page
73) or press
down the locking knob and then close the doors.
X Have the central locking system checked as soon as possible at a
qualified specialist workshop.74
Key
Opening and closing
Page 77 of 320
Problem
Possible causes/consequences and
M SolutionsIt is no longer possible
to lock or unlock the
vehicle using the Smart-
Key. The SmartKey battery is weak or discharged.
X Point the tip of the SmartKey at the driver's door handle from
very close range and press the % or & button.
If this does not work:
X Replace the SmartKey battery ( Y page 73).
or
X Lock or unlock the vehicle using the mechanical key ( Y page
73).The SmartKey is faulty.
X Lock the vehicle with the mechanical key (Y page
73).
X Have the SmartKey checked at a qualified specialist workshop. The engine cannot be
started using the Smart-
Key. The on-board voltage is too low.
X Switch off all non-essential consumers, such as interior lighting,
and try to start the engine again.
If this does not work:
X Check the starter battery and charge it if necessary
(Y page
262).
or
X Jump-start the vehicle ( Y page
272).
or
X Consult a qualified specialist workshop. You have lost a Smart-
Key. X
Have the SmartKey deactivated at a qualified specialist work-
shop.
X Report the loss immediately to the vehicle insurers.
X If necessary, have the mechanical locks replaced. You have lost the
mechanical key. X
Report the loss immediately to the vehicle insurers.
X If necessary, have the mechanical locks replaced. Central locking
Important safety notes
G
WARNING
If children are left unsupervised in the vehi-
cle, they could, in particular:
R open doors, thereby endangering other
persons or road users.
R get out and be struck by oncoming traffic.
R operate vehicle equipment and become
trapped, for example. In addition, children could set the vehicle in
motion, for example, if they:
R release the parking brake.
R change the transmission position.
R start the vehicle.
There is a risk of accident and injury.
Never leave children unsupervised in the
vehicle.
When leaving the vehicle, always take the
SmartKey with you and lock the vehicle.
Keep the SmartKey out of the reach of chil-
dren. Central locking
75
Opening and closing Z
Page 97 of 320
Armrests
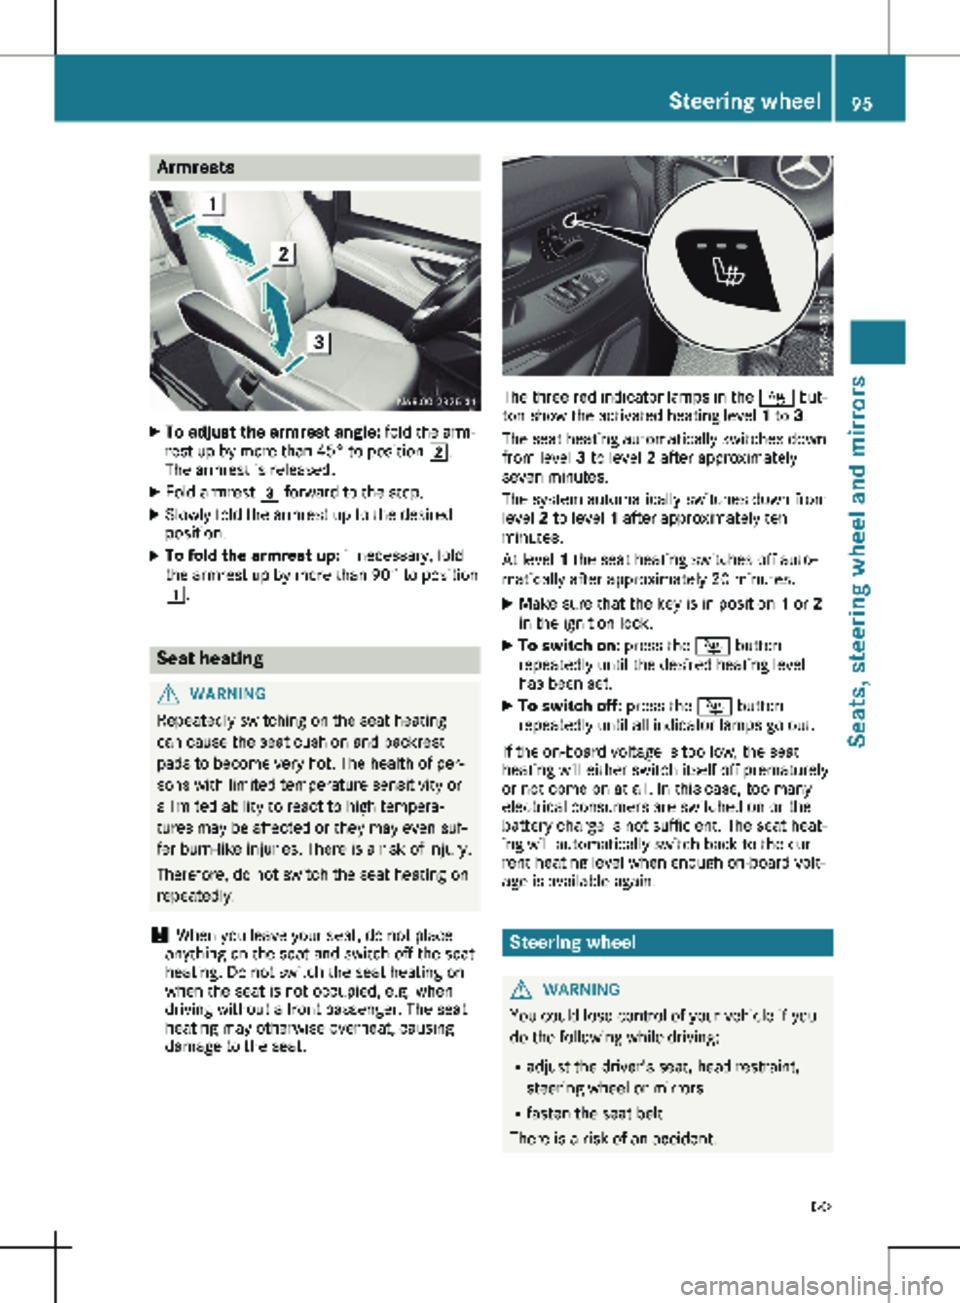
X
To adjust the armrest angle: fold the arm-
rest up by more than 45° to position 2.
The armrest is released.
X Fold armrest 3 forward to the stop.
X Slowly fold the armrest up to the desired
position.
X To fold the armrest up: if necessary, fold
the armrest up by more than 90° to position
1. Seat heating
G
WARNING
Repeatedly switching on the seat heating
can cause the seat cushion and backrest
pads to become very hot. The health of per-
sons with limited temperature sensitivity or
a limited ability to react to high tempera-
tures may be affected or they may even suf-
fer burn-like injuries. There is a risk of injury.
Therefore, do not switch the seat heating on
repeatedly.
! When you leave your seat, do not place
anything on the seat and switch off the seat
heating. Do not switch the seat heating on
when the seat is not occupied, e.g. when
driving without a front passenger. The seat
heating may otherwise overheat, causing
damage to the seat. The three red indicator lamps in the
Í but-
ton show the activated heating level 1 to 3.
The seat heating automatically switches down
from level 3 to level 2 after approximately
seven minutes.
The system automatically switches down from
level 2 to level 1 after approximately ten
minutes.
At level 1 the seat heating switches off auto-
matically after approximately
20 minutes.
X Make sure that the key is in position 1 or 2
in the ignition lock.
X To switch on: press the Í button
repeatedly until the desired heating level
has been set.
X To switch off: press the Í button
repeatedly until all indicator lamps go out.
If the on-board voltage is too low, the seat
heating will either switch itself off prematurely
or not come on at all. In this case, too many
electrical consumers are switched on or the
battery charge is not sufficient. The seat heat-
ing will automatically switch back to the cur-
rent heating level when enough on-board volt-
age is available again. Steering wheel
G
WARNING
You could lose control of your vehicle if you
do the following while driving:
R adjust the driver's seat, head restraint,
steering wheel or mirrors
R fasten the seat belt
There is a risk of an accident. Steering wheel
95
Seats, steering wheel and mirrors
Z
Page 102 of 320

Low-beam headlamps
When the ignition is switched on and the light
switch is in the
L position, the parking
lamps and low-beam headlamps are switched
on even if the light sensor does not sense dark
ambient light. This is particularly useful when
there is fog or rain.
X To switch on: turn the key to position 2 in
the ignition lock or start the engine.
X Turn the light switch to the L position.
The L indicator lamp in the instrument
cluster lights up.
Daytime running lamps X
To switch on: turn the light switch to the
$ or à position.
Automatic headlamp mode G
WARNING
When the light switch is set to Ã, the
low-beam headlamps may not be switched
on automatically if there is fog, snow or
other causes of poor visibility due to the
weather conditions such as spray. There is a
risk of an accident.
In such situations, turn the light switch to
L.
Automatic headlamp mode is only a driving
aid. You are responsible for the vehicle lighting
at all times.
When the parking lamps and low-beam head-
lamps are switched on, the green T (park-
ing lamps) and L (low-beam headlamps)
indicator lamps in the instrument cluster light
up.
à is the preferred light switch setting. The
light setting is automatically selected accord-
ing to the brightness of the ambient light
(exception: poor visibility due to weather con-
ditions, such as fog, snow or spray):
R Key in position 1 in the ignition lock: the
parking lamps are switched on or off auto-
matically depending on the brightness of the
ambient light.
R When the engine is on: depending on the
ambient light, the daytime running lamps or the parking lamps and low-beam headlamps
are switched on/off automatically.
X To switch on automatic headlamp mode:
turn the light switch to
Ã.
Fog lamps/rear fog lamp You can only switch the fog lamps on or off
manually in vehicles which have fog lamps
installed.
Front fog lamps help you to see and be seen in
conditions of poor visibility due to fog or pre-
cipitation. They can only be operated together
with the parking lamps or with the low-beam
headlamps.
The rear fog lamp improves visibility of your
vehicle for the traffic behind in the event of
heavy fog. Observe the legal requirements of
the country you are currently in when using
the rear fog lamp.
X Turn the light switch to L or Ã.
X Turn the key to position 2 in the ignition
lock or start the engine.
X To switch the front fog lamps on/off:
press the N button.
When the green
N indicator lamp in the
instrument cluster goes on, the fog lamps
are switched on.
X To switch the rear fog lamp on/off: press
the R button.
When the yellow R indicator lamp in the
instrument cluster goes on, the rear fog
lamp is switched on.
Standing lamps !
If the battery charge is very low, the stand-
ing lamps will switch off automatically to
enable the next engine start. Always park
your vehicle in accordance with legal regula-
tions, in a secure and adequately lit loca-
tion. Avoid leaving the T parking lamps
on for several hours. If possible, switch on
the right X or left W standing lamp.
Switching on the standing lamps ensures that
the corresponding side of the vehicle is illumi-
nated. 100
Exterior lightingLights and windshield wipers
Page 104 of 320
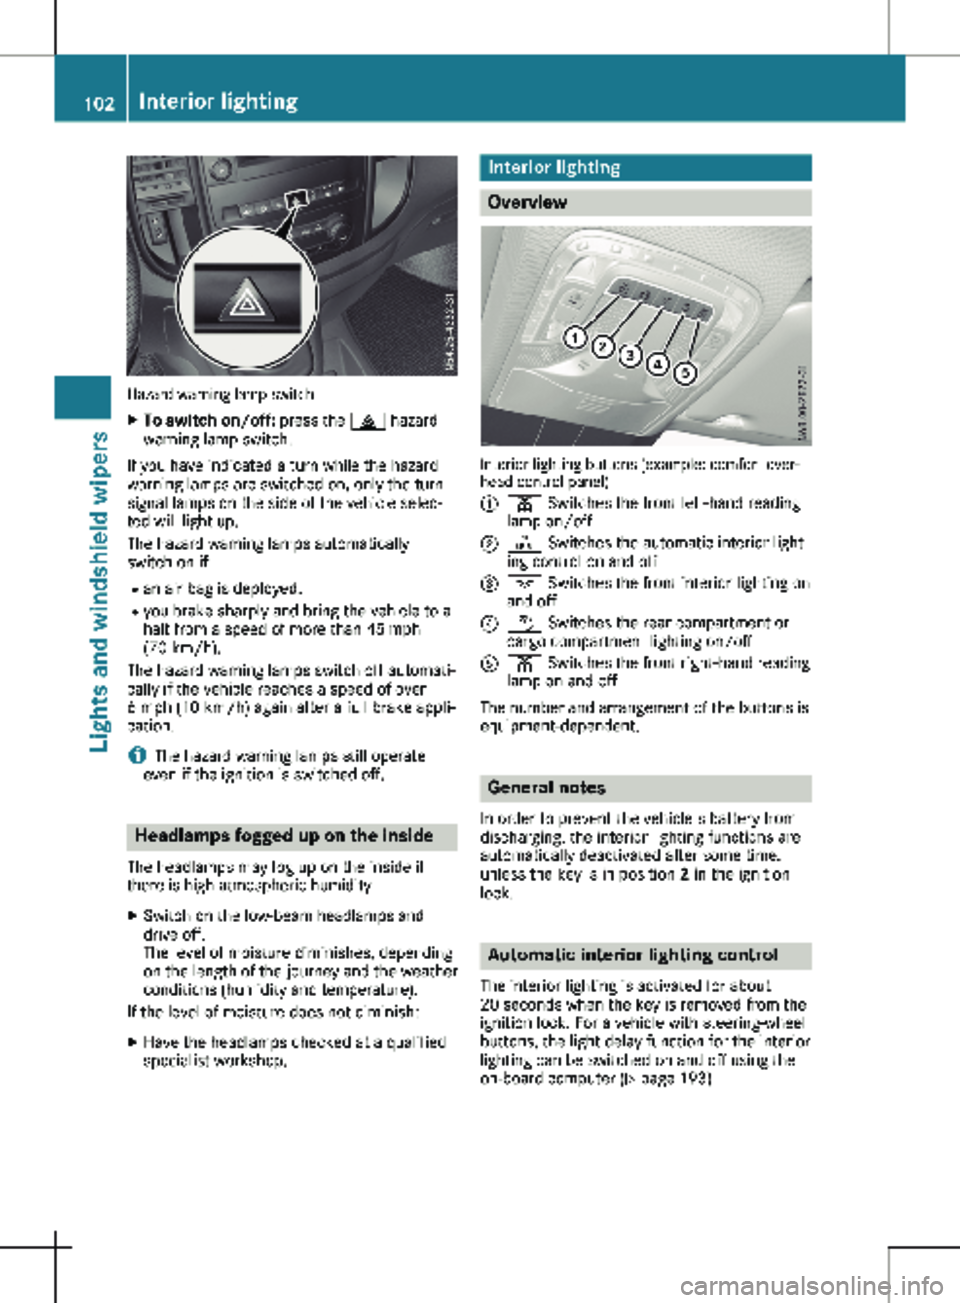
Hazard warning lamp switch
X
To switch on/off: press the £ hazard
warning lamp switch.
If you have indicated a turn while the hazard
warning lamps are switched on, only the turn
signal lamps on the side of the vehicle selec-
ted will light up.
The hazard warning lamps automatically
switch on if: R an air bag is deployed.
R you brake sharply and bring the vehicle to a
halt from a speed of more than 45 mph
(70 km/h
).
The hazard warning lamps switch off automati-
cally if the vehicle reaches a speed of over
6 mph (10 km/h) again after a full brake appli-
cation.
i The hazard warning lamps still operate
even if the ignition is switched off. Headlamps fogged up on the inside
The headlamps may fog up on the inside if
there is high atmospheric humidity.
X Switch on the low-beam headlamps and
drive off.
The level of moisture diminishes, depending
on the length of the journey and the weather
conditions (humidity and temperature).
If the level of moisture does not diminish:
X Have the headlamps checked at a qualified
specialist workshop. Interior lighting
Overview
Interior lighting buttons (example: comfort over-
head control panel)
:
p Switches the front left-hand reading
lamp on/off
; | Switches the automatic interior light-
ing control on and off
= c Switches the front interior lighting on
and off
? w Switches the rear compartment or
cargo compartment lighting on/off
A p Switches the front right-hand reading
lamp on and off
The number and arrangement of the buttons is
equipment-dependent. General notes
In order to prevent the vehicle's battery from
discharging, the interior lighting functions are
automatically deactivated after some time,
unless the key is in position 2 in the ignition
lock. Automatic interior lighting control
The interior lighting is activated for about
20 seconds
when the key is removed from the
ignition lock. For a vehicle with steering-wheel
buttons, the light delay function for the interior
lighting can be switched on and off using the
on-board computer ( Y page 193)102
Interior lighting
Lights and windshield wipers