ESP MERCEDES-BENZ METRIS 2021 MY21 Operator's Manual
[x] Cancel search | Manufacturer: MERCEDES-BENZ, Model Year: 2021, Model line: METRIS, Model: MERCEDES-BENZ METRIS 2021Pages: 290, PDF Size: 4.68 MB
Page 32 of 290
Limited pr
otection pr ovided byairbags &
WARNING Risk of inju rydue tomodifica‐
tions tothec ove rofana irbag
If yo um odify thec over of an airbag or af fix
object ssuchass tickers to it,thea irbag may
no longer function cor rectl y. #
Neverm odify thec over of an airbag and
do no taffix objectstoi t. An airbag's ins
tallation location is identified by
th el abel AIRB AG (/pag e28). &
WARNING Risk of inju ryor deat hdueto
th eu se of unsuitable seat co vers
Due tounsuitable seat co vers,t he airbags
canno tprotect vehicle occupants as inten‐
ded.
In addition, theo peration of thea utomatic
front passenger airbag shutof fcould be
re stricted. #
Yous houl donly use seat co vers that
ha ve been appr oved fort he cor respond‐
ing seats byMercedes-Benz. Ve
hicles with windo wcurtain airbags in all
ro ws of seats: &
WARNING Risk of inju rydue tomalfunc‐
tioning sensor sinthe door
The function of thea irbags can be impaired
due tomodifications or incor rect wo rkper‐
fo rm ed on thed oor sord oor trim, or if the
door saredamaged. #
Neverm odify thed oor sorp arts of the
doors. #
Alwaysh ave workon thed oor sord oor
trim car ried out at aqualified specialist
wo rkshop. &
WARNING Risk of inju rydue todeplo yed
airbag
Ad eplo yeda irbag no longer of fers anyp ro‐
te ction. #
Have thev ehicle towe dtoaq ualified
specialis tworks hop in order tohave the
deplo yeda irbag replaced. Ha
ve deplo yeda irbags replaced immediately. St
atus of thec o-d rive ra irbag Fu
nction of thea utomatic co-d rive ra irbag
shutoff
The au tomatic co-driver airbag shutof fisableto
de tect whe ther thec o-driver seat is occupied by
ap erson or achild restra int sy stem. The co-driver
airbag is enabled or disabled accordingly. &
WARNING Risk of inju ryor deat hdueto
object sunder thec o-driver seat
Objects trapped under thec o-driver seat can
inter fere wit hthe function of thea utomatic
co-driver airbag shutof fordamag ethe sys‐
te m. #
Do no tstore anyo bjectsu nderthec o-
driver seat. #
When thec o-driver seat is occupied,
mak esuret hat no objects ar etrapped
unde rthe co-driver seat. When ins
talling achild restra int sy stem on the
co-driver seat, al ways mak esureoft hefollowing:
R Ensur ethat thec hild restra int sy stem is posi‐
tioned cor rectl y(/ page 33).
R Alwaysc ompl ywitht he child restra int sy stem
manufacturer's ins tallation instructions.
R Neverp lace objects (e.g. cushions) under or
behind thec hild restra int sy stem.
R The entir ebase of thec hild restra int sy stem
mus talway sr estont he sitting sur face of the
co-driver seat.
R The ba ckrest of thef orwa rd-facin gchild
re stra int sy stem must, as farasp ossible, be
re sting on thes eat backres tofthe co-driver
seat.
R The child restra int sy stem mus tnot to ucht he
ro of or be put under stra in by theh ead
re stra ints. Adjus tthe seat backres tinclina‐
tion and theh ead restra int setting acco rd‐
ingly. &
WARNING Risk of inju ryor deat hdueto
object sbetwe en thes eat sur face and the
ch ild restra int sy stem
Objects between thes itting sur face and the
ch ild restra int sy stem could af fect thef unc‐
tion of thea utomatic co-driver airbag shutoff. #
Do no tplace an yobject sbetwe en the
sitting sur face and thec hild restra int
sy stem. 30
Occupant saf ety
Page 33 of 290
#
The entir ebase of thec hild restra int
sy stem mus talway sr estont he sitting
sur face of thec o-driver seat. #
The backres toftheforw ard-facin gchild
re stra int sy stem must, as farasp ossi‐
ble, be resting on thes eat backres tof
th ec o-driver seat. #
Alwaysc ompl ywitht he child restra int
sy stem manufacturer's ins tallation
instructions. Ap
erson on thec o-driver seat mus tobser vethe
fo llowing information:
R Fasten seat belts cor rectl y(/pag e25).
R Sit in an almos tupright sea tposition with
th eir bac kagains tthe seat backrest.
R Sit wit htheir feet resting on thef loor ,ifp ossi‐
ble.
The co-driver airbag ma yotherwise be disabled
by mis take ,for example, in thef ollowing situa‐
tions:
R The co-driver transfer stheir weight bysup‐
porting themselves on avehicle armrest.
R The co-driver sits in suc hawaythat their
we ight is raised from thes itting sur face. &
WARNING Risk of inju ryor deat hdueto
ad isable dfront passenger airbag
The front passenger airbag is disable dwhen
th eP ASSENGER AIR BAGO FF indicator lamp
is lit.
Ap erson in thef ront passenger seat could
th en, fore xamp le, com eintoc ontact wi th the
ve hicle interior ,especially if thep erson is sit‐
ting tooc lose tothec ockpit.
If th ef ront passenger seat is occupied,
alw ayse nsur ethat:
R The classification of thep erson in the
front passenger seat is cor rect and the
front passenger airbag is enabled or disa‐
ble dina ccordance wit hthe person in the
front passenger seat.
R The front passenger seat has been mo ved
as farb ackasp ossible.
R The person is seated cor rectl y. #
Both befor eand during thej ourne y,
ensur ethat thes tatus of thef ront
passenger airbag is cor rect. If
th ec o-driver seat is occupied, thec lassification
of thep erson or child restra int sy stem on thec o-
driver seat take sp lace af tert he co-driver airbag
shutof fself-test. The PASSENGER AIR BAGO FF
indicator lam pdispla ys th estatus of thec o-driver
airbag.
Alw ayso bser vethen otes on thef unction of the
PA SSENGER AIR BAGO FF indicator lamp
(/ page31).
Fu nction of theP ASSENGER AIR BAGi ndicator
lamps Self-tes
tofautomatic co-driver airbag shutoff
The PASSENGER AIR BAGO FF indicator lamp
light supf or appr oxima tely six seconds during the
self-tes twhen thei gnition is switched on.
The status of thec o-driver airbag is displa yed
af te rt he self-tes t:
R PASSENGER AIR BAGO FF is no tlit:t he co-
driver airbag ma ydeplo yduring an accident.
R PASSENGER AIR BAGO FF light supcontinu‐
ously: thec o-driver airbag is disabled. It will
no tbed eployedint heeve nt of an accident.
If th eP ASSENGER AIR BAGO FF indicator lamp
and the0075 restra int sy stem warning lam plight
up simultaneousl y,thec o-driver seat ma ynotbe
used. Also in this case, do no tins tallac hild
re stra int sy stem on thec o-driver seat. Ha vethe
automatic co-driver airbag shutof fchec keda nd
re paired immediatel yataqualified specialist
wo rkshop.
St atus indicator
If th ec o-driver seat is occupied, ensure, bo th
befor eand during thej ourne y,that thes tatus of
th ec o-driver airbag is cor rect fort he cur rent sit‐
uation. Occupant sa
fety 31
Page 34 of 290
Af
teri nstalling arear ward-facin gchild
re stra int sy stem on thec o-d rive rs eat:
PA SSENGER AIR BAGO FF mus tbelit continu‐
ousl y. &
WARNING Risk of inju ryor deat hwhen
using arear ward-facing child restra int
sy stem while thef ront passenger airbag
is enabled
If yo us ecur eac hild in arear ward-facing child
re stra int sy stem on thef ront passenger seat
and theP ASSENGER AIR BAGO FF indicator
lam piso ff,t he front passenger airbag can
deplo yintheeve nt of an accident.
The child could be stru ck bythea irbag.
Alw ayse nsur ethat thef ront passenger airbag
is disabled. The PASSENGER AIR BAGO FF
indicator lam pmustbel it.
NEVE Rusearear ward-facing child restra int
sy stem on aseat wit hanENABLED FRONT
AIRB AG.Thisc an result in theD EATH of or
SERIOUS INJUR YtotheCHILD. When ins
talling achild restra int sy stem on the
co-driver seat, obser vethev ehicle-speci fici nfor‐
mation (/ page39).
Depending on thec hild restra int sy stem and the
st atur eoft hechild, theP ASSENGER AIR BAG
OFF indicator lam pmaybe off. In this case, do
no tins tallth er ear ward-facing child restra int sys‐
te mont he co-driver seat.
Ins tead, install ther ear ward-facing child restra int
sy stem on asuitable rear seat.
Af teri nstalling aforwa rd-facin gchild
re stra int sy stem on thec o-d rive rs eat:
depending on thec hild restra int sy stem and the
st atur eoft hechild, PASSENGER AIR BAGO FF
ma ybel it continuousl yorbeoff.A lway so bser ve
th ef ollowing information. &
WARNING Risk of inju ryor deat hdueto
incor rect positioning of thef orwa rd-
fa cing child restra int sy stem
If yo us ecur eac hild in aforwa rd-facin gchild
re stra int sy stem on thef ront passenger seat
th at is positioned tooc lose tothec ockpit, in
th ee vent of an accident ,the child could:
R com eintoc ontact wi th thevehicle interior
if th eP ASSENGER AIR BAGO FF indicator
lam pisl it,fore xamp le
R bestru ck bythea irbag if theP ASSENGER
AIR BAGO FF indicator lam pisoff. #
Alwaysm ove thef ront passenger seat
as farb ackasp ossible and fully retract
th es eat cushion lengt hadjustment.
While doing so, alw aysm akes uret hat
th es houlder belt stra pisc orrectly
ro uted from thes eat belt outle tofthe
ve hicle tothes houlder belt guide on the
ch ild restra int sy stem. The shoulder belt
st ra pm ustber outed forw ards and
down wardsf romt he seat belt outlet. If
necessar y,adjus tthe seat belt outlet
and thef ront passenger seat accord‐
ingly. #
Alwaysc ompl ywitht he child restra int
sy stem manufacturer's ins tallation
instructions. When ins
talling achild restra int sy stem on the
co-driver seat, obser vethev ehicle-speci fici nfor‐
mation (/ page39).
If ap erson is sitting on thec o-d rive rs eat:
PA SSENGER AIR BAGO FF ma ybelit continuously
or be off, dependin gonthe person's stature.
Ap erson on thec o-driver seat mus talways
obser vethef ollowing information:
R Ifth ec o-driver seat is occupied byan adult or
ap erson wit hastatur ec orresponding tothat
of an adult ,the PASSENGER AIR BAGO FF
indicator lam pmustbeo ff.T his indicates that
th ec o-driver airbag is enabled.
If th eP ASSENGER AIR BAGO FF indicator
lam pisl it continuousl y,an adult or person
wit hab uild cor responding tothat of an adult
should no tuse thec o-driver seat.
Ins tead, they should use arear seat.
R Ifth ec o-driver seat is occupied byap erson
of smaller statur e(e.g. ateenager or small
adult), theP ASSENGER AIR BAGO FF indica‐
to rlamp either lights up continuously or 32
Occupant saf ety
Page 39 of 290
Deactivating th
especial sea tbelt retractor #
Press ther elease button of thes eat belt
buckle. #
Hold thes eat belt tongu eand guid ebackto
th es eat belt outlet. Installing
aLATCH -type (ISOFIX) child
re stra int sy stem on ther ear seat Installing
aLATCH -type (ISOFIX) child
re stra int sy stem on ther ear seat &
WARNING Risk of inju ryor deat hifthe
permissible gross mass of thec hild and
ch ild restra int sy stem toget her is excee‐
ded.
To om uchl oad ma ybeplaced on theL ATCH-
type (ISOFIX )child restra int sy stem and the
ch ild ma ynotbe restra ined cor rectly in the
eve nt of an accident, fore xamp le. #
Ifth ec hild and thec hild restra int sys‐
te mt ogether weigh mor ethan thep er‐
missible gross mass of 73lb (33 kg),
onl yuseaL ATCH -type (ISOFIX )child
re stra int sy stem wit hwhichthe child is
secured wit hthe vehicle seat belt. #
Also secur ethe child restra int sy stem
wit hthe TopT ether belt, if available. Alw
aysc ompl ywitht he information about the
mass of thec hild restra int sy stem:
R inthem anufacturer's ins tallation and operat‐
ing instructions fort he child restra int sy stem
used
R onalabel on thec hild restra int sy stem, if
av ailable
Chec kregularly that thep ermissible gross mass
of thec hild plus thec hild restra int sy stem is not
exc eeded.
When youi nstallac hild restra int sy stem, obser ve
th ef ollowing:
0073 Alw
ayso bser vethec orrect use and sui tabil‐
ity of thes eats fora ttaching achild restra int
sy stem.
0073 Alw
ayso bser vethem anufacturer's ins talla‐
tion and operatin ginstructions fort he child
re stra int sy stem used.
0073 Mak
esuret hat thec hild's feet do no ttouch
th ef ront seat. If necessar y,mo vethef ront
seat slightl yforwa rds. ®
When ins talling aLATCH -type (ISOFIX )child
re stra int sy stem, also obser vethef ollowing:
0073 When using
aGroup 0/0+ bab ycar seat
and aGroup Irear ward-facin gchild
re stra int sy stem on arear sea t:adju stthe
front seat so that thes eat does no ttouch
th ec hild restra int sy stem.
0073 Mo
vether ear seat backres ttoanupright
position befor eyou ins tallth ec hild seat. Do
no ta djus tthe seat backres twhen aLATCH-
type (ISOFIX )child restra int sy stem is ins tal‐
led.
0073 Fo
rc ertain child restra int sy stems in weight
Group II or III, ther em aybe restrictions on
th em aximum size setting, e.g. due topossi‐
ble con tact wi th theroof.
0073 Do no
tputthec hild restra int sy stem under
st ra in between ther oof and thes itting sur‐
fa ce and/or ins tall it facing thew rong direc‐
tion.
0073 Do no
tputthec hild restra int sy stem under
st ra in by theh ead restra int .A dju sttheh ead
re stra int sasa ppropriate. 1
LATC H-type (ISOFIX )mounting brac kets
Befor eevery journe y,mak esuret hat theL ATCH-
type (ISOFIX )child restra int sy stem is engaged
cor rectl yinb othm ounting brac kets in thev ehi‐
cle.
* NO
TEDama getothes eat belt fort he
center seat during ins tallation of thec hild
re stra int sy stem #
Mak esuret hat thes eat belt is no ttrap‐
ped. Occupant saf
ety37
Page 40 of 290
#
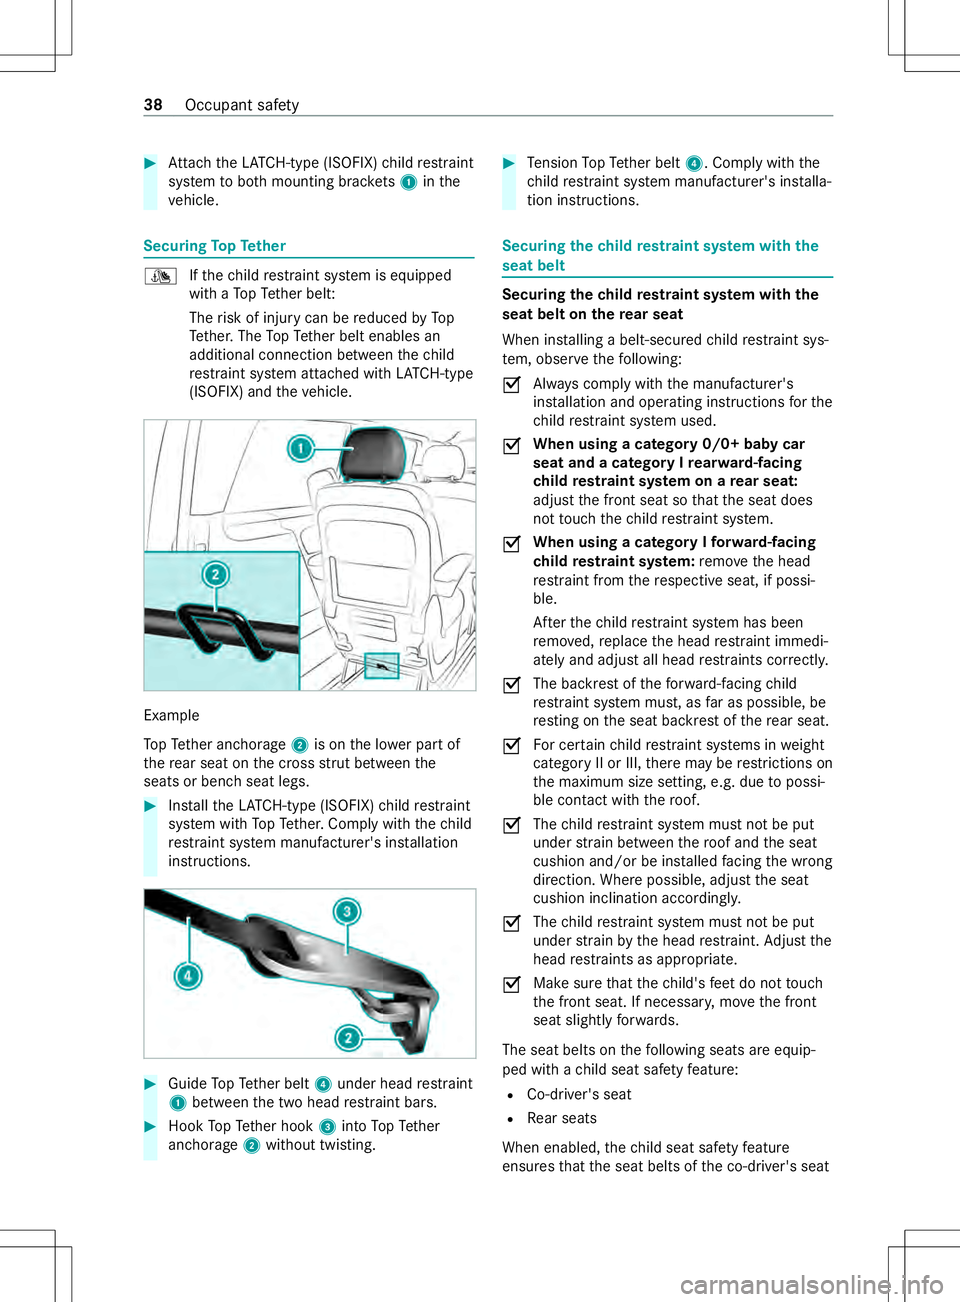
Attach theL ATCH -type (ISOFIX )child restra int
sy stem toboth mounting brac kets 1 inthe
ve hicle. Securing
TopT ether ¯
Ifth ec hild restra int sy stem is equipped
wit haT opTether belt:
The risk of injur ycan be reduced byTo p
Te ther.T he TopT ether belt enables an
additional connection between thec hild
re stra int sy stem attached wit hLATCH -type
(ISOFIX )and thev ehicle. Example
To
pT ether anchorage 2is on thel owe rpartof
th er ear seat on thec ross stru tb etwe en the
seats or benc hseat legs. #
Installth eL ATCH -type (ISOFIX )child restra int
sy stem wit hTop Tether.C ompl ywitht he child
re stra int sy stem manufacturer's ins tallation
instructions. #
Guide TopT ether belt 4under head restra int
1 between thet wo head restra int bars. #
Hook TopT ether hook 3intoT op Tether
anchorage 2without twisting. #
Tensio nTop Tether belt 4.Comply wit hthe
ch ild restra int sy stem manufacturer's ins talla‐
tion instructions. Securing
thec hild restra int sy stem wit hthe
seat belt Secu
ring thec hild restra int sy stem wit hthe
seat belt on ther ear seat
Whe ninstalling abelt-secured child restra int sys‐
te m, obser vethef ollowing:
0073 Alw
aysc ompl ywitht he manufacturer's
ins tallation and operatin ginstructions fort he
ch ild restra int sy stem used.
0073 When using
acategor y0/0+ bab ycar
seat and acategor yIrearward-facing
ch ild restra int sy stem on arear sea t:
adju stthef ront seat so that thes eat does
no ttouc hthe child restra int sy stem.
0073 When using
acategor yIforwa rd-facing
ch ild restra int sy stem: remo vetheh ead
re stra int from ther espectiv eseat, if possi‐
ble.
Af tert he child restra int sy stem has been
re mo ved, replace theh ead restra int immedi‐
atel yand adjus tall head restra int sc orrectly.
0073 The ba
ckrest of thef orwa rd-facin gchild
re stra int sy stem must, as farasp ossible, be
re sting on thes eat backres toftherear seat.
0073 Fo
rc ertain child restra int sy stems in weight
categor yIIorIII,ther em aybe restrictions on
th em aximum size setting, e.g. due topossi‐
ble con tact wi th theroof.
0073 The
child restra int sy stem mus tnotbe put
under stra in between ther oof and thes eat
cushion and/or be ins talled facing thew rong
direction .Wher epossible, adjus tthe seat
cushion inclination accordingly.
0073 The
child restra int sy stem mus tnotbe put
under stra in by theh ead restra int .A dju stthe
head restra int sasa ppropriate.
0073 Mak
esuret hat thec hild's feet do no ttouch
th ef ront seat. If necessar y,mo vethef ront
seat slightl yforwa rds.
The seat belt sonthefollowing seats ar eequip‐
ped wit hachild seat saf etyf eature:
R Co-driver's seat
R Rear seats
When enabled, thec hild seat saf etyf eature
ensures that thes eat belts of thec o-driver's seat 38
Occupant saf ety
Page 41 of 290
and
rear seat sdonotslac keno nce thec hild
re stra int sy stem is secured (/ page36). #
Installth ec hild restra int sy stem.
The entir ebase of thec hild restra int sy stem
mus talway sr estont he sitting sur face of the
re ar seat. #
Alwaysm akes uret hat thes houlder belt strap
is cor rectl yr outed from thes eat belt outle tof
th ev ehicle tothes houlder belt guide on the
ch ild restra int sy stem.
The shoulder belt stra pm ustber outed for‐
wa rdsa nd down wardsf romt he seat belt out‐
let.
Note sonr earward-facin gand forw ard-facing
ch ild restra int sy stems on thec o-d rive rs eat &
WARNING Risk of inju ryor deat hwhen
using achild restra int sy stem while the
co-driver airba gisenabled
If yo us ecur eac hild in achild restra int sys‐
te mont he co-driver seat and the
PA SSENGER AIR BAGO FF indicator lam pis
off, thec o-driver airbag can deplo yinthe
eve nt of an accident.
The child could be stru ck bythea irbag. #
Alwayse nsur ethat thec o-driver airbag
is disabled. The PASSENGER AIR BAG
OFF indicator lam pmustbel it.
NEVER use arear wardfacing child restra int
on aseat pr otected byan ENABLE DAIRBAG
in front of it, DE ATHorS ERIOU SINJU RYto
th eC HILD ma yoccur. Obser
vethes pecific instruction sfor ther ear‐
wa rd-facing and forw ard-facin gchild restra int
sy stems (/ page39).
Alw ayso bser vethes tatus of thec o-driver airbag
on theP ASSENGER AIR BAGO FF indicator lamp:
R When usin garearward-facing child restra int
sy stem on thec o-driver seat, thec o-driver
airbag mus talway sbed isabled. It is only
deactivated if theP ASSENGER AIR BAGO FF
indicator lam pislit continuously
(/ page31).
R Ifth eP ASSENGER AIR BAGO FF indicator
lam piso ff,t he co-driver airbag is enabled.
The co-driver airbag ma ydeplo yduring an
accident. Securing
thec hild restra int sy stem wit hthe
seat belt on thec o-d rive rs eat
Whe ninstalling abelt-secured child restra int sys‐
te mont he co-driver seat, alw ayso bser vethef ol‐
lowing:
0073 Obser
vethen otes on rear wa rd-facing and
fo rw ard-facin gchild restra int sy stems on the
co-driver sea t(/pa ge39).
0073 Obse
rvet he child restra int sy stem manufac‐
turer's ins tallation and operatin ginstruc‐
tions.
0073 When using
aforwa rd-facin gchild restra int
sy stem in categor yI:removetheh ead
re stra int from ther espectiv eseat, if possi‐
ble.
Af tert he child restra int sy stem has been
re mo ved, replace theh ead restra int immedi‐
ately and adjus tall head restra int sc orrectl y.
0073 The backres
toftheforw ard-facin gchild
re stra int sy stem must, as farasp ossible, be
re sting on thes eat backres tofthe co-driver
seat.
0073 Fo
rc ertain child restra int sy stems in weight
categor yIIorIII,ther em aybe restrictions on
th em aximum size setting, e.g. due topossi‐
ble con tact wi th theroof.
0073 The
child restra int sy stem mus tnotbe put
under stra in between ther oof and thes eat
cushion and/or be ins talled facing thew rong
direction.
0073 The
child restra int sy stem mus tnotbe put
under stra in by theh ead restra int .A dju stthe
head restra int sasa ppropriate.
0073 Ne
verp lace objects (e.g. cushions) under or
behind thec hild restra int sy stem.
The seat belt on thec o-driver side is equipped
wit has pecial seat belt retractor.
Whe nenabled ,the special seat belt retractor
ensures that thes eat belt does no tslac keno nce
th ec hild seat is secured (/ page36). #
Setthe co-driver seat as farb ackasp ossible
and mo vethes eat int othe highes tposition
possible. #
Setthe seat backres ttothe mos tvertical
position possible. #
Installth ec hild restra int sy stem.
The entir ebase of thec hild restra int sy stem
mus talway sr estont he sitting sur face of the
co-driver seat. Occupant saf
ety39
Page 45 of 290
er's door or
thed rive r's and co-d rive r's
door: pressthe0036 button asecon dtime. Re
moving and inse rting thee mer gency key %
The anti-thef
talarms ystem (A TA)ist riggered
when youu nlockand open thev ehicle using
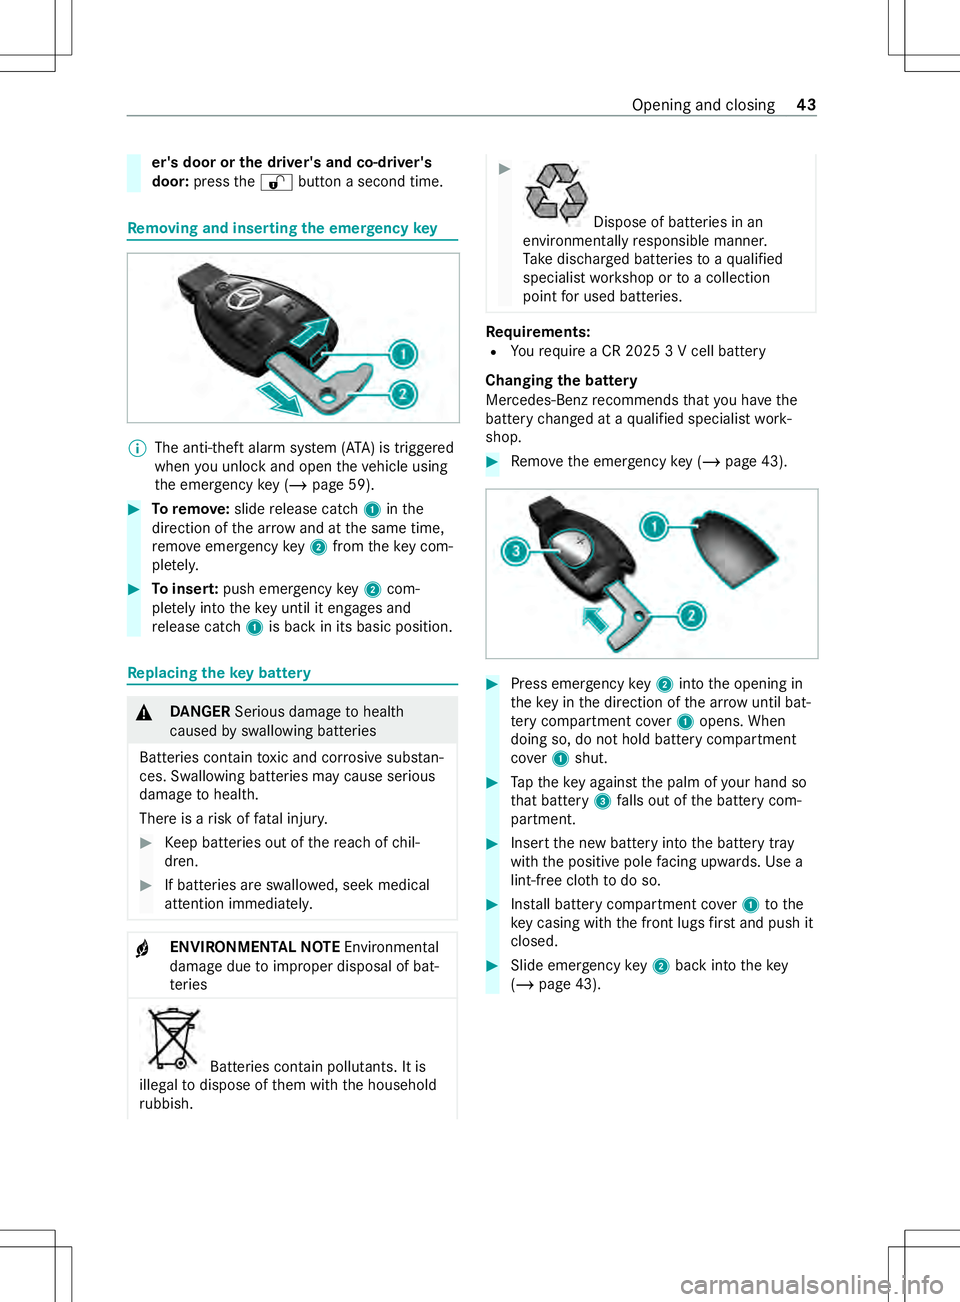
th ee mer gency key( /pag e59). #
Toremo ve: sliderelease catch 1inthe
direction of thea rrow and at thes ame time,
re mo veemer gency key2from thek eycom‐
ple tely. #
Toinser t:push emer gency key2com‐
ple tely in tothek eyuntil it en gage sa nd
re lease cat ch1 is bac kinits basic position. Re
placing the keyb attery &
DANG ER Serious damag etohealth
caused byswallowing batteries
Batteries contain toxic and cor rosiv es ubs tan‐
ces. Swallowing batterie smaycause serious
damag etohealth.
Ther eisar isk offata linjur y. #
Keep batteries out of ther eac hofc hil‐
dren. #
If batteries ar eswallowe d, seek medical
attention immediately. +
ENVIRONMEN
TALN OTE Environmental
damag eduetoimproper disposal of bat‐
te ries Batteries contain pollutants. It is
illegal todispose of them wit hthe household
ru bbish. #
Dispose of batteries in an
environmen tallyr esponsibl emanner.
Ta ke dischar gedb atteries toaq ualified
specialis tworks hop or toac ollection
poin tfor used batteries. Re
quirements:
R Your equir eaCR2 0253Vc ell battery
Changin gthe battery
Mercedes-Benz recommends that youh ave the
batter ychanged at aqualified specialis twork‐
shop. #
Remo vethee mer gency key( /pag e43). #
Press eme rgency key2intot he opening in
th ek eyinthed irection of thea rrow until bat‐
te ry compa rtment co ver1opens. When
doing so, do no thold batter ycompartment
co ver 1shut. #
Tapt he keya gainst thep alm of your han dso
th at battery 3falls out of theb atter ycom‐
partment. #
Inser tthe ne wbatter yintot he batter ytray
wit hthe positiv epole facing up wards. Use a
lint-free clo thtodo so. #
Install batter ycompartment co ver1tothe
ke yc asing wit hthe front lugs firs ta nd push it
closed. #
Slide emergency key2bac kintot he key
( / pag e43). Openin
gand closing 43
Page 49 of 290
Sliding door
Opening/closing
thes liding door from out‐
side &
WARNING Risk of becoming trapped due
to an open slidin gdoor whic hisnot
engaged in place
On an incline ,the sliding door can mo veby
itself.
This can cause youoro ther people to
become trapped. #
Alwaysm akes uret hat theo pen sliding
door is engaged. Todo so, open thes lid‐
ing door tothes top. *
NO
TEDama getothes liding door due to
incor rect use Using
thel owe rguide of thes liding door (car‐
ri age) as astepc an result in damag etothe
trim and/or mechanic alcomponents of the
sliding door. #
Do no tuse thel owe rguide of thes liding
door (car riage) as astep. Opening
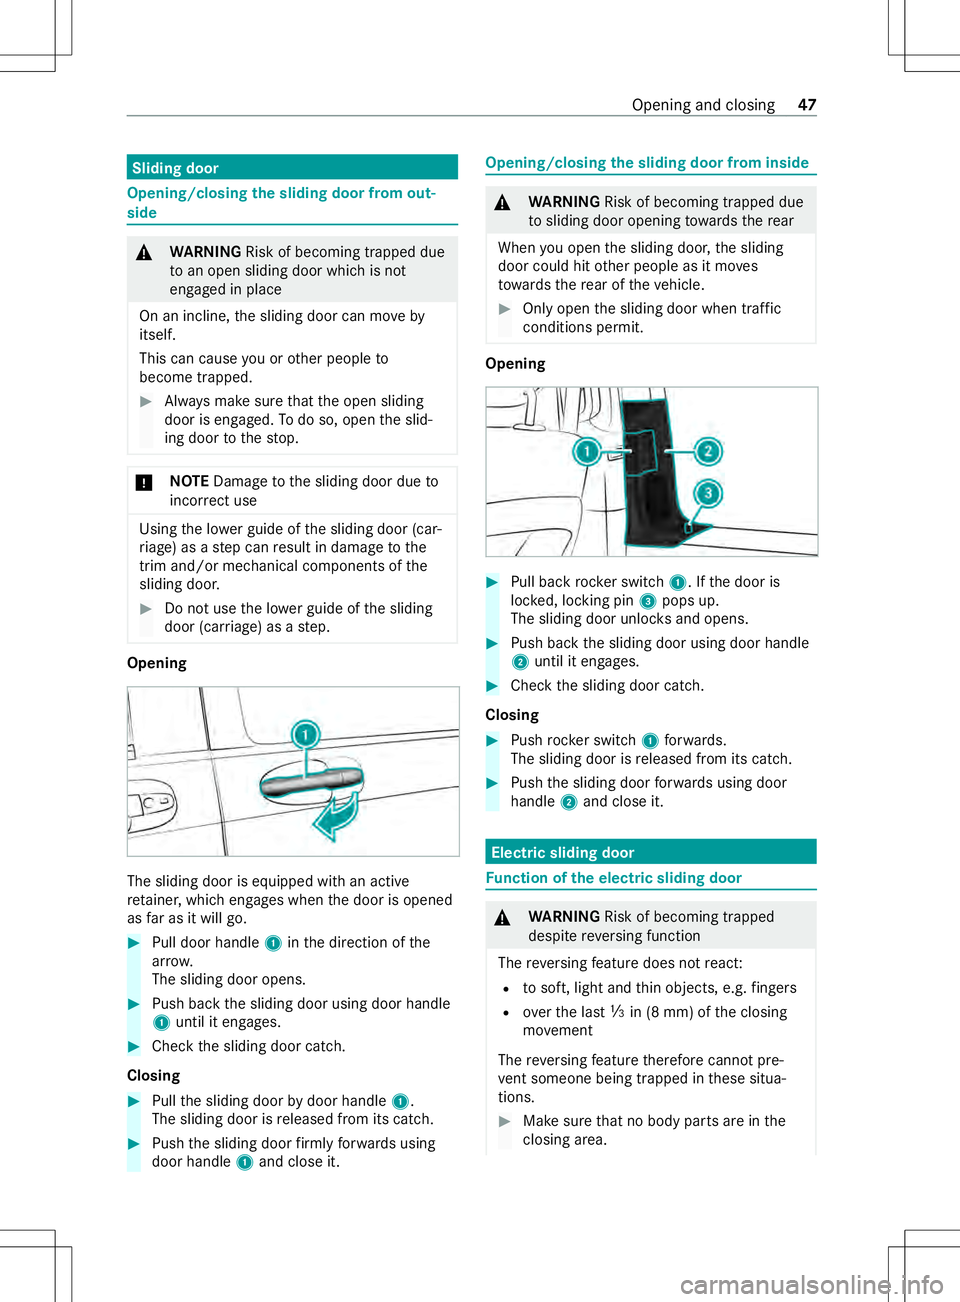
The sliding door is equipped wit
hanactive
re tainer ,whic he ngages when thed oor is opened
as farasitw illg o. #
Pulld oor handle 1inthed irection of the
ar row.
The sliding door opens. #
Push bac kthe sliding door using door handle
1 until it engages. #
Chec kthe sliding door catch.
Closing #
Pull thes liding door bydoor handle 1.
The sliding door is released from its cat ch. #
Push thes liding door firm lyforw ards using
door handle 1and close it. Opening/closing
thes liding door from inside &
WARNING Risk of becoming trapped due
to sliding door opening towa rdst he rear
When youo pen thes liding door ,the sliding
door could hit other people as it mo ves
to wa rdst he rear of thev ehicle. #
Onlyopen thes liding door when tra ffic
condition spermit. Opening
#
Pull bac krockers witch 1.Ift he door is
loc ked, locking pin 3pops up.
The sliding door unloc ksand opens. #
Push bac kthe sliding door using door handle
2 until it engages. #
Chec kthe sliding door catch.
Closing #
Push rocker switch 1forw ards.
The slidin gdoor is released from its cat ch. #
Push thes liding door forw ards usin gdoor
handle 2and close it. Electric sliding door
Fu
nction of thee lectric sliding door &
WARNING Risk of becoming trapped
despit ereve rsing function
The reve rsing featur edoes no treact:
R tosoft, light and thin objects, e.g. fingers
R overthe last 00C2in (8 mm) of thec losing
mo vement
The reve rsing featur etherefor ecann otpre‐
ve nt someone being trappe dinthese situa‐
tions. #
Mak esuret hat no body parts ar einthe
closing area. Opening and closing
47
Page 51 of 290
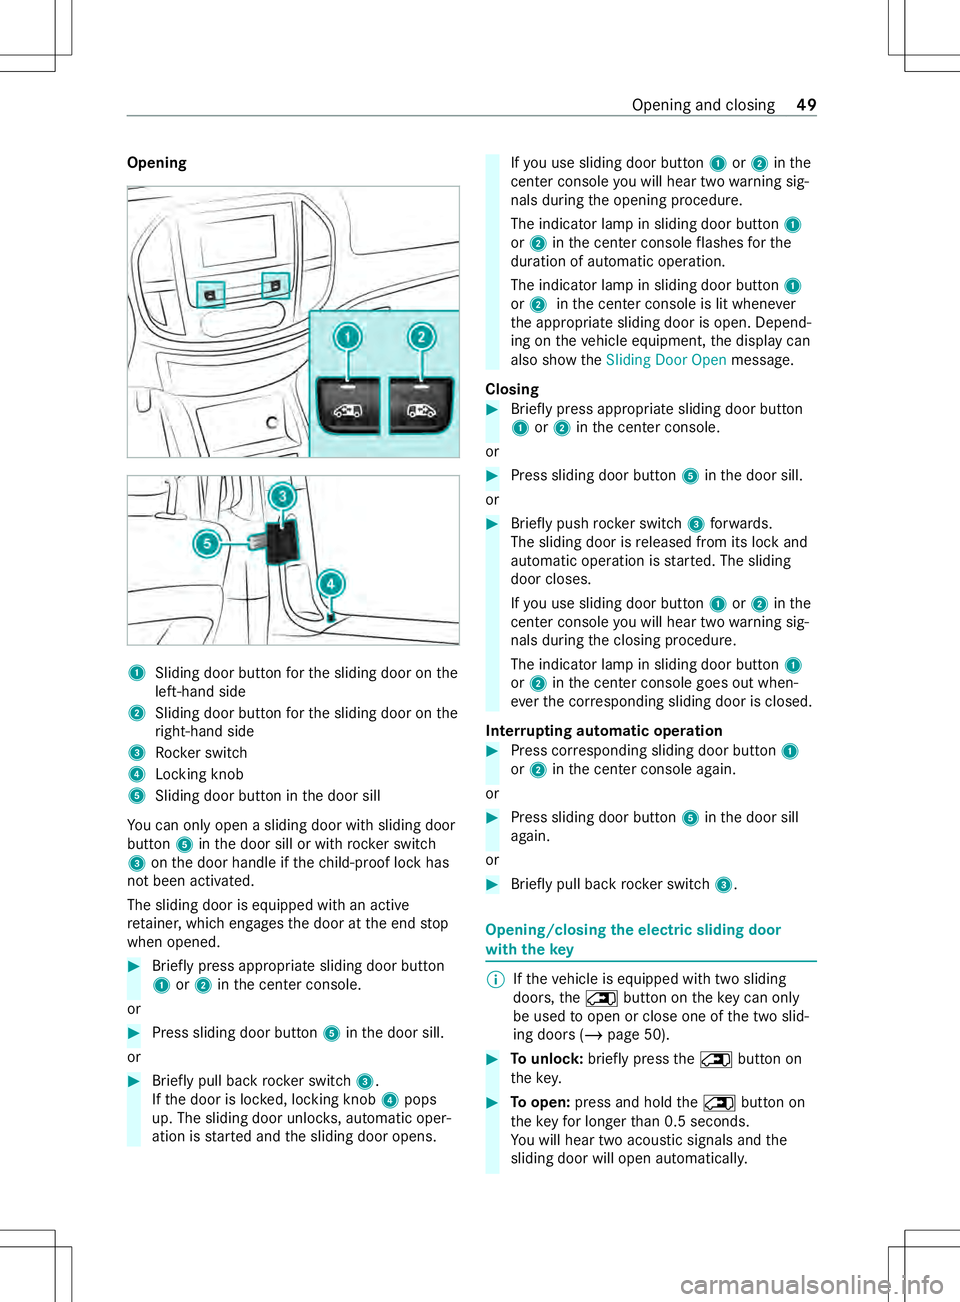
Opening
1
Sliding door button fort he sliding door on the
left-hand side
2 Slidin gdoor button fort he sliding door on the
ri ght-han dside
3 Rocker switch
4 Locking knob
5 Sliding door button in thed oor sill
Yo uc an on lyopen asliding door wit hsliding door
button 5inthed oor sill or wit hrockers witch
3 onthed oor handle if thec hild-p roof loc khas
no tb een activated.
The sliding door is equipped wit hanactive
re tainer ,whic he ngages thed oor at thee nd stop
when opened. #
Brief lypress appropriat esliding door button
1 or2 inthec enter console.
or #
Press sliding door button 5inthed oor sill.
or #
Brief lypull bac krockers witch 3.
If th ed oor is loc ked, locking knob 4pops
up. The sliding door unloc ks,a utomatic oper‐
ation is star teda nd thes liding door opens. If
yo uu se slidin gdoor button 1or2 inthe
center consol eyou will hear tw owarning sig‐
nals during theo pening procedure.
The indicator lam pinsliding door button 1
or 2 inthec enter console flashes fort he
duration of automatic operation.
The indicator lam pinsliding door button 1
or 2 inthec enter console is lit whene ver
th ea ppropriat esliding door is open. Depend‐
ing on thev ehicle equipment, thed ispla ycan
also sho wthe Sliding Door Open message.
Closing #
Brief lypress appropriat esliding door button
1 or2 inthec enter console.
or #
Press sliding door button 5inthed oor sill.
or #
Brief lypush rocker switch 3forw ards.
The slidin gdoor is released from its loc kand
automatic operation is star ted. The sliding
door closes.
If yo uu se slidin gdoor button 1or2 inthe
center consol eyou will hear tw owarning sig‐
nals during thec losing procedure.
The indicator lam pinsliding door button 1
or 2 inthec enter console goes out when‐
eve rthe cor responding sliding door is closed.
Inter rupting automatic operation #
Press cor responding sliding door button 1
or 2 inthec enter console again.
or #
Press sliding door button 5inthed oor sill
again.
or #
Brief lypull bac krockers witch 3. Opening/closing
thee lectric sliding door
wit hthe key %
If
th ev ehicle is equipped wit htwo sliding
doors, the0042 button on thek eycan on ly
be used toopen or close one of thet wo slid‐
ing door s(/pag e50). #
Tounlo ck:brie flyp ress the 0042 button on
th ek ey. #
Toopen: press and hold the0042 button on
th ek ey fo rlonger than 0. 5seconds.
Yo uw ill hear tw oacoustic signals and the
sliding door will open automaticall y. Opening and closing
49
Page 52 of 290
#
Toclose: press and hold the0042 button on
th ek ey fo rlonger than 0. 5seconds.
Yo uw ill hear tw oacoustic signals and the
sliding door will close automaticall y.#
Tointer rupt automatic operation: briefly
press the0042 button on thek ey.
The sliding door stops moving.
% In unf
avorable operating conditions ,e.g.
frost, ice or heavy soiling, press and hold the
appropriat eslidin gdoor button. The electric
slidin gdoor mo vesw ithi ncreased forc e.
Obser vethat, in suc hcircum stances, the
obs tacle de tection is les ssensitive. Tostop
th em ovement, release thes liding door but‐
to n. Opening/closing the electrical sliding door
from the outside
#
Toopen: pull door handle 1.
The slidin gdoor unloc ks,a utomatic operation
is star teda nd thes liding door opens. In addi‐
tion, youw ill hear tw owarning signals. #
Toclose: pull door handle 1.
The slidin gdoor is released from its loc kand
automatic operation is star ted. The sliding
door closes. #
Tointer rupt automatic operation: pulldoor
handle 1again. Prog
rammin gthe keyb utton fort he sliding
door Re
quirements
R The vehicle is equipped wit htwo electric slid‐
ing doors.
R The sliding door tobe prog rammed is open.
R The ignition is switched on.
The 0042 button on thek eycan be prog rammed.
Program the0042 button toopen ther ight or left
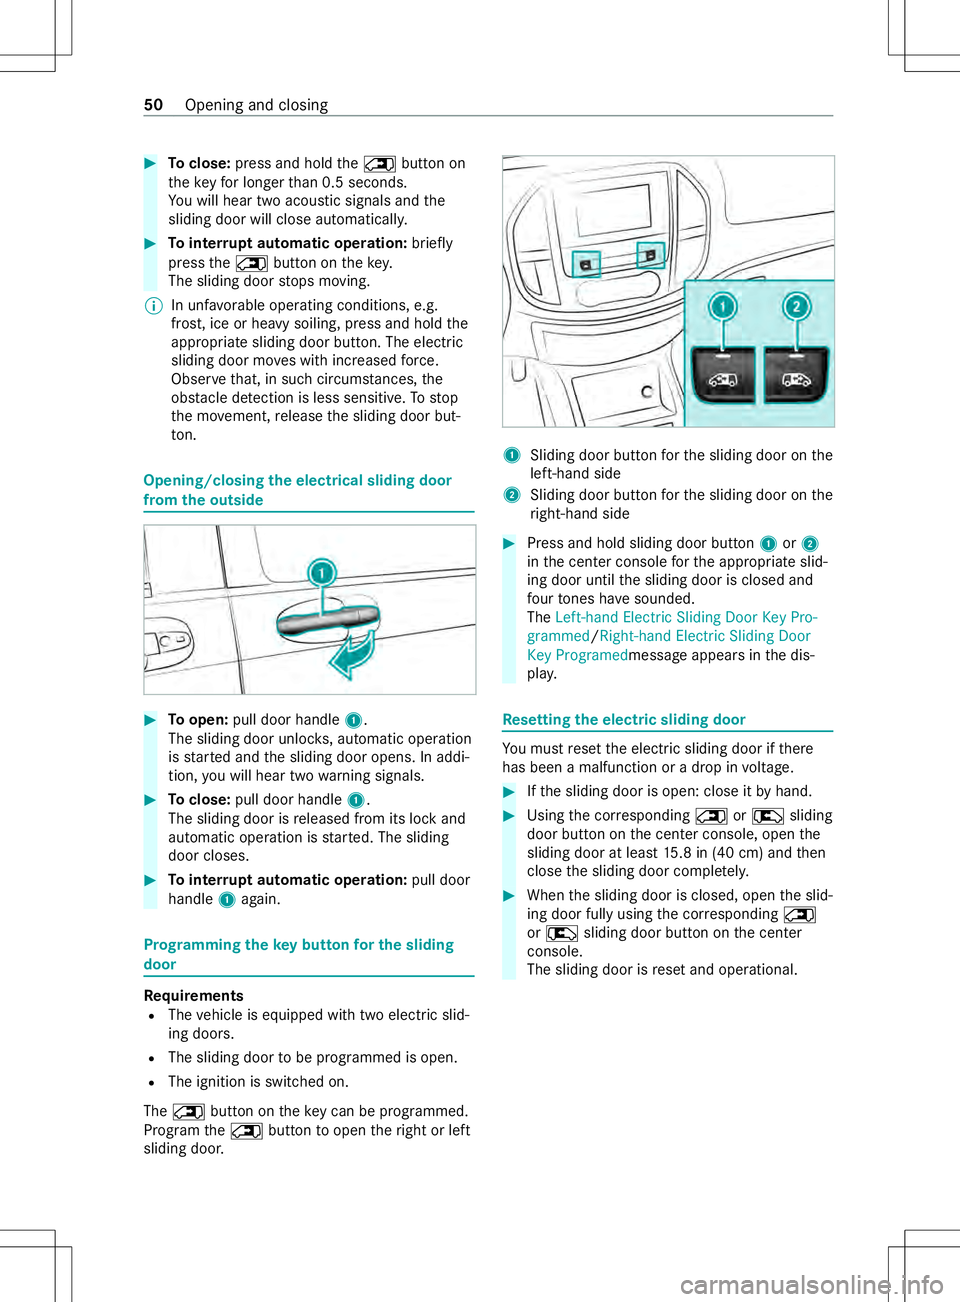
slidin gdoor. 1
Sliding door button fort he sliding door on the
left-hand side
2 Slidin gdoor button fort he sliding door on the
ri ght-han dside #
Press and hold sliding door button 1or2
in thec enter console fort he appropriat eslid‐
ing door until thes liding door is closed and
fo ur tones ha vesounded.
The Left-hand Electric Sliding Door Key Pro-
grammed/Right-hand Electric Sliding Door
Key Programedmessag eappears inthed is‐
pla y. Re
setting thee lectric sliding door Yo
um ustrese tthe electric sliding door if there
has been amalfunction or adropinv oltage. #
Ifth es liding door is open: close it byhand. #
Using thec orresponding 0042or0041 sliding
door button on thec enter console, open the
sliding door at leas t15.8 in (40 cm) and then
close thes liding door comple tely. #
When thes liding door is closed, open thes lid‐
ing door fully using thec orresponding 0042
or 0041 sliding door button on thec enter
console.
The sliding door is rese ta nd operational. 50
Opening and closing