brakes MERCEDES-BENZ ML320 1997 Complete User Guide
[x] Cancel search | Manufacturer: MERCEDES-BENZ, Model Year: 1997, Model line: ML320, Model: MERCEDES-BENZ ML320 1997Pages: 4133, PDF Size: 88.89 MB
Page 235 of 4133
185 Driving instructions
Te ch n ica l
data Instruments
and controlsOperationDrivingInstrument
cluster displayPractical hints Car care Index Driving on embankments, slopes and other steep
inclines should only be done straight up or downhill, i.e.
in the line of gravity.
Do not drive along the side of a slope (danger of vehicle
rollover). If in doing so, the vehicle begins to show a
tendency to roll, immediately steer into a line of gravity
(straight up or downhill).
To help avoid the vehicle rolling over, never turn it
around on steep inclines. If the vehicle cannot complete
the attempted climb, back it down in reverse gear.
Utilize the engine’s braking power when descending a
slope, observe the engine speed (do not overrev the
engine). Apply the service brake as needed.
Check the brakes after a lengthy downgrade drive.
Notes:
Avoid excessive engine speeds – drive with moderate
engine speeds (max. 3000 RPM).
Select gear range “2” or “1” on the automatic
transmission, see page 165.Traction in steep terrain:
Be easy on the accelerator and watch for continuous
wheel traction when driving in steep terrain.
The 4-ETS+ helps greatly when starting out on a steep
incline. The front wheels have then the tendency to slip
due to the weight reduction over the front axle. The ETS
recognizes the situation and limits the torque for the
front wheels by braking them. Simultaneously the
torque for the rear wheels is increased.
See page 203 for four wheel electronic traction system
(4-ETS+).
Driving across a hilltop:
To prevent the vehicle from speeding up too much after
climbing a hill, decelerate just ahead of a hilltop (do not
select gear range “N”). Use the momentum of the
vehicle to drive across the hilltop. Driving in this
manner prevents the vehicle from jumping across the
hilltop and thus loosing its forward momentum.
Page 236 of 4133
186 Driving instructions
Te ch n ica l
data Instruments
and controlsOperationDrivingInstrument
cluster displayPractical hints Car care Index
Driving downhill:
Select gear range “1” on the automatic transmission,
see page 165.
Drive downhill observing the same rules as driving
uphill.
Driving on embankments, slopes and other steep
inclines should only be done straight up or downhill, i.e.
in the line of gravity.
Do not drive along the side of a slope (danger of vehicle
rollover). If in doing so, the vehicle begins to show a
tendency to roll, immediately steer into a line of gravity
(straight up or downhill).Utilize the engine’s braking power when descending a
slope, observe the engine speed (do not overrev the
engine). Apply the service brake as needed.
The special low range ABS setting allows for precise and
brief (cyclical) blocking of the front wheels, permitting
them to dig into loose ground. Remember that the front
wheels when stopped, slide across a surface, thus loose
their ability to steer the vehicle.
Check the brakes after a lengthy downgrade drive.
Important!
Only apply the service brake if the vehicle travels
straight downhill, i.e. in the line of gravity.
Page 237 of 4133
187 Driving instructions
Te ch n ica l
data Instruments
and controlsOperationDrivingInstrument
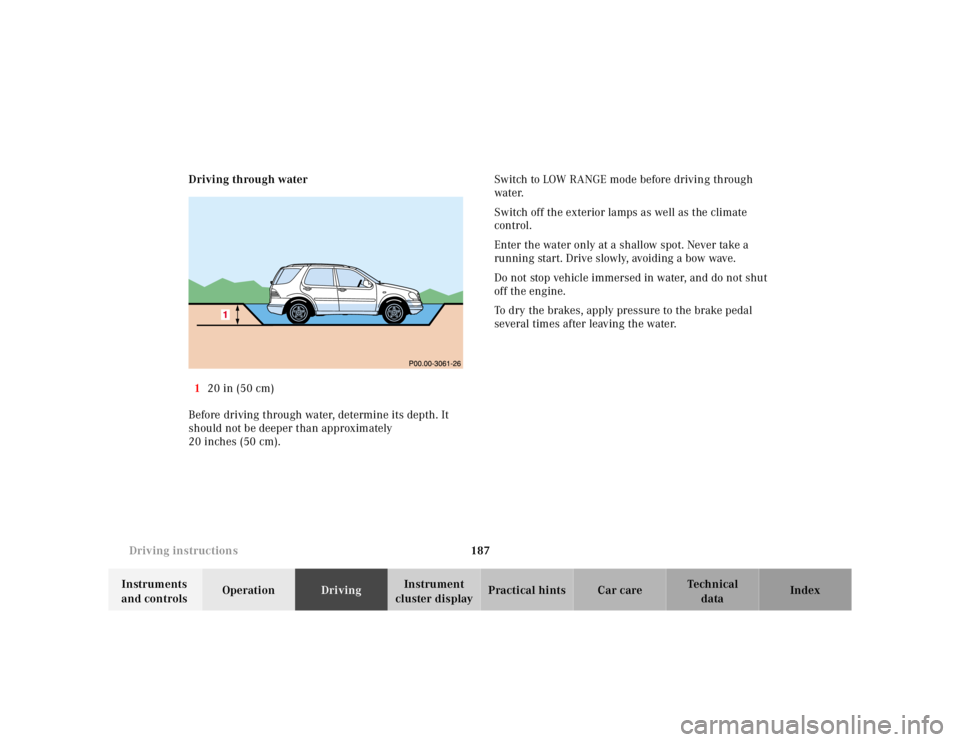
cluster displayPractical hints Car care Index Driving through water
120 in (50 cm)
Before driving through water, determine its depth. It
should not be deeper than approximately
20 inches (50 cm).Switch to LOW RANGE mode before driving through
water.
Switch off the exterior lamps as well as the climate
control.
Enter the water only at a shallow spot. Never take a
running start. Drive slowly, avoiding a bow wave.
Do not stop vehicle immersed in water, and do not shut
off the engine.
To dry the brakes, apply pressure to the brake pedal
several times after leaving the water.
Page 239 of 4133
189 Driving instructions
Te ch n ica l
data Instruments
and controlsOperationDrivingInstrument
cluster displayPractical hints Car care Index Returning from off-road driving
Off-road driving increases strain on the vehicle.
We recommend that you inspect the vehicle for possible
damage after each off-road trip. Recognizing any
damage and a subsequent timely repair reduces the
chance of a possible breakdown or accident later on.
Proceed as follows:
•Switch off the LOW RANGE mode, see page 209.
•Remove excessive dirt from tires, wheels, wheel
housings, and underbody. For instance, after driving
in mud, clean the radiator, chassis, engine, brakes,
and wheels from extreme dirt, using a strong jet of
water.
•Inspect frame, oil pan, brake hoses, etc., as well as
vehicle underbody for possible damage.
•Check tires for possible damage, clean all exterior
lamps, and conduct a brake test.•Check for brush or branches caught in the
undercarriage. They could increase the possibility of
a fire, as well as cut fuel and / or brake lines,
puncture rubber bellows of the axles or drive shafts.
Wa r n i n g !
If you feel a sudden significant vibration or ride
disturbance, or you suspect that possible damage to
your vehicle has occurred, you should turn on the
hazard warning flashers, carefully slow down, and
drive with caution to an area which is a safe
distance from the roadway.Inspect the tires and under the vehicle for possible
damage. If the vehicle or tires appear unsafe, have
it towed to the nearest Mercedes-Benz Light Truck
Center or tire dealer for repairs.
Page 243 of 4133
193 Driving instructions
Te ch n ica l
data Instruments
and controlsOperationDrivingInstrument
cluster displayPractical hints Car care Index Attaching a trailer
Please observe maximum permitted trailer dimensions
(width and length).
Most states and all Canadian provinces require safety
chains between your tow vehicle and the trailer. The
chains should be crisscrossed under the trailer tongue.
They must be attached to the hitch receiver, and not to
the vehicle’s bumper or axle. Be sure to leave enough
slack in the chains to permit turning corners.
Most states and all Canadian provinces require a
separate brake system at various trailer weights.Caution!
Do not connect a trailer brake system (if trailer is so
equipped) directly to the vehicle’s hydraulic brake
system, as your vehicle is equipped with antilock
brakes. If you do, neither the vehicle’s brakes nor the
trailer’s brakes will function properly.
The provided vehicle electrical wiring harness for trailer
towing has a brake signal wire (color orange) for
hook-up to a brake controller.
Most states and all Canadian provinces require a
break-away switch on trailers with a separate brake
system. The switch activates the trailer brakes in the
possible event that the trailer might separate from the
tow vehicle.
You should consider using a trailer sway control system.
For further information see your authorized
Mercedes-Benz Light Truck Center.
Page 244 of 4133
194 Driving instructions
Te ch n ica l
data Instruments
and controlsOperationDrivingInstrument
cluster displayPractical hints Car care Index
Tow in g a t r ai le r
There are many different laws, including speed limit
restrictions, having to do with trailer towing. Make sure
t ha t your rig will be lega l, not only for w here you reside,
but also for where you will be driving. A good source for
this information can be the police or local authorities.
Before you start driving with the trailer, check the
trailer hitch, break-away switch, safety chains, electrical
connections, lighting and tires. Also adjust the mirrors
to permit unobstructed view beyond rear of trailer.
If the trailer has electric brakes, start your vehicle and
trailer moving slowly, and then apply only the trailer
brake controller by hand to be sure the brakes are
working properly.
When towing a trailer, check occasionally to be sure that
the load is secure, and that lighting and trailer brakes
(if so equipped) are functioning properly.
Always secure items in the trailer to prevent load shifts
while driving.
Take into consideration that when towing a trailer, the
handling characteristics are different and less stable
from those when operating the vehicle without a trailer.
It is important to avoid sudden maneuvers.The vehicle and trailer combination is heavier, and
therefore is limited in acceleration and climbing ability,
and requires longer stopping distances. It is more prone
to reacting to side wind gusts, and requires more
sensitive steering input.
In order to gain skill and an understanding of the
vehicle’s behavior, you should practice turning,
stopping and backing up in an area which is free from
traffic.
If possible, do not brake abruptly, but rather engage the
brake slightly at first to permit the trailer to activate its
brake. Then increase the braking force.
Caution!
If the trailer should begin to sway, reduce the vehicle’s
speed and use the brake controller by hand to straighten
out the vehicle and trailer. In no case should you
attempt to straighten out the tow vehicle and trailer by
increasing the speed or oversteering and stepping on
the brakes.
If the transmission hunts between gears on inclines,
manually shift to a lower gear (select “4”, “3”, “2”
or “1”). A lower gear and reduction of speed reduces the
chance of engine overloading and / or overheating.
Page 245 of 4133
195 Driving instructions
Te ch n ica l
data Instruments
and controlsOperationDrivingInstrument
cluster displayPractical hints Car care Index At very steep inclines, not manageable with selector
lever in position “1”, switch transfer case to LOW
RANGE, see page 209 for instructions on how to engage
LOW RANGE.
When going down a long hill, shift into a lower gear and
use the engine’s braking effect. Avoid riding the brakes,
thus overheating the vehicle and trailer brakes.
If the engine coolant rises to an extremely high
temperature (coolant temperature needle approaching
the red zone) when the air conditioner is on, turn off the
air conditioner. Engine coolant heat can be additionally
vented by opening the windows, switching the climate
control fan speed to high and setting the temperature
control to the maximum hot position.
Extreme care must be exercised since your vehicle with
a trailer will require additional passing distance ahead
than when driving without a trailer. Because your
vehicle and trailer is longer than your vehicle alone, you
will also need to go much farther ahead of the passed
vehicle before you can return to your lane.Parking
Wa r n i n g !
To reduce the risk of personal injury, or damage to
the vehicle powertrain, as a result of vehicle/trailer
movement, always:1. Keep right foot on brake pedal.2. Shift gear selector lever to position “N”.3. Have a second person place wheel chocks on
downhill side of left and right trailer wheels.4. Slowly release brake pedal and let vehicle and
trailer roll into chocks until stopped.5. Firmly depress parking brake pedal.6. Move gear selector lever to position “P”.7. On inclines turn front wheels towards the road
curb.
Page 249 of 4133
199 Driving systems
Te ch n ica l
data Instruments
and controlsOperationDrivingInstrument
cluster displayPractical hints Car care Index Brake assist system (BAS)The BAS is designed to maximize the vehicle’s braking
capability during emergency braking maneuvers by
having maximum power boost applied to the brakes
more quickly in emergency braking conditions than
might otherwise be afforded solely by the driver’s
braking style. This can help reduce braking distances
over what ordinary driving and braking style might do.
The BAS complements the antilock brake system (ABS).
Applying the brakes very quickly results in maximum
BAS assistance.
To receive the benefit of the system you must apply
continuous full braking power during the stopping
sequence. Do not reduce brake pedal pressure.
Once the brake pedal is released, the BAS is deactivated.
The malfunction indicator lamp for the electronic
stability program (ESP) is combined with the BAS
malfunction indicator lamp.
Wa r n i n g !
BAS cannot prevent the natural laws of physics
from acting on the vehicle, nor can it increase
braking efficiency beyond that afforded by the
condition of the vehicle brakes and tires or the
traction afforded. The BAS cannot prevent
accidents, including those resulting from excessive
speed in turns, following another vehicle too
closely, or aquaplaning. Only a safe, attentive, and
skillful driver can prevent accidents. The
capabilities of a BAS equipped vehicle must never
be exploited in a reckless or dangerous manner
which could jeopardize the user’s safety or the
safety of others.
Page 252 of 4133
202 Driving systems
Te ch n ica l
data Instruments
and controlsOperationDrivingInstrument
cluster displayPractical hints Car care Index
If the charging voltage falls below 10 volts, the
malfunction indicator lamp comes on and the ABS is
switched off. When the voltage is above this value again,
the malfunction indicator lamp should go out and the
ABS is operational.
If the ABS malfunction indicator lamp stays illuminated,
have the system checked at your authorized
Mercedes-Benz Light Truck Center as soon as possible.Notes:
To alert following vehicles to slippery road conditions
you discover, operate your hazard warning flashers as
appropriate.
Operating the vehicle on a single axle dynamometer
should only be done for briefly testing the brakes. To do
so, move selector lever to position “N”. The engine must
be shut off (key in steering lock position 0 or 1).
LOW RANGE – ABS
During off-road driving a special low range system for
the antilock brake system (ABS) is operational with
transmission in LOW RANGE mode, see page 211.
When applying the service brakes at speeds below
approximately 18 mph (30 km / h), the front wheels are
locked cyclically to shorten the braking distance (dig in
effect). This affects steering the vehicle.
Wa r n i n g !
ABS cannot prevent the natural laws of physics
from acting on the vehicle, nor can it increase
braking or steering efficiency beyond that afforded
by the condition of the vehicle brakes and tires or
the traction afforded. The ABS cannot prevent
accidents, including those resulting from excessive
speed in turns, following another vehicle too
closely, or aquaplaning. Only a safe, attentive, and
skillful driver can prevent accidents. The
capabilities of an ABS equipped vehicle must never
be exploited in a reckless or dangerous manner
which could jeopardize the user’s safety or the
safety of others.
Page 253 of 4133
203 Driving systems
Te ch n ica l
data Instruments
and controlsOperationDrivingInstrument
cluster displayPractical hints Car care Index Four-wheel electronic traction system (4-ETS+)
With the key in steering lock position 2, the yellow
4-ETS+ malfunction indicator lamp{ and the 4-ETS+
warning lampv come on and should go out when
the engine is running.
The 4-ETS+ improves vehicle’s ability to utilize available
traction, especially under slippery road conditions. The
brakes are applied to the spinning wheel and power is
transferred to the wheel(s) with traction.
The 4-ETS+ warning lampv, located in the
speedometer dial, starts to flash at any vehicle speed, as
soon as the tires lose traction and the wheels begin to
spin.
Important!
If the 4-ETS+ warning lampv flashes:
•during take-off, apply as little throttle as possible,
•while driving, ease up on the accelerator.
Adapt your speed and driving to the prevailing road
conditions.4-ETS+ Control
If the yellow 4-ETS+ malfunction indicator lamp{
comes on while the 4-ETS+ warning lampv flashes,
the electronic traction system is being switched off
temporarily to prevent overheating of the drive wheel
brakes.
If the 4-ETS+ malfunction indicator lamp{ comes on
with the engine running, a malfunction has been
detected.
Have the 4-ETS+ checked at your authorized
Mercedes-Benz Light Truck Center as soon as possible.
With the ABS malfunctioning, the 4-ETS+ is also
switched off.
Caution!
If the vehicle is towed with the front axle raised (see
towing the vehicle on page 255), or when testing the
parking brake on a brake test dynamometer, the engine
must be shut off (key in steering lock position 0 or 1).
Otherwise, the electronic traction system will
immediately be engaged and will apply the rear wheel
brakes.