radiator cap MERCEDES-BENZ ML320 1997 Complete User Guide
[x] Cancel search | Manufacturer: MERCEDES-BENZ, Model Year: 1997, Model line: ML320, Model: MERCEDES-BENZ ML320 1997Pages: 4133, PDF Size: 88.89 MB
Page 2454 of 4133
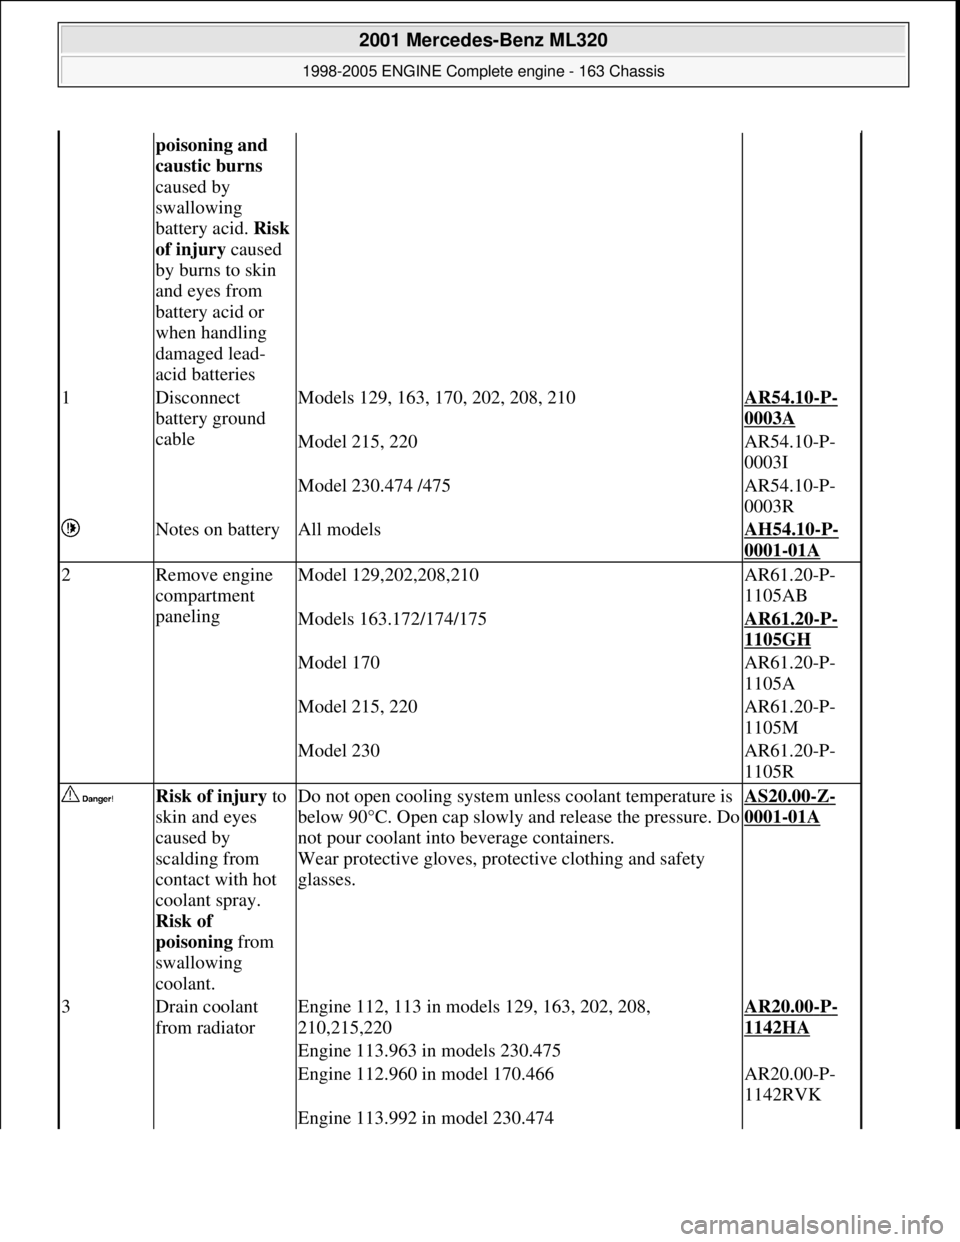
poisoning and
caustic burns
caused by
swallowing
battery acid. Risk
of injury caused
by burns to skin
and eyes from
battery acid or
when handling
damaged lead-
acid batteries
1Disconnect
battery ground
cableModels 129, 163, 170, 202, 208, 210AR54.10-P-
0003A
Model 215, 220AR54.10-P-
0003I
Model 230.474 /475AR54.10-P-
0003R
Notes on batteryAll modelsAH54.10-P-
0001-01A
2Remove engine
compartment
panelingModel 129,202,208,210AR61.20-P-
1105AB
Models 163.172/174/175AR61.20-P-
1105GH
Model 170AR61.20-P-
1105A
Model 215, 220AR61.20-P-
1105M
Model 230AR61.20-P-
1105R
Risk of injury to
skin and eyes
caused by
scalding from
contact with hot
coolant spray.
Risk of
poisoning from
swallowing
coolant.Do not open cooling system unless coolant temperature is
below 90°C. Open cap slowly and release the pressure. Do
not pour coolant into beverage containers.
Wear protective gloves, protec tive clothing and safety
glasses.
AS20.00-Z-
0001-01A
3Drain coolant
from radiatorEngine 112, 113 in models 129, 163, 202, 208,
210,215,220AR20.00-P-
1142HA
Engine 113.963 in models 230.475
Engine 112.960 in model 170.466AR20.00-P-
1142RVK
Engine 113.992 in model 230.474
2001 Mercedes-Benz ML320
1998-2005 ENGINE Complete engine - 163 Chassis
me
Saturday, October 02, 2010 3:17:57 PMPage 98 © 2006 Mitchell Repair Information Company, LLC.
Page 2583 of 4133
AR07.16-P-1100MM
Remove, install fuel cooler
5.11.99
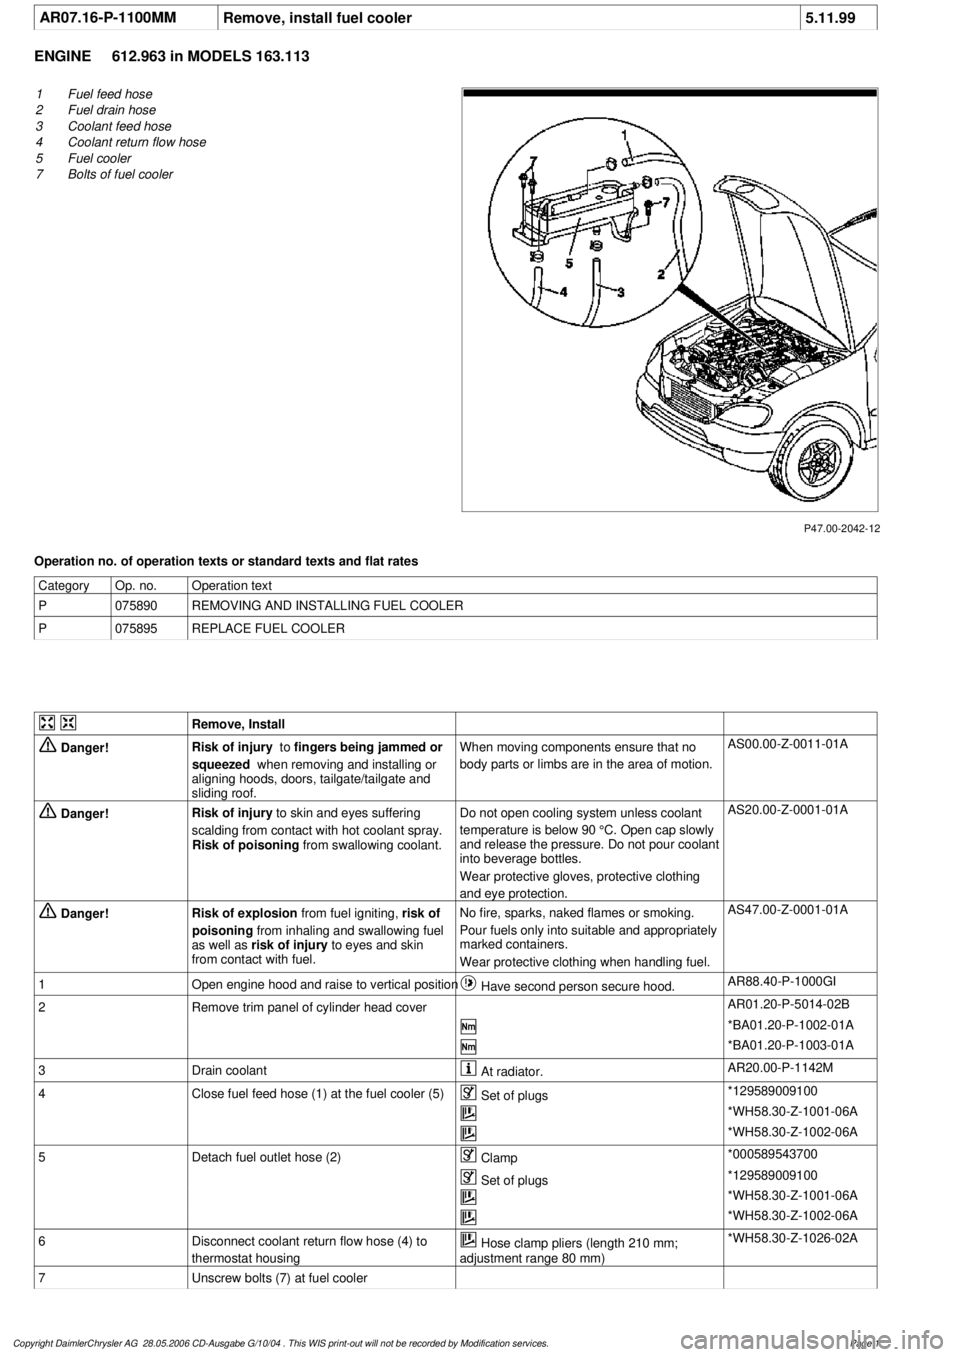
ENGINE
612.963 in MODELS 163.113
P47.00-2042-12
1
Fuel feed hose
2
Fuel drain hose
3
Coolant feed hose
4
Coolant return flow hose
5
Fuel cooler
7
Bolts of fuel cooler
Operation no. of operation texts or standard texts and flat rates
Category
Op. no.
Operation text
P
075890
REMOVING AND INSTALLING FUEL COOLER
P
075895
REPLACE FUEL COOLER
Remove, Install
Danger!
Risk of injury
to
fingers being jammed or
squeezed
when removing and installing or
aligning hoods, doors, tailgate/tailgate and
sliding roof.
When moving components ensure that no
body parts or limbs are in the area of motion.
AS00.00-Z-0011-01A
Danger!
Risk of injury
to skin and eyes suffering
scalding from contact with hot coolant spray.
Risk of poisoning
from swallowing coolant.
Do not open cooling system unless coolant
temperature is below 90 °C. Open cap slowly
and release the pressure. Do not pour coolant
into beverage bottles.
Wear protective gloves, protective clothing
and eye protection.
AS20.00-Z-0001-01A
Danger!
Risk of explosion
from fuel igniting,
risk of
poisoning
from inhaling and swallowing fuel
as well as
risk of injury
to eyes and skin
from contact with fuel.
No fire, sparks, naked flames or smoking.
Pour fuels only into suitable and appropriately
marked containers.
Wear protective clothing when handling fuel.
AS47.00-Z-0001-01A
1
Open engine hood and raise to vertical position
Have second person secure hood.
AR88.40-P-1000GI
2
Remove trim panel of cylinder head cover
AR01.20-P-5014-02B
*BA01.20-P-1002-01A
*BA01.20-P-1003-01A
3
Drain coolant
At radiator.
AR20.00-P-1142M
4
Close fuel feed hose (1) at the fuel cooler (5)
Set of plugs
*129589009100
*WH58.30-Z-1001-06A
*WH58.30-Z-1002-06A
5
Detach fuel outlet hose (2)
Clamp
*000589543700
Set of plugs
*129589009100
*WH58.30-Z-1001-06A
*WH58.30-Z-1002-06A
6
Disconnect coolant return flow hose (4) to
thermostat housing
Hose clamp pliers (length 210 mm;
adjustment range 80 mm)
*WH58.30-Z-1026-02A
7
Unscrew bolts (7) at fuel cooler
Copyright DaimlerChrysler AG 28.05.2006 CD-Ausgabe G/10/04 . This WIS print-out will not be recorde
d by Modification services.
Page 1
Page 3049 of 4133
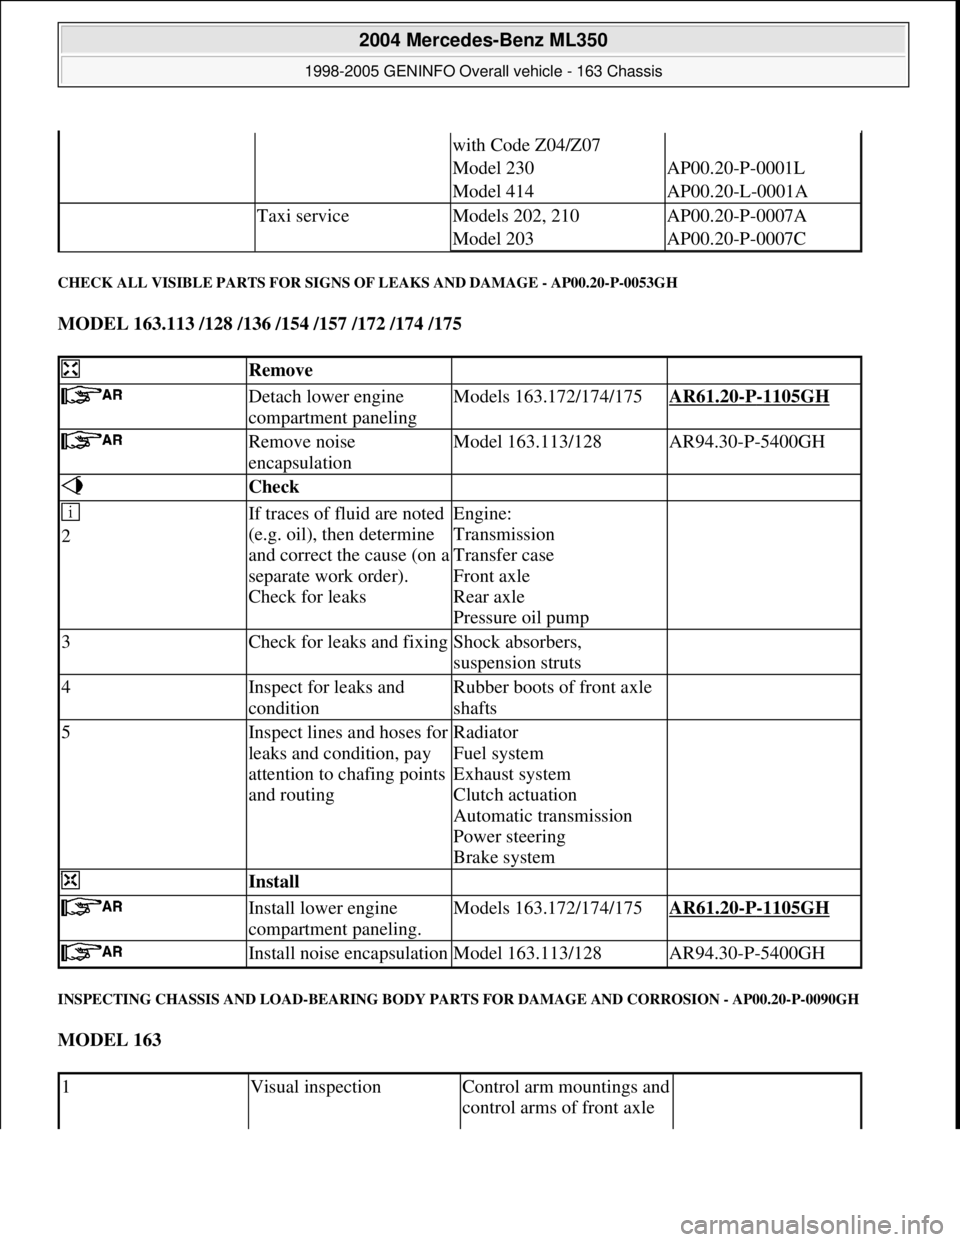
CHECK ALL VISIBLE PARTS FOR SIGNS OF LEAKS AND DAMAGE - AP00.20-P-0053GH
MODEL 163.113 /128 /136 /154 /157 /172 /174 /175
INSPECTING CHASSIS AND LOAD-BEARING BODY PARTS FOR DAMAGE AND CORROSION - AP00.20-P-0090GH
MODEL 163
with Code Z04/Z07
Model 230AP00.20-P-0001L
Model 414AP00.20-L-0001A
Taxi serviceModels 202, 210AP00.20-P-0007A
Model 203AP00.20-P-0007C
Remove
Detach lower engine
compartment panelingModels 163.172/174/175AR61.20-P-1105GH
Remove noise
encapsulationModel 163.113/128AR94.30-P-5400GH
Check
2If traces of fluid are noted
(e.g. oil), then determine
and correct the cause (on a
separate work order).
Check for leaksEngine:
Transmission
Transfer case
Front axle
Rear axle
Pressure oil pump
3Check for leaks and fixingShock absorbers,
suspension struts
4Inspect for leaks and
conditionRubber boots of front axle
shafts
5Inspect lines and hoses for
leaks and condition, pay
attention to chafing points
and routingRadiator
Fuel system
Exhaust system
Clutch actuation
Automatic transmission
Power steering
Brake system
Install
Install lower engine
compartment paneling.Models 163.172/174/175AR61.20-P-1105GH
Install noise encapsulationModel 163.113/128AR94.30-P-5400GH
1Visual inspectionControl arm mountings and
control arms of front axle
2004 Mercedes-Benz ML350
1998-2005 GENINFO Overall vehicle - 163 Chassis
me
Saturday, October 02, 2010 3:47:52 PMPage 404 © 2006 Mitchell Repair Information Company, LLC.
Page 3459 of 4133
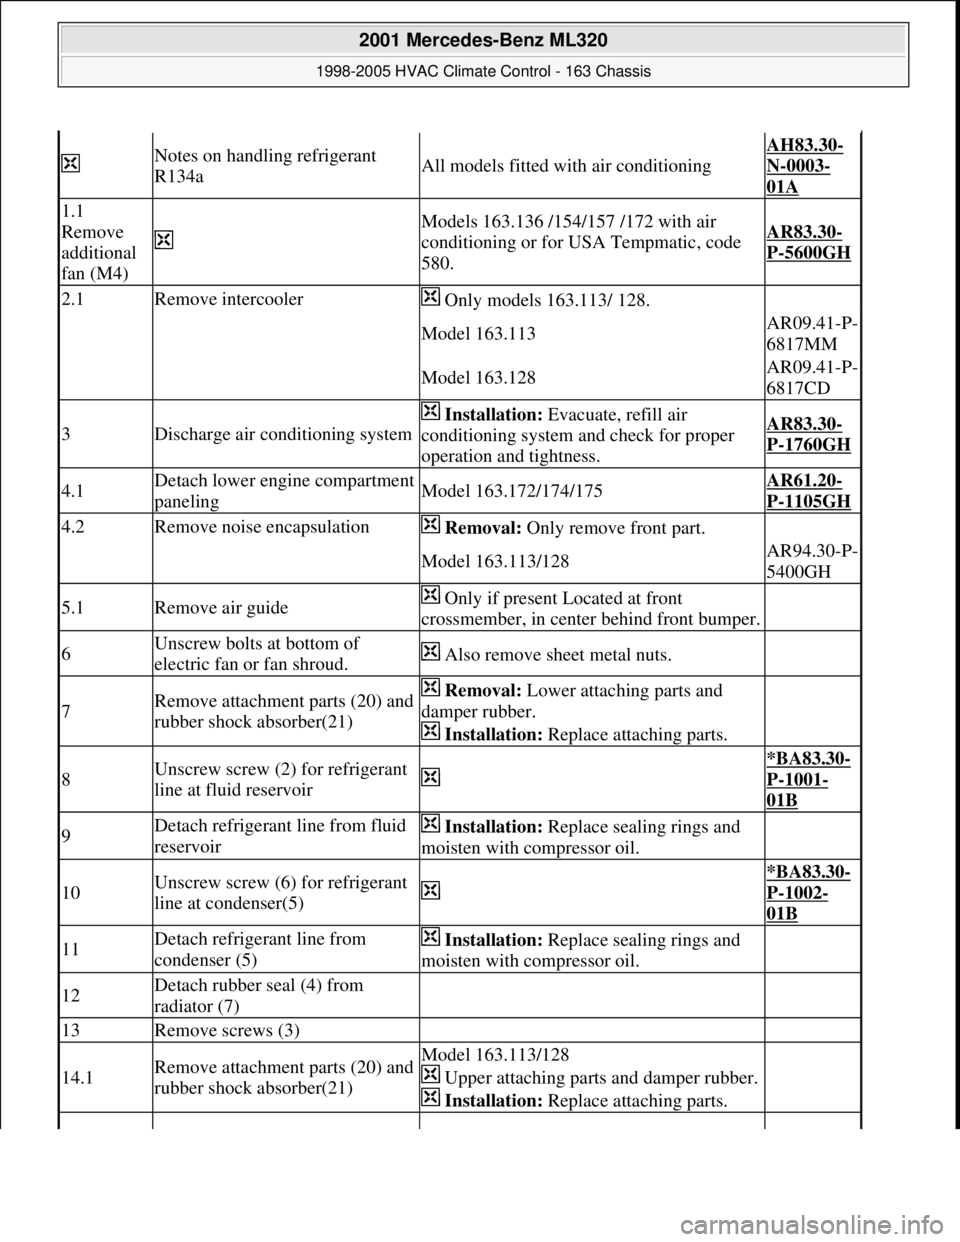
Notes on handling refrigerant
R134aAll models fitted with air conditioning
AH83.30-
N-0003-
01A
1.1
Remove
additional
fan (M4)
Models 163.136 /154/157 /172 with air
conditioning or for USA Tempmatic, code
580.AR83.30-
P-5600GH
2.1Remove intercooler Only models 163.113/ 128.
Model 163.113AR09.41-P-
6817MM
Model 163.128AR09.41-P-
6817CD
3Discharge air conditioning system
Installation: Evacuate, refill air
conditioning system and check for proper
operation and tightness.AR83.30-
P-1760GH
4.1Detach lower engine compartment
panelingModel 163.172/174/175AR61.20-
P-1105GH
4.2Remove noise encapsulation Removal: Only remove front part.
Model 163.113/128AR94.30-P-
5400GH
5.1Remove air guide Only if present Located at front
crossmember, in center behind front bumper.
6Unscrew bolts at bottom of
electric fan or fan shroud. Also remove sheet metal nuts.
7Remove attachment parts (20) and
rubber shock absorber(21) Removal: Lower attaching parts and
damper rubber.
Installation: Replace attaching parts.
8Unscrew screw (2) for refrigerant
line at fluid reservoir
*BA83.30-
P-1001-
01B
9Detach refrigerant line from fluid
reservoir Installation: Replace sealing rings and
moisten with compressor oil.
10Unscrew screw (6) for refrigerant
line at condenser(5)
*BA83.30-
P-1002-
01B
11Detach refrigerant line from
condenser (5) Installation: Replace sealing rings and
moisten with compressor oil.
12Detach rubber seal (4) from
radiator (7)
13Remove screws (3)
14.1Remove attachment parts (20) and
rubber shock absorber(21)Model 163.113/128
Upper attaching parts and damper rubber.
Installation: Replace attaching parts.
2001 Mercedes-Benz ML320
1998-2005 HVAC Climate Control - 163 Chassis
me
Saturday, October 02, 2010 3:23:18 PMPage 215 © 2006 Mitchell Repair Information Company, LLC.
Page 3755 of 4133
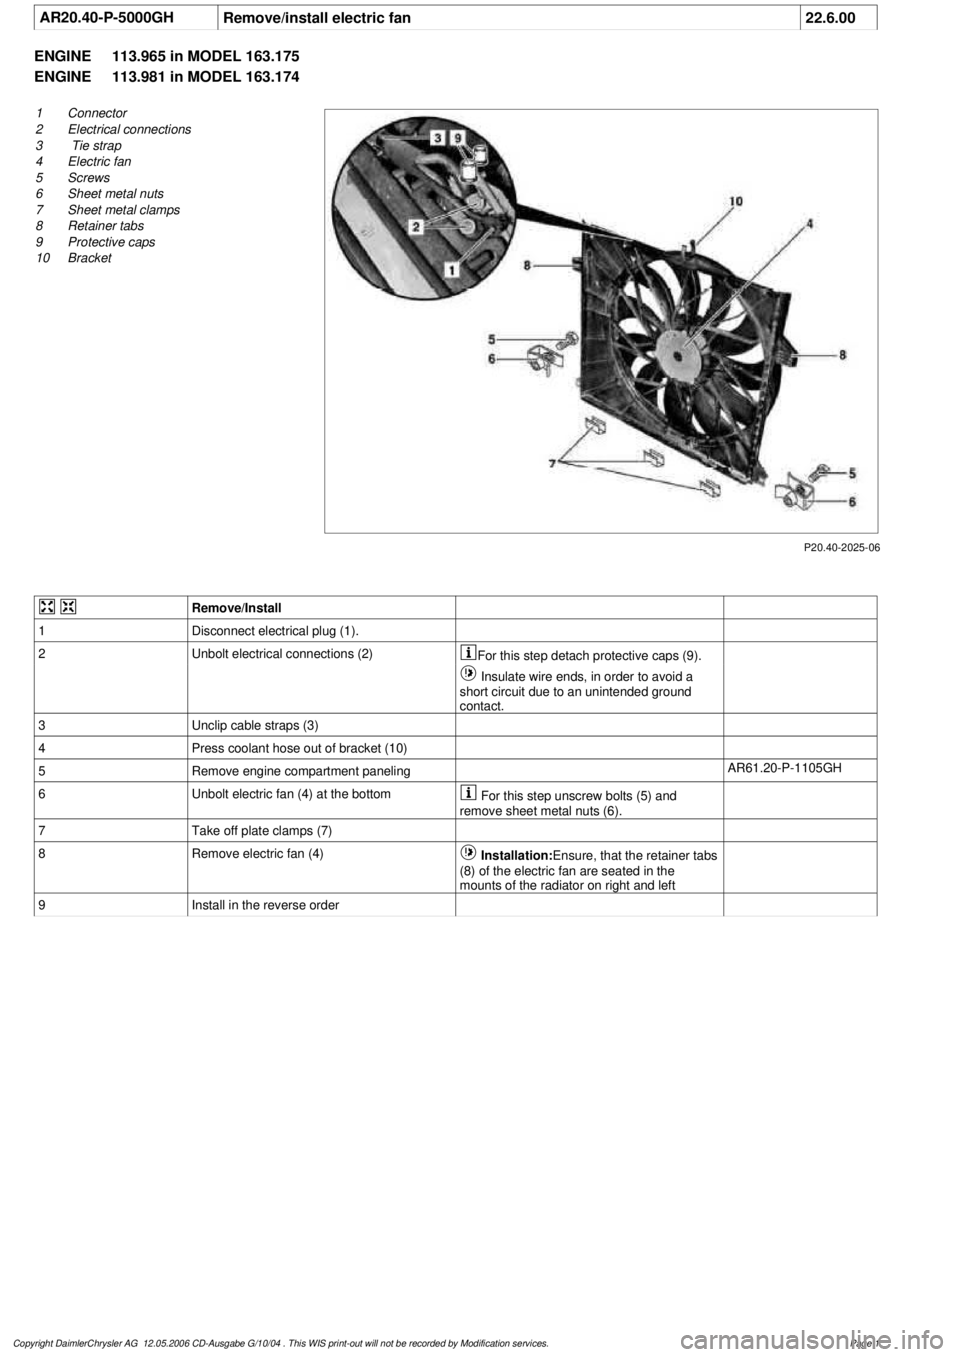
AR20.40-P-5000GH
Remove/install electric fan
22.6.00
ENGINE
113.965 in MODEL 163.175
ENGINE
113.981 in MODEL 163.174
P20.40-2025-06
1
Connector
2
Electrical connections
3
Tie strap
4
Electric fan
5
Screws
6
Sheet metal nuts
7
Sheet metal clamps
8
Retainer tabs
9
Protective caps
10
Bracket
Remove/Install
1
Disconnect electrical plug (1).
2
Unbolt electrical connections (2)
For this step detach protective caps (9).
Insulate wire ends, in order to avoid a
short circuit due to an unintended ground
contact.
3
Unclip cable straps (3)
4
Press coolant hose out of bracket (10)
5
Remove engine compartment paneling
AR61.20-P-1105GH
6
Unbolt electric fan (4) at the bottom
For this step unscrew bolts (5) and
remove sheet metal nuts (6).
7
Take off plate clamps (7)
8
Remove electric fan (4)
Installation:
Ensure, that the retainer tabs
(8) of the electric fan are seated in the
mounts of the radiator on right and left
9
Install in the reverse order
Copyright DaimlerChrysler AG 12.05.2006 CD-Ausgabe G/10/04 . This WIS print-out will not be recorde
d by Modification services.
Page 1
Page 3756 of 4133
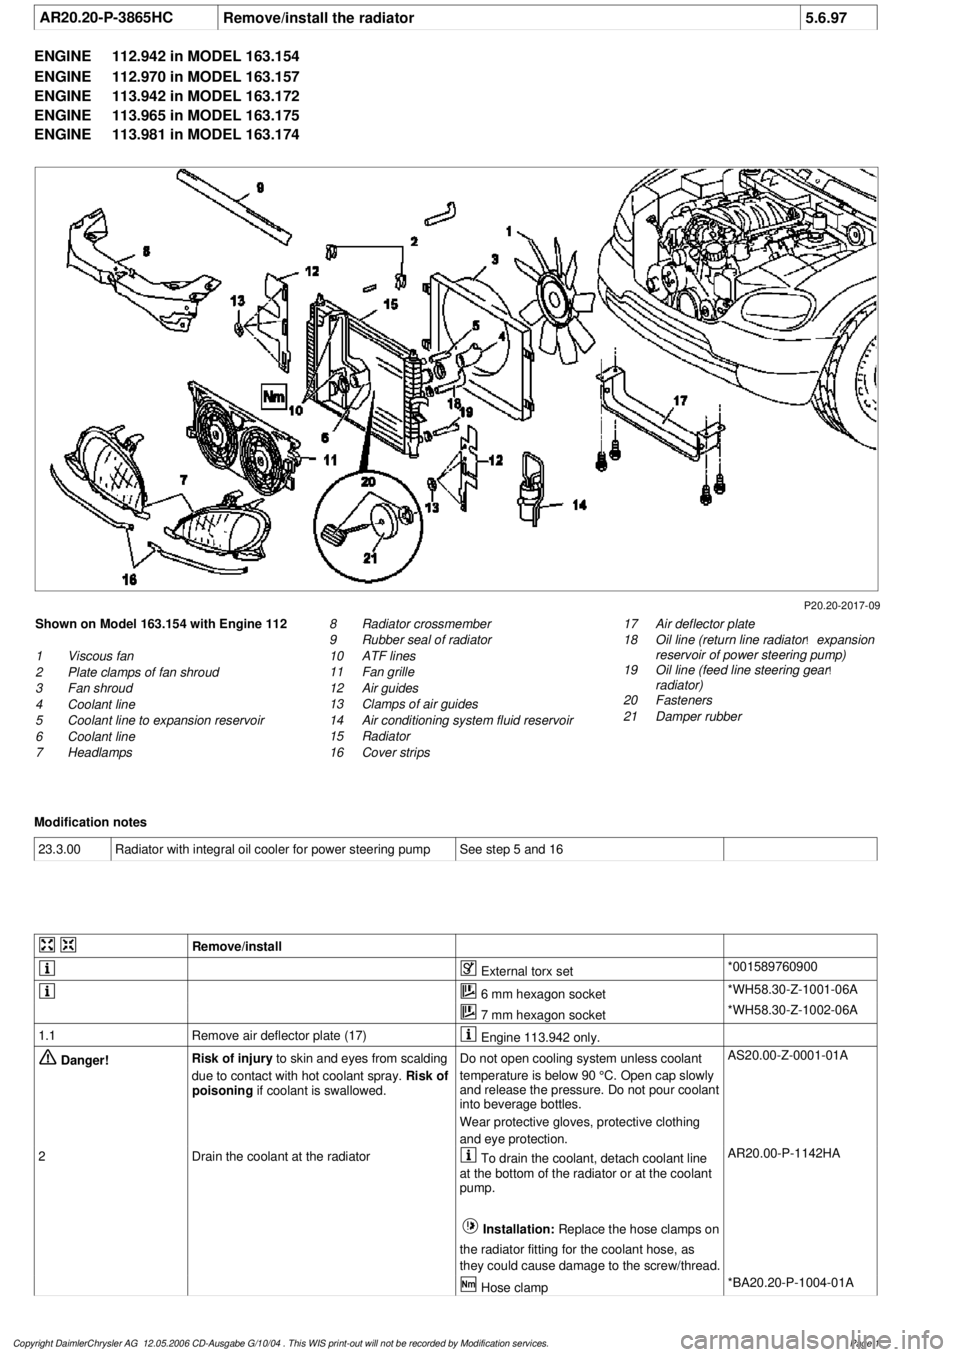
AR20.20-P-3865HC
Remove/install the radiator
5.6.97
ENGINE
112.942 in MODEL 163.154
ENGINE
112.970 in MODEL 163.157
ENGINE
113.942 in MODEL 163.172
ENGINE
113.965 in MODEL 163.175
ENGINE
113.981 in MODEL 163.174
P20.20-2017-09
Shown on Model 163.154 with Engine 112
1
Viscous fan
2
Plate clamps of fan shroud
3
Fan shroud
4
Coolant line
5
Coolant line to expansion reservoir
6
Coolant line
7
Headlamps
17
Air deflector plate
18
Oil line (return line radiator
!
expansion
reservoir of power steering pump)
19
Oil line (feed line steering gear
!
radiator)
20
Fasteners
21
Damper rubber
8
Radiator crossmember
9
Rubber seal of radiator
10
ATF lines
11
Fan grille
12
Air guides
13
Clamps of air guides
14
Air conditioning system fluid reservoir
15
Radiator
16
Cover strips
Modification notes
23.3.00
Radiator with integral oil cooler for power steering pump
See step 5 and 16
Remove/install
External torx set
*001589760900
6 mm hexagon socket
*WH58.30-Z-1001-06A
7 mm hexagon socket
*WH58.30-Z-1002-06A
1.1
Remove air deflector plate (17)
Engine 113.942 only.
Danger!
Risk of injury
to skin and eyes from scalding
due to contact with hot coolant spray.
Risk of
poisoning
if coolant is swallowed.
Do not open cooling system unless coolant
temperature is below 90 °C. Open cap slowly
and release the pressure. Do not pour coolant
into beverage bottles.
Wear protective gloves, protective clothing
and eye protection.
AS20.00-Z-0001-01A
2
Drain the coolant at the radiator
To drain the coolant, detach coolant line
at the bottom of the radiator or at the coolant
pump.
Installation:
Replace the hose clamps on
the radiator fitting for the coolant hose, as
they could cause damage to the screw/thread. AR20.00-P-1142HA
Hose clamp
*BA20.20-P-1004-01A
Copyright DaimlerChrysler AG 12.05.2006 CD-Ausgabe G/10/04 . This WIS print-out will not be recorde
d by Modification services.
Page 1
Page 3759 of 4133
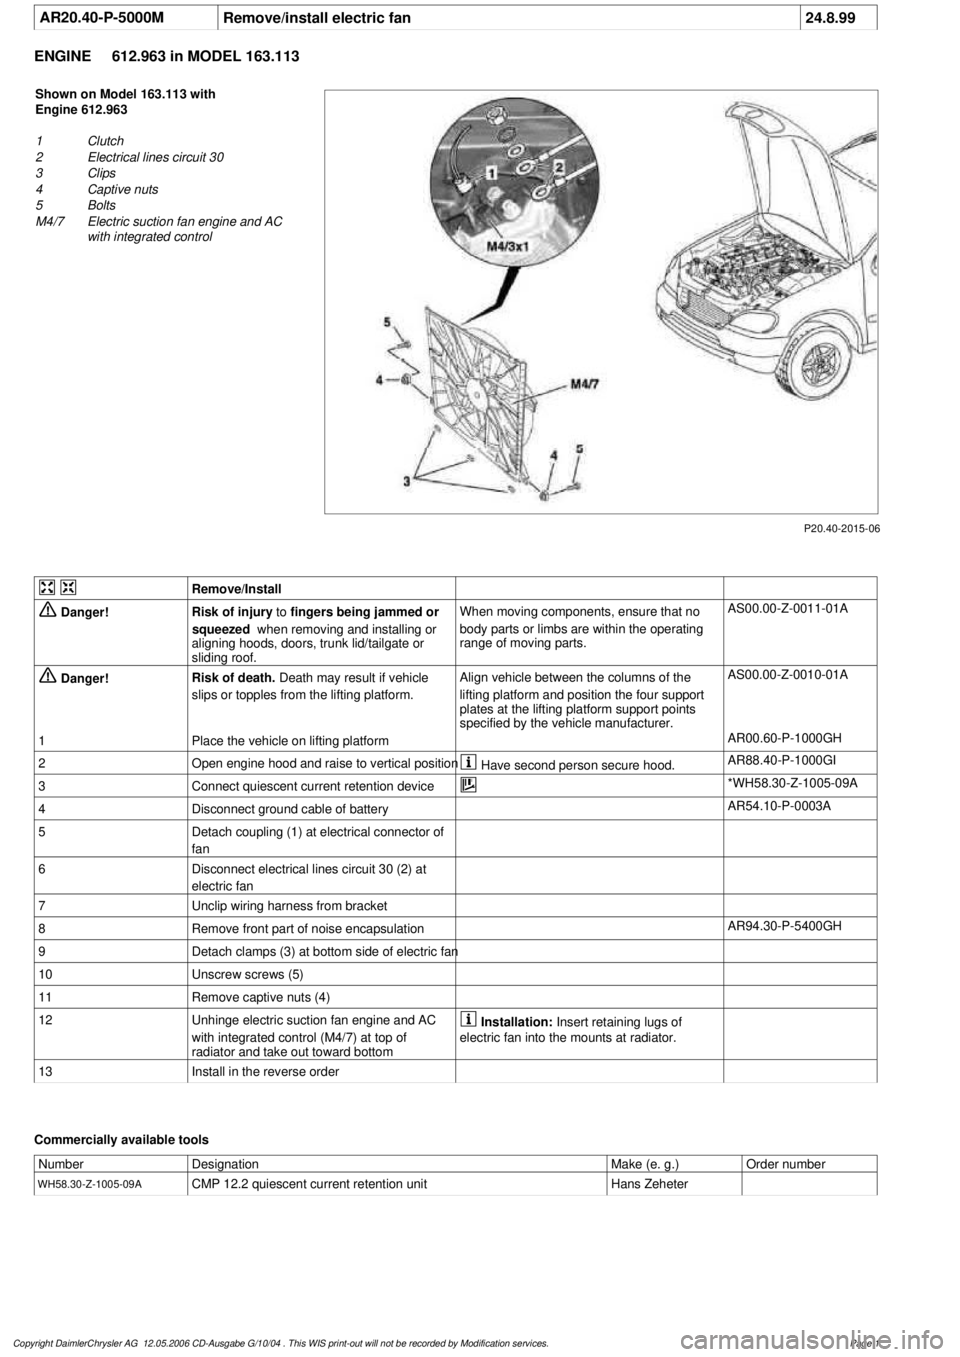
AR20.40-P-5000M
Remove/install electric fan
24.8.99
ENGINE
612.963 in MODEL 163.113
P20.40-2015-06
Shown on Model 163.113 with
Engine 612.963
1
Clutch
2
Electrical lines circuit 30
3
Clips
4
Captive nuts
5
Bolts
M4/7
Electric suction fan engine and AC
with integrated control
Remove/Install
Danger!
Risk of injury
to
fingers being jammed or
squeezed
when removing and installing or
aligning hoods, doors, trunk lid/tailgate or
sliding roof.
When moving components, ensure that no
body parts or limbs are within the operating
range of moving parts.
AS00.00-Z-0011-01A
Danger!
Risk of death.
Death may result if vehicle
slips or topples from the lifting platform.
Align vehicle between the columns of the
lifting platform and position the four support
plates
at the lifting platform support points
specified by the vehicle manufacturer.
AS00.00-Z-0010-01A
1
Place the vehicle on lifting platform
AR00.60-P-1000GH
2
Open engine hood and raise to vertical position
Have second person secure hood.
AR88.40-P-1000GI
3
Connect quiescent current retention device
*WH58.30-Z-1005-09A
4
Disconnect ground cable of battery
AR54.10-P-0003A
5
Detach coupling (1) at electrical connector of
fan
6
Disconnect electrical lines circuit 30 (2) at
electric fan
7
Unclip wiring harness from bracket
8
Remove front part of noise encapsulation
AR94.30-P-5400GH
9
Detach clamps (3) at bottom side of electric fan
10
Unscrew screws (5)
11
Remove captive nuts (4)
12
Unhinge electric suction fan engine and AC
with integrated control (M4/7) at top of
radiator and take out toward bottom
Installation:
Insert retaining lugs of
electric fan into the mounts at radiator.
13
Install in the reverse order
Commercially available tools
Number
Designation
Make (e. g.)
Order number
WH58.30-Z-1005-09A
CMP 12.2 quiescent current retention unit
Hans Zeheter
Copyright DaimlerChrysler AG 12.05.2006 CD-Ausgabe G/10/04 . This WIS print-out will not be recorde
d by Modification services.
Page 1
Page 3760 of 4133
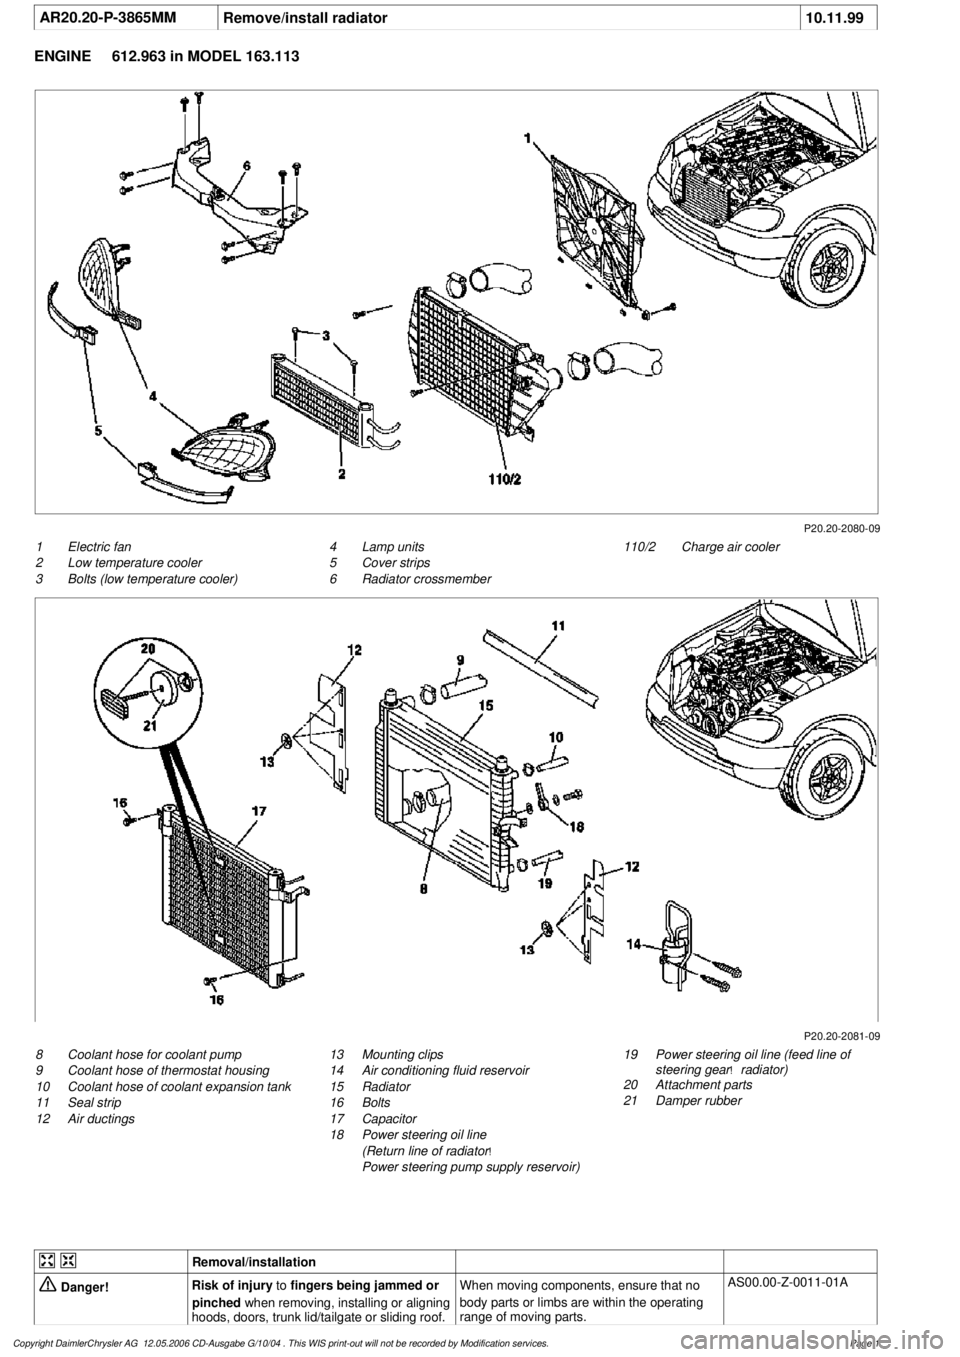
AR20.20-P-3865MM
Remove/install radiator
10.11.99
ENGINE
612.963 in MODEL 163.113
P20.20-2080-09
1
Electric fan
2
Low temperature cooler
3
Bolts (low temperature cooler)
110/2
Charge air cooler
4
Lamp units
5
Cover strips
6
Radiator crossmember
P20.20-2081-09
8
Coolant hose for coolant pump
9
Coolant hose of thermostat housing
10
Coolant hose of coolant expansion tank
11
Seal strip
12
Air ductings
19
Power steering oil line (feed line of
steering gear
!
radiator)
20
Attachment parts
21
Damper rubber
13
Mounting clips
14
Air conditioning fluid reservoir
15
Radiator
16
Bolts
17
Capacitor
18
Power steering oil line
(Return line of radiator
!
Power steering pump supply reservoir)
Removal/installation
Danger!
Risk of injury
to
fingers being jammed or
pinched
when removing, installing or aligning
hoods, doors, trunk lid/tailgate or sliding roof.
When moving components, ensure that no
body parts or limbs are within the operating
range of moving parts.
AS00.00-Z-0011-01A
Copyright DaimlerChrysler AG 12.05.2006 CD-Ausgabe G/10/04 . This WIS print-out will not be recorde
d by Modification services.
Page 1
Page 3761 of 4133

Danger!
Risk of injury
to skin and eyes suffering
scalding from contact with hot coolant spray.
Risk of poisoning
from swallowing coolant.
Do not open cooling system unless coolant
temperature is below 90 °C. Open cap slowly
and release the pressure. Do not pour coolant
into beverage bottles.
Wear protective gloves, protective clothing
and eye protection.
AS20.00-Z-0001-01A
1
Open engine hood and raise to vertical position
Have second person secure hood.
AR88.40-P-1000GI
2
Connect no load current retention unit
*WH58.30-Z-1005-09A
3
Disconnect battery ground cable
AR54.10-P-0003A
4
Remove trim panel of cylinder head cover
AR01.20-P-5014-02B
*BA01.20-P-1002-01A
*BA01.20-P-1003-01A
5
Remove bottom part of noise encapsulation
at front
AR94.30-P-5400GH
6
Remove electric fan (1)
Remove toward bottom.
AR20.40-P-5000M
7
Drain coolant
At radiator.
AR20.00-P-1142M
Notes on coolant
All engines
AH20.00-N-2080-01A
8
Remove charge air cooler (110/2)
AR09.41-P-6817MM
9.1
Attach guard plate for radiator/condenser
With automatic air conditioning, code
581a and AC system or Tempmatic USA,
code 580.
Attach additional AC condenser in the
vehicle.
y
Guard plate for radiator/condenser
Engine 606 in model 124,
Engine 606.961 in model 140,
Engine 112, 113, 604, 605, 611.960 in
MODEL 202,
Engine 602.983, 612.966 in MODEL 461,
Engine 628.962, 612.965, 606.964, 112.945,
113.962/ 982 in MODEL 463,
Engine 111, 112, 611.962, 612.962 in model
203,
Engines 112, 113, 611.961, 612.961, 613.961
in MODEL 210,
Engine 112 in model 170,
Engine 112 in MODEL 220,
Engine 113 in MODEL 211, 215, 220,
Engine 112 in MODEL 208,
Engine 112, 612.963, 628.963 in MODEL 163,
Engine 112.923 /943, 113.961 in MODEL 129,
Engine 137, 275 in MODEL 215, 220,
Engine 613.960, 628.960 in MODEL 220,
Engine 113.992 in model 230.474,
Engine 271 in model 209, 203,
Engine 285.950 in model 240.078 /178,
Engine 612.967 in model 209.316,
Engine 648 in model 220
Engine 112.951 in model 639.601/603/
605/701/703/705/801/803/805
Engine 646.983/984 in model 639.601/
603/605/701/703/705/801/803/805
Engine 646.982 in model
639.601/603/605/701/703/705
WF58.50-P-0110-01A
10
Remove seal rail (11)
11
Extract steering oil from reservoir
Hand pump
*210589007100
12.1
Disconnect power steering oil line (return line
radiator
!
power steering pump supply
reservoir) (18)
Seal connections.
Installation:
Install new sealing rings.
*BA46.30-P-1012-01A
Clamp
*000589543700
Set of stop plugs
*129589009100
12.2
Disconnect power steering oil line (feed line of
steering gear
!
radiator) (19)
Clamp
*000589543700
Set of stop plugs
*129589009100
Hexagon socket wrench
*WH58.30-Z-1001-06A
Hexagon socket wrench
*WH58.30-Z-1002-06A
Copyright DaimlerChrysler AG 12.05.2006 CD-Ausgabe G/10/04 . This WIS print-out will not be recorde
d by Modification services.
Page 2
Page 3762 of 4133

13
Disconnect coolant hose to coolant pump (8),
coolant hose from thermostat housing (9) and
coolant hose from coolant expansion tank
(10) at radiator
Hexagon socket wrench
*WH58.30-Z-1001-06A
Hexagon socket wrench
*WH58.30-Z-1002-06A
14
Detach air guides (12)
Installation:
Replace fastening clamps
(13)
15
Unscrew bolts (16) at condenser (17) to
radiator
Avoid deformation of condenser lines.
Do not disconnect lines.
16
Remove attachment parts (20) and rubber
shock absorber (21)
Installation:
Ensure, that the rubber
shock absorbers do not drop when installing
the radiator.
Replace fastening clamps.
17
Take off fluid reservoir of AC (14) at radiator
Place to the side with lines connected.
External torx set
*001589760900
18
Remove bracket of charge air pipe at left
radiator
Installation:
Insert bracket of charge air
pipe into the bracket at the radiator.
19
Remove radiator (15)
Installation:
When installing, the mounting
studs of the radiator must be inserted into the
rubber grommets of the lower crossmember.
20
Install in the reverse order
21
Check headlamp adjustment, correct if
necessary
e
Check and correct headlamp adjustment
AP82.10-P-8260A
22
Inspect cooling system for leaks
AR20.00-P-1010HA
23
Fill power steering pump and bleed
Danger!
Risk of accident
caused by vehicle starting
off by itself when engine is running.
Risk of
injury
caused by contusions and burns when
working in engine during starting procedure
Secure vehicle to prevent it from moving.
Wear closed and snug-fitting work clothes.
Do not grasp hot or rotating parts.
AS00.00-Z-0005-01A
24
Run engine and inspect for leaks
Crankcase ventilation, cylinder head cover
Number
Designation
Engine
612.963
BA01.20-P-1002-01A
Bolt, cylinder head cover trim panel to
cylinder head cover
Nm
10
BA01.20-P-1003-01A
Bolt, cover panel to charge air distribution
pipe
Nm
10
Power steering pump
Number
Designation
Model
163.113
BA46.30-P-1012-01A
Banjo bolt, power steering oil line to radiator
Nm
30
Cooling system
Number
Designation
Engine
612.963
BF20.00-P-1001-02E
Cooling system
Total capacity
Liter
Y
11.0
Copyright DaimlerChrysler AG 12.05.2006 CD-Ausgabe G/10/04 . This WIS print-out will not be recorde
d by Modification services.
Page 3