oil MERCEDES-BENZ ML320 1997 Complete Repair Manual
[x] Cancel search | Manufacturer: MERCEDES-BENZ, Model Year: 1997, Model line: ML320, Model: MERCEDES-BENZ ML320 1997Pages: 4133, PDF Size: 88.89 MB
Page 3207 of 4133

AP88.40-P-8821GH
Lubricating hood catch, locking hook and hinges
2.7.97
MODEL
163
Engine hood lock version up to
31/ 08/ 99
P88.40-0381-01 P88.40-0380-01
P88.40-2082-01
E
ngine hood lock version as of
01/ 09/ 99
P88.40-2083-01
1
Oil locking hook (arrow)
Use engine oil
2
Inspect ease of operation of locking hook
3
Grease hood lock (arrows)
*BR00.45-Z-1001-06A
Repair products
Number
Designation
Order number
BR00.45-Z-1001-06A
MB longlife grease
000 989 63 51
Copyright DaimlerChrysler AG 09.05.2006 CD-Ausgabe G/10/04 . This WIS print-out will not be recorde
d by Modification services.
Page 1
Page 3210 of 4133

OS00.00-P-1001-01A
Releasing gas from gas strut and emptying
Danger!
Risk of injury
from drilling gas-filled
subassemblies or components (gas filling non-
combustible)
Wear safety glasses and face mask.
AS00.00-Z-0006-01A
P88.40-0216-01
1
Clamp gas-operated strut in machine vise of pillar drilling machine.
Conrod must point away from body, no other persons must be within danger area.
2
Drill gas-operated strut approx. 20 mm (dimension a) from bottom of gas-operated strut
4
with a 3 mm drill (arrow). Drill with as little force as possible.
3
Unclamp gas-operated strut, pump gas-operated strut empty by pressing conrod in several
times.
Observe regulations for disposal of hydraulic oil.
4
Dispose of gas-operated strut (worn part).
Copyright DaimlerChrysler AG 09.05.2006 CD-Ausgabe G/10/04 . This WIS print-out will not be recorde
d by Modification services.
Page 1
Page 3212 of 4133

2000-01 MANUAL A/C-HEATER SYSTEMS
ML 320, ML 430 & ML 55
SPECIFICATIONS
SPECIFICATIONS
DESCRIPTION & OPERATION
A/C CONTROL PANEL
The A/C control panel contains switches to control A/C functions such as blower motor speed, mode control,
i
n-vehicle temperature, A/C on/off, and fresh/recirculated air control. See Fig. 1.
ApplicationSpecification
Compressor TypeNippondenso 7SB16 7-Cyl.
Compressor Belt Tension(1)
Compressor Oil Capacity(2) 5.6-6.3 ozs.
Refrigerant (R-134a) Capacity26.4 ozs.
System Operating Pressures(3)
(1)Belt tension is automatically adjusted by belt tensioner.
(2)Use Densooil 8 (A 001 989 08 03).
(3)Information is not available from manufacturer.
WARNING:To avoid injury from Accidental air bag deployment, read and carefully
follow all SERVICE PRECAUTIONS and DISABLING & ACTIVATING AIR
BAG SYSTEM procedures in AIR BAG SYSTEM SAFETY article in
GENERAL SERVICING.
2001 Mercedes-Benz ML320
2000-01 MANUAL A/C-HEATER SYSTEMS ML 320, ML 430 & ML 55
2001 Mercedes-Benz ML320
2000-01 MANUAL A/C-HEATER SYSTEMS ML 320, ML 430 & ML 55
me
Saturday, October 02, 2010 3:25:10 PMPage 1 © 2006 Mitchell Repair Information Company, LLC.
me
Saturday, October 02, 2010 3:25:13 PMPage 1 © 2006 Mitchell Repair Information Company, LLC.
Page 3228 of 4133
A/C housing. Disconnect control module connector. To install reverse removal procedure. Recode 5-digit radio
security code. Using HHT, check for DTC and erase, and set clock.
A/C PUSH BUTTON CONTROL PANEL
Removal & Installation
1. Obtain 5-digit radio security code from vehicle owner. Disconnect negative battery cable. Using radio
removal plates, remove radio. Disconnect electrical connectors.
2. Remove instrument panel center section. Remove 4 A/C control panel screws and remove control panel.
Release pull cables and disconnect connectors. To install, reverse removal procedure. Recode radio. See
RECODING RADIO
under PROGRAMMING.
BLOWER MOTOR
Removal & Installation
Remove passenger-side instrument panel under cover. Remove blower motor mounting screws from A/C
housing unit. Disconnect blower motor connector and remove blower motor. To install, reverse removal
procedure.
COMPRESSOR
Removal & Installation
1. Discharge A/C system, using approved refrigerant recovery/recycling equipment. Remove accessory
drive belt. Disconnect low pressure refrigerant line from compressor. Discard "O" rings. Plug exposed
openings to protect A/C system from debris and moisture.
2. Disconnect high pressure refrigerant line from compressor. Discard "O" rings. Plug exposed openings to
protect A/C system from debris and moisture. Disconnect electrical connector. Remove compressor
mounting bolts.
3. Raise and support vehicle. Remove compressor from under vehicle without spilling refrigerant oil. To
install, reverse removal procedure. Ensure refrigerant oil quantity in compressor is correct. See
COMPRESSOR REFRIGERANT OIL CHECKING under GENERAL SERVICING. Tighten bolts to
specification. See TORQUE SPECIFICATIONS
.
CONDENSER
Removal & Installation
1. Discharge A/C system, using approved refrigerant recovery/recycling equipment. Remove cooling fans.
See COOLING FANS
. Disconnect refrigerant line from receiver-drier. See Fig. 5 . Discard "O" rings.
2. Plug exposed openings to protect A/C system from debris and moisture. Remove refrigerant line from
condenser. Remove radiator upper rubber seal. See Fig. 6
. Remove condenser upper mounting screws.
Lift condenser upward and remove. NOTE: Each time A/C compressor is removed and installed, receiver-drier must be
replaced.
2001 Mercedes-Benz ML320
2000-01 MANUAL A/C-HEATER SYSTEMS ML 320, ML 430 & ML 55
me
Saturday, October 02, 2010 3:25:10 PMPage 17 © 2006 Mitchell Repair Information Company, LLC.
Page 3229 of 4133

3. To install, reverse removal procedure. Use NEW "O" rings lubricated with refrigerant oil. If installing a
new or repaired condenser, add 0.68 ounce of NEW refrigerant oil to condenser. Tighten refrigerant line
bolts to specification. See TORQUE SPECIFICATIONS.
2001 Mercedes-Benz ML320
2000-01 MANUAL A/C-HEATER SYSTEMS ML 320, ML 430 & ML 55
me
Saturday, October 02, 2010 3:25:10 PMPage 18 © 2006 Mitchell Repair Information Company, LLC.
Page 3232 of 4133
Fig. 6: Removing Cooling Fans & Condenser
Courtesy of MERCEDES-BENZ OF NORTH AMERICA.
COOLING FANS
Removal & Installation
Remove headlight units. Remove upper frame crossmember, release hood release control cable and remove
crossmember. See Fig. 6
. Remove 2 cooling fans frame bolts on radiator. Disconnect cooling fan connector.
Release outside temperature sensor wiring harness. Pull up on cooling fan and remove. To install, reverse
removal procedure. Ensure cooling fan bottom guides are properly seated in lower mounts.
EVAPORATOR
Removal & Installation
Remove A/C housing unit. See A/C HOUSING UNIT . Remove expansion valve. See Fig. 5 . Discard "O"
rings. Disassemble A/C housing unit. Remove evaporator. Remove evaporator temperature sensor. To install,
reverse removal procedure. Use NEW "O" rings lubricated with refrigerant oil. If installing a new or repair
evaporator, add 1.35 ounces of NEW refrigerant oil to evaporator.
EXPANSION VALVE
Removal & Installation
1. Discharge A/C system, using approved refrigerant recovery/recycling equipment. Without disconnecting
coolant hoses, remove coolant expansion reservoir and set aside. Remove refrigerant line bracket and
loosen clamps. See Fig. 5
. Pull refrigerant lines out of expansion valve.
2. Remove expansion valve self-locking nut and discard. Remove expansion valve. Discard "O" rings. To
install, reverse removal procedure. Use NEW "O" rings lubricated with refrigerant oil. Tighten NEW self-
locking nut to specification. See TORQUE SPECIFICATIONS
.
INSTRUMENT PANEL & INSTRUMENT PANEL CARRIER
Removal & Installation
1. Secure vehicle against rolling. Set transmission selector to "D" position. Obtain radio security code.
Disconnect negative battery cable. Remove driver-side air bag.
2. Place match marks on steering wheel and steering shaft. Remove steering wheel, upper steering column
covers and combination switch. Remove instrument cluster cover frame. Remove one instrument panel
lower section bolt.
3. Remove screws in footwell from left side of instrument panel bottom section. Remove instrument panel
center section. Remove 4 A/C control panel screws and remove control panel. See Fig. 1
. Release pull
cables and disconnect connectors.
4. Remove screws from center section. Remove glove box. Remove screws in footwell from right side of
instrument panel bottom section. Remove entry courtesy lights. Remove end covers and screws.
5. Release 4 "A" clips between instrument panel bottom section and upper section. See Fig. 7
. Release
parkin
g brake release cable from handle. With assistance, remove instrument panel bottom section.
2001 Mercedes-Benz ML320
2000-01 MANUAL A/C-HEATER SYSTEMS ML 320, ML 430 & ML 55
me
Saturday, October 02, 2010 3:25:10 PMPage 21 © 2006 Mitchell Repair Information Company, LLC.
Page 3236 of 4133
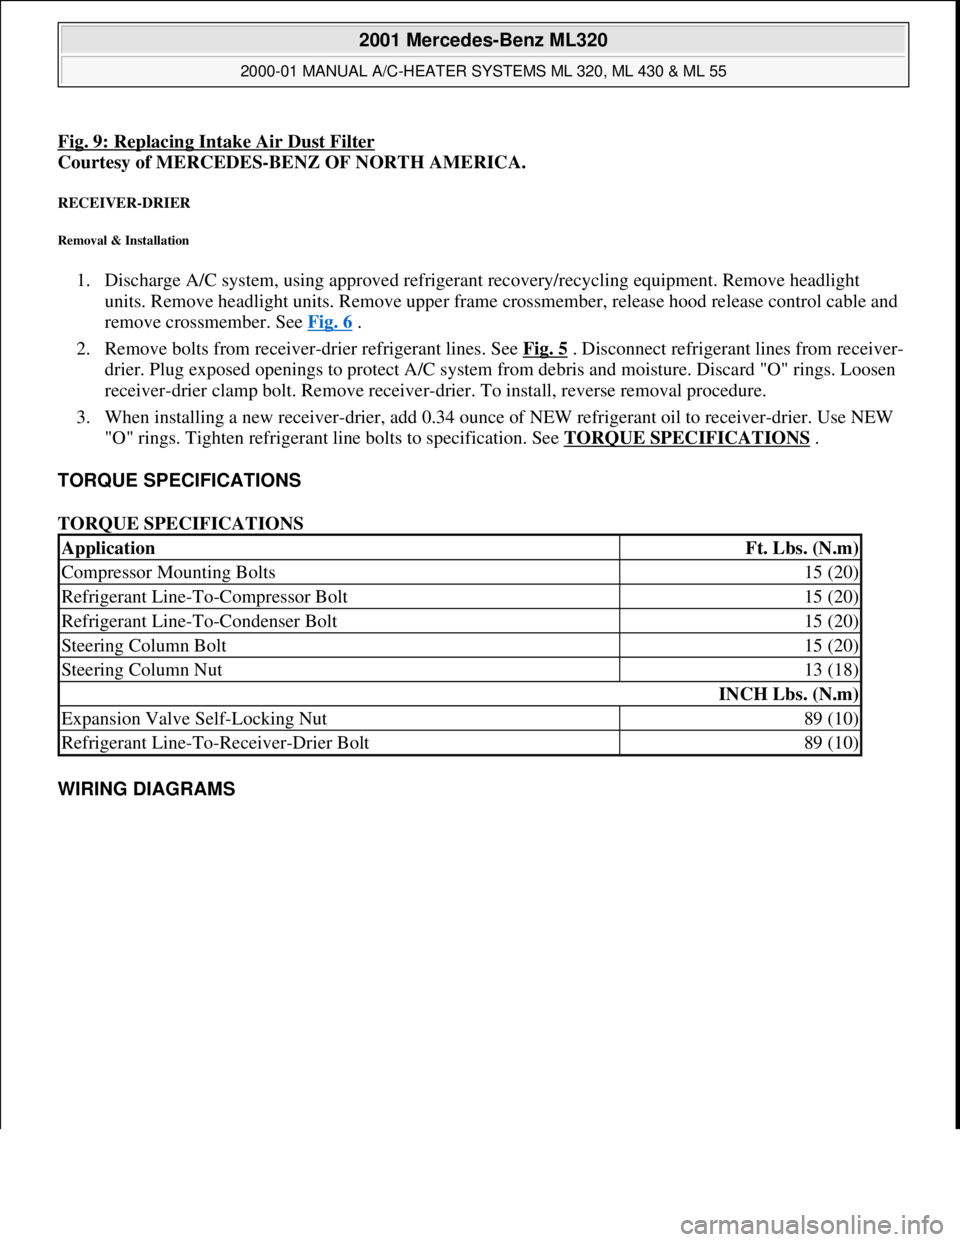
Fig. 9: Replacing Intake Air Dust Filter
Courtesy of MERCEDES-BENZ OF NORTH AMERICA.
RECEIVER-DRIER
Removal & Installation
1. Discharge A/C system, using approved refrigerant recovery/recycling equipment. Remove headlight
units. Remove headlight units. Remove upper frame crossmember, release hood release control cable and
remove crossmember. See Fig. 6
.
2. Remove bolts from receiver-drier refrigerant lines. See Fig. 5
. Disconnect refrigerant lines from receiver-
drier. Plug exposed openings to protect A/C system from debris and moisture. Discard "O" rings. Loosen
receiver-drier clamp bolt. Remove receiver-drier. To install, reverse removal procedure.
3. When installing a new receiver-drier, add 0.34 ounce of NEW refrigerant oil to receiver-drier. Use NEW
"O" rings. Tighten refrigerant line bolts to specification. See TORQUE SPECIFICATIONS
.
TORQUE SPECIFICATIONS
TORQUE SPECIFICATIONS
WIRING DIAGRAMS
ApplicationFt. Lbs. (N.m)
Compressor Mounting Bolts15 (20)
Refrigerant Line-To-Compressor Bolt15 (20)
Refrigerant Line-To-Condenser Bolt15 (20)
Steering Column Bolt15 (20)
Steering Column Nut13 (18)
INCH Lbs. (N.m)
Expansion Valve Self-Locking Nut89 (10)
Refrigerant Line-To-Receiver-Drier Bolt89 (10)
2001 Mercedes-Benz ML320
2000-01 MANUAL A/C-HEATER SYSTEMS ML 320, ML 430 & ML 55
me
Saturday, October 02, 2010 3:25:10 PMPage 25 © 2006 Mitchell Repair Information Company, LLC.
Page 3248 of 4133

All models fitted with air conditioning
Do not carry repair operations out on the air conditioning circuit in the open air during moist weather.
Moisture in the refrigerant circuit reduces the system's refrigeration output and leads to damage to the
components. The acidic substances produced by moisture within the system decompose the desiccant in the
fluid reservoir and damage the entire system.
After separating/unscrewing refrigerant lines, immediately seal off the connection openings so that they are
airproof using suitable stop plugs (parts kit).
Replace the fluid reservoir every time you open up the refrigeration circuit.
Always store all spare components in a dry, sealed-off area. Do not remove stop plugs in new components until
just before they are installed. Use special care when handling the receiver/dryer with its integral desiccation
unit.
When a receiver/dryer is left open, the dryer unit quickly becomes saturated with moisture, rendering it useless.
Check drier cartridge packaging for damage. Dispose of drier cartridges with damaged packaging.
Install the desiccant cartridge no later than 20 minutes after opening the packaging.
Further protection against moisture is provided by carefully evacuating the air conditioning system following
repair operations. By generating vacuum in the system, the evacuation process removes any moisture that might
have penetrated into the system.
NOTES ON RETROFITTING AN AIR CONDITIONING SYSTEM - AH83.30-P-0001-02A
Do not remove the plugs on any of the components until immediately prior to installation.
Fit all AC lines with new sealing rings. Coat thread and sealing rings with compressor oil.
BASIC KNOWLEDGE
VENTILATION, FUNCTION - GF83.10-P-2000GH
MODEL 163 up to 31.8.01
2001 Mercedes-Benz ML320
1998-2005 HVAC Climate Control - 163 Chassis
me
Saturday, October 02, 2010 3:23:14 PMPage 4 © 2006 Mitchell Repair Information Company, LLC.
Page 3344 of 4133

Fig. 80: Identifying AC Electric Suction Fan With Integrated Control
CONDENSER FUNCTION - GF83.40-P-2120-01GC
Function
The hot, gaseous refrigerant routed into the condenser passes the heat (compression heat) to the coiled pipes and
slats. These then very quickly absorb the refrigerant's heat and transmit the heat to the outside air passing
through. This in turn cools the refrigerant.
By cooling down, the refrigerant is liquefied (condensed). The liquid heat refrigerant is then carried away from
the condenser and flows into the fluid reservoir.
CONDENSER, LOCATION - GF83.40-P-2120-02GH
The condenser (7) is located directly in front of the radiator.
2001 Mercedes-Benz ML320
1998-2005 HVAC Climate Control - 163 Chassis
me
Saturday, October 02, 2010 3:23:16 PMPage 100 © 2006 Mitchell Repair Information Company, LLC.
Page 3369 of 4133
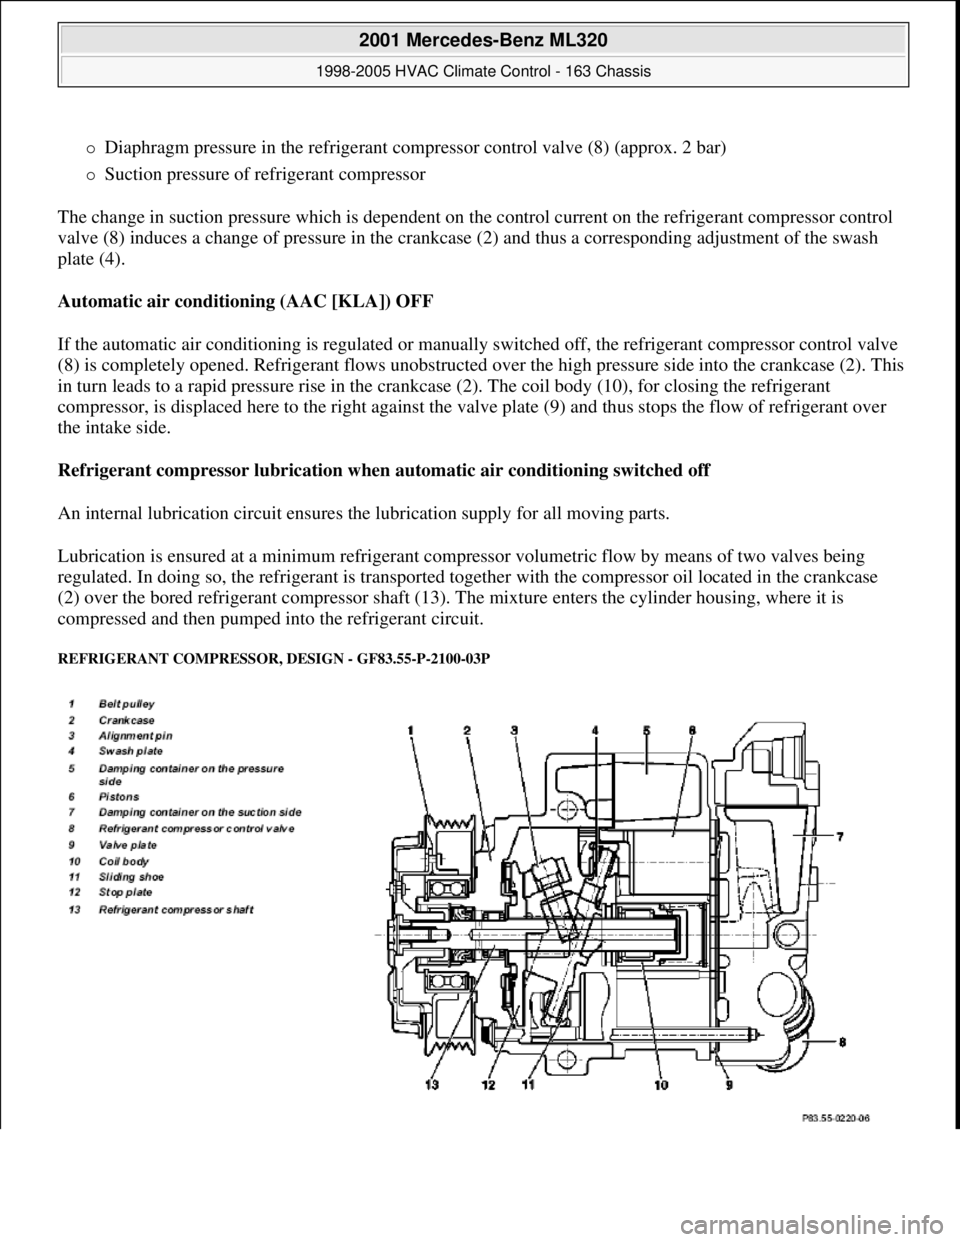
Diaphragm pressure in the refrigerant compressor control valve (8) (approx. 2 bar)
Suction pressure of refrigerant compressor
The change in suction pressure which is dependent on the control current on the refrigerant compressor control
valve (8) induces a change of pressure in the crankcase (2) and thus a corresponding adjustment of the swash
plate (4).
Automatic air conditioning (AAC [KLA]) OFF
If the automatic air conditioning is regulated or manually switched off, the refrigerant compressor control valve
(8) is completely opened. Refrigerant flows unobstructed over the high pressure side into the crankcase (2). This
in turn leads to a rapid pressure rise in the crankcase (2). The coil body (10), for closing the refrigerant
compressor, is displaced here to the right against the valve plate (9) and thus stops the flow of refrigerant over
the intake side.
Refrigerant compressor lubrication when automatic air conditioning switched off
An internal lubrication circuit ensures the lubrication supply for all moving parts.
Lubrication is ensured at a minimum refrigerant compressor volumetric flow by means of two valves being
regulated. In doing so, the refrigerant is transported together with the compressor oil located in the crankcase
(2) over the bored refrigerant compressor shaft (13). The mixture enters the cylinder housing, where it is
compressed and then pumped into the refrigerant circuit.
REFRIGERANT COMPRESSOR, DESIGN - GF83.55-P-2100-03P
2001 Mercedes-Benz ML320
1998-2005 HVAC Climate Control - 163 Chassis
me
Saturday, October 02, 2010 3:23:16 PMPage 125 © 2006 Mitchell Repair Information Company, LLC.