key MERCEDES-BENZ ML320 1997 Complete Repair Manual
[x] Cancel search | Manufacturer: MERCEDES-BENZ, Model Year: 1997, Model line: ML320, Model: MERCEDES-BENZ ML320 1997Pages: 4133, PDF Size: 88.89 MB
Page 5 of 4133
UNDEPLOYED AIR BAG/ETR
After deploying procedures and/or diagnostic testing have confirmed air bag module and/or ETR is
undeployable, contact vehicle manufacturer for proper disposal instructions.
REMOVAL & INSTALLATION
CLOCKSPRING ASSEMBLY
Removal & Installation
1. Before proceeding, see SERVICE PRECAUTIONS . Disable air bag system. See DISABLING &
ACTIVATING AIR BAG SYSTEM .
2. Remove driver air bag module. See DRIVER
-SIDE AIR BAG MODULE . Remove steering wheel bolt.
Using a puller, remove steering wheel. Disconnect lower clockspring connector. Turn 2 fixing screws
(locating on clockspring) counterclockwise until clockspring cannot be rotated. Remove clockspring
mounting screws as necessary. Disconnect all necessary electrical connectors. Remove clockspring
assembly. To install, reverse removal procedure. Activate air bag system. See DISABLING &
ACTIVATING AIR BAG SYSTEM . Perform system operation check to ensure system is functioning
properly. See SYSTEM OPERATION CHECK
.
CONTROL UNIT
Removal & Installation (C Class)
1. Before proceeding, see SERVICE PRECAUTIONS . Disable air bag system. See DISABLING &
ACTIVATING AIR BAG SYSTEM . Remove ignition key. Remove shift lever cover bezel. Lift shift
lever cover enough to disconnect electrical connector. Remove shift lever cover.
2. Remove storage compartment mounting screws from center console. Remove storage compartment.
Remove ashtray. Disconnect electrical connectors as necessary. Disconnect control module electrical
connector. Remove control module mounting bolts. Remove control module.
3. To install, reverse removal procedure. Ensure control module arrow points to front of vehicle. Set
parameters and program new control module with Hand-Held Tester (965 589 00 01 00). Activate air bag
system. Perform system operation check to ensure system is functioning properly. See SYSTEM
OPERATION CHECK .
Removal & Installation (E Class)
1. Before proceeding, see SERVICE PRECAUTIONS . Disable air bag system. See DISABLING &
ACTIVATING AIR BAG SYSTEM . Remove ignition key. Remove gear shift cover panel. Remove
ashtray and ashtray housing at front of console. Remove radio (if necessary).
2. Remove center console right side cover screws and right side cover. Disconnect electrical connector for
control unit. Remove 2 control unit mounting screws. Remove control unit. WARNING:Failure to follow service precautions may result in air bag deployment and
personal injury. See SERVICE PRECAUTIONS
. After component
replacement, check system operation. See SYSTEM OPERATION CHECK
.
1998 Mercedes-Benz ML320
AIR BAG RESTRAINT SYSTEM 1998 AIR BAG RESTRAINT SYSTEMS Mercedes-Benz
me
Saturday, October 02, 2010 3:33:13 PMPage 5 © 2006 Mitchell Repair Information Company, LLC.
Page 6 of 4133
3. To install, reverse removal procedure. Ensure control module arrow points to front of vehicle. Set
parameters and program new control module with Hand-Held Tester (965 589 00 01 00). Activate air bag
system. Perform system operation check to ensure system is functioning properly. See SYSTEM
OPERATION CHECK .
Removal & Installation (S Class)
1. Before proceeding, see SERVICE PRECAUTIONS . Disable air bag system. See DISABLING &
ACTIVATING AIR BAG SYSTEM . Remove ignition key. Remove radio. Remove ashtray. Remove
wooden surround for ashtray. Remove shift lever cover mounting screws. Push shift lever cover toward
rear of vehicle and remove in an upward direction.
2. Remove center console cover screws. Remove center console cover by pulling from bottom in an upward
direction. When removing covers, disconnect electrical connectors as necessary. Disconnect control
module electrical connector. Remove control module.
3. To install, reverse removal procedure. Ensure control module arrow points to front of vehicle. Set
parameters and program new control module with Hand-Held Tester (965 589 00 01 00). Activate air bag
system. Perform system operation check to ensure system is functioning properly. See SYSTEM
OPERATION CHECK .
Removal & Installation (SL Class)
1. Before proceeding, see SERVICE PRECAUTIONS . Disable air bag system. See DISABLING &
ACTIVATING AIR BAG SYSTEM . Remove ignition key. Remove radio. Push up and pull out heater
control panel. Unplug 2 connectors. Remove screw in middle of storage tray.
2. Bend up at top corners and lift out storage tray. Remove screws below storage tray. Lift wood trim panel
at rear, pull down and out of catches. Unplug switch connectors and remove wood trim panel. Unplug
connectors at control unit and remove Torx mounting screws. Remove control unit.
3. To install, reverse removal procedure. Ensure control module arrow points to front of vehicle. Set
parameters and program new control module with Hand-Held Tester (965 589 00 01 00). Activate air bag
system. Perform system operation check to ensure system is functioning properly. See SYSTEM
OPERATION CHECK .
Removal & Installation (CLK 320 & SLK 230)
1. Before proceeding, see SERVICE PRECAUTIONS . Disable air bag system. See DISABLING &
ACTIVATING AIR BAG SYSTEM . Remove ignition key. Remove cover on center console. Remove
cover on shift lever. Remove ash tray housing with storage compartment at front of center console.
Unplug connectors at control unit and remove Torx mounting screws. Remove control unit.
2. To install, reverse removal procedure. Ensure control module arrow points to front of vehicle. Set
parameters and program new control module with Hand-Held Tester (965 589 00 01 00). Activate air bag
system. Perform system operation check to ensure system is functioning properly. See SYSTEM
OPERATION CHECK .
DRIVER-SIDE AIR BAG MODULE
NOTE: Air bag module and steering wheel must be replaced following a collision in
1998 Mercedes-Benz ML320
AIR BAG RESTRAINT SYSTEM 1998 AIR BAG RESTRAINT SYSTEMS Mercedes-Benz
me
Saturday, October 02, 2010 3:33:13 PMPage 6 © 2006 Mitchell Repair Information Company, LLC.
Page 7 of 4133
Removal & Installation
1. Before proceeding, see SERVICE PRECAUTIONS . Disable air bag system. See DISABLING &
ACTIVATING AIR BAG SYSTEM . Remove ignition key. Remove 2 Torx screws from rear of
steering wheel. Lift off air bag module enough to unplug connector from rear of module. Place module
away from work area, with pad facing upward.
2. To install, reverse removal procedure. Tighten Torx screws to specification. See TORQUE
SPECIFICATIONS . Activate air bag system. Perform system operation check to ensure system is
functioning properly. See SYSTEM OPERATION CHECK
.
SIDE AIR BAG UNIT - DRIVER-SIDE & PASSENGER-SIDE
Removal & Installation
1. Before proceeding, see SERVICE PRECAUTIONS . Disable air bag system. See DISABLING &
ACTIVATING AIR BAG SYSTEM . Remove ignition key. Drill out rivets at retaining plate of side air
bag unit. Pull air bag unit out of door. Disconnect connector at driver-side air bag squib. Remove unit
from vehicle. See Fig. 2
.
2. To install, connect connector so that connector audibly clicks when connector engages. Install unit in
door trim panel and rivet using only special rivets (Part No. 003 990 0097). Perform system operation
check to ensure s
ystem is functioning properly. See SYSTEM OPERATION CHECK . which air bag was deployed.
1998 Mercedes-Benz ML320
AIR BAG RESTRAINT SYSTEM 1998 AIR BAG RESTRAINT SYSTEMS Mercedes-Benz
me
Saturday, October 02, 2010 3:33:13 PMPage 7 © 2006 Mitchell Repair Information Company, LLC.
Page 9 of 4133
Fig. 2: Removing Side Air Bag Unit
Courtesy of MERCEDES-BENZ OF NORTH AMERICA
SIDE AIR BAG SENSOR - DRIVER-SIDE & PASSENGER-SIDE
Removal & Installation
1. Before proceeding, see SERVICE PRECAUTIONS . Disable air bag system. See DISABLING &
ACTIVATING AIR BAG SYSTEM . Remove ignition key. On SLK 230, remove door sill moulding.
On all models, remove front seat. Fold floor covering in area toward rear. Unclip connector on side bag
sensor. Remove 2 mounting screws. Remove sensor from vehicle.
2. To install, reverse removal procedure. Ensure that arrow on sensor points toward outside. Perform system
operation check to ensure system is functioning properly. See SYSTEM OPERATION CHECK
.
1998 Mercedes-Benz ML320
AIR BAG RESTRAINT SYSTEM 1998 AIR BAG RESTRAINT SYSTEMS Mercedes-Benz
me
Saturday, October 02, 2010 3:33:14 PMPage 9 © 2006 Mitchell Repair Information Company, LLC.
Page 11 of 4133
Fig. 3: Removing Side Air Bag Sensor (E Class Shown; Others Are Similar)
Courtesy of MERCEDES-BENZ OF NORTH AMERICA
OCCUPIED SEAT RECOGNITION SENSOR
Removal & Installation
1. Before proceeding, see SERVICE PRECAUTIONS . Disable air bag system. See DISABLING &
ACTIVATING AIR BAG SYSTEM .
2. Remove cover on front seat cushion. Remove ignition key. Unclip connection for occupied seat
recognition sensor on seat connector block. Remove electrical connection lead from seat and pull upward
out of rubberized fiber matting. See Fig. 4
.
3. To install, lay out occupied seat recognition sensor uniformly on rubberized fiber matting. Fabric side
should point upward. Do not kink occupied seat sensor. Reverse removal procedure. Perform system
operation check to ensure s
ystem is functioning properly. See SYSTEM OPERATION CHECK.
1998 Mercedes-Benz ML320
AIR BAG RESTRAINT SYSTEM 1998 AIR BAG RESTRAINT SYSTEMS Mercedes-Benz
me
Saturday, October 02, 2010 3:33:14 PMPage 11 © 2006 Mitchell Repair Information Company, LLC.
Page 12 of 4133
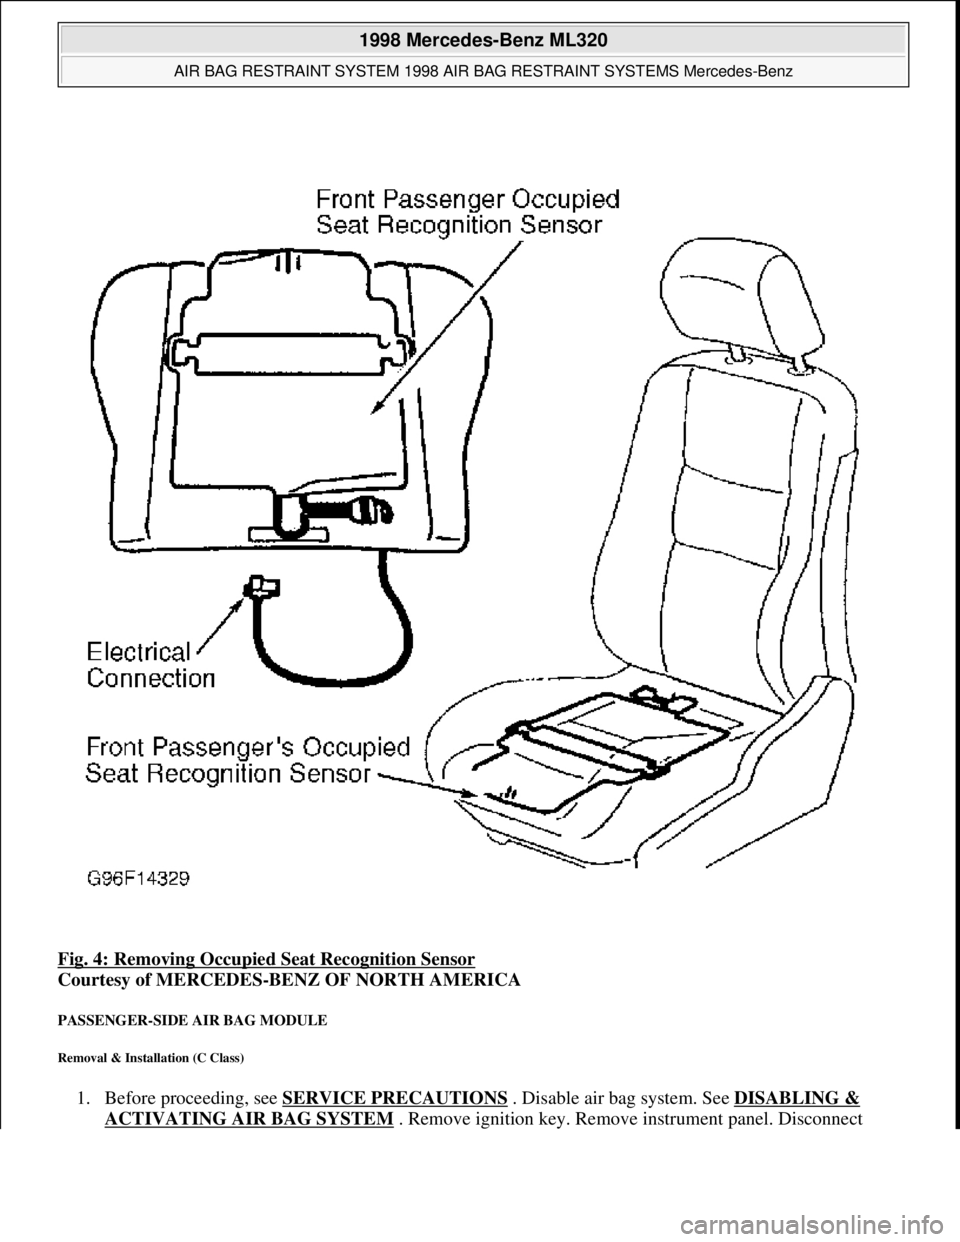
Fig. 4: Removing Occupied Seat Recognition Sensor
Courtesy of MERCEDES-BENZ OF NORTH AMERICA
PASSENGER-SIDE AIR BAG MODULE
Removal & Installation (C Class)
1. Before proceeding, see SERVICE PRECAUTIONS . Disable air bag system. See DISABLING &
ACTIVATING AIR BAG SYSTEM. Remove ignition key. Remove instrument panel. Disconnect
1998 Mercedes-Benz ML320
AIR BAG RESTRAINT SYSTEM 1998 AIR BAG RESTRAINT SYSTEMS Mercedes-Benz
me
Saturday, October 02, 2010 3:33:14 PMPage 12 © 2006 Mitchell Repair Information Company, LLC.
Page 13 of 4133
passenger-side air bag module squib connector. Remove 4 passenger-side air bag module mounting nuts.
2. To install, reverse removal procedure. Ensure passenger-side air bag module squib connector audibly
clicks when connecting connector. Activate air bag system. Perform system operation check to ensure
system is functioning properly. See SYSTEM OPERATION CHECK
.
Removal & Installation (E Class)
1. Before proceeding, see SERVICE PRECAUTIONS . Disable air bag system. See DISABLING &
ACTIVATING AIR BAG SYSTEM . Remove ignition key. Remove 2 central mounting bolts for
passenger-side air bag module. Lift air bag module enough to unplug connector from rear of module.
Place module away from work area, with pad facing upward.
2. If necessary to replace passenger air bag installation frame, remove 4 frame mounting bolts. Remove
installation frame from vehicle.
3. To install air bag module or installation frame, reverse removal procedure. Activate air bag system.
Perform system operation check to ensure system is functioning properly. See SYSTEM OPERATION
CHECK .
Removal & Installation (S Class)
1. Before proceeding, see SERVICE PRECAUTIONS . Disable air bag system. See DISABLING &
ACTIVATING AIR BAG SYSTEM . Remove ignition key. Open glove box door. Remove 4 clips
securing glove box. Remove glove box compartment. When removing compartment, disconnect glove
box light. Remove glove box door lock striker.
2. Disconnect passenger-side air bag module squib connector. Remove 4 passenger-side air bag module
mounting nuts. Remove passenger-side air bag module through glove box opening. Place module away
from work area with pad facing up.
3. To install, reverse removal procedure. Ensure module squib connector audibly clicks when connecting
connector. Activate air bag system. Perform system operation check to ensure system is functioning
properly. See SYSTEM OPERATION CHECK
.
Removal & Installation (SL Class)
1. Before proceeding, see SERVICE PRECAUTIONS . Disable air bag system. See DISABLING &
ACTIVATING AIR BAG SYSTEM . Remove ignition key. Remove cover below instrument panel.
Remove one bolt in installation slot of center air outlet, and one bolt below right air outlet.
2. Remove air bag panel (3 Phillips screws and 2 hex bolts). Unplug connector at squib of passenger-side air
bag unit. Remove mounting bolts. Pull off and take air bag out of panel opening.
3. To install air bag module, reverse removal procedure. Activate air bag system. Perform system operation
check to ensure system is functioning properly. See SYSTEM OPERATION CHECK
.
Removal & Installation (CLK 320)
1. Before proceeding, see SERVICE PRECAUTIONS . Disable air bag system. See DISABLING &
ACTIVATING AIR BAG SYSTEM . Remove ignition key. Remove instrument panel. Disconnect
passenger-side air bag module connector. Remove 4 screws and passenger-side air bag module.
2. To install air ba
g module, reverse removal procedure. Activate air bag system. Perform system operation
1998 Mercedes-Benz ML320
AIR BAG RESTRAINT SYSTEM 1998 AIR BAG RESTRAINT SYSTEMS Mercedes-Benz
me
Saturday, October 02, 2010 3:33:14 PMPage 13 © 2006 Mitchell Repair Information Company, LLC.
Page 14 of 4133
check to ensure system is functioning properly. See SYSTEM OPERATION CHECK .
Removal & Installation (SLK 230)
1. Before proceeding, see SERVICE PRECAUTIONS . Disable air bag system. See DISABLING &
ACTIVATING AIR BAG SYSTEM . Remove ignition key. Remove top section of instrument panel.
Fold vapor barrier toward front to reveal 2 screws. Disconnect passenger-side air bag module connector.
Remove 4 screws and passenger-side air bag module.
2. To install air bag module, reverse removal procedure. Activate air bag system. Perform system operation
check to ensure system is functioning properly. See SYSTEM OPERATION CHECK
.
SYSTEM OPERATION CHECK
SRS warning light indicates air bag and Emergency Tensioning Retractor (ETR) system readiness. Turn
ignition on. SRS warning light will light, and then go out after approximately 4 seconds indicating system is
functioning properly. If SRS warning light does not light, lights up while driving or lights all the time, there is a
system fault. Repair malfunctioning system. See DIAGNOSIS & TESTING
.
SERVICE PRECAUTIONS
Observe following precautions when working with air bag systems:
When working around steering column components and before any repairs are performed, disable air bag
system. See DISABLING & ACTIVATING AIR BAG SYSTEM
.
Before straightening any damage to body, or before performing electrical arc-welding, disable air bag
system. See DISABLING & ACTIVATING AIR BAG SYSTEM
.
Always wear safety glasses and gloves when handling a deployed air bag module. Air bag module may
contain sodium hydroxide deposits which are irritating to the skin.
DO NOT repair any portion of SRS wiring harness.
Always handle air bag module with trim cover away from your body. Always place air bag module on
workbench with trim cover up, away from loose objects.
DO NOT expose any SRS component to temperatures in excess of 212°F (100°C).
DO NOT expose any SRS component to cleaning agents such as solvents, gasoline, lye, etc.
DO NOT connect Hand-Held Tester (6511 0001 99) to Data Link Connector (DLC) with ignition on.
Damage to HHT may result.
DO NOT connect HHT (6511 0001 99) to vehicle if a battery charger is connected to vehicle battery.
Damage to HHT may result.
DISABLING & ACTIVATING AIR BAG SYSTEM DISABLING SYSTEM
Before proceeding, follow air bag service precautions. See SERVICE PRECAUTIONS
. Turn ignition off.
Disconnect and shield negative battery cable. Remove passenger foot mat. Remove passenger footrest.
Disconnect SRS system connector (X29/9) located at passenger footwell area. See Fig. 5
. System is now
disabled.
1998 Mercedes-Benz ML320
AIR BAG RESTRAINT SYSTEM 1998 AIR BAG RESTRAINT SYSTEMS Mercedes-Benz
me
Saturday, October 02, 2010 3:33:14 PMPage 14 © 2006 Mitchell Repair Information Company, LLC.
Page 16 of 4133
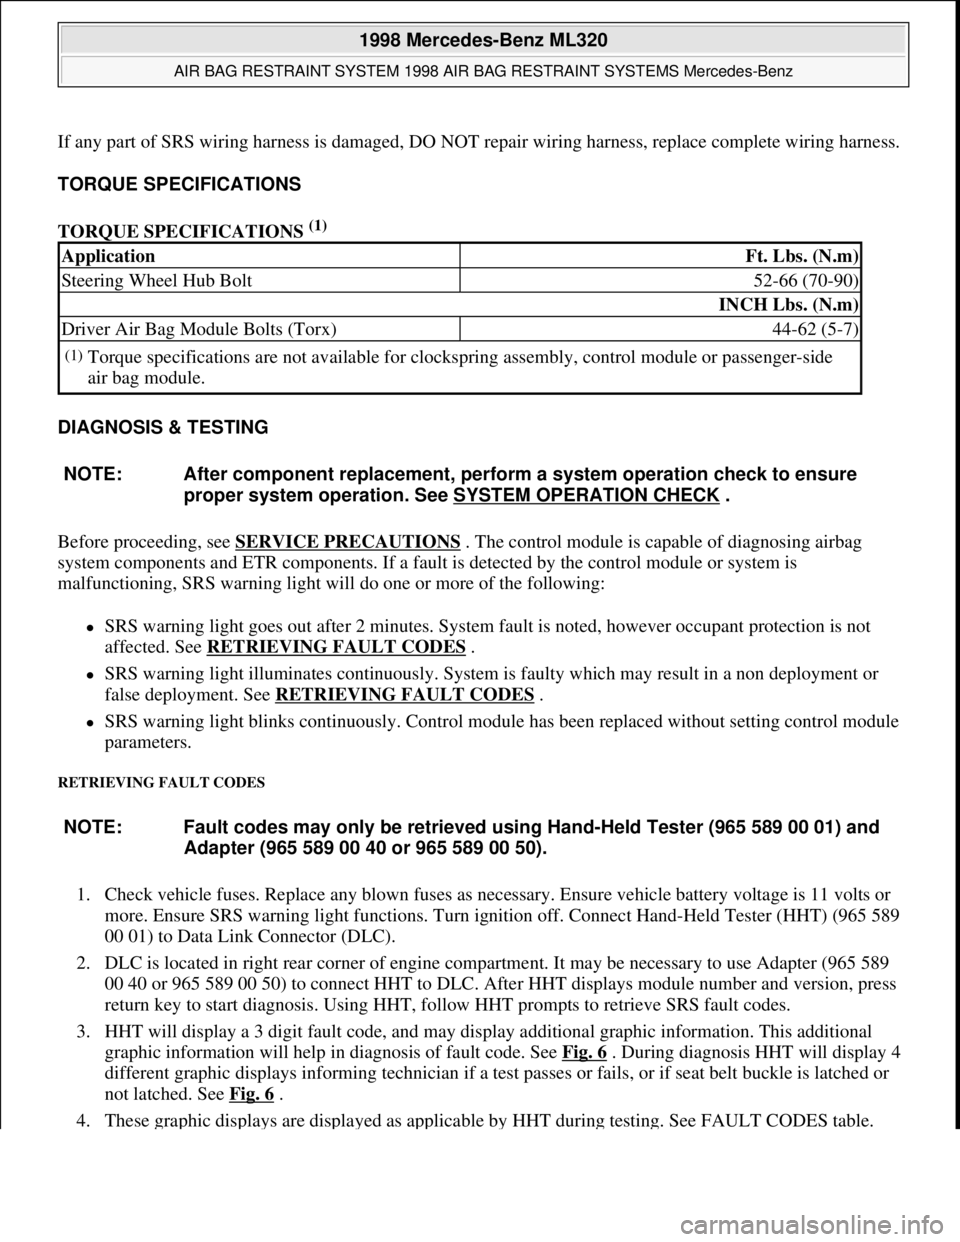
If any part of SRS wiring harness is damaged, DO NOT repair wiring harness, replace complete wiring harness.
TORQUE SPECIFICATIONS
TORQUE SPECIFICATIONS
(1)
DIAGNOSIS & TESTING
Before proceeding, see SERVICE PRECAUTIONS
. The control module is capable of diagnosing airbag
system components and ETR components. If a fault is detected by the control module or system is
malfunctioning, SRS warning light will do one or more of the following:
SRS warning light goes out after 2 minutes. System fault is noted, however occupant protection is not
affected. See RETRIEVING FAULT CODES
.
SRS warning light illuminates continuously. System is faulty which may result in a non deployment or
false deployment. See RETRIEVING FAULT CODES
.
SRS warning light blinks continuously. Control module has been replaced without setting control module
parameters.
RETRIEVING FAULT CODES
1. Check vehicle fuses. Replace any blown fuses as necessary. Ensure vehicle battery voltage is 11 volts or
more. Ensure SRS warning light functions. Turn ignition off. Connect Hand-Held Tester (HHT) (965 589
00 01) to Data Link Connector (DLC).
2. DLC is located in right rear corner of engine compartment. It may be necessary to use Adapter (965 589
00 40 or 965 589 00 50) to connect HHT to DLC. After HHT displays module number and version, press
return key to start diagnosis. Using HHT, follow HHT prompts to retrieve SRS fault codes.
3. HHT will display a 3 digit fault code, and may display additional graphic information. This additional
graphic information will help in diagnosis of fault code. See Fig. 6
. During diagnosis HHT will display 4
different graphic displays informing technician if a test passes or fails, or if seat belt buckle is latched or
not latched. See Fig. 6
.
4. These
graphic displays are displayed as applicable by HHT during testing. See FAULT CODES table.
ApplicationFt. Lbs. (N.m)
Steering Wheel Hub Bolt52-66 (70-90)
INCH Lbs. (N.m)
Driver Air Bag Module Bolts (Torx)44-62 (5-7)
(1)Torque specifications are not available for clockspring assembly, control module or passenger-side
air bag module.
NOTE: After component replacement, perform a system operation check to ensure
proper system operation. See SYSTEM OPERATION CHECK
.
NOTE: Fault codes may only be retrieved using Hand-Held Tester (965 589 00 01) and
Adapter (965 589 00 40 or 965 589 00 50).
1998 Mercedes-Benz ML320
AIR BAG RESTRAINT SYSTEM 1998 AIR BAG RESTRAINT SYSTEMS Mercedes-Benz
me
Saturday, October 02, 2010 3:33:14 PMPage 16 © 2006 Mitchell Repair Information Company, LLC.
Page 19 of 4133
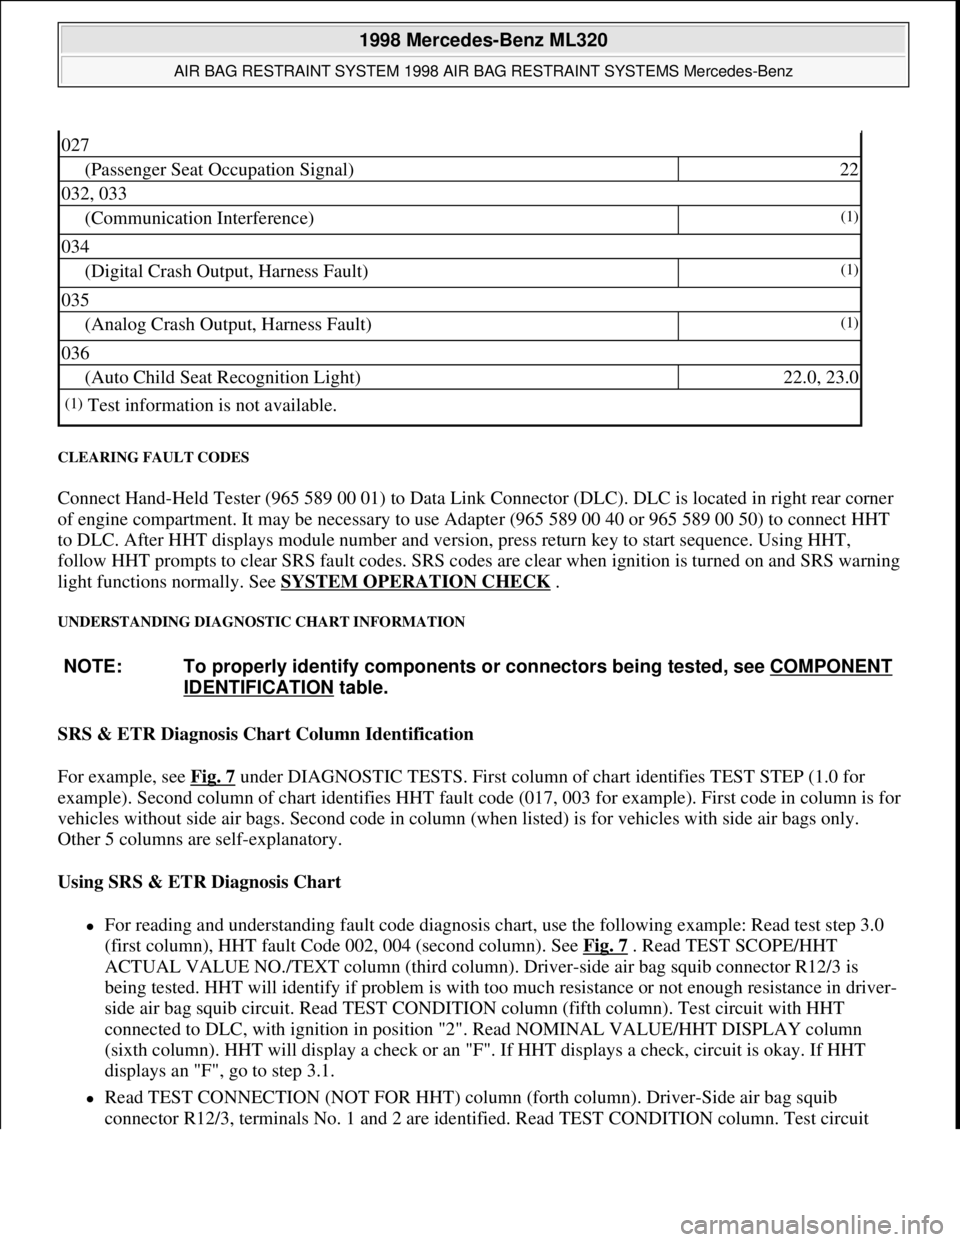
CLEARING FAULT CODES
Connect Hand-Held Tester (965 589 00 01) to Data Link Connector (DLC). DLC is located in right rear corner
of engine compartment. It may be necessary to use Adapter (965 589 00 40 or 965 589 00 50) to connect HHT
to DLC. After HHT displays module number and version, press return key to start sequence. Using HHT,
follow HHT prompts to clear SRS fault codes. SRS codes are clear when ignition is turned on and SRS warning
light functions normally. See SYSTEM OPERATION CHECK
.
UNDERSTANDING DIAGNOSTIC CHART INFORMATION
SRS & ETR Diagnosis Chart Column Identification
For example, see Fig. 7
under DIAGNOSTIC TESTS. First column of chart identifies TEST STEP (1.0 for
example). Second column of chart identifies HHT fault code (017, 003 for example). First code in column is for
vehicles without side air bags. Second code in column (when listed) is for vehicles with side air bags only.
Other 5 columns are self-explanatory.
Using SRS & ETR Diagnosis Chart
For reading and understanding fault code diagnosis chart, use the following example: Read test step 3.0
(first column), HHT fault Code 002, 004 (second column). See Fig. 7
. Read TEST SCOPE/HHT
ACTUAL VALUE NO./TEXT column (third column). Driver-side air bag squib connector R12/3 is
being tested. HHT will identify if problem is with too much resistance or not enough resistance in driver-
side air bag squib circuit. Read TEST CONDITION column (fifth column). Test circuit with HHT
connected to DLC, with ignition in position "2". Read NOMINAL VALUE/HHT DISPLAY column
(sixth column). HHT will display a check or an "F". If HHT displays a check, circuit is okay. If HHT
displays an "F", go to step 3.1.
Read TEST CONNECTION (NOT FOR HHT) column (forth column). Driver-Side air bag squib
connector R12/3, terminals No. 1 and 2 are identified. Read TEST CONDITION column. Test circuit
027
(Passenger Seat Occupation Signal)22
032, 033
(Communication Interference)(1)
034
(Digital Crash Output, Harness Fault)(1)
035
(Analog Crash Output, Harness Fault)(1)
036
(Auto Child Seat Recognition Light)22.0, 23.0
(1)Test information is not available.
NOTE: To properly identify components or connectors being tested, see COMPONENT
IDENTIFICATION table.
1998 Mercedes-Benz ML320
AIR BAG RESTRAINT SYSTEM 1998 AIR BAG RESTRAINT SYSTEMS Mercedes-Benz
me
Saturday, October 02, 2010 3:33:14 PMPage 19 © 2006 Mitchell Repair Information Company, LLC.