ESP MERCEDES-BENZ ML320 2010 W164 Owners Manual
[x] Cancel search | Manufacturer: MERCEDES-BENZ, Model Year: 2010, Model line: ML320, Model: MERCEDES-BENZ ML320 2010 W164Pages: 368, PDF Size: 9.09 MB
Page 249 of 368
The brakes may produce a squeaking-type
noise depending on the
R vehicle speed
R brake force applied
R ambient conditions, e.g. temperature and
humidity
As with any brake system, the wear of
individual brake system components such as
brake pads or disks strongly depends on your
driving style and the conditions under which
you operate the vehicle. Thus, a driving style
calling for high-demand braking will cause
your vehicle’s brakes to wear more quickly.
Parking brake
When driving on wet roads or dirt covered
surfaces, road salt and/or dirt can get into
the parking brake.
To prevent corrosion and a reduction in the
braking power of the parking brake, observe
the following:
XFrom time to time, lightly engage the
parking brake before driving off.XDrive a distance of approximately 110 yds
(100 m) at a maximum speed of 12 mph
(20 km/h).GWarning!
While performing this procedure please
assure that the vehicle is stopped before
applying the parking brake. Otherwise the
rear wheels could lock up. You could lose
control of the vehicle and cause an accident.
In addition, the vehicle’s brake lights do not
light up when the parking brake is engaged.
Make sure not to endanger any other road
users when you engage the parking brake.
Driving off
Warm up the engine smoothly. Do not place
full load on the engine until the operating
temperature has been reached.
! When driving off on a slippery surface, do
not allow a drive wheel to spin for an
extended period with the ESP ®
switched
off. Doing so may cause serious damage to
the drivetrain which is not covered by the
Mercedes-Benz Limited Warranty.
! Simultaneously depressing the
accelerator pedal and applying the brakes
reduces engine performance and causes
premature brake and drivetrain wear which
is not covered by the Mercedes-Benz
Limited Warranty.
Hydroplaning
Depending on the depth of the water layer on
the road, hydroplaning may occur, even at low
speeds and with new tires. In heavy rain or
when conditions indicate possible
hydroplaning:
XReduce vehicle speed.XAvoid track grooves in the road.XApply brakes cautiously.
Standing water
! Do not drive through flooded areas.
Before driving through water, determine its
depth.
If you must drive through standing water,
drive slowly to prevent water from entering
the passenger compartment or the engine
compartment. Water in these areas could
cause damage to electrical components or
wiring of the engine or transmission, or
could result in water being ingested by the
engine through the air intake causing
severe internal engine damage. Any such
damage is not covered by the Mercedes-
Benz Limited Warranty.
i Vehicles with air suspension program:
Select the raised level (Y page 156) before
driving through standing water.
Driving instructions247Operation164_AKB; 7; 31, en-USd2ureepe,Version: 2.11.8.12009-09-11T12:07:36+02:00 - Seite 247Z
Page 250 of 368
For more information, see “Driving through
water” ( Y page 251).
Off-road driving
GWarning!
Do not load items on the basic carrier bars. It
may cause instability during some maneuvers
which could result in an accident.
Drive slowly in unknown terrain. This will
make it easier to recognize unexpected
obstacles and avoid damage to the vehicle.
To help avoid the vehicle rolling over, never
turn it around on steep inclines. If the vehicle
cannot complete the attempted climb, back it
down in reverse gear.
Do not drive along the side of a slope. The
vehicle might otherwise rollover. If in doing so
the vehicle begins to show a tendency to roll,
immediately steer into a line of gravity
(straight up or downhill).
Never let the vehicle roll backwards in idle.
You may lose control of the vehicle if you use
only the service brake. For information on
driving downhill, see “Driving downhill”.
GWarning!
Sand, dirt, mud and other material having
friction property can cause exceptional wear
and tear as well as brake failure.
Have the brakes checked for dirt build-up and
cleaned. There is otherwise a risk that full
braking power may not be available in an
emergency.
GWarning!
Vehicles with air suspension program: Please
be aware that by raising the vehicle level, the
center of gravity also rises. Therefore, always
ensure that the vehicle level is as low as
possible. With higher ride height the ESP ®
may activate earlier in certain situations.
Read this chapter carefully before you begin
off-road travel.
Familiarize yourself with the vehicle
characteristics and gear changing before you
attempt any difficult terrain off-road driving.
We recommend that you start out with easy
off-road travel.
Special driving features for off-road
driving
The following driving features are available for
specific kind of operation:
R Off-road ABS ( Y page 63)
R Off-road ESP ®
(Y page 65)
R Off-road 4-ETS ( Y page 64)
R Hill-start assist system ( Y page 113)
R Downhill Speed Regulation (DSR)
( Y page 152)
R Off-road driving program ( Y page 155)
R Air suspension program ( Y page 155)
Off-road driving rules
R Engage the off-road driving program
( Y page 155) before driving under off-road
conditions.
R Vehicles with air suspension program:
Make sure you select a vehicle level
( Y page 156) appropriate to the
topographical conditions. Always make
sure the vehicle has enough ground
clearance.
R Fasten items being carried as securely as
possible ( Y page 186).
R Always navigate gradients with the engine
on and with the transmission engaged in a
gear. Switch on the DSR ( Y page 152) to
help maintain a preset speed.
248Driving instructionsOperation
164_AKB; 7; 31, en-USd2ureepe,Version: 2.11.8.12009-09-11T12:07:36+02:00 - Seite 248
Page 251 of 368
! Observe the following during off-road
driving:
R Keep doors, tailgate, windows, and tilt/
sliding sunroof closed whenever driving
off-road.
R Adjust vehicle speed to condition of
terrain. The more uneven, rutty and
steeper the terrain, the lower the speed
should be. Drive through water slowly at
an even speed, avoiding a bow wave.
R Be especially careful when driving in
unknown territory. It may be necessary
to get out of the vehicle and scout the
path you intend to take.
R Watch out for obstacles, such as rocks,
holes, tree stumps and ruts.
R Before driving through water, determine
its depth.
R Do not stop vehicle while immersed in
water, and do not shut off the engine.
R In sandy soil, drive at a steady speed as
allowed by conditions. This helps
overcome the vehicle rolling resistance
and reduces the likelihood of the vehicle
sinking into the ground.
R Do not initiate jumps with the vehicle. It
interrupts the forward momentum of the
vehicle.
R Always drive onto slopes with the engine
running and the vehicle in gear.
R Do not shift automatic transmission into
neutral position N.GWarning!
Do not reduce the tire inflation pressure
before driving through sand. However, if you
do so, remember to correct the tire inflation
pressure before continuing your trip. Driving
with reduced tire inflation pressure increases
the risk of losing control of the vehicle and
rolling over.
Checklist before off-road driving
Engine oil level
R Check the engine oil level ( Y page 214).
Only with a proper oil level can the vehicle
obtain a trouble-free oil supply, even on
steep gradients.
! If the engine oil level warning lamp comes
on while driving, stop the vehicle in a safe
location or as soon at is safe to do so.
Check the engine oil level.
The engine oil level warnings should not be
ignored. Extended driving with the symbol
displayed could result in serious engine
damage that is not covered by the
Mercedes-Benz Limited Warranty.
Tires
R Check the tread depth and maintain
specified tire inflation pressure. A placard
with the recommended tire inflation
pressures is located on the driver’s door B-
pillar ( Y page 228).
R Check tires for possible damage and
remove foreign objects.
R Replace missing valve caps.
Rims
R Dented or bent rims can cause tire inflation
pressure loss and damage the tire beads.
For this reason, check and, if necessary,
change rims before driving off-road.
Vehicle tool kit
R Check if the jack ( Y page 270) is
functional.
R Always take the vehicle tool kit, a strong
tow rope, a shovel and a small plank (to put
under the jack on sandy soil) with you.
Driving instructions249Operation164_AKB; 7; 31, en-USd2ureepe,Version: 2.11.8.12009-09-11T12:07:36+02:00 - Seite 249Z
Page 253 of 368
The 4-ETS recognizes the situation and
limits the torque for the front wheels by
braking them.
Simultaneously the torque for the rear
wheels is increased.
Driving across a hilltop
Decelerate just ahead of a hilltop (do not shift
automatic transmission into neutral position
N), to prevent the vehicle from speeding up
too much after climbing a hill.
Use the momentum of the vehicle to drive
across the hilltop.
After climbing a hill, driving in this manner
prevents the vehicle from:
Rlosing ground contact when cresting hills
Rlosing its forward momentum
Rspeeding up too much after climbing the hill
Driving downhill
RDrive slowly.
RDo not drive at an angle to the incline. Steer
into the line of gravity and drive with the
front wheels pointing straight downhill.
Otherwise, the vehicle may slide sideways
off the path and roll over.
RShift automatic transmission into gear
range 1 (Y page 113).
ROn steep inclines, use the Downhill Speed
Regulation (Y page 152).
RUtilize the engine’s braking power to
reduce vehicle speed.
If this is insufficient, apply the brakes
gently. Make sure the vehicle is moving in
the line of gravity.
RCheck the brakes after a lengthy
downgrade drive.
iThe special Off-road ABS (Y page 63)
setting allows for precise and brief
(cyclical) blocking of the front wheels,
permitting them to dig into loose ground.
Remember that, when stopped, the front
wheels slide across a surface and thus lose
their ability to steer the vehicle.
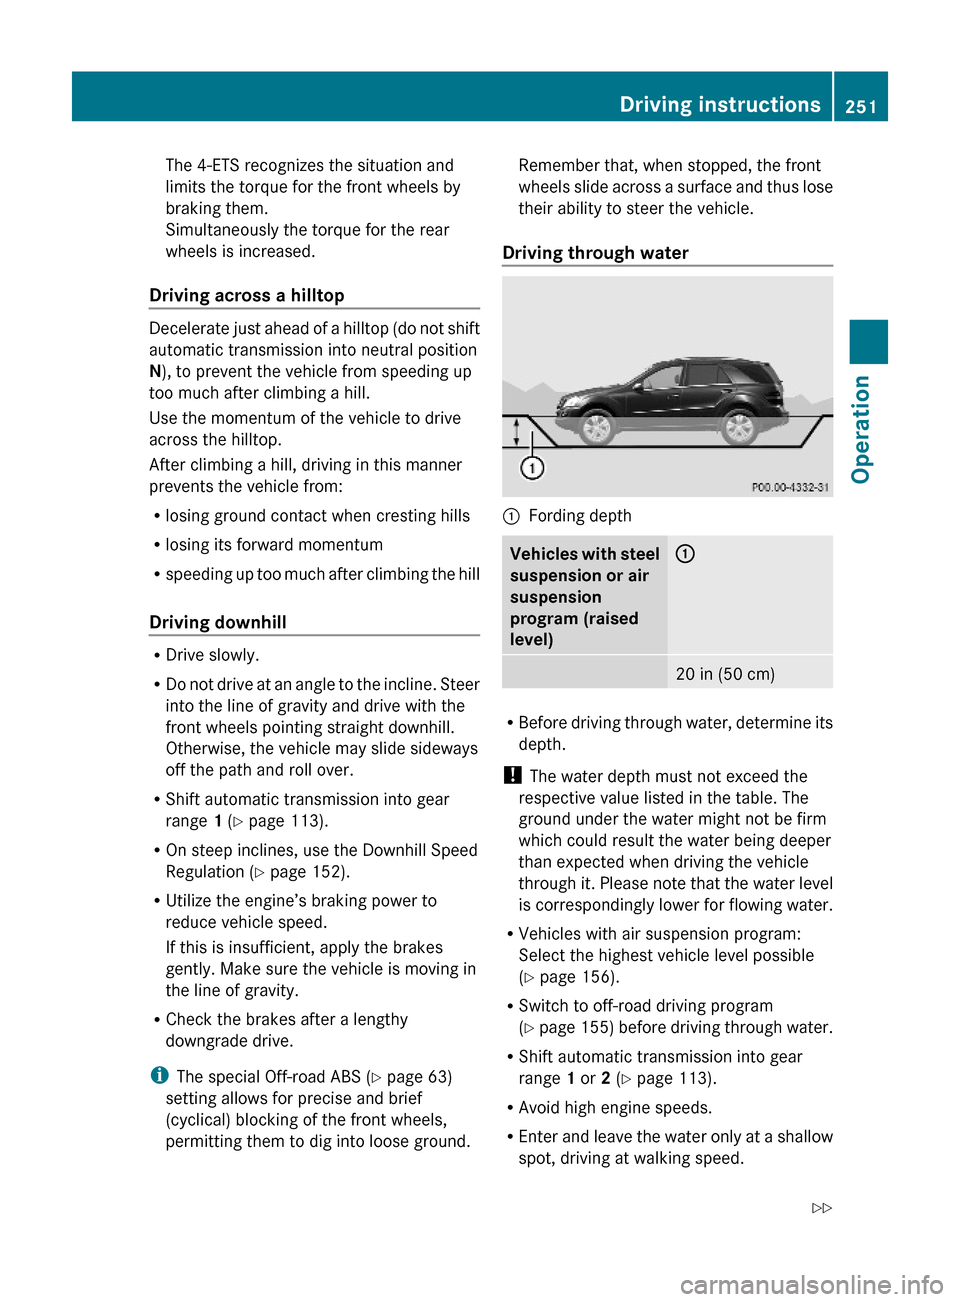
Driving through water
:Fording depthVehicles with steel
suspension or air
suspension
program (raised
level)
:20 in (50 cm)
RBefore driving through water, determine its
depth.
! The water depth must not exceed the
respective value listed in the table. The
ground under the water might not be firm
which could result the water being deeper
than expected when driving the vehicle
through it. Please note that the water level
is correspondingly lower for flowing water.
RVehicles with air suspension program:
Select the highest vehicle level possible
(Y page 156).
RSwitch to off-road driving program
(Y page 155) before driving through water.
RShift automatic transmission into gear
range 1 or 2 (Y page 113).
RAvoid high engine speeds.
REnter and leave the water only at a shallow
spot, driving at walking speed.
Driving instructions251Operation164_AKB; 7; 31, en-USd2ureepe,Version: 2.11.8.12009-09-11T12:07:36+02:00 - Seite 251Z
Page 254 of 368
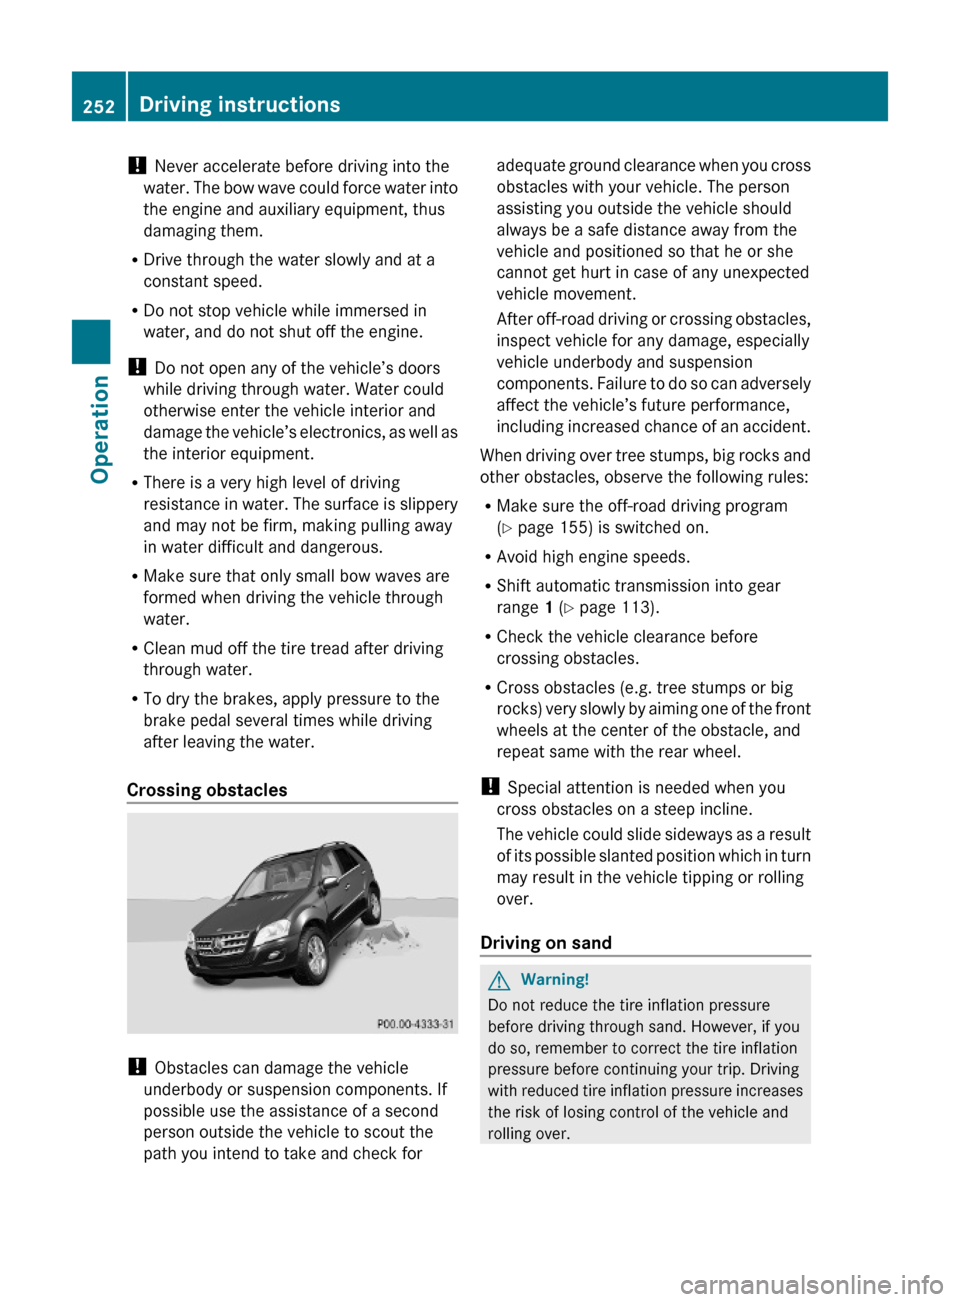
! Never accelerate before driving into the
water. The bow wave could force water into
the engine and auxiliary equipment, thus
damaging them.
RDrive through the water slowly and at a
constant speed.
RDo not stop vehicle while immersed in
water, and do not shut off the engine.
! Do not open any of the vehicle’s doors
while driving through water. Water could
otherwise enter the vehicle interior and
damage the vehicle’s electronics, as well as
the interior equipment.
RThere is a very high level of driving
resistance in water. The surface is slippery
and may not be firm, making pulling away
in water difficult and dangerous.
RMake sure that only small bow waves are
formed when driving the vehicle through
water.
RClean mud off the tire tread after driving
through water.
RTo dry the brakes, apply pressure to the
brake pedal several times while driving
after leaving the water.
Crossing obstacles
! Obstacles can damage the vehicle
underbody or suspension components. If
possible use the assistance of a second
person outside the vehicle to scout the
path you intend to take and check for
adequate ground clearance when you cross
obstacles with your vehicle. The person
assisting you outside the vehicle should
always be a safe distance away from the
vehicle and positioned so that he or she
cannot get hurt in case of any unexpected
vehicle movement.
After off-road driving or crossing obstacles,
inspect vehicle for any damage, especially
vehicle underbody and suspension
components. Failure to do so can adversely
affect the vehicle’s future performance,
including increased chance of an accident.
When driving over tree stumps, big rocks and
other obstacles, observe the following rules:
RMake sure the off-road driving program
(Y page 155) is switched on.
RAvoid high engine speeds.
RShift automatic transmission into gear
range 1 (Y page 113).
RCheck the vehicle clearance before
crossing obstacles.
RCross obstacles (e.g. tree stumps or big
rocks) very slowly by aiming one of the front
wheels at the center of the obstacle, and
repeat same with the rear wheel.
! Special attention is needed when you
cross obstacles on a steep incline.
The vehicle could slide sideways as a result
of its possible slanted position which in turn
may result in the vehicle tipping or rolling
over.
Driving on sand
GWarning!
Do not reduce the tire inflation pressure
before driving through sand. However, if you
do so, remember to correct the tire inflation
pressure before continuing your trip. Driving
with reduced tire inflation pressure increases
the risk of losing control of the vehicle and
rolling over.
252Driving instructionsOperation
164_AKB; 7; 31, en-USd2ureepe,Version: 2.11.8.12009-09-11T12:07:36+02:00 - Seite 252
Page 259 of 368
Avoid riding the brakes, thus overheating
the vehicle and trailer brakes (if so
equipped).
R If the engine coolant rises to an extremely
high temperature when the air conditioning
is on, turn off the air conditioning system.
Engine coolant heat can be additionally
vented by opening the windows, switching
the climate control fan speed to high and
setting the temperature control to the
maximum.
R During a passing maneuver extreme care
must be exercised since your vehicle with
a trailer will require additional passing
distance ahead than when driving without
a trailer.
Because your vehicle and trailer is longer
than your vehicle alone, you will also need
to go much farther ahead of the passed
vehicle before you can return to your lane.
Decoupling a trailer GWarning!
Vehicles with air suspension program: While
you are coupling or decoupling a trailer, make
sure nobody locks or unlocks the vehicle and/
or opens or closes doors or the tailgate.
The vehicle’s level could change and you
could endanger yourself and/or others as a
result.
Make sure that you do not operate the ADS
switch or the vehicle level control system
when coupling/decoupling the trailer.
XMake sure the automatic transmission is in
park position P (Y page 110).XEngage the parking brake for the vehicle
( Y page 107).XStart the engine ( Y page 103).XClose all doors and the tailgate.XEngage the parking brake for the trailer.GWarning!
Vehicles with air suspension program: As
soon as you disconnect the electrical
connection between the trailer and the
vehicle, the vehicle will lower. To help avoid
personal injury, make sure no one is near the
wheel housing or underneath the vehicle
before the electrical connection is
disconnected.
When you decouple the trailer, the vehicle is
temporarily raised because the springs are
relieved of load. Be especially careful during
this process, as you could otherwise injure
yourself and/or others. Make sure that any
persons remaining in the vehicle do not press
the switches for vehicle level control or the
ADS.
XDisconnect all electrical plug connectors.XDecouple the trailer.XMake sure that the trailer coupling is free
of load.XTurn off the engine ( Y page 108).
Driving abroad
If you plan to drive the vehicle outside the U.S.
or Canada, you should request dealer
network information for your destination from
any authorized Mercedes-Benz Center.
Control and operation of radio
transmitter
Safety notes
GWarning!
Please do not forget that your primary
responsibility is to drive the vehicle. A driver’s
attention to the road must always be his/her
primary focus when driving. For your safety
and the safety of others, we recommend that
you pull over to a safe location and stop
before placing or taking a telephone call.
Driving instructions257Operation164_AKB; 7; 31, en-USd2ureepe,Version: 2.11.8.12009-09-11T12:07:36+02:00 - Seite 257Z
Page 266 of 368
! Do not clean the camera and the area
around the camera
R with a high-pressure cleaner
R with a dry cloth and strong pressure
R with aggressive cleaning agents
You could otherwise damage the camera.
Cleaning the windows and the wiper
blades
! Never open the hood when the wiper arms
are folded forward.
GWarning!
For safety reasons, switch off wipers and
remove SmartKey from starter switch before
cleaning the windshield and/or the wiper
blades. Vehicles with KEYLESS-GO: Make
sure the vehicle’s on-board electronics have
status 0. Otherwise, the wiper motor could
suddenly turn on and cause injury.
! Do not pull on the wiper blade inserts.
They could tear.
XFold the wiper arms forward until they snap
into place.XClean the windshield and the wiper blade
inserts with a clean cloth and mild
detergent solution.XUse a soft, clean cloth and a mild window
cleaning solution on all outside and inside
glass surfaces.
An automotive glass cleaner is
recommended.
! Fold the windshield wiper arms back onto
the windshield before turning the SmartKey
in the starter switch or pressing the
KEYLESS-GO start/stop button.
Hold on to the wiper when folding the wiper
arm back. If released, the force of the
impact from the tensioning spring could
crack the windshield.
! To clean the window interior, do not use
a dry cloth, abrasives, solvents or cleaners
containing solvents. Do not touch the
inside of the windows with hard objects
such as an ice scraper or ring. Doing so may
damage the windows.
Light alloy wheels
If possible, clean wheels once a week.
XUse Mercedes-Benz approved Wheel Care,
a soft bristle brush and a strong spray of
water for cleaning the light alloy wheels.
! Only use acid-free cleaning materials.
Acid may cause corrosion or damage the
clear coat.
! The vehicle should not be parked for an
extended period of time immediately after
it has been cleaned. This applies especially
after the wheel rims have been cleaned
with wheel rim cleaner. Wheel rim cleaners
can lead to increased corrosion of the
brake disks and brake pads. Non-approved
wheel cleaners may also damage the wheel
paint if the vehicle is not driven after
cleaning.
Therefore, the vehicle’s brake system
should always be warmed-up before it is
parked after cleaning. Drive your vehicle for
several minutes to allow the brakes to dry.
When applying Mercedes-Benz approved
Tire Care and Mercedes-Benz approved
Wheel Care products, take care not to
spray them on the brake disks.
Plastic and rubber parts
XUse a gentle dishwashing detergent or mild
detergent for delicate fabrics as a washing
solution.XWipe with a cloth moistened in a lukewarm
solution.
The surface may temporarily change color.
If this is the case, wait for it to dry.GWarning!
Do not use cleaners or cockpit care sprays
containing solvents to clean the cockpit or the
264Vehicle careOperation
164_AKB; 7; 31, en-USd2ureepe,Version: 2.11.8.12009-09-11T12:07:36+02:00 - Seite 264
Page 268 of 368
! To avoid damage to leather upholstery:
R Wipe with light pressure only.
R Do not clean with abrasive cleaning
agents such as scouring milk or powder.
R Do not soak the leather upholstery.
As leather is a natural product, it could
otherwise harden or become porous.
R Exercise particular care when cleaning
perforated leather as its underside
should not become wet.
MB Tex upholsteryXUse Mercedes-Benz approved Interior Care
onto a soft, lint-free cloth and apply with
light pressure for cleaning the upholstery.
Wood trims
XOnly use water and a damp cloth to clean
wood trims in your vehicle.
! Do not use solvents like tar remover or
wheel cleaner nor polishes or waxes as
these may be abrasive.
Chrome-plated exhaust tip
Regular cleaning and care of chrome-plated
exhaust tips will help to maintain their shine
and the classy appearance.
XUse Mercedes-Benz approved Chrome
Polishing Paste each time the vehicle has
been washed, especially during the winter.
! Do not use alkaline cleaners such as
wheel cleaners as they could cause
corrosion.
266Vehicle careOperation
164_AKB; 7; 31, en-USd2ureepe,Version: 2.11.8.12009-09-11T12:07:36+02:00 - Seite 266
Page 272 of 368
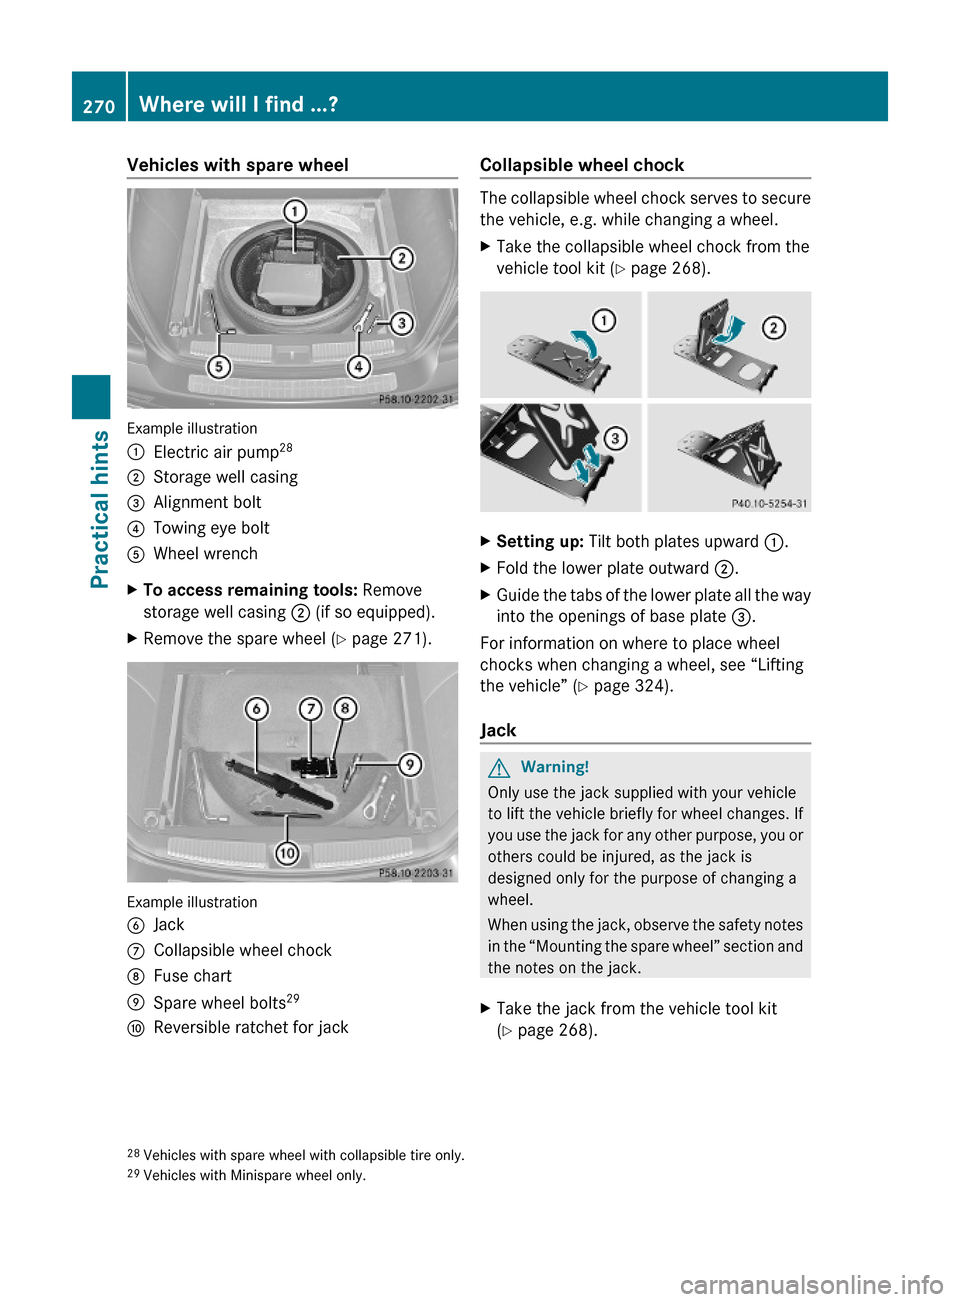
Vehicles with spare wheel
Example illustration
:Electric air pump28;Storage well casing=Alignment bolt?Towing eye boltAWheel wrenchXTo access remaining tools: Remove
storage well casing ; (if so equipped).
XRemove the spare wheel (Y page 271).
Example illustration
BJackCCollapsible wheel chockDFuse chartESpare wheel bolts29FReversible ratchet for jackCollapsible wheel chock
The collapsible wheel chock serves to secure
the vehicle, e.g. while changing a wheel.
XTake the collapsible wheel chock from the
vehicle tool kit (Y page 268).
XSetting up: Tilt both plates upward :.XFold the lower plate outward ;.XGuide the tabs of the lower plate all the way
into the openings of base plate =.
For information on where to place wheel
chocks when changing a wheel, see “Lifting
the vehicle” (Y page 324).
Jack
GWarning!
Only use the jack supplied with your vehicle
to lift the vehicle briefly for wheel changes. If
you use the jack for any other purpose, you or
others could be injured, as the jack is
designed only for the purpose of changing a
wheel.
When using the jack, observe the safety notes
in the “Mounting the spare wheel” section and
the notes on the jack.
XTake the jack from the vehicle tool kit
(Y page 268).28Vehicles with spare wheel with collapsible tire only.29Vehicles with Minispare wheel only.
270Where will I find ...?Practical hints
164_AKB; 7; 31, en-USd2ureepe,Version: 2.11.8.12009-09-11T12:07:36+02:00 - Seite 270
Page 275 of 368
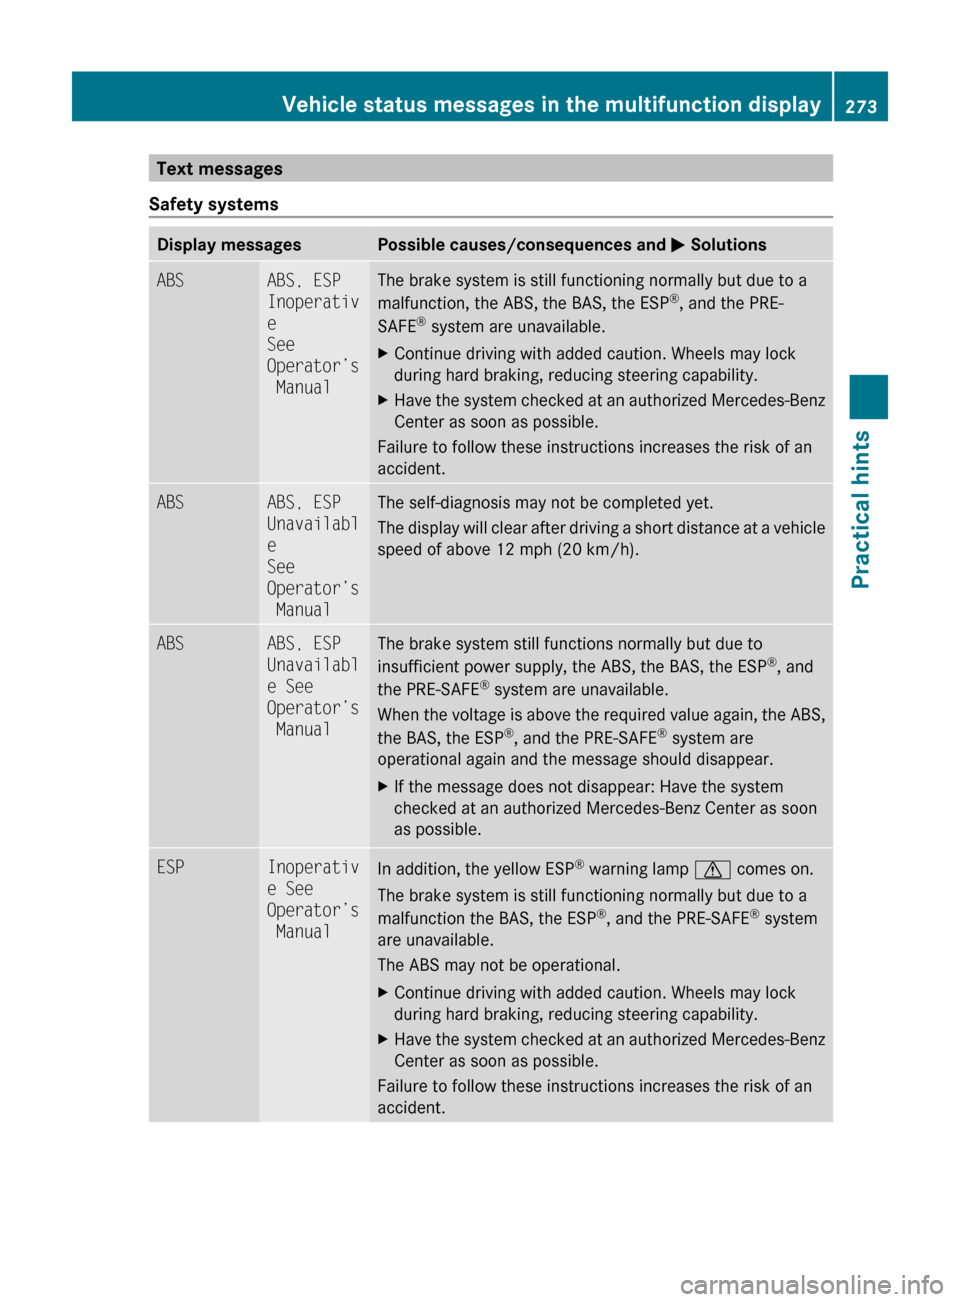
Text messages
Safety systemsDisplay messagesPossible causes/consequences and M SolutionsABSABS, ESP
Inoperativ
e
See
Operator’s
ManualThe brake system is still functioning normally but due to a
malfunction, the ABS, the BAS, the ESP ®
, and the PRE-
SAFE ®
system are unavailable.XContinue driving with added caution. Wheels may lock
during hard braking, reducing steering capability.XHave the system checked at an authorized Mercedes-Benz
Center as soon as possible.
Failure to follow these instructions increases the risk of an
accident.
ABSABS, ESP
Unavailabl
e
See
Operator’s
ManualThe self-diagnosis may not be completed yet.
The display will clear after driving a short distance at a vehicle
speed of above 12 mph (20 km/h).ABSABS, ESP
Unavailabl
e See
Operator’s
ManualThe brake system still functions normally but due to
insufficient power supply, the ABS, the BAS, the ESP ®
, and
the PRE-SAFE ®
system are unavailable.
When the voltage is above the required value again, the ABS,
the BAS, the ESP ®
, and the PRE-SAFE ®
system are
operational again and the message should disappear.XIf the message does not disappear: Have the system
checked at an authorized Mercedes-Benz Center as soon
as possible.ESPInoperativ
e See
Operator’s
ManualIn addition, the yellow ESP ®
warning lamp d comes on.
The brake system is still functioning normally but due to a
malfunction the BAS, the ESP ®
, and the PRE-SAFE ®
system
are unavailable.
The ABS may not be operational.XContinue driving with added caution. Wheels may lock
during hard braking, reducing steering capability.XHave the system checked at an authorized Mercedes-Benz
Center as soon as possible.
Failure to follow these instructions increases the risk of an
accident.
Vehicle status messages in the multifunction display273Practical hints164_AKB; 7; 31, en-USd2ureepe,Version: 2.11.8.12009-09-11T12:07:36+02:00 - Seite 273Z