MERCEDES-BENZ ML350 1997 Complete Repair Manual
Manufacturer: MERCEDES-BENZ, Model Year: 1997, Model line: ML350, Model: MERCEDES-BENZ ML350 1997Pages: 4133, PDF Size: 88.89 MB
Page 3451 of 4133
Air conditioning system
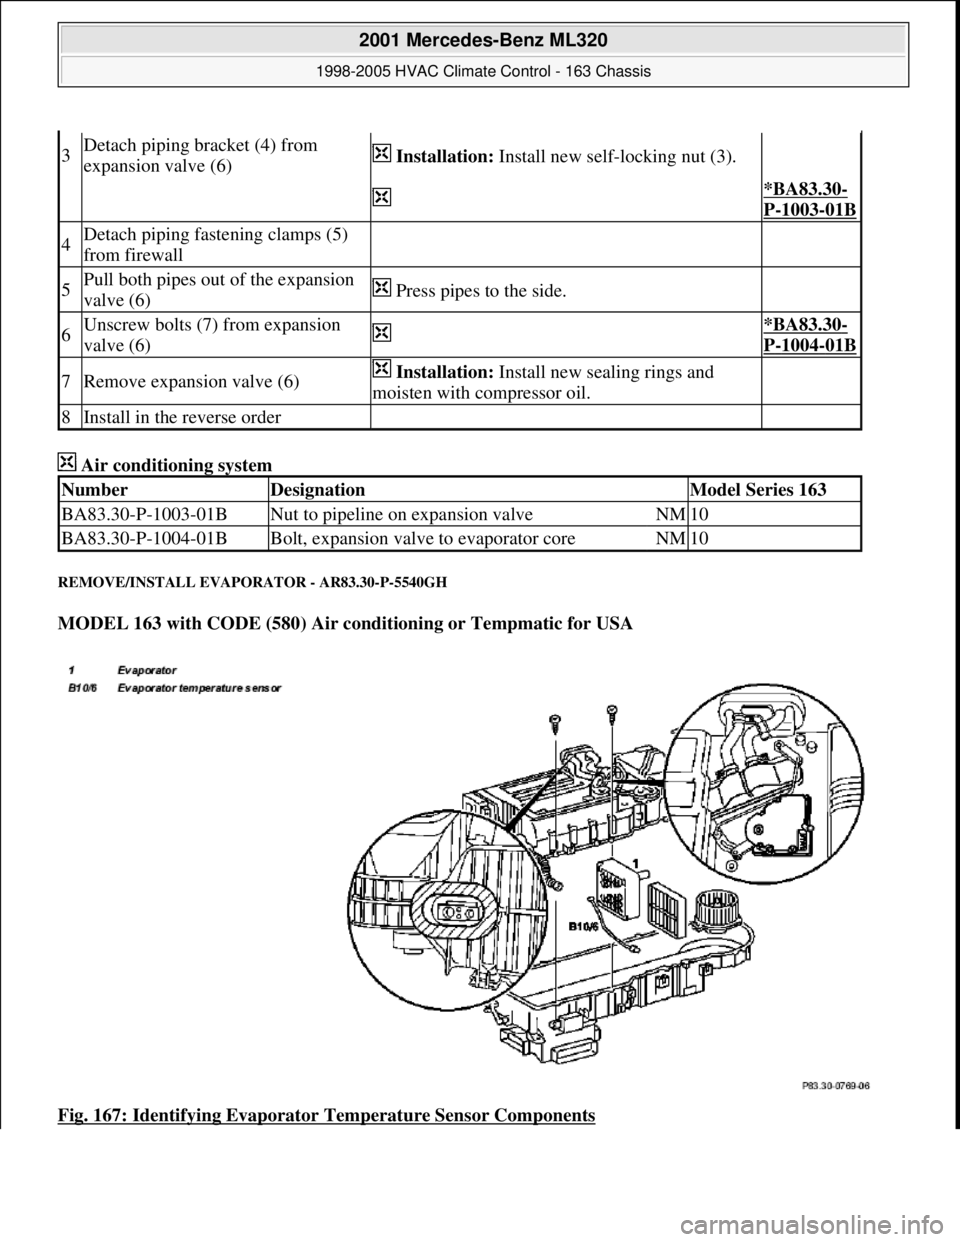
REMOVE/INSTALL EVAPORATOR - AR83.30-P-5540GH
MODEL 163 with CODE (580) Air conditioning or Tempmatic for USA
Fig. 167: Identifying Evaporator Temperature Sensor Components
3Detach piping bracket (4) from
expansion valve (6) Installation: Install new self-locking nut (3).
*BA83.30-
P-1003-01B
4Detach piping fastening clamps (5)
from firewall
5Pull both pipes out of the expansion
valve (6) Press pipes to the side.
6Unscrew bolts (7) from expansion
valve (6) *BA83.30-
P-1004-01B
7Remove expansion valve (6) Installation: Install new sealing rings and
moisten with compressor oil.
8Install in the reverse order
NumberDesignationModel Series 163
BA83.30-P-1003-01BNut to pipeline on expansion valveNM10
BA83.30-P-1004-01BBolt, expansion valve to evaporator coreNM10
2001 Mercedes-Benz ML320
1998-2005 HVAC Climate Control - 163 Chassis
me
Saturday, October 02, 2010 3:23:18 PMPage 207 © 2006 Mitchell Repair Information Company, LLC.
Page 3452 of 4133
Refrigerant compressor
Remove/Install
Risk of explosion from welding or
soldering work on closed air
conditioning system. Risk of
poisoning . Inhaling overheated
refrigerant vapors may be toxic. Risk
of injury. Contact with liquid
refrigerant may result in injury to the
skin and eyes.Do not carry out any welding work on the
closed air conditioning system or in the
surrounding area. No smoking or open
flames. Wear eye protection and protective
gloves. Work only in well ventilated areas.
Carry out repair work on the air
conditioning system circuit only after the
system has been discharged.
AS83.00-Z-
0001-01A
Procedures if air conditioning system
is damaged or leakingAll models
AH83.30-
N-0004-
01A
Protect air conditioning circuit and
components from moisture when
carrying out repair work
All models fitted with air conditioning
AH83.30-
N-0005-
01A
Notes on handling refrigerant R134aAll models fitted with air conditioning
AH83.30-
N-0003-
01A
1Remove evaporator housing AR83.30-
P-5200GH
2Remove expansion valve
Installation: Replace sealing rings
between the expansion valve and
evaporator and moisten with compressor
oil.
AR83.30-
P-5520GH
3Disassemble AC housing AR83.30-
P-5201GH
4Remove evaporator (1) from AC
housing Observe oil filling capacity when
replacing the evaporator.
*BF83.55-
P-1004-
01A
5Remove evaporator temperature sensor
(B10/6) AR83.30-
P-8085GH
6Install in the reverse order
NumberDesignationRefrigerant
compressor 7SB16,
refrigerant R134a
in model 163
BF83.55-P-1004-
01AAdditional oil filling
capacity when
replacing evaporatorCompressor oilcm3 40
Specifications for
Service ProductsSheetBB00.40-P-0362-
00A
2001 Mercedes-Benz ML320
1998-2005 HVAC Climate Control - 163 Chassis
me
Saturday, October 02, 2010 3:23:18 PMPage 208 © 2006 Mitchell Repair Information Company, LLC.
Page 3453 of 4133
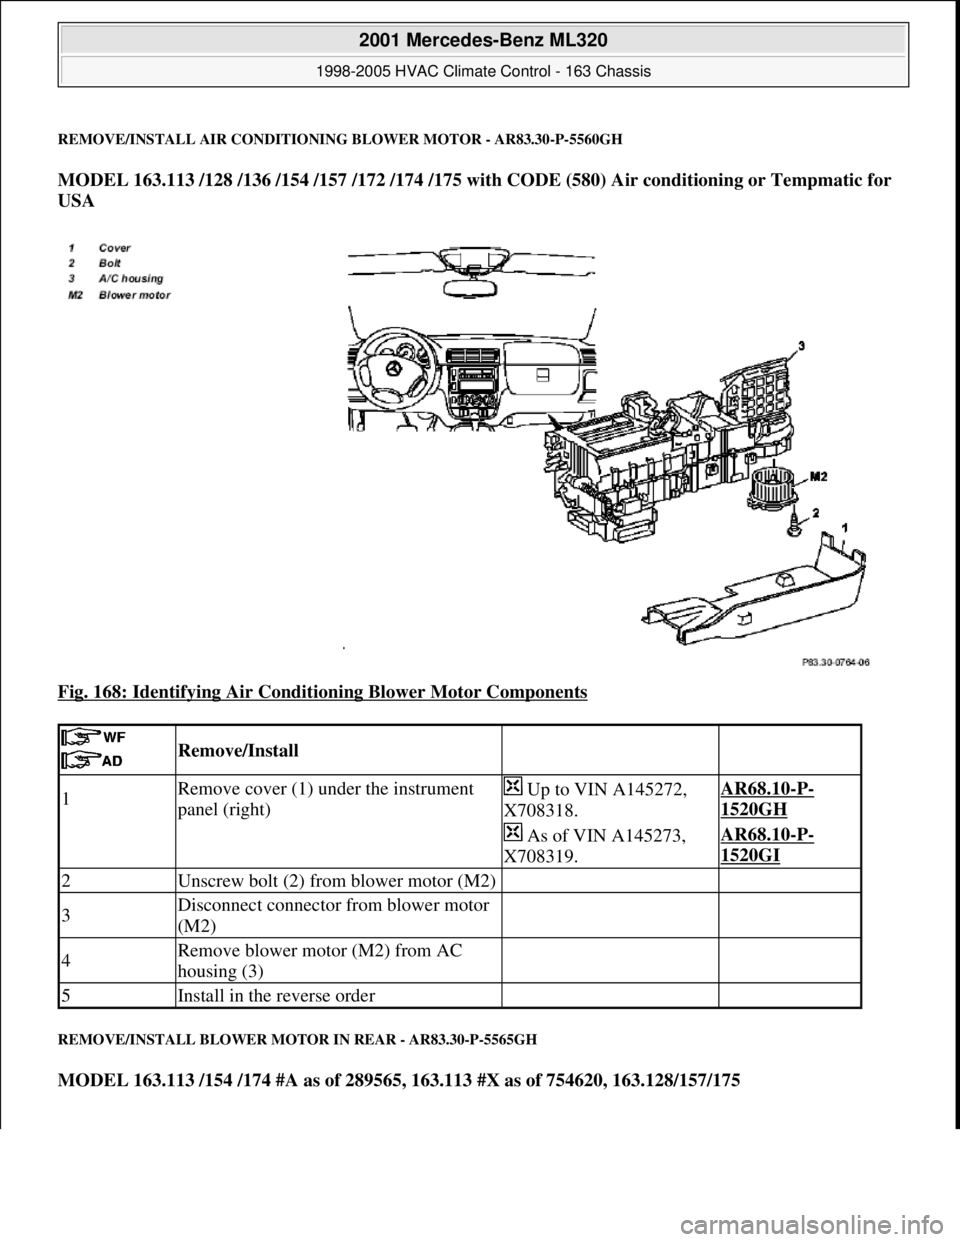
REMOVE/INSTALL AIR CONDITIONING BLOWER MOTOR - AR83.30-P-5560GH
MODEL 163.113 /128 /136 /154 /157 /172 /174 /175 with CODE (580) Air conditioning or Tempmatic for
USA
Fig. 168: Identifying Air Conditioning Blower Motor Components
REMOVE/INSTALL BLOWER MOTOR IN REAR - AR83.30-P-5565GH
MODEL 163.113 /154 /174 #A as of 289565, 163.113 #X as of 754620, 163.128/157/175
Remove/Install
1Remove cover (1) under the instrument
panel (right) Up to VIN A145272,
X708318.AR68.10-P-
1520GH
As of VIN A145273,
X708319.AR68.10-P-
1520GI
2Unscrew bolt (2) from blower motor (M2)
3Disconnect connector from blower motor
(M2)
4Remove blower motor (M2) from AC
housing (3)
5Install in the reverse order
2001 Mercedes-Benz ML320
1998-2005 HVAC Climate Control - 163 Chassis
me
Saturday, October 02, 2010 3:23:18 PMPage 209 © 2006 Mitchell Repair Information Company, LLC.
Page 3454 of 4133
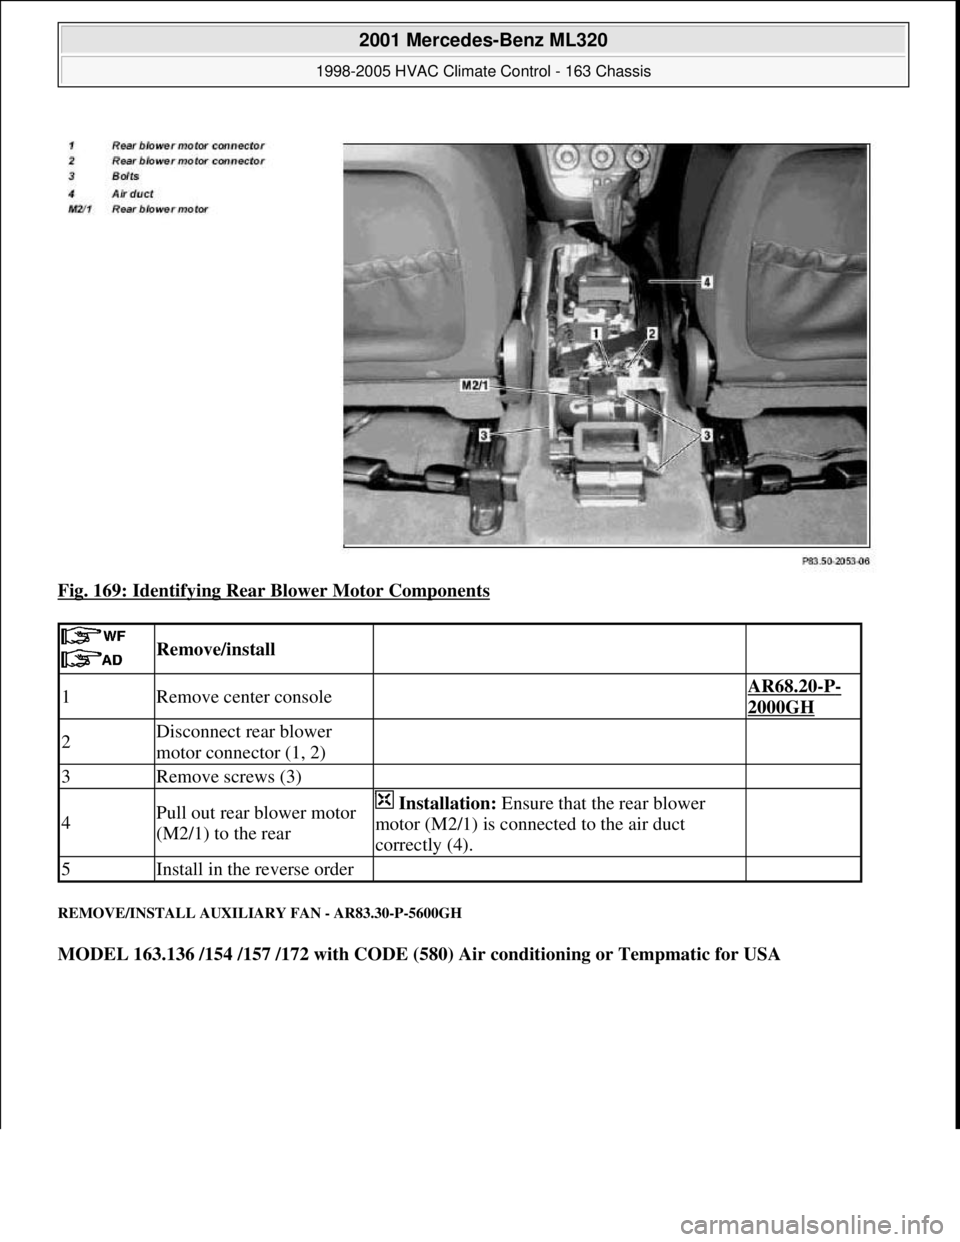
Fig. 169: Identifying Rear Blower Motor Components
REMOVE/INSTALL AUXILIARY FAN - AR83.30-P-5600GH
MODEL 163.136 /154 /157 /172 with CODE (580) Air conditioning or Tempmatic for USA
Remove/install
1Remove center console AR68.20-P-
2000GH
2Disconnect rear blower
motor connector (1, 2)
3Remove screws (3)
4Pull out rear blower motor
(M2/1) to the rear Installation: Ensure that the rear blower
motor (M2/1) is connected to the air duct
correctly (4).
5Install in the reverse order
2001 Mercedes-Benz ML320
1998-2005 HVAC Climate Control - 163 Chassis
me
Saturday, October 02, 2010 3:23:18 PMPage 210 © 2006 Mitchell Repair Information Company, LLC.
Page 3455 of 4133
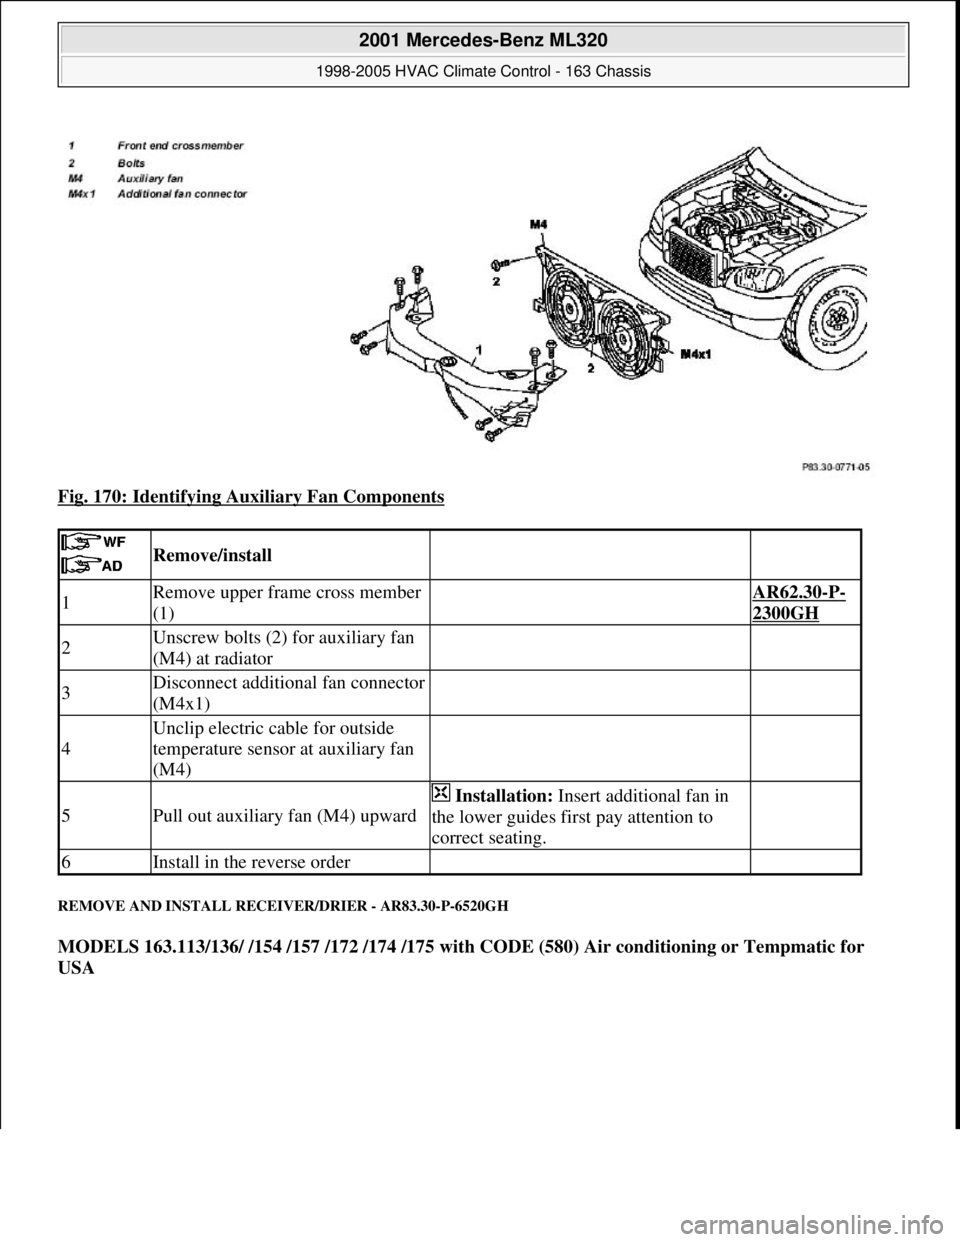
Fig. 170: Identifying Auxiliary Fan Components
REMOVE AND INSTALL RECEIVER/DRIER - AR83.30-P-6520GH
MODELS 163.113/136/ /154 /157 /172 /174 /175 with CODE (580) Air conditioning or Tempmatic for
USA
Remove/install
1Remove upper frame cross member
(1) AR62.30-P-
2300GH
2Unscrew bolts (2) for auxiliary fan
(M4) at radiator
3Disconnect additional fan connector
(M4x1)
4
Unclip electric cable for outside
temperature sensor at auxiliary fan
(M4)
5Pull out auxiliary fan (M4) upward
Installation: Insert additional fan in
the lower guides first pay attention to
correct seating.
6Install in the reverse order
2001 Mercedes-Benz ML320
1998-2005 HVAC Climate Control - 163 Chassis
me
Saturday, October 02, 2010 3:23:18 PMPage 211 © 2006 Mitchell Repair Information Company, LLC.
Page 3456 of 4133
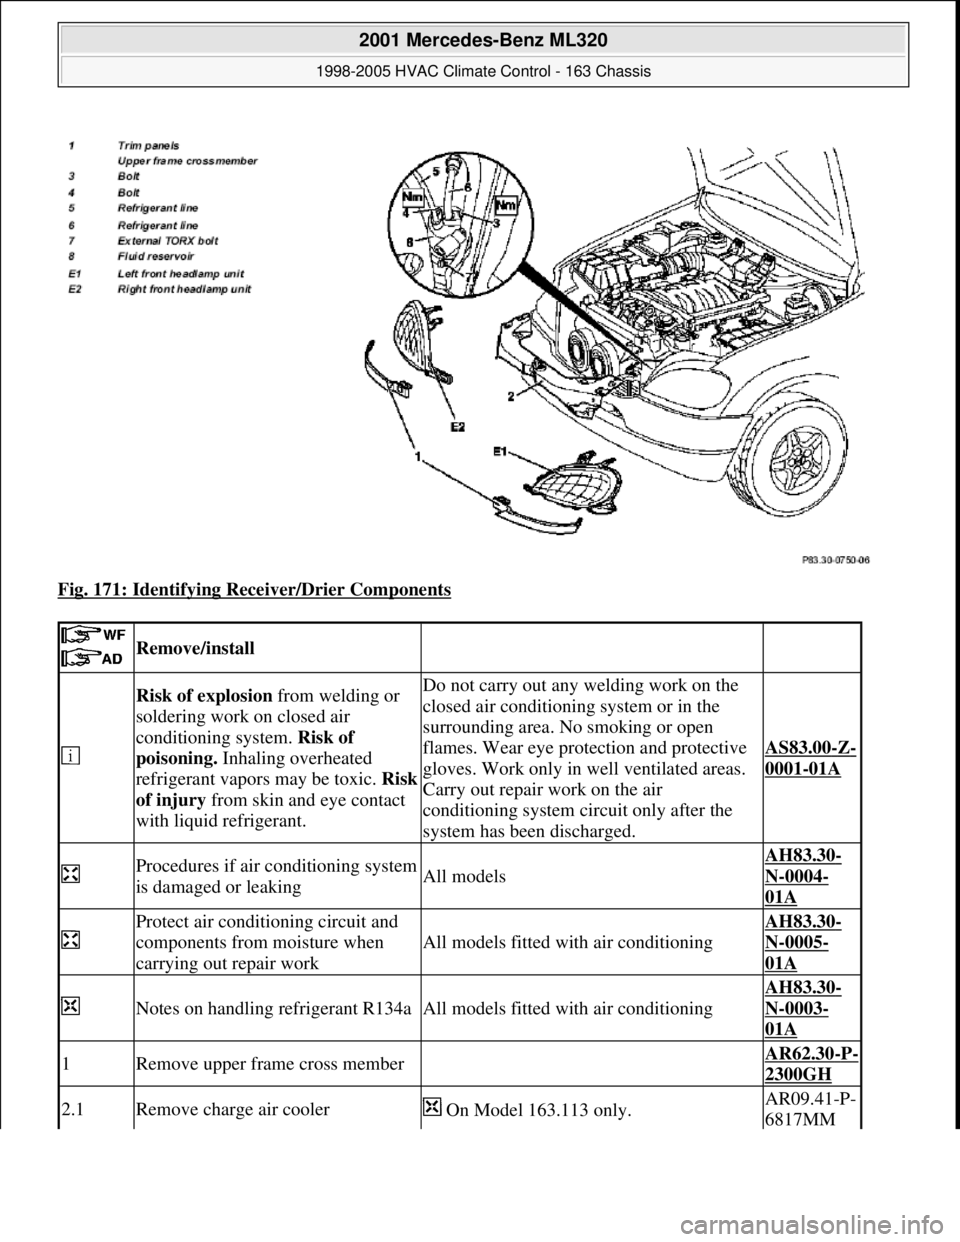
Fig. 171: Identifying Receiver/Drier Components
Remove/install
Risk of explosion from welding or
soldering work on closed air
conditioning system. Risk of
poisoning. Inhaling overheated
refrigerant vapors may be toxic. Risk
of injury from skin and eye contact
with liquid refrigerant.Do not carry out any welding work on the
closed air conditioning system or in the
surrounding area. No smoking or open
flames. Wear eye protection and protective
gloves. Work only in well ventilated areas.
Carry out repair work on the air
conditioning system circuit only after the
system has been discharged.
AS83.00-Z-
0001-01A
Procedures if air conditioning system
is damaged or leakingAll models
AH83.30-
N-0004-
01A
Protect air conditioning circuit and
components from moisture when
carrying out repair work
All models fitted with air conditioning
AH83.30-
N-0005-
01A
Notes on handling refrigerant R134aAll models fitted with air conditioning
AH83.30-
N-0003-
01A
1Remove upper frame cross member AR62.30-P-
2300GH
2.1Remove charge air cooler On Model 163.113 only.AR09.41-P-
6817MM
2001 Mercedes-Benz ML320
1998-2005 HVAC Climate Control - 163 Chassis
me
Saturday, October 02, 2010 3:23:18 PMPage 212 © 2006 Mitchell Repair Information Company, LLC.
Page 3457 of 4133
Air conditioning system
Refrigerant compressor
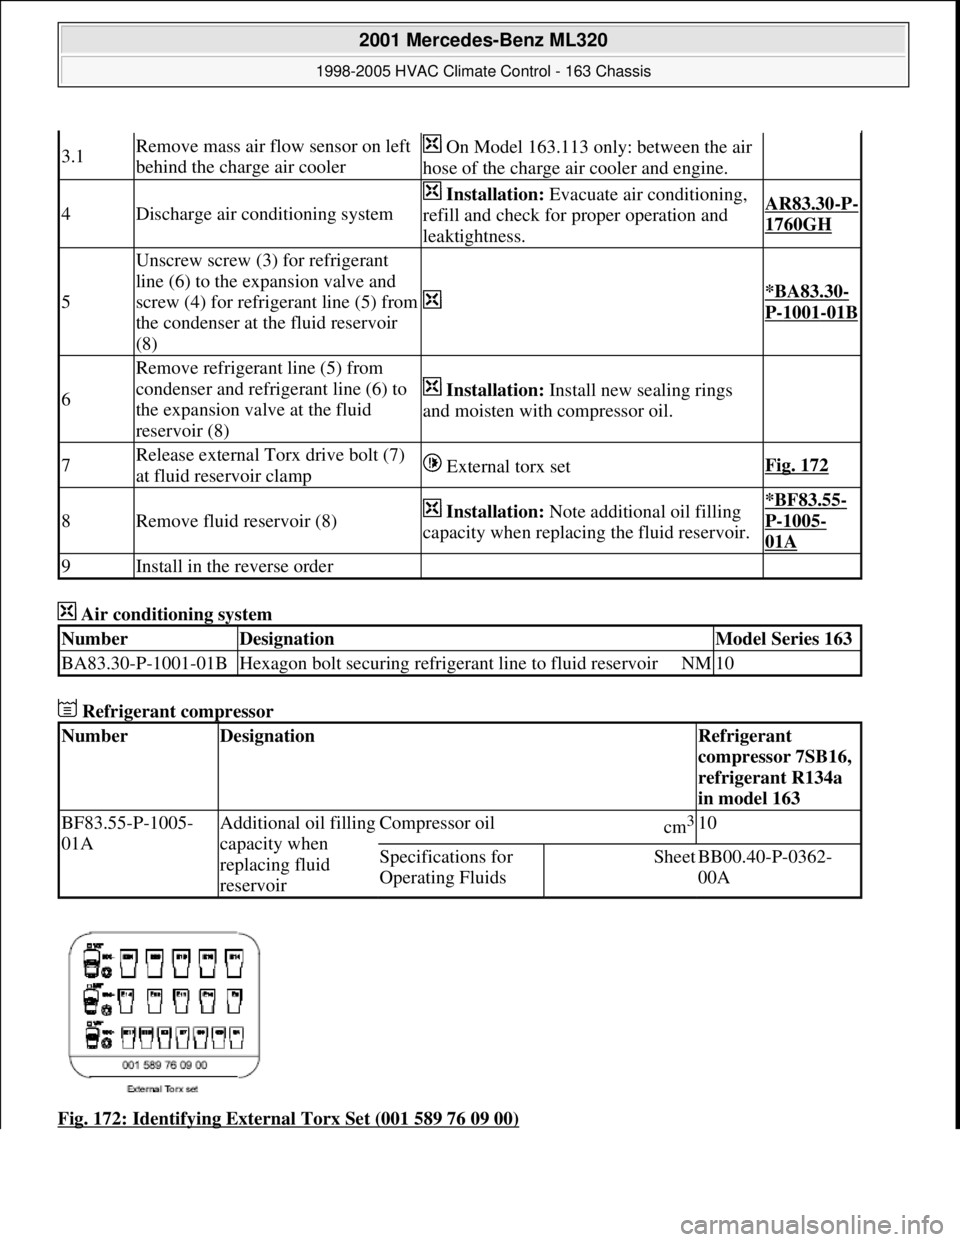
Fig. 172: Identifying External Torx Set (001 589 76 09 00)
3.1Remove mass air flow sensor on left
behind the charge air cooler On Model 163.113 only: between the air
hose of the charge air cooler and engine.
4Discharge air conditioning system
Installation: Evacuate air conditioning,
refill and check for proper operation and
leaktightness.AR83.30-P-
1760GH
5
Unscrew screw (3) for refrigerant
line (6) to the expansion valve and
screw (4) for refrigerant line (5) from
the condenser at the fluid reservoir
(8)
*BA83.30-
P-1001-01B
6
Remove refrigerant line (5) from
condenser and refrigerant line (6) to
the expansion valve at the fluid
reservoir (8)
Installation: Install new sealing rings
and moisten with compressor oil.
7Release external Torx drive bolt (7)
at fluid reservoir clamp External torx setFig. 172
8Remove fluid reservoir (8) Installation: Note additional oil filling
capacity when replacing the fluid reservoir.*BF83.55-
P-1005-
01A
9Install in the reverse order
NumberDesignationModel Series 163
BA83.30-P-1001-01BHexagon bolt securing refrigerant line to fluid reservoirNM10
NumberDesignationRefrigerant
compressor 7SB16,
refrigerant R134a
in model 163
BF83.55-P-1005-
01AAdditional oil filling
capacity when
replacing fluid
reservoirCompressor oilcm3 10
Specifications for
Operating FluidsSheetBB00.40-P-0362-
00A
2001 Mercedes-Benz ML320
1998-2005 HVAC Climate Control - 163 Chassis
me
Saturday, October 02, 2010 3:23:18 PMPage 213 © 2006 Mitchell Repair Information Company, LLC.
Page 3458 of 4133
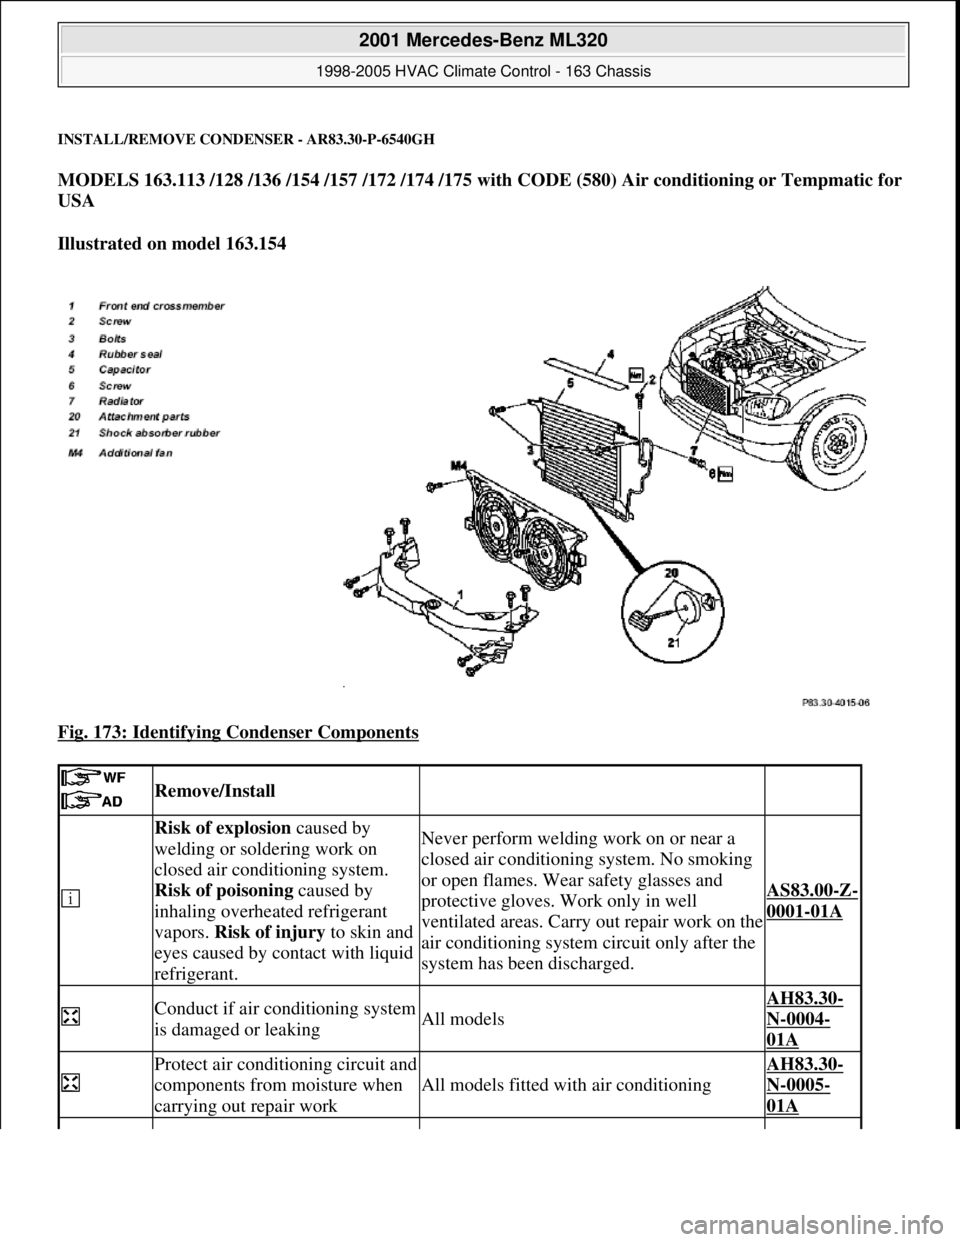
INSTALL/REMOVE CONDENSER - AR83.30-P-6540GH
MODELS 163.113 /128 /136 /154 /157 /172 /174 /175 with CODE (580) Air conditioning or Tempmatic for
USA
Illustrated on model 163.154
Fig. 173: Identifying Condenser Components
Remove/Install
Risk of explosion caused by
welding or soldering work on
closed air conditioning system.
Risk of poisoning caused by
inhaling overheated refrigerant
vapors. Risk of injury to skin and
eyes caused by contact with liquid
refrigerant.Never perform welding work on or near a
closed air conditioning system. No smoking
or open flames. Wear safety glasses and
protective gloves. Work only in well
ventilated areas. Carry out repair work on the
air conditioning system circuit only after the
system has been discharged.
AS83.00-Z-
0001-01A
Conduct if air conditioning system
is damaged or leakingAll models
AH83.30-
N-0004-
01A
Protect air conditioning circuit and
components from moisture when
carrying out repair work
All models fitted with air conditioning
AH83.30-
N-0005-
01A
2001 Mercedes-Benz ML320
1998-2005 HVAC Climate Control - 163 Chassis
me
Saturday, October 02, 2010 3:23:18 PMPage 214 © 2006 Mitchell Repair Information Company, LLC.
Page 3459 of 4133
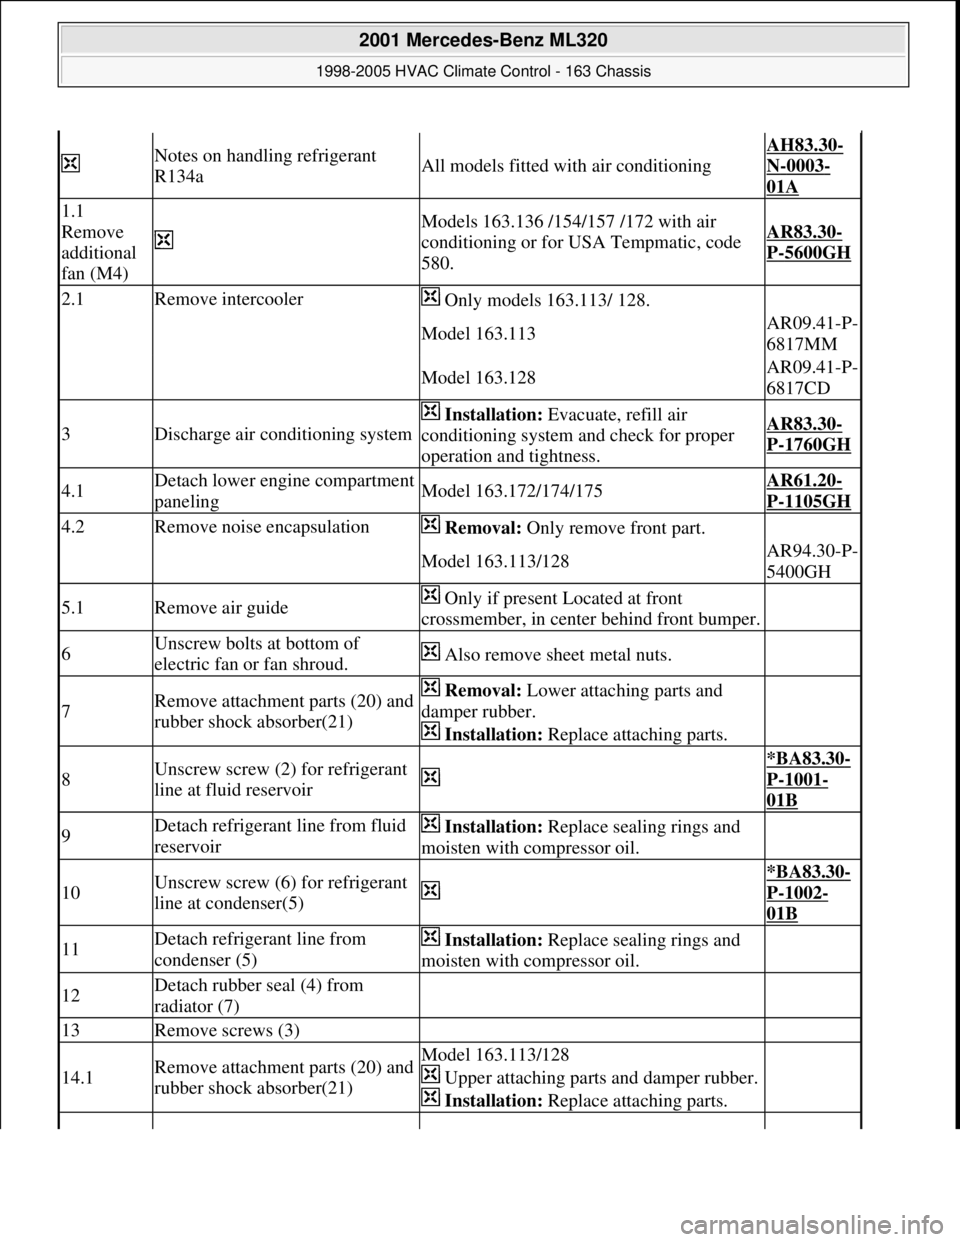
Notes on handling refrigerant
R134aAll models fitted with air conditioning
AH83.30-
N-0003-
01A
1.1
Remove
additional
fan (M4)
Models 163.136 /154/157 /172 with air
conditioning or for USA Tempmatic, code
580.AR83.30-
P-5600GH
2.1Remove intercooler Only models 163.113/ 128.
Model 163.113AR09.41-P-
6817MM
Model 163.128AR09.41-P-
6817CD
3Discharge air conditioning system
Installation: Evacuate, refill air
conditioning system and check for proper
operation and tightness.AR83.30-
P-1760GH
4.1Detach lower engine compartment
panelingModel 163.172/174/175AR61.20-
P-1105GH
4.2Remove noise encapsulation Removal: Only remove front part.
Model 163.113/128AR94.30-P-
5400GH
5.1Remove air guide Only if present Located at front
crossmember, in center behind front bumper.
6Unscrew bolts at bottom of
electric fan or fan shroud. Also remove sheet metal nuts.
7Remove attachment parts (20) and
rubber shock absorber(21) Removal: Lower attaching parts and
damper rubber.
Installation: Replace attaching parts.
8Unscrew screw (2) for refrigerant
line at fluid reservoir
*BA83.30-
P-1001-
01B
9Detach refrigerant line from fluid
reservoir Installation: Replace sealing rings and
moisten with compressor oil.
10Unscrew screw (6) for refrigerant
line at condenser(5)
*BA83.30-
P-1002-
01B
11Detach refrigerant line from
condenser (5) Installation: Replace sealing rings and
moisten with compressor oil.
12Detach rubber seal (4) from
radiator (7)
13Remove screws (3)
14.1Remove attachment parts (20) and
rubber shock absorber(21)Model 163.113/128
Upper attaching parts and damper rubber.
Installation: Replace attaching parts.
2001 Mercedes-Benz ML320
1998-2005 HVAC Climate Control - 163 Chassis
me
Saturday, October 02, 2010 3:23:18 PMPage 215 © 2006 Mitchell Repair Information Company, LLC.
Page 3460 of 4133
Air conditioning system
Refrigerant compressor
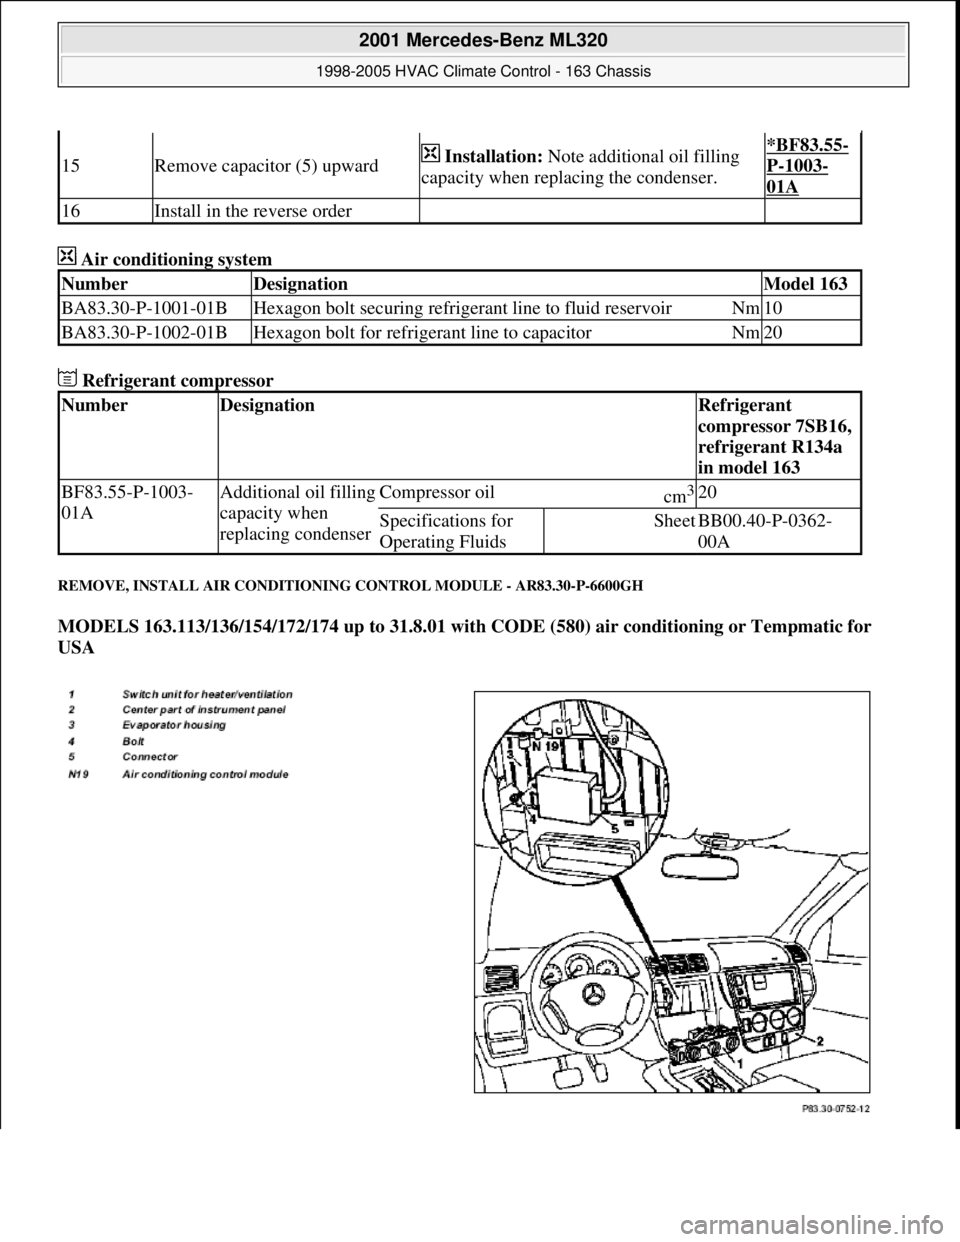
REMOVE, INSTALL AIR CONDITIONING CONTROL MODULE - AR83.30-P-6600GH
MODELS 163.113/136/154/172/174 up to 31.8.01 with CODE (580) air conditioning or Tempmatic for
USA
15Remove capacitor (5) upward Installation: Note additional oil filling
capacity when replacing the condenser.*BF83.55-
P-1003-
01A
16Install in the reverse order
NumberDesignationModel 163
BA83.30-P-1001-01BHexagon bolt securing refrigerant line to fluid reservoirNm10
BA83.30-P-1002-01BHexagon bolt for refrigerant line to capacitorNm20
NumberDesignationRefrigerant
compressor 7SB16,
refrigerant R134a
in model 163
BF83.55-P-1003-
01AAdditional oil filling
capacity when
replacing condenserCompressor oilcm3 20
Specifications for
Operating FluidsSheetBB00.40-P-0362-
00A
2001 Mercedes-Benz ML320
1998-2005 HVAC Climate Control - 163 Chassis
me
Saturday, October 02, 2010 3:23:18 PMPage 216 © 2006 Mitchell Repair Information Company, LLC.