esp is not available MERCEDES-BENZ ML350 2010 W164 Owner's Manual
[x] Cancel search | Manufacturer: MERCEDES-BENZ, Model Year: 2010, Model line: ML350, Model: MERCEDES-BENZ ML350 2010 W164Pages: 368, PDF Size: 9.09 MB
Page 22 of 368
Product Information
Please observe the following in your own best
interest:
We recommend using Genuine Mercedes-
Benz Parts as well as conversion parts and
accessories explicitly approved by us for your
vehicle model.
We have tested these parts to determine their
reliability, safety and special suitability for
Mercedes-Benz vehicles.
We are unable to make an assessment for
other products and therefore cannot be held
responsible for them, even if in individual
cases an official approval or authorization by
governmental or other agencies should exist.
Use of such parts and accessories could
adversely affect the safety, performance or
reliability of your vehicle. Please do not use
them.
Genuine Mercedes-Benz Parts and pre-
approved conversion parts and accessories
are available at any authorized Mercedes-
Benz Center. In addition, you will receive
comprehensive information on permissible
technical modifications and expert
installations.
Operator’s Manual
Notes
This Operator’s Manual contains a great deal
of useful information. We urge you to read it
carefully and familiarize yourself with the
vehicle before driving.
For your own safety and longer service life of
the vehicle, we urge you to follow the
instructions and warnings contained in this
Operator’s Manual. Ignoring them could
result in damage to the vehicle or personal
injury to you or others. Vehicle damage
caused by failure to follow instructions is not
covered by the Mercedes-Benz Limited
Warranty.
We continuously strive to improve our
product and ask for your understanding that
we reserve the right to make changes in
design and equipment. Therefore,
information, illustrations, and descriptions in
this Operator’s Manual might differ from your
vehicle.
Vehicle equipment
Your vehicle may have some or all of the
equipment described in this manual.
Therefore, you may find explanations for
optional equipment not installed in your
vehicle. If you have any questions about
operating particular equipment, any
authorized Mercedes-Benz Center will be glad
to demonstrate the proper procedures.
Optional equipment is also described in this
manual, including operating instructions
wherever necessary. Since they are special-
order items, the descriptions and illustrations
herein may vary slightly from the actual
equipment of your vehicle.
If there are any equipment details that are not
shown or described in this Operator’s
Manual, any authorized Mercedes-Benz
Center will be glad to inform you of correct
care and operating procedures. The
Operator’s Manual and Maintenance Booklet
are important documents and should be kept
with the vehicle.
Service and warranty information
The Service and Warranty Information
booklet contains detailed information about
the warranties covering your Mercedes-Benz,
including:
R New Vehicle Limited Warranty
R Emission System Warranty
R Emission Performance Warranty
R California, Connecticut, Maine,
Massachusetts, New York, Pennsylvania,
20Introduction164_AKB; 7; 31, en-USd2ureepe,Version: 2.11.8.12009-09-11T12:07:36+02:00 - Seite 20
Page 39 of 368
GWarning!
The SRS self-check has detected a
malfunction when the SRS indicator lamp
+ :
R does not come on at all
R does not go out after 4 seconds after the
engine was started
R comes on while driving
For your safety, we strongly recommend that
you contact an authorized Mercedes-Benz
Center immediately to have the system
checked. Otherwise the SRS may not be
activated when needed in an accident, which
could result in serious or fatal injury. The SRS
might also deploy unexpectedly and
unnecessarily which could also result in injury
as well.
In addition, improper work on the SRS creates
a risk of rendering the SRS inoperative or
causing unintended air bag deployment. Work
on the SRS must therefore only be performed
by qualified technicians. Contact an
authorized Mercedes-Benz Center.
If it is necessary to modify an air bag system
to accommodate a person with disabilities,
contact an authorized Mercedes-Benz Center.
USA only: Call our Customer Assistance
Center at 1-800-FOR-MERCedes
(1-800-367-6372) for details.
Air bags
GWarning!
Air bags are designed to reduce the potential
of injury and fatality in certain
R frontal impacts (front air bags)
R side impacts (side impact air bags and
window curtain air bags)
R rollovers (window curtain air bags)
However, no system available today can
completely eliminate injuries and fatalities.
Deployment of the air bags temporarily
releases a small amount of dust from the air
bags. This dust, however, is neither harmful
to your health, nor does it indicate a fire in the
vehicle. The dust might cause some
temporary breathing difficulty for people with
asthma or other breathing trouble. To avoid
this, you may wish to get out of the vehicle as
soon as it is safe to do so. If you have any
breathing difficulty but cannot get out of the
vehicle after the air bag inflates, then get fresh
air by opening a window or door.GWarning!
To reduce the risk of injury when the front air
bags inflate, it is very important for the driver
and front passenger to always be in a properly
seated position and to wear their respective
seat belt.
For maximum protection in the event of a
collision always be in normal seated position
with your back against the seat backrest.
Fasten your seat belt and make sure it is
properly positioned on your body.
Since the air bag inflates with considerable
speed and force, a proper seating position
and correct positioning of the hands on the
steering wheel will help to keep you at a safe
distance from the air bag. Occupants who are
not wearing their seat belt, are not seated
properly or are too close to the air bag can be
seriously injured or killed by an air bag as it
inflates with great force instantaneously:
R Sit with the seat belt properly fastened in a
position that is as upright as possible with
your back against the seat backrest.
R Move the driver’s seat as far back as
possible, still permitting proper operation
of vehicle controls. The distance from the
center of the driver’s chest to the center of
the air bag cover on the steering wheel
must be at least 10 inches (25 cm) or more.
You should be able to accomplish this by
adjusting the seat and steering wheel. If
Occupant safety37Safety and security164_AKB; 7; 31, en-USd2ureepe,Version: 2.11.8.12009-09-11T12:07:36+02:00 - Seite 37Z
Page 54 of 368
If you and/or your passenger release the
seat belt during driving, the seat belt
telltale 7 starts flashing and the
warning chime sounds as described before.
If the driver’s or the front passenger’s seat
belt remains unfastened after 60 seconds,
the warning chime stops sounding, the seat
belt telltale 7 stops flashing but
continues to be illuminated.
After a vehicle standstill, the warning chime
is reactivated and the seat belt telltale
7 is flashing again if the vehicle speed
once exceeds 15 mph (25 km/h).
The seat belt telltale 7 will only go out if
both the driver’s and the front passenger’s
seat belt (with the front passenger seat
occupied) are fastened, or the vehicle is
standing still and a front door is opened.
For more information, see “Practical hints”
( Y page 300).
Emergency Tensioning Device (ETD),
seat belt force limiter
The seat belts for the front seats and rear
outer seats are equipped with ETDs and seat
belt force limiters.
The ETDs are designed to activate in the
following cases:
R in frontal or rear-end impacts exceeding
the system’s preset deployment threshold
R in side impacts exceeding the system’s
preset deployment threshold on the far
side of the impact
R in certain vehicle rollovers
R if the restraint systems are operational and
functioning correctly, see “SRS indicator
lamp” ( Y page 36)
The ETDs for the front seats will only activate
if the front seat belts are fastened (latch plate
properly inserted into buckle).
The ETDs for the rear outer seats will activate
with or without the respective seat belts
fastened.
In an impact, the ETDs remove slack from the
seat belts in such a way that the seat belts fit
more snugly against the body. Seat belt force
limiters, when activated, are employed to
help reduce the peak force exerted by the
seat belts on occupants during a crash.
i The ETDs do not correct an incorrect seat
position or incorrectly worn seat belts.
The ETDs do not pull occupants back
toward the seat backrest.GWarning!
Pyrotechnic ETDs that were activated must be
replaced.
For your safety, when disposing of the
pyrotechnic ETDs always follow our safety
instructions. These are available at any
authorized Mercedes-Benz Center.
The PRE-SAFE ®
system has electrically
operated reversible pre-tensioners that do
not require replacement after activation.
Preventive occupant safety (PRE-
SAFE ®
)
GWarning!
The PRE-SAFE ®
system is intended to reduce
the effects of an accident on vehicle
occupants who are wearing their seat belt
properly. Despite your vehicle being equipped
with the PRE-SAFE ®
system, the possibility of
personal injuries occurring as a result of an
accident cannot be eliminated. Therefore,
always drive carefully and adjust your driving
to the prevailing road, weather, and traffic
conditions.
52Occupant safetySafety and security
164_AKB; 7; 31, en-USd2ureepe,Version: 2.11.8.12009-09-11T12:07:36+02:00 - Seite 52
Page 65 of 368
GWarning!
If the ABS malfunctions, other driving safety
systems such as the BAS or the ESP ®
are also
switched off. Observe indicator and warning
lamps that may come on as well as messages
in the multifunction display that may appear.
If the ABS malfunctions, the wheels may lock
during hard braking, reducing steering
capability and extending the braking distance.
Off-road ABS (vehicles with 4MATIC)
Vehicles with 4MATIC have a special ABS off-
road feature. With the off-road driving
program switched on ( Y page 155), the ABS
designed for off-road driving is activated
automatically.
When applying the brakes at speeds below
18 mph (30 km/h), the front wheels are
locked cyclically to shorten the braking
distance (dig-in effect). This will restrict
steering the vehicle.
BAS
GObserve Safety notes, see page 62.
The Brake Assist System (BAS) operates in
emergency situations. If you apply the brakes
very quickly, the BAS provides full brake
boost automatically, thereby potentially
reducing the braking distance.
XApply continuous full braking pressure until
the emergency braking situation is over.
The ABS will prevent the wheels from
locking.
When you release the brake pedal, the brakes
function again as normal. The BAS is then
deactivated.
GWarning!
If the BAS malfunctions, the brake system still
functions, but without the additional brake
boost available that the BAS would normally
provide in an emergency braking maneuver.
Therefore, the braking distance may increase.
EBPGObserve Safety notes, see page 62.
The Electronic Brake Proportioning (EBP)
enhances braking effectiveness by allowing
the rear brakes to supply a greater proportion
of the braking effort in straight-line braking
without a loss of vehicle stability.
GWarning!
If the EBP malfunctions, the brake system will
still function with full brake boost. However,
the rear wheels could lock up during
emergency braking situations, for example.
You could lose control of the vehicle and
cause an accident.
Adapt your driving style to the changed
driving characteristics.
ESP ®
GObserve Safety notes, see page 62.
The Electronic Stability Program (ESP
®
) is
operational as soon as the engine is running.
It monitors the vehicle’s traction (force of
adhesive friction between the tires and the
road surface) and handling.
The ESP ®
recognizes that the vehicle deviates
from the direction of travel as intended by the
driver. By applying brakes to individual
wheels and by limiting the engine output, the
ESP ®
works to stabilize the vehicle. The
ESP ®
is especially useful while driving off and
on wet or slippery road surfaces. The ESP ®
also stabilizes the vehicle during braking and
steering maneuvers.
The ESP ®
warning lamp d in the
instrument cluster comes on when you switch
on the ignition. It goes out when the engine
is running.
The ESP ®
warning lamp d in the
instrument cluster flashes when the ESP ®
is
engaged.
Driving safety systems63Safety and security164_AKB; 7; 31, en-USd2ureepe,Version: 2.11.8.12009-09-11T12:07:36+02:00 - Seite 63Z
Page 66 of 368
GWarning!
Never switch off the ESP®
when you see the
ESP ®
warning lamp d flashing in the
instrument cluster. In this case proceed as
follows:
R When driving off, apply as little throttle as
possible.
R While driving, ease up on the accelerator
pedal.
R Adapt your speed and driving style to the
prevailing road conditions.
Failure to observe these guidelines could
cause the vehicle to skid. The ESP ®
cannot
prevent accidents resulting from excessive
speed.
! Vehicles with 4MATIC:
Only conduct operational or performance
tests on a two-axle dynamometer. If such
tests are necessary, contact an authorized
Mercedes-Benz Center. You could
otherwise seriously damage the brake
system or the transfer case which is not
covered by the Mercedes-Benz Limited
Warranty.
! Vehicles without 4MATIC:
Because the ESP ®
operates automatically,
the engine and ignition must be shut off
(SmartKey in starter switch position 0 or
1 or KEYLESS-GO start/stop button in
position 0 or 1) when the parking brake is
being tested on a brake test dynamometer
or the vehicle is being towed with one axle
raised.
Active braking action through the ESP ®
may otherwise seriously damage the brake
system which is not covered by the
Mercedes-Benz Limited Warranty.
! Vehicles with 4MATIC:
Because the ESP ®
operates automatically,
the engine and ignition must be shut off
(SmartKey in starter switch position 0 or
1 or KEYLESS-GO start/stop button in
position 0 or 1) when the parking brake is
being tested on a brake test dynamometer.
Such testing should be no longer than 10
seconds.
Active braking action through the ESP ®
may otherwise seriously damage the brake
system which is not covered by the
Mercedes-Benz Limited Warranty.
! The ESP ®
will only function properly if you
use wheels of the recommended tire size
as specified in the “Technical data” section
of this Operator’s Manual.
i The cruise control switches off
automatically when the ESP ®
engages.
Electronic Traction System
(ETS/4-ETS) GObserve Safety notes, see page 62.
The ETS (Electronic Traction System) and
4-ETS (four-wheel Electronic Traction
System, vehicles with 4MATIC only) are
components of the ESP ®
. The ETS/4-ETS
improves the vehicle’s ability to utilize
available traction, especially under slippery
road conditions by applying the brakes to a
spinning wheel. Vehicles with 4MATIC also
transfer more power to the wheel(s) with
traction.
When you switch off the ESP ®
, the
ETS/4-ETS is still enabled.
XIf conditions require, switch on the off-road
driving program ( Y page 155).
Off-road 4-ETS (vehicles with 4MATIC)
With the off-road driving program switched on
( Y page 155), the 4-ETS designed for off-road
use is activated automatically.
Switching off the ESP ®
GWarning!
The ESP
®
should not be switched off during
normal driving other than in the
64Driving safety systemsSafety and security
164_AKB; 7; 31, en-USd2ureepe,Version: 2.11.8.12009-09-11T12:07:36+02:00 - Seite 64
Page 69 of 368
iIf the alarm stays on for more than
30 seconds, the Tele Aid system initiates a
call to the Response Center automatically.
The Tele Aid system will initiate the call
provided that
Ryou have subscribed to the Tele Aid
service
Rthe Tele Aid service has been activated
properly
Rthe necessary mobile phone, power
supply and GPS coverage are available
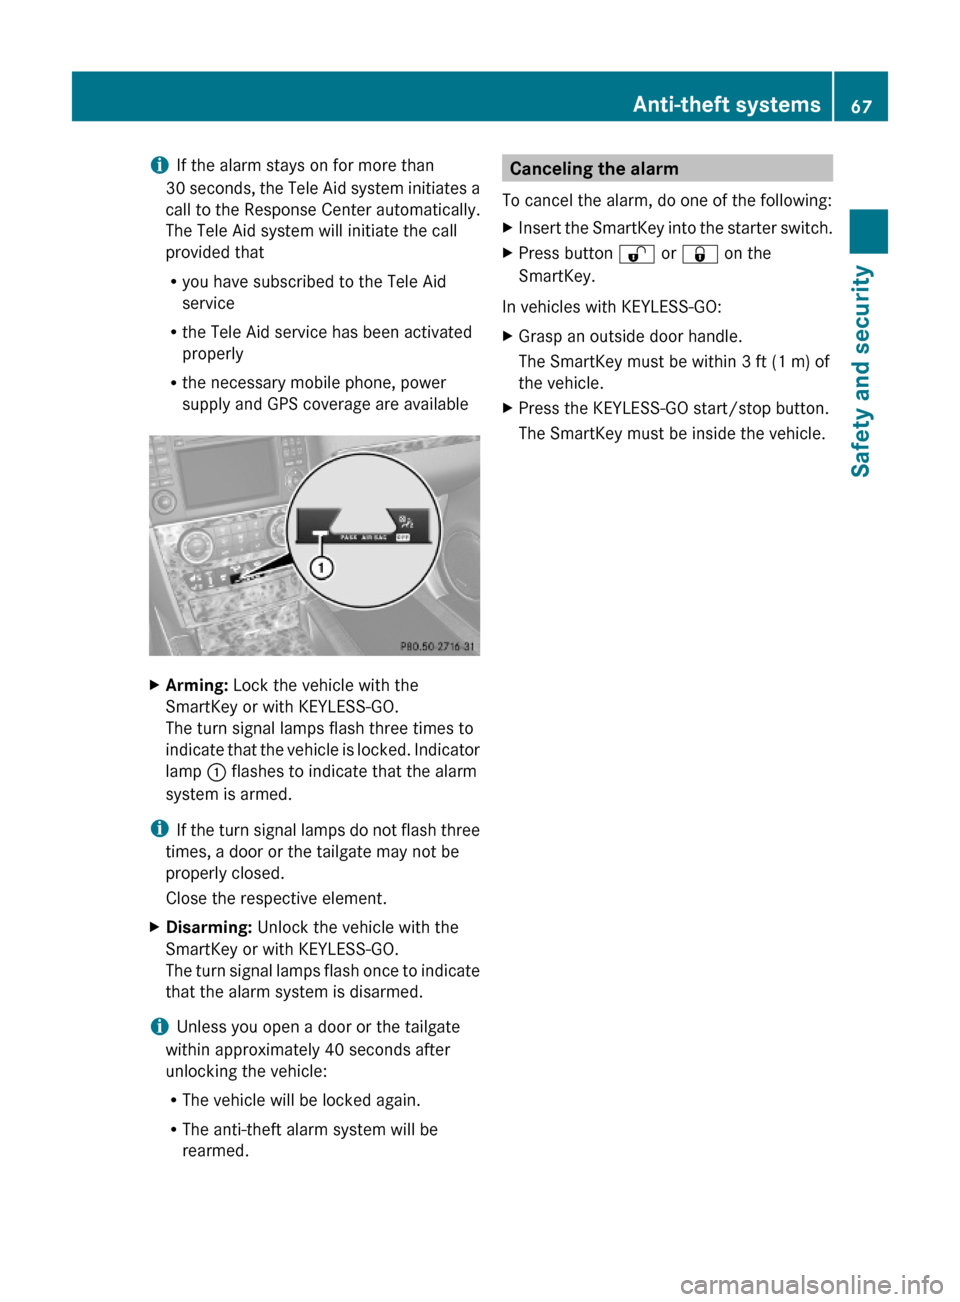
XArming: Lock the vehicle with the
SmartKey or with KEYLESS-GO.
The turn signal lamps flash three times to
indicate that the vehicle is locked. Indicator
lamp : flashes to indicate that the alarm
system is armed.
iIf the turn signal lamps do not flash three
times, a door or the tailgate may not be
properly closed.
Close the respective element.
XDisarming: Unlock the vehicle with the
SmartKey or with KEYLESS-GO.
The turn signal lamps flash once to indicate
that the alarm system is disarmed.
iUnless you open a door or the tailgate
within approximately 40 seconds after
unlocking the vehicle:
RThe vehicle will be locked again.
RThe anti-theft alarm system will be
rearmed.
Canceling the alarm
To cancel the alarm, do one of the following:
XInsert the SmartKey into the starter switch.XPress button % or & on the
SmartKey.
In vehicles with KEYLESS-GO:
XGrasp an outside door handle.
The SmartKey must be within 3 ft (1 m) of
the vehicle.
XPress the KEYLESS-GO start/stop button.
The SmartKey must be inside the vehicle.
Anti-theft systems67Safety and security164_AKB; 7; 31, en-USd2ureepe,Version: 2.11.8.12009-09-11T12:07:36+02:00 - Seite 67Z
Page 85 of 368
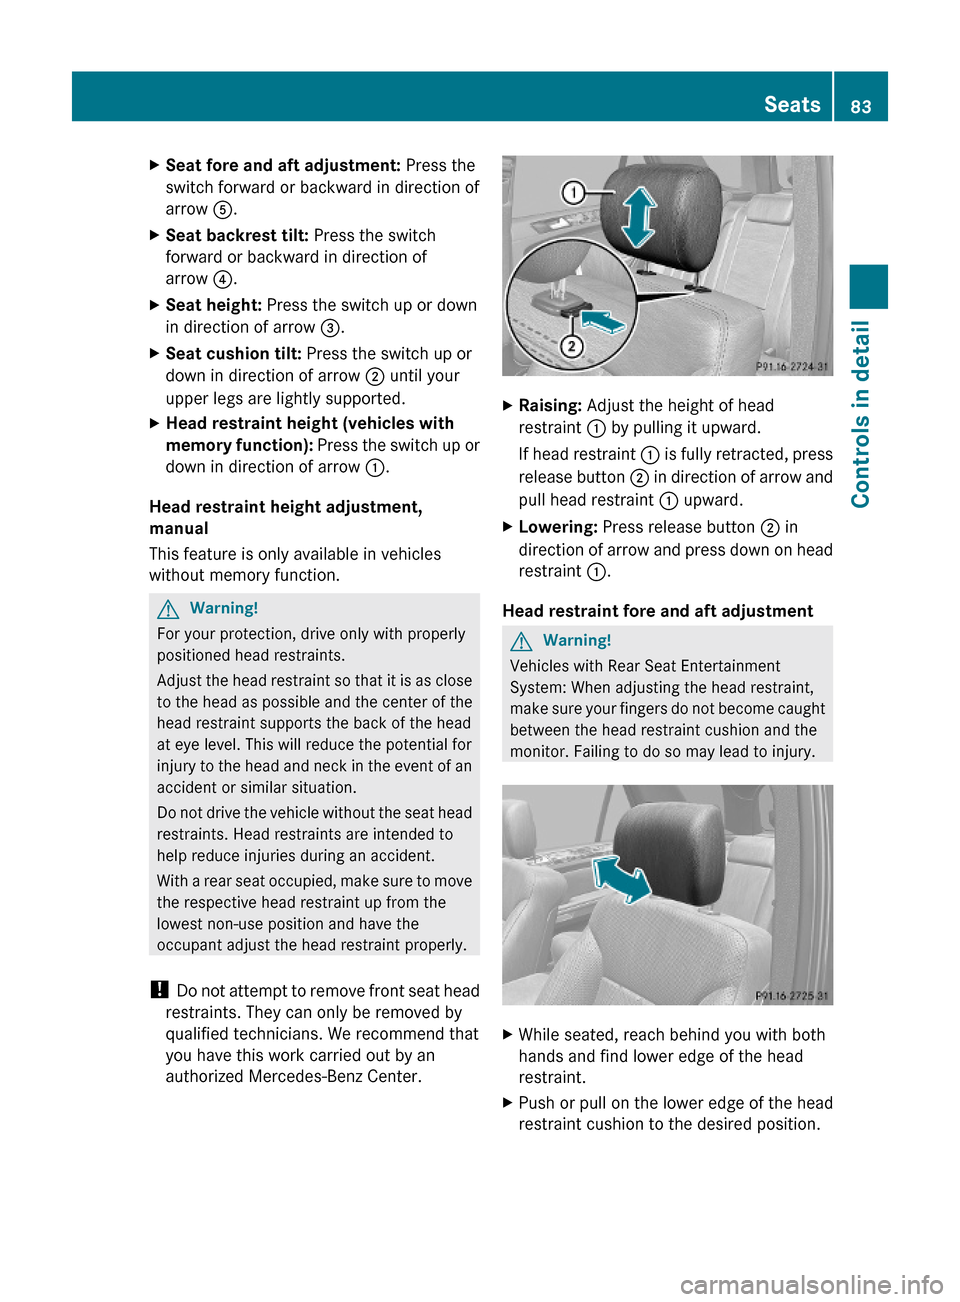
XSeat fore and aft adjustment: Press the
switch forward or backward in direction of
arrow A.
XSeat backrest tilt: Press the switch
forward or backward in direction of
arrow ?.
XSeat height: Press the switch up or down
in direction of arrow =.
XSeat cushion tilt: Press the switch up or
down in direction of arrow ; until your
upper legs are lightly supported.
XHead restraint height (vehicles with
memory function): Press the switch up or
down in direction of arrow :.
Head restraint height adjustment,
manual
This feature is only available in vehicles
without memory function.
GWarning!
For your protection, drive only with properly
positioned head restraints.
Adjust the head restraint so that it is as close
to the head as possible and the center of the
head restraint supports the back of the head
at eye level. This will reduce the potential for
injury to the head and neck in the event of an
accident or similar situation.
Do not drive the vehicle without the seat head
restraints. Head restraints are intended to
help reduce injuries during an accident.
With a rear seat occupied, make sure to move
the respective head restraint up from the
lowest non-use position and have the
occupant adjust the head restraint properly.
! Do not attempt to remove front seat head
restraints. They can only be removed by
qualified technicians. We recommend that
you have this work carried out by an
authorized Mercedes-Benz Center.
XRaising: Adjust the height of head
restraint : by pulling it upward.
If head restraint : is fully retracted, press
release button ; in direction of arrow and
pull head restraint : upward.
XLowering: Press release button ; in
direction of arrow and press down on head
restraint :.
Head restraint fore and aft adjustment
GWarning!
Vehicles with Rear Seat Entertainment
System: When adjusting the head restraint,
make sure your fingers do not become caught
between the head restraint cushion and the
monitor. Failing to do so may lead to injury.
XWhile seated, reach behind you with both
hands and find lower edge of the head
restraint.
XPush or pull on the lower edge of the head
restraint cushion to the desired position.
Seats83Controls in detail164_AKB; 7; 31, en-USd2ureepe,Version: 2.11.8.12009-09-11T12:07:36+02:00 - Seite 83Z
Page 88 of 368
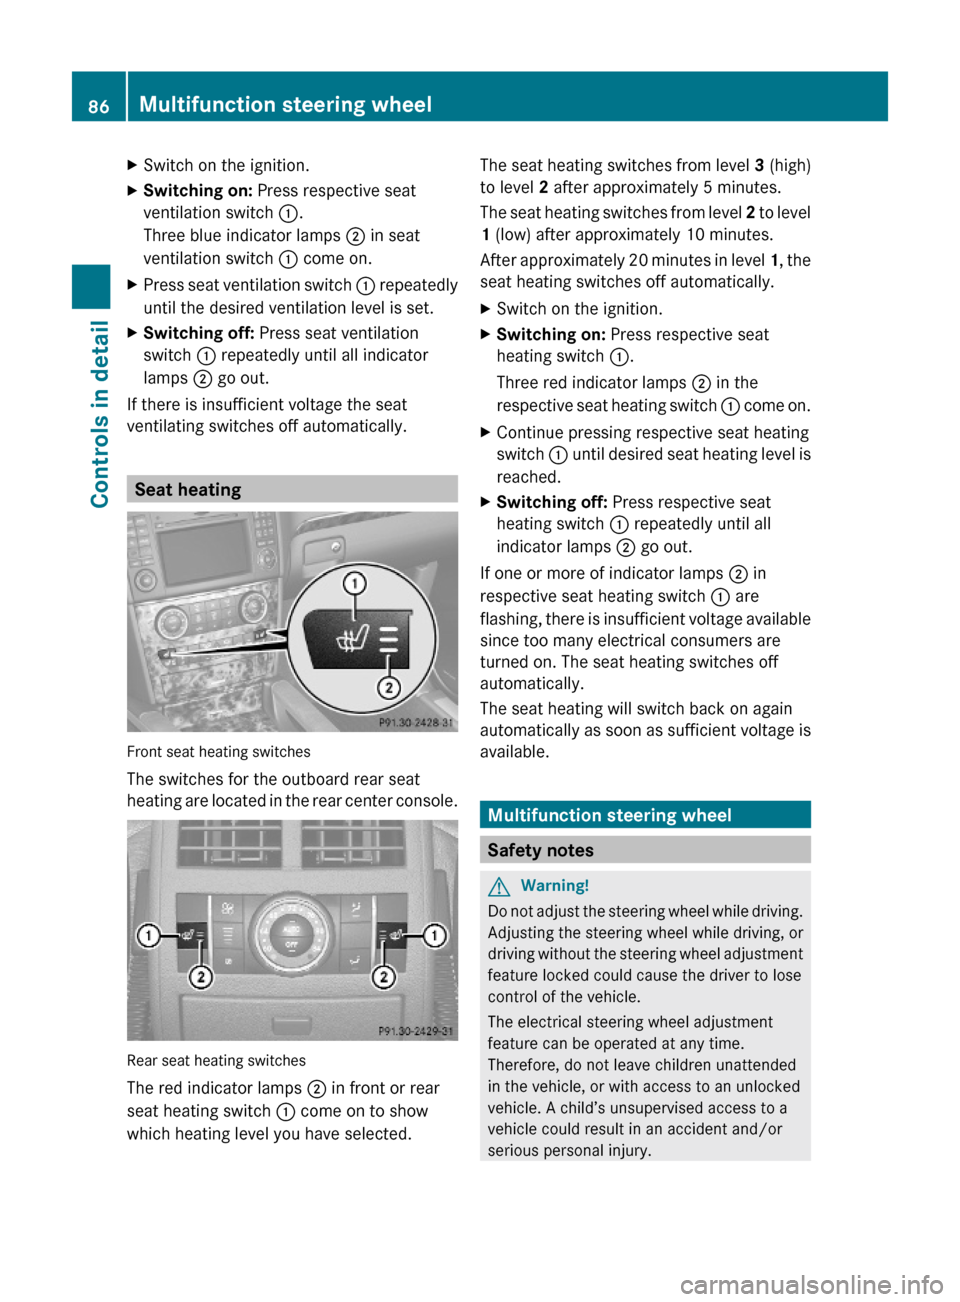
XSwitch on the ignition.XSwitching on: Press respective seat
ventilation switch :.
Three blue indicator lamps ; in seat
ventilation switch : come on.
XPress seat ventilation switch : repeatedly
until the desired ventilation level is set.
XSwitching off: Press seat ventilation
switch : repeatedly until all indicator
lamps ; go out.
If there is insufficient voltage the seat
ventilating switches off automatically.
Seat heating
Front seat heating switches
The switches for the outboard rear seat
heating are located in the rear center console.
Rear seat heating switches
The red indicator lamps ; in front or rear
seat heating switch : come on to show
which heating level you have selected.
The seat heating switches from level 3 (high)
to level 2 after approximately 5 minutes.
The seat heating switches from level 2 to level
1 (low) after approximately 10 minutes.
After approximately 20 minutes in level 1, the
seat heating switches off automatically.
XSwitch on the ignition.XSwitching on: Press respective seat
heating switch :.
Three red indicator lamps ; in the
respective seat heating switch : come on.
XContinue pressing respective seat heating
switch : until desired seat heating level is
reached.
XSwitching off: Press respective seat
heating switch : repeatedly until all
indicator lamps ; go out.
If one or more of indicator lamps ; in
respective seat heating switch : are
flashing, there is insufficient voltage available
since too many electrical consumers are
turned on. The seat heating switches off
automatically.
The seat heating will switch back on again
automatically as soon as sufficient voltage is
available.
Multifunction steering wheel
Safety notes
GWarning!
Do not adjust the steering wheel while driving.
Adjusting the steering wheel while driving, or
driving without the steering wheel adjustment
feature locked could cause the driver to lose
control of the vehicle.
The electrical steering wheel adjustment
feature can be operated at any time.
Therefore, do not leave children unattended
in the vehicle, or with access to an unlocked
vehicle. A child’s unsupervised access to a
vehicle could result in an accident and/or
serious personal injury.
86Multifunction steering wheelControls in detail
164_AKB; 7; 31, en-USd2ureepe,Version: 2.11.8.12009-09-11T12:07:36+02:00 - Seite 86
Page 96 of 368
ambient lighting conditions require you to do
so.
In low ambient lighting conditions, only switch
from position à to L with the vehicle
at a standstill in a safe location. Switching
from à to L will briefly switch off the
headlamps. Doing so while driving in low
ambient lighting conditions may result in an
accident.
The automatic headlamp feature is only an aid
to the driver. The driver is responsible for the
operation of the vehicle’s lights at all times.XSwitching on: Turn the exterior lamp
switch to position Ã.
The following lamps come on and go out
depending on the brightness of the ambient
light with the SmartKey in starter switch
position 1 or the KEYLESS-GO start/stop
button pressed once:
R tail lamps
R parking lamps
R license plate lamps
R side marker lamps
When the engine is running, the low-beam
headlamps will also come on and turn off
automatically.
Canada only: High-beam headlamps are only
available with the exterior lamp switch in
position L.
Daytime running lamp mode
In Canada, the daytime running lamp mode is
mandatory and therefore in a constant mode.
In the USA, the daytime running lamp mode
is deactivated by default.
XActivate the daytime running lamp mode
using the control system, see “Switchingdaytime running lamp mode on or off (USA
only)” ( Y page 133).XTurn the exterior lamp switch to position
$ or à .
When the engine is running, the low-beam
headlamps come on.
In low ambient lighting conditions, the
following lamps will come on additionally:
R Tail lamps
R Parking lamps
R License plate lamps
R Side marker lamps
With the daytime running lamp mode
activated and the engine running, you cannot
switch off the low-beam headlamps manually.
Canada only
With the exterior lamp switch in position
$ or à , you cannot switch on the high-
beam headlamps.
The high-beam flasher is available at all times.
XFor nighttime driving turn the exterior lamp
switch to position L to permit activation
of the high-beam headlamps.
When the engine is running, and you
R shift from a driving position to park
position P with the vehicle at a standstill or
the parking brake is engaged, the low-beam
headlamps will go out with a delay of
3 minutes
R turn the exterior lamp switch to position
T , the low-beam headlamps, the tail
and parking lamps, the license plate lamps
and the side marker lamps come on
R turn the exterior lamp switch to position
L , the manual headlamp mode has
priority over the daytime running lamp
mode
The corresponding exterior lamps come on
( Y page 93).
94LightingControls in detail
164_AKB; 7; 31, en-USd2ureepe,Version: 2.11.8.12009-09-11T12:07:36+02:00 - Seite 94
Page 97 of 368
USA only
You can only switch on the high-beam
headlamps in low ambient lighting conditions.
The high-beam flasher is available at all times.
XFor nighttime driving turn the exterior lamp
switch to position L or à to permit
activation of the high-beam headlamps.
When the engine is running, and you turn the
exterior lamp switch to position T or
L, the manual headlamp mode has
priority over the daytime running lamp mode.
The corresponding exterior lamps come on
(Y page 93).
Fog lamps
Fog lamps cannot be switched on with the
exterior lamp switch in position Ã.
GWarning!
In low ambient lighting or foggy conditions,
only switch from position à to L with
the vehicle at a standstill in a safe location.
Switching from à to L will briefly
switch off the headlamps. Doing so while
driving in low ambient lighting conditions may
result in an accident.
Fog lamps will operate with the parking lamps
and/or the low-beam headlamps on. Fog
lamps should only be used in conjunction with
low-beam headlamps. Consult your State or
Province Motor Vehicle Regulations
regarding permissible lamp operation.
XSwitch on the ignition.XTurn the exterior lamp switch to position
T or L (Y page 93).
XSwitching on front fog lamps: Pull out the
exterior lamp switch to first stop.
The green indicator lamp N in the
exterior lamp switch comes on.
XSwitching on rear fog lamp: Pull out the
exterior lamp switch to second stop.
The rear fog lamp, the front fog lamps, the
green and the yellow indicator lamp R
in the exterior lamp switch come on.
XSwitching off front fog lamps/rear fog
lamp: Push in the exterior lamp switch to
its stop.
Locator lighting and night security
illumination
Locator lighting and night security
illumination are described in the “Control
system” section, see “Switching locator
lighting on or off” (Y page 133) and
“Switching night security illumination
(Headlamps delayed shut-off feature) on or
off” (Y page 134).
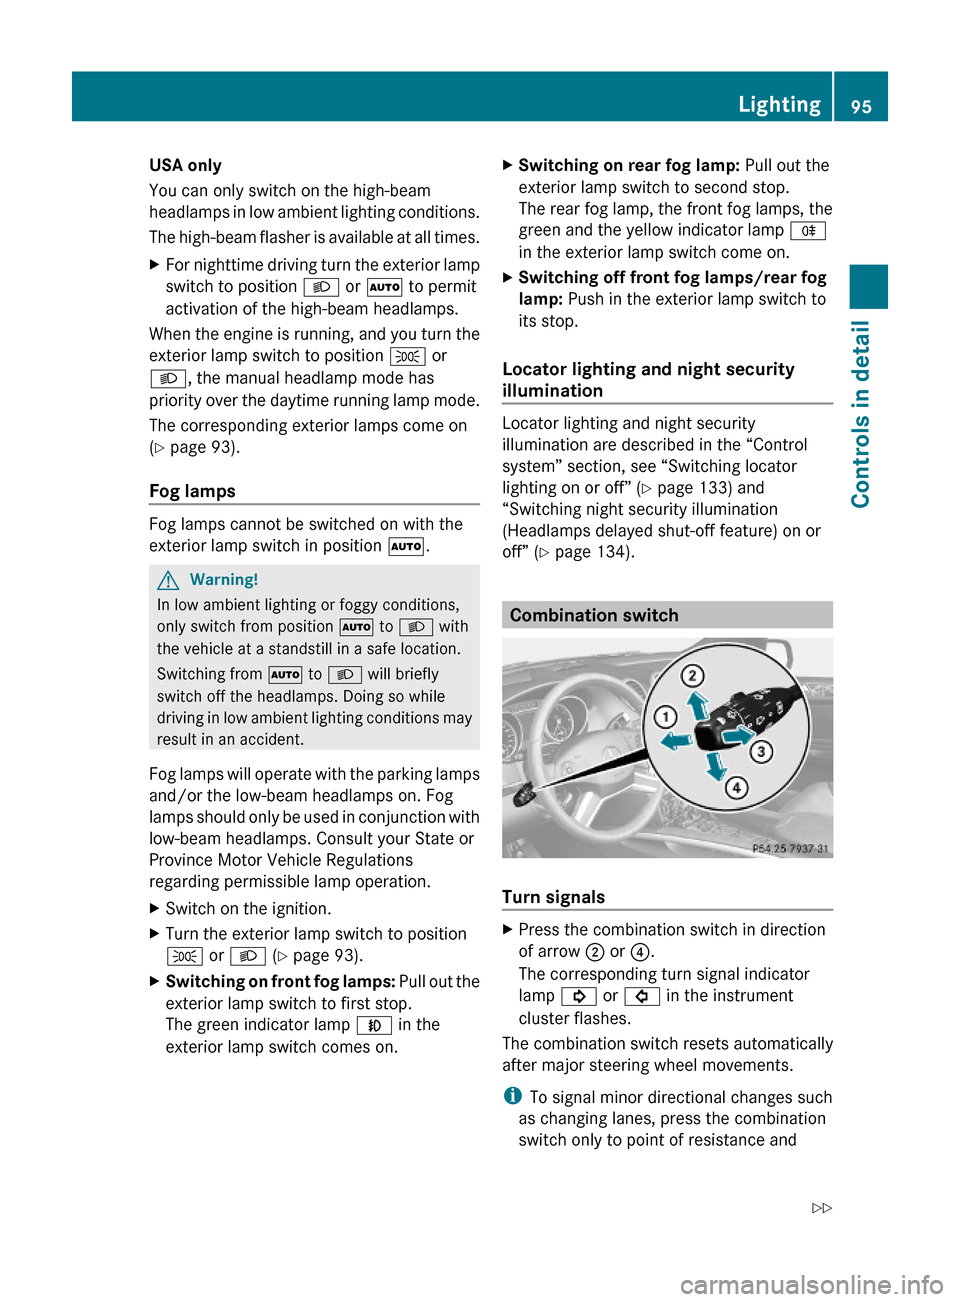
Combination switch
Turn signals
XPress the combination switch in direction
of arrow ; or ?.
The corresponding turn signal indicator
lamp ! or # in the instrument
cluster flashes.
The combination switch resets automatically
after major steering wheel movements.
iTo signal minor directional changes such
as changing lanes, press the combination
switch only to point of resistance and
Lighting95Controls in detail164_AKB; 7; 31, en-USd2ureepe,Version: 2.11.8.12009-09-11T12:07:36+02:00 - Seite 95Z