reset button MERCEDES-BENZ ML350 2010 W164 Owner's Manual
[x] Cancel search | Manufacturer: MERCEDES-BENZ, Model Year: 2010, Model line: ML350, Model: MERCEDES-BENZ ML350 2010 W164Pages: 368, PDF Size: 9.09 MB
Page 15 of 368
Air filter .......................................... 292
Air suspension program .................285
Alternator .............................. 280, 290
Automatic
transmission .................................. 280
Battery ................................... 280, 290
Brake fluid ..................................... 284
Brake pads ..................................... 283
Coolant .......................................... 288
Corner-illuminating front fog
lamps ............................................. 295
Cruise control ................................ 278
Distronic ........................................ 278
Doors ............................................. 286
Downhill Speed Regulation (DSR) ..286
EBP ................................................ 284
Engine oil ....................................... 291
ESP ®
...................................... 273, 284
Fog lamps .............................. 293, 294
Front passenger front air bag ........275
Gas cap .......................................... 292
High-beam lamps ........................... 294
Hood .............................................. 286
License plate lamps .......................294
Light sensor ................................... 294
Low-beam lamps ............................ 294
Parking brake ................................ 284
Parking lamps ................................ 294
PRE-SAFE ®
.................................... 274
Reserve fuel ................................... 291
Reverse lamp ................................. 293
Side marker lamps .........................293
SmartKey ............................... 286, 287
SmartKey with KEYLESS-GO ..........286
SRS ................................................ 285
Tailgate .......................................... 286
Tail lamps ...................................... 295
Tele Aid .......................................... 285
Tire inflation pressure ............281, 296
Tire pressure monitor ....................281
Tires ...................................... 281, 296
Trailer brake lamps ........................295
Trailer tail lamps ............................ 295
Trailer turn signal lamps ................295
Turn signals ................................... 296
Washer fluid ................................... 288Multifunction steering wheel
Adjustment ...................................... 86
Buttons .......................................... 119
Cleaning ......................................... 265
Easy-entry/exit feature ...........87, 136
Gearshift control ............................ 115
Heating ............................................ 88
Memory function .............................. 92
Overview .......................................... 30
N
Navigation menu ............................... 127
Navigation system see Separate operating instructions
NECK-PRO active front head
restraints ............................................. 53
Resetting ....................................... 309
Nets, parcel ....................................... 188
Night security illumination .............. 134
Normal occupant weight .................. 241
Number, vehicle identification
(VIN) ................................................... 347
O
Occupant Classification System see OCS (Occupant Classification
System)
Occupant distribution ....................... 241
Occupant safety
Air bags ........................................... 37
BabySmart™ .................................... 46
Children and air bags .......................37
Children in the vehicle .....................55
Child seat anchors – LATCH-type ....59
Fastening the seat belts ................... 50
Front passenger front air bag off
indicator lamp (Canada
only) ........................................ 46, 305
Front passenger front air bag off
indicator lamp (USA only) ........42, 305
Infant and child restraint systems .... 56
Introduction ..................................... 36
OCS (Occupant Classification
System) ........................................... 42
PRE-SAFE ®
....................................... 52
Seat belts .................................. 39, 48
Index13164_AKB; 7; 31, en-USd2ureepe,Version: 2.11.8.12009-09-11T12:07:36+02:00 - Seite 13
Page 17 of 368
Program mode selector switch
Automatic shift program ................114
Manual shift program ..................... 116
Proximity key
see Key, SmartKey
PSI (air pressure unit) ....................... 241
R
RACETIMER ........................................ 124
Radiator ..................................... 214, 242
Radio
Selecting stations ..........................126
Radio transmitters ............................ 257
Rain sensor see Intermittent wiping
Rear axle oil ....................................... 357
Rear center console ashtray see Ashtrays
Rear doors
Child safety locks ............................ 60
Rear door window
Override switch ................................ 60
Rear fog lamp
see Fog lamps
Rear lamps
see Tail lamps
Rear seat head restraints
see Head restraints
Rear view camera .............................. 163
Cleaning the camera lens ..............263
Rear window defroster ..................... 183
Rear window wiper/washer ............. 100
Recommended tire inflation
pressure ..................................... 219, 241
Refilling
AdBlue ®
......................................... 332
Refrigerant, air conditioning ............ 359
Refueling ............................................ 210
Regular checks .................................. 212
Reminder, Seat belt see Seat belts, Telltale
Remote control
see Key, SmartKey
Remote door unlock (Tele Aid) ......... 203
Replacing
Key .................................................. 74
Replacing bulbs ................................. 311
Reporting safety defects .................... 24
Research Octane Number see RON
Reserve fuel
Messages in the multifunction
display ........................................... 291
Warning lamp ................................... 29
Reset button ................................ 28, 118
Reset tool (NECK-PRO active front
head restraints) ................................. 309
Restraint systems see Occupant safety
Rims ........................................... 241, 352
Roadside Assistance ................... 21, 201
RON (Research Octane Number) ..... 360
Rubber parts, cleaning ...................... 264
Run-flat tires see MOExtended tires
S
Safety
Driving safety systems .....................61
Occupant safety ............................... 36
Reporting defects ............................ 24
Safety belts
see Seat belts
Seat belt force limiter ......................... 52
Seat belts ............................................. 48
Adjustment function ........................51
Children in the vehicle .....................55
Cleaning ......................................... 265
Fastening ......................................... 50
Height adjustment ...........................51
Proper use of ................................... 48
Safety guidelines ............................. 39
Safety notes ..................................... 48
Telltale ..................................... 29, 300
Seat heating ......................................... 86
Seating capacity ................................ 228
Seats ..................................................... 81
Adjustment ...................................... 81
Easy-entry/exit feature ....................87
Folding (expanding cargo volume) . 189
Heating ............................................ 86
Memory function .............................. 92
Multicontour seat ............................ 85
Ventilation ....................................... 85
Index15164_AKB; 7; 31, en-USd2ureepe,Version: 2.11.8.12009-09-11T12:07:36+02:00 - Seite 15
Page 30 of 368
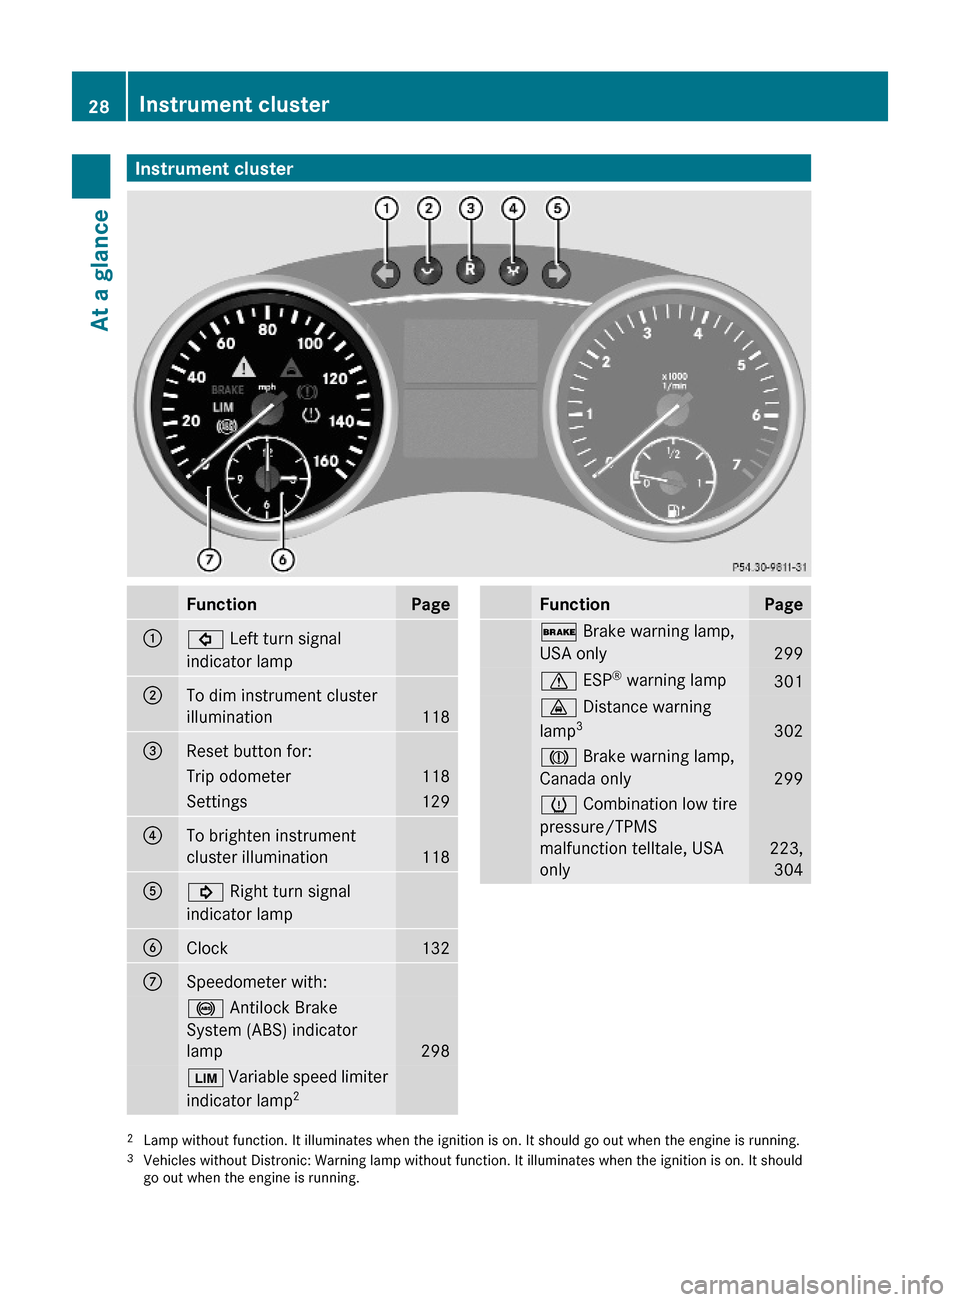
Instrument clusterFunctionPage:# Left turn signal
indicator lamp
;To dim instrument cluster
illumination118
=Reset button for: Trip odometer118Settings129?To brighten instrument
cluster illumination118
A! Right turn signal
indicator lamp
BClock 132CSpeedometer with: ! Antilock Brake
System (ABS) indicator
lamp 298
È Variable speed limiter
indicator lamp2FunctionPage$ Brake warning lamp,
USA only 299
d ESP® warning lamp 301· Distance warning
lamp3302
J Brake warning lamp,
Canada only299
h Combination low tire
pressure/TPMS
malfunction telltale, USA
only
223,
304
2Lamp without function. It illuminates when the ignition is on. It should go out when the engine is running.3Vehicles without Distronic: Warning lamp without function. It illuminates when the ignition is on. It shouldgo out when the engine is running.
28Instrument clusterAt a glance
164_AKB; 7; 31, en-USd2ureepe,Version: 2.11.8.12009-09-11T12:07:36+02:00 - Seite 28
Page 92 of 368
iAt low ambient temperatures, the exterior
rear view mirrors will be heated
automatically.
Auto-dimming rear view mirrors
The exterior rear view mirror on the driver’s
side and the interior rear view mirror will
respond automatically to glare when the
ignition is switched on and incoming light
from headlamps falls on the sensor in the
interior rear view mirror.
The rear view mirrors will not react if the
automatic transmission is set to reverse gear
R or the interior lighting is switched on.
GWarning!
The auto-dimming function does not react if
incoming light is not aimed directly at sensors
in the interior rear view mirror.
The interior rear view mirror and the exterior
rear view mirror on the driver’s side do not
react, for example, when transporting cargo
which covers the rear window.
Light hitting the mirror(s) at certain angles
(incident light) could blind you. As a result,
you may not be able to observe traffic
conditions and could cause an accident.
Exterior rear view mirror parking
position
For more convenient parking, you can set the
passenger-side exterior rear view mirror so
that you can see the rear wheel and the road
curb.
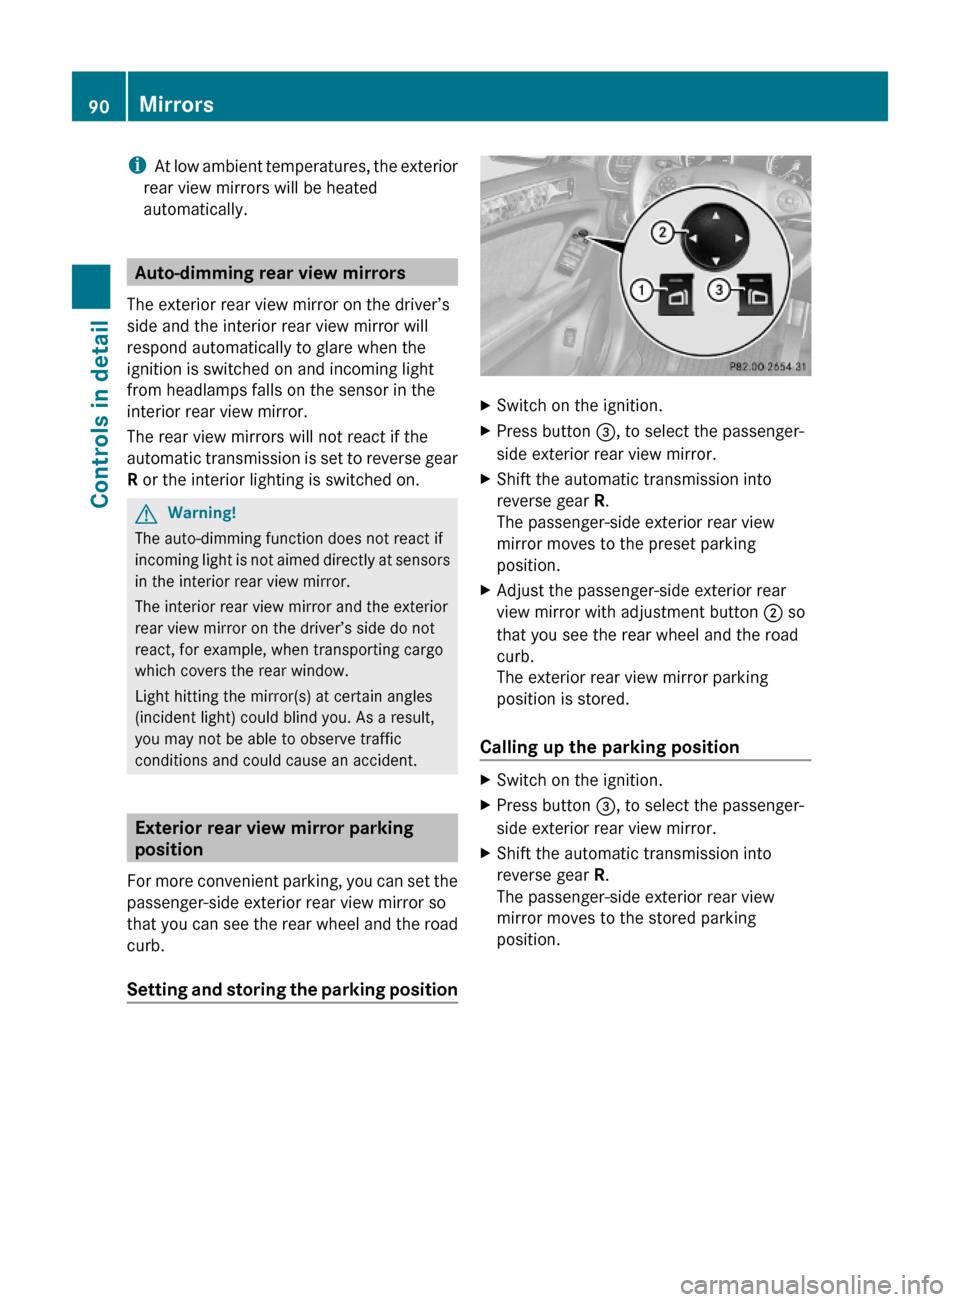
Setting and storing the parking position
XSwitch on the ignition.XPress button =, to select the passenger-
side exterior rear view mirror.
XShift the automatic transmission into
reverse gear R.
The passenger-side exterior rear view
mirror moves to the preset parking
position.
XAdjust the passenger-side exterior rear
view mirror with adjustment button ; so
that you see the rear wheel and the road
curb.
The exterior rear view mirror parking
position is stored.
Calling up the parking position
XSwitch on the ignition.XPress button =, to select the passenger-
side exterior rear view mirror.
XShift the automatic transmission into
reverse gear R.
The passenger-side exterior rear view
mirror moves to the stored parking
position.
90MirrorsControls in detail
164_AKB; 7; 31, en-USd2ureepe,Version: 2.11.8.12009-09-11T12:07:36+02:00 - Seite 90
Page 120 of 368
GWarning!
No messages will be displayed if either the
instrument cluster or the multifunction
display is inoperative.
As a result, you will not be able to see
information about your driving conditions,
such as
Rspeed
Routside temperature
Rwarning/indicator lamps
Rmalfunction/warning messages
Rfailure of any systems
Driving characteristics may be impaired.
If you must continue to drive, do so with added
caution. Contact an authorized Mercedes-
Benz Center as soon as possible.
GWarning!
HYBRID vehicles: It is imperative that you read
the HYBRID Supplemental Operating
Instructions included in your vehicle literature
portfolio. You may otherwise not recognize
potential danger.
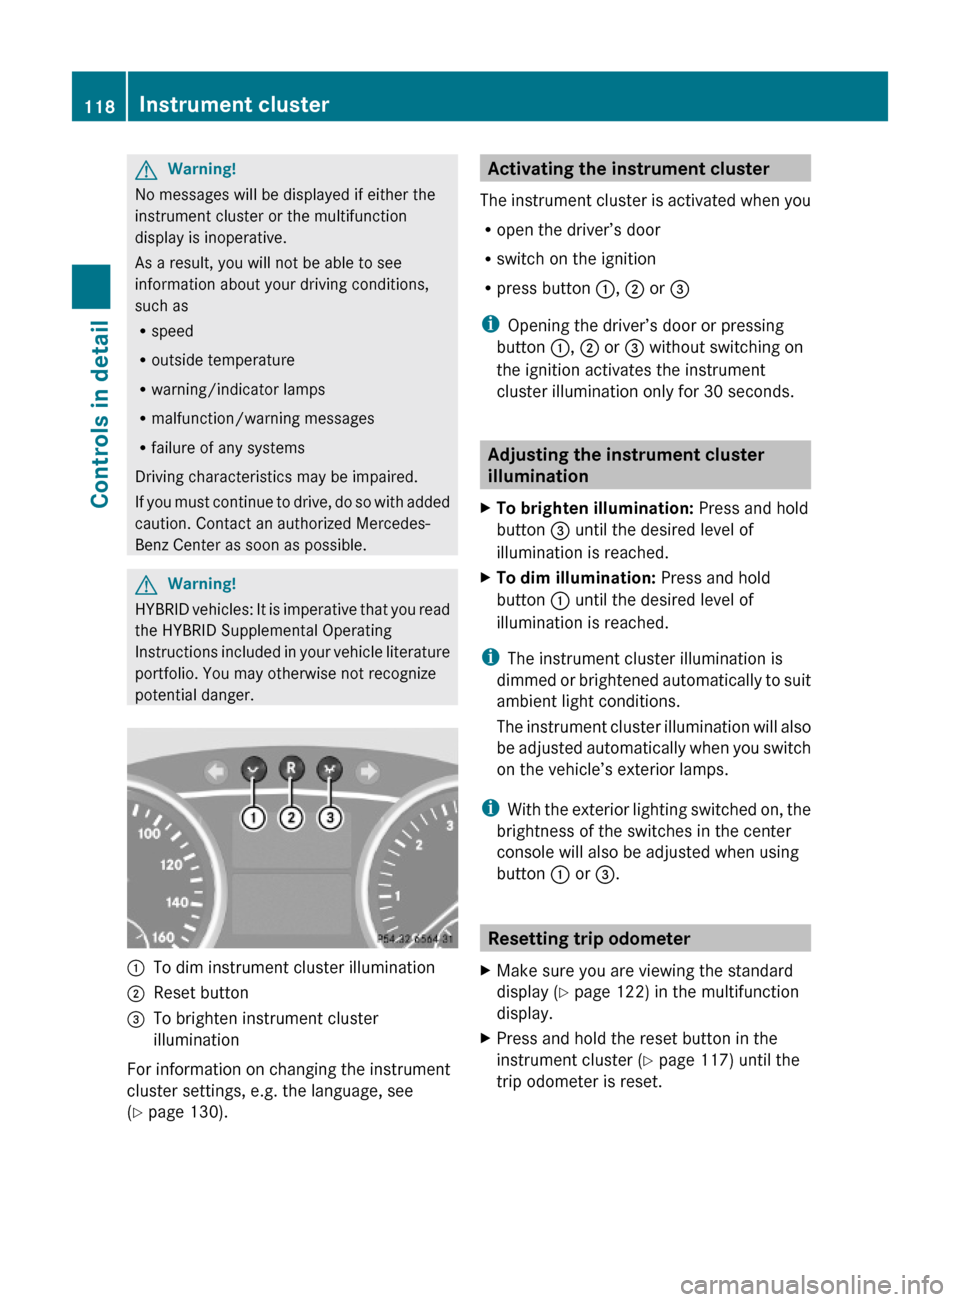
:To dim instrument cluster illumination;Reset button =To brighten instrument cluster
illumination
For information on changing the instrument
cluster settings, e.g. the language, see
(Y page 130).
Activating the instrument cluster
The instrument cluster is activated when you
Ropen the driver’s door
Rswitch on the ignition
Rpress button :, ; or =
iOpening the driver’s door or pressing
button :, ; or = without switching on
the ignition activates the instrument
cluster illumination only for 30 seconds.
Adjusting the instrument cluster
illumination
XTo brighten illumination: Press and hold
button = until the desired level of
illumination is reached.
XTo dim illumination: Press and hold
button : until the desired level of
illumination is reached.
iThe instrument cluster illumination is
dimmed or brightened automatically to suit
ambient light conditions.
The instrument cluster illumination will also
be adjusted automatically when you switch
on the vehicle’s exterior lamps.
iWith the exterior lighting switched on, the
brightness of the switches in the center
console will also be adjusted when using
button : or =.
Resetting trip odometer
XMake sure you are viewing the standard
display (Y page 122) in the multifunction
display.
XPress and hold the reset button in the
instrument cluster (Y page 117) until the
trip odometer is reset.
118Instrument clusterControls in detail
164_AKB; 7; 31, en-USd2ureepe,Version: 2.11.8.12009-09-11T12:07:36+02:00 - Seite 118
Page 126 of 368
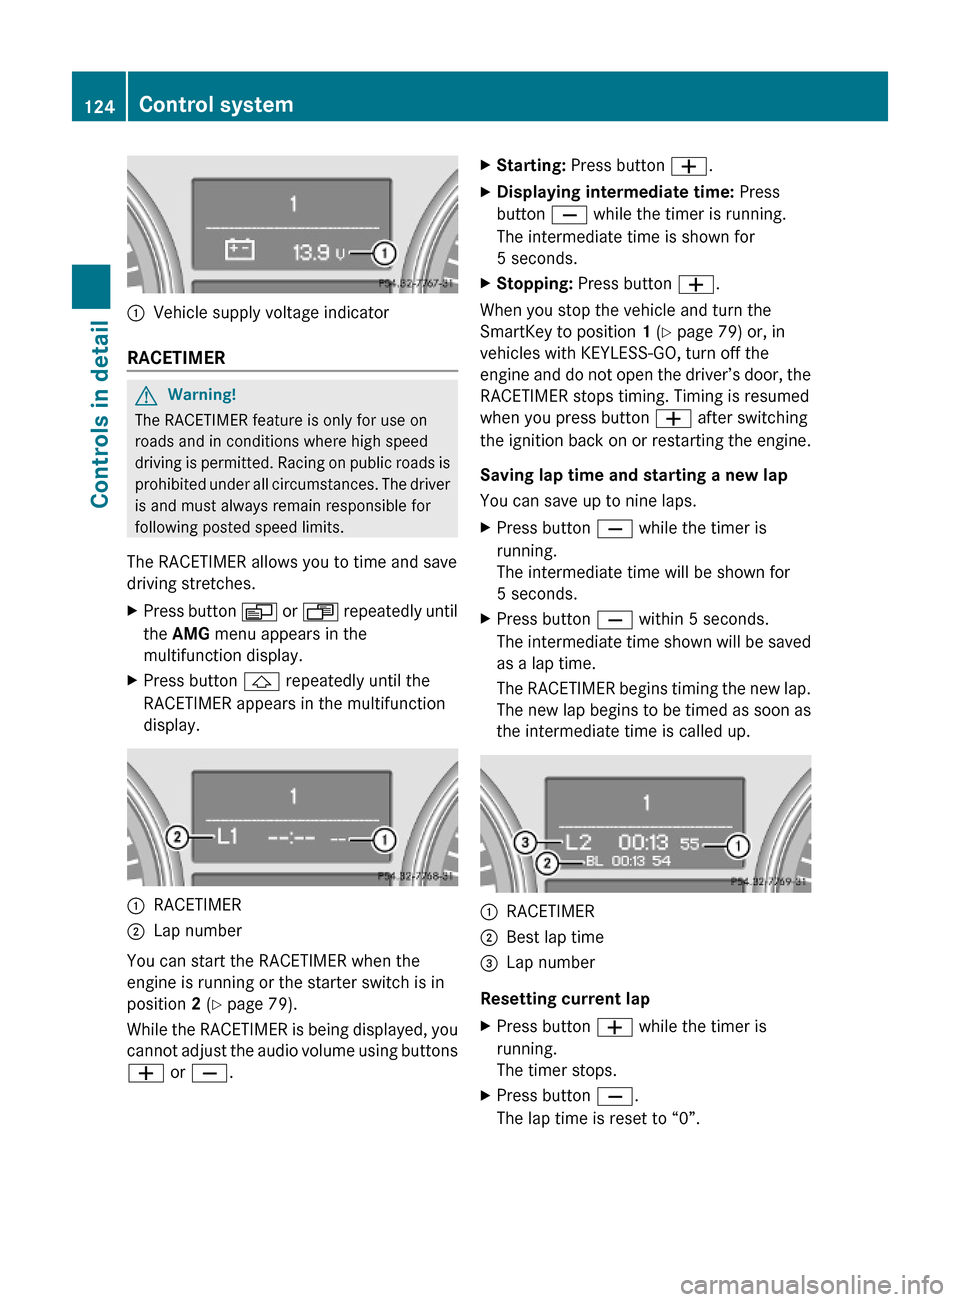
:Vehicle supply voltage indicator
RACETIMER
GWarning!
The RACETIMER feature is only for use on
roads and in conditions where high speed
driving is permitted. Racing on public roads is
prohibited under all circumstances. The driver
is and must always remain responsible for
following posted speed limits.
The RACETIMER allows you to time and save
driving stretches.
XPress button V or U repeatedly until
the AMG menu appears in the
multifunction display.
XPress button & repeatedly until the
RACETIMER appears in the multifunction
display.
:RACETIMER;Lap number
You can start the RACETIMER when the
engine is running or the starter switch is in
position 2 (Y page 79).
While the RACETIMER is being displayed, you
cannot adjust the audio volume using buttons
W or X.
XStarting: Press button W.XDisplaying intermediate time: Press
button X while the timer is running.
The intermediate time is shown for
5 seconds.
XStopping: Press button W.
When you stop the vehicle and turn the
SmartKey to position 1 (Y page 79) or, in
vehicles with KEYLESS-GO, turn off the
engine and do not open the driver’s door, the
RACETIMER stops timing. Timing is resumed
when you press button W after switching
the ignition back on or restarting the engine.
Saving lap time and starting a new lap
You can save up to nine laps.
XPress button X while the timer is
running.
The intermediate time will be shown for
5 seconds.
XPress button X within 5 seconds.
The intermediate time shown will be saved
as a lap time.
The RACETIMER begins timing the new lap.
The new lap begins to be timed as soon as
the intermediate time is called up.
:RACETIMER;Best lap time=Lap number
Resetting current lap
XPress button W while the timer is
running.
The timer stops.
XPress button X.
The lap time is reset to “0”.
124Control systemControls in detail
164_AKB; 7; 31, en-USd2ureepe,Version: 2.11.8.12009-09-11T12:07:36+02:00 - Seite 124
Page 127 of 368
Deleting all laps
It is not possible to delete a single saved lap.
When you turn off the engine, the RACETIMER
will be reset to “0” after 30 seconds. All laps
are deleted.
XPress button W while the timer is
running.
The timer stops.
XPress the reset button in the instrument
cluster twice (Y page 118).
XPress button W.
The timer starts. The saved laps are
deleted.
Overall analysis
This function is only available if you have
saved at least one lap and have stopped the
RACETIMER.
XPress button V or U repeatedly until
the AMG menu appears in the
multifunction display.
XPress button & repeatedly until the
overall analysis appears in the
multifunction display.
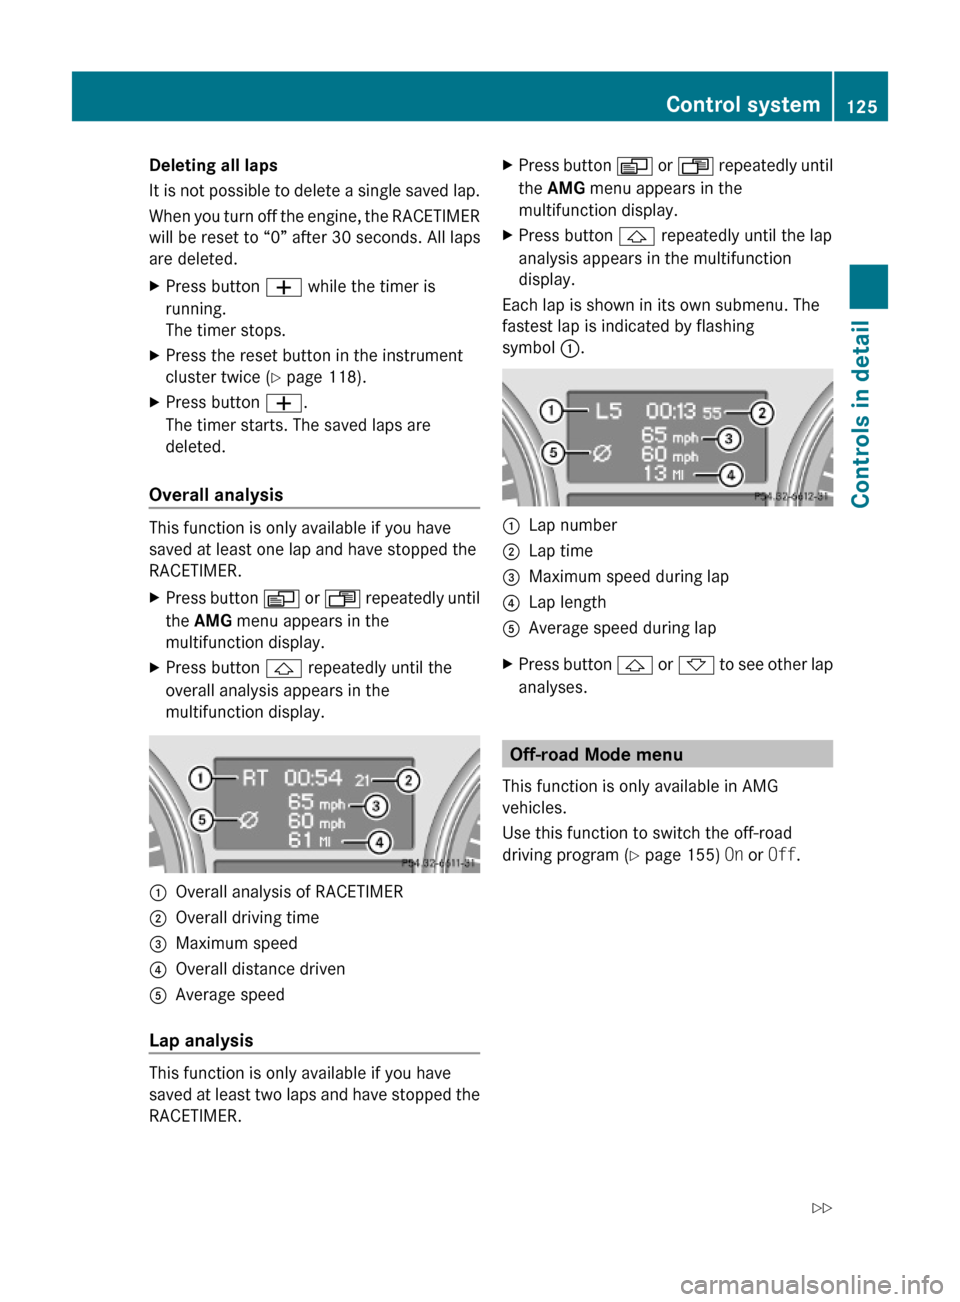
:Overall analysis of RACETIMER;Overall driving time=Maximum speed?Overall distance drivenAAverage speed
Lap analysis
This function is only available if you have
saved at least two laps and have stopped the
RACETIMER.
XPress button V or U repeatedly until
the AMG menu appears in the
multifunction display.
XPress button & repeatedly until the lap
analysis appears in the multifunction
display.
Each lap is shown in its own submenu. The
fastest lap is indicated by flashing
symbol :.
:Lap number;Lap time=Maximum speed during lap?Lap lengthAAverage speed during lapXPress button & or * to see other lap
analyses.
Off-road Mode menu
This function is only available in AMG
vehicles.
Use this function to switch the off-road
driving program (Y page 155) On or Off.
Control system125Controls in detail164_AKB; 7; 31, en-USd2ureepe,Version: 2.11.8.12009-09-11T12:07:36+02:00 - Seite 125Z
Page 131 of 368
Should the vehicle’s system record any
conditions while driving, the number of
messages will reappear in the multifunction
display when the SmartKey in the starter
switch is turned to position 0 or removed
from the starter switch. With KEYLESS-GO,
the number of messages will reappear when
you turn off the engine by pressing the
KEYLESS-GO start/stop button and open the
driver’s door.
Except for high-priority messages, the vehicle
status message memory will be cleared when
you switch off the ignition.
Settings menu
Introduction
In the Settings menu there are two
functions: The function To reset, press
reset button for 3 seconds, with which
you can reset all the settings to the original
factory settings and a collection of submenus
with which you can make individual settings
for your vehicle.
The following settings and submenus are
available in the Settings menu:
RResetting to factory settings
(Y page 129)
RSubmenus in the Settings menu
(Y page 130)
RInstrument cluster submenu
(Y page 130)
RTime/Date submenu (Y page 132)
RLighting submenu (Y page 133)
RVehicle submenu (Y page 135)
RComfort submenu (Y page 135)
Resetting to factory settings
You can reset the settings of all submenus to
the factory settings.
For safety reasons, the function Lamp
Circuit Headlamp in the Lighting
submenu cannot be reset while driving.
The following message appears in the
multifunction display:
Settings
Cannot be
completely reset
to factory settings
when engine is running.
XPress button V or U repeatedly until
the Settings menu appears in the
multifunction display.
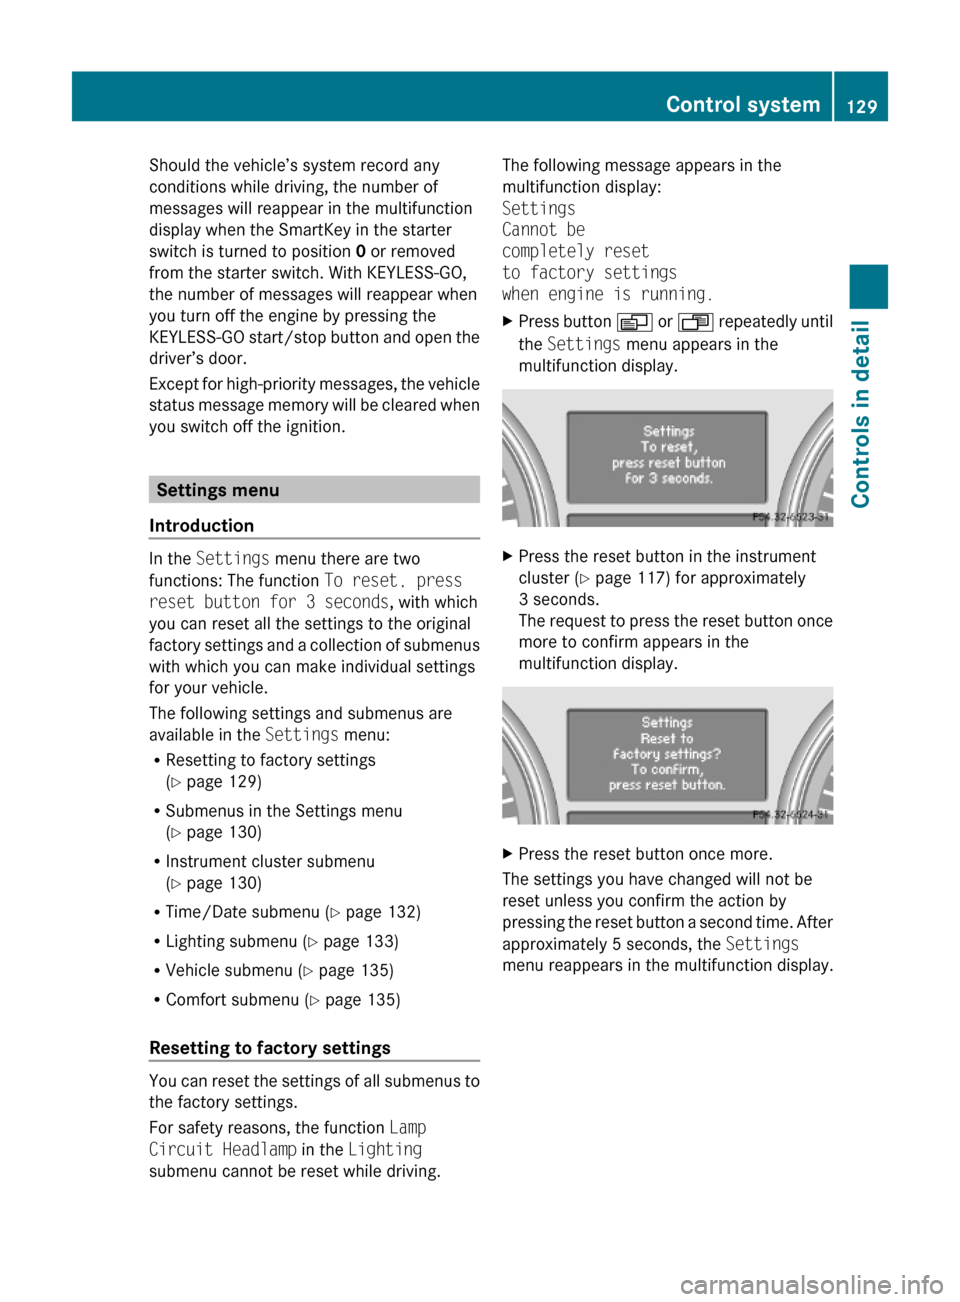
XPress the reset button in the instrument
cluster (Y page 117) for approximately
3 seconds.
The request to press the reset button once
more to confirm appears in the
multifunction display.
XPress the reset button once more.
The settings you have changed will not be
reset unless you confirm the action by
pressing the reset button a second time. After
approximately 5 seconds, the Settings
menu reappears in the multifunction display.
Control system129Controls in detail164_AKB; 7; 31, en-USd2ureepe,Version: 2.11.8.12009-09-11T12:07:36+02:00 - Seite 129Z
Page 135 of 368
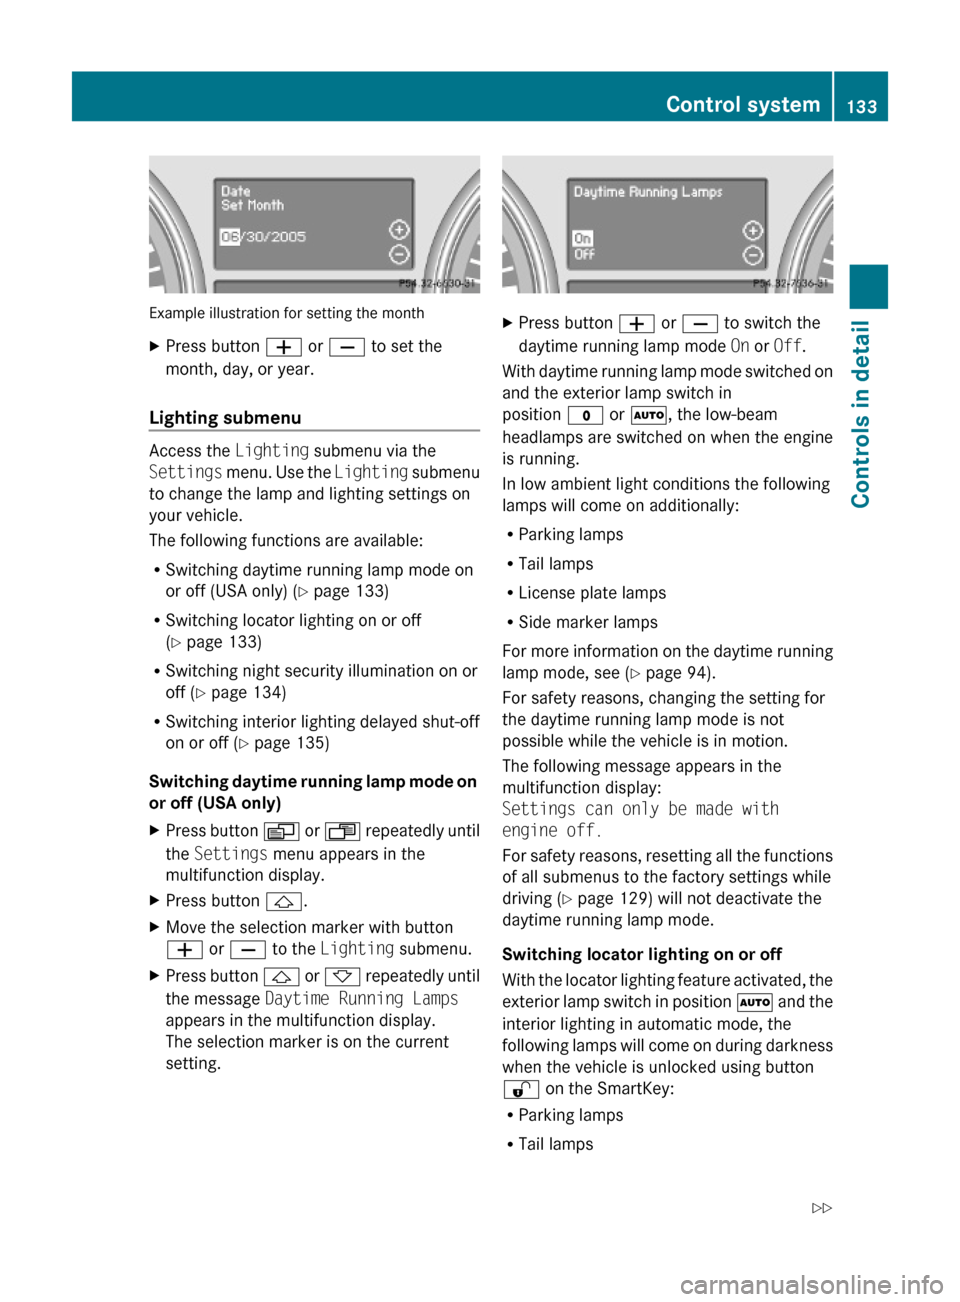
Example illustration for setting the month
XPress button W or X to set the
month, day, or year.
Lighting submenu
Access the Lighting submenu via the
Settings menu. Use the Lighting submenu
to change the lamp and lighting settings on
your vehicle.
The following functions are available:
RSwitching daytime running lamp mode on
or off (USA only) (Y page 133)
RSwitching locator lighting on or off
(Y page 133)
RSwitching night security illumination on or
off (Y page 134)
RSwitching interior lighting delayed shut-off
on or off (Y page 135)
Switching daytime running lamp mode on
or off (USA only)
XPress button V or U repeatedly until
the Settings menu appears in the
multifunction display.
XPress button &.XMove the selection marker with button
W or X to the Lighting submenu.
XPress button & or * repeatedly until
the message Daytime Running Lamps
appears in the multifunction display.
The selection marker is on the current
setting.
XPress button W or X to switch the
daytime running lamp mode On or Off.
With daytime running lamp mode switched on
and the exterior lamp switch in
position $ or Ã, the low-beam
headlamps are switched on when the engine
is running.
In low ambient light conditions the following
lamps will come on additionally:
RParking lamps
RTail lamps
RLicense plate lamps
RSide marker lamps
For more information on the daytime running
lamp mode, see (Y page 94).
For safety reasons, changing the setting for
the daytime running lamp mode is not
possible while the vehicle is in motion.
The following message appears in the
multifunction display:
Settings can only be made with
engine off.
For safety reasons, resetting all the functions
of all submenus to the factory settings while
driving (Y page 129) will not deactivate the
daytime running lamp mode.
Switching locator lighting on or off
With the locator lighting feature activated, the
exterior lamp switch in position à and the
interior lighting in automatic mode, the
following lamps will come on during darkness
when the vehicle is unlocked using button
% on the SmartKey:
RParking lamps
RTail lamps
Control system133Controls in detail164_AKB; 7; 31, en-USd2ureepe,Version: 2.11.8.12009-09-11T12:07:36+02:00 - Seite 133Z
Page 140 of 368
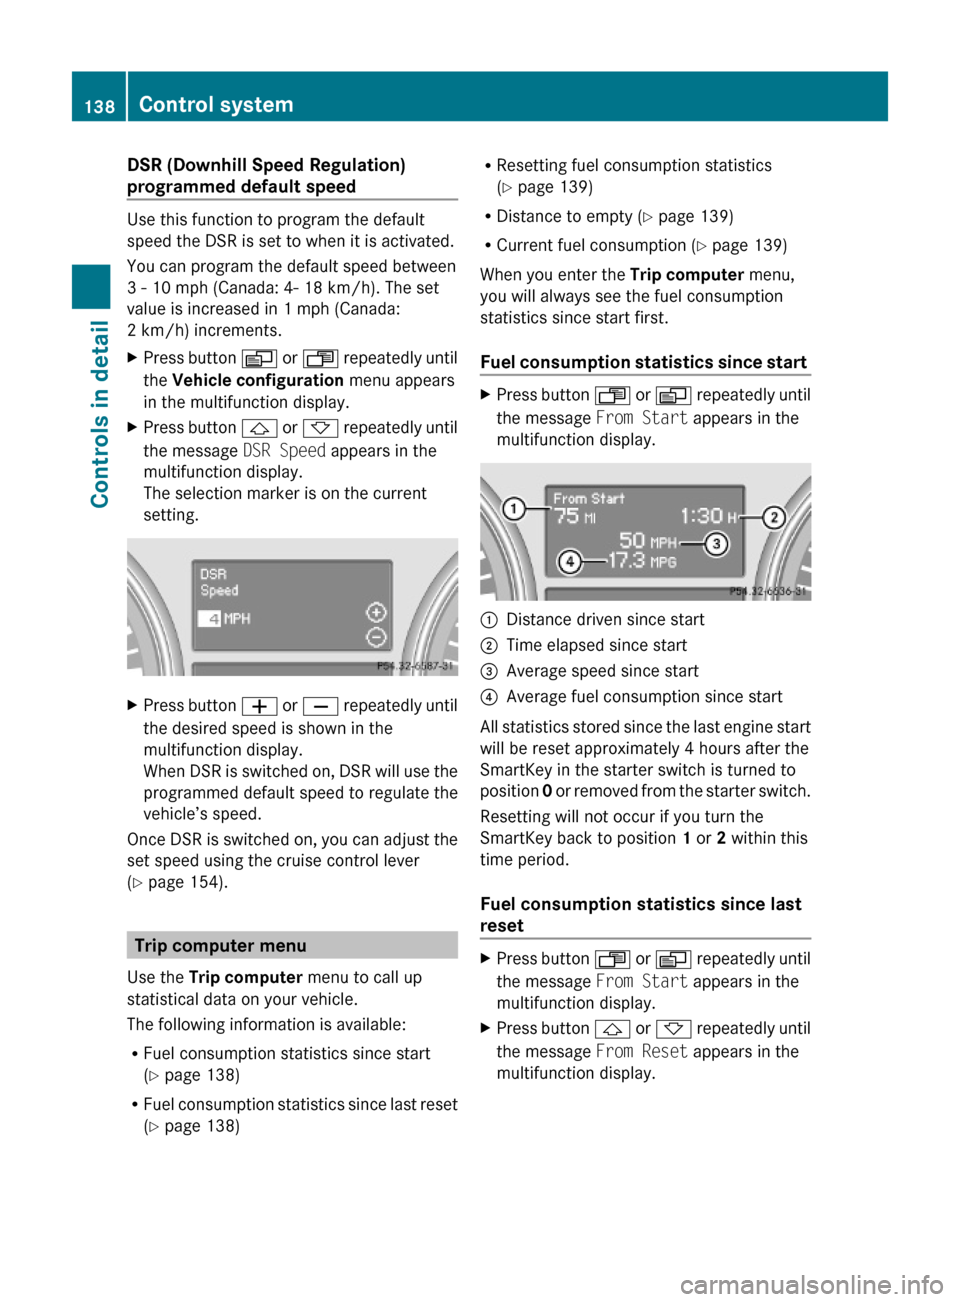
DSR (Downhill Speed Regulation)
programmed default speed
Use this function to program the default
speed the DSR is set to when it is activated.
You can program the default speed between
3 - 10 mph (Canada: 4- 18 km/h). The set
value is increased in 1 mph (Canada:
2 km/h) increments.
XPress button V or U repeatedly until
the Vehicle configuration menu appears
in the multifunction display.
XPress button & or * repeatedly until
the message DSR Speed appears in the
multifunction display.
The selection marker is on the current
setting.
XPress button W or X repeatedly until
the desired speed is shown in the
multifunction display.
When DSR is switched on, DSR will use the
programmed default speed to regulate the
vehicle’s speed.
Once DSR is switched on, you can adjust the
set speed using the cruise control lever
(Y page 154).
Trip computer menu
Use the Trip computer menu to call up
statistical data on your vehicle.
The following information is available:
RFuel consumption statistics since start
(Y page 138)
RFuel consumption statistics since last reset
(Y page 138)
RResetting fuel consumption statistics
(Y page 139)
RDistance to empty (Y page 139)
RCurrent fuel consumption (Y page 139)
When you enter the Trip computer menu,
you will always see the fuel consumption
statistics since start first.
Fuel consumption statistics since start
XPress button U or V repeatedly until
the message From Start appears in the
multifunction display.
:Distance driven since start;Time elapsed since start=Average speed since start?Average fuel consumption since start
All statistics stored since the last engine start
will be reset approximately 4 hours after the
SmartKey in the starter switch is turned to
position 0 or removed from the starter switch.
Resetting will not occur if you turn the
SmartKey back to position 1 or 2 within this
time period.
Fuel consumption statistics since last
reset
XPress button U or V repeatedly until
the message From Start appears in the
multifunction display.
XPress button & or * repeatedly until
the message From Reset appears in the
multifunction display.
138Control systemControls in detail
164_AKB; 7; 31, en-USd2ureepe,Version: 2.11.8.12009-09-11T12:07:36+02:00 - Seite 138