ESP MERCEDES-BENZ ML430 1997 Complete Manual PDF
[x] Cancel search | Manufacturer: MERCEDES-BENZ, Model Year: 1997, Model line: ML430, Model: MERCEDES-BENZ ML430 1997Pages: 4133, PDF Size: 88.89 MB
Page 353 of 4133
303 Index
Te ch n ica l
data Instruments
and controlsOperation DrivingInstrument
cluster displayPractical hints Car careIndex Emission control label ..................................................285
Engine compartment ..................................................... 231
Engine malfunction
CHECK ENGINE malfunction indicator lamp ....... 218
Engine oil additives .......................................................294
Engine oil consumption ................................................234
Engine oil level
Checking ............................................................. 89, 233
Warning ......................................................................224
Engine oil level indicator ................................................ 89
Engine oils ......................................................................294
Capacities ...................................................................292
Low engine oil level warning ..................................224
Engine overheating ......................................................... 81
Engine speed limit
Overrevving ................................................................. 82
Enlarged cargo area ....................................................... 131
Entrance lamps ...............................................................112
ESP
LOW RANGE — ESP ..................................................208
ESP (Electronic stability program) ..............................205
Control switch ...........................................................207
Malfunction indicator lamp ..................................... 221
Synchronizing ...........................................................206
Warning lamp ............................................................ 221ETR (Emergency tensioning retractor) .........................55
ETS (4-ETS+) .................................................................. 203
LOW RANGE – 4-ETS+ ............................................ 204
Exterior lamp switch .......................................................90
Exterior lamps ............................................................... 260
Adjusting headlamp aim ......................................... 268
Auxiliary fog lamp ............................................. 92, 264
Fog lamps .....................................................................93
Headlamp assembly ......................................... 261, 262
Headlamps .................................90, 261, 262, 268, 280
High mounted stop lamp ......................................... 267
License plate lamps ................................................. 267
Low and high beam ............................................90, 263
Parking lamp ...................................................... 90, 264
Replacing bulbs ........................................................ 260
Side marker lamp ..................................................... 264
Standing lamp .....................................................90, 264
Taillamp assemblies ................................................ 265
Turn signal lamp ................................................90, 264
Turn signal lamp, side ............................................. 266
Exterior rear view mirrors ..............................................73
Electrically folding ...................................................... 75
Page 356 of 4133
306 Index
Te ch n ica l
data Instruments
and controlsOperation DrivingInstrument
cluster displayPractical hints Car careIndex
Parking lamp ...................................................... 90, 264
Replacing bulbs .........................................................260
Side marker lamp ......................................................264
Standing lamp .................................................... 90, 264
Taillamp assemblies .................................................265
Turn signal lamp ................................................ 90, 264
Turn signal lamp, side .............................................266
Layout of poly-V-belt ......................................................286
Liftgate ............................................................................... 34
Unlocking ..................................................................... 28
Lighter ..............................................................................119
Limp home mode (Automatic transmission) ............. 172
Loading instructions ..................................................... 136
Lockable storage compartment .....................................116
Locking and unlocking the vehicle ............................... 27
Low engine coolant level warning ..............................224
Low engine oil level warning .......................................224
LOW RANGE
Indicator lamp ........................................................... 221
LOW RANGE mode ........................................................209
LOW RANGE – 4-ETS+ .............................................204
LOW RANGE – ABS ..................................................202
LOW RANGE – ESP ...................................................208
MMaintenance ...................................................................147
Malfunction and indicator lamps in the instrument
cluster ......................................................................... 218
Manual locking/unlocking the doors ...........................29
Manual operation of Skyview Top .............................. 273
Manual operation of sliding/pop-up roof .................. 272
Manual seat, front ............................................................39
MCS, radio and telephone ............................................146
Mechanical keys ............................................................... 29
Memory .............................................................................42
Recalling ....................................................................... 42
Storing ........................................................................... 42
Mirror, exterior, adjusting ..............................................73
Mirror, exterior, rear view ..............................................73
Mirror, inside, rear view ................................................. 71
Mirrors, vanity ................................................................ 113
Page 470 of 4133
3
Contents Snow chains ................................ 179
Winter driving instructions ...... 180
Deep water .................................. 181
Passenger compartment ........... 182
Traveling abroad ........................ 182
Off-Road driving ............................. 183
Trailer towing ................................. 190
Cruise control ................................. 196
Brake assist system (BAS) ............ 199
Antilock brake system (ABS) ....... 201
Four-wheel electronic traction system (4-ETS+) ..........203
Electronic brake proportioning (EBP) ..................204
Electronic stability program (ESP) ...........................................205
Transmission control – LOW RANGE mode ...................209
What you should know at the gas station ....................... 212
Check regularly and before a long trip ....................... 215
Instrument cluster displayMalfunction and indicator lamps in the
instrument cluster .....................218
On-board diagnostic system –
Check engine malfunction
indicator lamp .............................218
Brake warning lamp ...................219
Supplemental restraint system
(SRS) indicator lamp .................. 219
Fuel reserve warning ................ 220
Electronic stability
program (ESP) / Electronic
traction system (ETS) –
warning lamp ............................. 221
BAS/ESP malfunction
indicator lamp ............................ 221
4-ETS malfunction
indicator lamp ............................ 221
LOW RANGE
indicator lamp ............................ 221
ABS malfunction
indicator lamp ............................ 222 Adjustable steering wheel –
indicator lamp .............................222
AIRBAG OFF
indicator lamp .............................222
Seat belt warning lamp .............223
Charge indicator lamp ...............223
Low engine oil level
warning lamp ..............................224
Low engine coolant
level warning ..............................224
Brake pad wear
indicator lamp .............................225
FSS indicator ...............................225
Page 474 of 4133
7
Introduction Product information
Kindly observe the following in your own best interest:
We recommend using Mercedes-Benz original parts as well as conversion parts and accessories
explicitly approved by us for your vehicle model.
We have tested these parts to determine their reliability, safety and their special
suitability for Mercedes-Benz vehicles.
We are unable to make an assessment for other products and therefore cannot be held responsible
for them, even if in individual cases an official approval or authorization by governmental or other
agencies should exist. Use of such parts and accessories could adversely affect the safety,
performance or reliability of your vehicle. Please do not use them.
Mercedes-Benz original parts as well as conversion parts and accessories approved by us are available
at your authorized Mercedes-Benz Light Truck Center where you will receive comprehensive information, also on
permissible technical modifications, and where proper installation will be performed.
Page 477 of 4133
10
Introduction
Roadside assistance
The Mercedes-Benz Roadside Assistance Program provides factory trained technical help in the event of a breakdown.
Calls to the toll-free Roadside Assistance number:
1-800-FOR-MERCedes (in the USA)
1-800-387-0100 (in Canada)
will be answered by Mercedes-Benz Client Assistance Representatives 24 hours a day, 365 days a year.
Roadside assistance will be provided in accordance with standard program guidelines which include providing service
to the vehicle up to a reasonable distance from a paved roadway. We will make every effort to assist in a breakdown
situation, however, the accessibility of your vehicle will be determined by our authorized Mercedes-Benz Light Truck
Center technician or the tow service provider on a case by case basis and may be a factor in our ability to respond.
Additional charges may be applicable for a breakdown location determined not to be a reasonably accessible roadside
location as determined by our authorized technician and tow service provider.
For additional information refer to the Mercedes-Benz Roadside Assistance Program brochure in your glove box.
Page 487 of 4133
20
Instruments and controls
Te ch n ica l
data
Instruments
and controls Operation Driving
Instrument
cluster display Practical hints Car care Index
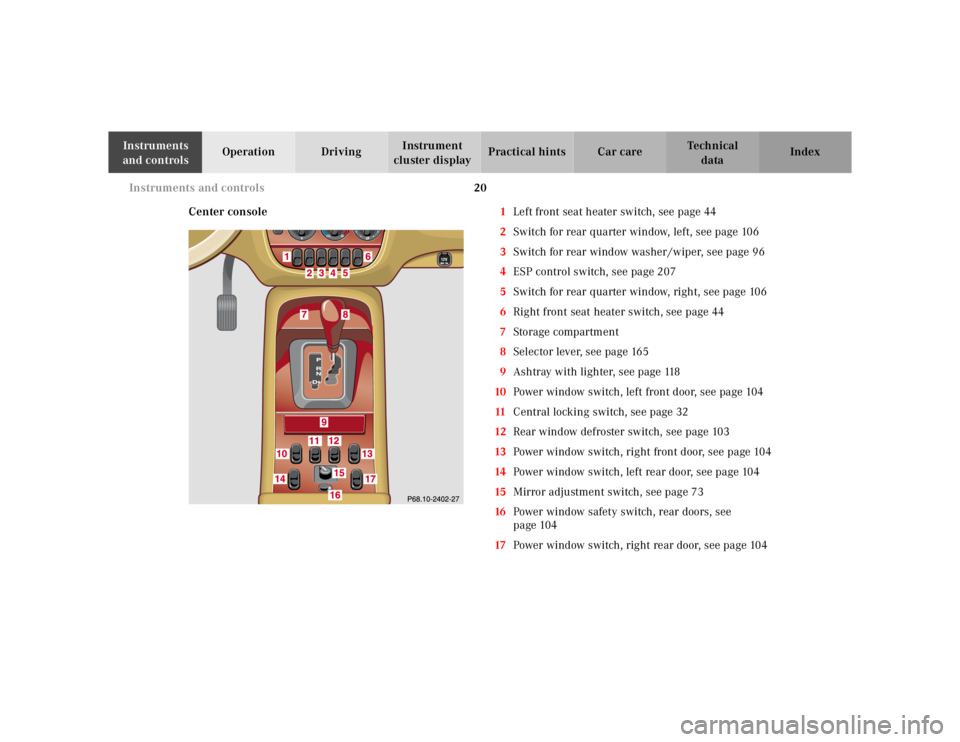
Center console 1Left front seat heater switch, see page 44
2 Switch for rear quarter window, left, see page 106
3 Switch for rear window washer /wiper, see page 96
4 ESP control switch, see page 207
5 Switch for rear quarter window, right, see page 106
6 Right front seat heater switch, see page 44
7 Storage compartment
8 Selector lever, see page 165
9 Ashtray with lighter, see page 118
10 Power window switch, left front door, see page 104
11 Central locking switch, see page 32
12 Rear window defroster switch, see page 103
13 Power window switch, right front door, see page 104
14 Power window switch, left rear door, see page 104
15 Mirror adjustment switch, see page 73
16 Power window safety switch, rear doors, see
page 104
17 Power window switch, right rear door, see page 104
Page 495 of 4133
28
Central locking system
Te ch n ica l
data
Instruments
and controls Operation
Driving Instrument
cluster display Practical hints Car care Index
Locking:
Press transmit button ‹ once. All turn signal lamps
blink three times to indicate that the vehicle is locked
and the antitheft alarm is activated.
Notes:
If the turn signal lamps do not blink three times when
locking the vehicle, a door, the liftgate, or the hood is
not properly closed. Close the respective element and
lock the vehicle again with the remote control.
If the vehicle cannot be locked or unlocked by pressing
the transmit button, then it may be necessary to change
the batteries in the remote control or to synchronize the
remote control, see page 270 and page 271.
Unlocking the liftgate
Press transmit button Š to unlock the liftgate. This
also deactivates the antitheft alarm.
Important!
A minimum height clearance of 7 ft. (2.15 m) is
required to open the liftgate. Panic button
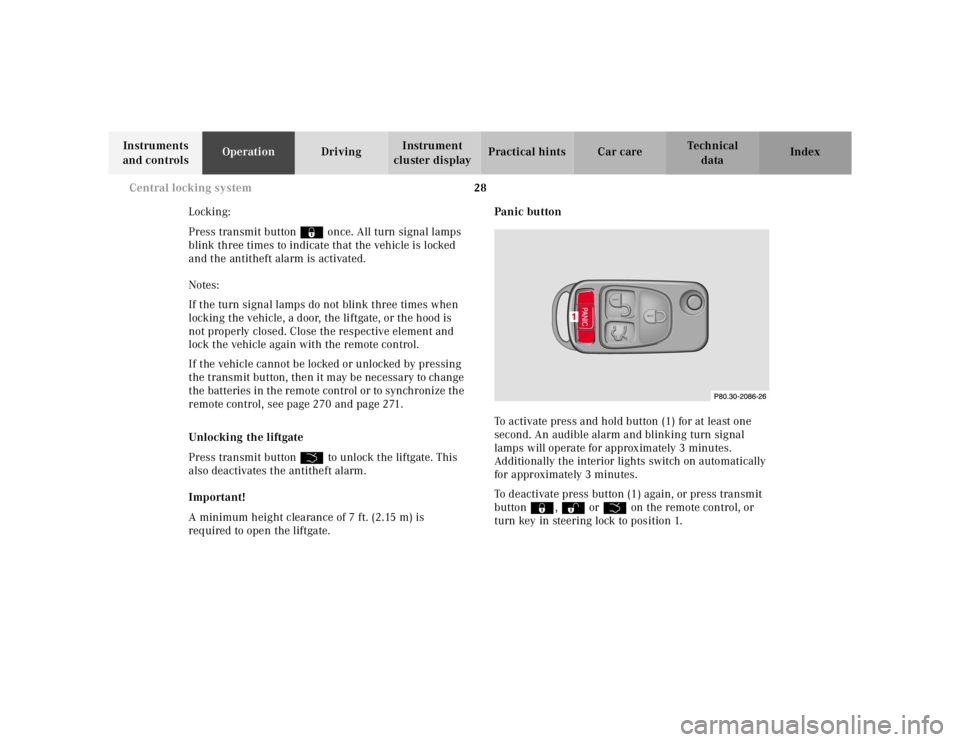
To activate press and hold button (1) for at least one
second. An audible alarm and blinking turn signal
lamps will operate for approximately 3 minutes.
Additionally the interior lights switch on automatically
for approximately 3 minutes.
To deactivate press button (1) again, or press transmit
button ‹, Œ orŠ on the remote control, or
turn key in steering lock to position 1.
Page 496 of 4133
29
Central locking system
Te ch n ica l
data
Instruments
and controls Operation
Driving Instrument
cluster display Practical hints Car care Index
Note:
For operation in the USA only: This device complies
with Part 15, Subpart C, Section 209 of the FCC Rules.
Operation is subject to the following two conditions:
(1) This device may not cause harmful interference, and
(2) this device must accept any interference received,
including interference that may cause undesired
operation.
WARNING: Changes or modification not expressly
approved by party responsible for compliance could void
the users’s authority to operate the equipment. Mechanical keys
The mechanical keys fit all locks on the vehicle.
Notes:
Use of the key does not operate the central locking
system or arm or disarm the antitheft alarm system.
The alarm sounds when unlocking the door. Cancel
alarm by turning key in steering lock to position 1, or
with the remote control by pressing button Œ.
Page 498 of 4133
31
Central locking system
Te ch n ica l
data
Instruments
and controls Operation
Driving Instrument
cluster display Practical hints Car care Index
Each individual door and the liftgate must be locked
with the respective door lock button – the driver’s door
can only be locked when it is closed.
Notes:
The alarm sounds when unlocking the driver’s door.
Cancel alarm by turning key in steering lock to
position 1, or with the remote control by pressing
button Œ.
If the vehicle has previously been locked from the
outside, only the door being opened from the inside will
unlock, and the alarm will come on. The remaining
doors, the liftgate and fuel filler flap remain locked.
In case of a malfunction in the central locking system
the doors can be locked and unlocked individually. To lock, push down lock buttons and turn mechanical
key in driver’s door lock to position 3. In addition lock
the liftgate.
To unlock, pull inside door handles and turn mechanical
key in driver’s door lock to position 2.
Rear doors, previously centrally locked, can be opened
from inside by first unlocking the vehicle with the
central locking switch, see page 32, or by first pulling
up the door lock button.
If the fuel filler flap cannot be opened, see page 274.
Page 509 of 4133
42
Seats
Te ch n ica l
data
Instruments
and controls Operation
Driving Instrument
cluster display Practical hints Car care Index
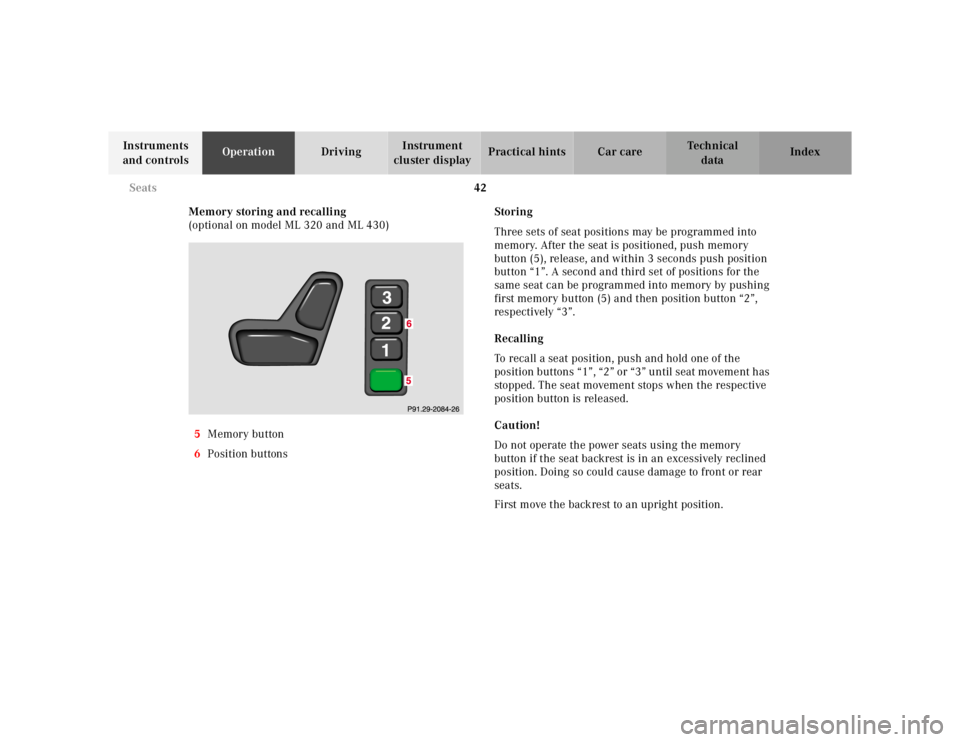
Memory storing and recalling
(optional on model ML 320 and ML 430)
5 Memory button
6 Position buttons Storing
Three sets of seat positions may be programmed into
memory. After the seat is positioned, push memory
button (5), release, and within 3 seconds push position
button “1”. A second and third set of positions for the
same seat can be programmed into memory by pushing
first memory button (5) and then position button “2”,
respectively “3”.
Recalling
To recall a seat position, push and hold one of the
position buttons “1”, “2” or “3” until seat movement has
stopped. The seat movement stops when the respective
position button is released.
Caution!
Do not operate the power seats using the memory
button if the seat backrest is in an excessively reclined
position. Doing so could cause damage to front or rear
seats.
First move the backrest to an upright position.