MERCEDES-BENZ ML430 1997 Complete Repair Manual
Manufacturer: MERCEDES-BENZ, Model Year: 1997, Model line: ML430, Model: MERCEDES-BENZ ML430 1997Pages: 4133, PDF Size: 88.89 MB
Page 701 of 4133
234
Engine compartment
Te ch n ica l
data
Instruments
and controls Operation Driving
Instrument
cluster display Practical hints
Car care Index
Automatic transmission fluid level
The transmission has a permanent fill of automatic
transmission fluid.
Regular automatic transmission fluid level checks and
changes are not required. For this reason the dipstick is
omitted.
If you notice fluid leaks or gear shifting malfunctions,
have your authorized Mercedes-Benz Light Truck Center
check the transmission fluid level.
Engine oil consumption
Engine oil consumption checks should only be made
after the break-in period. During the break-in period,
higher oil consumption may be noticed and is normal.
Frequent driving at high engine speeds results in
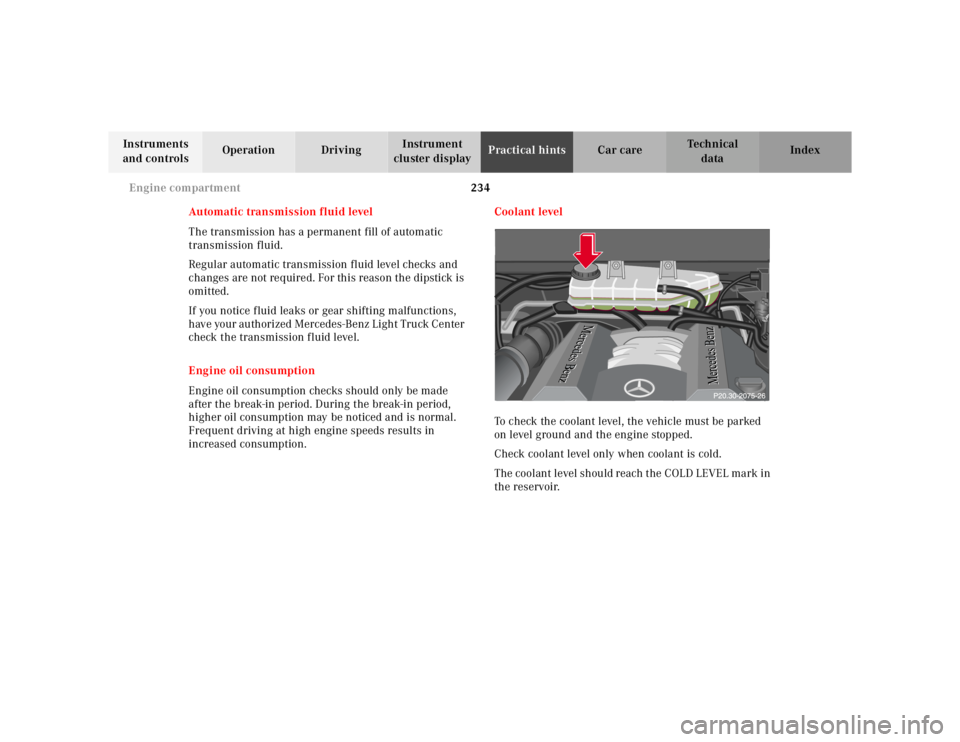
increased consumption. Coolant level
To check the coolant level, the vehicle must be parked
on level ground and the engine stopped.
Check coolant level only when coolant is cold.
The coolant level should reach the COLD LEVEL mark in
the reservoir.P20.30-0241-20
Page 702 of 4133
235
Engine compartment
Te ch n ica l
data
Instruments
and controls Operation Driving
Instrument
cluster display Practical hints
Car care Index
Adding coolant
If coolant has to be added, a 50 / 50 mixture of water and
MB anticorrosion / antifreeze should be added.
After adding coolant, close cap until you hear it click a
few times.
The drain plugs for the cooling system are located on
the left and right side of the engine block directly above
the engine mounts and at the bottom of the radiator.
Anticorrosion / antifreeze mixture, see page 297.
Wa r n i n g !
In order to avoid possible serious burns or injury: • Use extreme caution when opening the hood if there are any signs of steam or coolant leaking
from the cooling system, or if the coolant
temperature gauge indicates that the coolant is
overheated.
• Do not remove pressure cap on coolant reservoir if engine temperature is above 194 °F
(90 °C). Allow engine to cool down before
removing cap. The coolant reservoir contains
hot fluid and is under pressure.• Using a rag, slowly open cap approximately 1/2 turn to relieve excess pressure. If opened
immediately, scalding hot fluid and steam will
be blown out under pressure.• Do not spill antifreeze on hot engine parts. Antifreeze contains ethylene glycol which may
burn if it comes into contact with hot engine
parts.
Page 703 of 4133
236
Engine compartment
Te ch n ica l
data
Instruments
and controls Operation Driving
Instrument
cluster display Practical hints
Car care Index
Windshield washer/headlamp cleaning system
The reservoir should be refilled with MB Windshield
washer concentrate and water (or commercially
available premixed windshield washer solvent/
antifreeze, depending on ambient temperatures).
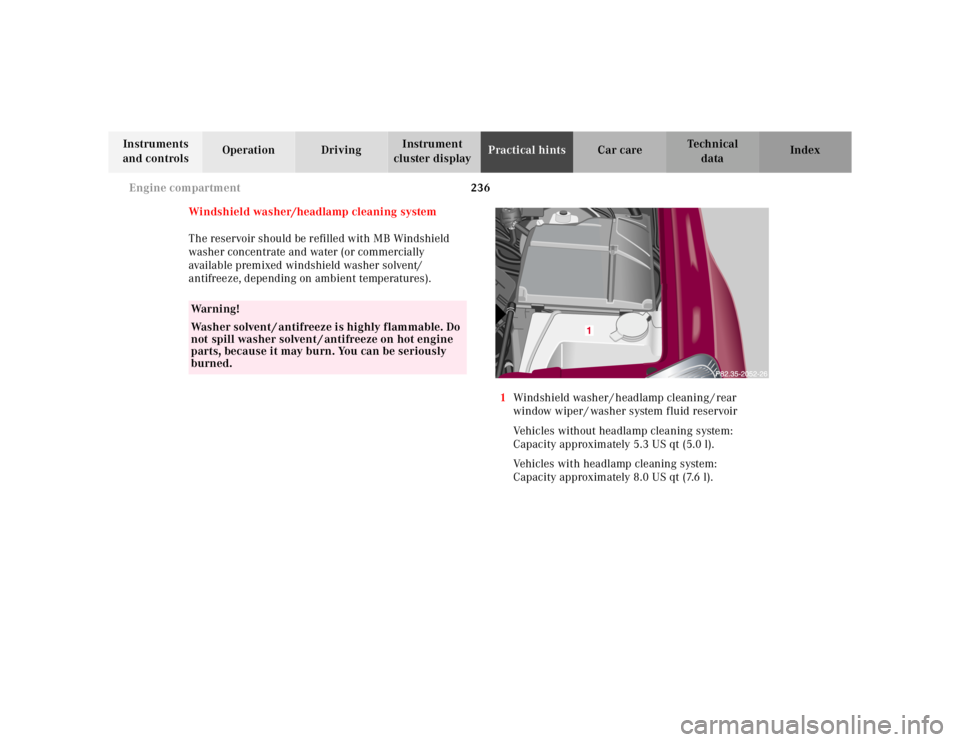
1 Windshield washer / headlamp cleaning / rear
window wiper / washer system fluid reservoir
Vehicles without headlamp cleaning system:
Capacity approximately 5.3 US qt (5.0 l).
Vehicles with headlamp cleaning system:
Capacity approximately 8.0 US qt (7.6 l).
Wa r n i n g !
Washer solvent / antifreeze is highly flammable. Do
not spill washer solvent / antifreeze on hot engine
parts, because it may burn. You can be seriously
burned.
Page 704 of 4133
237
Windshield wiper
Te ch n ica l
data
Instruments
and controls Operation Driving
Instrument
cluster display Practical hints
Car care Index
Windshield and headlamp washer
fluid mixing ratio
For temperatures above freezing:
MB Windshield Washer Concentrate “S” and water
1 part “S” to 100 parts water
(40 ml “S” to 1 gallon water).
For temperature below freezing:
MB Windshield Washer Concentrate “S” and
commercially available premixed windshield washer
solvent / antifreeze
1 part “S” to 100 parts solvent
(40 ml “S” to 1 gallon solvent). Vehicle jack, wheel bolt wrench and screwdriver
Wa r n i n g !
The jack is designed exclusively for jacking up the
vehicle at the jack take-up brackets built into either
side of the vehicle. To help avoid personal injury,
use the jack only to lift the vehicle during a wheel
change. Never get beneath the vehicle while it is
supported by the jack. Keep hands and feet away
from the area under the lifted vehicle. Always
firmly set parking brake and block wheels before
raising vehicle with jack.Do not disengage parking brake while the vehicle is
raised. Be certain that the jack is always vertical
when in use, especially on hills. Always try to use
the jack on level surface. Be sure that the jack arm
end is fully seated in the jack take-up bracket.
Always lower the vehicle onto sufficient capacity
jackstands before working under the vehicle.
Page 705 of 4133
238
Spare wheel, vehicle jack
Te ch n ica l
data
Instruments
and controls Operation Driving
Instrument
cluster display Practical hints
Car care Index
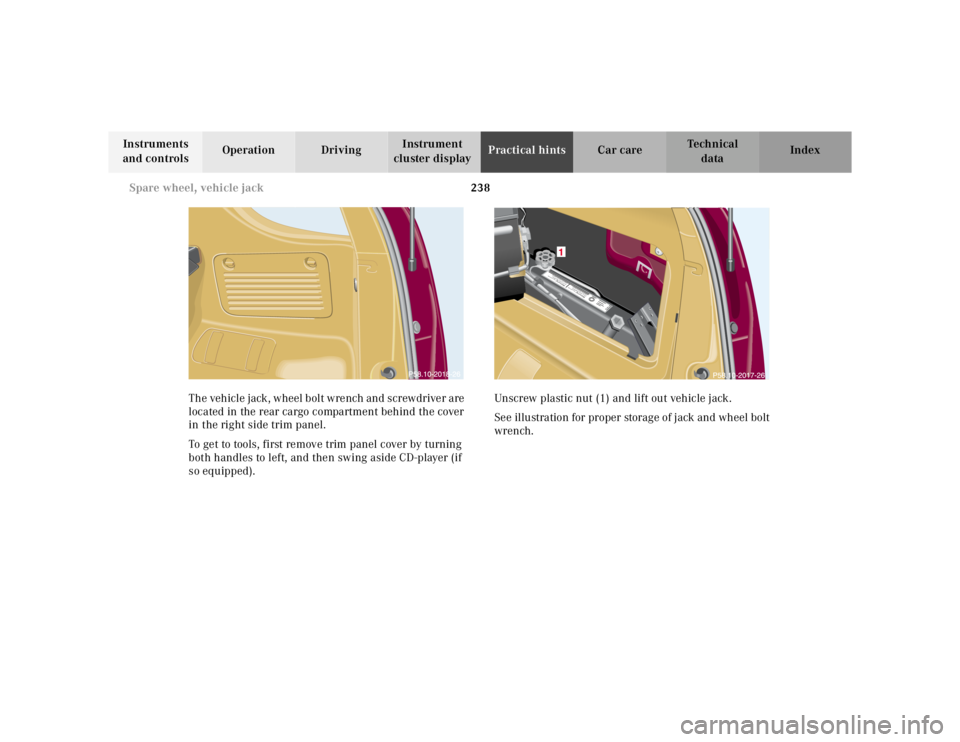
The vehicle jack, wheel bolt wrench and screwdriver are
located in the rear cargo compartment behind the cover
in the right side trim panel.
To get to tools, first remove trim panel cover by turning
both handles to left, and then swing aside CD-player (if
so equipped). Unscrew plastic nut (1) and lift out vehicle jack.
See illustration for proper storage of jack and wheel bolt
wrench.
Wa rn un g
!S ic h n icht u n
te r
d as n u
r m it d em
W
ag en
he ber
a u fg e
bo ckte F
a
hrz eug b
e
ge be
n
!Wa rn un g
!S ic h n ic
h
t u nte r
d a s
n ur m it d
e
m W
a gen he
be r
aufg e
bo ckte F ah rzeu g b ege be
n!
Page 706 of 4133
239
Spare wheel, vehicle jack
Te ch n ica l
data
Instruments
and controls Operation Driving
Instrument
cluster display Practical hints
Car care Index
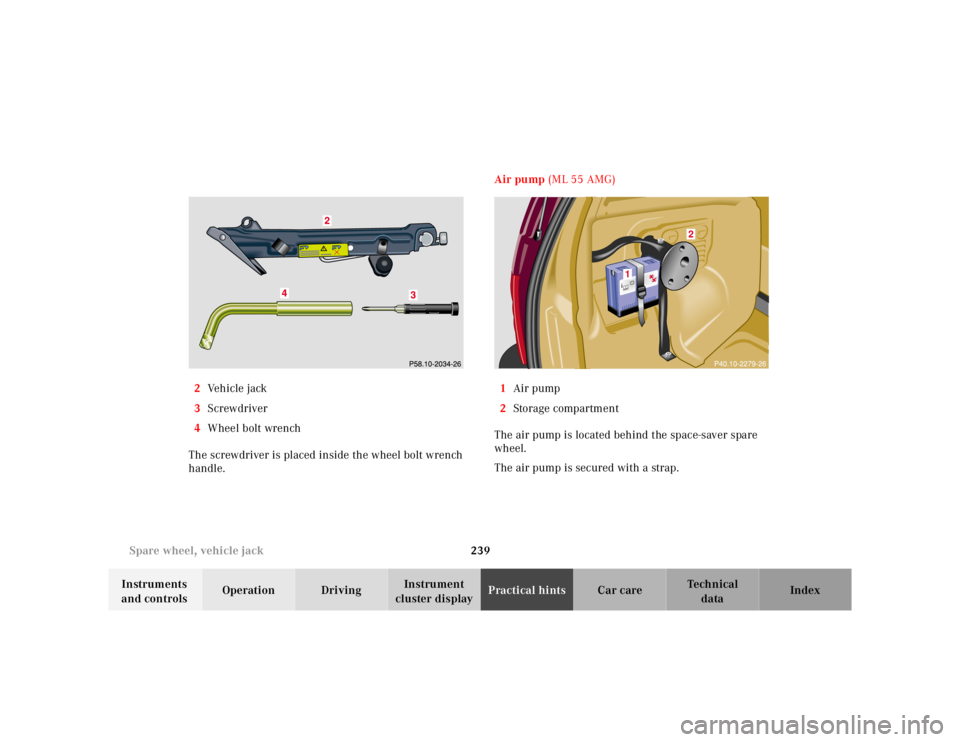
2
Ve h i c l e j a c k
3 Screwdriver
4 Wheel bolt wrench
The screwdriver is placed inside the wheel bolt wrench
handle. Air pump
(ML 55 AMG)
1 Air pump
2 Storage compartment
The air pump is located behind the space-saver spare
wheel.
The air pump is secured with a strap.
1
2
Page 707 of 4133
240
Tires, Wheels
Te ch n ica l
data
Instruments
and controls Operation Driving
Instrument
cluster display Practical hints
Car care Index
Wheels
Replace rims or tires with the same designation,
manufacturer and type as shown on the original part.
See your authorized Mercedes-Benz Light Truck Center
for further information.
See your authorized Mercedes-Benz Light Truck Center
for information on tested and recommended rims and
tires for summer and winter operation. They can also
offer advice concerning tire service and purchase. Tire replacement
Front and rear tires should be replaced in sets.
Furthermore – in the event of tire replacement – the
optional regular size spare wheel should be used on the
rear axle. Rims and tires must be of the correct size and
type. For dimensions, see technical data on page 288.
We recommend that you break in new tires for
approximately 60 miles (100 km) at moderate speed.
It is imperative that the wheel mounting bolts be
fastened to a tightening torq ue of 110 ft.lb. (150 Nm)
whenever wheels are mounted.
For rim and tire specifications, refer to technical data on
page 288.
Wa r n i n g !
Do not mix different tire construction types (i.e.
radial, bias, bias-belted) on your vehicle because
handling may be adversely affected and may result
in loss of control.
Wa r n i n g !
Worn, old tires can cause accidents. If the tire tread
is badly worn, or if the tires have sustained
damage, replace them.When replacing rims, use only genuine
Mercedes-Benz wheel bolts specified for the
particular rim type. Failure to do so can result in
the bolts loosening and possibly an accident.
Page 708 of 4133
241
Tires, Wheels
Te ch n ica l
data
Instruments
and controls Operation Driving
Instrument
cluster display Practical hints
Car care Index
Rotating wheels
The wheels can be rotated according to the degree of
tire wear while retaining the same direction of travel.
Rotating, however, should be carried out as
recommended by the tire manufacturer, before the
characteristic tire wear pattern (shoulder wear on front
wheels and tread center wear on rear wheels) becomes
visible, as otherwise the driving properties deteriorate.
Important!
Unidirectional tires must always be mounted with arrow
on tire sidewall pointing in direction of vehicle forward
movement. Notes:
Thoroughly clean the inner side of the wheels any time
you rotate the wheels or wash the vehicle underside.
The use of retread tires is not recommended. Retread
tires may adversely affect the handling characteristics
and safety of the vehicle.
Dented or bent rims can cause tire pressure loss and
dam age to t he tire bead s. For this reason, ch eck rims for
damage at regular intervals. The rim flanges must be
checked for wear before a tire is mounted. Remove
burrs, if any.
Check and ensure proper tire inflation pressure after
rotating the wheels. For tire inflation pressure see
page 250.
Page 709 of 4133
242
Tires, Wheels
Te ch n ica l
data
Instruments
and controls Operation Driving
Instrument
cluster display Practical hints
Car care Index
Spare wheel
In the case of a flat tire or break-down, you may
temporarily use the space-saver spare wheel, while
observing the following restrictions:
• Do not exceed vehicle speed of 50 mph (80 km / h).
• Drive to the nearest repair facility to have the f lat
tire repaired or replaced as appropriate.
• Do not operate vehicle with more than one spare
wheel mounted.
For rim and tire specifications, refer to “Technical data”
on page 288.
Caution!
Exercise care when removing or installing spare wheel
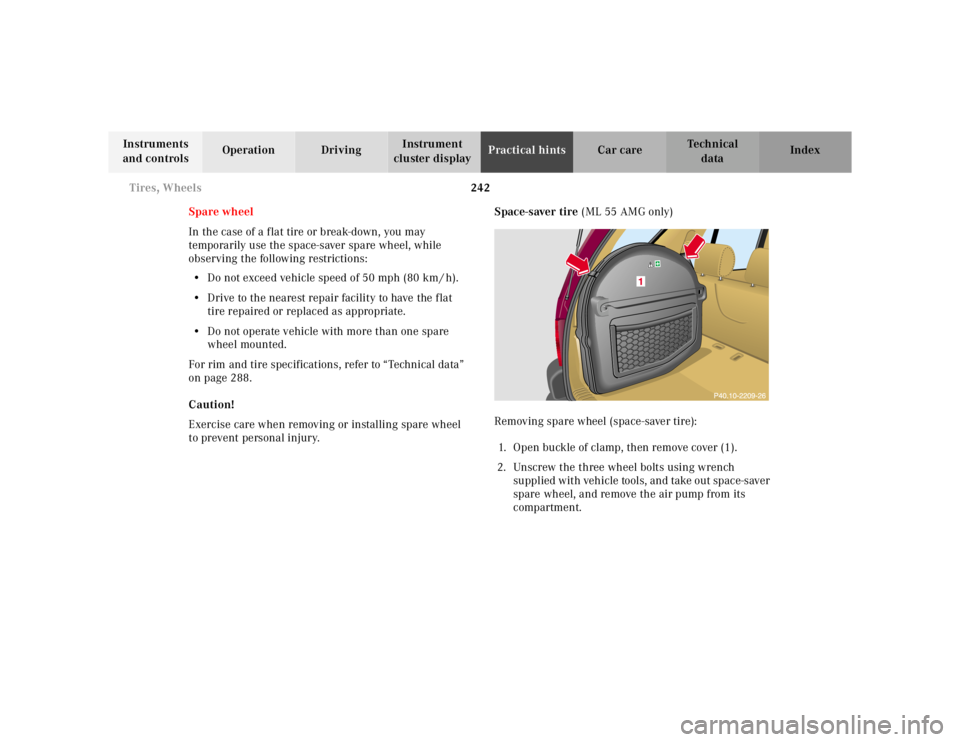
to prevent personal injury. Space-saver tire
(ML 55 AMG only)
Removing spare wheel (space-saver tire): 1. Open buckle of clamp, then remove cover (1).
2. Unscrew the three wheel bolts using wrench supplied with vehicle tools, and take out space-saver
spare wheel, and remove the air pump from its
compartment.
Page 710 of 4133
243
Tires, Wheels
Te ch n ica l
data
Instruments
and controls Operation Driving
Instrument
cluster display Practical hints
Car care Index
Important!
To realize the total crumple zone in case of a rear end
collision, the space-saver spare wheel must be stored in
its holder with the tire deflated. Properly inflate the tire
prior to mounting it on the axle. See page 249 for
detailed instructions.
When storing the space-saver spare wheel in its holder,
tighten the three wheel bolts with a tightening torque of
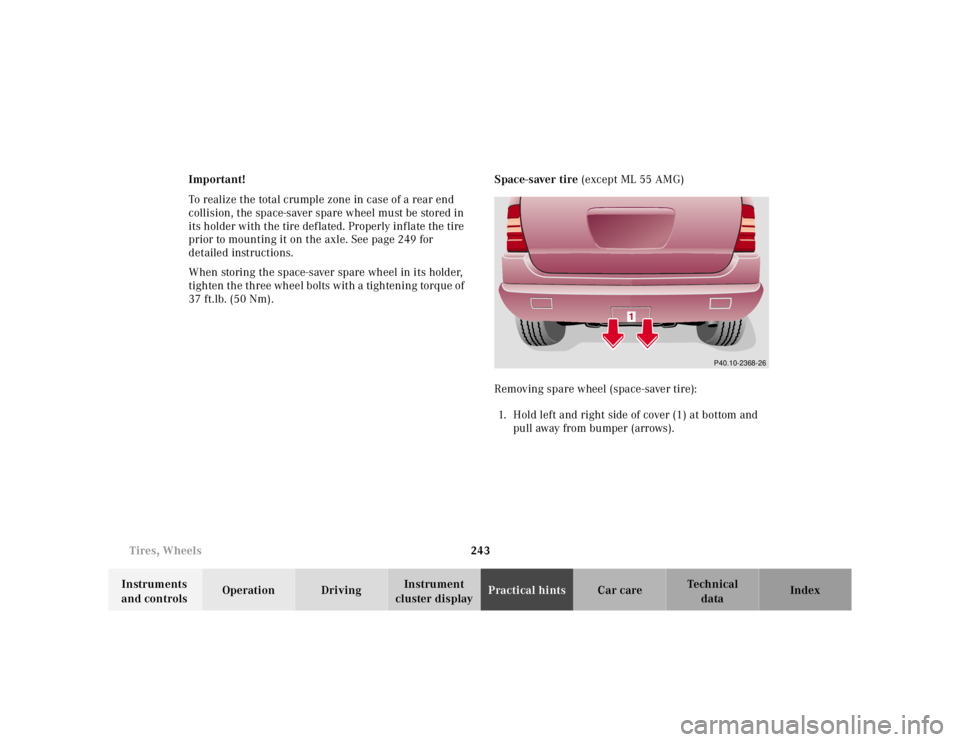
37 ft.lb. (50 Nm). Space-saver tire
(except ML 55 AMG)
Removing spare wheel (space-saver tire): 1. Hold left and right side of cover (1) at bottom and pu ll aw ay fr o m b u mpe r ( arr ows ) .
P40.10-2368-26