mirror MERCEDES-BENZ ML500 1997 Complete Repair Manual
[x] Cancel search | Manufacturer: MERCEDES-BENZ, Model Year: 1997, Model line: ML500, Model: MERCEDES-BENZ ML500 1997Pages: 4133, PDF Size: 88.89 MB
Page 3732 of 4133
AR88.70-P-9040GH
Removing and installing outside rearview mirror cover
12.2.97
MODEL
163.113 /136 /154 /172 /174 up to 31.8.01
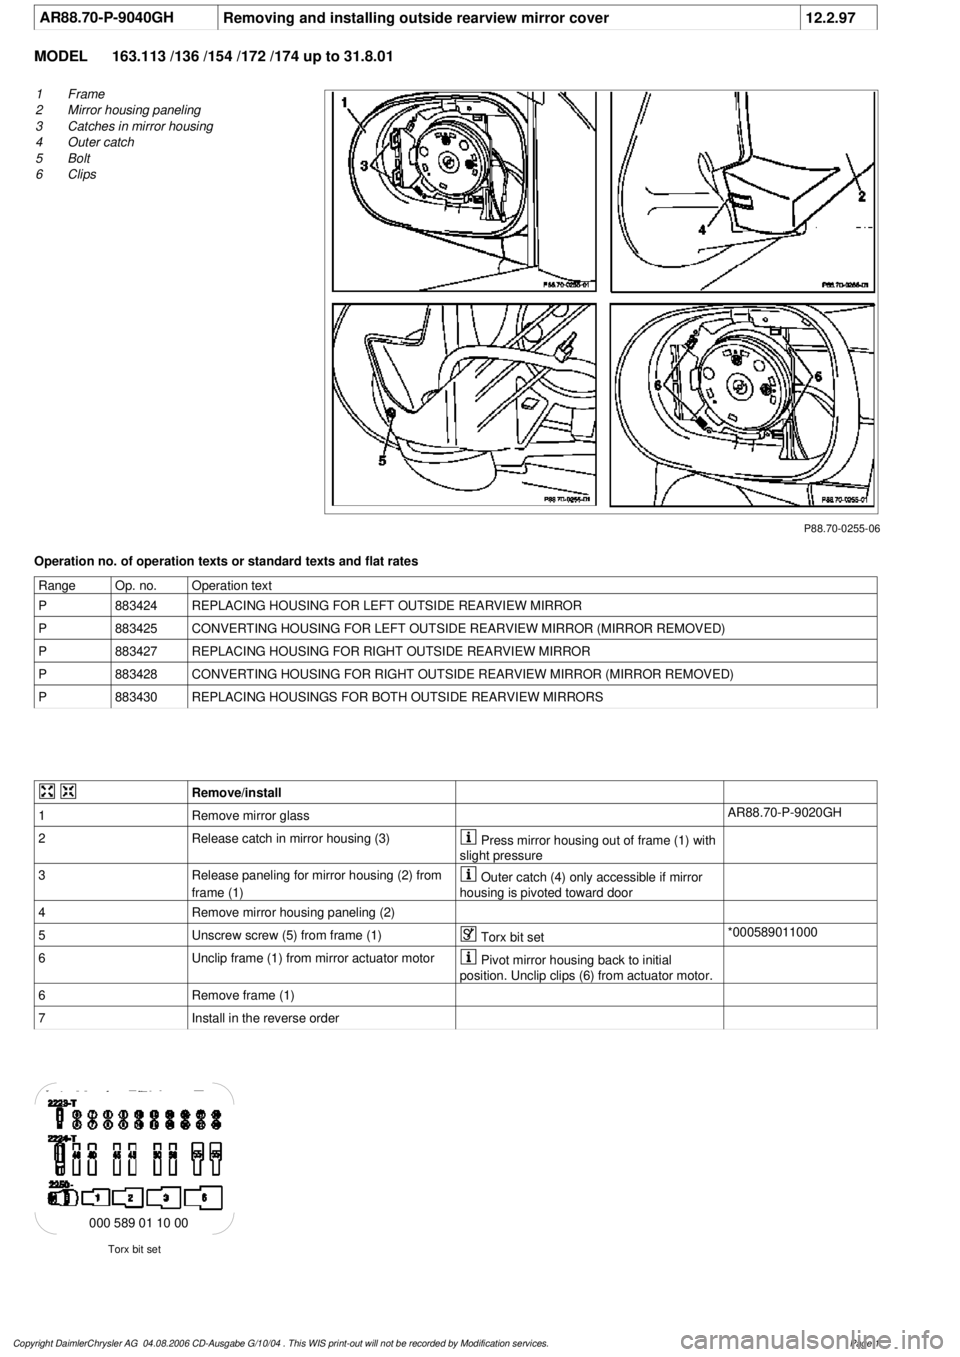
P88.70-0255-06
1
Frame
2
Mirror housing paneling
3
Catches in mirror housing
4
Outer catch
5
Bolt
6
Clips
Operation no. of operation texts or standard texts and flat rates
Range
Op. no.
Operation text
P
883424
REPLACING HOUSING FOR LEFT OUTSIDE REARVIEW MIRROR
P
883425
CONVERTING HOUSING FOR LEFT OUTSIDE REARVIEW MIRROR (MIRROR REMOVED)
P
883427
REPLACING HOUSING FOR RIGHT OUTSIDE REARVIEW MIRROR
P
883428
CONVERTING HOUSING FOR RIGHT OUTSIDE REARVIEW MIRROR (MIRROR REMOVED)
P
883430
REPLACING HOUSINGS FOR BOTH OUTSIDE REARVIEW MIRRORS
Remove/install
1
Remove mirror glass
AR88.70-P-9020GH
2
Release catch in mirror housing (3)
Press mirror housing out of frame (1) with
slight pressure
3
Release paneling for mirror housing (2) from
frame (1)
Outer catch (4) only accessible if mirror
housing is pivoted toward door
4
Remove mirror housing paneling (2)
5
Unscrew screw (5) from frame (1)
Torx bit set
*000589011000
6
Unclip frame (1) from mirror actuator motor
Pivot mirror housing back to initial
position. Unclip clips (6) from actuator motor.
6
Remove frame (1)
7
Install in the reverse order
Torx bit set
000 589 01 10 00
Copyright DaimlerChrysler AG 04.08.2006 CD-Ausgabe G/10/04 . This WIS print-out will not be recorde
d by Modification services.
Page 1
Page 3733 of 4133
AR88.70-P-9020GI
Remove/install mirror glass
24.4.01
MODEL
163.113 /154 /174 #A as of 289565,
163.113 /154 /174 #X as of 754620,
163.128 /157 /175
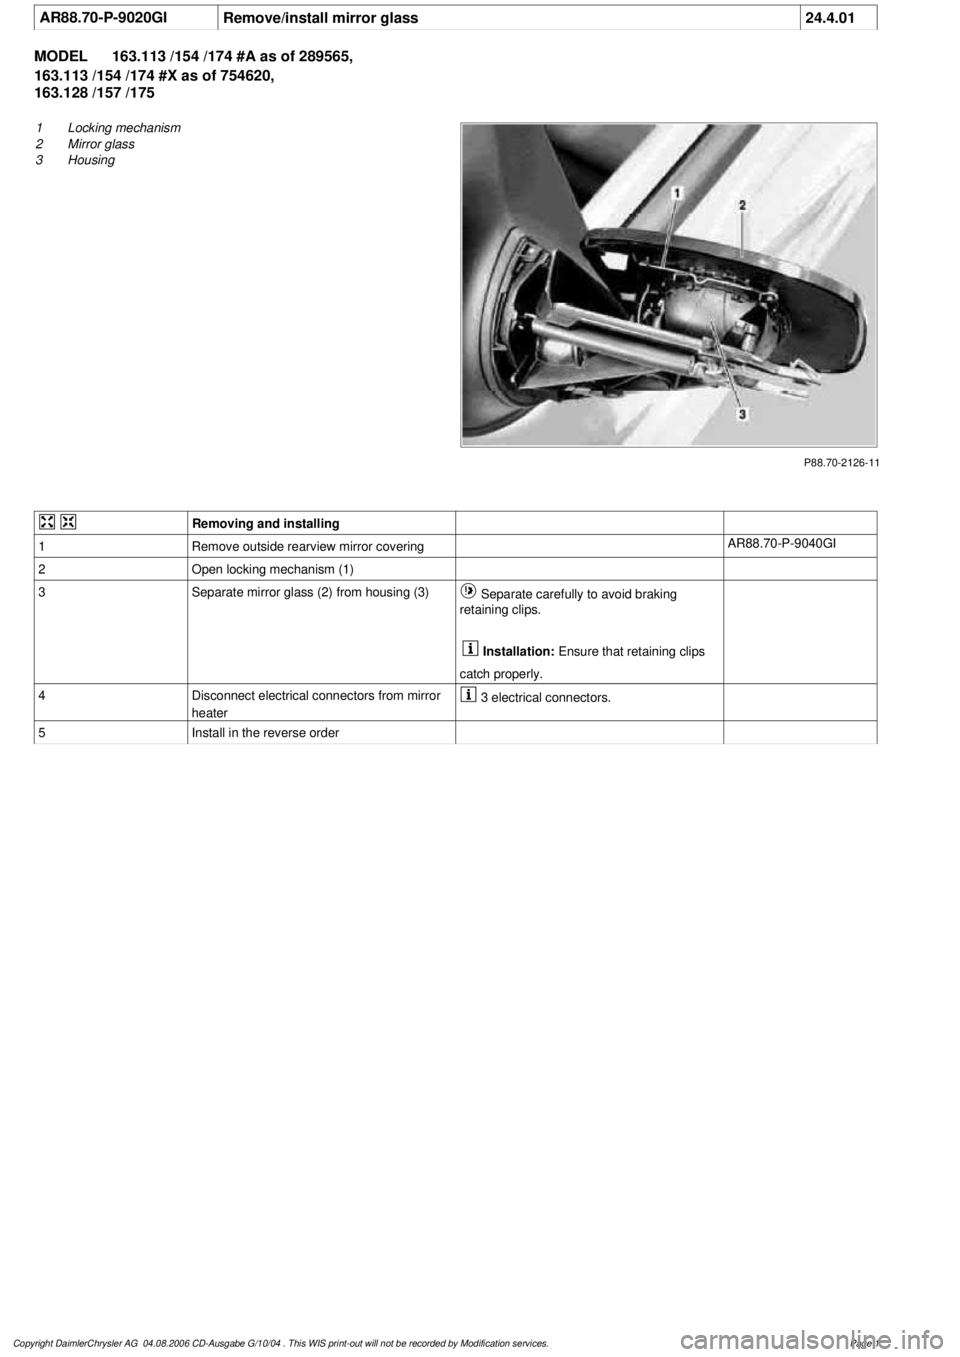
P88.70-2126-11
1
Locking mechanism
2
Mirror glass
3
Housing
Removing and installing
1
Remove outside rearview mirror covering
AR88.70-P-9040GI
2
Open locking mechanism (1)
3
Separate mirror glass (2) from housing (3)
Separate carefully to avoid braking
retaining clips.
Installation:
Ensure that retaining clips
catch properly.
4
Disconnect electrical connectors from mirror
heater
3 electrical connectors.
5
Install in the reverse order
Copyright DaimlerChrysler AG 04.08.2006 CD-Ausgabe G/10/04 . This WIS print-out will not be recorde
d by Modification services.
Page 1
Page 3871 of 4133
Risk of injury!
Class 2 lasers emit a visible radiation. Looking directly into the laser beam can result in damage to the eye.
The reflected laser beam can likewise cause damage to the eye.
For this reason, avoid reflections of the laser beam by using mirrors and similar aids. Laser beams may also
cause skin damage.
Safety instructions/precautions
Never look directly into the laser beam.
Do not attempt to suppress the natural reflex of the eyelids.
The eye is normally protected by defensive reactions including the reflex of the eyelid closing.
Avoid direct skin contact with the laser beam.
If damage to the eye is suspected, consult an eye specialist immediately.
It is prohibited to further bundle the laser beam and thus to concentrate the energy (increasing the laser
class).
Only properly instructed personnel may be entrusted with the work on this equipment.
TESTING & REPAIR
ADJUST THROTTLE CONTROL - AR30.10-P-1010GJ
ENGINE 112.942 #2 in MODEL 163.154
ENGINE 112.970 #2 in MODEL 163.157
ENGINE 113.942 #2 in MODEL 163.172
ENGINE 113.981 #2 in MODEL 163.174
ENGINE 113.965 #2 in MODEL 163.175
Shown on Engine 112.942 in Model 163.154
2001 Mercedes-Benz ML320
1998-2005 ACCESSORIES & BODY CAB Throttle Control, Speed Control Systems - 163 Chassis
me
Saturday, October 02, 2010 3:36:27 PMPage 31 © 2006 Mitchell Repair Information Company, LLC.
Page 3957 of 4133
GF54.50-P-4100GH
Trip computer control module, location/task/design
24.3.00
MODEL
163 as of 1.9.00 with CODE (245) Trip computer
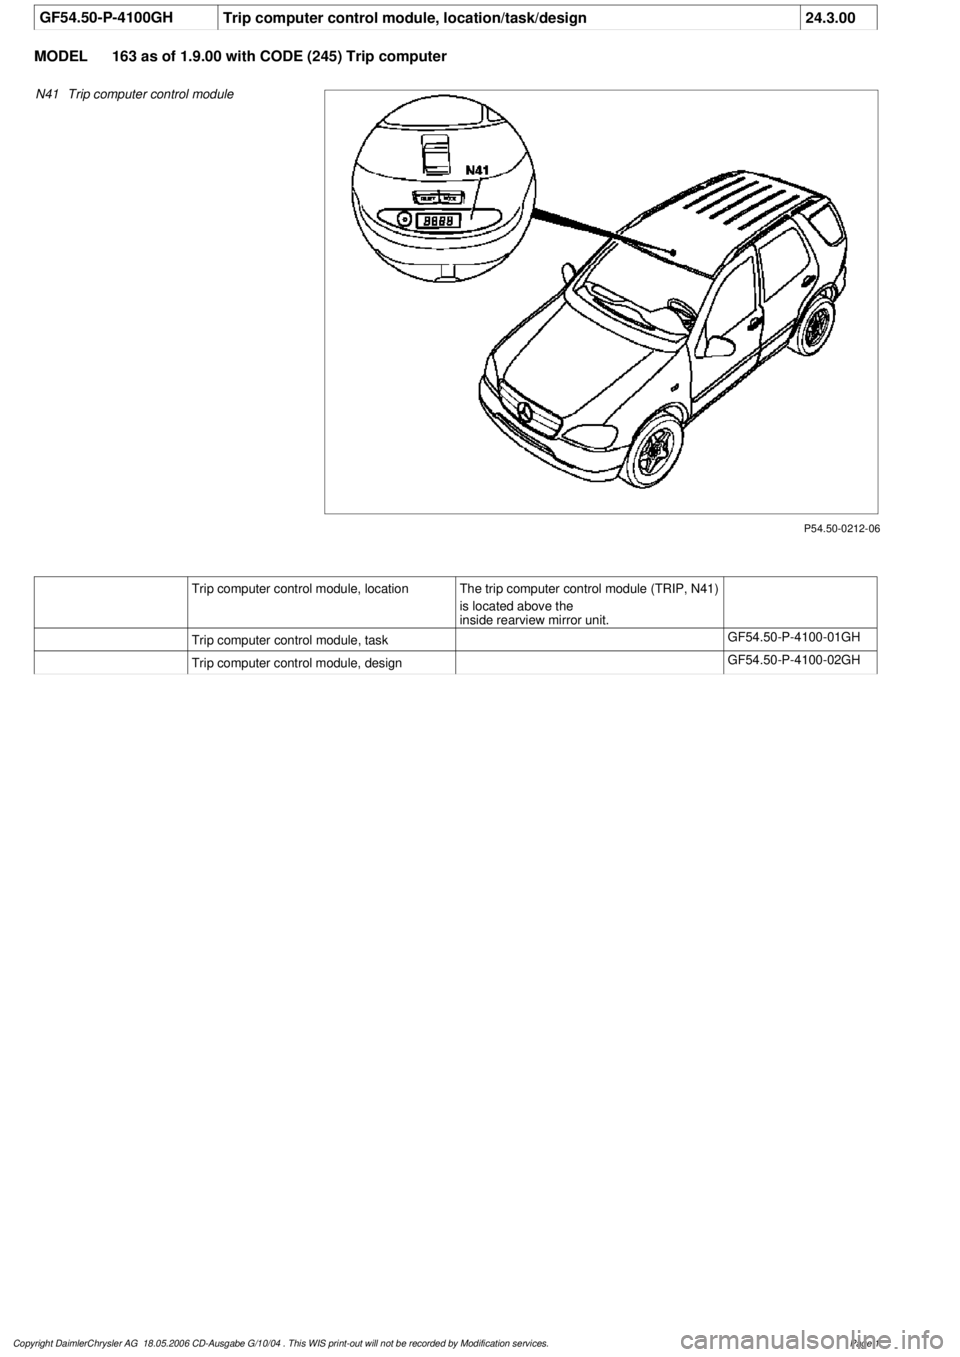
P54.50-0212-06
N41
Trip computer control module
Trip computer control module, location
The trip computer control module (TRIP, N41)
is located above the
inside rearview mirror unit.
Trip computer control module, task
GF54.50-P-4100-01GH
Trip computer control module, design
GF54.50-P-4100-02GH
Copyright DaimlerChrysler AG 18.05.2006 CD-Ausgabe G/10/04 . This WIS print-out will not be recorde
d by Modification services.
Page 1
Page 3996 of 4133
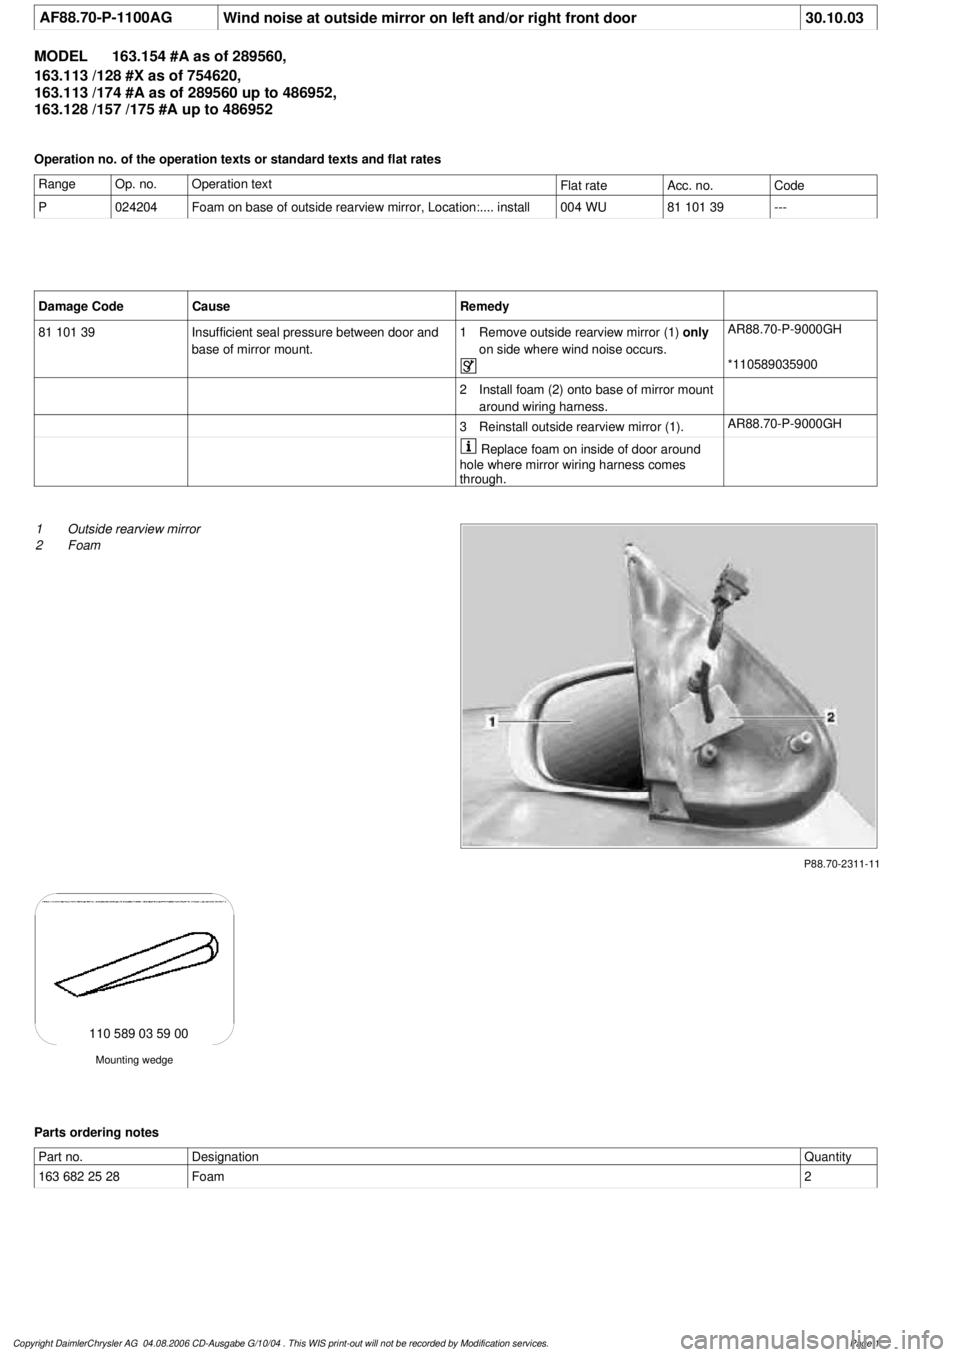
AF88.70-P-1100AG
Wind noise at outside mirror on left and/or right front door
30.10.03
MODEL
163.154 #A as of 289560,
163.113 /128 #X as of 754620,
163.113 /174 #A as of 289560 up to 486952,
163.128 /157 /175 #A up to 486952
Operation no. of the operation texts or standard texts and flat rates
Range
Op. no.
Operation text
Flat rate
Acc. no.
Code
P
024204
Foam on base of outside rearview mirror, Location:.... install
004 WU
81 101 39
---
Damage Code
Cause
Remedy
81 101 39
Insufficient seal pressure between door and
base of mirror mount.
1
Remove outside rearview mirror (1)
only
on side where wind noise occurs.
AR88.70-P-9000GH
*110589035900
2
Install foam (2) onto base of mirror mount
around wiring harness.
3
Reinstall outside rearview mirror (1).
AR88.70-P-9000GH
Replace foam on inside of door around
hole where mirror wiring harness comes
through.
P88.70-2311-11
1
Outside rearview mirror
2
Foam
Mounting wedge
110 589 03 59 00
Parts ordering notes
Part no.
Designation
Quantity
163 682 25 28
Foam
2
Copyright DaimlerChrysler AG 04.08.2006 CD-Ausgabe G/10/04 . This WIS print-out will not be recorde
d by Modification services.
Page 1
Page 4083 of 4133

Fig. 42: Power Door Locks Circuit
POWER MIRRORS
2001 Mercedes-Benz ML320
2001 SYSTEM WIRING DIAGRAMS Mercedes-Benz - ML320
me
Saturday, October 02, 2010 3:28:00 PMPage 85 © 2006 Mitchell Repair Information Company, LLC.
Page 4085 of 4133

Fig. 43: Power Mirrors Circuit
POWER SEATS
2001 Mercedes-Benz ML320
2001 SYSTEM WIRING DIAGRAMS Mercedes-Benz - ML320
me
Saturday, October 02, 2010 3:28:00 PMPage 87 © 2006 Mitchell Repair Information Company, LLC.