roof MERCEDES-BENZ ML500 1997 Complete Repair Manual
[x] Cancel search | Manufacturer: MERCEDES-BENZ, Model Year: 1997, Model line: ML500, Model: MERCEDES-BENZ ML500 1997Pages: 4133, PDF Size: 88.89 MB
Page 52 of 4133

2 Contents
Fog lamp switch
(except Canada) ........................... 92
Fog lamp switch
(Canada only) .............................. 93
Hazard warning flasher
switch ............................................ 94
Headlamp cleaning system ............ 94
Windshield wiper/washer
switch ............................................ 95
Rear window wiper/washer ........... 96
Climate control ................................. 98
Basic setting – Heater ............... 100
Basic setting –
Air conditioner ........................... 100
Special setting ............................ 101
Dust filter .................................... 102
Air recirculation ......................... 102
Rear window defroster .............. 103
Power windows ............................... 104
Rear quarter windows ................... 106
Sliding/pop-up roof ....................... 107
Skyview Top .................................... 109
Interior lighting ..............................110
Sun visors ........................................113Illuminated vanity mirrors ........... 113
Interior ............................................. 114
Storage compartments,
armrest and cup holder ............ 114
Glove box ...................................... 115
Armrest in rear bench seat ........... 117
Ashtrays ........................................... 118
Lighter .............................................. 119
Split rear seat bench ..................... 120
Easy entry/exit feature ............. 123
Rear seat head restraints ......... 124
Third row seats .............................. 126
Removable cargo floor plates ...... 129
Enlarged cargo area .......................131
Cargo tie-down rings .....................132
Hooks ...............................................133
Partition net ....................................133
Loading instructions ......................136
Cargo area cover blind ..................137
Telephone, general .........................139
Cellular telephone ..........................139
Garage door opener ....................... 140
DrivingControl and operation of
radio transmitters ..................... 146
The first 1 000 miles
(1 500 km) ................................. 147
Maintenance ................................... 147
Tele Aid ........................................... 148
Catalytic converter ........................ 160
Emission control ............................ 161
Steering lock ................................... 162
Starting and turning off
the engine .................................. 164
Automatic transmission ............... 165
Parking brake ................................. 173
Driving instructions ...................... 174
Drive sensibly – save fuel ......... 174
Drinking and driving ................. 174
Pedals ........................................... 174
Power assistance ........................ 175
Brakes .......................................... 175
Driving off ................................... 176
Parking ........................................ 176
Tires ............................................. 177
Page 54 of 4133

4 Contents
Practical hintsFirst aid kit .....................................228
Fuses ................................................228
Electrical outlet ..............................230
Stowing things in the vehicle ......230
Hood ................................................. 231
Checking engine oil level .............233
Automatic transmission
fluid level ...................................234
Engine oil consumption ................234
Coolant level ...................................234
Adding coolant ...........................235
Windshield washer/headlamp
cleaning system .........................236
Windshield and
headlamp washer fluid
mixing ratio ................................237Vehicle jack, wheel bolt
wrench and screwdriver ......... 237
Air pump ......................................... 239
Wheels ............................................ 240
Tire replacement ....................... 240
Rotating wheels ......................... 241
Spare wheel .................................... 242
Changing wheels ........................... 245
Tire inflation pressure ................. 250
Battery ............................................. 251
Jump starting ................................. 253
Towing the vehicle ........................ 255
Transmission selector lever,
manually unlocking .................. 259
Stranded vehicle ............................ 259Exterior lamps ................................260
Headlamp assembly ................... 261
Taillamp assemblies ..................265
Adjusting headlamp aim ...............268
Remote control
battery replacement .................270
Synchronizing
remote control ............................ 271
Emergency operation of
sliding/pop-up roof ...................272
Emergency operation of
Skyview Top ...............................273
Manual release for
fuel filler flap ............................. 274
Replacing wiper blades .................275
Roof rack ......................................... 276
Page 71 of 4133
21 Instruments and controls
Te ch n ica l
data Instruments
and controlsOperation DrivingInstrument
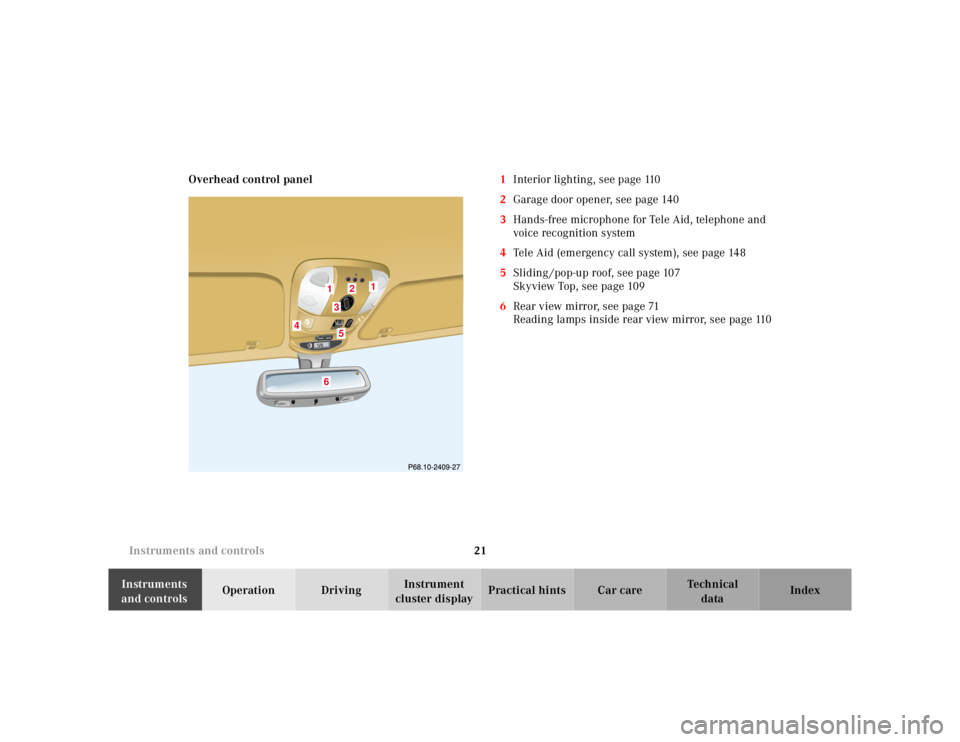
cluster displayPractical hints Car care Index Overhead control panel1Interior lighting, see page 110
2Garage door opener, see page 140
3Hands-free microphone for Tele Aid, telephone and
voice recognition system
4Tele Aid (emergency call system), see page 148
5Sliding /pop-up roof, see page 107
Skyview Top, see page 109
6Rear view mirror, see page 71
Reading lamps inside rear view mirror, see page 110
1
2
3
4
5
6
1
Page 73 of 4133
23 Contents - Operation
Te ch n ica l
data Instruments
and controlsOperationDrivingInstrument
cluster displayPractical hints Car care Index Basic setting –
Air conditioner ........................... 100
Special setting ............................ 101
Dust filter .................................... 102
Air recirculation ......................... 102
Rear window defroster .............. 103
Power windows ............................... 104
Rear quarter windows ................... 106
Sliding/pop-up roof ....................... 107
Skyview Top .................................... 109
Interior lighting ..............................110
Sun visors ........................................113Illuminated vanity mirrors ........... 113
Interior ............................................. 114
Storage compartments,
armrest and cup holder ............ 114
Glove box ...................................... 115
Armrest in rear bench seat ........... 117
Ashtrays ........................................... 118
Lighter .............................................. 119
Split rear seat bench ..................... 120
Easy entry/exit feature ............. 123
Rear seat head restraints ......... 124
Third row seats .............................. 126Removable cargo floor plates ....... 129
Enlarged cargo area ....................... 131
Cargo tie-down rings ..................... 132
Hooks ............................................... 133
Partition net .................................... 133
Loading instructions ..................... 136
Cargo area cover blind .................. 137
Telephone, general ........................ 139
Cellular telephone ......................... 139
Garage door opener ....................... 140
Page 136 of 4133
86 Trip computer
Te ch n ica l
data Instruments
and controlsOperationDrivingInstrument
cluster displayPractical hints Car care Index
To calibrate the compass:
If the vehicle was exposed to a significant magnetic
zone, such as high voltage power lines, the compass
may have to be calibrated.
Calibration of the compass should be done in an area
free of steel superstructures and power lines. All
electrical consumers (e.g. exterior lamps, climate
control, etc.) should be switched off, doors and liftgate
closed. Do not open or close the roof. An open door or
liftgate triggers the display “–––”.
1. Start and run the engine.
2. Press MODE key repeatedly until the compass
display appears in the trip computer display.
3. Press RESET key to select the compass zone display.
4. Press RESET repeatedly until the correct zone, as
determined from the zone map (see page 85), is
shown in the display.
5. Press MODE key, “CAL–” appears in the display.
6. Press and hold RESET for a minimum of 2 seconds.7. Without interruption drive two or more full circles
at a speed between 3 mph (5 km / h) and 7 mph
(10 km / h) during which the message “CAL” is
replaced with a compass bearing (e.g. N, SW etc.),
immediately followed by three full circles at the
same speed, with only the rear window defroster
switched on. The defroster can be switched off
again. The calibration of the compass is now
complete.
•Stop watch –
Press RESET key to start the count. Press again to
stop the count. Press and hold RESET key to reset
sto p watch.
•Average fuel consumption –
Press RESET key to delete present reading.
•Language –
Press RESET key to set the language used in the
display.
Page 157 of 4133
107 Interior equipment
Te ch n ica l
data Instruments
and controlsOperationDrivingInstrument
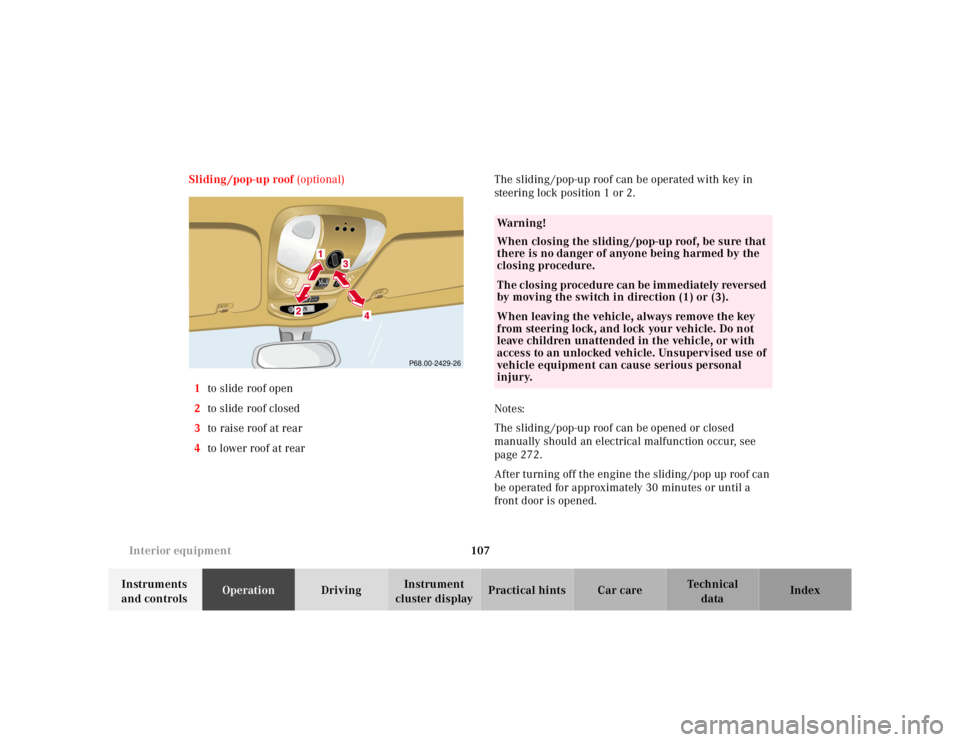
cluster displayPractical hints Car care Index Sliding /pop-up roof (optional)
1to slide roof open
2to slide roof closed
3to raise roof at rear
4to lower roof at rearThe sliding /pop-up roof can be operated with key in
steering lock position 1 or 2.
Notes:
The sliding /pop-up roof can be opened or closed
manually should an electrical malfunction occur, see
page 272.
After turning off the engine the sliding /pop up roof can
be operated for approximately 30 minutes or until a
front door is opened.
RESETMODE
P68.00-2429-26
Wa r n i n g !
When closing the sliding /pop-up roof, be sure that
there is no danger of anyone being harmed by the
closing procedure.The closing procedure can be immediately reversed
by moving the switch in direction (1) or (3).When leaving the vehicle, always remove the key
from steering lock, and lock your vehicle. Do not
leave children unattended in the vehicle, or with
access to an unlocked vehicle. Unsupervised use of
vehicle equipment can cause serious personal
injury.
Page 158 of 4133
108 Interior equipment
Te ch n ica l
data Instruments
and controlsOperationDrivingInstrument
cluster displayPractical hints Car care Index
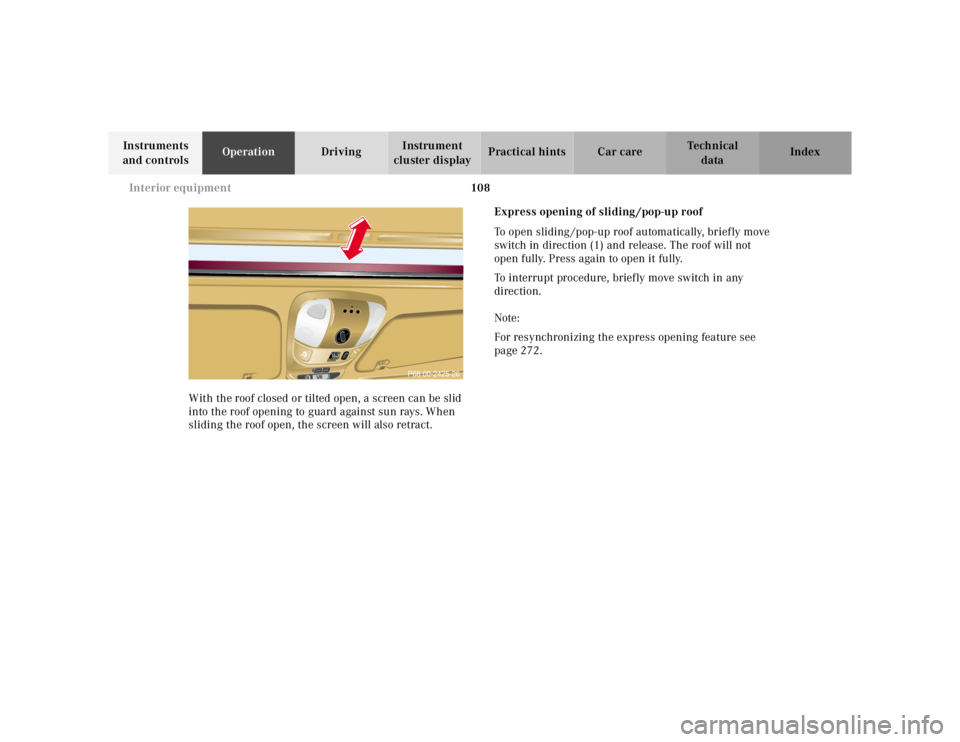
With the roof closed or tilted open, a screen can be slid
into the roof opening to guard against sun rays. When
sliding the roof open, the screen will also retract.Express opening of sliding /pop-up roof
To open sliding /pop-up roof automatically, briefly move
switch in direction (1) and release. The roof will not
open fully. Press again to open it fully.
To interrupt procedure, brief ly move switch in any
direction.
Note:
For resynchronizing the express opening feature see
page 272.
RESETMODE
Page 159 of 4133
109 Interior equipment
Te ch n ica l
data Instruments
and controlsOperationDrivingInstrument
cluster displayPractical hints Car care Index Skyview Top (optional)
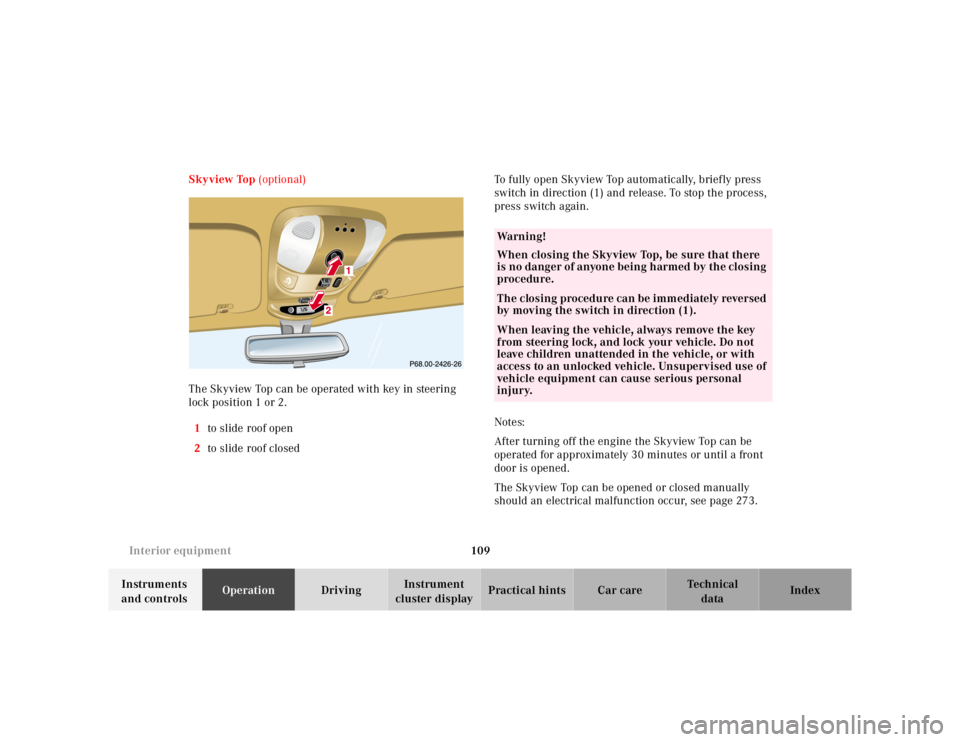
The Skyview Top can be operated with key in steering
lock position 1 or 2.
1to slide roof open
2to slide roof closedTo fully open Skyview Top automatically, brief ly press
switch in direction (1) and release. To stop the process,
press switch again.
Notes:
After turning off the engine the Skyview Top can be
operated for approximately 30 minutes or until a front
door is opened.
The Skyview Top can be opened or closed manually
should an electrical malfunction occur, see page 273.
RESETMODE
Wa r n i n g !
When closing the Skyview Top, be sure that there
is no danger of anyone being h armed by th e closing
procedure.The closing procedure can be immediately reversed
by moving the switch in direction (1).When leaving the vehicle, always remove the key
from steering lock, and lock your vehicle. Do not
leave children unattended in the vehicle, or with
access to an unlocked vehicle. Unsupervised use of
vehicle equipment can cause serious personal
injury.
Page 224 of 4133
174 Driving instructions
Te ch n ica l
data Instruments
and controlsOperationDrivingInstrument
cluster displayPractical hints Car care Index
Driving instructions
Drive sensibly – save fuel
Fuel consumption, to a great extent, depends on driving
habits and operating conditions.
To save fuel you should:
•keep tires at the recommended inflation pressures,
•remove unnecessary loads,
•remove roof rack when not in use,
•allow engine to warm up under low load use,
•avoid frequent acceleration and deceleration,
•have all maintenance work performed at regular
intervals by an authorized Mercedes-Benz Light
Truck Center.
Fuel consumption is also increased by driving in cold
weather, in stop-and-go traffic, on short trips and in hilly
country.Drinking and driving
Pedals
Wa r n i n g !
Drinking or taking drugs and driving can be a very
dangerous combination. Even a small amount of
alcohol or drugs can affect your reflexes,
perceptions and judgement.The possibility of a serious or even fatal accident is
sharply increased when you drink or take drugs
and drive.Please don’t drink or take drugs and drive or allow
anyone to drive after drinking or taking drugs.Wa r n i n g !
Keep driver’s foot area clear at all times. Objects
stored in this area may impair pedal movement.
Page 233 of 4133
183 Driving instructions
Te ch n ica l
data Instruments
and controlsOperationDrivingInstrument
cluster displayPractical hints Car care Index Off-Road driving
Familiarize yourself with the vehicle characteristics and
gear changing before you attempt any difficult terrain
off-road driving. We recommend that you start out with
easy off-road travel.
Please read this chapter carefully before you begin
off-road travel.
Special driving features are available for specific kinds
of operation:
•LOW RANGE mode, see page 209
•LOW RANGE - ABS, see page 202
•LOW RANGE - 4-ETS+, see page 204
•LOW RANGE - ESP, see page 208
Engage the LOW RANGE mode before driving under
off-road conditions. For switching LOW RANGE mode on
and off see page 209.
Fasten items being carried as securely as possible, see
page 136.
We recommend to keep doors, liftgate, windows, and
roof closed whenever driving in off-road mode.Important!
Adjust vehicle speed to condition of terrain. The more
uneven, rutty and steeper the terrain, the lower the
speed should be.
Watch out for obstacles, such as rocks, holes,
tree-stumps, ruts.
Be especially careful when driving in unknown
territory. Eventually get out of the vehicle and scout the
path you intend to take.
Continuous and speedy driving in sandy soil overcomes
the vehicle rolling resistance, and helps to prevent the
vehicle from sinking into the ground.
Do not initiate jumps with the vehicle. It interrupts the
forward momentum of the vehicle.
Sand, dirt, mud and other material having friction
property, can cause exceptional wear and tear as well as
failure of the brakes.
In this case the brakes may be less effective or even fail
when you most need them. Always clean and check the
brakes following each off-road trip.