ESP MERCEDES-BENZ ML55AMG 2002 W163 User Guide
[x] Cancel search | Manufacturer: MERCEDES-BENZ, Model Year: 2002, Model line: ML55AMG, Model: MERCEDES-BENZ ML55AMG 2002 W163Pages: 342, PDF Size: 13.75 MB
Page 68 of 342
65 Restraint systems
Te ch n i c a l
data Instruments
and controlsOperationDrivingInstrument
cluster displayPractical hints Car care Index
Wa r n i n g !
Accident research shows that the safest place for
children in an automobile is in the rear seat.
Should you choose to place a child 12 years old or
under in the front passenger seat of your vehicle,
you must properly use a BabySmart
TM child
restraint which will turn off the passenger side
front airbag. BabySmart
TM will not, however, turn
off the vehicle’s side impact airbag.
It should be noted that with respect to both front
and rear side impact airbags there is a possibility
for a side airbag related injury if occupants,
especially children, are not properly seated or
restrained when next to a side airbag which needs
to deploy rapidly in a side impact in order to do its
job.
To help avoid the possibility of injury, please follow
these guidelines: (1) occupants, especially
children, should never place their bodies or lean
their heads in the area of the door where the side
airbag inflates. This could result in serious
injuries or death should the side airbag be
activated; (2) always sit upright, properly use the
seat belts and use an appropriately sized infant or
child restraint system for all children 12 years old
or under; and (3) always wear seat belts properly.If you believe that, even with the use of these
guidelines, it would be safer for your rear seat
occupants to have both rear door mounted side
airbags deactivated, then deactivation can be
a ccompl is hed u pon your w ritten election to d o s o a t
your authorized Mercedes-Benz Center at an
additional cost. Please contact your local
authorized Mercedes-Benz Center or call our
Customer Assistance Center at
1-800-FOR-MERCedes (1-800-367-6372) for details.
Page 79 of 342
76 Rear view mirrors
Te ch n i c a l
data Instruments
and controlsOperationDrivingInstrument
cluster displayPractical hints Car care Index
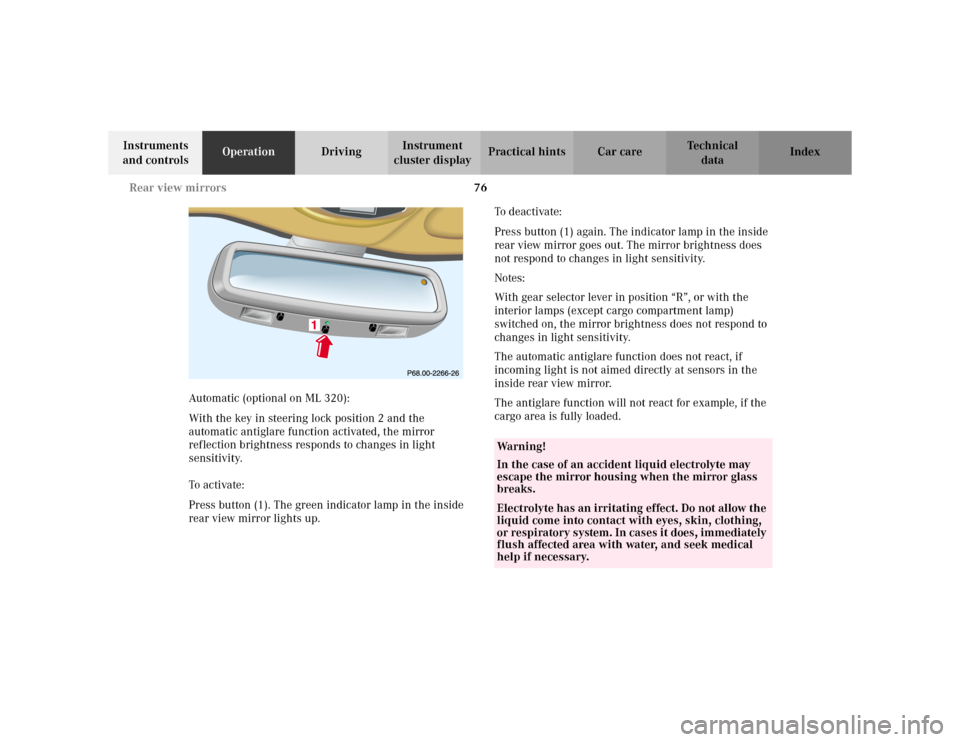
Automatic (optional on ML 320):
With the key in steering lock position 2 and the
automatic antiglare function activated, the mirror
reflection brightness responds to changes in light
sensitivity.
To a c ti va te :
Press button (1). The green indicator lamp in the inside
rear view mirror lights up.To d e a c t i va t e :
Press button (1) again. The indicator lamp in the inside
rear view mirror goes out. The mirror brightness does
not respond to changes in light sensitivity.
Notes:
With gear selector lever in position “R”, or with the
interior lamps (except cargo compartment lamp)
switched on, the mirror brightness does not respond to
changes in light sensitivity.
The automatic antiglare function does not react, if
incoming light is not aimed directly at sensors in the
inside rear view mirror.
The antiglare function will not react for example, if the
cargo area is fully loaded.
Wa r n i n g !
In the case of an accident liquid electrolyte may
escape the mirror housing when the mirror glass
breaks.Electrolyte has an irritating effect. Do not allow the
liquid come into contact with eyes, skin, clothing,
or respiratory system. In cases it does, immediately
flush affected area with water, and seek medical
help if necessary.
Page 83 of 342
80 Rear view mirrors
Te ch n i c a l
data Instruments
and controlsOperationDrivingInstrument
cluster displayPractical hints Car care Index
Driver’s side exterior rear view mirror, antiglare
mode (optional on ML 320)
Antiglare mode:
With the key in steering lock position 2, the mirror
reflection brightness responds to changes in light
sensitivity.
With the gear selector lever in position “R”, or with the
interior light switched on, the mirror brightness does
not respond to changes in light sensitivity.Note:
The automatic antiglare function does not react, if
incoming light is not aimed directly at sensors in the
inside rear view mirror.
The antiglare function will not react for example, if the
cargo area is fully loaded.
Page 84 of 342
81 Rear view mirrors
Te ch n i c a l
data Instruments
and controlsOperationDrivingInstrument
cluster displayPractical hints Car care IndexImportant!
Electrolyte drops coming into contact with the vehicle
paint finish can only be completely removed while in
their liquid state and by applying plenty of water.
Wa r n i n g !
In the case of an accident liquid electrolyte may
escape the mirror housing when the mirror glass
breaks.Electrolyte has an irritating effect. Do not allow the
liquid come into contact with eyes, skin, clothing,
or respiratory system. In cases it does, immediately
flush affected area with water, and seek medical
help if necessary.
Page 86 of 342
83 Instrument cluster
Te ch n i c a l
data Instruments
and controlsOperationDrivingInstrument
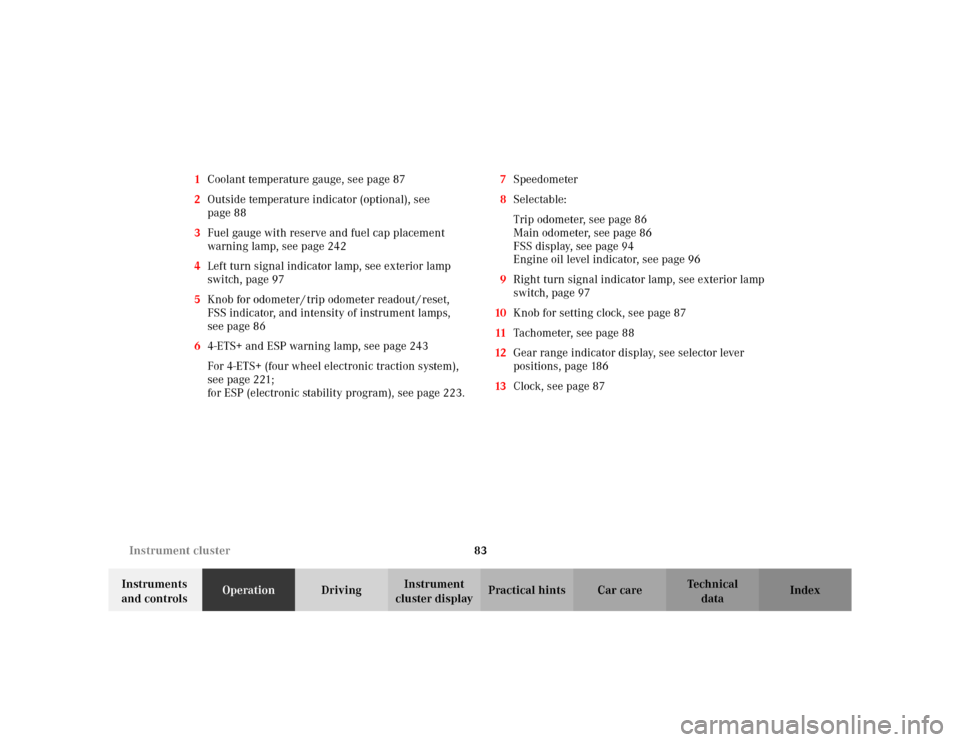
cluster displayPractical hints Car care Index 1Coolant temperature gauge, see page 87
2Outside temperature indicator (optional), see
page 88
3Fuel gauge with reserve and fuel cap placement
warning lamp, see page 242
4Left turn signal indicator lamp, see exterior lamp
switch, page 97
5Knob for odometer / trip odometer readout / reset,
FSS indicator, and intensity of instrument lamps,
see page 86
64-ETS+ and ESP warning lamp, see page 243
For 4-ETS+ (four wheel electronic traction system),
seepage221;
for ESP (electronic stability program), see page 223.7Speedometer
8Selectable:
Trip odometer, see page 86
Main odometer, see page 86
FSS display, see page 94
Engine oil level indicator, see page 96
9Right turn signal indicator lamp, see exterior lamp
switch, page 97
10Knob for setting clock, see page 87
11Tachometer, see page 88
12Gear range indicator display, see selector lever
positions, page 186
13Clock, see page 87
Page 87 of 342
84 Instrument cluster
Te ch n i c a l
data Instruments
and controlsOperationDrivingInstrument
cluster displayPractical hints Car care Index
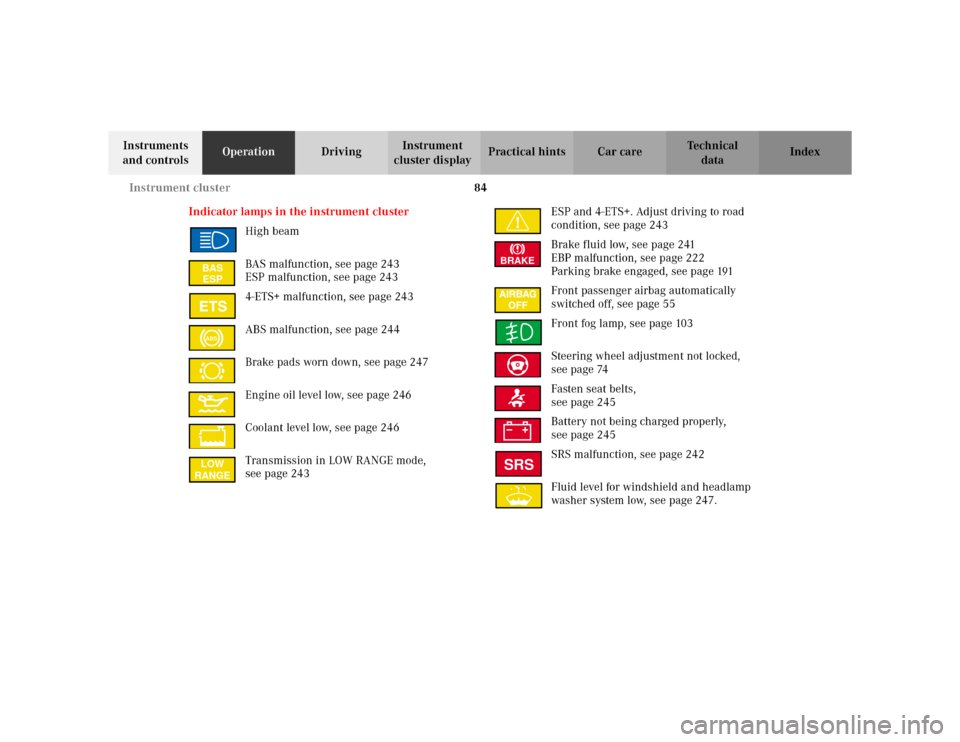
Indicator lamps in the instrument cluster
High beam
BAS malfunction, see page 243
ESP malfunction, see page 243
4-ETS+ malfunction, see page 243
ABS malfunction, see page 244
Brake pads worn down, see page 247
Engine oil level low, see page 246
Coolant level low, see page 246
Transmission in LOW RANGE mode,
see page 243ESP and 4-ETS+. Adjust driving to road
condition, see page 243
Brake fluid low, see page 241
EBP malfunction, see page 222
Parking brake engaged, see page 191
Front passenger airbag automatically
switched off, see page 55
Front fog lamp, see page 103
Steering wheel adjustment not locked,
see page 74
Fasten seat belts,
see page 245
Battery not being charged properly,
see page 245
SRS malfunction, see page 242
Fluid level for windshield and headlamp
washer system low, see page 247.
BAS
ESPABSLOW
RANGE
BRAKESRS
Page 102 of 342
99 Exterior lamp switch
Te ch n i c a l
data Instruments
and controlsOperationDrivingInstrument
cluster displayPractical hints Car care Index Headlamp mode
The headlamps can be switched on and off manually or
automatically.
Manual operation:
The low beam headlamps and parking lamps can be
switched on and off with the exterior lamp switch. For
exterior lamp switch, see page 97.
Automatic operation:
With electronic key in steering lock in position 1 turn
exterior lamp switch to positionU.
The parking lamps switches on and off automatically
depending on the brightness of the ambient light.With the engine running and exterior lamp switch in
positionU:
USA only:
The low beam headlamps and parking lamps are
switched on and off automatically depending on the
brightness of the ambient light.
Canada only:
In conjunction with the daytime running lamps, see
page 100, in low ambient light conditions the parking
lamps will also switch on.
Note:
The high beam headlamps, high beam flasher, low beam
headlamps, parking lamps can still be switched on and
off manually using the exterior lamp switch.
The headlamps will not be automatically switched on
under foggy conditions.
Front fog lamps and rear fog lamps cannot be switched
on manually with exterior lamp switch in positionU.
To activate the fog lamps turn exterior switch to
positionB.
Wa r n i n g !
The driver is responsible for the operation of the
vehicle’s lights at all times. The automatic
headlamp feature is only an aid to the driver.
Switch on the vehicle lights by hand when driving
or traffic conditions require you to do so.
Page 120 of 342
117 Automatic climate control
Te ch n i c a l
data Instruments
and controlsOperationDrivingInstrument
cluster displayPractical hints Car care Index Economy mode
The function of this setting corresponds to the
automatic mode. However, because the air conditioning
compressor will not engage (fuel savings), it is not
possible to air condition in this setting.
Press AC
OFF
button to activate. The indicator lamp in the
button illuminates.
Press AC
OFF
button once again to return to the previous
setting.
Important!
In the mode AC
OFF
the windows could fog up on the
inside. Switch off ACOFF
mode.Residual engine heat utilization
With the engine switched off, it is possible to continue
to heat or ventilate the interior for a short while,
dependent of the temperature set in the climate control.
Air volume and distribution are controlled
automatically.
To s e l e c t :
Turn the key in steering lock to position 1.
Press buttonT. The indicator lamp in the button
illuminates.
To s w i tch o f f :
Press buttonT. The indicator lamp in the button
goes out.
This function selection is automatically switched off,
•if turning the key in steering lock to position 2,
•after approx. 30 minutes,
•if the coolant temperature is too low and
•if the battery voltage drops.
Note:
The fan switches to a lower speed independent of the
setting of the air volume control.
Page 137 of 342
134 Interior equipment
Te ch n i c a l
data Instruments
and controlsOperationDrivingInstrument
cluster displayPractical hints Car care Index
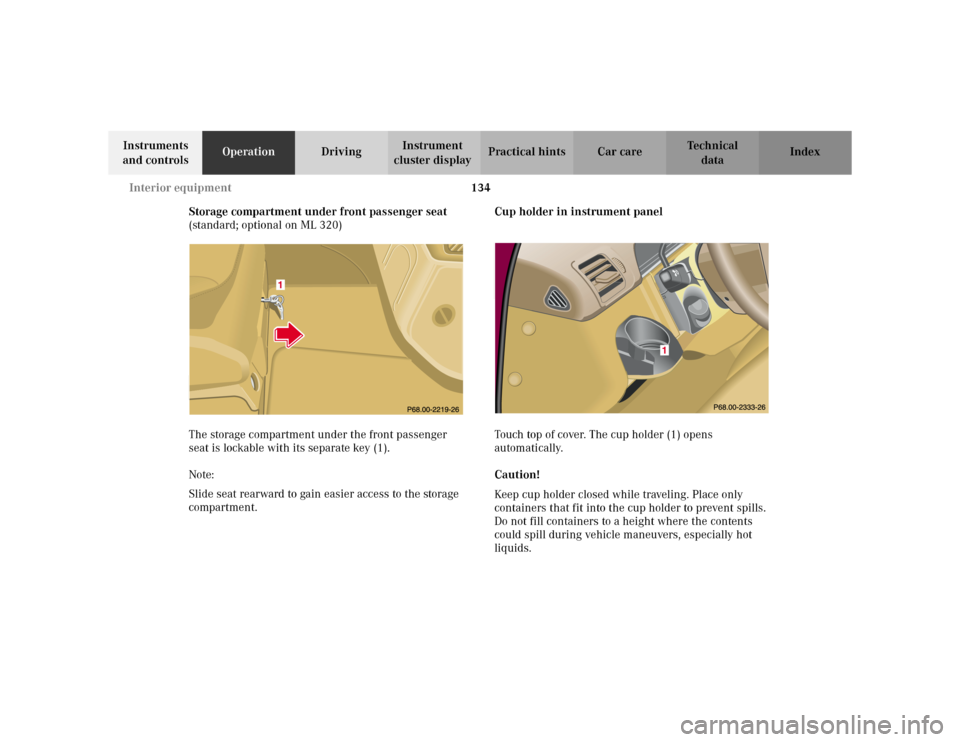
Storage compartment under front passenger seat
(standard; optional on ML 320)
The storage compartment under the front passenger
seat is lockable with its separate key (1).
Note:
Slide seat rearward to gain easier access to the storage
compartment.Cup holder in instrument panel
Touch top of cover. The cup holder (1) opens
automatically.
Caution!
Keep cup holder closed while traveling. Place only
containers that fit into the cup holder to prevent spills.
Do not fill containers to a height where the contents
could spill during vehicle maneuvers, especially hot
liquids.
Page 138 of 342
135 Interior equipment
Te ch n i c a l
data Instruments
and controlsOperationDrivingInstrument
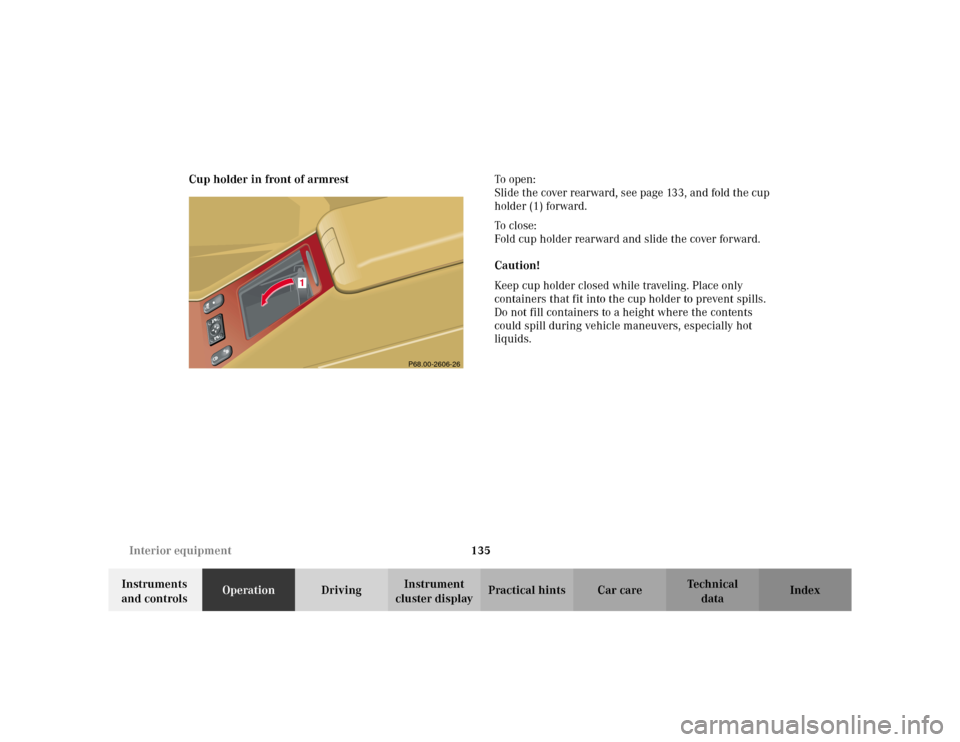
cluster displayPractical hints Car care Index Cup holder in front of armrestTo o p e n :
Slide the cover rearward, see page 133, and fold the cup
holder (1) forward.
To c l o s e :
Fold cup holder rearward and slide the cover forward.
Caution!
Keep cup holder closed while traveling. Place only
containers that fit into the cup holder to prevent spills.
Do not fill containers to a height where the contents
could spill during vehicle maneuvers, especially hot
liquids.
P68.00-2606-26
1