service MERCEDES-BENZ ML63AMG 2010 W164 User Guide
[x] Cancel search | Manufacturer: MERCEDES-BENZ, Model Year: 2010, Model line: ML63AMG, Model: MERCEDES-BENZ ML63AMG 2010 W164Pages: 368, PDF Size: 9.09 MB
Page 26 of 368
In Canada:
Customer Relations Department
Mercedes-Benz Canada, Inc.
98 Vanderhoof Avenue
Toronto, Ontario M4G 4C9
Reporting safety defects
For the USA only:
The following text is published as required of
manufacturers under Title 49, Code of U.S.
Federal Regulations, Part 575 pursuant to the
“National Traffic and Motor Vehicle Safety Act
of 1966”.
Reporting safety defects
If you believe that your vehicle has a defect
which could cause a crash or could cause
injury or death, you should immediately
inform the National Highway Traffic Safety
Administration (NHTSA) in addition to
notifying Mercedes-Benz USA, LLC.
If NHTSA receives similar complaints, it may
open an investigation, and if it finds that a
safety defect exists in a group of vehicles, it
may order a recall and remedy campaign.
However, NHTSA cannot become involved in
individual problems between you, your
dealer, or Mercedes-Benz USA, LLC.
To contact NHTSA, you may call the Vehicle
Safety Hotline toll-free at 1-888-327-4236
(TTY: 1-800-424-9153); go to
www.safercar.gov ; or write to:
Administrator, NHTSA Headquarters,
1200 New Jersey Avenue, SE, West Building,
Washington, DC 20590.
You can also obtain other information about
motor vehicle safety from
www.safercar.gov .
Vehicle data recording
Information regarding electronic
recording devices
( Including notice pursuant to California Code
§ 9951)
Please note that your vehicle is equipped with
devices that can record vehicle systems data
and, if equipped with the Tele Aid system, may
transmit some data in certain accidents.
This information helps, for example, to
diagnose vehicle systems after a collision and
to continuously improve vehicle safety.
Daimler may access the information and
share it with others
R for safety research or vehicle diagnosis
purposes
R with the consent of the vehicle owner or
lessee
R in response to an official request by law
enforcement or other government agency
R for use in dispute resolution involving
Daimler, its affiliates or sales/service
organization and/or
R as otherwise required or permitted by law
Please check the Tele Aid subscription
service agreement for details regarding the
information that may be recorded or
transmitted via that system.
24Introduction164_AKB; 7; 31, en-USd2ureepe,Version: 2.11.8.12009-09-11T12:07:36+02:00 - Seite 24
Page 44 of 368
Rregardless of whether the front passenger
seat is occupied
R in certain vehicle rollovers, if the system
determines that air bag deployment can
offer additional protection to that provided
by the seat belt
Window curtain air bags : are not deployed
in impacts which do not exceed the system’s
deployment threshold.
Window curtain air bags : deploy in the area
indicated by the arrows.
Occupant Classification System
The Occupant Classification System (OCS) is
standard equipment in USA.
The OCS activates or deactivates the front
passenger front air bag automatically. The
respective status is based on the classified
occupant weight category determined by
weight sensor readings from the front
passenger seat.
The system does not deactivate
R the front passenger side impact air bag
R the window curtain air bag
R the Emergency Tensioning Devices (ETDs)
To be classified correctly, the front passenger
must sit
R with the seat belt properly fastened
R in a position that is as upright as possible
with the back against the seat backrest
R with the feet on the floor
If the occupant’s weight is transferred to
another object in the vehicle (e.g. by leaning
on armrests), the OCS may not be able to
properly approximate the occupant’s weight
category.
Furthermore, the occupant weight may
appear to increase or decrease due to the
following:
R objects hanging on the seat
R objects lodged underneath the seat
R objects stuffed between the seat and
middle console
R objects stuffed between the seat and door
R other passengers pushing on the seat
R objects applying pressure to the back of
the seat
Always make sure the seat has clearance
in all directions at all times.
If your seat, including the trim cover and
cushion, needs to be serviced in any way, take
the vehicle to an authorized Mercedes-Benz
Center.
Only seat accessories approved by
Mercedes-Benz may be used.
Both the driver and the front passenger
should always use the 42
indicator lamp as an indication of whether or
not the front passenger is properly
positioned.GWarning!
If the 42 indicator lamp
illuminates when an adult or someone larger
than a small individual is in the front
passenger seat, have the front passenger
reposition himself or herself in the seat until
the 42 indicator lamp goes out,
or check whether objects are caught under or
around the seat.
In the event of a collision, the air bag control
unit will not allow front passenger front air bag
deployment when the OCS has classified the
front passenger seat occupant as weighting
as much as or less than a typical 12-month-
old child in a standard child restraint or if the
front passenger seat is classified as being
empty.
42Occupant safetySafety and security
164_AKB; 7; 31, en-USd2ureepe,Version: 2.11.8.12009-09-11T12:07:36+02:00 - Seite 42
Page 69 of 368
iIf the alarm stays on for more than
30 seconds, the Tele Aid system initiates a
call to the Response Center automatically.
The Tele Aid system will initiate the call
provided that
Ryou have subscribed to the Tele Aid
service
Rthe Tele Aid service has been activated
properly
Rthe necessary mobile phone, power
supply and GPS coverage are available
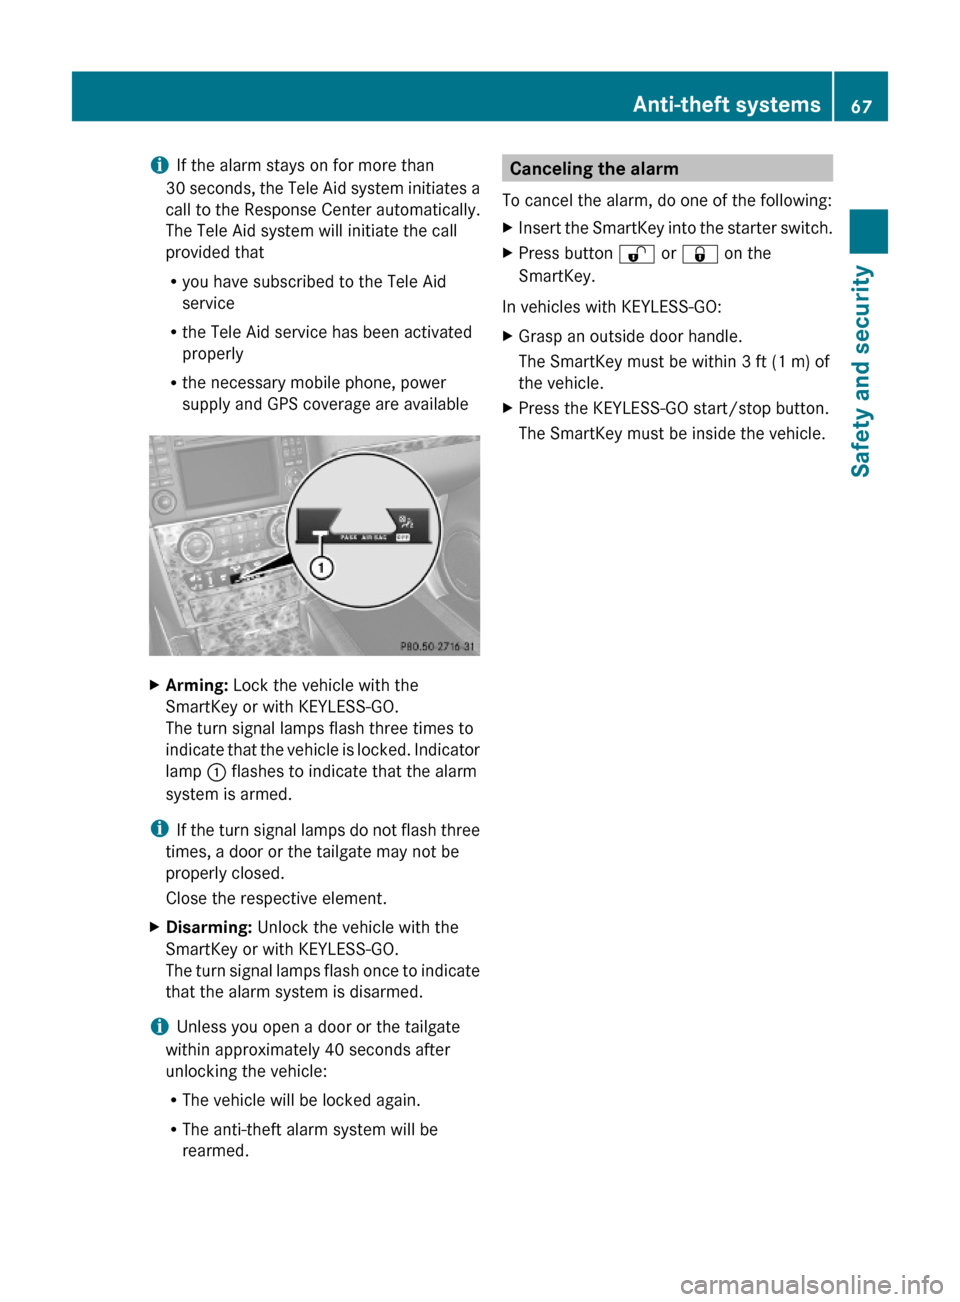
XArming: Lock the vehicle with the
SmartKey or with KEYLESS-GO.
The turn signal lamps flash three times to
indicate that the vehicle is locked. Indicator
lamp : flashes to indicate that the alarm
system is armed.
iIf the turn signal lamps do not flash three
times, a door or the tailgate may not be
properly closed.
Close the respective element.
XDisarming: Unlock the vehicle with the
SmartKey or with KEYLESS-GO.
The turn signal lamps flash once to indicate
that the alarm system is disarmed.
iUnless you open a door or the tailgate
within approximately 40 seconds after
unlocking the vehicle:
RThe vehicle will be locked again.
RThe anti-theft alarm system will be
rearmed.
Canceling the alarm
To cancel the alarm, do one of the following:
XInsert the SmartKey into the starter switch.XPress button % or & on the
SmartKey.
In vehicles with KEYLESS-GO:
XGrasp an outside door handle.
The SmartKey must be within 3 ft (1 m) of
the vehicle.
XPress the KEYLESS-GO start/stop button.
The SmartKey must be inside the vehicle.
Anti-theft systems67Safety and security164_AKB; 7; 31, en-USd2ureepe,Version: 2.11.8.12009-09-11T12:07:36+02:00 - Seite 67Z
Page 107 of 368
XMake sure the KEYLESS-GO start/stop
button is inserted in the starter switch
( Y page 80).
i
To start the engine with the SmartKey
instead of the KEYLESS-GO function,
remove the KEYLESS-GO start/stop button
from the starter switch. Proceed as
described in “With SmartKey”
( Y page 104).
XDepress the brake pedal during the starting
procedure.XDo not depress the accelerator pedal.XGasoline engine: Press the KEYLESS-GO
start/stop button once.
The engine starts automatically.XDiesel engine: Press the KEYLESS-GO
start/stop button once.
The engine preglows and starts
automatically.
i If the engine is at operating temperature,
the time the engine needs to preglow is
reduced.
Starting difficulties
! Remember that extended starting
attempts can drain the battery.
The engine does not start. You can hear
the starter.
There could be a malfunction in the engine
electronics or in the fuel supply system.
Carry out the following steps:
XIf you are starting the engine with the
SmartKey: Turn the SmartKey in the starter
switch to position 0 and repeat the starting
procedure.XIf you are starting the engine with KEYLESS-
GO: Close any doors that may be open to
allow for better detection of the SmartKey.
or
XRemove the KEYLESS-GO start/stop
button from the starter switch.XStart the engine with the SmartKey as radio
signals from another source may be
interfering with the KEYLESS-GO function.XRepeat the starting procedure.
If the engine does not start after several
starting attempts:
XContact an authorized Mercedes-Benz
Center or call Roadside Assistance.
The engine does not start. You cannot
hear the starter.
The battery may not be charged sufficiently.
XGet a jump start ( Y page 336).
If the engine will not start despite a jump
start:
XContact an authorized Mercedes-Benz
Center or call Roadside Assistance.
The starter has been exposed to excessive
temperatures.
XLet the starter cool for about 2 minutes.XRepeat the starting procedure.
If the engine does not start after several
starting attempts:
XContact an authorized Mercedes-Benz
Center or call Roadside Assistance.
Driving off
GWarning!
On slippery road surfaces, never downshift in
order to obtain braking action. This could
result in drive wheel slip and reduced vehicle
control. Your vehicle’s ABS will not prevent
this type of loss of control.
! Do not run a cold engine at high engine
speeds. Running a cold engine at high
engine speeds may shorten the service life
of the engine. This is not covered by the
Mercedes-Benz Limited Warranty.
ML 63 AMG: At engine temperatures below
68‡ (20†), the engine’s maximum speed
Driving and parking105Controls in detail164_AKB; 7; 31, en-USd2ureepe,Version: 2.11.8.12009-09-11T12:07:36+02:00 - Seite 105Z
Page 121 of 368
Tachometer
The red marking on the tachometer
(Y page 29) denotes excessive engine speed.
! Avoid driving at excessive engine speeds,
as it may result in serious engine damage
that is not covered by the Mercedes-Benz
Limited Warranty.
To help protect the engine, the fuel supply is
interrupted if the engine is operated within
the red marking.
Control system
Introduction
The control system is activated as soon as the
starter switch is in position 1 (Y page 79).
The control system enables you to call up
information about your vehicle and to change
vehicle settings.
For example, you can use the control system
to find out when your vehicle is next due for
maintenance service, to set the language for
messages in the instrument cluster display,
and much more.
GWarning!
A driver’s attention to the road and traffic
conditions must always be his/her primary
focus when driving.
For your safety and the safety of others,
selecting features through the multifunction
steering wheel should only be done by the
driver when traffic and road conditions permit
it to be done safely.
Bear in mind that at a speed of just 30 mph
(approximately 50 km/h), your vehicle is
covering a distance of 44 feet (approximately
14 m) every second.
GWarning!
HYBRID vehicles: It is imperative that you read
the HYBRID Supplemental Operating
Instructions included in your vehicle literature
portfolio. You may otherwise not recognize
potential danger.
The control system relays information to the
multifunction display.
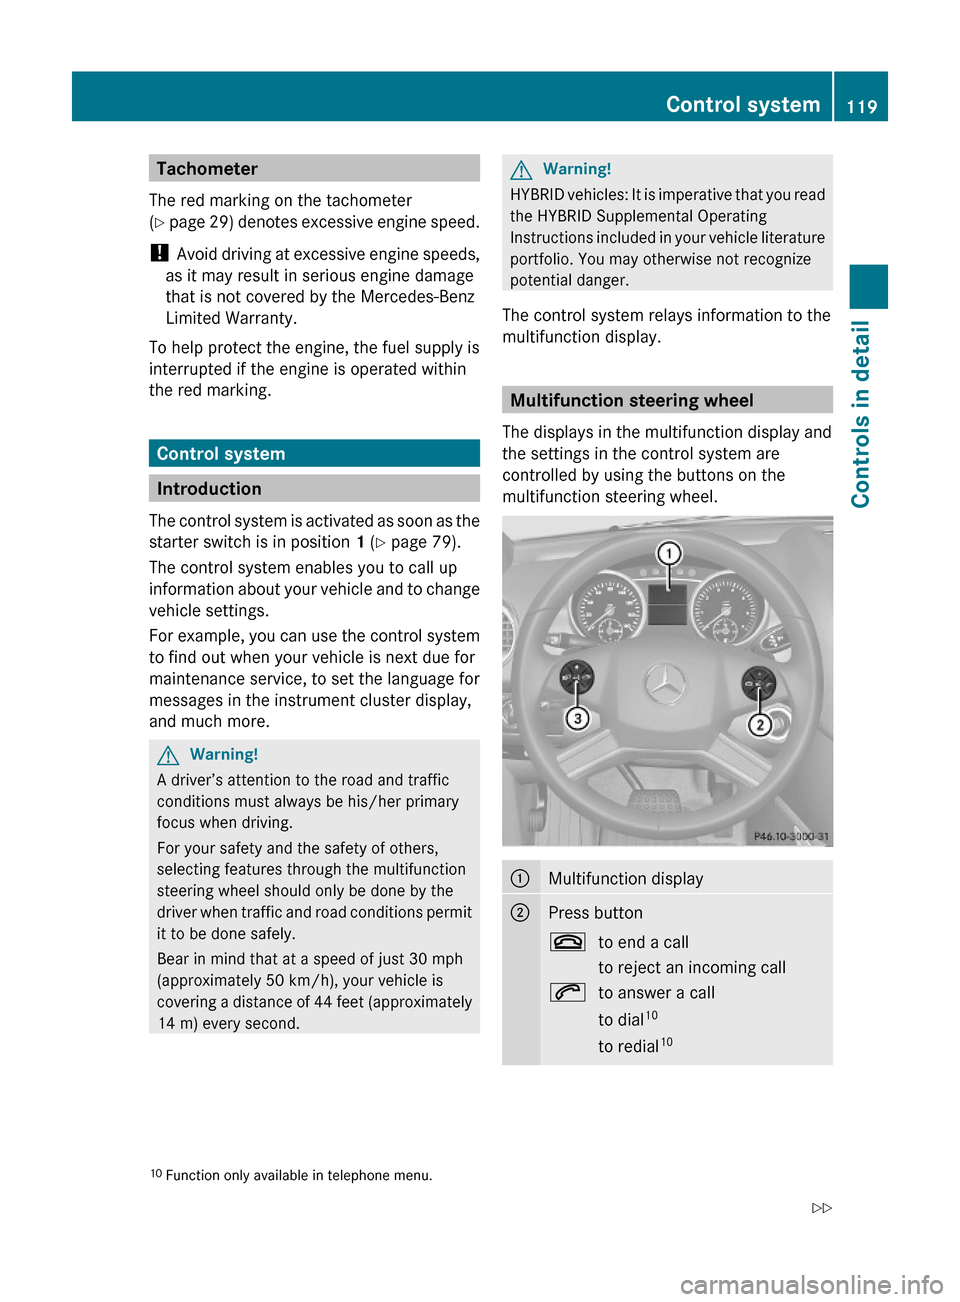
Multifunction steering wheel
The displays in the multifunction display and
the settings in the control system are
controlled by using the buttons on the
multifunction steering wheel.
:Multifunction display;Press button~to end a call
to reject an incoming call
6to answer a call
to dial10
to redial10
10Function only available in telephone menu.Control system119Controls in detail164_AKB; 7; 31, en-USd2ureepe,Version: 2.11.8.12009-09-11T12:07:36+02:00 - Seite 119Z
Page 124 of 368
Function?Audio/DVD menu (Y page 126)ANavigation menu (Y page 127)BAIRMATIC/Compass menu
(Y page 127)
CDistronic menu (Y page 128)DVehicle status message
memory15 menu (Y page 128)
ESettings menu (Y page 129)FVehicle configuration menu
(Y page 137)
GTrip computer menu (Y page 138)HTelephone menu (Y page 139)
Standard display menu
Standard display
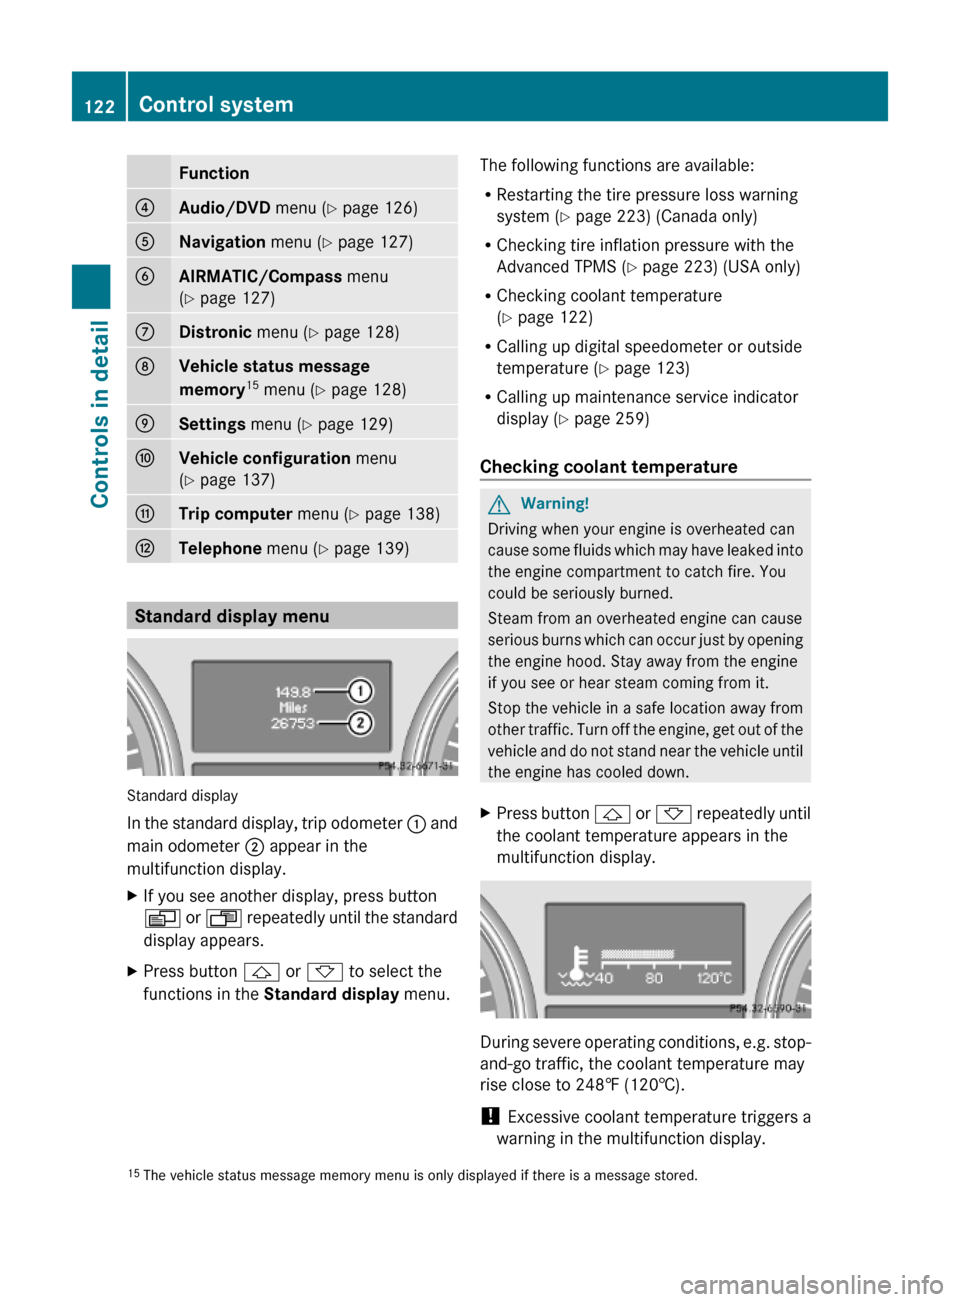
In the standard display, trip odometer : and
main odometer ; appear in the
multifunction display.
XIf you see another display, press button
V or U repeatedly until the standard
display appears.
XPress button & or * to select the
functions in the Standard display menu.
The following functions are available:
RRestarting the tire pressure loss warning
system (Y page 223) (Canada only)
RChecking tire inflation pressure with the
Advanced TPMS (Y page 223) (USA only)
RChecking coolant temperature
(Y page 122)
RCalling up digital speedometer or outside
temperature (Y page 123)
RCalling up maintenance service indicator
display (Y page 259)
Checking coolant temperature
GWarning!
Driving when your engine is overheated can
cause some fluids which may have leaked into
the engine compartment to catch fire. You
could be seriously burned.
Steam from an overheated engine can cause
serious burns which can occur just by opening
the engine hood. Stay away from the engine
if you see or hear steam coming from it.
Stop the vehicle in a safe location away from
other traffic. Turn off the engine, get out of the
vehicle and do not stand near the vehicle until
the engine has cooled down.
XPress button & or * repeatedly until
the coolant temperature appears in the
multifunction display.
During severe operating conditions, e.g. stop-
and-go traffic, the coolant temperature may
rise close to 248‡ (120†).
! Excessive coolant temperature triggers a
warning in the multifunction display.
15The vehicle status message memory menu is only displayed if there is a message stored.122Control systemControls in detail
164_AKB; 7; 31, en-USd2ureepe,Version: 2.11.8.12009-09-11T12:07:36+02:00 - Seite 122
Page 128 of 368
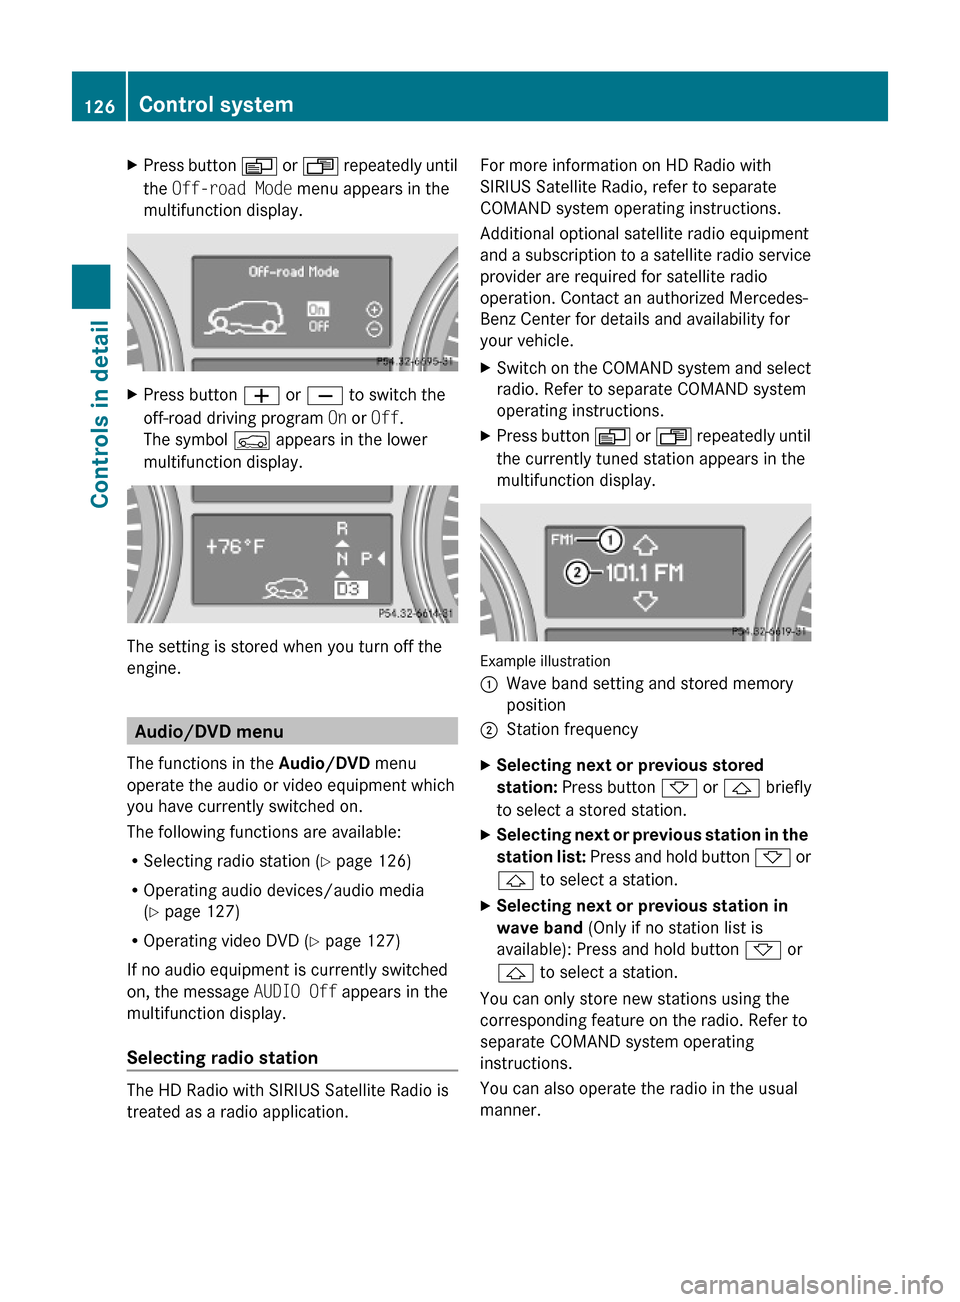
XPress button V or U repeatedly until
the Off-road Mode menu appears in the
multifunction display.
XPress button W or X to switch the
off-road driving program On or Off.
The symbol Ç appears in the lower
multifunction display.
The setting is stored when you turn off the
engine.
Audio/DVD menu
The functions in the Audio/DVD menu
operate the audio or video equipment which
you have currently switched on.
The following functions are available:
RSelecting radio station (Y page 126)
ROperating audio devices/audio media
(Y page 127)
ROperating video DVD (Y page 127)
If no audio equipment is currently switched
on, the message AUDIO Off appears in the
multifunction display.
Selecting radio station
The HD Radio with SIRIUS Satellite Radio is
treated as a radio application.
For more information on HD Radio with
SIRIUS Satellite Radio, refer to separate
COMAND system operating instructions.
Additional optional satellite radio equipment
and a subscription to a satellite radio service
provider are required for satellite radio
operation. Contact an authorized Mercedes-
Benz Center for details and availability for
your vehicle.
XSwitch on the COMAND system and select
radio. Refer to separate COMAND system
operating instructions.
XPress button V or U repeatedly until
the currently tuned station appears in the
multifunction display.
Example illustration
:Wave band setting and stored memory
position
;Station frequencyXSelecting next or previous stored
station: Press button * or & briefly
to select a stored station.
XSelecting next or previous station in the
station list: Press and hold button * or
& to select a station.
XSelecting next or previous station in
wave band (Only if no station list is
available): Press and hold button * or
& to select a station.
You can only store new stations using the
corresponding feature on the radio. Refer to
separate COMAND system operating
instructions.
You can also operate the radio in the usual
manner.
126Control systemControls in detail
164_AKB; 7; 31, en-USd2ureepe,Version: 2.11.8.12009-09-11T12:07:36+02:00 - Seite 126
Page 142 of 368
separate COMAND system operating
instructions.
XSwitch on the COMAND system.
Refer to separate COMAND system
operating instructions.
XPress button U or V repeatedly until
the message TEL appears in the
multifunction display.
One of the following messages will appear
in the multifunction display:
RNo Service: No network is available.
RBluetooth Ready: The telephone has
not been connected to the COMAND
system via Bluetooth® yet.
XConnect the telephone to the
COMAND system via Bluetooth®.
RReady or name of the network provider
(if available): The telephone has found a
network and is ready for use. You can
operate it using the control system.
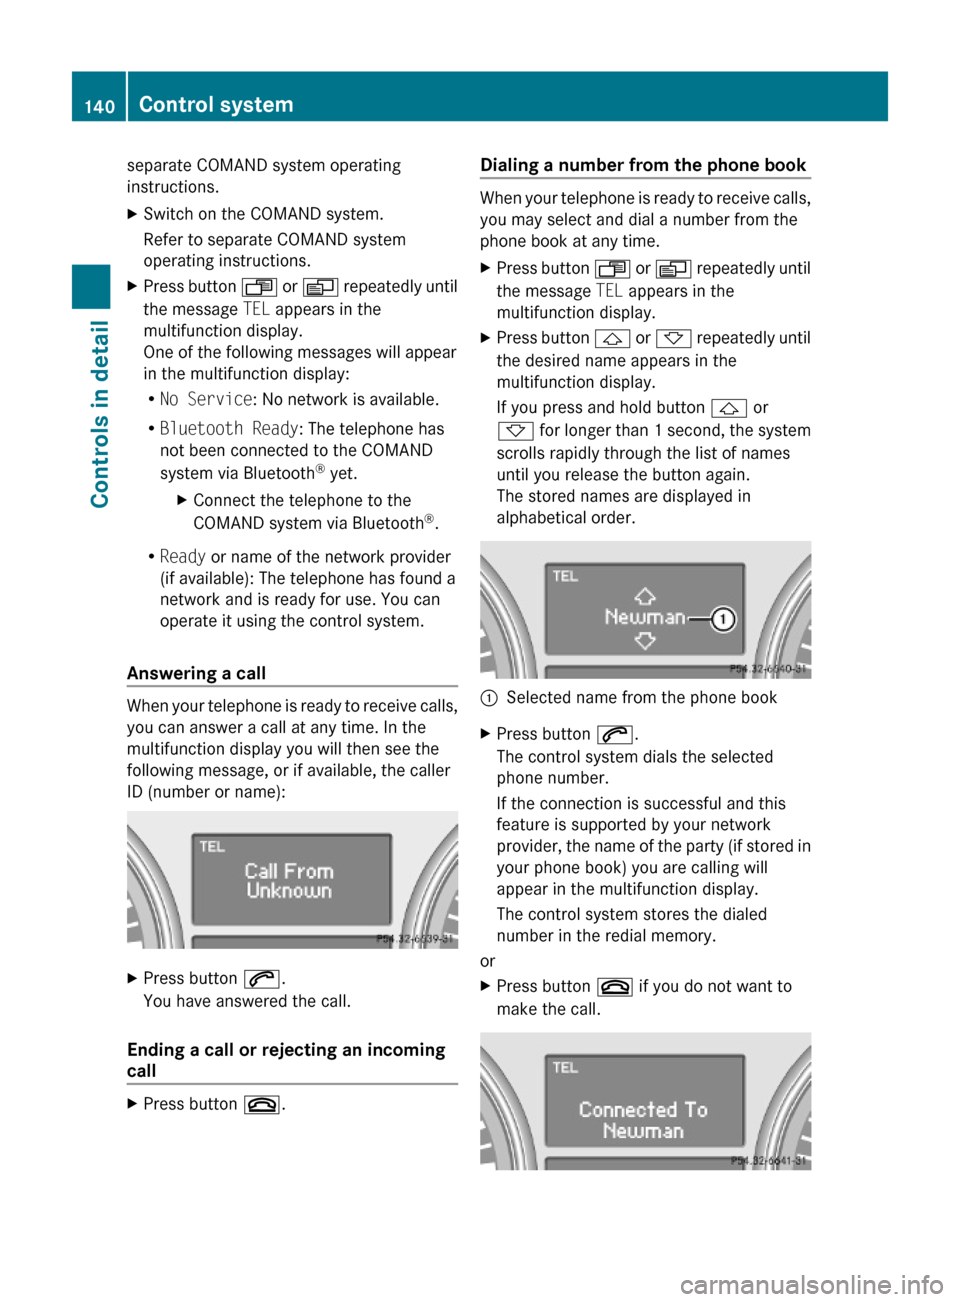
Answering a call
When your telephone is ready to receive calls,
you can answer a call at any time. In the
multifunction display you will then see the
following message, or if available, the caller
ID (number or name):
XPress button 6.
You have answered the call.
Ending a call or rejecting an incoming
call
XPress button ~.Dialing a number from the phone book
When your telephone is ready to receive calls,
you may select and dial a number from the
phone book at any time.
XPress button U or V repeatedly until
the message TEL appears in the
multifunction display.
XPress button & or * repeatedly until
the desired name appears in the
multifunction display.
If you press and hold button & or
* for longer than 1 second, the system
scrolls rapidly through the list of names
until you release the button again.
The stored names are displayed in
alphabetical order.
:Selected name from the phone bookXPress button 6.
The control system dials the selected
phone number.
If the connection is successful and this
feature is supported by your network
provider, the name of the party (if stored in
your phone book) you are calling will
appear in the multifunction display.
The control system stores the dialed
number in the redial memory.
or
XPress button ~ if you do not want to
make the call.
140Control systemControls in detail
164_AKB; 7; 31, en-USd2ureepe,Version: 2.11.8.12009-09-11T12:07:36+02:00 - Seite 140
Page 195 of 368
storing objects in the vehicle. Put luggage or
cargo in the cargo compartment if possible.
Do not pile luggage or cargo higher than the
seat backrests.
If so equipped, always use the cargo net when
transporting cargo. The cargo net cannot
secure hard or heavy objects.
Parcel nets cannot secure hard or heavy
objects.
Keep compartment lids closed. This will help
to prevent stored objects from being thrown
about and injuring vehicle occupants during
Rbraking
Rvehicle maneuvers
Ran accident
Glove box
Depending on vehicle equipment, an AUX
socket or a media interface is located in the
glove box. For information on Audio AUX
mode or on media interface, see separate
COMAND system operating instructions.
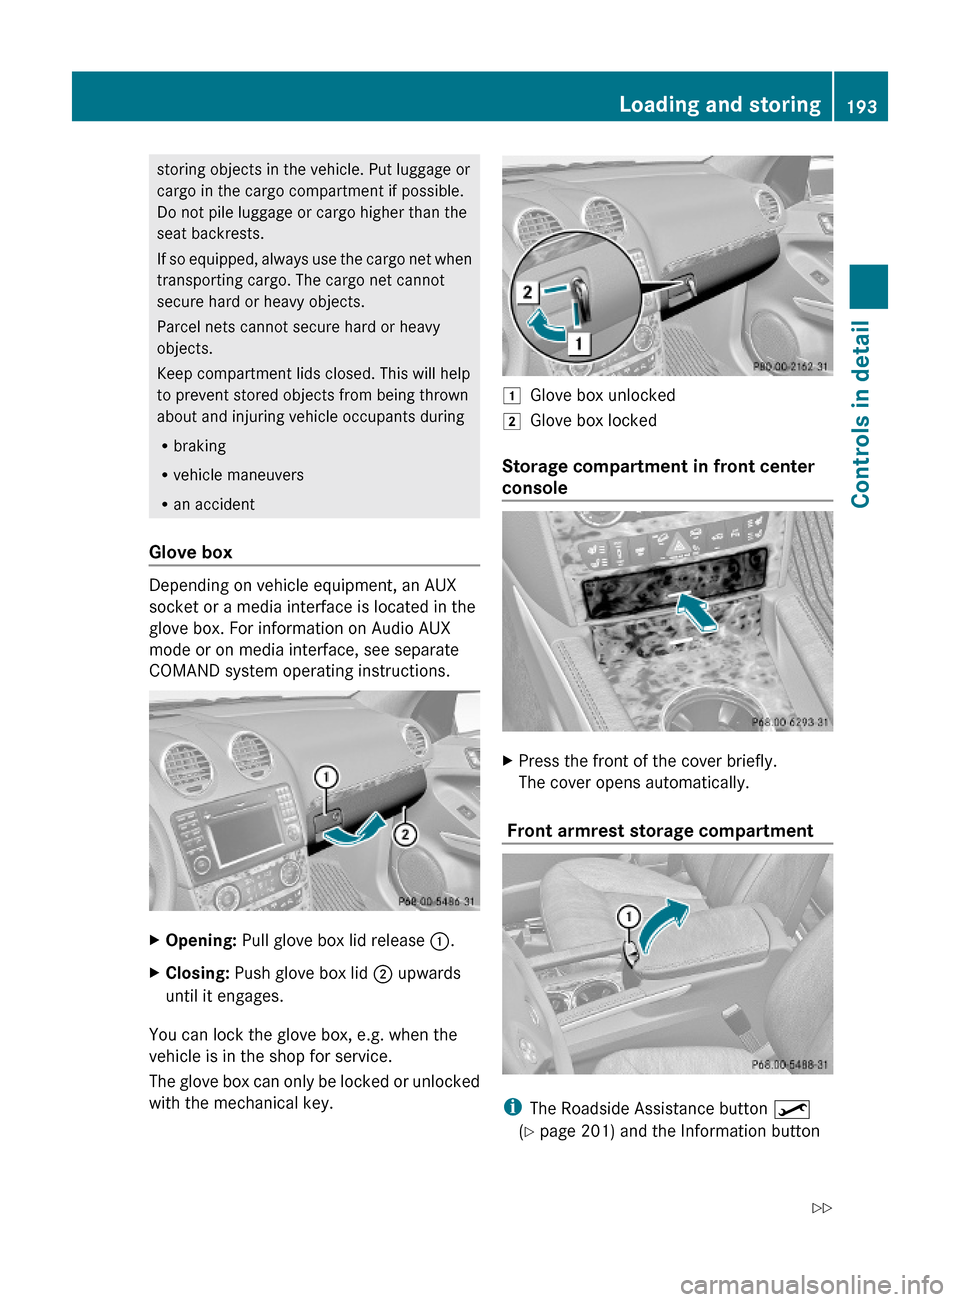
XOpening: Pull glove box lid release :.XClosing: Push glove box lid ; upwards
until it engages.
You can lock the glove box, e.g. when the
vehicle is in the shop for service.
The glove box can only be locked or unlocked
with the mechanical key.
1Glove box unlocked2Glove box locked
Storage compartment in front center
console
XPress the front of the cover briefly.
The cover opens automatically.
Front armrest storage compartment
iThe Roadside Assistance button º
(Y page 201) and the Information button
Loading and storing193Controls in detail164_AKB; 7; 31, en-USd2ureepe,Version: 2.11.8.12009-09-11T12:07:36+02:00 - Seite 193Z
Page 201 of 368
XStart the engine.
RThe temperature of the DC/AC inverter is
temporarily too high.
XPull the plug of the small device out of
115V AC socket : and plug it in again
after waiting a few minutes.
R Some small devices have a continuous
power rating of less than 150 W but a very
high switch-on current. Such devices will
not operate. When connecting such a
device, 115V AC socket : will not provide
power.
If LED ; still does not come on, contact an
authorized Mercedes-Benz Center.
Tele Aid
! In order to activate the Tele Aid system, a
subscriber agreement must be completed.
To ensure your system is activated and
operational, please press Information
button E to perform the acquaintance
call. Failure to complete either of these
steps may result in a system that is not
activated.
If you have any questions regarding
activation, please call the Customer
Assistance Center at
1-800-FOR-MERCedes (1-800-367-6372)
(USA only) or 1-888-923-8367 (Canada
only).
Shortly after the completion of your Tele Aid
acquaintance call, you will receive a user ID
and password in the mail. You may use this
password to access the Tele Aid section in
“Owner’s Online” at www.mbusa.com (USA
only). The “My Tele Aid” section will give you
access to account information, remote door
unlock and more.
The Tele Aid system is available if
R it has been activated and is operational.
Activation requires a subscription for
monitoring services, connection and
cellular air time
R vehicle battery power is available
R the relevant cellular phone network and
GPS signals are available and pass the
information on to the Customer Assistance
Center
i Location of the vehicle on a map is only
possible if the vehicle is able to receive
signals from the GPS satellite network and
pass the information on to the Customer
Assistance Center.
The Tele Aid system
(Telematic Alarm Identification on Demand)
The Tele Aid system consists of three types
of response:
R Automatic and manual emergency
R Roadside Assistance
R Information
To adjust the speaker volume during a Tele
Aid call do the following:
XPress button W or X on the
multifunction steering wheel.
or
XUse the adjustment button on your
COMAND system.
Be sure to check “Owner’s Online” at
www.mbusa.com (USA only) for more
information and a description of all available
features.
System self-test
The system performs a self-test after you
have switched on the ignition.
GWarning!
A malfunction in the system has been
detected if any or all of the following
conditions occur:
Useful features199Controls in detail164_AKB; 7; 31, en-USd2ureepe,Version: 2.11.8.12009-09-11T12:07:36+02:00 - Seite 199Z