stop start MERCEDES-BENZ R-Class 2011 W251 Owner's Manual
[x] Cancel search | Manufacturer: MERCEDES-BENZ, Model Year: 2011, Model line: R-Class, Model: MERCEDES-BENZ R-Class 2011 W251Pages: 364, PDF Size: 16.5 MB
Page 10 of 364
Towing a trailer .............................. 193
Wet road surface ........................... 170
Winter ............................................ 172
DVD audio (on-board computer) ...... 203
E
EASY-ENTRY feature ......................... 110
3rd row of seats ............................. 105
Activating/deactivating (on-
board computer) ............................ 209
EASY-EXIT feature ............................. 110
3rd row of seats ............................. 105
Crash-responsive ........................... 111
EBD (Electronic Brake force
Distribution) Display message ............................ 220
Function/notes ................................ 70
Electrical fuses
see Fuses
Electronic Brake-force
Distribution) see EBD
Electronic Stability Program
see ESP ®
Electronic Traction Support
see 4ETS
Emergency call
see mbrace
Emergency release
Fuel filler flap ................................. 162
Vehicle ............................................. 82
Emergency running mode
Automatic transmission .................160
Emergency spare wheel
Storage location ............................ 295
Stowing .......................................... 295
Emergency tensioning device
Function ........................................... 58
Safety guidelines ............................. 37
Emissions purification
Service and warranty information ....19
Engine
Irregular running ............................ 154
Starting problems ..........................154
Starting the engine with the key ....150
Starting with KEYLESS GO .............151
Switching off .................................. 152
Warning lamp (engine
diagnostics) ................................... 242
Engine electronics
Malfunction .................................... 154
Engine emergency stop .................... 317
Engine number .................................. 350
Engine oil Adding ........................................... 280
Checking the oil level ..................... 279
Display message ............................ 226
Lubricant additives ........................355
Notes about oil grades ................... 354
Viscosity ........................................ 355
ESP ®
(Electronic Stability
Program) Activating/deactivating ...................69
Display message ............................ 214
Important safety information ...........68
Trailer stabilization ........................... 70
Warning lamp ................................. 240
Exhaust check ................................... 169
Exhaust tail pipe (cleaning
instructions) ...................................... 287
Exterior lighting see Lights
Exterior mirrors
Adjusting ....................................... 112
Dipping (automatic) .......................113
Folding in/out (automatically) .......112
Folding in/out (electrically) ...........112
Folding in when locking (on-board
computer) ...................................... 209
Out of position ............................... 113
Setting ........................................... 112
Storing settings (memory
function) ........................................ 114
Storing the parking position ..........113
Exterior view ........................................ 26
F
Filling capacity see Technical data
First-aid kit ......................................... 293
8IndexBA 251 USA, CA Edition A 2011; 1; 3, en-USd2sboikeVersion: 3.0.3.52010-04-16T14:31:55+02:00 - Seite 8
Page 11 of 364
Flat tireChanging a wheel/mounting the
spare wheel ................................... 301
MOExtended run-flat system .........307
Preparing the vehicle .....................296
Raising the vehicle .........................303
TIREFIT kit ...................................... 297
Floormat ............................................. 276
Front fog lamp (display
message) ............................................ 223
Fuel Additives ........................................ 353
Notes ............................................. 352
Premium-grade unleaded gasoline . 352
Refueling ........................................ 160
Specifications ................................ 352
Troubleshooting ............................. 164
Fuel consumption
Current (on-board computer) .........211
Notes ............................................. 168
Fuel filler cap (display message) ..... 227
Fuel filler flap Emergency release ........................162
Opening/closing ............................ 162
Fuel filter (display message) ............ 227
Fuel level Calling up the range (on-board
computer) ...................................... 211
Fuses
Dashboard fuse box .......................316
Engine emergency stop .................317
Fuse allocation chart .....................315
Fuse box in the cargo
compartment ................................. 316
Fuse box in the engine
compartment ................................. 316
Notes ............................................. 315
G
Garage door opener Clearing the memory .....................275
Notes ............................................. 272
Opening/closing the garage door ..275
Programming the remote control ...273
Gear or selector lever (cleaning
guidelines) ......................................... 288
Genuine Mercedes-Benz parts ......... 348
Genuine wood trim and trim strips
(cleaning instructions) ...................... 288
Glove box ........................................... 247
GTW (Gross Trailer Weight)
(definition) ......................................... 341
H
Headlamp cleaning system .............. 119
Adding washer fluid .......................281
Notes ............................................. 357
Headlamp delayed switch-off
see Delayed switch-off, exterior lighting
Headlamp mode (daytime driving)
see Daytime running lamps
Headlamps
Cleaning ......................................... 286
Misting up ...................................... 120
Head restraint
Adjusting (electrically) ...................101
Head restraints
Adjusting (manually) ......................101
Adjusting (rear) .............................. 102
Installing/removing (rear) ..............102
Luxury ............................................ 101
see NECK-PRO head restraints/
NECK-PRO luxury head restraints
Heating
see Climate control
High beam flasher ............................. 119
Hill start assist .................................. 152
Hood Closing ........................................... 279
Opening ......................................... 278
Hydroplaning ..................................... 171
I
Immobilizer .......................................... 71
Indicator and warning lamps ABS ................................................ 239
Brakes ........................................... 236
DISTRONIC .................................... 243
Engine diagnostics .........................242
ESP ®
.............................................. 240
Fuel tank ........................................ 242
Reserve fuel ................................... 242
Seat belt ........................................ 237
Index9BA 251 USA, CA Edition A 2011; 1; 3, en-USd2sboikeVersion: 3.0.3.52010-04-16T14:31:55+02:00 - Seite 9
Page 29 of 364
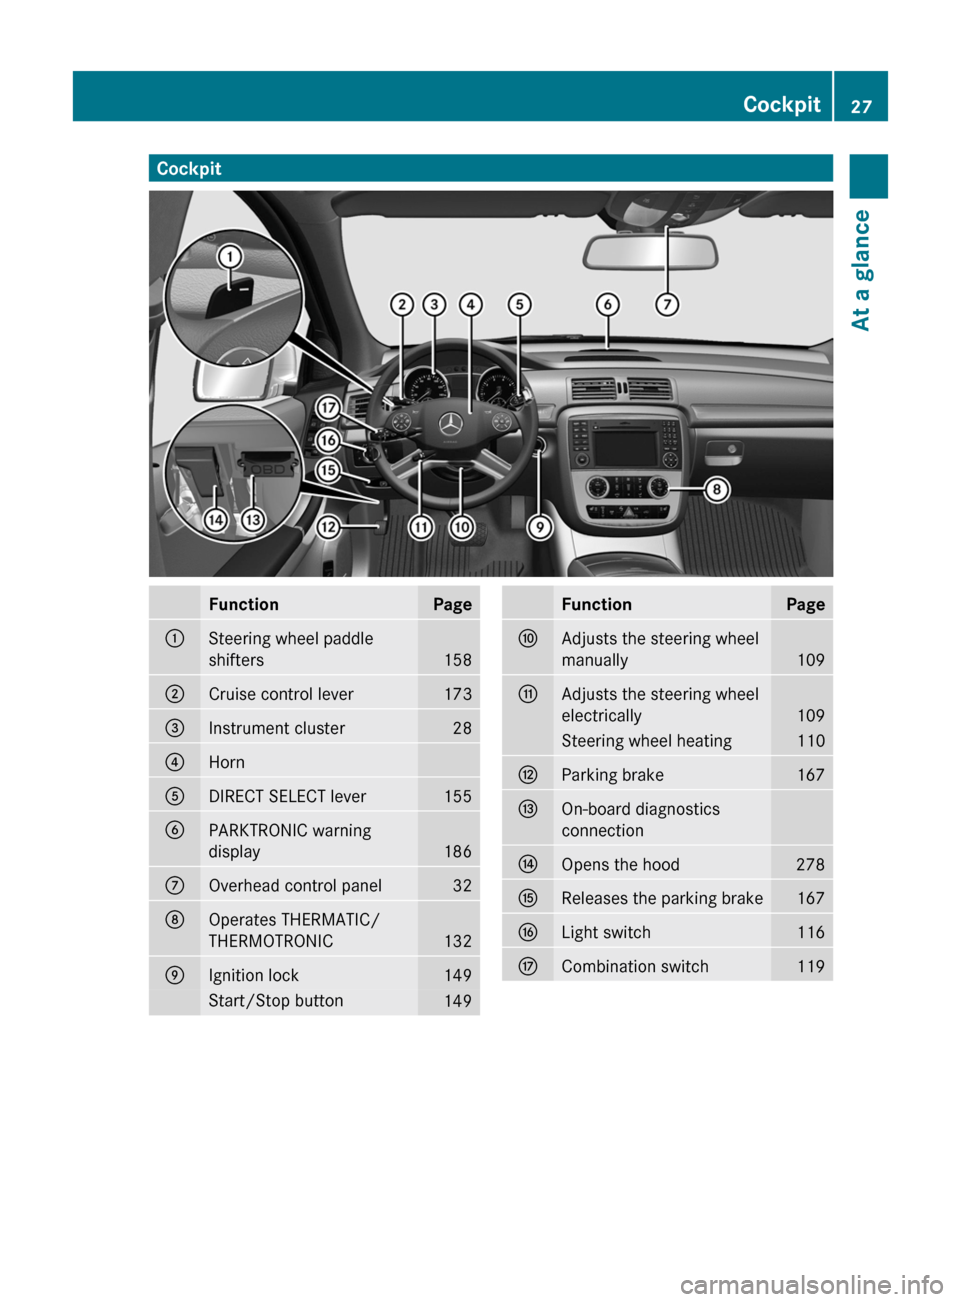
CockpitFunctionPage:Steering wheel paddle
shifters
158
;Cruise control lever173=Instrument cluster28?HornADIRECT SELECT lever155BPARKTRONIC warning
display
186
COverhead control panel32DOperates THERMATIC/
THERMOTRONIC
132
EIgnition lock149Start/Stop button149FunctionPageFAdjusts the steering wheel
manually
109
GAdjusts the steering wheel
electrically
109
Steering wheel heating110HParking brake167IOn-board diagnostics
connectionJOpens the hood278KReleases the parking brake167LLight switch116MCombination switch119Cockpit27At a glanceBA 251 USA, CA Edition A 2011; 1; 3, en-USd2sboikeVersion: 3.0.3.52010-04-16T14:31:55+02:00 - Seite 27
Page 47 of 364
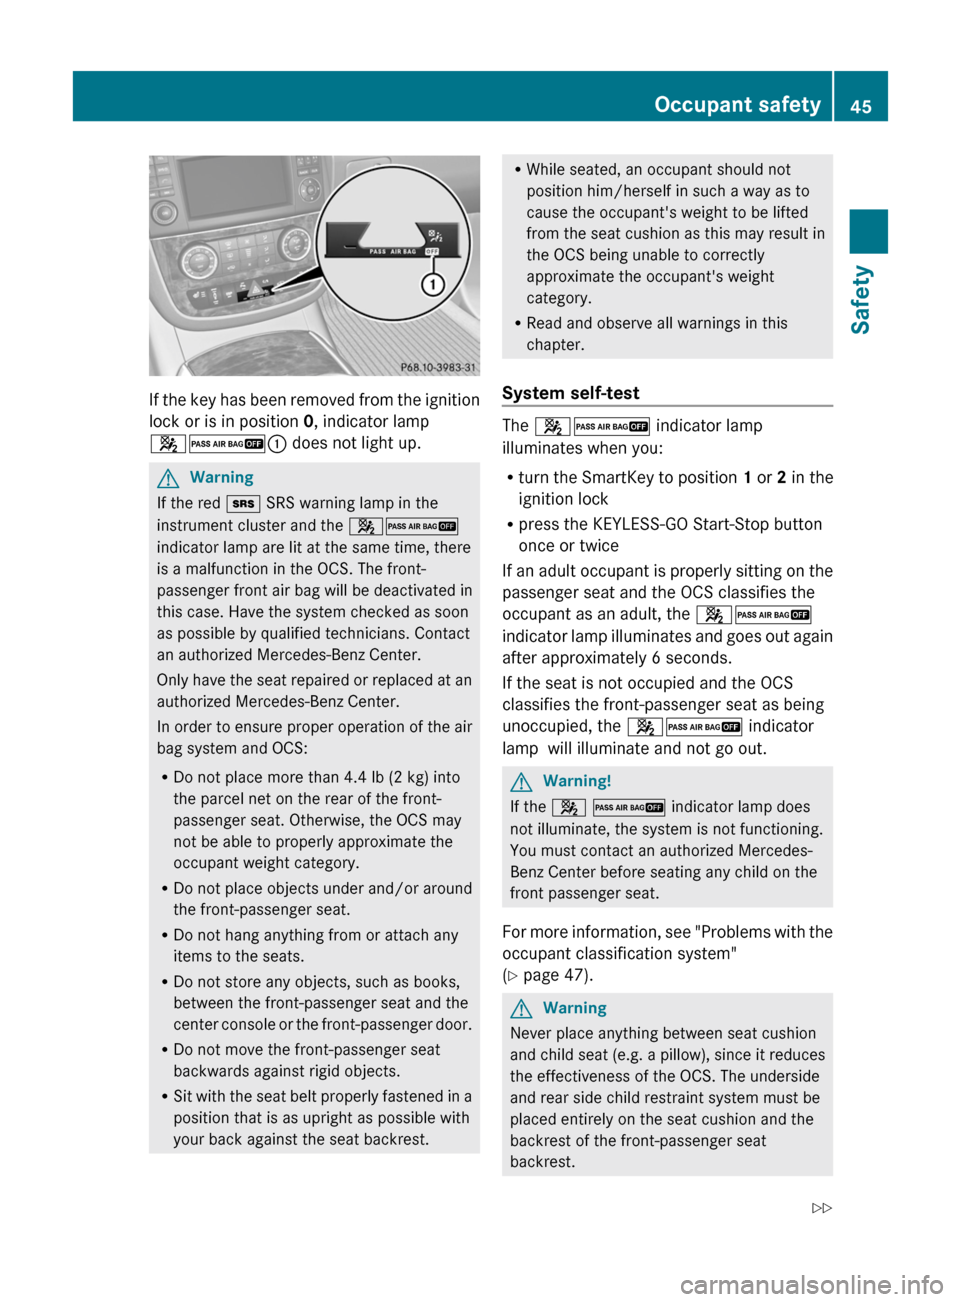
If the key has been removed from the ignition
lock or is in position 0, indicator lamp
42 : does not light up.
GWarning
If the red + SRS warning lamp in the
instrument cluster and the 42
indicator lamp are lit at the same time, there
is a malfunction in the OCS. The front-
passenger front air bag will be deactivated in
this case. Have the system checked as soon
as possible by qualified technicians. Contact
an authorized Mercedes-Benz Center.
Only have the seat repaired or replaced at an
authorized Mercedes-Benz Center.
In order to ensure proper operation of the air
bag system and OCS:
R Do not place more than 4.4 lb (2 kg) into
the parcel net on the rear of the front-
passenger seat. Otherwise, the OCS may
not be able to properly approximate the
occupant weight category.
R Do not place objects under and/or around
the front-passenger seat.
R Do not hang anything from or attach any
items to the seats.
R Do not store any objects, such as books,
between the front-passenger seat and the
center console or the front-passenger door.
R Do not move the front-passenger seat
backwards against rigid objects.
R Sit with the seat belt properly fastened in a
position that is as upright as possible with
your back against the seat backrest.
R While seated, an occupant should not
position him/herself in such a way as to
cause the occupant's weight to be lifted
from the seat cushion as this may result in
the OCS being unable to correctly
approximate the occupant's weight
category.
R Read and observe all warnings in this
chapter.
System self-test
The 42 indicator lamp
illuminates when you:
R turn the SmartKey to position 1 or 2 in the
ignition lock
R press the KEYLESS-GO Start-Stop button
once or twice
If an adult occupant is properly sitting on the
passenger seat and the OCS classifies the
occupant as an adult, the 42
indicator lamp illuminates and goes out again
after approximately 6 seconds.
If the seat is not occupied and the OCS
classifies the front-passenger seat as being
unoccupied, the 42 indicator
lamp will illuminate and not go out.
GWarning!
If the 4 2 indicator lamp does
not illuminate, the system is not functioning.
You must contact an authorized Mercedes-
Benz Center before seating any child on the
front passenger seat.
For more information, see "Problems with the
occupant classification system"
( Y page 47).
GWarning
Never place anything between seat cushion
and child seat (e.g. a pillow), since it reduces
the effectiveness of the OCS. The underside
and rear side child restraint system must be
placed entirely on the seat cushion and the
backrest of the front-passenger seat
backrest.
Occupant safety45SafetyBA 251 USA, CA Edition A 2011; 1; 3, en-USd2sboikeVersion: 3.0.3.52010-04-16T14:31:55+02:00 - Seite 45Z
Page 52 of 364
System self-test
The 42 indicator lamp
illuminates when you:
R turn the SmartKey to position 1 or 2 in the
ignition lock
R on vehicles with KEYLESS-GO, press the
Start-Stop button once or twice
The 42 indicator lamp goes out
again after approximately six seconds.
If the 42 indicator lamp does not
illuminate or is lit continuously, the system is
malfunctioning. Before transporting a child
on the front-passenger seat, have the
BabySmart™ system checked at an
authorized Mercedes-Benz Center.
For more information, see "Problems with the
air bag deactivation system" section
( Y page 51)
GWarning
Do not place powered-on laptops, mobile
phones, electronic tags such as those used in
ski passes or similar electronic devices on the
front passenger seat. Signals from such
devices may interfere with the BabySmart™
air bag deactivation system. Such signal
interference may cause the 42
indicator lamp not to come on during self-test.
The + SRS indicator lamp and/or the
42 indicator lamp could be
continuously lit, indicating that the system is
not functioning. The front-passenger front air
bag could deploy inadvertently or fail to
deploy in an accident.
50Occupant safetySafety
BA 251 USA, CA Edition A 2011; 1; 3, en-USd2sboikeVersion: 3.0.3.52010-04-16T14:31:55+02:00 - Seite 50
Page 59 of 364
on and off in the on-board computer
( Y page 209).
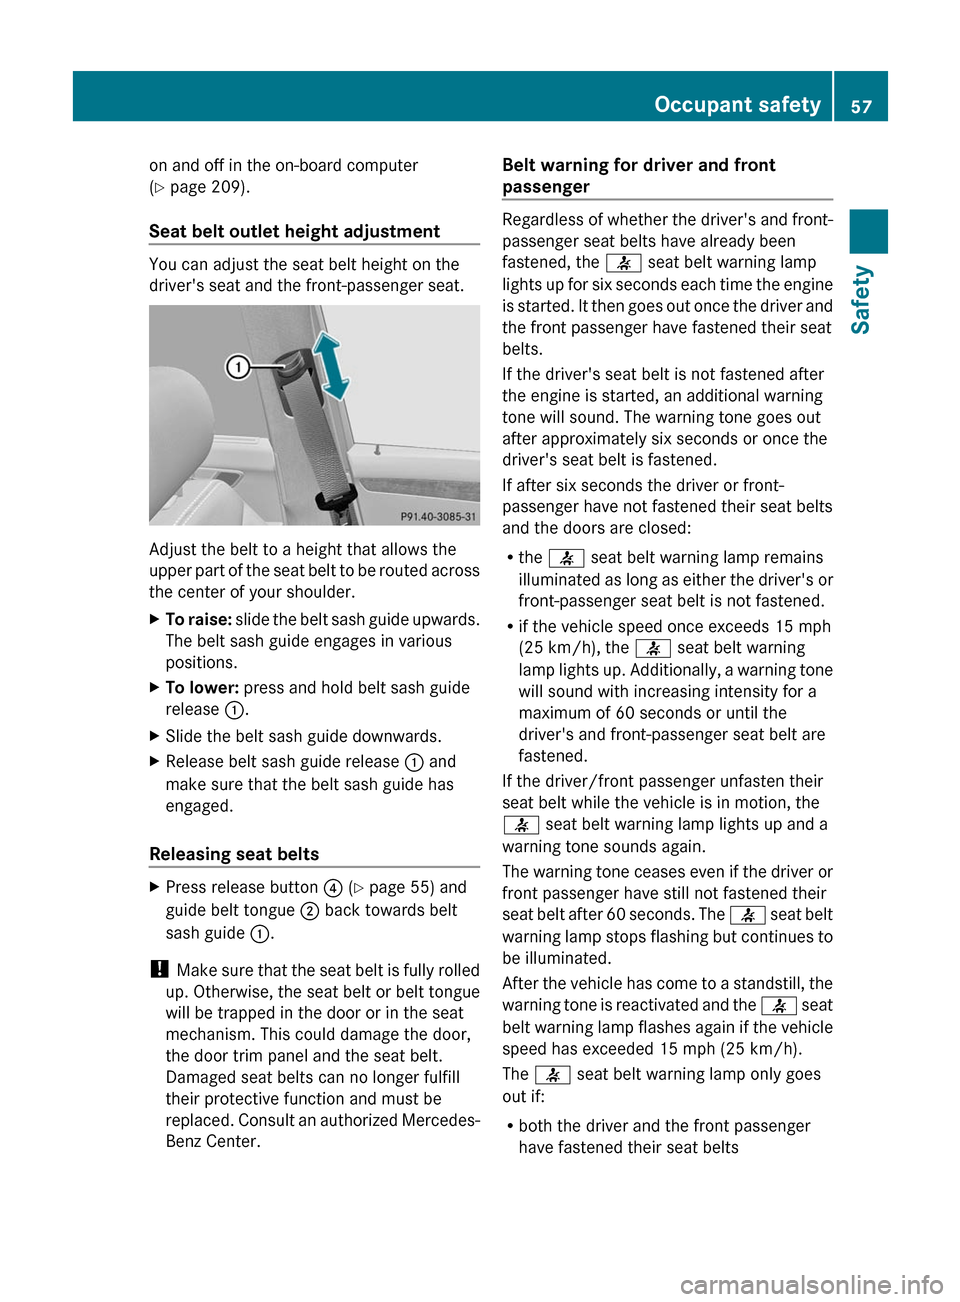
Seat belt outlet height adjustment
You can adjust the seat belt height on the
driver's seat and the front-passenger seat.
Adjust the belt to a height that allows the
upper part of the seat belt to be routed across
the center of your shoulder.
XTo raise: slide the belt sash guide upwards.
The belt sash guide engages in various
positions.XTo lower: press and hold belt sash guide
release :.XSlide the belt sash guide downwards.XRelease belt sash guide release : and
make sure that the belt sash guide has
engaged.
Releasing seat belts
XPress release button ? (Y page 55) and
guide belt tongue ; back towards belt
sash guide :.
!
Make sure that the seat belt is fully rolled
up. Otherwise, the seat belt or belt tongue
will be trapped in the door or in the seat
mechanism. This could damage the door,
the door trim panel and the seat belt.
Damaged seat belts can no longer fulfill
their protective function and must be
replaced. Consult an authorized Mercedes-
Benz Center.
Belt warning for driver and front
passenger
Regardless of whether the driver's and front-
passenger seat belts have already been
fastened, the 7 seat belt warning lamp
lights up for six seconds each time the engine
is started. It then goes out once the driver and
the front passenger have fastened their seat
belts.
If the driver's seat belt is not fastened after
the engine is started, an additional warning
tone will sound. The warning tone goes out
after approximately six seconds or once the
driver's seat belt is fastened.
If after six seconds the driver or front-
passenger have not fastened their seat belts
and the doors are closed:
R the 7 seat belt warning lamp remains
illuminated as long as either the driver's or
front-passenger seat belt is not fastened.
R if the vehicle speed once exceeds 15 mph
(25 km/h), the 7 seat belt warning
lamp lights up. Additionally, a warning tone
will sound with increasing intensity for a
maximum of 60 seconds or until the
driver's and front-passenger seat belt are
fastened.
If the driver/front passenger unfasten their
seat belt while the vehicle is in motion, the
7 seat belt warning lamp lights up and a
warning tone sounds again.
The warning tone ceases even if the driver or
front passenger have still not fastened their
seat belt after 60 seconds. The 7 seat belt
warning lamp stops flashing but continues to
be illuminated.
After the vehicle has come to a standstill, the
warning tone is reactivated and the 7 seat
belt warning lamp flashes again if the vehicle
speed has exceeded 15 mph (25 km/h).
The 7 seat belt warning lamp only goes
out if:
R both the driver and the front passenger
have fastened their seat belts
Occupant safety57SafetyBA 251 USA, CA Edition A 2011; 1; 3, en-USd2sboikeVersion: 3.0.3.52010-04-16T14:31:55+02:00 - Seite 57Z
Page 69 of 364
orXPress the KEYLESS-GO Start-Stop button.
The KEYLESS-GO key must be in the
vehicle.
i USA only:
This device complies with the part 15 of the
FCC regulations. Operation is subject to
the following two conditions:
1. This device may not cause interference,
and
2. This device must withstand any
interference received, including
interference that may cause undesired
operation.
Any unauthorized modification to this
device could void the user's authority to
operate the equipment.
i Canada only:
This device complies with the RSS-210
regulations of Industry Canada. Operation
is subject to the following two conditions:
1. This device may not cause interference,
and
2. This device must withstand any
interference received, including
interference that may cause undesired
operation of the device.
Any unauthorized modification to this
device could void the user's authority to
operate the equipment.
Driving safety systems
Overview of driving safety systems
In this section, you will find information about
the following driving safety systems:
R ABS ( Anti-lock Braking System)
R BAS ( Brake Assist System)
R ESP ®
(E lectronic Stability Program)
R EBD ( Electronic Brake-power Distribution)
Important safety guidelinesGWarning
The following factors increase the risk of
accidents:
R Excessive speed, especially in turns
R Wet and slippery road surfaces
R Following another vehicle too closely
The driving safety systems described in this
section cannot reduce these risks or prevent
the natural laws of physics from acting on the
vehicle. They cannot increase braking or
steering efficiency beyond that afforded by
the condition of the vehicle brakes and tires
or the traction afforded.
Only a safe, attentive, and skillful driver can
prevent accidents.
The capabilities of a vehicle equipped with the
driving safety systems described in this
section must never be exploited in a reckless
or dangerous manner which could jeopardize
the user's safety or the safety of others.
Always adjust your driving style to the
prevailing road and weather conditions and
keep a safe distance to other road users and
objects on the street.
If a driving system malfunctions, other driving
safety systems may also switch off. Observe
indicator and warning lamps that may come
on as well as messages in the multifunction
display that may appear.
i In wintry driving conditions, always use
winter tires (M+S tires) and if necessary,
snow chains. Only in this way will the
driving safety systems described in this
section work as effectively as possible.
ABS (Anti-lock Braking System)
Important safety information
GWarning
Observe "Important safety instructions"
( Y page 67).
Driving safety systems67SafetyBA 251 USA, CA Edition A 2011; 1; 3, en-USd2sboikeVersion: 3.0.3.52010-04-16T14:31:55+02:00 - Seite 67Z
Page 74 of 364
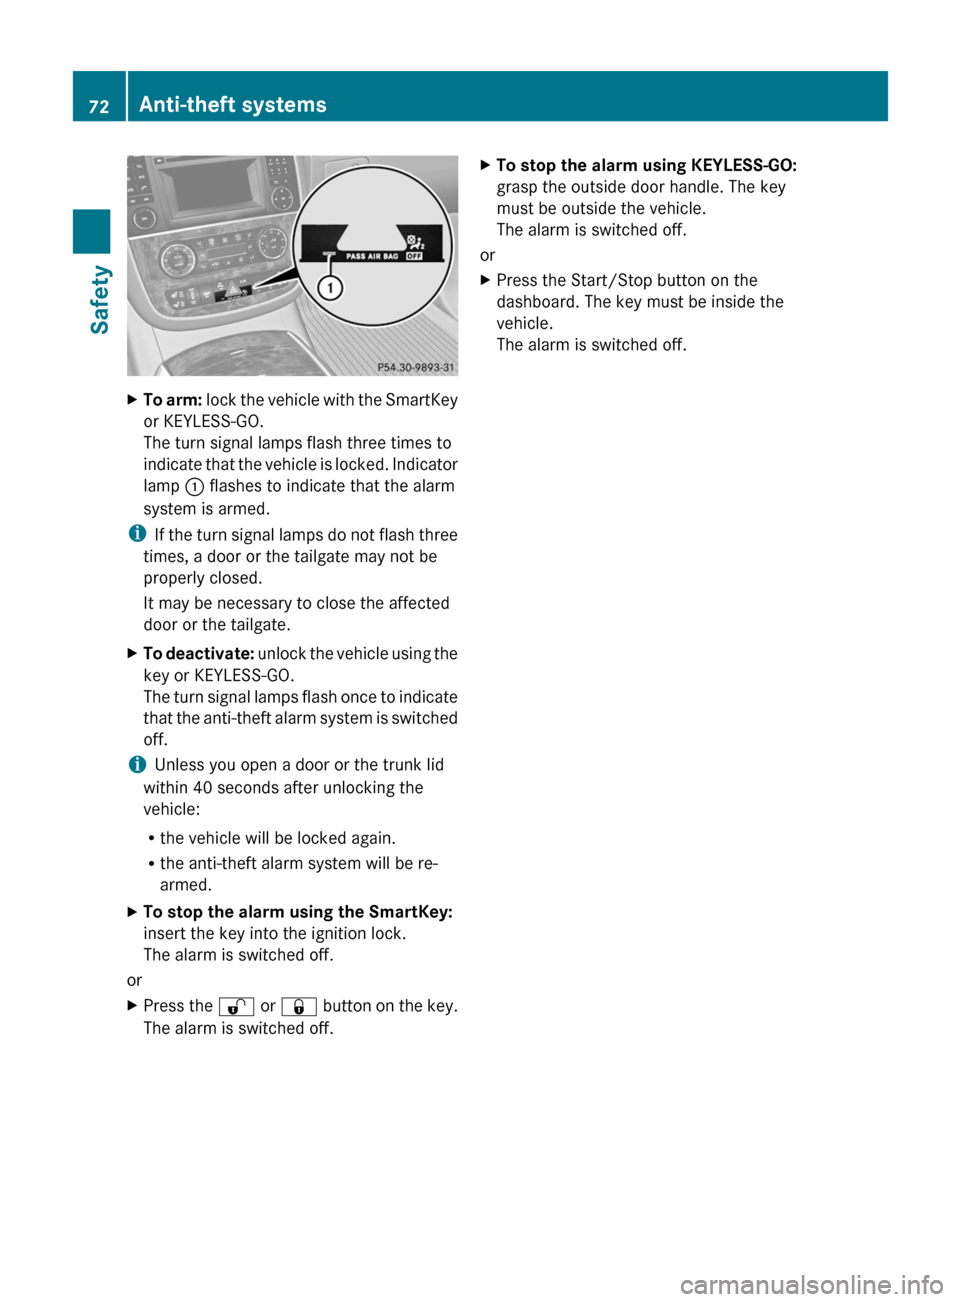
XTo arm: lock the vehicle with the SmartKey
or KEYLESS-GO.
The turn signal lamps flash three times to
indicate that the vehicle is locked. Indicator
lamp : flashes to indicate that the alarm
system is armed.
i If the turn signal lamps do not flash three
times, a door or the tailgate may not be
properly closed.
It may be necessary to close the affected
door or the tailgate.
XTo deactivate: unlock the vehicle using the
key or KEYLESS-GO.
The turn signal lamps flash once to indicate
that the anti-theft alarm system is switched
off.
i Unless you open a door or the trunk lid
within 40 seconds after unlocking the
vehicle:
R the vehicle will be locked again.
R the anti-theft alarm system will be re-
armed.
XTo stop the alarm using the SmartKey:
insert the key into the ignition lock.
The alarm is switched off.
or
XPress the % or & button on the key.
The alarm is switched off.XTo stop the alarm using KEYLESS-GO:
grasp the outside door handle. The key
must be outside the vehicle.
The alarm is switched off.
or
XPress the Start/Stop button on the
dashboard. The key must be inside the
vehicle.
The alarm is switched off.72Anti-theft systemsSafety
BA 251 USA, CA Edition A 2011; 1; 3, en-USd2sboikeVersion: 3.0.3.52010-04-16T14:31:55+02:00 - Seite 72
Page 78 of 364
This may impair the functioning of KEYLESS-
GO.
R To open or close the vehicle, the KEYLESS-
GO key should be no more than 3 ft (1 m)
from the door or tailgate.
R When the vehicle is parked for more than
72 hours, the KEYLESS-GO function is
deactivated. Pull one of the outer door
handles and turn on the ignition to
reactivate the KEYLESS-GO function.
R If the KEYLESS-GO key is not near the
vehicle, it is possible that the system may
not recognize it. In this case, the vehicle
cannot be locked or started with KEYLESS-
GO.
R If the KEYLESS-GO key has been removed
from the vehicle (e.g. if a passenger leaves
the vehicle with the KEYLESS-GO key):
- while someone is holding the Start/Stop
button or attempting to lock the vehicle
with the outer door handle, the message
Key not detected appears in the
multifunction display
- while someone is holding the Start/Stop
button or attempting to lock the vehicle
with the outer door handle, the message
Key not detected appears in the
multifunction display
- while the engine is running, the red
message Key not detected appears in
the multifunction display as you pull
away. Find the KEYLESS-GO key or
change its current position immediately
(e.g. place it on the front-passenger seat
or carry it in your shirt pocket.)
R If you have started the engine using the
Start/Stop button, you can turn if off again
by:
- pressing the Start/Stop button again
- inserting the KEYLESS-GO key in the
ignition lock when the vehicle isstationary and the automatic
transmission is in parking position P.
R You may accidentally unlock the vehicle if
the KEYLESS-GO key is within 3 ft (1 m) of
the vehicle and:
- an outer door handle comes into contact
with water
or
- you are cleaning an outer door handle.
R Note that the engine can be started by any
vehicle occupant if a KEYLESS-GO key is in
the vehicle.
Option 1: there is a KEYLESS-GO key in the
vehicle and a KEYLESS-GO key outside the
vehicle. If you leave the KEYLESS-GO key
behind when you get out and lock the
vehicle, a message does not appear in the
multifunction display.
Option 2: there is a KEYLESS-GO key in the
vehicle but no KEYLESS-GO key outside the
vehicle. When you get out and try to lock
the vehicle, the message Key still in
vehicle appears in the multifunction
display. The vehicle is not locked in this
case.
When starting the engine and while driving,
KEYLESS-GO also checks whether a valid key
is in the vehicle by periodically establishing
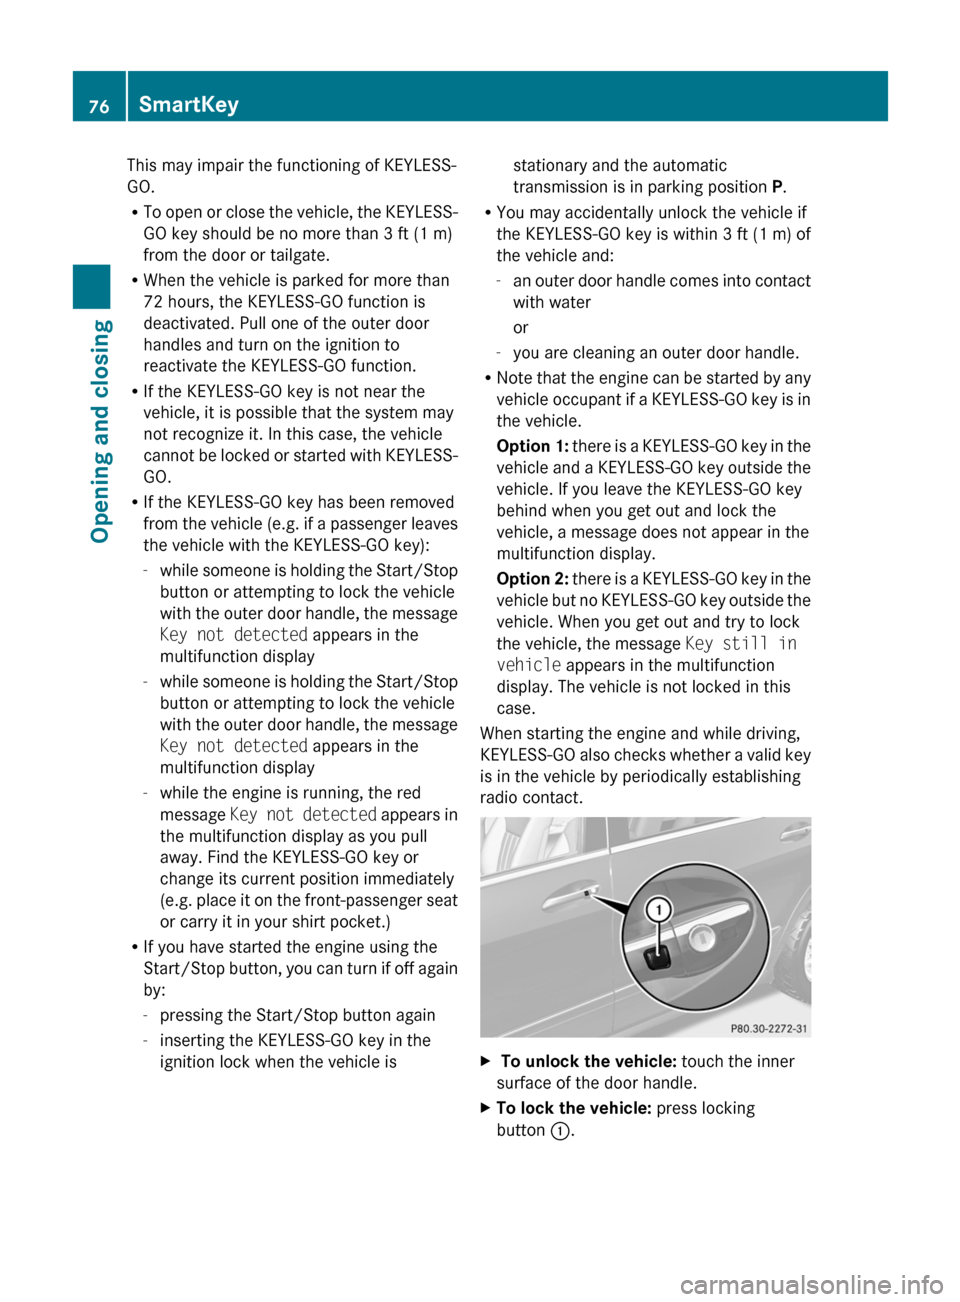
radio contact.X To unlock the vehicle: touch the inner
surface of the door handle.XTo lock the vehicle: press locking
button :.76SmartKeyOpening and closing
BA 251 USA, CA Edition A 2011; 1; 3, en-USd2sboikeVersion: 3.0.3.52010-04-16T14:31:55+02:00 - Seite 76
Page 79 of 364
If you pull on the handle of the tailgate, only
the cargo area of the vehicle is unlocked.
i If the vehicle has been parked for a long
time, you must pull the door handle to
activate the KEYLESS-GO functions.
Changing the settings of the locking
system
You can change the settings of the locking
system in such a way that only the driver's
door and the fuel filler flap are unlocked. This
is useful if you frequently travel on your own.
XTo change the setting: press the %
and & buttons simultaneously for
approximately six seconds until the battery
check lamp flashes twice.
The SmartKey now functions as follows:
XTo unlock the driver's door: press the
% button once.XTo unlock centrally: press the %
button twice.XTo lock centrally: press the & button.
The KEYLESS-GO function is changed as
follows:
XTo unlock the driver's door: touch the
inner surface of the door handle on the
driver's door.XTo unlock centrally: touch the inner
surface of the door handle on the front-
passenger door or the rear door.XTo lock centrally: press locking
button : on one of the door handles.
Restoring the factory settings
XPress the % and & buttons
simultaneously for approximately six
seconds until the battery check lamp
flashes twice.Mechanical key
General notes
If you use the mechanical key to unlock and
open the driver's door, the anti-theft alarm
system will be triggered ( Y page 71).
There are several ways to turn off the alarm:
XPress the % or & button on the
SmartKey.
or
XInsert the SmartKey into the ignition lock.
or
XPress the Start/Stop button in the ignition
lock. The SmartKey must be in the vehicle.
or
XLock or unlock the vehicle using KEYLESS-
GO. The SmartKey must be outside the
vehicle.
Removing the mechanical key
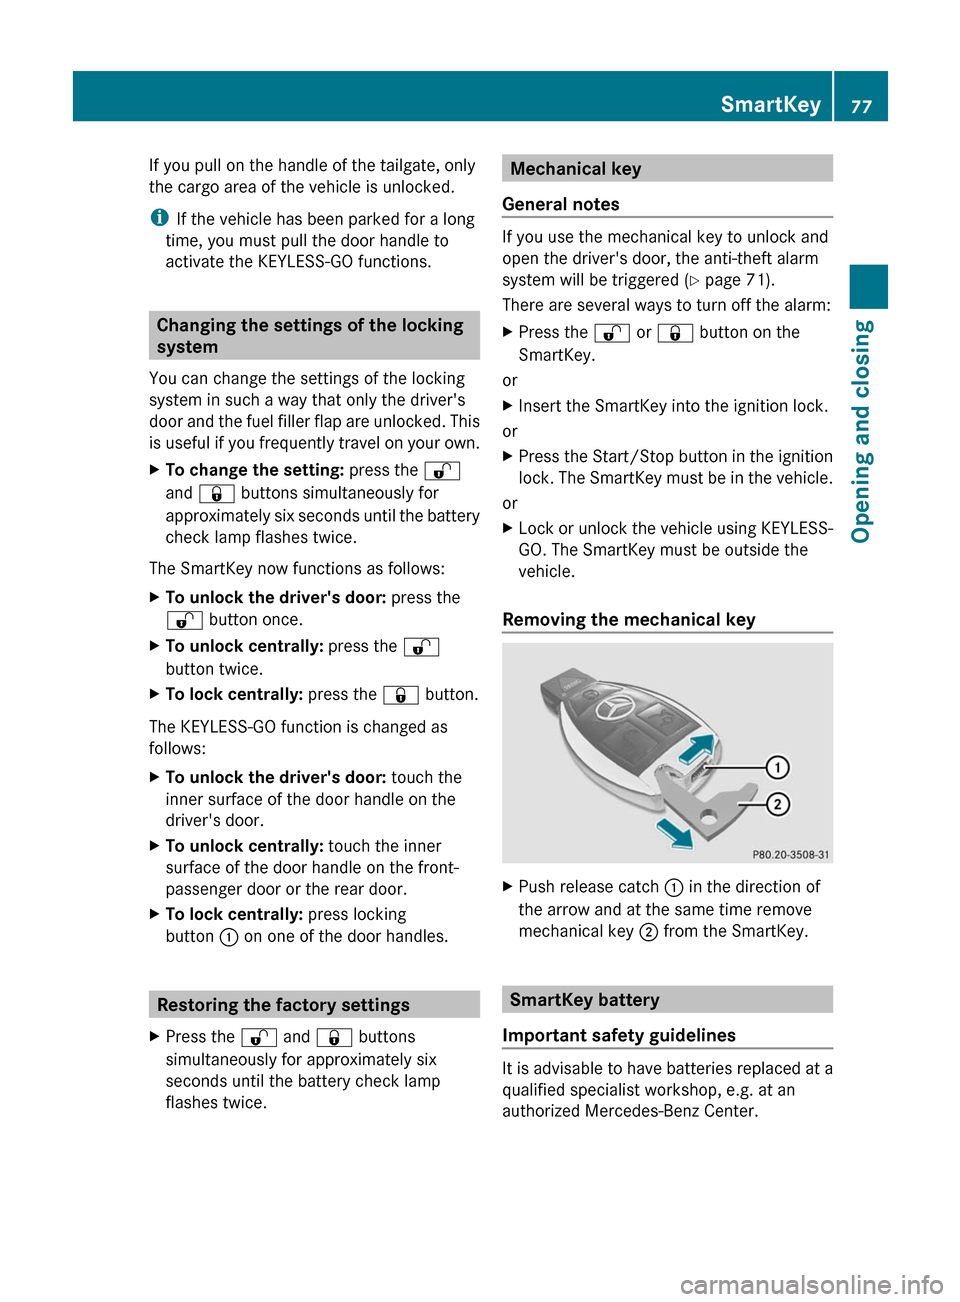
XPush release catch : in the direction of
the arrow and at the same time remove
mechanical key ; from the SmartKey.
SmartKey battery
Important safety guidelines
It is advisable to have batteries replaced at a
qualified specialist workshop, e.g. at an
authorized Mercedes-Benz Center.
SmartKey77Opening and closingBA 251 USA, CA Edition A 2011; 1; 3, en-USd2sboikeVersion: 3.0.3.52010-04-16T14:31:55+02:00 - Seite 77Z