display MERCEDES-BENZ R-Class 2012 W251 Comand Manual
[x] Cancel search | Manufacturer: MERCEDES-BENZ, Model Year: 2012, Model line: R-Class, Model: MERCEDES-BENZ R-Class 2012 W251Pages: 210, PDF Size: 5.11 MB
Page 25 of 210
selection
list,you select anentry tocopy itto
the address entrymenu.
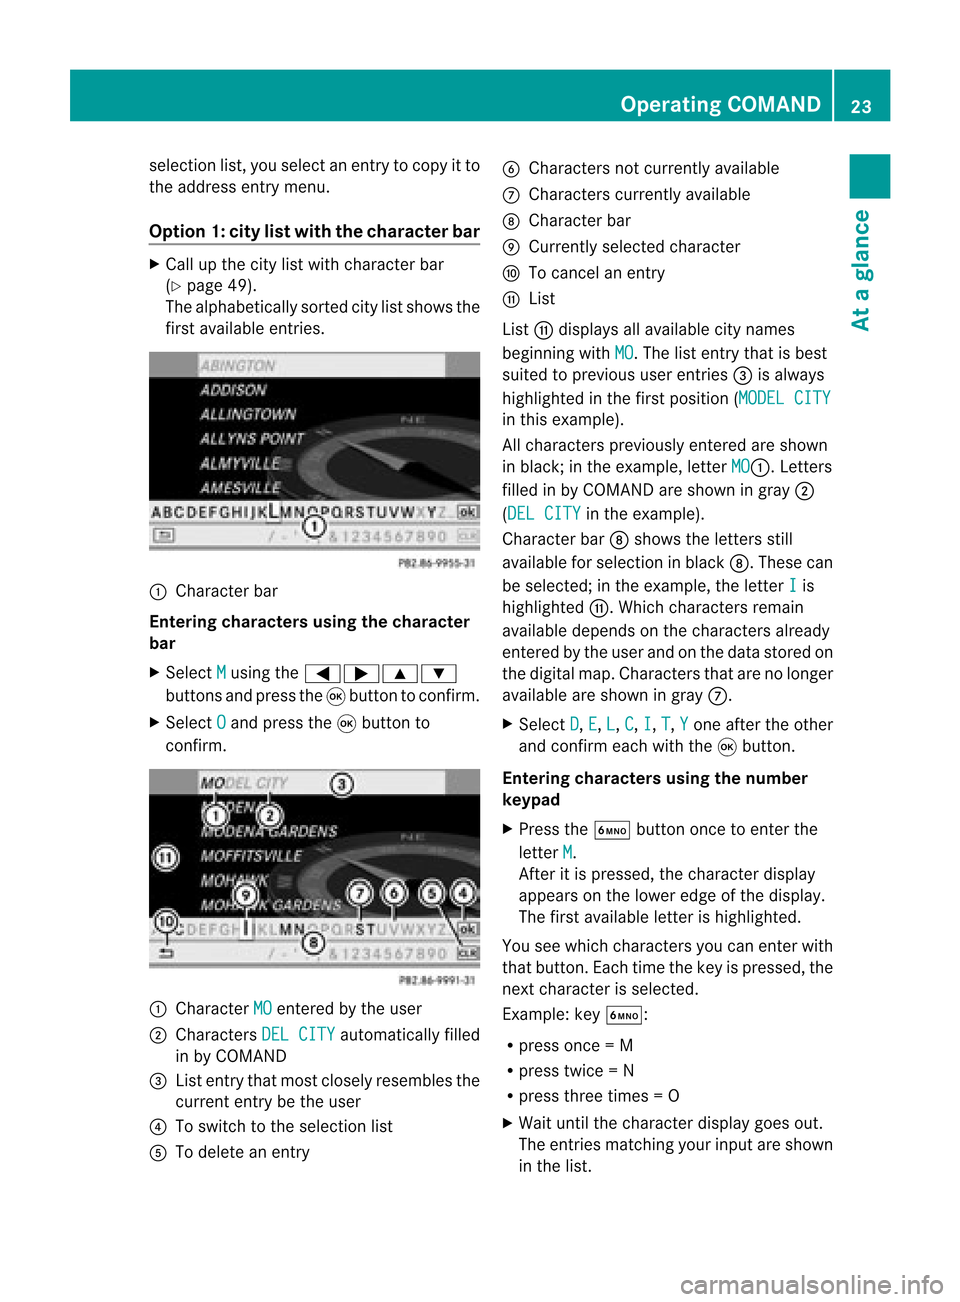
Option 1:city listwith thecharacter bar X
Cal lup the city listwith character bar
(Y page 49).
The alpha betically sortedcitylistshows the
first available entries. :
Chara cterbar
Entering characters usingthecharacter
bar
X Select M using
the=;9:
buttons andpress the9button toconfirm.
X Select O and
press the9button to
confirm. :
Chara cterMO entered
bythe user
; Chara ctersDELCITY automaticall
yfilled
in by COMAND
= List entry thatmost closely resembles the
current entrybethe user
? Toswitch tothe selection list
A Todelete anentry B
Chara ctersnotcurrently available
C Chara cterscurrently available
D Chara cterbar
E Currently selectedcharacter
F Tocancel anentry
G List
List Gdispla ysall avail able citynames
beginning withMO .T
he list entr ythat isbest
suited toprevious userentries=isalwa ys
highlighted inthe first position (MODELCITY in
this example).
All characters previouslyenteredareshown
in black; inthe example, letterMO :.
Letters
filled inby COMAND areshown ingray ;
(DEL CITY in
the example).
Character barDshows theletters still
availa bleforselection inblack D.These can
be selected; inthe example, theletter I is
highlighted G.Whichcharacters remain
availa bledepends onthe characters already
entered bythe user andonthe data stored on
the digital map.Characters thatarenolonger
availa bleare shown ingray C.
X Select D ,
E ,
L ,
C ,
I ,
T ,
Y one
after theother
and confirm eachwiththe9button.
Entering character susing thenumber
keypad
X Press theÀ button oncetoenter the
letter M .
Aft eritis pressed, thecharacter display
appea rson the lower edgeofthe displa y.
The first availa bleletter ishighlighted.
You seewhich characters youcan enter with
that button. Eachtimethekey ispressed, the
next character isselected.
Example: keyÀ:
R press once=M
R press twice=N
R press three times =O
X Wait untilthecharact erdisplay goesout.
The entries matc hingyour input areshown
in the list. Opera
tingCOMAND
23Ataglance Z
Page 28 of 210
Switching
thedatafield If
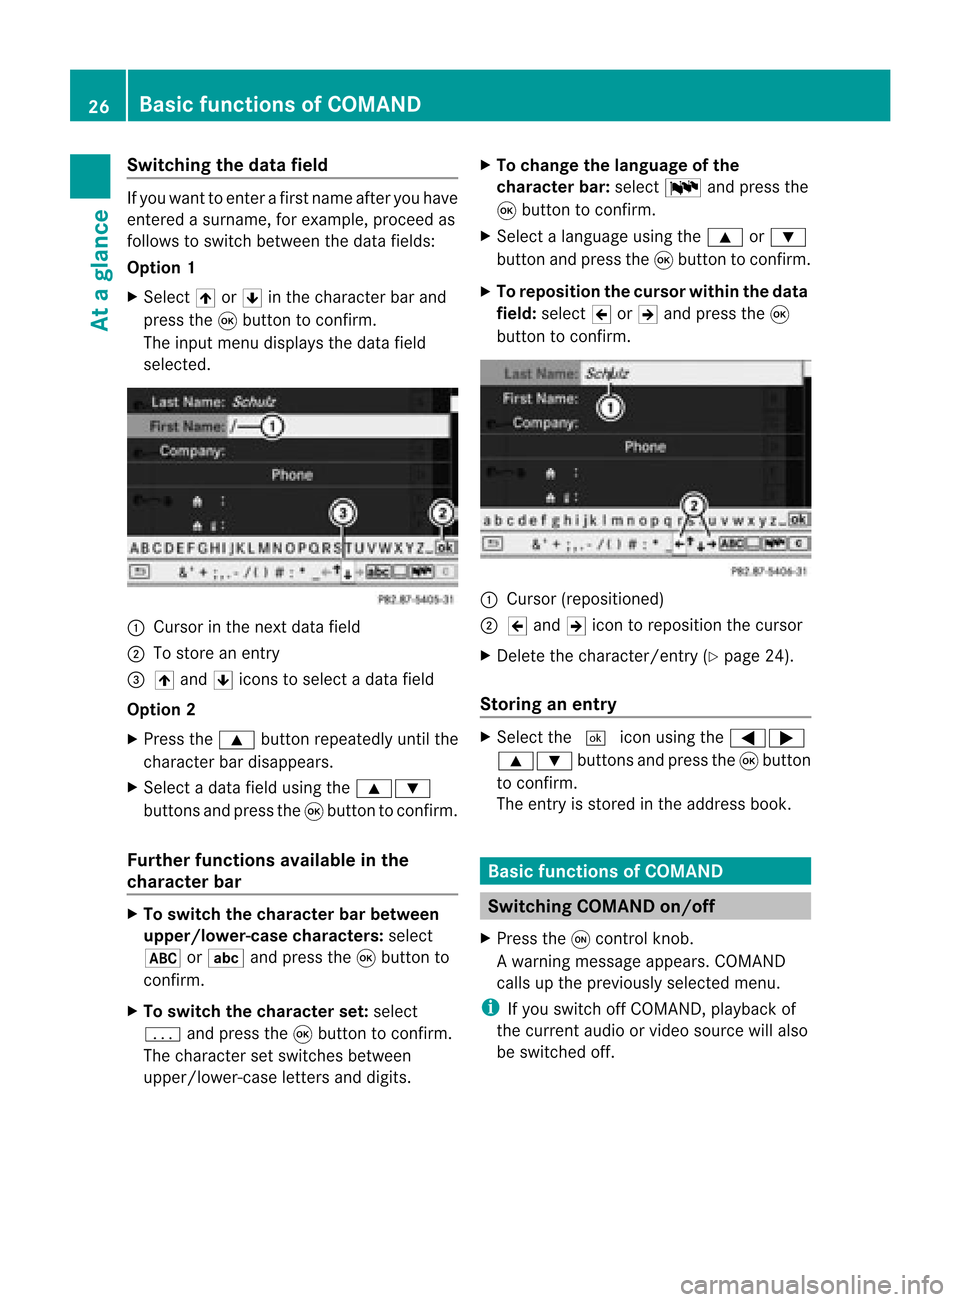
you want toenter afirst name afteryouhave
entered asurname, forexample, proceedas
follows toswitch between thedata fields:
Option 1
X Select 4or5 inthe character barand
press the9button toconf irm.
The input menu display sthe data field
selected. :
Cursor inthe next data field
; Tostore anentr y
= 4 and 5icons toselect adata field
Option 2
X Press the9 button repeatedly untilthe
character bardisappea rs.
X Select adata fieldusing the9:
buttons andpress the9button toconf irm.
Furth erfunctions availableinthe
charact erbar X
To switch thecharact erbar between
upper /lower-case characters:select
* orE andpress the9button to
conf irm.
X To switch thecharact erset: select
p andpress the9button toconf irm.
The character setswitches between
upper/lower-case lettersanddigits. X
To change thelanguage ofthe
charact erbar: select Bandpress the
9 button toconf irm.
X Select alanguage usingthe9 or:
button andpress the9button toconf irm.
X To reposition thecursor withinthedata
field: select 2or3 and press the9
button toconf irm. :
Cursor (repositioned)
; 2 and 3icon toreposition thecursor
X Delete thecharacter/ entry(Ypage 24).
Stor inganentr y X
Select the¬ iconusing the=;
9: buttonsand press the9butt on
to con firm.
The entryisstor edinthe address book. Basic
functionsofCOMAND Switching
COMANDon/off
X Press theqcon trolkn ob.
Aw arning mes sage appear s.COMA ND
calls uptheprev iously selectedmen u.
i Ifyou switchoff COMA ND,playbac kof
the curre ntaudio or vide os ource willalso
be switched off. 26
Basic
functions ofCOMANDAt aglance
Page 29 of 210
Switching
theCOMAND displayon/
off
X Press theW functionbutton.
or
X Select System in
the main functionbar
using the9=; buttonsand
press the9button toconf irm.
In both cases, thesystem menuappears.
X To switch off:select Display off and
press the9button toconf irm.
X To switch on:press theqor% back
button. Mute
Switching audioandvideo sources on/
off X
Press the8 button.
The sound fromtherespective audioor
video source isswitched onormuted.
i When thesound isoff, thesystem
display sthe , icon inthe status line.
When youchange theaudi oor video
source, oradjust thevolume, sound
automatically switchesonagain.
i Even ifthe sound isswitched off,you will
still hear traffic andnavigation system
announc ements.
Switching offtraffic progra mand
navigation announcements completely X
Tra ffic progra m:press andhold the
8 button untilthe. display
disappea rsfrom thestatus barofthe
display .
X Navigat ionannouncements: pressthe
8 button duringtheannounc ement.
i Navigation announcementscanbeturned
on again afterCOMAND hasbeen switched
on oroff with theqcont rolknob. Adjust
ingthe volume
Audio andvideo source volume X
Turn qthe cont rolknob.
or
X Press theW orX button onthe
multifunct ionsteering wheel.
The volume ofthe current lyselected audio
or video source changes.
Adjust ingthe volume fortraffic
announcements andnavigation
announcements i
You cansetthe volume oftraffic and
navigation announcementsrelativetothe
volume ofthe audi oor video source.
During trafficornavigation announcements:
X Turn qthe cont rolknob.
or
X Press theW orX button onthe
multifunct ionsteering wheel.
Adjust ingthe volume forphone calls You
canadjust thevolume forhands-free
mode during atelephone call.
X Turn qthe cont rolknob.
or
X Press theW orX button onthe
multifunct ionsteering wheel. Adjust
ingthe sound settings
Calling upthe sound menu You
canmake various soundsettingsfor the
different audioand video sources. Thismeans
that itis possible toset more bassforradio
mode thanforCD mode, forexample. Youcan
call upthe respective soundmenufromthe
menu ofthe desired mode.
The example describes howtocall upthe
sound menuinradio mode. Basic
functions ofCOMAND
27Ataglance Z
Page 30 of 210
X
Press the$ functionbutton .
The radio display appears. Youwillhear the
last station playedonthe last waveband.
X Select Sound using
the:=;
button sand press the9button toconf irm.
You cannow setthe treble andbass orthe
balance andfader forradio mode.
Adju sting treble andbass X
Select Treble or
Bass in
the sound menu
using the:=; buttonson the
remot econt roland press the9button to
conf irm.
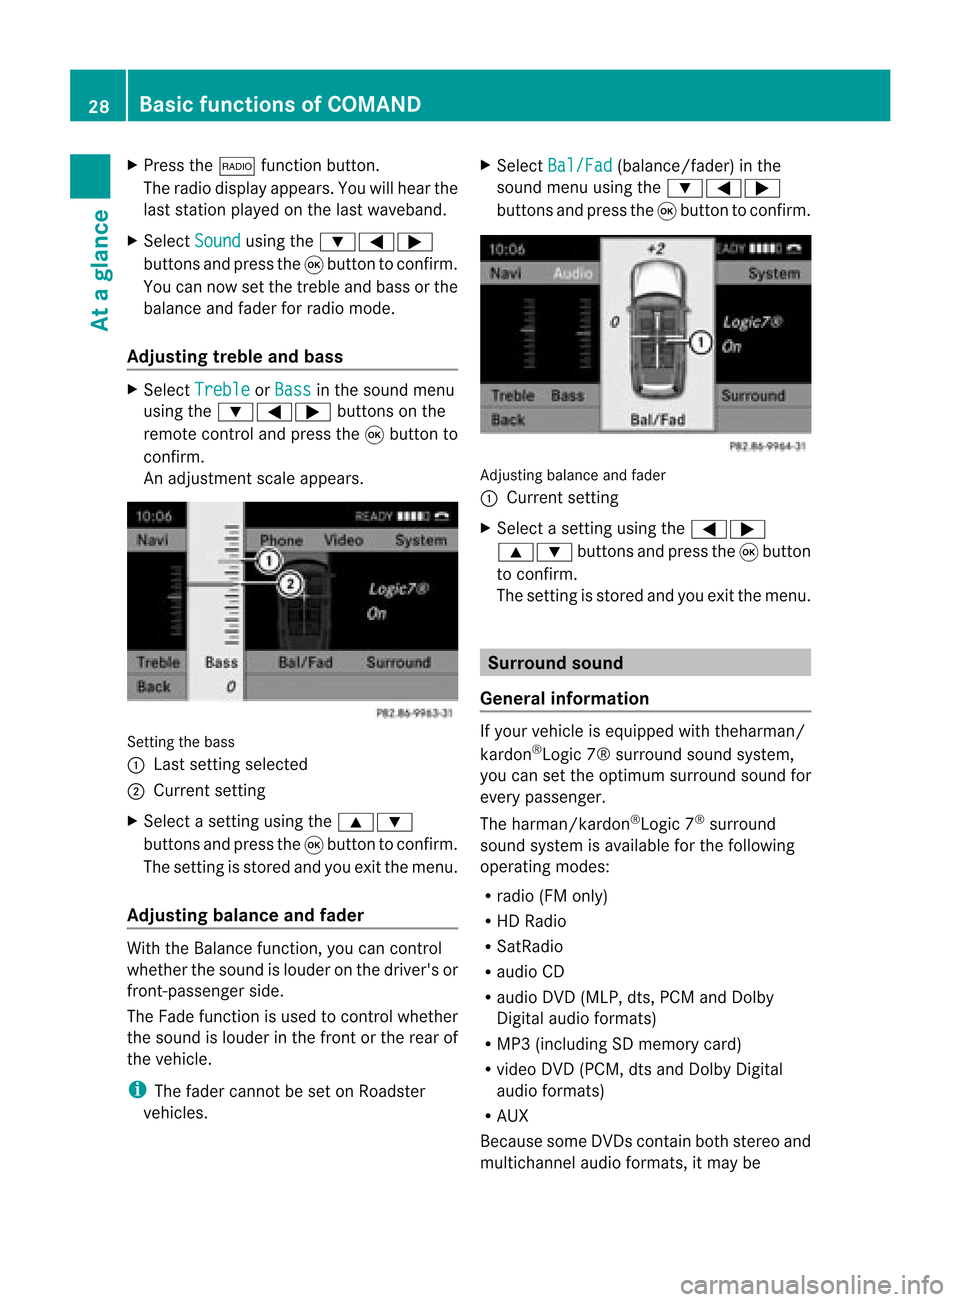
An adjustmen tscal eap pea rs. Setting
thebass
: Lastsett ing select ed
; Current setting
X Select asett ingusing the9:
button sand press the9button tocon firm.
The settingisstor edand youexit themenu.
Adju sting balance andfader With
theBalance function,you can control
whether thesound islouder onthe driver's or
fron t-passenger side.
The Fade function isused tocon trol whether
the sound islouder inthe fron torthe rear of
the vehicle.
i The fader cannot beset onRoadster
vehicles. X
Select Bal/Fad (bala
nce/ fader) inthe
sound menuusingthe:=;
buttons andpress the9button toconfirm . Adjustin
gbalance andfader
: Current setting
X Select asettin gusing the=;
9: buttonsandpress the9button
to confirm .
The settin gis stored andyouexit themenu. Surr
ound sound
General informat ion If
your vehicle isequipp edwith theharman/
kardon ®
Logic 7®surround soundsystem,
you can setthe optimum surround soundfor
every passenger.
The harman/kardon ®
Logic 7®
surround
sound system isavaila bleforthe following
operating modes:
R radio (FMonly)
R HD Radi o
R SatRadio
R audi oCD
R audi oDVD (MLP, dts,PCM andDolby
Digital audioformats)
R MP3 (including SDmemory card)
R video DVD(PCM, dtsand Dolby Digital
audi oformats)
R AUX
Because someDVDscont ainboth stereo and
multichannel audioformats, itmay be 28
Basic
functions ofCOMANDAt aglance
Page 33 of 210
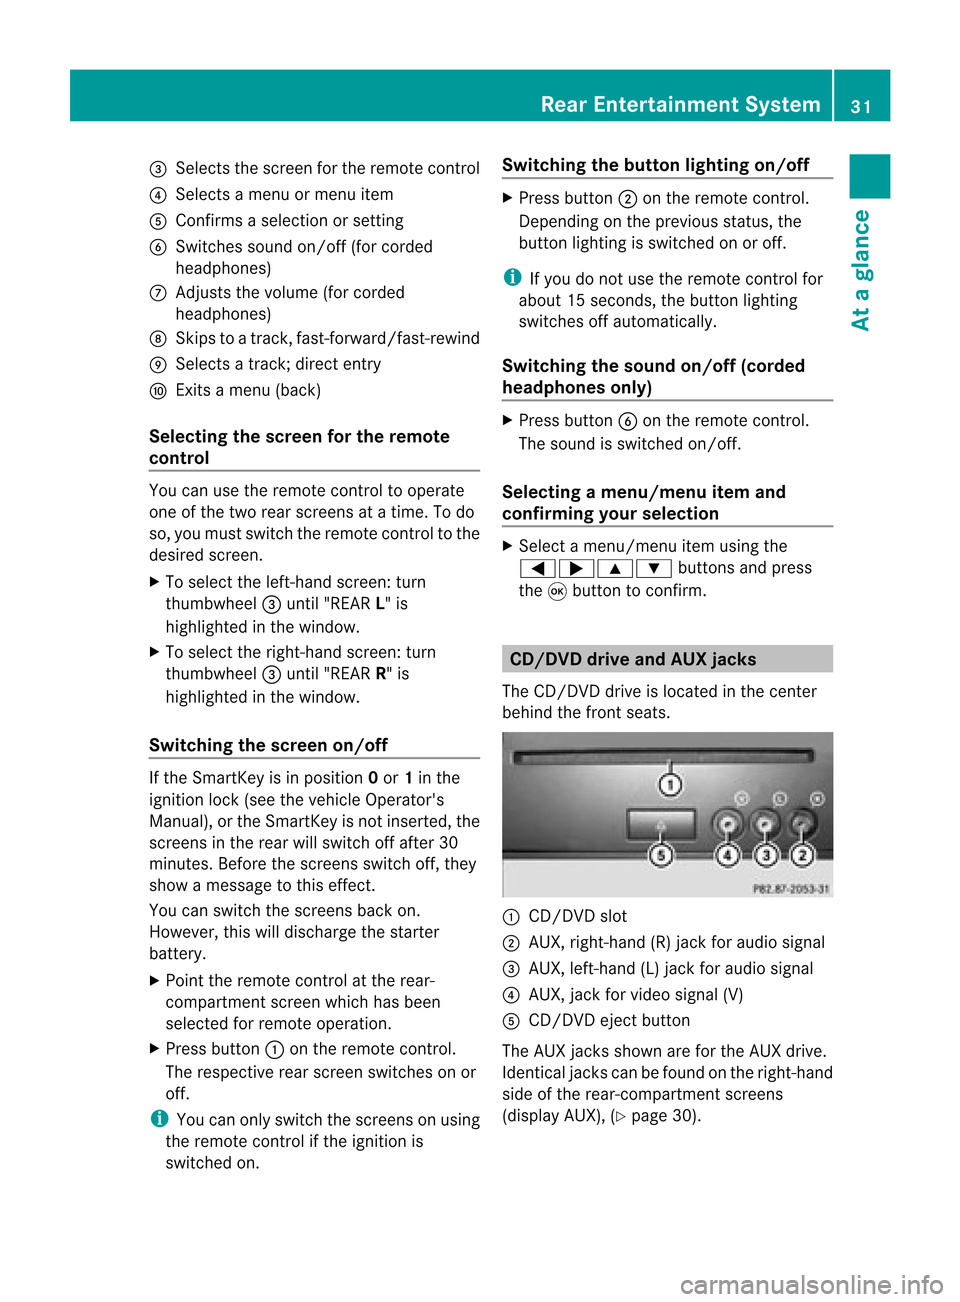
=
Selects thescre enfor the remo tecontrol
? Selects amenu ormenu item
A Confirm sa sel ecti onorsetti ng
B Switches soundon/of f(for corded
hea dpho nes)
C Adjusts thevolu me(for corded
hea dpho nes)
D Skips toatrack, fast-forwa rd/fast-rew ind
E Selects atrack; directentry
F Exits amenu (back)
Sel ecting thescre enfor the remote
co ntrol You
canusetheremote controltoopera te
one ofthe two rear screens atatime. Todo
so, you must switch the remote controltothe
desi redscreen.
X To sele ctthe left-hand screen:turn
thumbw heel=until "REAR L"is
high lighted inthe windo w.
X To sele ctthe right-hand screen:turn
thumbw heel=until "REAR R"is
high lighted inthe windo w.
Swi tching thescre enon/ off If
the SmartKey isin posi tion 0or 1in the
ignitio nlock (see thevehicle Operator's
Manual), orthe Smart Keyisnot insert ed,the
screen sin the rear willswitch offafter 30
minutes. Beforethescreen sswitch off,they
show amessage tothis effect .
You canswitch thescreen sback on.
How ever,this will disc harg eth est art er
bat tery.
X Poin tth erem oteco ntrol attherear -
co mpar tments cree nwhich hasbeen
selected forremote operation.
X Press button :onthe remote control.
The respective rearscreen switches onor
off.
i You canonly switch thescreens onusing
the remote controlifthe ignition is
switched on. Switching
thebutt onlighting on/off X
Press button ;onthe remote control.
Depending onthe previous status,the
button lighting isswitched onoroff.
i Ifyou donot use theremote controlfor
about 15seconds, thebutton lighting
switches offautomatically .
Switching thesound on/off(corded
headph onesonly) X
Press button Bonthe remote control.
The sound isswitched on/off.
Selec tingamenu/m enuitem and
confir mingyour select ion X
Sele ctamen u/m enuitemusin gth e
=;9 :buttonsand pres s
th e9 butt ontocon firm. CD/DVD
drive and AUX jacks
The CD/ DVDdriv eis locat edinthecen ter
behin dth efron tseats. :
CD/D VDslot
; AUX, right-hand (R)jack foraudio signal
= AUX, left-hand (L)jack foraudio signal
? AUX, jackforvideo signal (V)
A CD/D VDejec tbutton
The AUX jacksshown areforthe AUX drive.
Ident icaljack scan befound onthe right- hand
side ofthe rear-c ompartm entscreen s
(display AUX),(Ypage 30). Rear
Entert ainment System
31Ataglance Z
Page 34 of 210
Cord
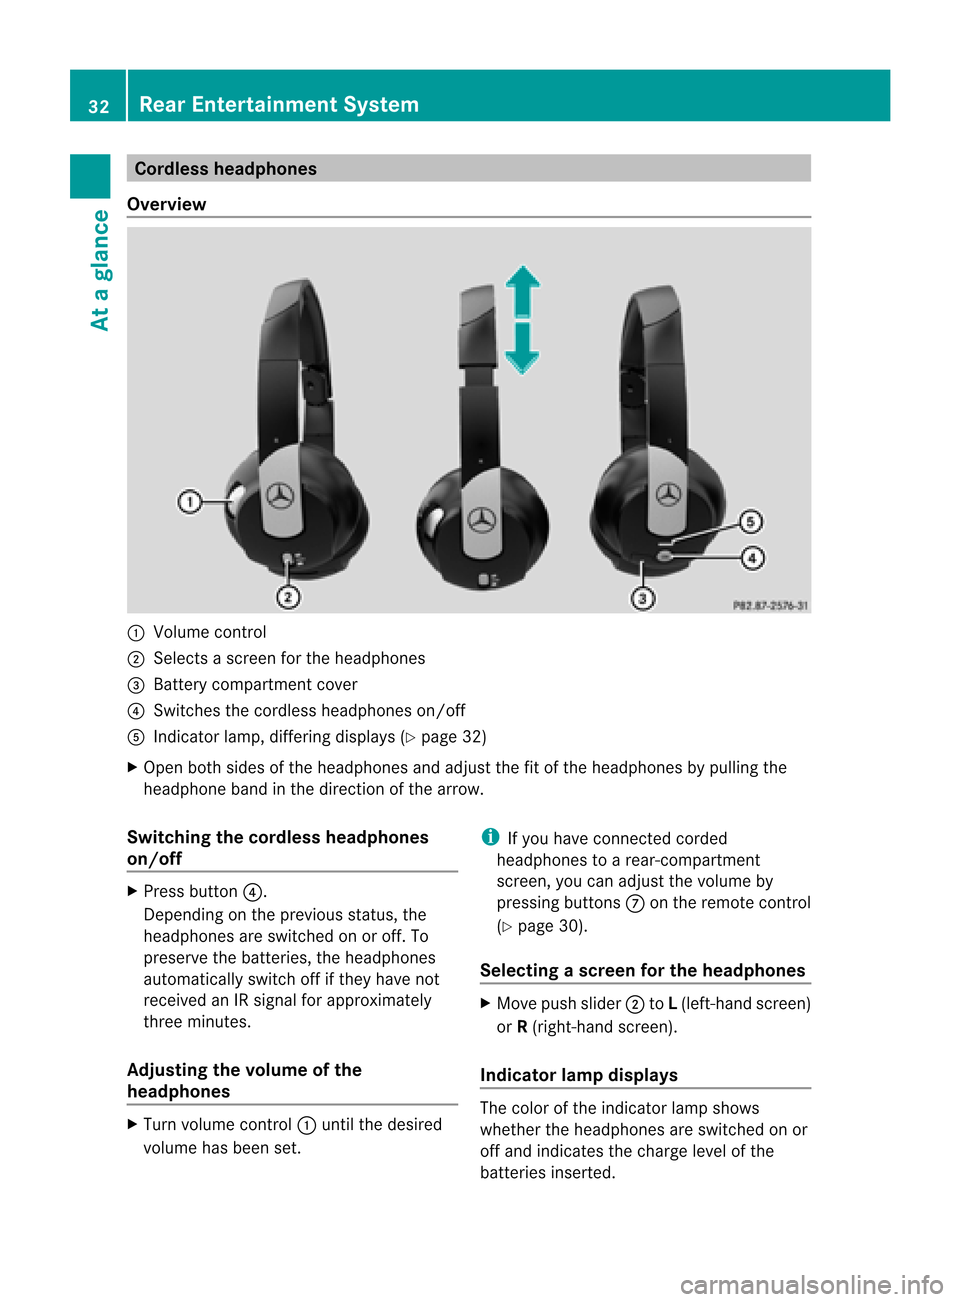
lessheadphones
Over view :
Volum eco ntrol
; Select sa sc ree nfor the headphones
= Batt erycompart mentcover
? Switches thecordless headphones on/off
A Indicat orlamp, differing displays(Y page 32)
X Open bothsides ofthe headphones andadjust thefitofthe headphones bypulling the
headphone bandinthe direction ofthe arrow.
Switching thecordless headphones
on/off X
Press button ?.
Dependin gon the previous status,the
headphones areswitched onoroff. To
preserve thebatteries, theheadphones
automatically switchoffifthey have not
received anIRsignal forapproximately
three minutes.
Adjust ingthe volume ofthe
headp hones X
Turn volume control: until thedesired
volume hasbeen set. i
Ifyou have connected corded
headphones toarear-com partment
screen ,you can adjust thevolume by
pressing buttonsC onthe remote control
(Y page 30).
Selecting ascree nfor thehea dphones X
Mov epush slider; toL(lef t-han dsc ree n)
or R(rig ht-hand scree n).
Ind icat orlam pdis pla ys The
color oftheind icat orlamp shows
whet hertheheadp honesare swit ched on or
off and indicat esthech arge levelof the
bat teries inserted. 32
Rea
rEnt ertain men tSys temAtaglan ce
Page 35 of 210
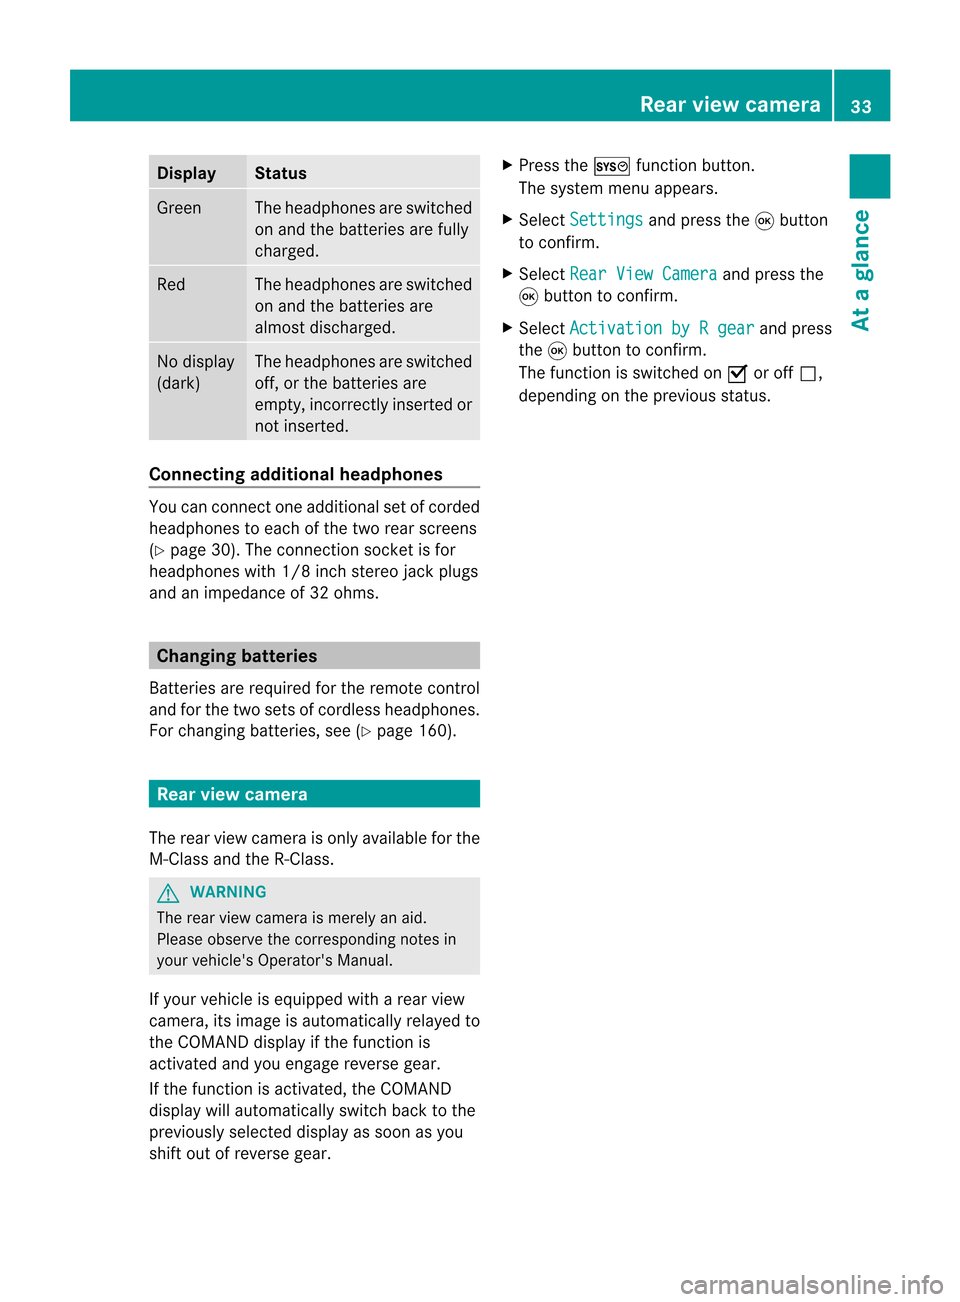
Disp
lay St
atus Gree
n The
head phonesare swit ched
on and thebat terie sare fully
ch arg ed. Red The
head phonesare swit ched
on and thebat terie sare
almo stdisc harged. No
disp lay
(dar k) The
head phonesare swit ched
of f,or thebat terie sare
emp ty,inco rrec tly in ser tedor
no tinser ted. Co
nnectin gadditi onalhea dpho nes Yo
ucan conne ctone additio nal set ofcord ed
hea dphone sto each ofthe two rearscree ns
(Y page 30). Theconnecti onsocke tis for
hea dph ones with 1/8 inch stere ojack plug s
and animp edance of32 ohms . Chan
ging batte ries
Batter iesare required forthe remo tecontrol
and forthe two sets ofcord less hea dph ones .
For changing batterie s,see (Ypage 160). Rear
viewcame ra
The rearview came raisonly available forthe
M-Class andtheR-Class. G
WARN
ING
The rear view came raismere lyan aid.
Please observethe correspo ndingnotes in
your vehicle's Operator's Manual.
If your vehicle isequipped witharear view
camera, itsimage isautomatically relayedto
the COMAND displayifthe funct ionis
activated andyouengage reverse gear.
If the funct ionisactivated, theCOMAND
display willautomatically switchbacktothe
previously selecteddisplayassoon asyou
shift outofreverse gear. X
Press theW functionbutton .
The system menuappears.
X Select Settings and
press the9button
to conf irm.
X Select RearViewCamera and
press the
9 button toconf irm.
X Select Activation byRgear and
press
the 9button toconf irm.
The funct ionisswitched onO oroff ª,
depending onthe previous status. Rear
view camera
33Ataglance Z
Page 37 of 210
COMAN
Dfea tures <0023002300230023002300230023002300230023002300230023002300230023
002300230023002300230023002300230023002300230023002300230023> 36
Display settings <0023002300230023002300230023002300230023002300230023002300230023
0023002300230023002300230023002300230023002300230023002300230023
00230023> 36
Tim esett ings .................. .................. ... 36
Text readersett ings ........ .......... .......... 38
Voice Control System settings .......... 38
Bluet ooth®
sett ings <0023002300230023002300230023002300230023002300230023002300230023
002300230023002300230023002300230023002300230023> 40
System language settings <0023002300230023002300230023002300230023002300230023002300230023
00230023> 43
Reset function <0023002300230023002300230023002300230023002300230023002300230023
0023002300230023002300230023002300230023002300230023002300230023
00230023002300230023> 43 35System
settings
Page 38 of 210
COMAN
Dfea tures
Thes eOper atingIn st ruc tions desc ribeall
st andar dand optionalequipm enta vail able
for you rCOMAND systematthe time of
purcha se.Cou ntry-specifi cdeviation sare
possible. Pleasenotethat your COMAND
system maynotbeequipped withallthe
features described. Display
settings Sett
ingthe bright ness
The brightn essdetec tedbythe COMAND
light sensor affectsthe sett ingoption sfor this
func tion.
X Press theW button .
X Select Setting s using
the :=; buttonsand press the
9 button tocon firm.
X Select Display and
press the9button to
con firm.
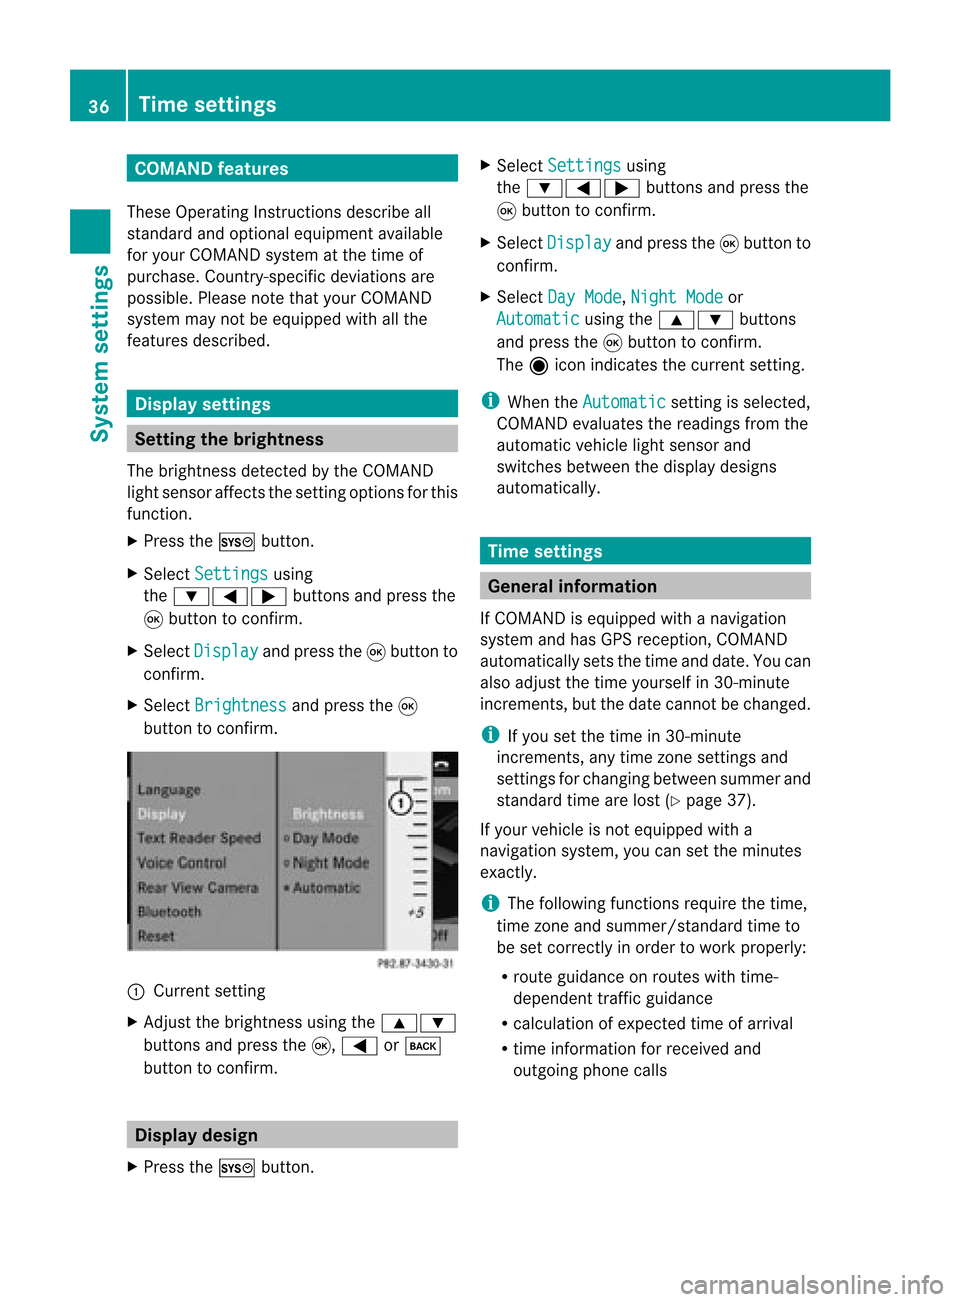
X Select Brightn ess and
press the9
button tocon firm. :
Current setting
X Adj ust the brightn essusing the9:
button sand press the9, = ork
button tocon firm. Display
design
X Press theW button . X
Select Setting s using
the :=; buttonsand press the
9 button tocon firm.
X Select Display and
press the9button to
con firm.
X Select DayMode ,
Night Mode or
Automat ic using
the9: buttons
and press the9button tocon firm.
The äicon indicat esthe curren tsett ing.
i When theAutomat ic sett
ingisselect ed,
COMAND evaluatesthereadings fromthe
automatic vehiclelightsensor and
switch esbetween thedisplay designs
automatic ally. Tim
esettings General
information
If COMAND isequipped withanavigation
system andhasGPS recept ion,COMAND
automatic allysets thetime anddate. Youcan
also adjust thetime yourself in30- minut e
incr ement s,but thedate cannotbe changed.
i Ifyou setthe time in30- minut e
incr ement s,any time zonesett ings and
sett ings forchangin gbetween summerand
stan dard timearelost (Ypage 37).
If your vehicle isnot equipped witha
navigation system,youcan setthe minut es
exact ly.
i The following functionsrequire thetime,
time zoneand summer/ standard timeto
be set corr ectlyin order towork properly:
R route guidance onroutes withtime-
dependen ttraffic guidance
R calcu lation ofexpected timeofarriva l
R time informati onfor receive dand
outgoi ngphone calls 36
Time
setting sSystem settings
Page 43 of 210
(
http://ww w.mercedes-benz.com/
co nne ct).
Searchi ngfor Bluetoo th®
devic es X
Select Settin gs in
the syste mmenuusing
the =;9: buttonsand
press the9button tocon firm.
X Select Bluetoo th and
press the9button
to con firm.
X Select Bluetoo th device list and
press
the 9button tocon firm.
X Select Update and
press 9tocon firm.
COMAND searchesforBluetoot h®
devices
within range. Afterashort while, the
Bluetoot h®
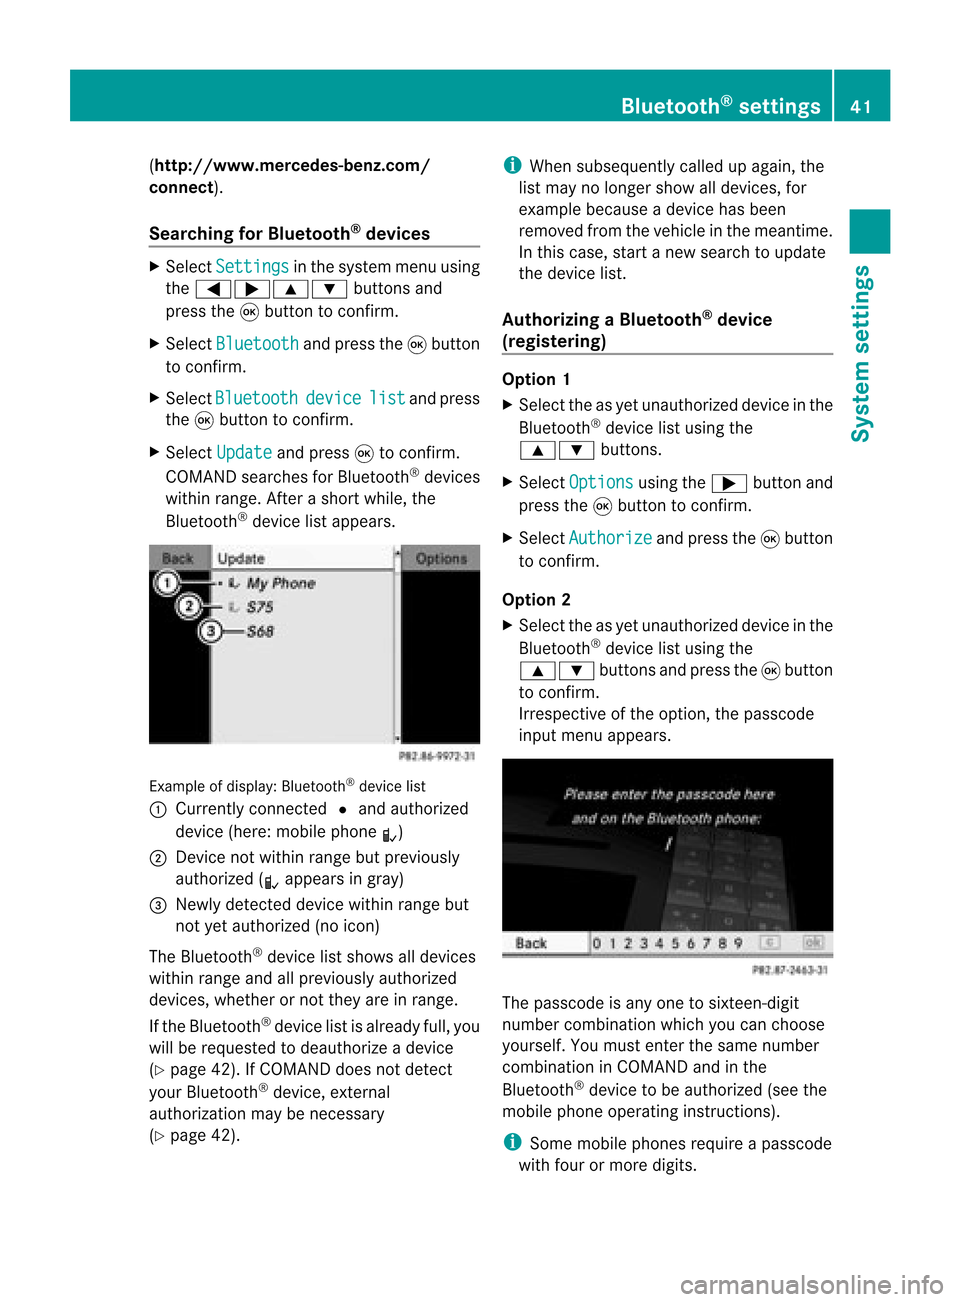
device listappears. Ex
ample ofdisplay: Bluetoot h®
device list
: Current lycon nected #and authoriz ed
device (here:mobile phoneL)
; Devic enot within rangebutpreviously
authoriz ed(L appears ingray)
= Newly detecteddevice withinrangebut
not yetauthoriz ed(no icon)
The Bluetoot h®
device listshows alldevices
within rangeandallpreviously authorized
devices, whether ornot they areinrange.
If the Bluetoot h®
device listisalready full,you
will berequested todeauthorize adevice
(Y page 42).IfCOMAND doesnotdetec t
your Bluetoot h®
device, external
authoriz ationmaybenec essary
(Y page 42). i
When subsequently calledupagain, the
list may nolonger showalldevices, for
example becauseadevice hasbeen
removed fromthevehicle inthe meant ime.
In this case, startanew search toupdate
the device list.
Author izingaBluet ooth®
device
(register ing) Opt
ion 1
X Select theasyet unauthoriz eddevice inthe
Bluetoot h®
device listusing the
9: buttons.
X Select Options using
the; button and
press the9button tocon firm.
X Select Authori ze and
press the9button
to con firm.
Opt ion 2
X Select theasyet unauthoriz eddevice inthe
Bluetoot h®
device listusing the
9: buttonsand press the9button
to con firm.
Irrespec tiveofthe option ,the passcode
input menu appears. The
passcode isany one tosixt een- digit
number combinationwhich youcan choose
yourself. Youmust enterthe same number
combin ationinCOMAND andinthe
Bluetoot h®
device tobe authoriz ed(see the
mobile phoneoperatin ginst ruct ions).
i Some mobile phones requireapasscode
with fourormore digits. Bluet
ooth®
sett ings 41System
settings