check engine light MERCEDES-BENZ R-Class 2012 W251 User Guide
[x] Cancel search | Manufacturer: MERCEDES-BENZ, Model Year: 2012, Model line: R-Class, Model: MERCEDES-BENZ R-Class 2012 W251Pages: 368, PDF Size: 15.19 MB
Page 169 of 368
Wet roadsGWARNING
After driving in heavy rain for some time
without applying the brakes or through water
deep enough to wet brake components, the
first braking action may be somewhat
reduced. You have to depress the brake pedal
more firmly. Maintain a safe distance from
vehicles in front.
After driving on a wet road or having the
vehicle washed, brake firmly while paying
attention to the traffic conditions. This will
warm up the brake discs, thereby drying them
more quickly and protecting them against
corrosion.
Limited braking performance on salt
treated roads
GWARNING
The layer of salt on the brake discs and the
brake pads/linings may cause a delay in the
braking effect, resulting in a significantly
longer braking distance, which could lead to
an accident.
To avoid this danger, you should:
R occasionally brake carefully, without
putting other road users at risk, when you
are driving on salted roads. This helps to
remove any salt that may have started to
build up on the brake discs and the brake
pads/linings.
R maintain a greater distance to the vehicle
ahead and drive with particular care.
R carefully apply the brakes at the end of a
trip and immediately after commencing a
new trip, so that salt residues are removed
from the brake discs.
Servicing the brakes
! If the brake warning lamp lights up in the
instrument cluster and you hear a warning
tone even though the parking brake has
been released, the brake fluid level may be
too low. Observe additional warning
messages in the multifunction display.
The brake fluid level may be too low due to
brake pad wear or leaking brake lines.
Have the brake system checked
immediately. Have this work carried out at
an authorized Mercedes-Benz Center.
All checks and maintenance work on the
brake system must be carried out at a
qualified specialist workshop. This work
should be carried out at an authorized
Mercedes-Benz Center.
Have the brake pads and brake fluid installed
or replaced at a qualified specialist workshop,
e.g. an authorized Mercedes-Benz Center.GWARNING
If other than recommended brake pads are
installed, or other than recommended brake
fluid is used, the braking properties of the
vehicle can be degraded to an extent that safe
braking is substantially impaired. This could
result in an accident.
! A function or performance test should
only be carried out on a 2-axle
dynamometer. If you are planning to have
the vehicle tested on such a dynamometer,
contact an authorized Mercedes-Benz
Center to obtain further information first.
Otherwise, you could damage the drive
train or the brake system.
! As the ESP ®
system operates
automatically, the engine and the ignition
must be switched off (SmartKey in position
0 or 1 in the ignition lock or Start/Stop
button in position 0 or 1) while the parking
brake is being tested on a brake
dynamometer (maximum 10 seconds).
Braking maneuvers triggered automatically
by ESP ®
may seriously damage the brake
system.
If your brake system is subject only to
moderate loads, you should test the
functionality of your brakes at regular
intervals by pressing firmly on the brake pedal
Driving tips167Driving and parkingZ
Page 170 of 368
at high speeds. This improves the grip of the
brake pads.GWARNING
Make sure that you do not endanger other
road users when you apply the brakes.
You can find a description of Brake Assist
(BAS) on ( Y page 65).
Parking brake
If you drive on wet roads or dirt-covered
surfaces, road salt and/or dirt could get into
the parking brake.
In order to prevent corrosion and a reduction
in the braking power of the parking brake,
observe the following:
R Gently depress the parking brake from time
to time before beginning the journey.
R Drive a distance of approximately 110 yds
(100 m) with a maximum speed of 12 mph
(20 km/h).
GWARNING
While performing this procedure please
assure that the vehicle is stopped before
applying the parking brake. Otherwise the
rear wheels could lock up. You could lose
control of the vehicle and cause an accident.
In addition, the vehicle's brake lights do not
light up when the parking brake is engaged.
Make sure not to endanger any other road
users when you engage the parking brake.
Driving on wet roads
Hydroplaning
If water has accumulated to a certain depth
on the road surface, there is a danger of
hydroplaning occurring, even if:
R you drive at low speeds.
R the tires have adequate tread depth.
For this reason, in the event of heavy rain or
in conditions in which hydroplaning can occur
you must drive in the following manner:
R reduce your speed
R avoid ruts
R brake carefully
Driving on flooded roads
! Do not drive through flooded areas.
Check the depth of any water before driving
through it. Drive slowly through standing
water. Otherwise, water may enter the
vehicle interior or the engine compartment.
This can damage the electronic
components in the engine or the automatic
transmission. Water can also be drawn in
by the engine's air suction nozzles and this
can cause engine damage.
Do not allow water to enter the passenger
compartment or the engine compartment. If
you have to drive through a stretch of
standing water, please be aware the
following:
R the depth of the water must not exceed
10 inches (25 cm) for calm water
R you should drive no faster than at walking
pace.
i For vehicles with AIRMATIC package:
if you have set the raised level before
driving through a stretch of standing water,
the maximum water depth is 12 inches
(30 cm).
Winter driving
Important safety notes
GWARNING
If the vehicle becomes trapped in snow,
ensure that snow is kept away from the
exhaust pipe and from around the vehicle as
long as the engine is running. Otherwise,
poisonous carbon monoxide (CO) may enter
168Driving tipsDriving and parking
Page 171 of 368
the vehicle, resulting in loss of consciousness
and even death.
To assure sufficient fresh air ventilation, open
a window slightly on the side of the vehicle
not facing the wind.
At the onset of winter, have your vehicle
winterproofed at a qualified specialist
workshop, e.g. at an authorized Mercedes-
Benz Center.
i Vehicles with a diesel engine: do not
cover the radiator, e.g. with a protective
cover. The measuring function of the
Onboard Diagnosis System may otherwise
provide inaccurate values. Some of these
values are required by law and must
therefore always be accurate.
Winter tires
At temperatures below 45 ‡(+7 †), use
winter tires or all-season tires. Both types of
tire are identified by the M+S marking.
Only winter tires bearing the i snowflake
symbol in addition to the M+S marking
provide the best possible grip in wintry road
conditions. Only these tires will allow driving
safety systems such as ABS and ESP ®
to
function optimally in winter, as these tires
have been designed specifically for driving on
snow.
Use M+S tires of the same make and tread on
all wheels to maintain safe handling
characteristics.
GWARNING
M+S tires with a tread depth of less than 1
/ 6
inch (4 mm) must be replaced immediately.
They are no longer suitable for use in winter.
Always observe the maximum permissible
speed specified for the M+S tires you have
mounted.
Once you have mounted the winter tires:XCheck the tire pressures ( Y page 329).XRestart the tire pressure monitor
( Y page 331).GWARNING
If you use your spare wheel when M+S tires
are mounted on the other wheels, be aware
that the difference in tire characteristics
impairs cornering ability and reduces driving
stability. Adapt your driving style accordingly.
Have the spare wheel replaced by a normal
wheel with an M+S tire at the nearest
Mercedes-Benz Center.
Snow chains
For safety reasons, Mercedes-Benz
recommends that you only use snow chains
which have been specially approved for your
vehicle by Mercedes-Benz, or are of a
corresponding standard of quality.
! Vehicles with the Adaptive Damping
System (ADS): do not drive in ADS SPORT
mode if snow chains have been mounted.
The vehicle may otherwise be damaged.
! There is not enough space for snow
chains on some wheel sizes. Observe the
information under "Tires and wheels" in the
"Technical Data" section to avoid damage
to the vehicle or the wheels.
R Only use snow chains when driving on
roads completely covered by snow. Do not
exceed the maximum permissible speed of
30 mph (50 km/h). Remove the snow
chains as soon as possible when you are no
longer driving on snow-covered roads.
R Local regulations may restrict the use of
snow chains. Applicable regulations must
be observed if you wish to mount snow
chains.
R Snow chains must not be mounted on
emergency spare wheels.
Driving tips169Driving and parkingZ
Page 193 of 368
side. When you are passing another vehicle,
the warning is emitted only if the difference
in speed is less than 7 mph (12 km/h).
The yellow indicator lamp goes out if the
reverse gear is engaged. In this event, Blind
Spot Assist is no longer active.
The brightness of the indicator/warning
lamps is adjusted automatically according to
the ambient light.GWARNING
Blind Spot Assist is not active at speeds under
approximately 20 mph (30 km/h). The
indicator lamps in the exterior mirrors are
yellow. Vehicles in the monitoring range are
then not indicated.
Always pay attention to traffic conditions and
your surroundings. Otherwise, you may fail to
recognize dangers in time, cause an accident
and injure yourself and others.
Collision warning
If a vehicle is detected in the monitoring range
of Blind Spot Assist and you switch on the turn
signal, a double warning tone sounds. Red
warning lamp : flashes. If the turn signal
remains on, detected vehicles are indicated
by the flashing of red warning lamp :. There
are no further warning tones.
Switching on Blind Spot Assist
XMake sure that the radar sensor system
( Y page 208) and Blind Spot Assist
( Y page 210) are activated in the on-board
computer.XTurn the SmartKey to position 2 in the
ignition lock.
Warning lamps : light up red in the
exterior mirrors for approximately 1.5
seconds and then turn yellow.
Trailer towing
When you attach a trailer, make sure you have
correctly established the electrical
connection. This can be accomplished by
checking the trailer lighting. In this event,
Blind Spot Assist is deactivated. The indicator
lamp in the exterior mirrors lights up yellow
and the Blind Spot Assist Currently
Unavailable See Operator's Manual
message appears in the multifunction
display.
i You can deactivate the indicator lamps in
the exterior mirrors.
To do so, switch off Blind Spot Assist when:
R the SmartKey is in position 2 in the
ignition lock.
R the engine is not running.
R the electrical connection to the trailer
has been established.
Trailer towing
Notes on towing a trailer
Important safety notes
GWARNING
When towing a trailer, incorrect equipment
and driving style could cause you to lose
control of the vehicle.
Towing incorrectly or not observing this
Operator's Manual could lead to damage to
the vehicle and/or serious injuries. Observe
the following guidelines to ensure safe trailer
towing.
Contact a Mercedes-Benz Center if you need
further explanation of the information
contained in this Operator's Manual.
General information
R Only install an approved trailer coupling on
your vehicle.
Further information on availability and on
installation is available from any authorized
Mercedes-Benz Center.
R The bumpers of your vehicle are not
suitable for installing detachable trailer
couplings.
Trailer towing191Driving and parkingZ
Page 195 of 368
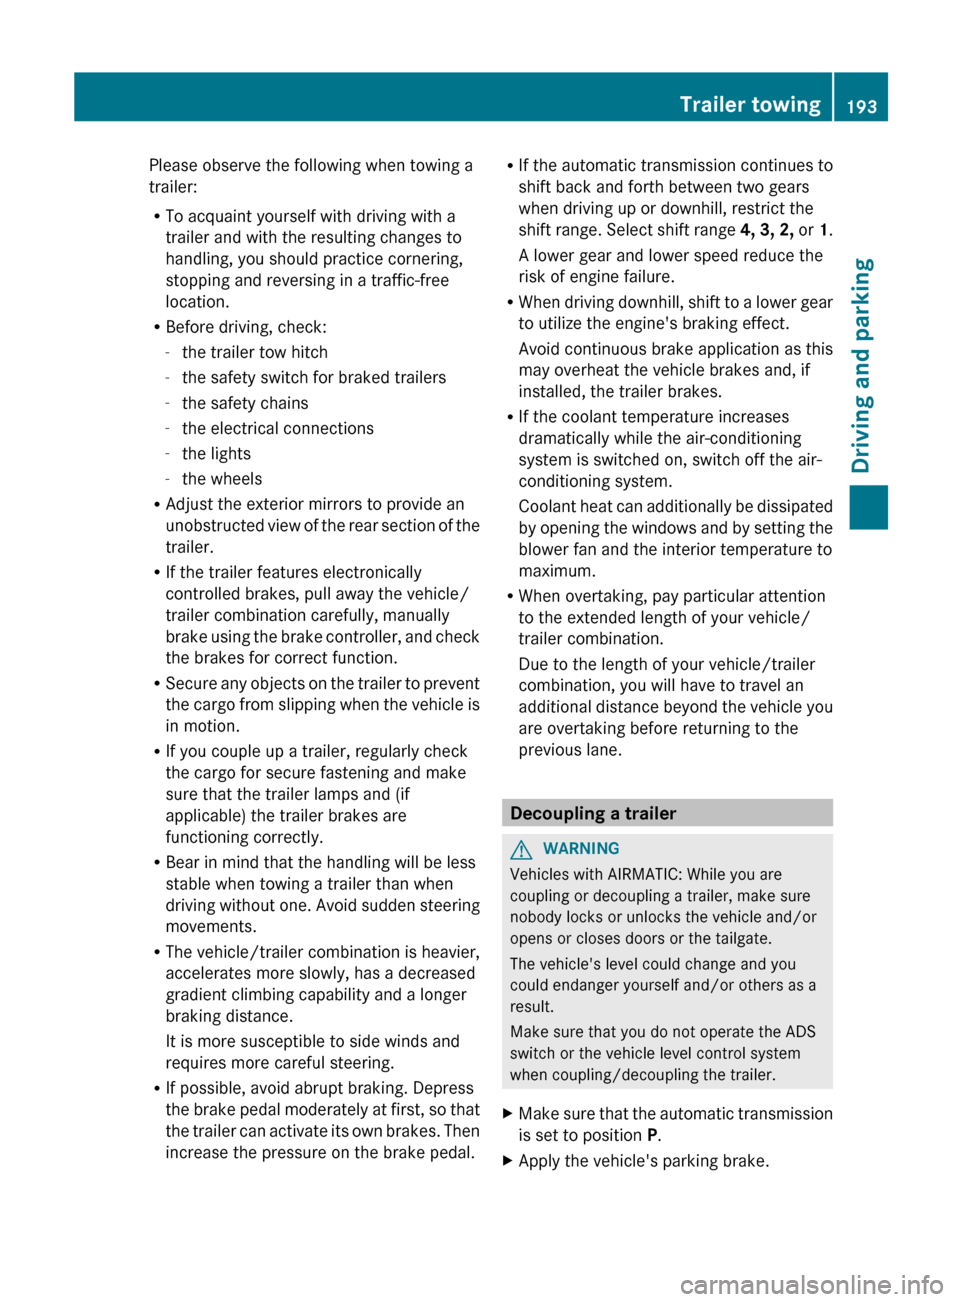
Please observe the following when towing a
trailer:
R To acquaint yourself with driving with a
trailer and with the resulting changes to
handling, you should practice cornering,
stopping and reversing in a traffic-free
location.
R Before driving, check:
- the trailer tow hitch
- the safety switch for braked trailers
- the safety chains
- the electrical connections
- the lights
- the wheels
R Adjust the exterior mirrors to provide an
unobstructed view of the rear section of the
trailer.
R If the trailer features electronically
controlled brakes, pull away the vehicle/
trailer combination carefully, manually
brake using the brake controller, and check
the brakes for correct function.
R Secure any objects on the trailer to prevent
the cargo from slipping when the vehicle is
in motion.
R If you couple up a trailer, regularly check
the cargo for secure fastening and make
sure that the trailer lamps and (if
applicable) the trailer brakes are
functioning correctly.
R Bear in mind that the handling will be less
stable when towing a trailer than when
driving without one. Avoid sudden steering
movements.
R The vehicle/trailer combination is heavier,
accelerates more slowly, has a decreased
gradient climbing capability and a longer
braking distance.
It is more susceptible to side winds and
requires more careful steering.
R If possible, avoid abrupt braking. Depress
the brake pedal moderately at first, so that
the trailer can activate its own brakes. Then
increase the pressure on the brake pedal.R If the automatic transmission continues to
shift back and forth between two gears
when driving up or downhill, restrict the
shift range. Select shift range 4, 3, 2, or 1.
A lower gear and lower speed reduce the
risk of engine failure.
R When driving downhill, shift to a lower gear
to utilize the engine's braking effect.
Avoid continuous brake application as this
may overheat the vehicle brakes and, if
installed, the trailer brakes.
R If the coolant temperature increases
dramatically while the air-conditioning
system is switched on, switch off the air-
conditioning system.
Coolant heat can additionally be dissipated
by opening the windows and by setting the
blower fan and the interior temperature to
maximum.
R When overtaking, pay particular attention
to the extended length of your vehicle/
trailer combination.
Due to the length of your vehicle/trailer
combination, you will have to travel an
additional distance beyond the vehicle you
are overtaking before returning to the
previous lane.
Decoupling a trailer
GWARNING
Vehicles with AIRMATIC: While you are
coupling or decoupling a trailer, make sure
nobody locks or unlocks the vehicle and/or
opens or closes doors or the tailgate.
The vehicle's level could change and you
could endanger yourself and/or others as a
result.
Make sure that you do not operate the ADS
switch or the vehicle level control system
when coupling/decoupling the trailer.
XMake sure that the automatic transmission
is set to position P.XApply the vehicle's parking brake.Trailer towing193Driving and parkingZ
Page 219 of 368
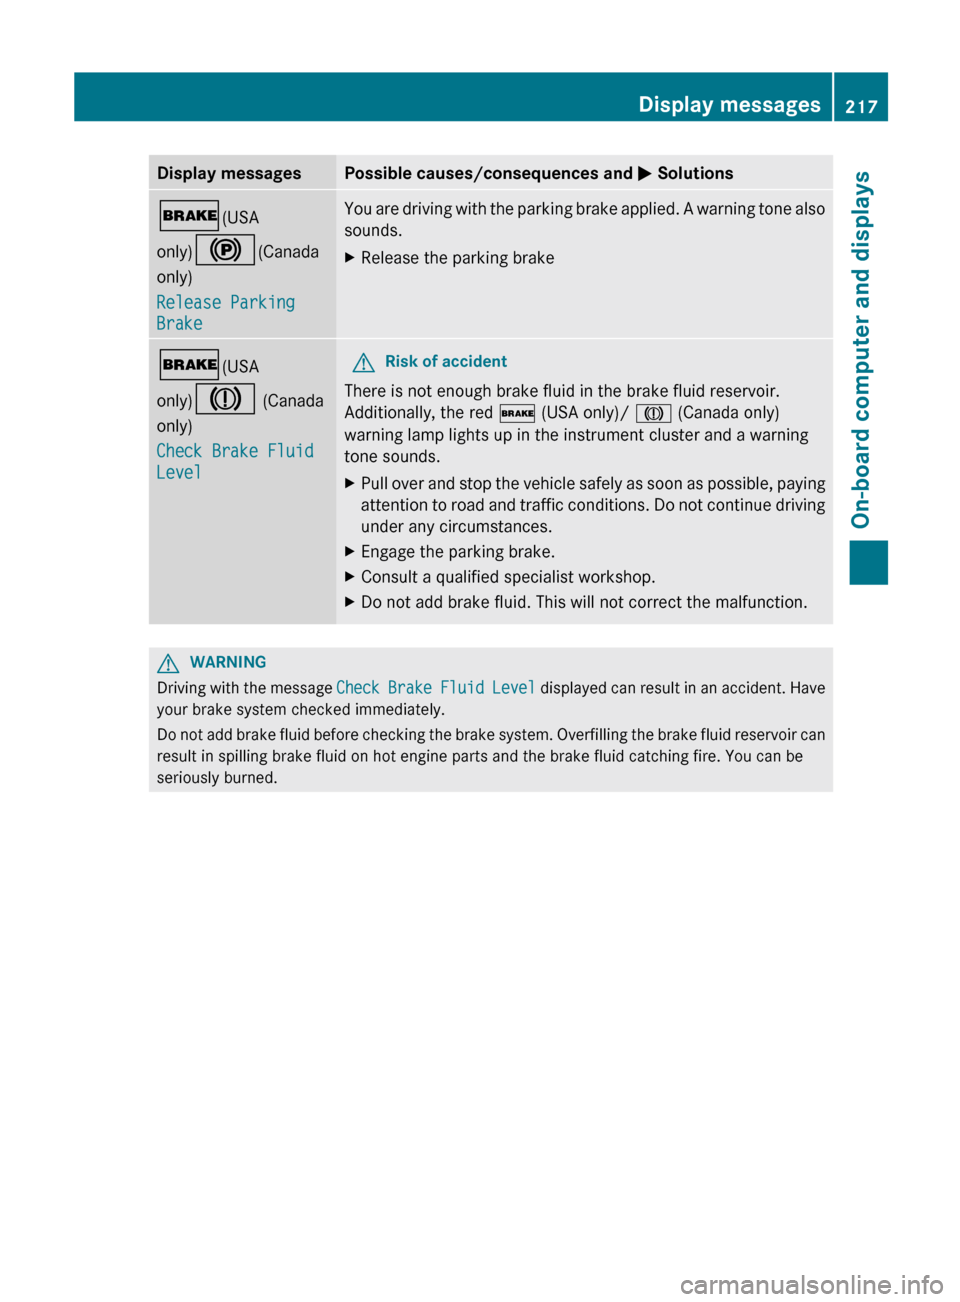
Display messagesPossible causes/consequences and M Solutions$ (USA
only) ! (Canada
only)
Release Parking
BrakeYou are driving with the parking brake applied. A warning tone also
sounds.XRelease the parking brake$ (USA
only) J (Canada
only)
Check Brake Fluid
LevelGRisk of accident
There is not enough brake fluid in the brake fluid reservoir.
Additionally, the red $ (USA only)/ J (Canada only)
warning lamp lights up in the instrument cluster and a warning
tone sounds.
XPull over and stop the vehicle safely as soon as possible, paying
attention to road and traffic conditions. Do not continue driving
under any circumstances.XEngage the parking brake.XConsult a qualified specialist workshop.XDo not add brake fluid. This will not correct the malfunction.GWARNING
Driving with the message Check Brake Fluid Level displayed can result in an accident. Have
your brake system checked immediately.
Do not add brake fluid before checking the brake system. Overfilling the brake fluid reservoir can
result in spilling brake fluid on hot engine parts and the brake fluid catching fire. You can be
seriously burned.
Display messages217On-board computer and displaysZ
Page 227 of 368
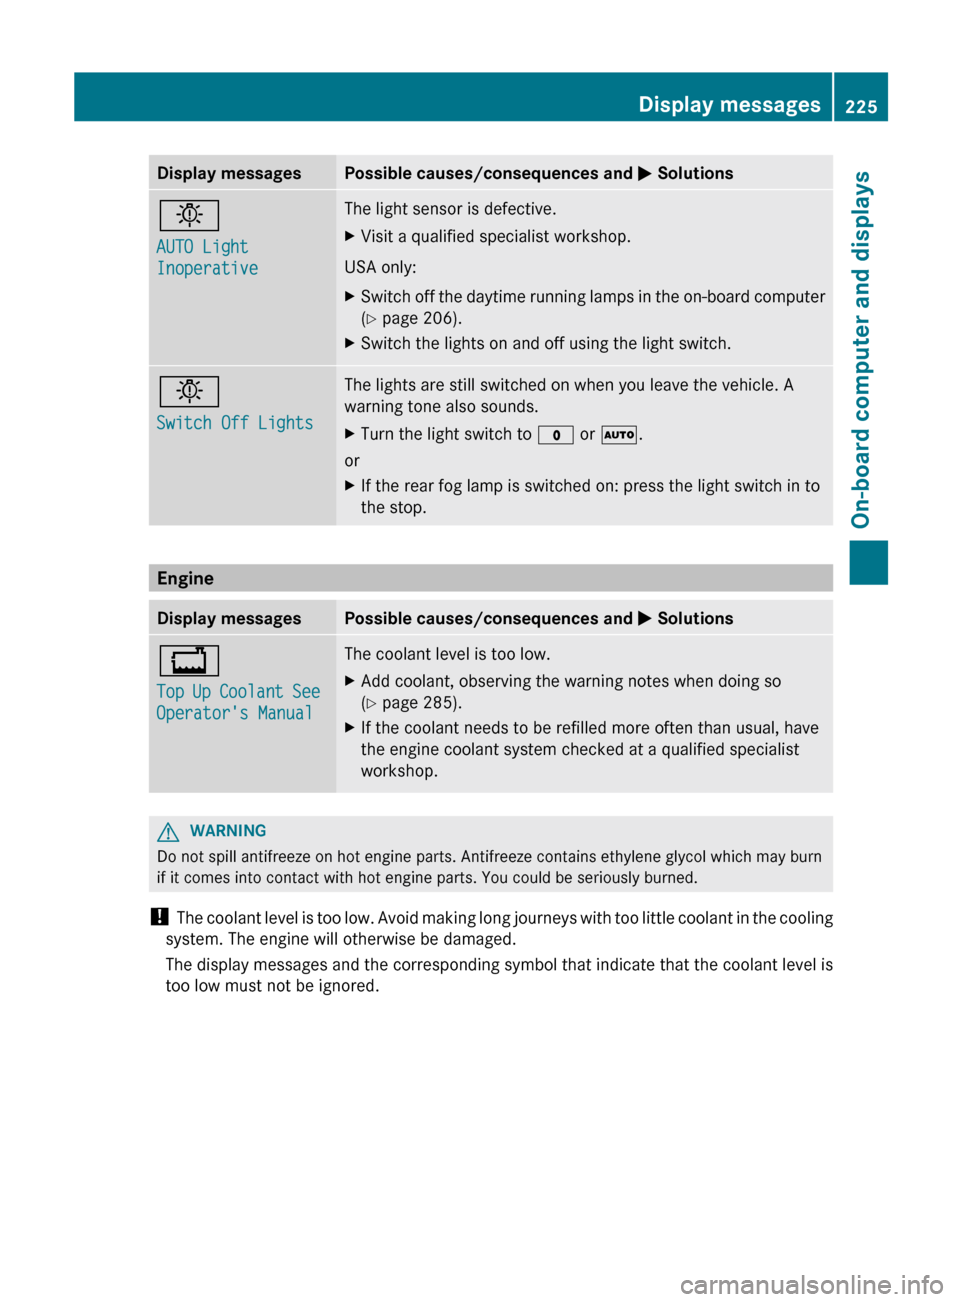
Display messagesPossible causes/consequences and M Solutionsb
AUTO Light
InoperativeThe light sensor is defective.XVisit a qualified specialist workshop.
USA only:
XSwitch off the daytime running lamps in the on-board computer
( Y page 206).XSwitch the lights on and off using the light switch.b
Switch Off LightsThe lights are still switched on when you leave the vehicle. A
warning tone also sounds.XTurn the light switch to $ or à .
or
XIf the rear fog lamp is switched on: press the light switch in to
the stop.
Engine
Display messagesPossible causes/consequences and M Solutions+
Top Up Coolant See
Operator's ManualThe coolant level is too low.XAdd coolant, observing the warning notes when doing so
( Y page 285).XIf the coolant needs to be refilled more often than usual, have
the engine coolant system checked at a qualified specialist
workshop.GWARNING
Do not spill antifreeze on hot engine parts. Antifreeze contains ethylene glycol which may burn
if it comes into contact with hot engine parts. You could be seriously burned.
! The coolant level is too low. Avoid making long journeys with too little coolant in the cooling
system. The engine will otherwise be damaged.
The display messages and the corresponding symbol that indicate that the coolant level is
too low must not be ignored.
Display messages225On-board computer and displaysZ
Page 232 of 368
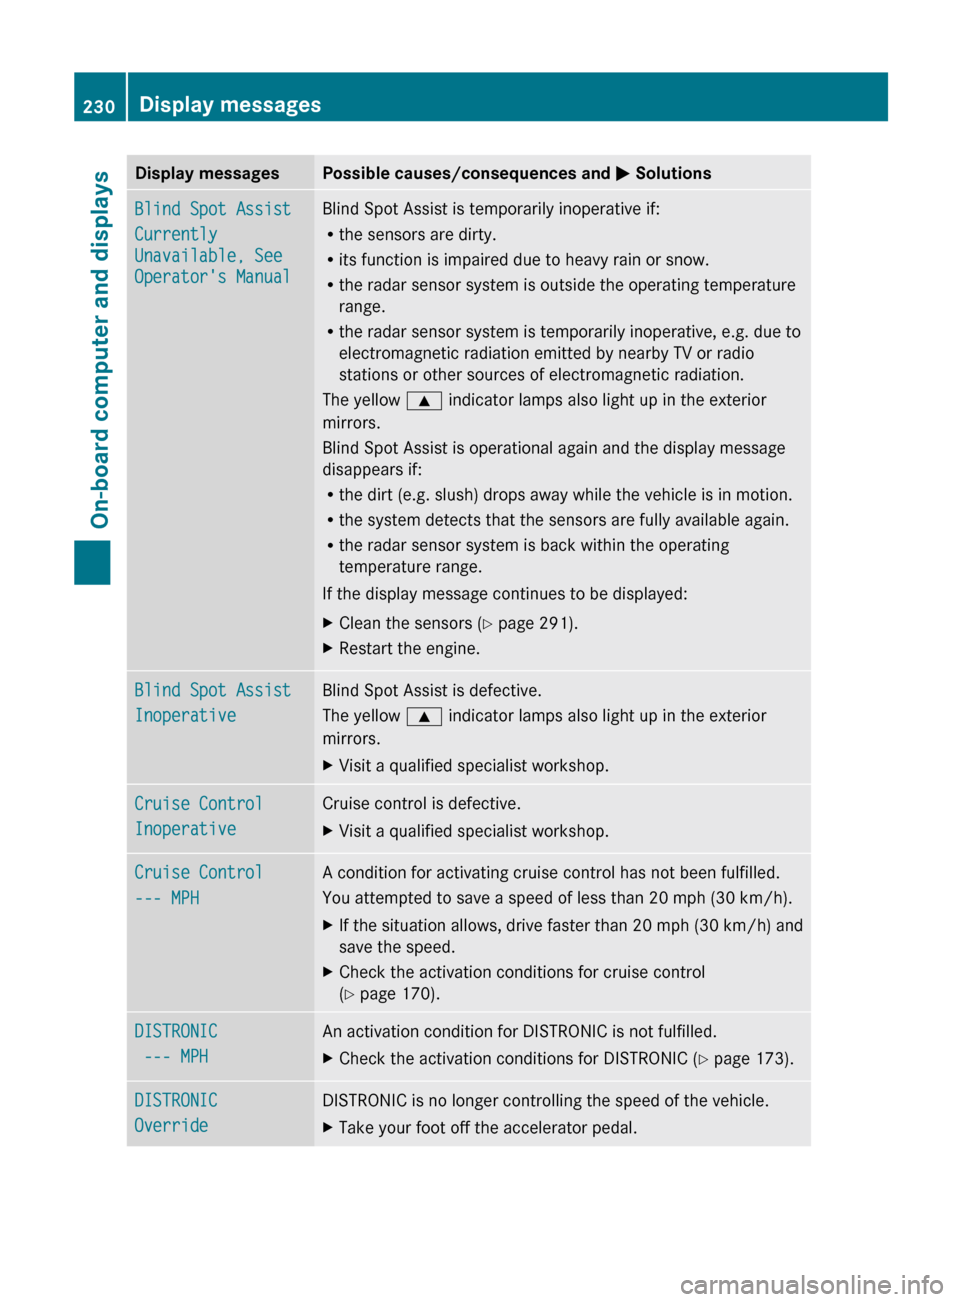
Display messagesPossible causes/consequences and M SolutionsBlind Spot Assist
Currently
Unavailable, See
Operator's ManualBlind Spot Assist is temporarily inoperative if:
R the sensors are dirty.
R its function is impaired due to heavy rain or snow.
R the radar sensor system is outside the operating temperature
range.
R the radar sensor system is temporarily inoperative, e.g. due to
electromagnetic radiation emitted by nearby TV or radio
stations or other sources of electromagnetic radiation.
The yellow 9 indicator lamps also light up in the exterior
mirrors.
Blind Spot Assist is operational again and the display message
disappears if:
R the dirt (e.g. slush) drops away while the vehicle is in motion.
R the system detects that the sensors are fully available again.
R the radar sensor system is back within the operating
temperature range.
If the display message continues to be displayed:XClean the sensors ( Y page 291).XRestart the engine.Blind Spot Assist
InoperativeBlind Spot Assist is defective.
The yellow 9 indicator lamps also light up in the exterior
mirrors.XVisit a qualified specialist workshop.Cruise Control
InoperativeCruise control is defective.XVisit a qualified specialist workshop.Cruise Control
--- MPH A condition for activating cruise control has not been fulfilled.
You attempted to save a speed of less than 20 mph (30 km/h).XIf the situation allows, drive faster than 20 mph ( 30 km/h) and
save the speed.XCheck the activation conditions for cruise control
( Y page 170).DISTRONIC
--- MPH An activation condition for DISTRONIC is not fulfilled.XCheck the activation conditions for DISTRONIC ( Y page 173).DISTRONIC
OverrideDISTRONIC is no longer controlling the speed of the vehicle.XTake your foot off the accelerator pedal.230Display messagesOn-board computer and displays
Page 246 of 368

EngineProblemPossible causes/consequences and M Solutions! (USA only)
; (Canada only)
The yellow Check
Engine warning lamp
lights up while the
ignition is switched on
with the engine
running.There may be a malfunction, for example:
R in the engine management
R in the fuel injection system
R in the exhaust system
R in the ignition system (for vehicles with a gasoline engine)
R in the fuel system
The emission limit values may be exceeded and the engine may
be running in emergency mode.XHave the vehicle checked as soon as possible at a qualified
specialist workshop.
i In some states, you are required by law to immediately visit a
qualified specialist workshop as soon as the yellow Check
Engine warning lamp lights up. If in doubt, check whether such
legal regulations apply in the state/province in which you are
currently driving.
Vehicles with a diesel engine: the fuel tank has been run dry
( Y page 160).XStart the engine three to four times after refueling.
If the yellow Check Engine warning lamp goes out, emergency
running mode is canceled. The vehicle need not be checked.The yellow reserve fuel
warning lamp flashes
while the vehicle is in
motion.
In addition, the !
(USA only)/ ;
(Canada only) yellow
Check Engine warning
lamp may light up.The fuel system pressure is too low. The fuel filler cap is not closed
correctly or the fuel system is leaking.XObserve the additional display messages in the multifunction
display.XCheck that the fuel filler cap is correctly closed.XIf the fuel filler cap is not correctly closed: close the fuel filler
cap.XIf the fuel filler cap is closed: visit a qualified specialist
workshop.The yellow reserve fuel
warning lamp lights up
while the engine is
running.The fuel level has dropped into the reserve range.XRefuel at the nearest gas station.244Warning and indicator lamps in the instrument clusterOn-board computer and displays
Page 285 of 368
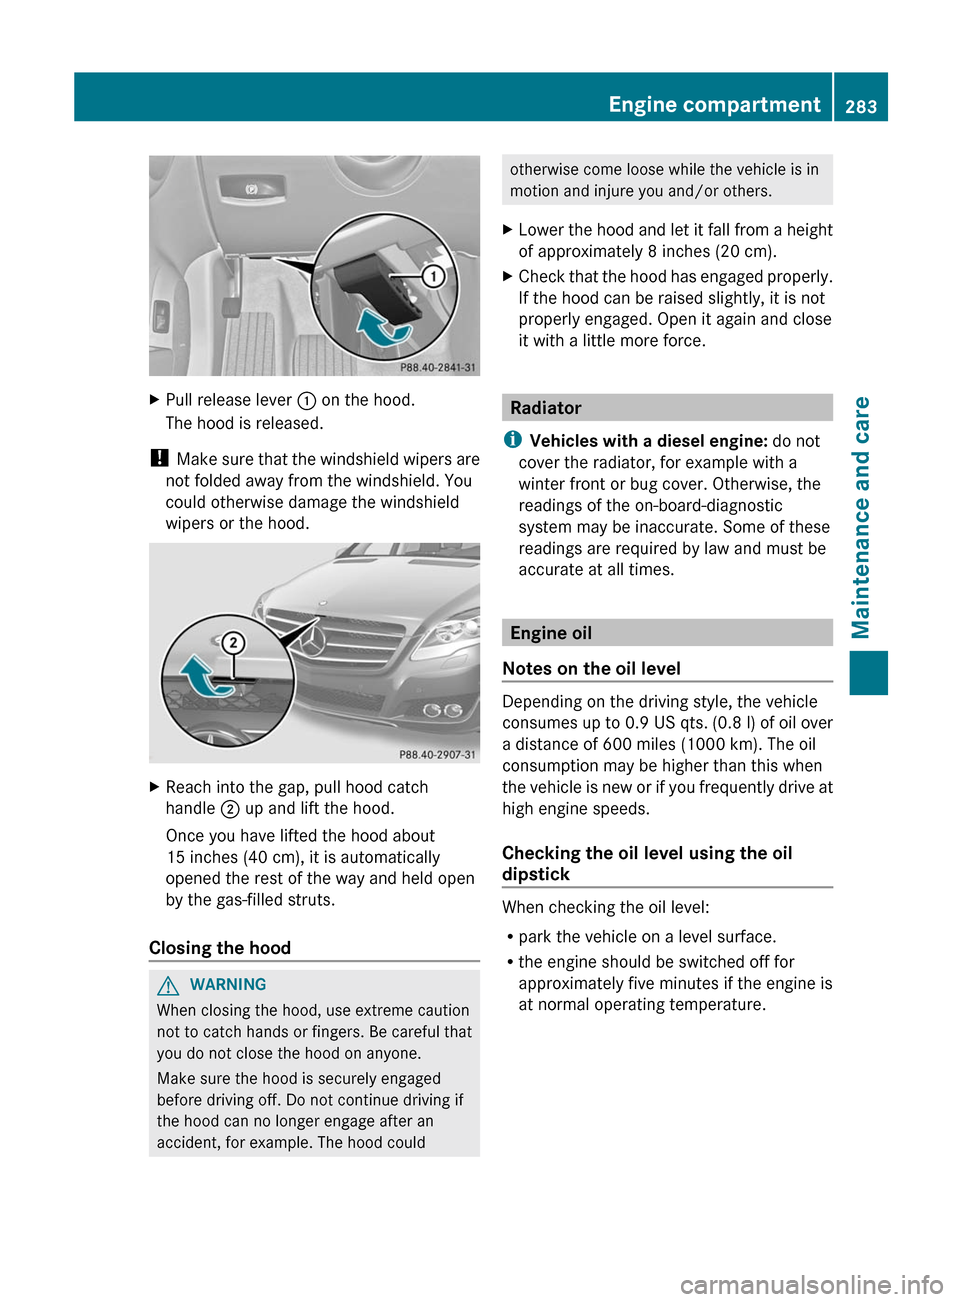
XPull release lever : on the hood.
The hood is released.
! Make sure that the windshield wipers are
not folded away from the windshield. You
could otherwise damage the windshield
wipers or the hood.
XReach into the gap, pull hood catch
handle ; up and lift the hood.
Once you have lifted the hood about
15 inches (40 cm), it is automatically
opened the rest of the way and held open
by the gas-filled struts.
Closing the hood
GWARNING
When closing the hood, use extreme caution
not to catch hands or fingers. Be careful that
you do not close the hood on anyone.
Make sure the hood is securely engaged
before driving off. Do not continue driving if
the hood can no longer engage after an
accident, for example. The hood could
otherwise come loose while the vehicle is in
motion and injure you and/or others.XLower the hood and let it fall from a height
of approximately 8 inches (20 cm).XCheck that the hood has engaged properly.
If the hood can be raised slightly, it is not
properly engaged. Open it again and close
it with a little more force.
Radiator
i Vehicles with a diesel engine: do not
cover the radiator, for example with a
winter front or bug cover. Otherwise, the
readings of the on-board-diagnostic
system may be inaccurate. Some of these
readings are required by law and must be
accurate at all times.
Engine oil
Notes on the oil level
Depending on the driving style, the vehicle
consumes up to 0.9 US qts. (0.8 l) of oil over
a distance of 600 miles (1000 km). The oil
consumption may be higher than this when
the vehicle is new or if you frequently drive at
high engine speeds.
Checking the oil level using the oil
dipstick
When checking the oil level:
R park the vehicle on a level surface.
R the engine should be switched off for
approximately five minutes if the engine is
at normal operating temperature.
Engine compartment283Maintenance and careZ