check engine light MERCEDES-BENZ R-Class 2012 W251 Owner's Manual
[x] Cancel search | Manufacturer: MERCEDES-BENZ, Model Year: 2012, Model line: R-Class, Model: MERCEDES-BENZ R-Class 2012 W251Pages: 368, PDF Size: 15.19 MB
Page 9 of 368
Coolant (engine)Checking the level .........................285
Display message ............................ 225
Notes ............................................. 359
Temperature gauge ........................ 202
Cooling
see Climate control
Crash-responsive emergency
lighting ............................................... 119
Cruise control Cruise control lever .......................171
Deactivating ................................... 172
Display message ............................ 230
Driving system ............................... 170
Function/notes ............................. 170
Important safety notes ..................170
LIM indicator lamp .........................171
Setting a speed .............................. 172
Storing and maintaining current
speed ............................................. 171
Cup holder
Center console .............................. 263
Important safety notes ..................262
second row of seats ....................... 263
Second row of seats (armrest) .......264
third row of seats ........................... 264
Customer Assistance Center (CAC) ... 24
Customer Relations Department ....... 24
D
Dashboard see Cockpit
Date (on-board computer) ................ 206
Daytime running lamp mode see Daytime running lamps
Daytime running lamps
Display message ............................ 224
Switching on/off (on-board
computer) ...................................... 206
Switching on/off (switch) ..............115
DEF
Adding ........................................... 161
Display message ............................ 228
Delayed switch-off
Exterior lighting (on-board
computer) ...................................... 207
Interior lighting .............................. 208
Diesel particle filter .......................... 166
Digital speedometer Displaying ...................................... 202
Setting the unit (on-board
computer) ...................................... 205
DIRECT SELECT lever
see Automatic transmission
Display (cleaning instructions) ........ 292
Display messages Calling up (on-board computer) .....213
Driving systems ............................. 229
Engine ............................................ 225
General notes ................................ 213
Hiding (on-board computer) ...........213
Key ................................................ 236
KEYLESS-GO .................................. 236
Lights ............................................. 222
Safety systems .............................. 214
Service interval display ..................287
Tires ............................................... 231
Vehicle ........................................... 234
Distance recorder ............................. 202
see Odometer
see Trip odometer
Distance warning (warning lamp) .... 245
Distance warning function
(vehicles with DISTRONIC) Activating/deactivating (on-
board computer) ............................ 210
Notes ............................................... 68
DISTRONIC
Deactivating ................................... 178
Display message ............................ 230
Displays in the multifunction
display ........................................... 178
Driving tips .................................... 179
Important safety notes ..................173
Notes/function .............................. 173
Setting the specified minimum
distance ......................................... 177
Warning lamp ................................. 245
Door
Central locking/unlocking (key) ......72
Control panel ................................... 35
Important safety notes ....................79Index7
Page 11 of 368
Emergency spare wheelStorage location ............................ 297
Stowing .......................................... 298
Emergency Tensioning Devices
Function ........................................... 55
Safety guidelines ............................. 39
Emissions purification
Service and warranty information ....21
Engine
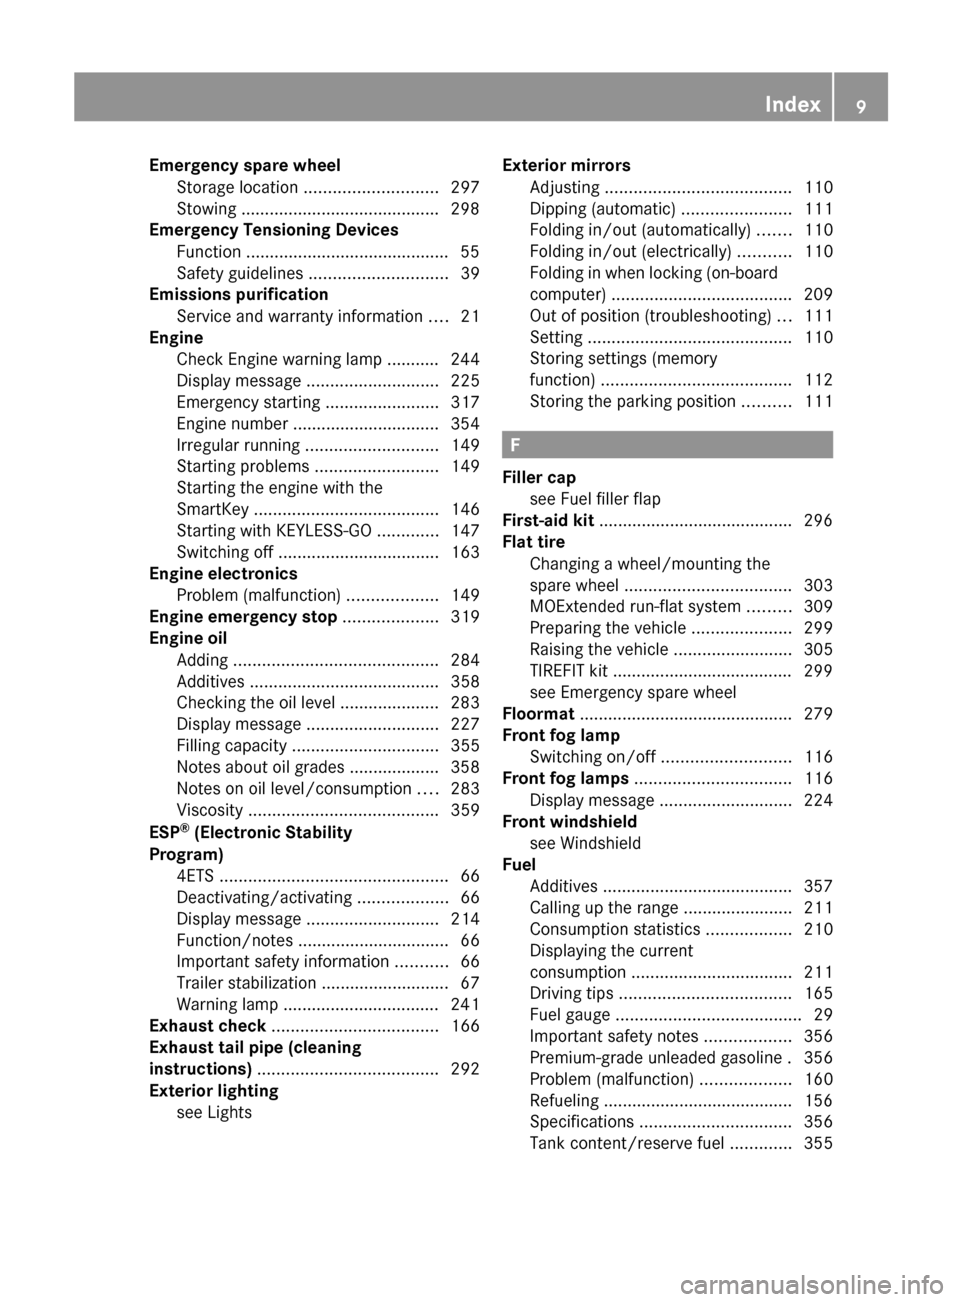
Check Engine warning lamp ........... 244
Display message ............................ 225
Emergency starting ........................317
Engine number ............................... 354
Irregular running ............................ 149
Starting problems ..........................149
Starting the engine with the
SmartKey ....................................... 146
Starting with KEYLESS-GO .............147
Switching off .................................. 163
Engine electronics
Problem (malfunction) ...................149
Engine emergency stop .................... 319
Engine oil Adding ........................................... 284
Additives ........................................ 358
Checking the oil level ..................... 283
Display message ............................ 227
Filling capacity ............................... 355
Notes about oil grades ................... 358
Notes on oil level/consumption ....283
Viscosity ........................................ 359
ESP ®
(Electronic Stability
Program) 4ETS ................................................ 66
Deactivating/activating ...................66
Display message ............................ 214
Function/notes ................................ 66
Important safety information ...........66
Trailer stabilization ........................... 67
Warning lamp ................................. 241
Exhaust check ................................... 166
Exhaust tail pipe (cleaning
instructions) ...................................... 292
Exterior lighting see Lights Exterior mirrors
Adjusting ....................................... 110
Dipping (automatic) .......................111
Folding in/out (automatically) .......110
Folding in/out (electrically) ...........110
Folding in when locking (on-board
computer) ...................................... 209
Out of position (troubleshooting) ...111
Setting ........................................... 110
Storing settings (memory
function) ........................................ 112
Storing the parking position ..........111
F
Filler cap see Fuel filler flap
First-aid kit ......................................... 296
Flat tire Changing a wheel/mounting the
spare wheel ................................... 303
MOExtended run-flat system .........309
Preparing the vehicle .....................299
Raising the vehicle .........................305
TIREFIT kit ...................................... 299
see Emergency spare wheel
Floormat ............................................. 279
Front fog lamp Switching on/off ........................... 116
Front fog lamps ................................. 116
Display message ............................ 224
Front windshield
see Windshield
Fuel
Additives ........................................ 357
Calling up the range .......................211
Consumption statistics ..................210
Displaying the current
consumption .................................. 211
Driving tips .................................... 165
Fuel gauge ....................................... 29
Important safety notes ..................356
Premium-grade unleaded gasoline . 356
Problem (malfunction) ...................160
Refueling ........................................ 156
Specifications ................................ 356
Tank content/reserve fuel .............355
Index9
Page 32 of 368
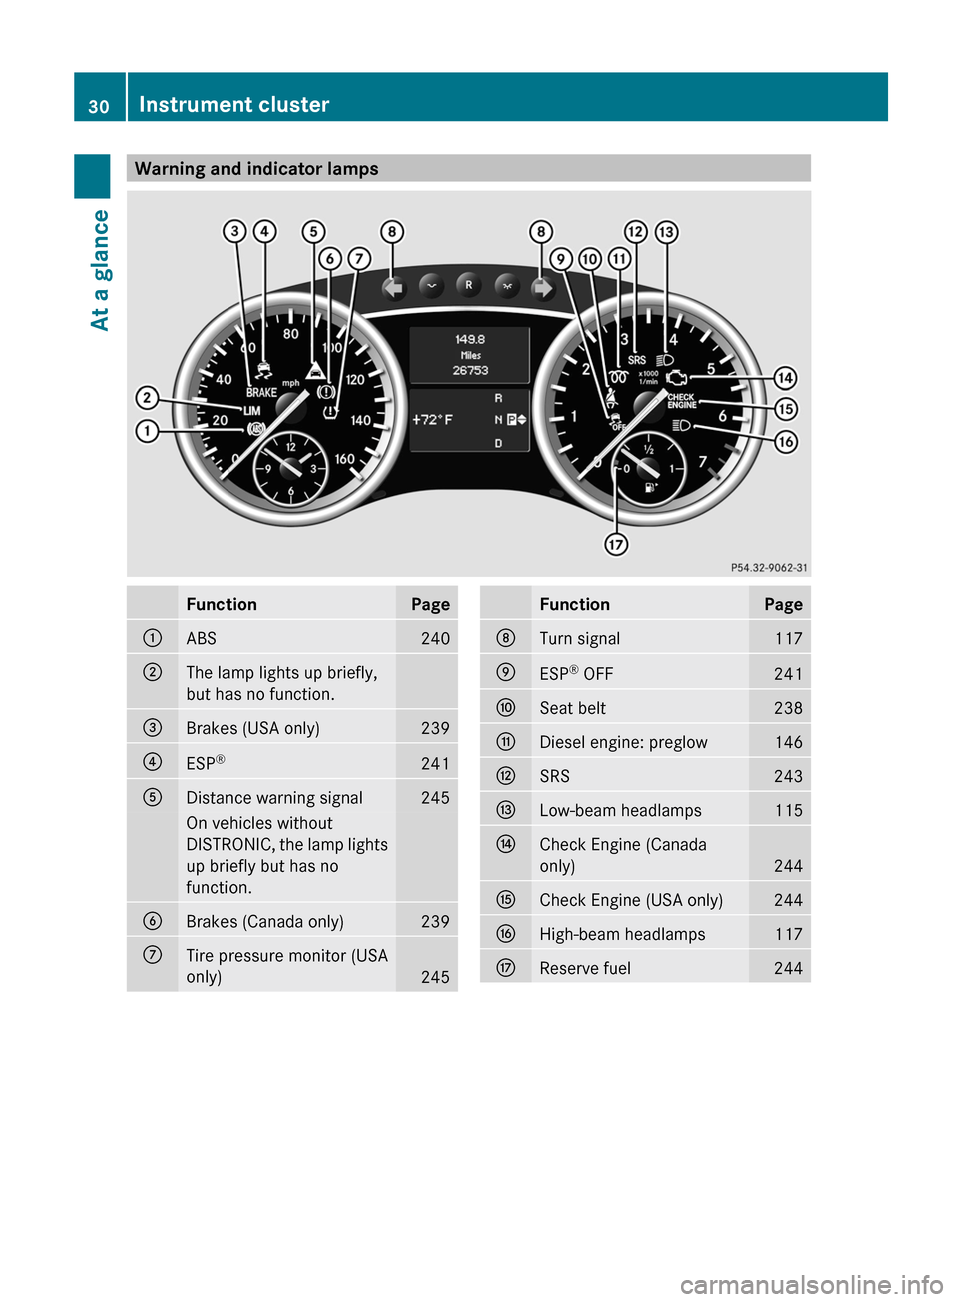
Warning and indicator lampsFunctionPage:ABS240;The lamp lights up briefly,
but has no function.=Brakes (USA only)239?ESP ®241ADistance warning signal245On vehicles without
DISTRONIC, the lamp lights
up briefly but has no
function.BBrakes (Canada only)239CTire pressure monitor (USA
only)
245
FunctionPageDTurn signal117EESP ®
OFF241FSeat belt238GDiesel engine: preglow146HSRS243ILow-beam headlamps115JCheck Engine (Canada
only)
244
KCheck Engine (USA only)244LHigh-beam headlamps117MReserve fuel24430Instrument clusterAt a glance
Page 40 of 368
Useful information
i This Operator's Manual describes all
models and all standard and optional
equipment of your vehicle available at the
time of publication of the Operator's
Manual. Country-specific differences are
possible. Please note that your vehicle may
not be equipped with all features
described. This also applies to safety-
related systems and functions.
i Please read the information on qualified
specialist workshops ( Y page 24).
Occupant safety
Overview of occupant safety
In this section, you will learn the most
important facts about the restraint system
components of the vehicle.
The restraint system consists of:
R seat belts
R child restraint systems
R LATCH-type (ISOFIX) child seat anchors
Additional protection is provided by:
R SRS (Supplemental Restraint System)
R NECK-PRO head restraints/NECK-PRO
luxury head restraints
R PRE-SAFE ®
R Air bag system components with:
- PASSENGER AIR BAG OFF indicator lamp
- front-passenger seat with Occupant
Classification System (OCS)
The different air bag systems work
independently of each other. The protective
functions of the system work in conjunction
with each other. Not all air bags are deployed
in an accident.
GWARNING
Modifications to or work improperly
conducted on restraint system components
or their wiring, as well as tampering with
interconnected electronic systems, can lead
to the restraint systems no longer functioning
as intended.
Air bags or Emergency Tensioning Devices
(ETDs), for example, could deploy
inadvertently or fail to deploy in accidents
although the deceleration threshold for air
bag deployment is exceeded. Therefore,
never modify the restraint systems. Do not
tamper with electronic components or their
software.
i See "Children in the vehicle"
( Y page 56) for more information on
infants and children traveling with you in
the vehicle and restraints for infants and
children.
SRS (Supplemental Restraint System)
Introduction
SRS consists of:
R the + SRS warning lamp
R air bags
R air bag control unit (with crash sensors)
R Emergency Tensioning Devices
R belt force limiters
SRS reduces the risk of occupants coming
into contact with the vehicle's interior in the
event of an accident. It can also reduce the
effect of the forces to which occupants are
subjected during an accident.
SRS warning lamps
SRS functions are checked regularly when
you switch on the ignition and when the
engine is running. Therefore, malfunctions
can be detected in good time.
The + SRS warning lamp in the instrument
cluster lights up when the ignition is switched
on. It goes out no later than a few seconds
after the engine is started.
38Occupant safetySafety
Page 74 of 368
Useful information
i This Operator's Manual describes all
models and all standard and optional
equipment of your vehicle available at the
time of publication of the Operator's
Manual. Country-specific differences are
possible. Please note that your vehicle may
not be equipped with all features
described. This also applies to safety-
related systems and functions.
i Please read the information on qualified
specialist workshops ( Y page 24).
SmartKey
Important safety notes
GWARNING
When leaving the vehicle, always remove the
SmartKey from the ignition lock. Always take
the SmartKey with you and lock the vehicle.
Do not leave children unsupervised in the
vehicle, even if they are secured in a child
restraint system, and do not give them access
to an unlocked vehicle. A child's unsupervised
access to a vehicle could result in an accident
and/or serious personal injury. They could:
R injure themselves on vehicle parts
R be seriously or fatally injured by extreme
heat or cold
R injure themselves or have an accident with
vehicle equipment that may still be in
operation even after the SmartKey has
been removed from the ignition, such as the
seat adjustment, steering wheel
adjustment or memory function.
If children open a door, they could cause
severe or even fatal injury to other persons; if
they get out of the vehicle, they could injure
themselves when doing so or be seriously or
even fatally injured by any passing traffic.
Do not expose the child restraint system to
direct sunlight. The child restraint system's
metal parts, for example, could become very
hot, and a child could be burned on these
parts.GWARNING
If a key ring is too heavy or too large, the
weight acting on the key could cause it to turn
in the ignition lock or catch on the steering
wheel. This could cause the engine to be
switched off suddenly. You could lose control
of the vehicle and cause an accident. Do not
attach any heavy or large key rings to the key
that is inserted in the ignition.
General information
If you cannot lock or unlock the vehicle with
the SmartKey, either the battery in the
SmartKey is discharged, the SmartKey is
faulty or the starter battery is discharged.
XCheck the battery in the SmartKey and
replace it if necessary ( Y page 76).XUnlock the driver's door using the
mechanical key ( Y page 81).XLock the vehicle ( Y page 81).XHave the starter battery and battery
contacts checked at an authorized
Mercedes-Benz Center.
If the SmartKey is faulty, contact Roadside
Assistance or an authorized Mercedes-Benz
Center.
SmartKey functions
General notes
i USA only:
This device complies with Part 15 of the
FCC Rules. Operation is subject to the
following two conditions:
1. This device may not cause harmful
interference, and
2. this device must accept any interference
received, including interference that may
cause undesired operation.
72SmartKeyOpening/closing
Page 81 of 368

ProblemPossible causes/consequences and M SolutionsYou have lost the
mechanical key.XReport the loss immediately to the vehicle insurers.XIf necessary, have the locks changed as well.The engine cannot be
started using the
SmartKey.The on-board voltage is too low.XSwitch off non-essential consumers, e.g. seat heating or interior
lighting, and try to start the engine again.
If this does not work:
XCheck the starter battery and charge it if necessary
( Y page 310).
or
XJump-start the vehicle ( Y page 313).
or
XConsult a qualified specialist workshop.The engine cannot be
started using KEYLESS-
GO. The SmartKey is in
the vehicle.A door is open. Therefore, the SmartKey cannot be detected as
easily.XClose the door and try to start the vehicle again.There is interference from a powerful source of radio waves.XStart your vehicle with the SmartKey in the ignition lock.Doors
Important safety notes
GWARNING
When leaving the vehicle, always remove the
SmartKey from the ignition lock. Always take
the SmartKey with you and lock the vehicle.
Do not leave children unsupervised in the
vehicle, even if they are secured in a child
restraint system, and do not give them access
to an unlocked vehicle. A child's unsupervised
access to a vehicle could result in an accident
and/or serious personal injury. They could:
R injure themselves on vehicle parts
R be seriously or fatally injured by extreme
heat or cold
R injure themselves or have an accident with
vehicle equipment that may still be in
operation even after the SmartKey has
been removed from the ignition, such as the
seat adjustment, steering wheel
adjustment or memory function.
If children open a door, they could cause
severe or even fatal injury to other persons; if
they get out of the vehicle, they could injure
themselves when doing so or be seriously or
even fatally injured by any passing traffic.
Do not expose the child restraint system to
direct sunlight. The child restraint system's
metal parts, for example, could become very
hot, and a child could be burned on these
parts.GWARNING
Do not carry heavy or hard objects in the
passenger compartment or cargo
compartment unless they are firmly secured
in place.
Doors79Opening/closingZ
Page 129 of 368
XFor safety reasons, you should remove the
SmartKey from the ignition lock.
or
XSwitch off the engine using the Start/Stop
button and open the driver's door.XRemove the cause of the obstruction.XSwitch the windshield wipers back on.
The windshield wipers are inoperative
The windshield wiper drive is malfunctioning.
XSelect another wiper speed on the
combination switch.XHave the windshield wipers checked at a
qualified specialist workshop.
The spray nozzles are misaligned
The windshield washer fluid from the spray
nozzles no longer hits the center of the
windshield. The spray nozzles are misaligned.
XHave the spray nozzles adjusted at a
qualified specialist workshop.Windshield wipers127Lights and windshield wipersZ
Page 152 of 368
ProblemPossible causes/consequences and M SolutionsVehicles with a
gasoline engine:
The engine is not
running smoothly and
is misfiring.There is a malfunction in the engine electronics or a mechanical
component of the engine management system.XOnly depress the accelerator pedal slightly.XHave the cause rectified immediately at a qualified specialist
workshop, e.g. an authorized Mercedes-Benz Center.
Otherwise, non-combusted fuel may get into the catalytic
converter and damage it.The coolant
temperature gauge
shows a value above
248 ‡ (120 †).The coolant level is too low. The coolant is too hot and the engine
is no longer being cooled sufficiently.XStop as soon as possible and allow the engine and the coolant
to cool down.XCheck the coolant level ( Y page 285). Observe the warning
notes as you do so and add coolant if necessary.Automatic transmission
Important safety notes
GWARNING
It is dangerous to shift the automatic
transmission out of parking position P or
neutral position N if the engine speed is
higher than idle speed. If your foot is not firmly
on the brake pedal, the vehicle could
accelerate quickly forward or in reverse. You
could lose control of the vehicle and hit
someone or something. Only shift into gear
when the engine is idling normally and when
your right foot is firmly on the brake pedal.
GWARNING
Keep in mind that turning off the engine alone
only will shift the automatic transmission into
neutral position N automatically.
Always shift the automatic transmission into
park position P before turning off the engine.
Otherwise the vehicle could roll away which
could result in an accident and/or serious
personal injury.
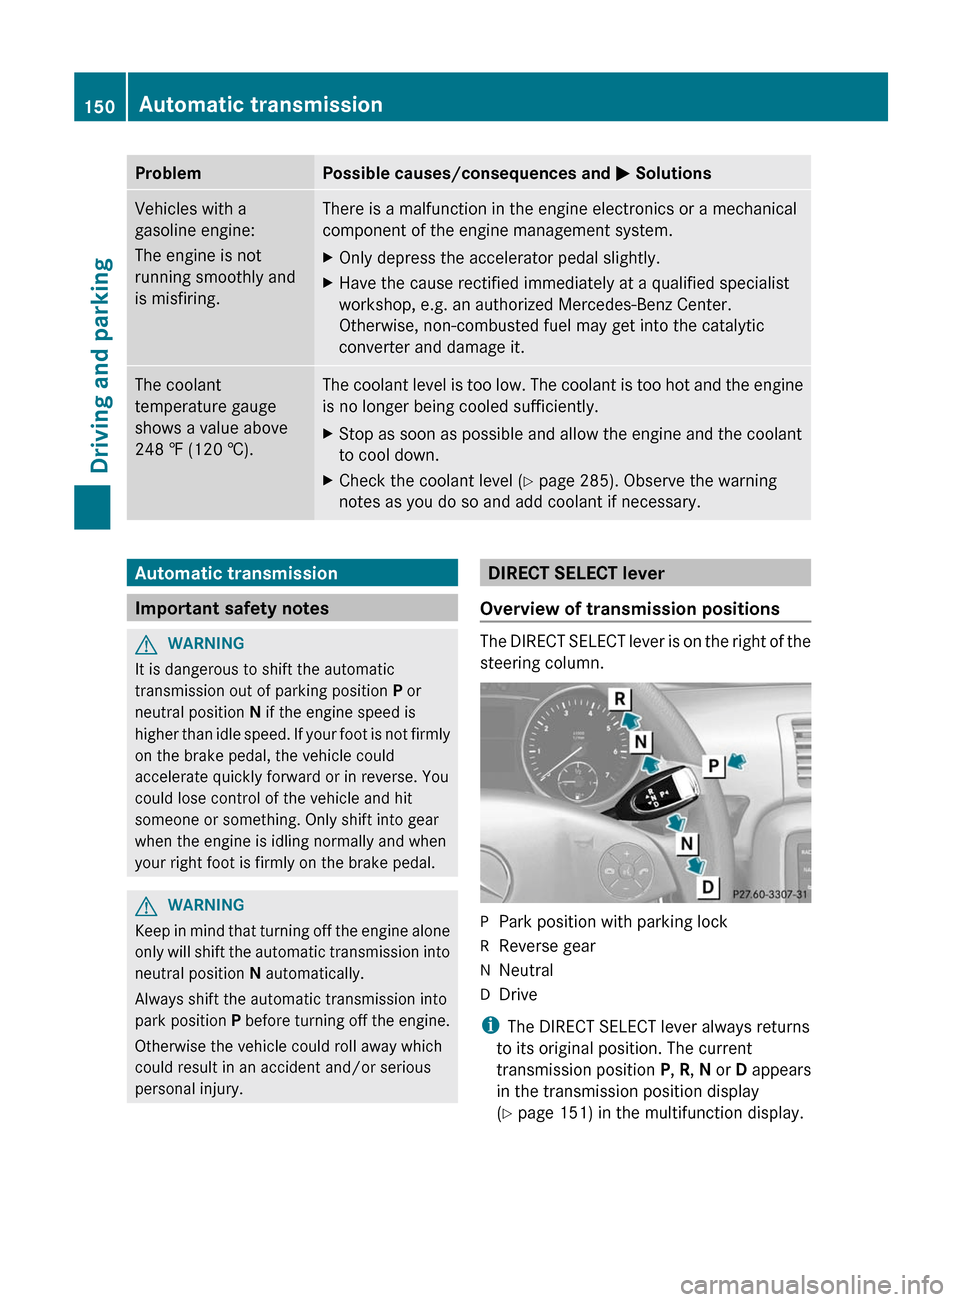
DIRECT SELECT lever
Overview of transmission positions
The DIRECT SELECT lever is on the right of the
steering column.
PPark position with parking lockRReverse gearNNeutralDDrive
i The DIRECT SELECT lever always returns
to its original position. The current
transmission position P, R , N or D appears
in the transmission position display
( Y page 151) in the multifunction display.
150Automatic transmissionDriving and parking
Page 160 of 368
obtained from oil companies, e.g. at gas
stations.
Refueling
Fuel filler flap
The fuel filler flap is unlocked or locked
automatically when you open or close the
vehicle with the SmartKey or using KEYLESS-
GO.
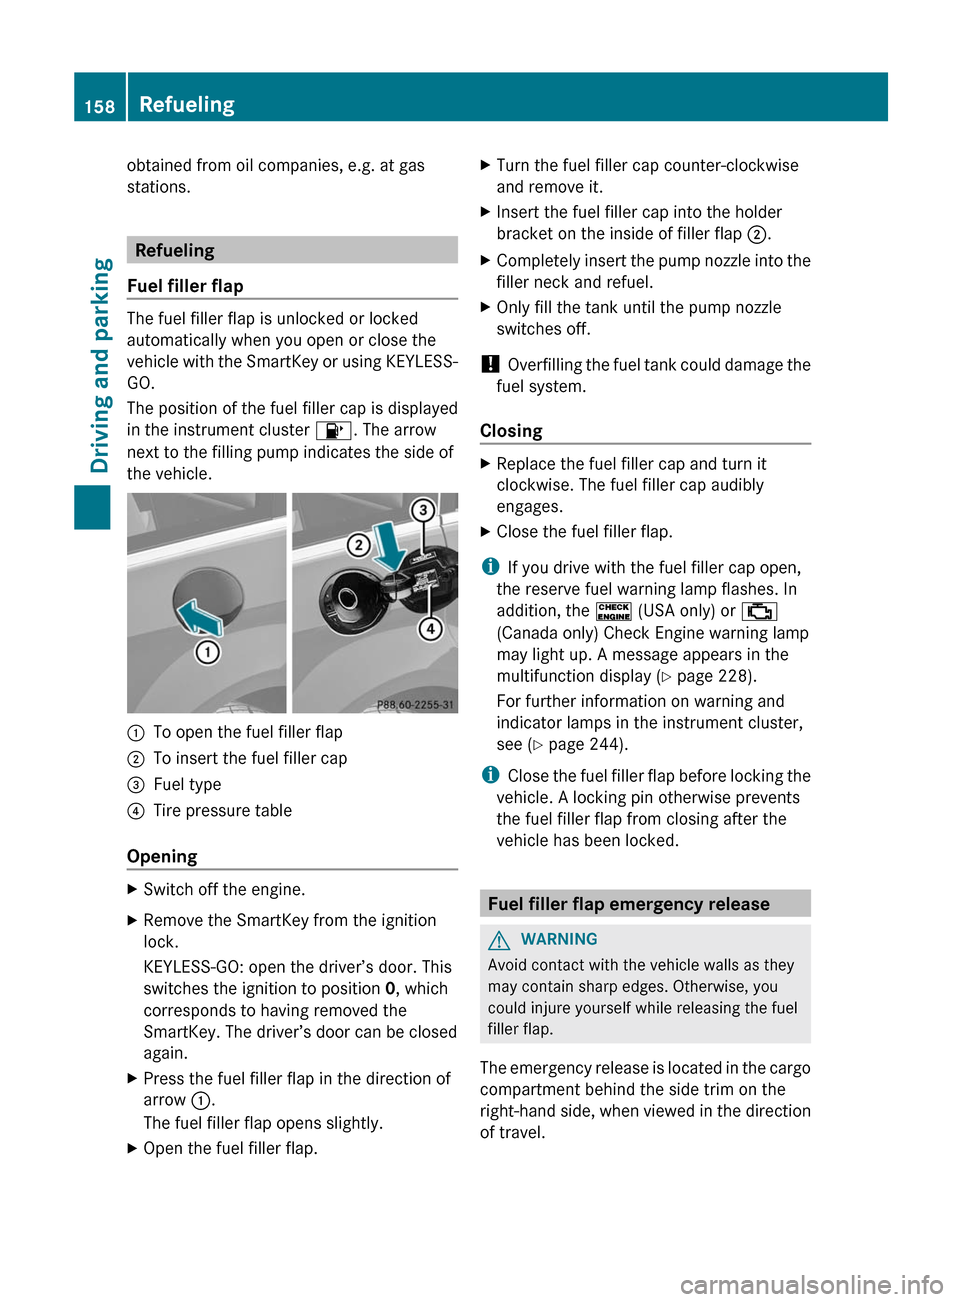
The position of the fuel filler cap is displayed
in the instrument cluster 8. The arrow
next to the filling pump indicates the side of
the vehicle.
:To open the fuel filler flap;To insert the fuel filler cap=Fuel type?Tire pressure table
Opening
XSwitch off the engine.XRemove the SmartKey from the ignition
lock.
KEYLESS-GO: open the driver’s door. This
switches the ignition to position 0, which
corresponds to having removed the
SmartKey. The driver’s door can be closed
again.XPress the fuel filler flap in the direction of
arrow :.
The fuel filler flap opens slightly.XOpen the fuel filler flap.XTurn the fuel filler cap counter-clockwise
and remove it.XInsert the fuel filler cap into the holder
bracket on the inside of filler flap ;.XCompletely insert the pump nozzle into the
filler neck and refuel.XOnly fill the tank until the pump nozzle
switches off.
! Overfilling the fuel tank could damage the
fuel system.
Closing
XReplace the fuel filler cap and turn it
clockwise. The fuel filler cap audibly
engages.XClose the fuel filler flap.
i If you drive with the fuel filler cap open,
the reserve fuel warning lamp flashes. In
addition, the ! (USA only) or ;
(Canada only) Check Engine warning lamp
may light up. A message appears in the
multifunction display ( Y page 228).
For further information on warning and
indicator lamps in the instrument cluster,
see ( Y page 244).
i Close the fuel filler flap before locking the
vehicle. A locking pin otherwise prevents
the fuel filler flap from closing after the
vehicle has been locked.
Fuel filler flap emergency release
GWARNING
Avoid contact with the vehicle walls as they
may contain sharp edges. Otherwise, you
could injure yourself while releasing the fuel
filler flap.
The emergency release is located in the cargo
compartment behind the side trim on the
right-hand side, when viewed in the direction
of travel.
158RefuelingDriving and parking
Page 168 of 368
Exhaust checkGWARNING
Inhalation of exhaust gas is hazardous to your
health. All exhaust gas contains carbon
monoxide (CO), and inhaling it can cause
unconsciousness and possible death.
Do not run the engine in confined areas (such
as a garage) which are not properly ventilated.
If you think that exhaust gas fumes are
entering the vehicle while driving, have the
cause determined and corrected
immediately. If you must drive under these
conditions, drive only with at least one
window fully open at all times.
Certain engine systems are designed to keep
the level of poisonous components in exhaust
fumes within legal limits.
These systems only work at peak efficiency
when they are maintained exactly in
accordance with the manufacturer's
specifications. For this reason, all work on the
engine must be carried out only by qualified
and authorized Mercedes-Benz technicians.
The engine settings must not be changed in
any circumstances. Furthermore, all specific
service work must be carried out at regular
intervals and in accordance with the
Mercedes-Benz service requirements. Details
can be found in the Service Booklet.
Engine oil
! Vehicles with a diesel particle filter:
If the vehicle is mostly driven for short
distances, it is possible that malfunctions
may occur during the automatic cleaning of
the diesel particle filter. This can lead to
engine damage. Therefore, if you frequently
drive short distances, make sure to drive
on highways or inter-urban roads for 20
minutes at least every 310 miles (500 km).
Brakes
Important safety notesGWARNING
On slippery road surfaces, never downshift in
order to obtain braking action. This could
result in drive wheel slip and reduced vehicle
control. Your vehicle's ABS will not prevent
this type of loss of control.
GWARNING
Make sure that you do not endanger other
road users when you apply the brakes.
Downhill gradients
! On long and steep gradients, you must
reduce the load on the brakes by shifting
early to a lower gear. This allows you to take
advantage of the engine braking effect and
helps avoid overheating and excessive
wear of the brakes.
When you take advantage of the engine
braking effect, a drive wheel may not turn
for some time, e.g. on a slippery road
surface. This could cause damage to the
drive train. This type of damage is not
covered by the Mercedes-Benz warranty.
Heavy and light loads
GWARNING
Depressing the brake pedal constantly results
in excessive and premature wear to the brake
pads.
It may also cause the brakes to overheat,
seriously impairing their effectiveness. It may
then not be possible to stop the vehicle in
sufficient time to avoid an accident.
If the brakes have been subjected to a heavy
load, do not stop the vehicle immediately, but
drive on for a short while. This allows the
airflow to cool the brakes more quickly.
166Driving tipsDriving and parking